Quadro Plex 7000 Rack Mount Guide - Nvidia
Quadro Plex 7000 Rack Mount Guide - Nvidia Quadro Plex 7000 Rack Mount Guide - Nvidia
UNPACKING 02 RACK-MOUNT INSTALLATION (CONT’D) Unpacking the NVIDIA Quadro Plex Rack-mount Kit One rack-mount kit has all the hardware necessary to install one NVIDIA Quadro Plex 7000 in a standard 19-inch Electronics Industries Alliance (EIA) cabinet. Note that the NVIDIA Quadro Plex 7000 takes up half the width space in a rack which allows two Quadro Plex’s to be rack-mounted side-by-side. 1 Slide the bracket assembly out of the rack side panel. 2 Adjust the rack side panel to fit the rack. Loosen eight (8) screws to adjust the length of the side-panel. 8x One (1) Side Rail, Eight (8) Screws Used to mount the NVIDIA Quadro Plex 7000 in a standard 19” EIA rack. 4x One (1) Rear Alignment Bracket, Four (4) Screws Connects two Quadro Plex 7000 units when mounting side by side in a rack. Two (2) Thumb Screws Used to secure the NVIDIA Quadro Plex 7000 to the rack and side rail. 3 Install the side panel into the cabinet. 02 RACK-MOUNT INSTALLATION 176-0119-000 Rev A 176-0119-000 Rev A Connecting to a Host System Refer to the NVIDIA Quadro Plex 7000 Quick Start Guide for instructions on preparing the host system and installing the interface card. Rack-mount Installation Use the following procedure to install the NVIDIA Quadro Plex 7000 into a standard 19-inch EIA equipment cabinet. You will need a Phillips #2 screw driver to install the rack mount kit hardware. The NVIDIA Quadro Plex 7000 must be mounted within 2 meters of the host system. NVIDIA ® QUADRO PLEX 7000 RACK MOUNT INSTRUCTIONS Note: The hardware in the rack-mount kit is intended for a standard 19” EIA rack only.
UNPACKING<br />
02<br />
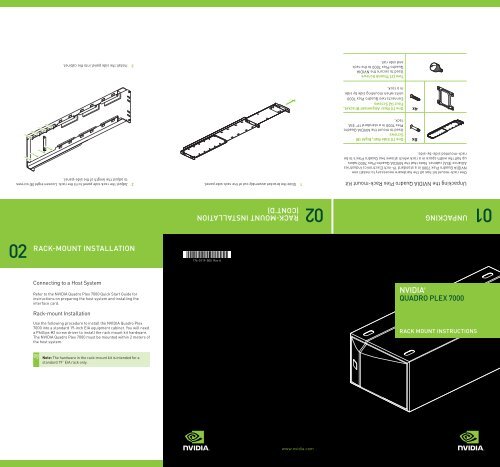
RACK-MOUNT INSTALLATION<br />
(CONT’D)<br />
Unpacking the NVIDIA <strong>Quadro</strong> <strong>Plex</strong> <strong>Rack</strong>-mount Kit<br />
One rack-mount kit has all the hardware necessary to install one<br />
NVIDIA <strong>Quadro</strong> <strong>Plex</strong> <strong>7000</strong> in a standard 19-inch Electronics Industries<br />
Alliance (EIA) cabinet. Note that the NVIDIA <strong>Quadro</strong> <strong>Plex</strong> <strong>7000</strong> takes<br />
up half the width space in a rack which allows two <strong>Quadro</strong> <strong>Plex</strong>’s to be<br />
rack-mounted side-by-side.<br />
1 Slide the bracket assembly out of the rack side panel.<br />
2 Adjust the rack side panel to fit the rack. Loosen eight (8) screws<br />
to adjust the length of the side-panel.<br />
8x<br />
One (1) Side Rail, Eight (8)<br />
Screws<br />
Used to mount the NVIDIA <strong>Quadro</strong><br />
<strong>Plex</strong> <strong>7000</strong> in a standard 19” EIA<br />
rack.<br />
4x<br />
One (1) Rear Alignment Bracket,<br />
Four (4) Screws<br />
Connects two <strong>Quadro</strong> <strong>Plex</strong> <strong>7000</strong><br />
units when mounting side by side<br />
in a rack.<br />
Two (2) Thumb Screws<br />
Used to secure the NVIDIA<br />
<strong>Quadro</strong> <strong>Plex</strong> <strong>7000</strong> to the rack<br />
and side rail.<br />
3 Install the side panel into the cabinet.<br />
02<br />
RACK-MOUNT INSTALLATION<br />
176-0119-000 Rev A<br />
176-0119-000 Rev A<br />
Connecting to a Host System<br />
Refer to the NVIDIA <strong>Quadro</strong> <strong>Plex</strong> <strong>7000</strong> Quick Start <strong>Guide</strong> for<br />
instructions on preparing the host system and installing the<br />
interface card.<br />
<strong>Rack</strong>-mount Installation<br />
Use the following procedure to install the NVIDIA <strong>Quadro</strong> <strong>Plex</strong><br />
<strong>7000</strong> into a standard 19-inch EIA equipment cabinet. You will need<br />
a Phillips #2 screw driver to install the rack mount kit hardware.<br />
The NVIDIA <strong>Quadro</strong> <strong>Plex</strong> <strong>7000</strong> must be mounted within 2 meters of<br />
the host system.<br />
NVIDIA ®<br />
QUADRO PLEX <strong>7000</strong><br />
RACK MOUNT INSTRUCTIONS<br />
Note: The hardware in the rack-mount kit is intended for a<br />
standard 19” EIA rack only.
02<br />
RACK-MOUNT INSTALLATION<br />
(CONT’D)<br />
4 Remove the two (2) screws holding the aluminum shells to the<br />
<strong>Quadro</strong> <strong>Plex</strong> <strong>7000</strong> chassis.<br />
9 Push the silver aluminum shell towards the display connectors<br />
until it stops. Slide up and remove the silver aluminum shell. You<br />
may need to slide the silver shell forward slightly to release the<br />
retaining clips before you can lift up.<br />
13 Secure the <strong>Quadro</strong> <strong>Plex</strong> <strong>7000</strong> to the rack and side panel using<br />
the two (2) thumb screws provided in the kit.<br />
14 If needed, remove and rotate the NVIDIA logo on the front<br />
<strong>Quadro</strong> <strong>Plex</strong> <strong>7000</strong> bezel.<br />
Note: If you are installing one <strong>Quadro</strong> <strong>Plex</strong> <strong>7000</strong> into the rack,<br />
go to Step 19. If you are installing a second <strong>Quadro</strong> <strong>Plex</strong> <strong>7000</strong><br />
into the rack next to the first <strong>Quadro</strong> <strong>Plex</strong> <strong>7000</strong>, you need to<br />
continue with Step 5.<br />
15 Prepare the second <strong>Quadro</strong> <strong>Plex</strong> <strong>7000</strong> following Steps 1<br />
through 14.<br />
16 On each <strong>Quadro</strong> <strong>Plex</strong> <strong>7000</strong>, remove the two screws that you<br />
removed in Step 4.<br />
5 Remove screw from the bottom of the <strong>Quadro</strong> <strong>Plex</strong> <strong>7000</strong> Chassis<br />
10 Reinstall the two screws removed in Step 4.<br />
11 Place the front handle bracket on top of the <strong>Quadro</strong> <strong>Plex</strong> <strong>7000</strong> and<br />
attach with the eight (8) screws provided in the box.<br />
17 Install the Alignment bracket and attach with the four (4)<br />
screws included in the box.<br />
6 Place the <strong>Quadro</strong> <strong>Plex</strong> <strong>7000</strong> silver side down.<br />
7 Push the black aluminum shell towards the display connectors<br />
until it stops. Slide up and remove the black shell. You may need to<br />
slide the black shell forward slightly to release the retaining clips<br />
before you can lift up.<br />
12 Slide the <strong>Quadro</strong> <strong>Plex</strong> <strong>7000</strong> into the side bracket installed in the<br />
cabinet in Step 3. Be sure to line up the alignment bracket on the<br />
<strong>Quadro</strong> <strong>Plex</strong> <strong>7000</strong> to the alignment pins on the side panel.<br />
18 Connect the power cord to the <strong>Quadro</strong> <strong>Plex</strong> <strong>7000</strong>.<br />
19 Connect the Interconnect Cable to the <strong>Quadro</strong> <strong>Plex</strong> <strong>7000</strong> and<br />
the Workstation.<br />
20 If using the Dual Host Interface Card in the workstation,<br />
connect the G-Sync board in each <strong>Quadro</strong> <strong>Plex</strong> <strong>7000</strong> with a<br />
G-Sync cable.<br />
21 Connect DVI cables from the display(s) to the <strong>Quadro</strong> <strong>Plex</strong> <strong>7000</strong><br />
DVI connectors.<br />
Refer to the NVIDIA <strong>Quadro</strong> <strong>Plex</strong> <strong>7000</strong> Quick Start <strong>Guide</strong> for instructions<br />
on installing the drivers in a Windows or Linux environment.<br />
Note: On the <strong>Quadro</strong> <strong>Plex</strong> <strong>7000</strong>, the primary boot monitor<br />
is defined by your motherboard and SBIOS. To help you<br />
determine which GPU will drive the primary boot display,<br />
there is an orange LED between the DVI connectors which<br />
will illuminate on the primary GPU.<br />
8 Rotate the <strong>Quadro</strong> <strong>Plex</strong> <strong>7000</strong> over so the silver side is up.


