Congo™ jr Master Playback Wing Setup Guide - ETC
Congo™ jr Master Playback Wing Setup Guide - ETC
Congo™ jr Master Playback Wing Setup Guide - ETC

You also want an ePaper? Increase the reach of your titles
YUMPU automatically turns print PDFs into web optimized ePapers that Google loves.
<strong>ETC</strong> ® <strong>Setup</strong> <strong>Guide</strong><br />
Universal Fader <strong>Wing</strong> Installation<br />
Note:<br />
Up to three (3) Universal Fader <strong>Wing</strong>s may be connected together and then connected to Eos<br />
consoles using a USB cable only.<br />
The best way to connect wings is to attach them in order from left to right.<br />
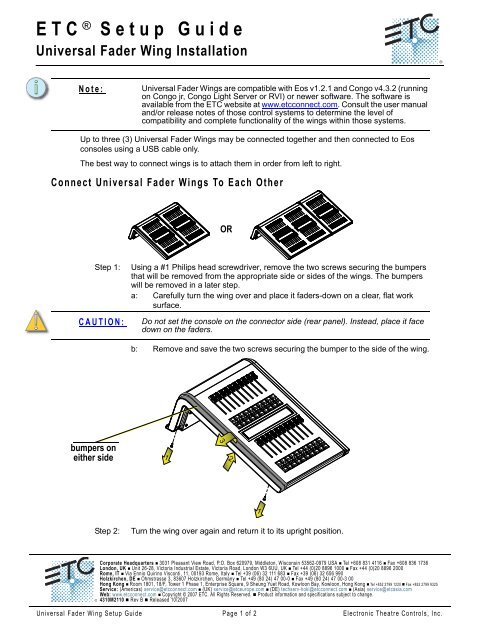
Connect Universal Fader <strong>Wing</strong>s To Each Other<br />
Step 1: Using a #1 Philips head screwdriver, remove the two screws securing the bumpers<br />
that will be removed from the appropriate side or sides of the wings. The bumpers<br />
will be removed in a later step.<br />
a: Carefully turn the wing over and place it faders-down on a clear, flat work<br />
surface.<br />
CAUTION:<br />
bumpers on<br />
either side<br />
Universal Fader <strong>Wing</strong>s are compatible with Eos v1.2.1 and Congo v4.3.2 (running<br />
on Congo <strong>jr</strong>, Congo Light Server or RVI) or newer software. The software is<br />
available from the <strong>ETC</strong> website at www.etcconnect.com. Consult the user manual<br />
and/or release notes of those control systems to determine the level of<br />
compatibility and complete functionality of the wings within those systems.<br />
Do not set the console on the connector side (rear panel). Instead, place it face<br />
down on the faders.<br />
b: Remove and save the two screws securing the bumper to the side of the wing.<br />
1<br />
3<br />
Step 2: Turn the wing over again and return it to its upright position.<br />
OR<br />
2<br />
Corporate Headquarters � 3031 Pleasant View Road, P.O. Box 620979, Middleton, Wisconsin 53562-0979 USA � Tel +608 831 4116 � Fax +608 836 1736<br />
London, UK � Unit 26-28, Victoria Industrial Estate, Victoria Road, London W3 6UU, UK � Tel +44 (0)20 8896 1000 � Fax +44 (0)20 8896 2000<br />
Rome, IT � Via Ennio Quirino Visconti, 11, 00193 Rome, Italy � Tel +39 (06) 32 111 683 � Fax +39 (06) 32 656 990<br />
Holzkirchen, DE � Ohmstrasse 3, 83607 Holzkirchen, Germany � Tel +49 (80 24) 47 00-0 � Fax +49 (80 24) 47 00-3 00<br />
Hong Kong � Room 1801, 18/F, Tower 1 Phase 1, Enterprise Square, 9 Sheung Yuet Road, Kowloon Bay, Kowloon, Hong Kong � Tel +852 2799 1220 � Fax +852 2799 9325<br />
Service: (Americas) service@etcconnect.com � (UK) service@etceurope.com � (DE) techserv-hoki@etcconnect.com � (Asia) service@etcasia.com<br />
Web: www.etcconnect.com � Copyright © 2007 <strong>ETC</strong>. All Rights Reserved. � Product information and specifications subject to change.<br />
4310M2110 � Rev B � Released 10/2007<br />
Universal Fader <strong>Wing</strong> <strong>Setup</strong> <strong>Guide</strong> Page 1 of 2 Electronic Theatre Controls, Inc.<br />
1
<strong>ETC</strong> <strong>Setup</strong> <strong>Guide</strong><br />
Universal Fader <strong>Wing</strong> <strong>Setup</strong> <strong>Guide</strong><br />
Step 3: Remove the bumper(s) from the wing.<br />
a: Gently pull the bumper on the right side of the wing up until it is flush with the<br />
facepanel. Gently push the bumper on the left side of the wing down until it<br />
loosens from the facepanel.<br />
b: Pull the bumper away from the facepanel until it is free from the wing.<br />
Step 4: Repeat steps 2 and 3 for each side of each wing that needs to be exposed.<br />
Step 5: Align the two wings. Lift the wing on the right and place it gently on the hooks provided<br />
on the wing on the left. Check that the two wings are aligned properly front and back,<br />
then press down gently on the wing on the right until it is fully seated. This should be<br />
a smooth connection but may require a little force.<br />
Step 6: Repeat above procedure to connect another wing to the right end of the pair, if<br />
desired.<br />
Step 7: Re-insert screws to secure wings together and secure the bumpers to the sides of the<br />
wings.<br />
Connect Universal Fader <strong>Wing</strong>(s) to Console with USB Cable<br />
connect PS313-F<br />
power supply<br />
cable<br />
(included)<br />
connect<br />
USB cable<br />
(included)<br />
connect to USB<br />
on the console<br />
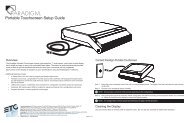
Step 1: With the console power off, attach the USB cable (provided) between the console and<br />
one wing as shown above. If multiple wings are joined, only one power and one USB<br />
connection is required for all joined wings.<br />
Step 2: Using the power supply adaptor kit, connect the fader wing to a power source.<br />
Step 3: It is recommended that you run the power and USB cables through the strain relief<br />
included on the back of the wings.<br />
Step 4: Turn the console on.<br />
Universal Fader <strong>Wing</strong> <strong>Setup</strong> <strong>Guide</strong> Page 2 of 2 Electronic Theatre Controls, Inc.