Create successful ePaper yourself
Turn your PDF publications into a flip-book with our unique Google optimized e-Paper software.
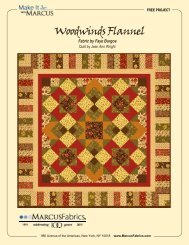
FREE PROJECT<br />
<strong>Pine</strong> <strong>Tree</strong> <strong>Lodge</strong><br />
by Judie Rothermel<br />
Quilt by Nancy Rink REVISED 21 March 2012<br />
Finished Size 50" x 50"”
PINE TREE LODGE Fabric by Judie Rothermel Quilt by Nancy Rink Page 2 of 4<br />
Skill Level: Confident Beginner • Quilt size: 50" x 50"•<br />
Block count and Size: 4 (15”) <strong>Pine</strong> <strong>Tree</strong> blocks<br />
FABRIC REQUIREMENTS<br />
Fat Quarter Each:<br />
4027-0150, 4027-0113, 4034-0114, 4034-0111,<br />
4030-0150, 4028-0129, 4029-0129, 4031-0111<br />
1-1/4 Yards of 4026-0114<br />
Four full Repeats (approx. 1-1/4 yd) of 4021-0111<br />
4027-0113<br />
4034-0114 4034-0111 4030-0150<br />
2-1/2 yds (backing) of 4035-0111<br />
4029-0129 4031-0111 4026-0114 4035-0111<br />
CUTTING GUIDE:<br />
From the brown print 4027-0113, cut:<br />
6 (3”) A squares<br />
6 (3-3/8”) B squares<br />
4 (2-1/4” x 6”) D rectangles<br />
1 (6-1/2”) H square<br />
4027-0150<br />
4028-0129<br />
4021-0111<br />
From the olive print 4034-0114, cut:<br />
10 (3”) A squares<br />
5 (2-1/2”) G squares<br />
From the dark red print 4034-0111, cut:<br />
4 (3”) A squares<br />
5 (3-3/8”) B squares<br />
5 (2-1/2”) G squares<br />
1 (6-1/2”) H square<br />
From the light blue print 4030-0150, cut:<br />
4 (3”) A squares<br />
4 (3-3/8”) B squares<br />
5 (2-1/2”) G squares<br />
From the multi print 4029-0129, cut:<br />
4 (3-3/8”) B squares<br />
6 (2-1/2”) G squares<br />
From the red floral print 4031-0111, cut:<br />
4 (3-3/8”) B squares<br />
5 (2-1/2”) G squares<br />
From the teal print 4027-0150, cut:<br />
4 (3”) A squares<br />
7 (3-3/8”) B squares<br />
5 (2-1/2”) G squares<br />
From the rust print 4028-0129, cut:<br />
5 (3-3/8”) B squares<br />
5 (2-1/2”) G squares<br />
From the cream print 4026-0114, cut:<br />
4 (3”) A squares<br />
28 (3-3/8”) B squares<br />
2 (7-1/2”) squares, cut in half twice diagonally to form C<br />
triangles<br />
4 (2-1/8”) E squares<br />
8 (3” x 13”) F rectangles<br />
36 (2-1/2”) G squares<br />
2 (2-1/2” x 30-1/2”) side borders<br />
2 (2-1/2” x 34-1/2”) top/bottom borders<br />
From the pine tree border stripe 4021-0111, cut:<br />
4 (6-1/2” x 38-1/2”) borders, centering pine tree motifs,<br />
and allowing for a ¼” seam allowance on top and<br />
bottom edge of border strips.<br />
From the backing 4035-0111, cut:<br />
1 (58” x WOF) panel<br />
2 (18-1/2” x 30”) strips pieced end to end and trimmed<br />
to 58” long.<br />
(continued)<br />
MARCUS FABRICS 980 Avenue of the Americas, New York, NY 10018 www.MarcusFabrics.com
PINE TREE LODGE Fabric by Judie Rothermel Quilt by Nancy Rink Page 3 of 4<br />
PLANNING YOUR QUILT<br />
A<br />
A<br />
A<br />
A<br />
A<br />
A<br />
A<br />
A<br />
A<br />
A<br />
Although the four pine tree blocks that make up the center of<br />
the quilt appear scrappy, they do have a few fabrics that are<br />
strategically placed to create a sense of unity. All of the (D) tree<br />
trunks are cut from the same brown fabric as are the thee triangles<br />
at the base of the tree. You may also notice that there are<br />
two olive print A squares and a brown and a blue (A) square<br />
positioned in the center area of the pine tree. There are two<br />
slight variations in the blocks. Notice that the block on the left<br />
has an olive print (A) square positioned below the tree trunk<br />
while the block on the right has a brown print square in this position.<br />
These create a four-patch in the center of the quilt when<br />
the blocks are pieced together.<br />
You also may have noticed that there is no yardage designated for the binding. Save all your leftover fabric, and cut it up into 2-1/4” wide<br />
strips to make a scrappy binding. However, if you’d like a separate fabric, purchase a half yard of matching fabric to bind the quilt.<br />
SEWING DIRECTIONS<br />
<strong>Pine</strong> <strong>Tree</strong> Blocks<br />
1. Pair a teal print (B) square with a cream print (B) square, right sides together. Draw a<br />
line diagonally from corner to corner. Stitch ¼” from both sides of drawn line. Cut apart<br />
on drawn line, pressing seams toward dark fabric. Repeat with the remaining (B)<br />
squares to make a total of 56 half-square triangles. (Diagram I)<br />
2. Sew two cream print (C) triangles to the sides of a brown print(D) rectangle, aligning<br />
patches on one end. The (D) rectangle should extend beyond the (C) triangles on the<br />
other end and will be trimmed later. Press seams toward the (D) rectangle. Make a total<br />
of four. (Diagram II)<br />
Diagram I<br />
C C<br />
D<br />
Diagram II<br />
3. Cut the brown print (B) squares in half once diagonally.<br />
Arrange three brown print triangles, two olive print (A)<br />
squares, and a brown print (A) square as shown in<br />
Diagram III. Sew together in rows then sew together<br />
the rows. Make a total of four.<br />
A<br />
A<br />
A<br />
Sew this unit to<br />
the unit created in<br />
Diagram III<br />
step two. Press<br />
seams open to<br />
reduce bulk. Align ruler with the edges of the block and trim the tree trunk. (Diagram III)<br />
E<br />
Diagram IV<br />
4. To sqaure off the base of the tree trunk, position a cream print (E) square as shown in<br />
Diagram IV. Draw a line diagonally from corner to corner. Stitch on drawn line. Flip<br />
cream print triangle to right side. If you like, you may trim away the bulk behind the cream<br />
print fabric. Repeat on all four blocks.<br />
(continued)<br />
MARCUS FABRICS 980 Avenue of the Americas, New York, NY 10018 www.MarcusFabrics.com
PINE TREE LODGE Fabric by Judie Rothermel Quilt by Nancy Rink Page 4 of 4<br />
5. Referring to Diagram IV, sew together half square triangles and (A)<br />
squares into two sections, paying particular attention to the placement<br />
of the light blue (A) square. Sew the smaller of the sections to the<br />
tree trunk section first. Add the remaining section to the block. Repeat<br />
for a total of four blocks.<br />
A<br />
6. Position a teal red print (A) on a cream print (F) as shown in Diagram<br />
V, right sides together. Draw a diagonal line from corner to corner.<br />
Make sure the diagonal seams are in the direction indicated in<br />
Diagram V. Stitch on drawn line. Flip teal fabric to right side. Trim<br />
bulk if desired.<br />
Repeat to make a total of four. In a similar manner, sew the dark red<br />
(A) squares to the remaining cream print (F) rectangles. Make sure<br />
the diagonal seams are in the direction indicated in Diagram V.<br />
7. Sew a cream and red rectangle unit to the left side of the <strong>Pine</strong> <strong>Tree</strong><br />
Block, pressing seams toward the rectangle. Repeat on all blocks. Sew an<br />
olive (A) to the cream and teal rectangle unit and add it to the block as<br />
shown in Diagram VI. Repeat for a total of two blocks. On the remaining<br />
two blocks, place a brown (A) square in the olive (A) patch position.<br />
F<br />
F<br />
Diagram IV<br />
Diagram V<br />
QUILT ASSEMBLY<br />
1. Sew together the four blocks, referring to Quilt Assembly Diagram for block orientation.<br />
2. Stitch cream print 30-1/2” border to sides, pressing seams toward borders. Sew remaining<br />
cream print borders to top/bottom of quilt. Press seams toward borders.<br />
3. Pieced Border. Stitch together 9 cream print (G)s and 8 various print fabric (G)s . Make<br />
a total of four pieced borders. Sew<br />
two borders to quilt sides. Add a<br />
print fabric (G) to the end of the<br />
remaining two borders. Sew to top<br />
and bottom of the quilt.<br />
Diagram VI<br />
A<br />
E<br />
4. <strong>Pine</strong> <strong>Tree</strong> Border Print Border.<br />
Position borders so that a pine tree border motif is aligned with the center<br />
of the quilt. <strong>Tree</strong>s should be facing outward. Sew borders to quilt<br />
sides, pressing seams toward outside edge. Stitch an (H) square to the<br />
ends of the remaining two borders. Sew to the top and bottom of quilt.<br />
FINISHING<br />
1. Layer the quilt top right side up on top of the batting and the wrong<br />
side of the backing. Quilt as desired.<br />
2. Bind with 2-1/4” wide binding strips made from the remaining scraps<br />
of fabric used in the quilt.<br />
Quilt Assembly Diagram<br />
MARCUS FABRICS 980 Avenue of the Americas, New York, NY 10018 www.MarcusFabrics.com