MNLS001 - Measurement Solutions - FMC Technologies
MNLS001 - Measurement Solutions - FMC Technologies
MNLS001 - Measurement Solutions - FMC Technologies

Create successful ePaper yourself
Turn your PDF publications into a flip-book with our unique Google optimized e-Paper software.
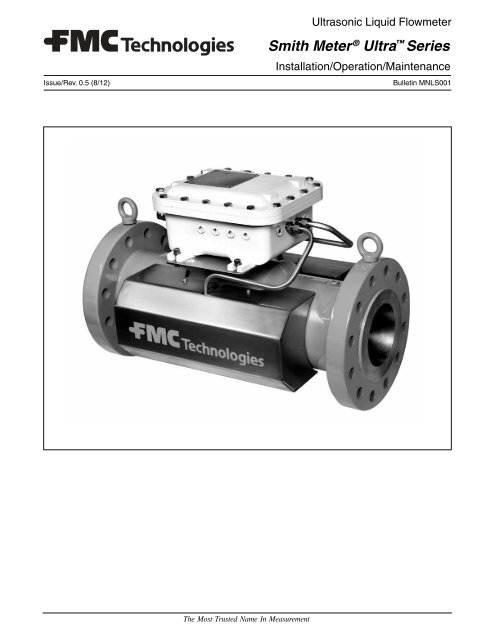
Ultrasonic Liquid Flowmeter<br />
Issue/Rev. 0.5 (8/12)<br />
Smith Meter ® Ultra Series<br />
Installation/Operation/Maintenance<br />
Bulletin <strong>MNLS001</strong><br />
The Most Trusted Name In <strong>Measurement</strong>
Table of Contents<br />
Section I – Customer Support ............................................................................................................................. 1<br />
Section II – General .............................................................................................................................................. 2<br />
Overview ............................................................................................................................................................ 2<br />
Principle of Operation ......................................................................................................................................... 2<br />
Ultra 6 and Ultra 4 Features ................................................................................................................................... 2<br />
Applications ........................................................................................................................................................ 2<br />
Specifications ..................................................................................................................................................... 2<br />
Architecture ........................................................................................................................................................ 3<br />
Section III – Installation ........................................................................................................................................ 5<br />
Receipt of Equipment ......................................................................................................................................... 5<br />
Pre-Installation Inspection .................................................................................................................................. 5<br />
Mechanical Installation ....................................................................................................................................... 5<br />
General .............................................................................................................................................................. 5<br />
Strainer ............................................................................................................................................................... 5<br />
Flow Conditioner ................................................................................................................................................ 5<br />
Electrical Installation .......................................................................................................................................... 6<br />
General .............................................................................................................................................................. 6<br />
Power Supply ..................................................................................................................................................... 6<br />
Input/Output Wiring ............................................................................................................................................ 6<br />
Digital I/O ........................................................................................................................................................... 8<br />
Analog I/O .......................................................................................................................................................... 8<br />
Communications ................................................................................................................................................ 8<br />
Pulse Output ...................................................................................................................................................... 9<br />
Section IV – Operation ......................................................................................................................................... 13<br />
Meter Start-up .................................................................................................................................................... 13<br />
Winscreen Interface ........................................................................................................................................... 13<br />
Verifi cation and Proving...................................................................................................................................... 13<br />
Section V – Maintenance ...................................................................................................................................... 14<br />
Transducer Replacement – Inner Transducer ..................................................................................................... 14<br />
Transducer Replacement – Complete Transducer ............................................................................................. 24<br />
Replacement of Electronic Boards ..................................................................................................................... 28<br />
UAFE Board Replacement ................................................................................................................................. 28<br />
UDSP Board Replacement ................................................................................................................................ 28<br />
Section VI – Returned Goods Policy ................................................................................................................... 30<br />
Section VII – Appendix ......................................................................................................................................... 31<br />
Section VIII – Related Publications ..................................................................................................................... 54<br />
i
Section I – Customer Support<br />
Customer Support<br />
Contact Address<br />
<strong>FMC</strong> <strong>Technologies</strong> <strong>Measurement</strong> <strong>Solutions</strong>, Inc.<br />
1602 Wagner Avenue<br />
Erie, Pennsylvania 16510<br />
U.S.A.<br />
Contact<br />
Customer Service<br />
Telephone Number<br />
(814) 898-5000<br />
Fax Number<br />
(814) 899-8927<br />
E-mail<br />
measurement.solutions@fmcti.com<br />
Website<br />
www.fmctechnologies.com<br />
Issue/Rev. 0.5 (8/12) <strong>MNLS001</strong> • Page 1
Section II – General<br />
Overview<br />
The Smith Meter ® Ultra 6 Liquid Flowmeter is a six path ultrasonic meter with Signal Processing Unit (SPU) for<br />
custody transfer of petroleum products. The Smith Meter ® Ultra 4 is a four path ultrasonic meter for custody and<br />
non-custody transfer measurement of petroleum products. The Ultra 6 and Ultra 4 are new additions to the Smith Meter<br />
family of high accuracy ultrasonic metering products which also includes the MPU 1200, 800, 600 and 200 gas<br />
fl owmeters. All these meters share the same technology and the Ultra 6 has the same principles of operation as the<br />
world leading MPU 1200 and the Ultra 4 has the same technology as the MPU 800 in terms of path confi guration,<br />
electronics and signal processing.<br />
Principle of Operation<br />
The Smith Meter Ultra 6 and Ultra 4 function is based on the well-established acoustic transit time principle. The measurement<br />
principle utilizes the fact that the direction and propagation velocity of an ultrasonic pulse will be modifi ed<br />
by the fl owing medium. An ultrasonic pulse propagating with the fl ow will experience an increase in velocity while an<br />
ultrasonic pulse propagating against the fl ow will experience a decrease in velocity. Turbulence and noise generated<br />
frequencies are fi ltered.<br />
The Ultra 6 and Ultra 4 measure the transit time of the ultrasonic signal that is transmitted. The start of the transmission<br />
and arrival of the correct signal is detected by the software.<br />
The Ultra 6 and Ultra 4 transducers are non-intrusive and flush mounted ensuring minimum risk of clogging by residues<br />
in the flow. The transducer is fully encapsulated and the transducer housing is manufactured in titanium.<br />
Ultra 6 and Ultra 4 Features<br />
• Custody Transfer Accuracy – The Ultra 6 and Ultra 4 combine the latest in ultrasonic design, sensitivity analysis,<br />
integration methods and signal processing optimization to deliver accurate custody transfer measurement.<br />
• <strong>Measurement</strong> Stability – The Ultra 6 unique 6 path confi guration and integration algorithms give superior fl ow<br />
profi le correction and compensation for swirl and cross-fl ow over a wide range of operating conditions.<br />
• Field Proven Electronics – The Ultra 6 and Ultra 4 utilize Smith Meter’s decades of proven know-how in ultrasonic<br />
measurement and microprocessor-based instrumentation for harsh outside petroleum applications.<br />
• Excellent Noise Immunity – The Ultra 6 and Ultra 4 are able to tolerate substantially higher ultrasonic noise levels<br />
than most other ultrasonic meters – up to 20 times less sensitive to outside interference.<br />
• Real-Time Diagnostics – WinScreen software provides real-time logs, trends, signal performance and<br />
parameter reports for operational, diagnostics and maintenance purposes. The user-friendly, Windows-based<br />
program displays meter information, including fl ow regime visualization, on one screen.<br />
• In-line Transducer Replacement – The Ultra 6 and Ultra 4 transducer housings are separate from the transducers,<br />
allowing the transducers to be changes without special tooling and without shutting down the process.<br />
• Automatic Compensation for Path Loss – In the unlikely event that a transducer should fail, the Ultra 6 and Ultra 4<br />
can be programmed to automatically compensate for the loss in path information with reduced accuracy in addition<br />
to advising the operator than an alarm is present.<br />
• Reciprocity – Optimum transducer and electronics design ensures full reciprocity and zero infl uences on linearity,<br />
independent of pressure, temperature and transducer aging.<br />
Applications<br />
<strong>Measurement</strong> of hydrocarbon liquids for:<br />
• Custody Transfer<br />
• Allocation<br />
• Leak Detection<br />
• Inventory Control<br />
• Off-loading and On-loading<br />
Specifications<br />
See Specification Bulletins SSLS001 and SSLS002<br />
Page 2 • <strong>MNLS001</strong><br />
Issue/Rev. 0.5 (8/12)
Section II – General<br />
Ultra 6 /Ultra 4 Architecture<br />
The Ultra 6 and Ultra 4 liquid fl owmeters consists of the<br />
following components:<br />
• Meter Body<br />
• (12)/(8) Transducers<br />
• (12)/(8) Transducer Adapters<br />
• (12)/(8) Conduit Unions<br />
• (12)/(8) M.I. (Mineral Insulated) Cables<br />
• Electronics Assembly consisting of:<br />
– Electronics Enclosure<br />
– UACF (Ultrasonic AC Filter) Board<br />
– UAFE (Ultrasonic Analog Front End) Board<br />
– UDSP (Ultrasonic Digital Signal Processing) Board<br />
UAFE<br />
(Ultrasonic Analog Front End)<br />
Ultra 6 /Ultra 4 New Style Architecture<br />
The Ultra 6 and Ultra 4 liquid flowmeters consists of the<br />
following components:<br />
• Meter Body<br />
• (12)/(8) Transducers<br />
• (12)/(8) Transducer Mounts<br />
• (12)/(8) Thread Adapter<br />
• (2) Cable Manifolds<br />
• Electronics Assembly consisting of:<br />
– Electronics Enclosure<br />
– UACF (Ultrasonic AC Filter) Board<br />
– UAFE (Ultrasonic Analog Front End) Board<br />
– UDSP (Ultrasonic Digital Signal Processing) Board<br />
UDSP<br />
(Ultrasonic Digital Signal Processor)<br />
UACF<br />
(Ultrasonic AC Filter)<br />
Issue/Rev. 0.5 (8/12) <strong>MNLS001</strong> • Page 3
Section II – General<br />
(Older Style – Welded Housing)<br />
Brass Adapter<br />
M.I. Cable<br />
Conduit Union<br />
Clamping<br />
Plate<br />
(Newer Style –<br />
Forged Housing)<br />
Bottom<br />
Plate<br />
Transducer<br />
Mount<br />
Thread<br />
Adapter<br />
Retaining<br />
Nut<br />
Micro-<br />
Conduit<br />
Transducer<br />
Manifold<br />
Adapter<br />
Page 4 • <strong>MNLS001</strong><br />
Issue/Rev. 0.5 (8/12)
Section III – Installation<br />
Receipt of Equipment<br />
When the equipment is received, the outside packing case should be checked immediately for any shipping damage.<br />
If the packing case has been damaged, the local carrier should be notifi ed at once regarding his liability. Carefully<br />
remove the unit from its packing case and inspect for damaged or missing parts.<br />
If damage has occurred during shipment or parts are missing, a written report should be submitted to the Customer<br />
Service department by using the contact information at the beginning of this manual.<br />
Prior to installation, the unit should be stored in its original packing case and protected from adverse weather conditions<br />
and abuse.<br />
Pre-Installation Inspection<br />
Visually inspect the meter and meter nameplate to insure the proper size, model number, flange rating and flow range.<br />
Note the direction of forward fl ow (described by an arrow) to determine the installation orientation.<br />
The Ultra 6 and Ultra 4 are precise measuring instruments and should be treated as such. Install the unit carefully. When<br />
transporting the meter, make certain it is not subjected to any severe shock as electronic components may be<br />
damaged. Cover fl ange openings to protect the internal diameter of the meter body. Lift the meter only by the lifting<br />
eyes located on each fl ange. DO NOT lift or move the meter by way of the cabling or conduit system. DO NOT lift or<br />
move the meter by inserting a forklift tine into the internal diameter of the meter.<br />
Mechanical Installation<br />
General<br />
Warning: Care must be taken in the installation of the Ultra 6 and Ultra 4 . The installer must comply with all national,<br />
regional and local codes.<br />
Installation of the Ultra 6 and Ultra 4 should follow good piping practices, such as alignment of the pipe center lines. Align the<br />
piping and mating flanges before installing the meter. A temporary, straight pipe spool can be used to align the process<br />
piping prior to meter installation. Piping connections must be properly aligned to minimize compressive, tensile or<br />
torsional stresses placed on the meter. Do not use the meter to align the piping. Select gasket, bolt and nut materials<br />
that are compatible with the application environment. Comply with appropriate bolting torque specifi cations. Pipe<br />
supports should be installed to provide suffi cient support of the process piping upstream and downstream of the<br />
meter, in accordance with good piping practices.<br />
It is recommended that the meter be installed in the section of piping where the pressure is highest, downstream from<br />
pumps and upstream from fl ow control valves. When it is expected that fl ow will be intermittent, the meter should not<br />
be mounted at or near a low point or high point in the piping. Solids or water will settle in a low point in the piping;<br />
gas will accumulate in a high point in the piping. Both of these conditions may impede proper meter operation.<br />
The installation instructions described herein are intended to be general recommendations and, therefore, may<br />
require modification to fi t your specifi c application.<br />
Strainer<br />
Although the Ultra 6 and Ultra 4 do not have any moving parts and is non-intrusive to the fl ow stream, it is advisable to<br />
install a strainer upstream of the meter to protect not only the meter but also other components such as the fl ow conditioner<br />
and flow control valve. For most pipeline installations, a 4 mesh basket will provide adequate protection.<br />
Flow Conditioner<br />
The Ultra 6 automatically compensates for velocity profile, swirl and cross-flow. It is, however, still<br />
susceptible to systematic abnormalities due to installation effects and the resultant changes in fl ow profi le.<br />
To minimize the effects of these profile abnormalities, it is recommend that both the Ultra 6 and Ultra 4 be installed with either<br />
20 diameters of straight pipe or 10 diameters of straight pipe with a high performance fl ow conditioner (HPFC)<br />
upstream of the meter. (See Bulletin SS02018 for additional information.) It is also recommended that there be a<br />
minimum of 5 diameters of straight pipe directly downstream of the Ultra 6 and Ultra 4 .<br />
The Smith Meter HPFC and the Ultra 6 and Ultra 4 are doweled to provide precise and repeatable alignment. If the<br />
dowels are removed after installation, the holes should be packed with grease to prevent corrosion.<br />
Issue/Rev. 0.5 (8/12) <strong>MNLS001</strong> • Page 5
Section III – Installation<br />
Electrical Installation<br />
General<br />
The Ultra 6 and Ultra 4 electronics are mounted in a Flame Proof (Explosion Proof) enclosure which is then mounted<br />
on top of the Ultra 6 and Ultra 4 housing. Transducers are then wired into the electronics enclosure by means of cabling<br />
system. The Ultra 6 and Ultra 4 electronics perform all signal processing and calculations and outputs the indicated<br />
fl ow rate to a fl ow computer via a square wave pulse output. Modbus or TCP/IP Ethernet communications can also<br />
be used to communicate fl ow rate as well as historical data and diagnostic information to other ancillary systems<br />
such as a P.C. or a PLC system.<br />
The cable, conduit and conduit fi ttings must meet installation requirements, such as hazardous area classifi cations,<br />
humidity, temperature, voltage, current and others. All conduit connections must be installed with approved conduit<br />
seals installed within the required distance per the applicable electrical code(s).<br />
If the Ultra 6 and Ultra 4 are NOT connected to a fl ow computer using Ethernet or Serial Communications then <strong>FMC</strong><br />
strongly recommends that either an Ethernet or Serial RS-485 cable is connected to the meter and is fed into the<br />
closest control room. The cable does not need to be connected to any device but be available there for connection<br />
by any Weights & Measures offi cial. This way there will be no need to open up the Ultra 6 and Ultra 4 electronics in the<br />
fi eld for verifi cation of all the metrological parameters.<br />
For ATEX & IEC Ex Installations:<br />
For systems utilizing cable glands the cable entry must be in accordance to IEC 60079-1 section 13.1. The gland<br />
and / or thread adapter must be or Ex ‘d’ certifi ed. The cable end must be securely installed and, depending on<br />
the cable type, be properly protected from mechanical damage.<br />
For systems utilizing rigid conduit the conduit entry must be in accordance to EN 50018:2000 sections 13.2 / IEC<br />
60079-1 section 13.1, an Ex certifi ed stopping box (sealing device) must be used immediately at the entrance of<br />
the enclosure. (i.e.: within 50 mm)<br />
Any unused entry must be suitably blocked with an Ex certifi ed plug.<br />
The UTS must be connected to an Ex d IIB Gb fl ameproof enclosure with an EC-Type Examination certifi cate.<br />
Component certifi ed enclosures are not to be used. It shall have appropriate threaded connection facilities and<br />
ambient temperature range.<br />
Alternately, the J-Box Manifold Adaptor will provide a minimum 0.9245 in. (23.482 mm) O.D. for interface with an enclosure<br />
covered by ATEX Certificate DEMKO 12 ATEX 1204991X & IEC Ex UL 12.0025X with the following dimensions:<br />
Maximum Diametrical Clearance = 0.003 in.<br />
Minimum Length = 0.5 in.<br />
This joint is held in place by use of a two Allen head cap screws, DIN 912-A4-70 or DIN 912-A2-70, inserted<br />
through the Retaining Flange and threaded into the fl ameproof enclosure. This joint will be factory made and the<br />
two ATEX certifi ed products will always be shipped together.<br />
Contact manufacturer at address listed for information on the dimensions of the fl ameproof joints.<br />
For North American installations:<br />
Conduit connections must be in accordance to:<br />
USA – National Electric Code (NFPA 70)<br />
Canada – Canadian Electric Code (CSA C22.1),<br />
A listed seal off box must be used immediately at the entrance of the enclosure. (i.e.: within 3 inches)<br />
Any unused entry must be suitably blocked with a suitable listed plug.<br />
All installations notes:<br />
Caution: To prevent ignition of hazardous atmospheres, disconnect form supply circuit before opening. Keep<br />
tightly closed when circuits are in operation.<br />
Warning: Contains internal battery-powered circuit. To prevent ignition of hazardous atmospheres, do not open<br />
enclosure unless area is known to be non-hazardous.<br />
Page 6 • <strong>MNLS001</strong><br />
Issue/Rev. 0.5 (8/12)
Section III – Installation<br />
Two-wire shielded, twisted pair cables (22 AWG or larger wire) are recommended for connections between the Ultra 6<br />
and Ultra 4 outputs and any peripheral device. Maximum wire length for 22 AWG is 1000 feet (305 meters). The shield<br />
drain wire should be terminated to ground at the receiving device only.<br />
Power Supply<br />
The Ultra 6 and Ultra 4 are designed to be powered by 115 VAC, 230 VAC or 24 VDC. See specification sheets SSLS001<br />
and SSLS002 for additional information.<br />
The UACF board (mounted inside the electronics cover) must be confi gured to match the power input to the Ultra 6<br />
and Ultra 4 .<br />
For AC Input power:<br />
1. Set jumper J1 between pins 1 and 2 for AC input power<br />
2. Select AC input voltage level (115 or 230 VAC) with switch SW1<br />
3. Connect input power cable to connector CN15<br />
AC Input Wire<br />
L1<br />
L2 / N<br />
Earth Ground<br />
Terminal<br />
CN15-1<br />
CN15-2<br />
CN15-3<br />
For DC Input power:<br />
1. Set jumper J1 between pins 2 and 3 for DC input power<br />
2. Connect input power cable to connector CN16<br />
DC Input Wire<br />
Terminal<br />
24 VDC (+) CN16-1<br />
24 VDC (-) CN16-2<br />
The Ultra 6 and Ultra 4 utilize two fuses for power protection. The fi rst fuse is located on the UACF board and is labeled<br />
fuse F1. This fuse is only active when the Ultra 6 and Ultra 4 are being supplied AC power. Fuse F1 is a time-delay<br />
fuse rated for 200 mA at 250 VAC.<br />
The second fuse, F2, is located in-line between the UACF and the UDSP board. This fuse provides protection during<br />
both AC and DC operation of the Ultra 6 and Ultra 4 . Fuse F2 is a time-delay fuse rated for 1A at 250 VAC.<br />
Replacement fuses must be the same ratings in order to provide proper protection to the Ultra 6 and Ultra 4 electronics.<br />
Issue/Rev. 0.5 (8/12) <strong>MNLS001</strong> • Page 7
Section III – Installation<br />
Input / Output Wiring<br />
The Ultra 6 and Ultra 4 have the following inputs and outputs:<br />
• Digital I/O<br />
– 2 Digital Inputs<br />
– 2 Digital Outputs<br />
– 4 Digital Pulse Outputs<br />
• Analog I/O<br />
– 2 Analog I/O points – Confi gurable via modules as:<br />
4-20 mA Input<br />
4-20 mA Output<br />
1-5 VDC Input<br />
1-5 VDC Output<br />
• Communications<br />
– 1 ANSI/IEEE 802.3 Ethernet port<br />
– 2 Selectable Ports<br />
EIA-232<br />
EIA-485<br />
Half-Duplex (2 wire)<br />
Full-Duplex (4 wire)<br />
Note: Reference specifi cation sheets SSLS001 and SSLS002 for technical specifi cations of the I/O.<br />
Digital I / O<br />
Connections for the digital I/O are made on the UDSP board using terminal CN2:<br />
Digital I/O<br />
Connection Point<br />
Digital Out #1 CN2 – Terminal 1 – 3<br />
Digital Out #2 CN2 – Terminal 4 – 6<br />
Digital In #1 CN2 – Terminal 7 – 8<br />
Digital In #2 CN2 – Terminal 9 – 10<br />
Page 8 • <strong>MNLS001</strong><br />
Issue/Rev. 0.5 (8/12)
Section III – Installation<br />
Digital Ouputs<br />
Digital Out #1<br />
UDSP Board<br />
A<br />
B<br />
CN2<br />
1<br />
2<br />
+VDC<br />
Flow computer<br />
or similar<br />
C<br />
A<br />
3<br />
4<br />
Digital Input<br />
Digital Out #2<br />
B<br />
C<br />
5<br />
6<br />
Similar as<br />
digital out #1<br />
0V<br />
Digital outputs are optically isolated solid state relays that are normally open when power is removed from the meter.<br />
Digital Inputs<br />
UDSP Board<br />
+VDC<br />
DI # 1<br />
CN2<br />
7<br />
8<br />
Digital Out<br />
DI #2<br />
9<br />
10<br />
Similar as<br />
digital out #1<br />
0V<br />
Flow computer<br />
or similar<br />
Digital inputs are current limited and optically isolated.<br />
Analog I / O<br />
Connections for the 2 Analog I/O modules are made on the UDSP board using terminal CN9:<br />
Analog I/O<br />
Connection Point<br />
Analog I/O #1 CN9 – Terminal 1 – 4<br />
Analog I/O #2 CN9 – Terminal 5 – 8<br />
Analog modules are available in the configurations given above. Reference specification sheets SSLS001 and SSLS002.<br />
Issue/Rev. 0.5 (8/12) <strong>MNLS001</strong> • Page 9
Section III – Installation<br />
Current Output Module<br />
UDSP Board<br />
Analog I/O Slot 1<br />
CN9<br />
Internally<br />
Generated & Isolated<br />
Vcc 1<br />
2<br />
3<br />
(NC)<br />
SIG+<br />
Customer Wiring / Equipment<br />
Current Direction<br />
+<br />
-<br />
Customer Analog Output<br />
250 ohm<br />
Maximum<br />
Isolated GND<br />
Analog I/O Slot 2<br />
4<br />
5<br />
(NC) (NC)<br />
6<br />
7<br />
Connection Identical to Analog I/O Slot 1<br />
8<br />
(NC)<br />
Analog output module, type 4-20mA, must be mounted in the used slot.<br />
Note: The analog output module supplies current for the loop.<br />
Current Input Module<br />
UDSP Board<br />
Analog I/O Slot 1<br />
50 ohm<br />
Isolated GND<br />
Analog I/O Slot 2<br />
CN9<br />
1<br />
2<br />
3<br />
4<br />
5<br />
Customer Wiring / Equipment<br />
Current Direction<br />
+<br />
-<br />
Customer Analog Output<br />
6<br />
7<br />
8<br />
SIG-<br />
SIG- SIG+<br />
(NC) (NC) SIG- SIG+ (NC)<br />
(NC) SIG- SIG+<br />
Connection Identical to Analog I/O Slot 1<br />
Analog input module, type 4-20mA, must be mounted in the used slot.<br />
Note: Customer Analog Output must supply power for the current loop.<br />
Communications<br />
The 10/100 base-T Ethernet connection is made using socket CN12.<br />
Connections for the 2 confi gurable communications ports are made using terminal CN13:<br />
Page 10 • <strong>MNLS001</strong><br />
Issue/Rev. 0.5 (8/12)
Section III – Installation<br />
Comm. Port<br />
Connection Point<br />
Comm. #1 CN13 – Terminal 1 – 5<br />
Comm. #2 CN13 – Terminal 1 – 10<br />
The two RS232/485 communication ports must be confi gured in software via WinScreen AND in hardware using<br />
jumper CN14 located next to terminal CN13 per the following table:<br />
CN14 JUMPER ARRANGEMENT<br />
(CN14 LOCATED NEXT TO CN13<br />
PORT MUST BE STRAPPED FOR EITHER 232 OR 485<br />
CN14<br />
1<br />
1-2 IN=232 PORT 1<br />
3-4 IN=232 PORT 2<br />
5-6 IN=FULL DUPLEX PORT 1<br />
7-8 IN=FULL DUPLEX PORT 2<br />
9-10 N.C.<br />
OUT=485 PORT 1<br />
OUT=485 PORT 2<br />
OUT=HALF DUPLEX PORT 1<br />
OUT=HALF DUPLEX PORT 2<br />
RS485 Full Duplex<br />
UDSP Board<br />
Port 1<br />
CN13<br />
1<br />
2<br />
RS485 Device<br />
RX-<br />
RX+<br />
TX-<br />
TX+<br />
Customer Wiring / Equipment<br />
CN14<br />
1 2<br />
3<br />
4<br />
RX- RX+<br />
*120 ohm 1/4 W<br />
TX+<br />
TX-<br />
Electronics GND<br />
5<br />
COM<br />
*Customer Supplied Resistor<br />
9 10<br />
Port 2<br />
6<br />
TX-<br />
7<br />
TX+<br />
8<br />
9<br />
RX+<br />
RX-<br />
Connection Identical to Comm. Port 1<br />
Electronics GND<br />
10<br />
COM<br />
Pulse Output<br />
The pulse output connections are made using terminal CN1 as follows:<br />
Issue/Rev. 0.5 (8/12) <strong>MNLS001</strong> • Page 11
Section III – Installation<br />
Pulse Output<br />
Connection Point<br />
Pulse Out #1 CN1 – Terminal 1 – 2<br />
Pulse Out #2 CN1 – Terminal 3 – 4<br />
Pulse Out #3 CN1 – Terminal 5 – 6<br />
(Reverse Flow)<br />
Pulse Out #4 CN1 – Terminal 7 – 8<br />
(Reverse Flow)<br />
The pulse output is an open collector type output and thus will require a “pull-up” resistor in order to function properly<br />
unless the receiving instrument has a current-limiting resistor built in as in the case of the Smith Meter ® microFlow.<br />
net . The resistor must be sized appropriately to limit current to 10 mA through the output circuit.<br />
The location of the connection points for the above mentioned input / output is shown on the following photo:<br />
Page 12 • <strong>MNLS001</strong><br />
Issue/Rev. 0.5 (8/12)
Section III – Installation<br />
Issue/Rev. 0.5 (8/12) <strong>MNLS001</strong> • Page 13
Section IV – Operation<br />
Meter Start-up<br />
Before powering on the meter and beginning fl ow measurement, verify that the following items are completed:<br />
• Meter has been properly installed in the piping and all connections are free from leaks.<br />
• Power settings (voltage switch SW1 and/or jumper J1) have been set properly.<br />
• Input / Output connections have been checked for proper wiring and connection integrity.<br />
• All conduit and/or gland connections are in adherence to applicable electrical codes.<br />
When power is applied to the Ultra 6 and Ultra 4 , they will go through a boot sequence and will then begin measurement<br />
automatically. This process takes approximately 30 seconds. If fl ow is present, the pulse output will begin and<br />
the associated flow computer should begin totalizing.<br />
If power is interrupted for a period of less than 20 ms during operation, the meter will continue operating with no<br />
loss of measurement. If power is lost for more than 100 ms during operation, the Ultra 6 and Ultra 4 will go through an<br />
orderly shutdown with no loss of historical data. Once power is re-supplied, the Ultra 6 and Ultra 4 will go through the<br />
power-on boot sequence and will resume measurement.<br />
Winscreen Interface<br />
Before commissioning the meter, the Winscreen PC program will be required to be installed on a PC and communications<br />
established between the PC and the meter to verify all relevant parameters.<br />
The Ultra 6 and Ultra 4 will be supplied from the factory with an initial program in place. A CD will also be supplied<br />
containing a copy of the meter’s initial parameter database, raw signal logs and a copy of the Winscreen interface<br />
program.<br />
Winscreen is the primary tool to interface with the meter to program the Ultra 6 and Ultra 4 , view real-time run data,<br />
view historical information, troubleshoot the meter and gather trendlog data.<br />
Refer to Winscreen manual MN0A001 for detailed information on tasks completed using Winscreen as the interface<br />
to the Ultra 6 and Ultra 4 .<br />
Verification and Proving<br />
The Ultra 6 and Ultra 4 will be fl ow tested at the manufacturer’s location on a standard hydrocarbon fl uid to verify correct<br />
performance before being delivered. Upon request a calibration at a third party facility can also be performed.<br />
The performance criteria used will be the +/-0,027% uncertainty requirement as described in API MPMS Chapter 5.8.<br />
There are two general ways of calibrating or proving liquid ultrasonic meters – in a lab or on site in the fi eld. As per<br />
API MPMS Chapter 5.8 <strong>FMC</strong> recommends on-site proving.<br />
If lab proving is chosen the Ultra 6 and Ultra 4 should be re-calibrated at least every 5 years or if the meter diagnostics<br />
suggests something is wrong and major components are replaced. By major components is meant 4 or more transducers<br />
or the spool piece. 3 or less transducers or any electronic board does not require a re-calibration.<br />
If on site proving is chosen then the prover method should be chosen in accordance with API MPMS Chapter 5.8.<br />
Whether a prover is used or transfer proving is used with a master meter <strong>FMC</strong> recommend that a new proving should<br />
be performed whenever the fl uid thru the meter is changed.<br />
Page 14 • <strong>MNLS001</strong><br />
Issue/Rev. 0.5 (8/12)
Section V – Maintenance<br />
Note: An updated copy of the meter database should always be kept on file in the event the Ultra 6 or Ultra 4 would need<br />
to be re-programmed after maintenance has been performed. Refer to Winscreen manual MN0A001 for detailed<br />
information.<br />
Since the Ultra 6 and Ultra 4 have no moving parts and is non-intrusive to the flow stream maintenance requirements<br />
are minimal.<br />
As long as the meter is in operation, major faults can be revealed by proving the meter or utilizing a user supplied PC<br />
loaded with the Winscreen monitoring program connected to the communications port of the Ultra 6 and Ultra 4 .<br />
Note: It is recommended that a PC loaded with Winscreen is available during meter operations.<br />
Before beginning any maintenance procedure, the diagnostic tools in Winscreen should be used to properly diagnose<br />
the failure.<br />
Transducer Replacement – Inner Transducer<br />
In the unlikely event that a transducer should experience a failure, the inner transducer assembly may be removed<br />
and replaced without stopping the process fl ow and removing the meter from the piping. The meter must be powered<br />
off during the inner transducer replacement process.<br />
To change the inner transducer (welded on nozzle style), follow the following steps:<br />
1. Separate conduit union to expose the conduit wiring leads.<br />
Issue/Rev. 0.5 (8/12) <strong>MNLS001</strong> • Page 15
Section V – Maintenance<br />
2. Remove brass transducer adapter to expose transducer termination screws.<br />
3. Remove the transducer termination screws noting that the white wire is attached to the transducer center<br />
electrode and the black wire is attached to the transducer collar which is the case ground.<br />
Page 16 • <strong>MNLS001</strong><br />
Issue/Rev. 0.5 (8/12)
Section V – Maintenance<br />
4. Loosen the set screw on the transducer collar.<br />
Hold<br />
Center<br />
Electrode<br />
Stationary<br />
Loosen<br />
Collar<br />
5. Using a small wrench, hold the center electrode stationary while loosening the transducer collar.<br />
6. Once the transducer collar is disengaged, slide the old inner transducer out of the transducer well and mark it<br />
as failed.<br />
Issue/Rev. 0.5 (8/12) <strong>MNLS001</strong> • Page 17
Section V – Maintenance<br />
7. Apply a drop of pure silicone oil to the tip of the new inner transducer to ensure a good acoustic coupling<br />
between the piezo-electric crystal and the bottom of the transducer well.<br />
8. Again using a small wrench, hold the center electrode stationary while tightening the transducer collar of the<br />
new inner transducer.<br />
9. Tighten the set screw on the transducer collar.<br />
10. Fold excess wiring as shown and insert through transducer adapter.<br />
Page 18 • <strong>MNLS001</strong><br />
Issue/Rev. 0.5 (8/12)
Section V – Maintenance<br />
11. Re-attach the transducer wiring to the termination screws making sure that the white wire is attached to the<br />
center electrode and the black wire is attached to the transducer collar.<br />
12. Re-install transducer adapter onto transducer external threads.<br />
13. Re-connect and tighten conduit union making sure not to pinch the transducer wiring in the connection.<br />
To change the inner transducer (with Bottom Plate and Clamping Plate), follow the following steps:<br />
1. Separate conduit union to expose the conduit wiring lead.<br />
2. Remove the set screw.<br />
Issue/Rev. 0.5 (8/12) <strong>MNLS001</strong> • Page 19
Section V – Maintenance<br />
3. Remove brass transducer adapter to expose transducer termination screws.<br />
4. Remove the transducer termination screws noting that the white wire is attached to the transducer center<br />
electrode and the black wire is attached to the transducer collar which is the case ground.<br />
Page 20 • <strong>MNLS001</strong><br />
Issue/Rev. 0.5 (8/12)
Section V – Maintenance<br />
5. Loosen the set screw on the transducer collar.<br />
6. Using a small wrench, hold the center electrode stationary while loosening the transducer collar.<br />
Brass Adapter<br />
Clamping<br />
Plate<br />
Conduit Union<br />
M.I. Cable<br />
Hold<br />
Center<br />
Electrode<br />
Stationary<br />
Loosen<br />
Collar<br />
7. Once the transducer collar is disengaged, slide the old inner transducer out of the transducer well and mark it<br />
as failed.<br />
Bottom<br />
Plate<br />
8. Apply a drop of pure silicone oil to the tip of the new inner transducer to ensure a good acoustic coupling between<br />
the piezo-electric crystal and the bottom of the transducer well.<br />
Issue/Rev. 0.5 (8/12) <strong>MNLS001</strong> • Page 21
Section V – Maintenance<br />
10. Tighten the set screw on the transducer collar.<br />
11. Fold excess wiring as shown and insert through transducer adapter.<br />
12. Re-attach the transducer wiring to the termination screws making sure that the white wire is attached to the<br />
center electrode and the black wire is attached to the transducer collar.<br />
13. Re-install the transducer adapter onto the transducer external threads.<br />
14. Re-connect and tighten conduit union making sure not to pinch the transducer wiring in the connection.<br />
To change the inner transducer (with Thread adapter and cable manifold), follow the following steps:<br />
1. Separate the retaining nut of the micro-conduit manifold to expose the wiring lead.<br />
2. Compress the spring cage connector to release the wiring leads from the terminal block.<br />
Page 22 • <strong>MNLS001</strong><br />
Issue/Rev. 0.5 (8/12)
Section V – Maintenance<br />
3. Remove the set screw (M2) which secures the thread adapter.<br />
4. Using a deep well socket or wrench, remove the thread adapter.<br />
5. Using a small wrench, loosen the transducer.<br />
Issue/Rev. 0.5 (8/12) <strong>MNLS001</strong> • Page 23
Section V – Maintenance<br />
6. Once the transducer is disengaged, slide the old inner transducer out of the transducer well and mark it as failed.<br />
Inner Transducer<br />
7. Apply a drop of pure silicone oil to the tip of the new inner transducer to ensure a good acoustic coupling between<br />
the piezo-electric crystal and the bottom of the transducer well.<br />
Transducer<br />
Collar<br />
Transducer<br />
Adapter<br />
8. Again, using a small wrench, tighten the new inner transducer.<br />
9. Re-attach the thread Transducer adapter to the transducer external threads.<br />
Termination<br />
10. Insert the set screw Screws (M2) to secure the thread adapter.<br />
11. Re-attach the wire leads by compressing the spring cage connector to allow for easy insertion of the wire leads.<br />
Make sure that the black wire is connected to the ground port and the colored wire is attached to the signal<br />
port.<br />
12. Tuck excess wiring into transducer manifold adapter.<br />
13. Re-attach the retaining nut to the thread adapter paying attention not to pinch any wires.<br />
Page 24 • <strong>MNLS001</strong><br />
Issue/Rev. 0.5 (8/12)
Section V – Maintenance<br />
Transducer Replacement – Complete Transducer<br />
WARNING: If the outer transducer housing needs to be removed for any reason, the meter must be<br />
de-pressurized and drained of all product before proceeding.<br />
If the complete transducer needs to be changed, fl ow must be stopped. The meter must be powered off during the<br />
entire procedure.<br />
To change the complete transducer, follow the following steps:<br />
1. Separate conduit union to expose the conduit wiring leads. (Reference procedure for inner transducer replacement)<br />
2. Remove brass transducer adapter to expose transducer termination screws. (Reference procedure for innertransducer<br />
replacement)<br />
3. Remove the transducer termination screws noting that the white wire is attached to the transducer center<br />
electrode and the black wire is attached to the transducer collar which is the case ground. (Reference procedure<br />
for inner transducer replacement)<br />
WARNING: The meter MUST be de-pressurized and drained of all product before proceeding with step #4.<br />
4. Remove (8) M3 screws that secure the transducer into the meter body transducer nozzle.<br />
5. Lubricate the sealing o-ring on the new transducer and the bore of the meter body transducer nozzle with<br />
petroleum jelly to ensure it is not damaged during assembly.<br />
Issue/Rev. 0.5 (8/12) <strong>MNLS001</strong> • Page 25
Section V – Maintenance<br />
6. Install the new transducer into the meter body transducer nozzle and align the through holes in the transducer<br />
fl ange with the threaded holes in the nozzle.<br />
7. Re-install (8) M3 screws to secure the transducer into the meter body.<br />
8. Fold excess wiring and insert through transducer adapter. (Reference procedure for inner transducer replacement)<br />
9. Re-attach the transducer wiring to the termination screws making sure that the white wire is attached to the<br />
center electrode and the black wire is attached to the transducer collar. (Reference procedure for inner<br />
transducer replacement)<br />
10. Re-install transducer adapter onto transducer external threads. (Reference procedure for inner transducer<br />
replacement)<br />
11. Re-connect and tighten conduit union making sure not to pinch the transducer wiring in the connection.<br />
(Reference procedure for inner transducer replacement)<br />
After the transducer has been replaced, the path length may need to be changed in the meter database through<br />
Winscreen. The actual path length can be calculated based on the face-to-face distance of the transducer nozzles<br />
and the flange-to-face length of the original and replacement transducers. The face-to-face distance of the transducer<br />
nozzles and the fl ange-to-face length of the original transducer will be included in the data packet originally supplied<br />
with the meter. The fl ange-to-face length of the replacement transducer will be included with the replacement transducer.<br />
For assistance, contact us at using the information given in section I of this manual. For additional details on<br />
changing parameters in the meter database, refer to Winscreen manual MN0A001.<br />
WARNING: If the outer transducer housing needs to be removed for any reason, the meter must be<br />
de-pressurized and drained of all product before proceeding.<br />
If the complete transducer needs to be changed, fl ow must be stopped. The meter must be powered off during the<br />
entire procedure.<br />
To change the complete transducer (with Bottom Plate and Clamping Plate), follow the following steps:<br />
1. Separate conduit union to expose the conduit wiring leads. (Reference procedure for inner transducer replacement)<br />
2. Remove set screw. (Reference procedure for inner transducer replacement)<br />
3. Remove brass transducer adapter to expose transducer termination screws. (Reference procedure for inner transducer<br />
replacement)<br />
4. Remove the transducer termination screws noting that the white wire is attached to the transducer center electrode<br />
and black wire is attached to the transducer collar which is the case ground. (Reference procedure for inner transducer<br />
replacement)<br />
5. Remove (4) M6 screws that secure the transducer in-between the bottom plate and the clamping plate.<br />
Page 26 • <strong>MNLS001</strong><br />
Issue/Rev. 0.5 (8/12)
Section V – Maintenance<br />
6. Remove the transducer leaving the bottom plate attached to the meter. (Bottom plate can be removed at this<br />
time if replacement of o-ring is desired)<br />
7. Lubricate the sealing o-ring on the new transducer and the bore of the bottom plate with an appropriate lubricate<br />
to ensure it is not damaged during assembly.<br />
8. Install the new transducer into the bottom plate and align the (4) notches of the transducers with the threaded<br />
holes in the bottom plate.<br />
9. Re-install the (4) M6 screws to secure the transducer into the bottom plate paying close attention to leave access<br />
to the set screw hole of the clamping plate.<br />
10. Fold excess wiring and insert through transducer adapter. (Reference procedure for inner transducer replacement)<br />
11. Re-install the set screw to secure the brass adapter.<br />
After the transducer has been replaced, the path length may need to be changed in the meter database through<br />
Winscreen. The actual path length can be calculated based on the face-to-face distance of the transducer nozzles<br />
and the flange-to-face length of the original and replacement transducers. The face-to-face distance of the transducer<br />
nozzles and the fl ange-to-face length of the original transducer will be included in the data packet originally supplied<br />
with the meter. The fl ange-to-face length of the replacement transducer will be included with the replacement transducer.<br />
For assistance, contact us at using the information given in section I of this manual. For additional details on<br />
changing parameters in the meter database, refer to Winscreen manual MN0A001.<br />
WARNING: If the outer transducer housing needs to be removed for any reason, the meter must be<br />
de-pressurized and drained of all product before proceeding.<br />
If the complete transducer needs to be changed, fl ow must be stopped. The meter must be powered off during the<br />
entire procedure.<br />
To change the complete transducer (with Thread Adapter and Cable Manifolds), follow the following steps:<br />
1. Separate the retaining nut of the micro-conduit manifold to expose the wiring lead. (Reference procedure for inner<br />
transducer replacement)<br />
2. Compress the spring cage connector to release the wiring leads from the terminal block. (Reference procedure for<br />
inner transducer replacement)<br />
3. Remove set screw (M2X3) which secures the thread adapter. (Reference procedure for inner transducer replacement)<br />
Issue/Rev. 0.5 (8/12) <strong>MNLS001</strong> • Page 27
Section V – Maintenance<br />
4. Using a deep well socket or wrench, remove the thread adapter. (Reference procedure for inner transducer replacement)<br />
5. Remove (4) M6 screws that secure the transducer into the meter body.<br />
M6 Screws<br />
Qty. (4)<br />
6. Separate the transducer from the transducer mount.<br />
Transducer Mount<br />
5.0 Transducer<br />
7. Lubricate the sealing o-ring on the new transducer and the bore of the bottom plate with an appropriate lubricate<br />
to ensure it is not damaged during assembly.<br />
Lubricate<br />
Sealing<br />
O-Ring<br />
Page 28 • <strong>MNLS001</strong><br />
Issue/Rev. 0.5 (8/12)
Section V – Maintenance<br />
8. Install the new transducer into the meter body transducer bore and align the through holes in the transducer<br />
mount with the threaded holes in the housing.<br />
9. Re-install (4) M6 screws to secure the transducer into the meter body.<br />
10. Re-attach the thread adapter to the transducer external threads.<br />
11. Insert the set screw (M2X3) to secure the thread adapter.<br />
12. Re-attach the wire leads by compressing the spring cage connector to allow for easy insertion of the wire leads.<br />
Make sure that the black wire is connected to the ground port and the colored wire is attached to the signal port.<br />
13. Tuck excess wiring into transducer manifold adapter.<br />
14. Re-attach the retaining nut to the thread adapter paying attention not to pinch any wires.<br />
After the transducer has been replaced, the path length may need to be changed in the meter database through<br />
Winscreen. The actual path length can be calculated based on the face-to-face distance of the transducer nozzles<br />
and the flange-to-face length of the original and replacement transducers. The face-to-face distance of the transducer<br />
nozzles and the fl ange-to-face length of the original transducer will be included in the data packet originally supplied<br />
with the meter. The fl ange-to-face length of the replacement transducer will be included with the replacement transducer.<br />
For assistance, contact us at using the information given in section I of this manual. For additional details on<br />
changing parameters in the meter database, refer to Winscreen manual MN0A001.<br />
Replacement of Electronic Boards<br />
Note: The meter must be powered off while the electronics enclosure is open in a hazardous atmosphere. The meter<br />
must also be powered off if any electronic boards are to be replaced.<br />
UAFE Board Replacement<br />
The UAFE (Ultrasonic Analog Front End) board converts the digital ultrasonic signal to an analog signal that is<br />
carried to the sending transducer. The receiving transducer receives the signal which is then carried to the UAFE<br />
board and is converted back to a digital signal that is recognized by the on-board microprocessor.<br />
To replace the UAFE board, follow these steps:<br />
1. Remove the transducer connector hold-down bracket.<br />
2. Remove the transducer cable connectors CN1 through CN6 for the Ultra 6 ; CN1 through CN4 for the Ultra 4 .<br />
3. Remove the (5) screws on the UAFE board with a screwdriver and gently pull the UAFE board out of the socket<br />
on the UDSP board.<br />
4. Repeat this procedure in reverse order to install a new UAFE board.<br />
Replacement of the UAFE board should be followed by a “zero” procedure to re-calculate the transducer delay times,<br />
which includes the processing time taken by the UAFE board. Refer to Winscreen manual MN0A001 for details on<br />
this process.<br />
UDSP Board Replacement<br />
The UDSP (Ultrasonic Digital Signal Processing) board is the heart of the Ultra 6 and Ultra 4 ultrasonic meters. The<br />
UDSP board measures the ultrasonic transit times, performs flow calculations, reads & writes the values into memory<br />
and enables communications.<br />
To replace the UDSP board, follow these steps:<br />
1. Remove the UAFE board as described above.<br />
2. Remove all connectors plugged on to the UDSP board.<br />
3. Remove the (4) screws on the UDSP board with a screwdriver and lift the UDSP board out of the electronics enclosure.<br />
4. Repeat this procedure in reverse order to install a new UAFE board.<br />
Issue/Rev. 0.5 (8/12) <strong>MNLS001</strong> • Page 29
Section V – Maintenance<br />
After replacement of the UDSP board, you must perform the following actions:<br />
1. Confi gure UDSP board with correct IP network address.<br />
2. Load current DSP and CP software fi les.<br />
3. Load meter with saved meter database fi le. (If unavailable, meter must be re-programmed manually.)<br />
Refer to Winscreen manual MN0A001 for details on these processes.<br />
When downloading updated revisions of the software to the Ultra 6 and Ultra 4 meters, it must be ensured that the<br />
correct version is used for the application.<br />
The file name contains the revision of the software and if it is an MID type or normal version.<br />
If required by the local authorities having jurisdiction to be the MID type, the meter will be required to be protected<br />
with physicals seals and the internal hardware lock (Jumper).<br />
Warning: Breaking the physical seals and changing the hardware lock from closed to open should only be<br />
done when approved by the authorities having jurisdiction.<br />
When the hardware lock is open, the meter software can be uploaded (flashed) normally using the Winscreen PC Tool,<br />
however it should be noted that the meter will be inhibited from making legal measurements while in this condition.<br />
The MID operating mode can be verifi ed in the version block in the database.<br />
Page 30 • <strong>MNLS001</strong><br />
Issue/Rev. 0.5 (8/12)
Section VI – Returned Goods Policy<br />
Returned Goods Policy<br />
A Return Material Authorization (RMA) number must be obtained prior to returning any equipment to <strong>FMC</strong><br />
<strong>Technologies</strong> <strong>Measurement</strong> <strong>Solutions</strong>, Inc. for any reason. An RMA number can be obtained by contacting Customer<br />
Service via the information given in Section I of this manual.<br />
To conform with the OSHA “Right to Know Act” and provide a safe working environment for our employees, the<br />
following requirements have been made for any returned material:<br />
1. All equipment must be completely cleaned and decontaminated. Incomplete cleaning of the returned equipment<br />
may result in having the equipment cleaned or returned at the owner’s expense.<br />
2. A Material Safety Data Sheet (MSDS) is required for all process fl uids and fl uids used for cleaning that have come<br />
in contact with the equipment.<br />
3. The RMA number must be clearly marked on the outside of the shipping container. A document packet containing<br />
copies of the RMA and MSDS forms for all process fl uids and cleaning fl uids must also be attached to the outside<br />
of the shipping container.<br />
Returned equipment that does not conform to these requirements may not be processed.<br />
Issue/Rev. 0.5 (8/12) <strong>MNLS001</strong> • Page 31
Section VII – Appendix – Ultra 6 and Ultra 4 Database Listing<br />
* For Ultra 4 , disregard objects for paths 5 and 6.<br />
Version Information<br />
Description<br />
Winscreen<br />
Object #<br />
Modbus<br />
Register<br />
Unit Sl<br />
UDSP Serial Number 250 500 – –<br />
Serial number of the UDSP board. This is the mainboard in the electronics containing all digital electronics.<br />
UAFE Serial Number 251 502 – –<br />
Unit US<br />
Serial number of the UAFE board. This is a piggy-backboard in the electronics containing the analog front end to the transducers.<br />
UACF Serial Number 252 504 – –<br />
Serial number of the UACF board. The power supply board in the electronics is placed under the lid of the box.<br />
CP Software version 253 506 – –<br />
Version number of the CP software on the board. The CP (Communication Processor) handles all communication and IO except pulse and digital I/O.<br />
CP Software date 254 508 – –<br />
The date the CP software was build.<br />
CP Software build no. 255 510 – –<br />
The build number of the CP software. This is a running number that is incremented by one for each build.<br />
CP Software check sum 256 512 – –<br />
The checksum is a unique number to simplify identifi cation of software changes<br />
DSP Software version 257 514 – –<br />
Version number of the DSP software on the board. The DSP (Digital Signal Processor) does all the fl ow measurements.<br />
DSP Software type 258 516 – –<br />
This number is used to identify what type of software is running on the board.<br />
1200=MPU1200, 600=MPU600, 200=MPU200, 11200=Ultra6, 10800=Ultra4<br />
DSP Software date 259 518 – –<br />
The date the DSP software was build.<br />
DSP Software build no. 260 520 – –<br />
The build number of the CP software. This is a running number that is incremented by one for each build.<br />
DSP Software check sum 261 522 – –<br />
The check sum is a unique number to simplify identifi cation of software changes.<br />
AVR Software version 262 524 – –<br />
Version number of the AVR software on the board. The AVR handles pulse generation and digital I/O.<br />
AVR Software check sum 263 526 – –<br />
The check sum is unique number to simplify identifi cation of software changes.<br />
MID Protection Mode 264 528 – –<br />
Identifi es if MID protection mode is engaged.<br />
Hardware Lock 265 530 – –<br />
Identifi es if the hardware jumper is locking the meter. Locked=Read only, Open=Read and Write possible.<br />
Database check sum 266 532 – –<br />
The check sum is a unique number to simplify identifi cation of database changes.<br />
MAC Address 267 534 – –<br />
The unique MAC of the ethernet interface on the UDSP board.<br />
IP Address 268 536 – –<br />
The IP address of the meter. Identifies the meter in an TCP/IP network (normally via Ethernet). All clients (PC’s) need to be in the same subnet as the meter.<br />
Subnet Mask 269 538 – –<br />
The subnet mask specifi es the type of subnet. (Normal value is 255.255.255.0, class C network).<br />
Gateway Address 270 540 – –<br />
The gateway address specifi es the address of the router in the network in case meter and clients are on different networks.<br />
Page 32 • <strong>MNLS001</strong><br />
Issue/Rev. 0.5 (8/12)
Section VII – Appendix – Ultra 6 and Ultra 4 Database Listing<br />
Modes<br />
Description<br />
Winscreen<br />
Object #<br />
Modbus<br />
Register<br />
Unit Sl<br />
Run Mode 700 1400 – –<br />
Nominal Value: Run, Selection: Confi g/Run<br />
Specifi es the execution mode of the measurements.<br />
0=Confi g Mode, No calculations are performed. Output of meter is zero.<br />
1=Run mode (Default), Meter is running and measuring normally.<br />
Temp/Press compensation of diameter 701 1402 – –<br />
Nominal Value: Mode B, Selection: None/ModeA/ModeB<br />
Specifi es type of P/T compensation of ID, Path length and Path angle.<br />
0=None<br />
1=Mode A, Tank model.<br />
2=Mode B, Pipe model (Default).<br />
Disable Path 703 1406 – –<br />
Nominal Value: None<br />
Disables selected paths. No measurements will be performed on these paths.<br />
Enable manual values 704 1408 – –<br />
Nominal Value: Off<br />
Enables usage of manual values (600-657).<br />
Unit mode 705 1410 – –<br />
Nominal Value: Metric<br />
Selects between metric or imperial units.<br />
Warning! Should always be performed from the tools menu to also convert parameter values.<br />
Line Pressure Selector 706 1412 – –<br />
Nominal Value: Fallback, Selection: Fallback/Analog/Modbus<br />
Selects the source of the value (Fallback/Analog/Modbus).<br />
Line Temperature Selector 707 1414 – –<br />
Nominal Value: Fallback, Selection: Fallback/Analog/Modbus<br />
Selects the source of the value (Fallback/Analog/Modbus).<br />
Unit US<br />
Dimensions<br />
Description<br />
Winscreen<br />
Object #<br />
Modbus<br />
Register<br />
Unit Sl<br />
Internal Pipe Diameter 400 800 mm in<br />
Nominal value depends on meter size, Range 80-1500mm<br />
The average diameter of the meter.<br />
Transducer Path Length 1 401 802 mm in<br />
Nominal value depends on meter size, Range 80-1500mm<br />
The distance between the transducer tips.<br />
Transducer Path Length 2 402 804 mm in<br />
Nominal value depends on meter size, Range 80-1500mm<br />
The distance between the transducer tips.<br />
Transducer Path Length 3 403 806 mm in<br />
Nominal value depends on meter size, Range 80-1500mm<br />
The distance between the transducer tips.<br />
Unit US<br />
Issue/Rev. 0.5 (8/12) <strong>MNLS001</strong> • Page 33
Section VII – Appendix – Ultra 6 and Ultra 4 Database Listing<br />
Dimensions – Continued<br />
Description<br />
Winscreen<br />
Object #<br />
Modbus<br />
Register<br />
Unit Sl<br />
Transducer Path Length 4 404 808 mm in<br />
Unit US<br />
Nominal value depends on meter size, Range 80-1500mm<br />
The distance between the transducer tips.<br />
Transducer Path Length 5 405 810 mm in<br />
Nominal value depends on meter size, Range 80-1500mm<br />
The distance between the transducer tips.<br />
Transducer Path Length 6 406 812 mm in<br />
Nominal value depends on meter size, Range 80-1500mm<br />
The distance between the transducer tips.<br />
Transducer Path Angle 1 407 814 degree degree<br />
Typical Value Range: 40-60Deg.<br />
Angle between the transducer path and fl ow direction.<br />
Transducer Path Angle 2 408 816 degree degree<br />
Typical Value Range: 40-60Deg.<br />
Angle between the transducer path and fl ow direction.<br />
Transducer Path Angle 3 409 818 degree degree<br />
Typical Value Range: 40-60Deg.<br />
Angle between the transducer path and fl ow direction.<br />
Transducer Path Angle 4 410 820 degree degree<br />
Typical Value Range: 40-60Deg.<br />
Angle between the transducer path and fl ow direction.<br />
Transducer Path Angle 5 411 822 degree degree<br />
Typical Value Range: 40-60Deg.<br />
Angle between the transducer path and fl ow direction.<br />
Transducer Path Angle 6 412 824 degree degree<br />
Typical Value Range: 40-60Deg.<br />
Angle between the transducer path and fl ow direction.<br />
Wall thickness spool piece 413 826 mm in<br />
Nominal value depends of meter construction, Range: 20-100mm<br />
Average thickness of the walls in the spool piece.<br />
This thickness is used to correctly adjust the dimensions of the meter due to pressure and temperature.<br />
<strong>Measurement</strong> Ref. Temperature 414 828 °C °F<br />
Typical Value Range: 15-30˚C<br />
Temperature in the spool piece when ID and path lengths were measured. Used for P/T correction of dimensions.<br />
Meter pipe material 415 830 – –<br />
Carbon Steel / Stainless Steel / Duplex Steel<br />
Material in spool piece. Used for P/T correction of dimensions.<br />
Used Linear Thermal expansion coeff 108 216 °C °F<br />
The used coefficient for temperature expansion of the spool piece and path lengths / angles based on the selected material in object 415.<br />
Used pressure expansion coeff 109 218 Pas Pas<br />
The used coeffi cient for pressure expansion of the spool piece and path lengths / angles based on the selected material in object 415.<br />
Page 34 • <strong>MNLS001</strong><br />
Issue/Rev. 0.5 (8/12)
Section VII – Appendix – Ultra 6 and Ultra 4 Database Listing<br />
Setup<br />
Description<br />
Winscreen<br />
Object #<br />
Modbus<br />
Register<br />
Unit Sl<br />
Additional delay between fi rings 420 840 us us<br />
Nominal Value: 0.0, Range: 0.00-10000us<br />
Additional delay between the ultrasonic fi rings to prevent refl ections to infl uence the transit times.<br />
If the number is negative, it is only used for velocities below 4m/s.<br />
Signal AD value Setpoint 422 844 – –<br />
Nominal Value: 2.0, Range: 0.0-5.0<br />
The setpoint of the received signal amplitude for the gain controller.<br />
Range 0-5. Gain controller adjust the gain (object 38-49) to get the average signal amplitude close to the setpoint.<br />
Tx Gain (0=Auto Gain) 423 846 – –<br />
Nominal 0(Auto), Range: 0-100<br />
The amplitude in % on the transmitted signal.<br />
Reducing the transmitted signal strength reduces the risk of signal saturation (important on high pressures at small meters.)<br />
Max Number of Signals 426 852 – –<br />
Nominal Value: 10, Range: 0-60<br />
The max number of signal averaged for each measurement round.<br />
Unit US<br />
Rate Calibration<br />
Description<br />
Winscreen<br />
Object #<br />
Modbus<br />
Register<br />
Unit Sl<br />
Rate Correction factor A (Pos Dir) 416 832 – –<br />
Nominal Value: 1.0, Range: 0.95-1.05<br />
Adjustment factors of the measured fl ow rate for positive fl ow direction.<br />
Correction formula Q = Ax+B, where x is the originally measured fl owrate.<br />
A and B factors usually found after fl ow calibration of the meter.<br />
Rate Correction factor B (Pos Dir) 417 834 m 3 /h bph<br />
Nominal Value: 0.0, Range: -2.0 - +2.0 m3/h<br />
Adjustment factors of the measured fl ow rate for positive fl ow direction.<br />
Correction formula Q = Ax+B, where x is the originally measured fl owrate.<br />
A and B factors usually found after fl ow calibration of the meter.<br />
Rate Correction factor A (Neg Dir) 418 836 – –<br />
Nominal Value: 0.0, Range: -2.0 - 2.0 m3/h<br />
Adjustment factors of the measured fl ow rate for negative fl ow direction.<br />
Correction formula Q = Ax+B, where x is the originally measured fl owrate.<br />
A and B factors usually found after fl ow calibration of the meter.<br />
Rate Correction factor B (Neg Dir) 419 838 m 3 /h bph<br />
Adjustment factors of the measured fl ow rate for negative fl ow direction.<br />
Correction formula Q = Ax+B, where x is the originally measured fl owrate.<br />
A and B factors usually found after fl ow calibration of the meter.<br />
Rate Calibr. point 1 Flow rate 527 1054 m 3 /h bph<br />
Range: -50000 - +50000 m3/h<br />
Identifi es the fl ow rate for this calibration point.<br />
Rate Calibr. point 1 K-Factor 528 1056 – –<br />
Range: 0.95 - 1.05 m3/h<br />
Unit US<br />
Issue/Rev. 0.5 (8/12) <strong>MNLS001</strong> • Page 35
Section VII – Appendix – Ultra 6 and Ultra 4 Database Listing<br />
Rate Calibration – Continued<br />
Description<br />
Winscreen<br />
Object #<br />
Modbus<br />
Register<br />
Unit Sl<br />
Rate Calibr. point 2 Flow rate 529 1058 m 3 /h bph<br />
Range: -50000 - +50000 m3/h<br />
Identifi es the fl ow rate for this calibration point.<br />
Rate Calibr. point 2 K-Factor 530 1060 – –<br />
Range: 0.95 - 1.05 m3/h<br />
Rate Calibr. point 3 Flow rate 531 1062 m 3 /h bph<br />
Range: -5000 - +50000 m3/h<br />
Identifi es the fl ow rate for this calibration point.<br />
Rate Calibr. point 3 K-Factor 532 1064 – –<br />
Range: 0.95 - 1.05 m3/h<br />
Rate Calibr. point 4 Flow rate 533 1066 m 3 /h bph<br />
Range: -50000 - +50000 m3/h<br />
Identifi es the fl ow rate for this calibration point.<br />
Rate Calibr. point 4 K-Factor 534 1068 – –<br />
Range: 0.95 - 1.05 m3/h<br />
Rate Calibr. point 5 Flow rate 535 1070 m 3 /h bph<br />
Range: -50000 - +50000 m3/h<br />
Identifi es the fl ow rate for this calibration point<br />
Rate Calibr. point 5 K-Factor 536 1072 – –<br />
Range: 0.95 - 1.05 m3/h<br />
Rate Calibr. point 6 Flow rate 537 1074 m 3 /h bph<br />
Range: -50000 - +50000 m3/h<br />
Identifi es the fl ow rate for this calibration point.<br />
Rate Calibr. point 6 K-Factor 538 1076 – –<br />
Range: 0.95 - 1.05 m3/h<br />
Rate Calibr. point 7 Flow rate 539 1078 m 3 /h bph<br />
Range: -50000 - +50000 m3/h<br />
Identifi es the fl ow rate for this calibration point.<br />
Rate Calibr. point 7 K-Factor 540 1080 – –<br />
Range: 0.95 - 1.05 m3/h<br />
Rate Calibr. point 8 Flow rate 541 1082 m 3 /h bph<br />
Range: -50000 - +50000 m3/h<br />
Identifi es the fl ow rate for this calibration point.<br />
Rate Calibr. point 8 K-Factor 542 1084 – –<br />
Range: 0.95 - 1.05 m3/h<br />
Rate Calibr. point 9 Flow rate 543 1086 m 3 /h bph<br />
Range: -50000 - +50000 m3/h<br />
Identifi es the fl ow rate for this calibration point.<br />
Rate Calibr. point 9 K-Factor 544 1088 – –<br />
Range: 0.95 - 1.05 m3/h<br />
Unit US<br />
Page 36 • <strong>MNLS001</strong><br />
Issue/Rev. 0.5 (8/12)
Section VII – Appendix – Ultra 6 and Ultra 4 Database Listing<br />
Rate Calibration – Continued<br />
Description<br />
Winscreen<br />
Object #<br />
Modbus<br />
Register<br />
Unit Sl<br />
Rate Calibr. point 10 Flow rate 545 1090 m 3 /h bph<br />
Range: -50000 - +50000 m3/h<br />
Identifi es the fl ow rate for this calibration point.<br />
Rate Calibr. point 10 K-Factor 546 1092 – –<br />
Range: 0.95 - 1.05 m3/h<br />
Rate Calibr. point 11 Flow rate 547 1094 m 3 /h bph<br />
Range: -50000 - +50000 m3/h<br />
Identifi es the fl ow rate for this calibration point.<br />
Rate Calibr. point 11 K-Factor 548 1096 – –<br />
Range: 0.95 - 1.05 m3/h<br />
Rate Calibr. point 12 Flow rate 549 1098 m 3 /h bph<br />
Range: -50000 - +50000 m3/h<br />
Identifi es the fl ow rate for this calibration point.<br />
Rate Calibr. point 12 K-Factor 550 1100 – –<br />
Range: 0.95 - 1.05 m3/h<br />
Rate Calibr. point 13 Flow rate 551 1102 m 3 /h bph<br />
Range: -50000 - +50000 m3/h<br />
Identifi es the fl ow rate for this calibration point.<br />
Rate Calibr. point 13 K-Factor 552 1104 – –<br />
Range: 0.95 - 1.05 m3/h<br />
Rate Calibr. point 14 Flow rate 553 1106 m 3 /h bph<br />
Range: -50000 - +50000 m3/h<br />
Identifi es the fl ow rate for this calibration point.<br />
Rate Calibr. point 14 K-Factor 554 1108 – –<br />
Range: 0.95 - 1.05 m3/h<br />
Rate Calibr. point 15 Flow rate 555 1110 m 3 /h bph<br />
Range: -50000 - +50000 m3/h<br />
Identifi es the fl ow rate for this calibration point.<br />
Rate Calibr. point 15 K-Factor 556 1112 – –<br />
Range: 0.95 - 1.05 m3/h<br />
Rate Calibr. point 16 Flow rate 557 1114 m 3 /h bph<br />
Range: -50000 - +50000 m3/h<br />
Identifi es the fl ow rate for this calibration point.<br />
Rate Calibr. point 16 K-Factor 558 1116 – –<br />
Range: 0.95 - 1.05 m3/h<br />
Unit US<br />
Issue/Rev. 0.5 (8/12) <strong>MNLS001</strong> • Page 37
Section VII – Appendix – Ultra 6 and Ultra 4 Database Listing<br />
Limits<br />
Description<br />
Winscreen<br />
Object #<br />
Modbus<br />
Register<br />
Unit Sl<br />
Low fl ow cutoff limit 430 860 m/s ft/sec<br />
Unit US<br />
Nominal Value: 0.3m/s, Range: 0-1m/s<br />
Below this velocity limit the fl ow will be set to 0.<br />
Max VOS 431 862 m/s ft/sec<br />
Typical Value: 2000m/s<br />
Above this velocity of sound limit the VOS error alarm will be set.<br />
Min VOS 432 864 m/s ft/sec<br />
Typical Value: 1000m/s<br />
Below this velocity of sound limit the VOS error alarm will be set.<br />
Max Flow 433 866 m/s ft/sec<br />
Typical Value: 20m/s<br />
Above this fl ow velocity the too high fl ow alarm will be set.<br />
Min Flow 434 868 m/s ft/sec<br />
Typical Value: -20m/s<br />
Below this fl ow velocity the too low fl ow alarm will be set.<br />
Min Signals used 435 870 % %<br />
Typical Value: 30%<br />
If the signal % drops below this limit, the signal % low alarm wil be set.<br />
Max Gain 436 872 – –<br />
Typical Value: 2600<br />
If the gain is above the limit, the gain high alarm will be set.<br />
Max Gain Difference 437 874 % %<br />
Typical Value: 50%<br />
If the gain on individual paths differs more than the specifi ed limit compared to the median gain.<br />
Max VOS deviation 438 876 m/s ft/sec<br />
Typical Value: 2m/s<br />
If the VOS on individual paths differs more than the specifi ed limit compared to the median VOS.<br />
Min S/N ratio (Processed signal) 439 878 dB dB<br />
Typical Value: 15dB<br />
If the signal level (compared) to the noise drops below this level the S/N ratio alarm will be set.<br />
Max turbulence level 440 880 % %<br />
Typical Value: 20%<br />
If the variation in fl ow velocity (pr. path) is larger than the specifi ed limit, the turbulence alarm will be set.<br />
Max Deviation Profi le Flatness 441 882 % %<br />
Typical Value: 20%<br />
If the profi le fl atness differs more than the specifi ed limit the alarm will set.<br />
Max Deviation Profi le Symmetry 442 884 % %<br />
Typical Value: 20%<br />
If the profi le symmetry differs more than the specifi ed limit the alarm will set.<br />
Max Deviation Swirl/crossfl ow 443 886 % %<br />
Typical Value: 20%<br />
If the transversal fl ow differs more than the specifi ed limit the alarm will set.<br />
Page 38 • <strong>MNLS001</strong><br />
Issue/Rev. 0.5 (8/12)
Section VII – Appendix – Ultra 6 and Ultra 4 Database Listing<br />
Profile<br />
Description<br />
Winscreen<br />
Object #<br />
Modbus<br />
Register<br />
Unit Sl<br />
Lower Flow Limit, Profi le Correction 446 892 m/s ft/sec<br />
Unit US<br />
Typical Value: 20m/s, Range: 0-30m/s, 0=Off<br />
Below this limit no fl ow profi le checking and path substitution will be performed. Path substitution is still possible by VOS checking<br />
based on Max VOS deviation (438).<br />
Allowed VOS Profi le Dev. Center Pair 447 894 m/s ft/sec<br />
Typical Value: 2m/s, Range: 0.5-5m/s<br />
Below this limit a both center paths (3 and 4) will be used for calculation reference VOS.<br />
Profi le Learner, Minimum Velocity 448 896 m/s ft/sec<br />
Typical Value: 15m/s, Range: 0.5-30m/s<br />
Below minimum velocity the reference fl ow profi le will not be updated.<br />
Profi le Learner, Maximum Velocity 449 898 m/s ft/sec<br />
Typical Value: 15m/s, Range: 0.5-30m/s<br />
Above maximum velocity the reference fl ow profi le will not be updated.<br />
Profi le Learner, Path Quality Limit 451 902 – –<br />
Typical Value: 60, Range: 0-100<br />
Below the quality limit (signal %), the reference fl ow profi le will not be updated.<br />
Profi le Learner, Averaged Cycles 452 904 – –<br />
Typical Value: 30, Range: 0-100<br />
The average fl ow profi le of the specifi ed number of measurement cycles will be used for the reference fl ow profi le.<br />
Profi le Learner, Stability Req. 453 906 – –<br />
Typical Value: 1, Range: 0-1<br />
Factor used to verify stability of fl ow profi le before recording.<br />
Reference/Initial Flow Profi le Factors 1 454 908 – –<br />
Typical Value: 0.9, Range: 0.7-1.2<br />
Reference fl ow profi le.<br />
Reference/Initial Flow Profi le Factors 2 455 910 – –<br />
Typical Value: 0.9, Range: 0.7-1.2<br />
Reference fl ow profi le.<br />
Reference/Initial Flow Profi le Factors 3 456 912 – –<br />
Typical Value: 1.0, Range: 0.7-1.2<br />
Reference fl ow profi le.<br />
Reference/Initial Flow Profi le Factors 4 457 914 – –<br />
Typical Value: 1.0, Range: 0.7-1.2<br />
Reference fl ow profi le.<br />
Reference/Initial Flow Profi le Factors 5 458 916 – –<br />
Typical Value: 1.0, Range: 0.7-1.2<br />
Reference fl ow profi le.<br />
Reference/Initial Flow Profi le Factors 6 459 918 – –<br />
Typical Value: 0.9, Range: 0.7-1.2<br />
Reference fl ow profi le.<br />
Allowed Vel.profi le deviation 460 920 us us<br />
Typical Value: 5us, Range: 0.5-10us<br />
If the measured fl ow velocity for the path differs more than the specifi ed limit calculated in us, the path is substituted.<br />
Issue/Rev. 0.5 (8/12) <strong>MNLS001</strong> • Page 39
Section VII – Appendix – Ultra 6 and Ultra 4 Database Listing<br />
Profile – Continued<br />
Description<br />
Winscreen<br />
Object #<br />
Modbus<br />
Register<br />
Unit Sl<br />
Allowed VOS.profi le deviation 461 922 us us<br />
Typical Value: 5us, Range: 0.5-10us<br />
If the measured velocity of sound for the path differs more than the specifi ed limit calculated in us, the path is substituted.<br />
Profi le Indication Level 462 924 – –<br />
Typical Value: 1, Selection: 0 or 1<br />
Unit US<br />
IO<br />
Description<br />
Winscreen<br />
Object #<br />
Modbus<br />
Register<br />
Unit Sl<br />
Pulse Handling 474 948 – –<br />
Unit US<br />
Nominal Value: Single Pulse, Selections: Single Pulse/Dual Pulse<br />
Selects how pulses will be handled in forward vs. reverse fl ow.<br />
Single Pulse=Pulses generated on both output pair regardless of direction. Flow direction can be extracted from pulse phase coding.<br />
Dual Pulse=Separate pulse pair for forward and reverse fl ow.<br />
Pulse output rating 475 950 pulses/m 3 pulses/BBL<br />
Nominal value depends on meter size, Range 100-20000p/m3<br />
Specifi es the scaling of the pulse frequency from the fl ow rate.<br />
Pulse/AO update rate 476 952 sec sec<br />
Nominal value: 0.05s, Range 0.02-1.0s<br />
Specifi es how often the pulse output and analog output will be updated.<br />
Modbus averager update rate 477 954 sec sec<br />
Nominal value: 5s, Range 3-10s<br />
Specifi es how often Modbus registers will be updated.<br />
Slot 1 IO Type 478 956 – –<br />
Nominal value: 10 (No Module), Range 0-10<br />
Selects the type of module in the slot.<br />
0=4-20mA input for Temperature.<br />
1=4-20mA input for Pressure.<br />
4=4-20mA output for fl ow rate.<br />
5=4-20mA output for fl ow rate at standard conditions.<br />
10=No module installed.<br />
Slot 1 Max value 479 958 – –<br />
Nominal value and range depends on physical unit<br />
Maximum value of physical value being measured/output.<br />
Slot 1 Min value 480 960 – –<br />
Nominal value and range depends on physical unit<br />
Minimum value of physical value being measured/output.<br />
Slot 1 calibration factor A 481 962 – –<br />
Nominal value: 1.0<br />
Calibration factor applied to the normalized converter count value.<br />
Slot 1 calibration factor B 482 964 – –<br />
Nominal value: 0<br />
Calibration factor applied to the normalized converter count value.<br />
Page 40 • <strong>MNLS001</strong><br />
Issue/Rev. 0.5 (8/12)
Section VII – Appendix – Ultra 6 and Ultra 4 Database Listing<br />
IO – Continued<br />
Description<br />
Winscreen<br />
Object #<br />
Modbus<br />
Register<br />
Issue/Rev. 0.5 (8/12) <strong>MNLS001</strong> • Page 41<br />
Unit Sl<br />
Slot 1 calibration factor CAL1 483 966 – –<br />
Range 0-65536<br />
Calibration factor of the module (printed on the module).<br />
Slot 1 calibration factor CAL2 484 968 – –<br />
Range 0-65536<br />
Calibration factor of the module (printed on the module).<br />
Slot 2 IO Type 485 970 – –<br />
Nominal Value: 10 (No Module), Range 0-10<br />
Selects the type of module in the slot.<br />
0=4-20mA input for Temperature.<br />
1=4-20mA input for Pressure.<br />
4=4-20mA output for fl ow rate.<br />
5=4-20mA output for fl ow rate at standard conditions.<br />
10=No module installed.<br />
Slot 2 Max value 486 972 – –<br />
Nominal value and range depends on physical unit<br />
Maximum value of physical value being measured/output.<br />
Slot 2 Min value 487 974 – –<br />
Nominal value and range depends on physical unit<br />
Minimum value of physical value being measured/output.<br />
Slot 2 calibration factor A 488 976 – –<br />
Nominal Value: 1.0<br />
Calibration factor applied to the normalized converter count value.<br />
Slot 2 calibration factor B 489 978 – –<br />
Nominal Value: 0.0<br />
Calibration factor applied to the normalized converter count value.<br />
Slot 2 calibration factor CAL1 490 980 – –<br />
Range 0-65536<br />
Calibration factor of the module (printed on the module).<br />
Slot 2 calibration factor CAL2 491 982 – –<br />
Range 0-65536<br />
Calibration factor of the module (printed on the module).<br />
Com1 Duplex mode 492 984 –<br />
Nominal Value: Full duplex, Selections: Full duplex/half duplex<br />
Selects full or half duplex. Half duplex is used on RS485, two wires (Tx and Rx are send on the same pair).<br />
Com2 Modbus node number 493 986 – –<br />
Nominal Value: 1, Range: 1200-19200<br />
Modbus node number for multidrop networks. Use node number 1 for 1-to-1 connections.<br />
Com2 Baudrate 494 988 – –<br />
Nominal Value: 9600, Range: 1200-19200<br />
Communication speed. Meter and client (PC) needs to use the same baudrate.<br />
Com2 Duplex mode 495 990 – –<br />
Nominal Value: Full duplex, Selections: Full duplex/half duplex<br />
Selects full or half duplex. Half duplex is used on RS485, two wires (Tx and Rx are send on the same pair).<br />
Unit US
Section VII – Appendix – Ultra 6 and Ultra 4 Database Listing<br />
Misc.<br />
Description<br />
Winscreen<br />
Object #<br />
Modbus<br />
Register<br />
Unit Sl<br />
Transducer X-ref 463 926 – –<br />
Nominal Value: 0, Other values only for diagnostics use<br />
Pulse bias 466 932 – –<br />
Nominal Value: 1.01, Range: 1.0-1.1<br />
Pulse frequency factor to ensure pulses are not lost<br />
Debug Mode 467 934 – –<br />
Nominal Value: None, Selections: None/Trace buffer/Meas. errors/Transit time log/Pulse Diagnostics<br />
Select the usage of the debug buffer.<br />
Unit US<br />
Fallback Values<br />
Description<br />
Winscreen<br />
Object #<br />
Modbus<br />
Register<br />
Unit Sl<br />
Fallback Value – Line Pressure 660 1320 bara psiA<br />
Unit US<br />
Range 1-250BarA<br />
Fallback value for pressure. Used if fallback is selected in the Line Pressure Selector (406), or value is not updated on Modbus or<br />
Analog module.<br />
Fallback Value – Line Temperature 661 1322 °C °F<br />
Range: -40 - +120˚C<br />
Fallback value for pressure. Used if fallback is selected in the Line Temperature Selector (407), or value is not updated on Modbus or<br />
Analog module.<br />
Page 42 • <strong>MNLS001</strong><br />
Issue/Rev. 0.5 (8/12)
Section VII – Appendix – Ultra 6 and Ultra 4 Database Listing<br />
Transducer Calibration node 1<br />
Description<br />
Winscreen<br />
Object #<br />
Modbus<br />
Register<br />
Unit Sl<br />
Node 1 Signal Type 502 1004 – –<br />
Nominal Value 128, Range: 0-400<br />
Identifi es the signal type for this node during transducer calibration.<br />
Node 1 Tr. Delay 1 503 1006 us us<br />
Range: 0-1us<br />
Identifi es the transducer delay for each pair of transducers for this node during transducer calibration.<br />
Node 1 Tr. Delay 2 504 1008 us us<br />
Range: 0-1us<br />
Identifi es the transducer delay for each pair of transducers for this node during transducer calibration.<br />
Node 1 Tr. Delay 3 505 1010 us us<br />
Range: 0-1us<br />
Identifi es the transducer delay for each pair of transducers for this node during transducer calibration.<br />
Node 1 Tr. Delay 4 506 1012 us us<br />
Range: 0-1us<br />
Identifi es the transducer delay for each pair of transducers for this node during transducer calibration.<br />
Node 1 Tr. Delay 5 507 1014 us us<br />
Range: 0-1us<br />
Identifi es the transducer delay for each pair of transducers for this node during transducer calibration.<br />
Node 1 Tr. Delay 6 508 1016 us us<br />
Range: 0-1us<br />
Identifi es the transducer delay for each pair of transducers for this node during transducer calibration.<br />
Unit US<br />
Issue/Rev. 0.5 (8/12) <strong>MNLS001</strong> • Page 43
Section VII – Appendix – Ultra 6 and Ultra 4 Database Listing<br />
VPC Correction Table<br />
Description<br />
Winscreen<br />
Object #<br />
Modbus<br />
Register<br />
Unit Sl<br />
Number of VPC points 509 1018 – –<br />
VPC point 1 VPC X 510 1020 – –<br />
Range: 1-3<br />
VPC point 1 Correction 511 1022 % %<br />
Range: -5 - +5<br />
VPC point 2 VPC X 512 1024 – –<br />
Range: 1-3<br />
VPC point 2 Correction 513 1026 % %<br />
Range: -5 - +5<br />
VPC point 3 VPC X 514 1028 – –<br />
Range: 1-3<br />
VPC point 3 Correction 515 1030 % %<br />
Range: -5 - +5<br />
VPC point 4 VPC X 516 1032 – –<br />
Range: 1-3<br />
VPC point 4 Correction 517 1034 % %<br />
Range: -5 - +5<br />
VPC point 5 VPC X 518 1036 – –<br />
Range: 1-3<br />
VPC point 5 Correction 519 1038 % %<br />
Range: -5 - +5<br />
VPC point 6 VPC X 520 1040 – –<br />
Range: 1-3<br />
VPC point 6 Correction 521 1042 % %<br />
Range: -5 - +5<br />
VPC point 7 VPC X 522 1044 – –<br />
Range: 1-3<br />
VPC point 7 Correction 523 1046 % %<br />
Range: -5 - +5<br />
VPC point 8 VPC X 524 1048 – –<br />
Range: 1-3<br />
VPC point 8 Correction 525 1050 % %<br />
Range: -5 - +5<br />
Unit US<br />
Page 44 • <strong>MNLS001</strong><br />
Issue/Rev. 0.5 (8/12)
Section VII – Appendix – Ultra 6 and Ultra 4 Database Listing<br />
Measured Values<br />
Description<br />
Winscreen<br />
Object #<br />
Modbus<br />
Register<br />
Unit Sl<br />
Log Count 0 0 – –<br />
This counter is incremented by one each time the meter has calculated a new fl ow rate. Rolls over at 65536.<br />
Alarm Status 1 2 – –<br />
Unit US<br />
The alarm status is a bit coded value.<br />
Each alarm has a value, and the values are added.<br />
1=Too high fl ow<br />
2=Electronics failure<br />
4=Transducer failure<br />
8=Calculation error<br />
16=Signal % low<br />
32=Gain error<br />
64=VOS difference<br />
128=Path substitution<br />
256=Parameter error<br />
512=S/N ratio low<br />
1024=Turbulence level high<br />
2048=Profi le deviation high<br />
Flow Velocity 2 4 m/s ft/sec<br />
Measured fl ow velocity through meter (Integrated across all paths).<br />
Velocity of Sound 3 6 m/s ft/sec<br />
Measured velocity of sound. (Average for all paths).<br />
Actual Volume Flowrate 4 8 m 3 /h bph<br />
Measured volume fl owrate.<br />
Accumulated Volume Forward 5 10 m 3 bbl<br />
Accumulated volume in forward flow direction.<br />
Rolls over at 1000000000 (1E9) m3.<br />
Always accumulating in forward fl ow.<br />
Accumulated Volume Reverse 6 12 m 3 bbl<br />
Accumulated volume in reverse fl ow direction.<br />
Rolls over at 1000000000 (1E9) m3.<br />
Always accumulating in reverse fl ow.<br />
Profi le fl atness (Center/Outer Paths) 7 14 % %<br />
Amount of fl ow on the outer paths compared to the center paths.<br />
Profi le symmetry (Upper/Lower Paths) 8 16 % %<br />
Amount of fl ow on the top paths compared to the bottom paths.<br />
Swirl Flow 9 18 % %<br />
Amount of fl ow rotation (clockwise)<br />
Cross Flow 10 20 % %<br />
Amount of dual vortex rotation<br />
Increment Time Duration 11 22 sec sec<br />
Time elapsed since last update of MODBUS registers. (See also object 10.)<br />
Used Line Pressure 12 24 bara psiA<br />
Line Pressure (at meter) used in calculation for correction of:<br />
1. Dimensions (ID, angle, path lengths)<br />
2. Selection of transducer calibration node<br />
3. Correction of zero calibration data<br />
Source (Analog/Modbus/Fallback) is selected by object 706.<br />
Issue/Rev. 0.5 (8/12) <strong>MNLS001</strong> • Page 45
Section VII – Appendix – Ultra 6 and Ultra 4 Database Listing<br />
Measured Values – Continued<br />
Description<br />
Winscreen<br />
Object #<br />
Modbus<br />
Register<br />
Unit Sl<br />
Used Line Temperature 13 26 °C °F<br />
Unit US<br />
Line Temperature (at meter) used in calculation for correction of:<br />
1. Dimensions (ID, angle, path lengths)<br />
2. Selection of transducer calibration node<br />
3. Correction of zero calibration data<br />
Source (Analog/Modbus/Fallback) is selected by object 707.<br />
Measured Flow Velocity 1 14 28 m/s ft/sec<br />
Flow velocity measured along each single path.<br />
Measured Flow Velocity 2 15 30 m/s ft/sec<br />
Flow velocity measured along each single path.<br />
Measured Flow Velocity 3 16 32 m/s ft/sec<br />
Flow velocity measured along each single path.<br />
Measured Flow Velocity 4 17 34 m/s ft/sec<br />
Flow velocity measured along each single path.<br />
Measured Flow Velocity 5 18 36 m/s ft/sec<br />
Flow velocity measured along each single path.<br />
Measured Flow Velocity 6 19 38 m/s ft/sec<br />
Flow velocity measured along each single path.<br />
Measured Velocity of Sound 1 20 40 m/s ft/sec<br />
Velocity of sound measured along each single path.<br />
Measured Velocity of Sound 2 21 42 m/s ft/sec<br />
Velocity of sound measured along each single path.<br />
Measured Velocity of Sound 3 22 44 m/s ft/sec<br />
Velocity of sound measured along each single path.<br />
Measured Velocity of Sound 4 23 46 m/s ft/sec<br />
Velocity of sound measured along each single path.<br />
Measured Velocity of Sound 5 24 48 m/s ft/sec<br />
Velocity of sound measured along each single path.<br />
Measured Velocity of Sound 6 25 50 m/s ft/sec<br />
Velocity of sound measured along each single path.<br />
Signals pr. path pr. calculation. 98 196 – –<br />
Number of signals on each path used to calculate the fl ow rate update for the pulse out.<br />
Page 46 • <strong>MNLS001</strong><br />
Issue/Rev. 0.5 (8/12)
Section VII – Appendix – Ultra 6 and Ultra 4 Database Listing<br />
Signal <strong>Measurement</strong>s<br />
Description<br />
Winscreen<br />
Object #<br />
Modbus<br />
Register<br />
Unit Sl<br />
Signal Percentage 1A 26 52 % %<br />
How many of the received signals are used for calculation.<br />
Signal Percentage 1B 27 54 % %<br />
How many of the received signals are used for calculation.<br />
Signal Percentage 2A 28 56 % %<br />
How many of the received signals are used for calculation.<br />
Signal Percentage 2B 29 58 % %<br />
How many of the received signals are used for calculation.<br />
Signal Percentage 3A 30 60 % %<br />
How many of the received signals are used for calculation.<br />
Signal Percentage 3B 31 62 % %<br />
How many of the received signals are used for calculation.<br />
Signal Percentage 4A 32 64 % %<br />
How many of the received signals are used for calculation.<br />
Signal Percentage 4B 33 66 % %<br />
How many of the received signals are used for calculation.<br />
Signal Percentage 5A 34 68 % %<br />
How many of the received signals are used for calculation.<br />
Signal Percentage 5B 35 70 % %<br />
How many of the received signals are used for calculation.<br />
Signal Percentage 6A 36 72 % %<br />
How many of the received signals are used for calculation.<br />
Signal Percentage 6B 37 74 % %<br />
How many of the received signals are used for calculation.<br />
Gain 1A 38 76 – –<br />
The amplifi cation of the received signal. Logarithmic scale, 200 = double/half. Range 100-2600<br />
Gain 1B 39 78 – –<br />
The amplifi cation of the received signal. Logarithmic scale, 200 = double/half. Range 100-2600<br />
Gain 2A 40 80 – –<br />
The amplifi cation of the received signal. Logarithmic scale, 200 = double/half. Range 100-2600<br />
Gain 2B 41 82 – –<br />
The amplifi cation of the received signal. Logarithmic scale, 200 = double/half. Range 100-2600<br />
Gain 3A 42 84 – –<br />
The amplifi cation of the received signal. Logarithmic scale, 200 = double/half. Range 100-2600<br />
Gain 3B 43 86 – –<br />
The amplifi cation of the received signal. Logarithmic scale, 200 = double/half. Range 100-2600<br />
Gain 4A 44 88 – –<br />
The amplifi cation of the received signal. Logarithmic scale, 200 = double/half. Range 100-2600<br />
Gain 4B 45 90 – –<br />
The amplifi cation of the received signal. Logarithmic scale, 200 = double/half. Range 100-2600<br />
Unit US<br />
Issue/Rev. 0.5 (8/12) <strong>MNLS001</strong> • Page 47
Section VII – Appendix – Ultra 6 and Ultra 4 Database Listing<br />
Signal <strong>Measurement</strong>s – Continued<br />
Description<br />
Winscreen<br />
Object #<br />
Modbus<br />
Register<br />
Unit Sl<br />
Gain 5A 46 92 – –<br />
The amplifi cation of the received signal. Logarithmic scale, 200 = double/half. Range 100-2600<br />
Gain 5B 47 94 – –<br />
The amplifi cation of the received signal. Logarithmic scale, 200 = double/half. Range 100-2600<br />
Gain 6A 48 96 – –<br />
The amplifi cation of the received signal. Logarithmic scale, 200 = double/half. Range 100-2600<br />
Gain 6B 49 98 – –<br />
The amplifi cation of the received signal. Logarithmic scale, 200 = double/half. Range 100-2600<br />
Unit US<br />
Travel Times<br />
Description<br />
Winscreen<br />
Object #<br />
Modbus<br />
Register<br />
Unit Sl<br />
Raw transit time A 1 68 136 nS nS<br />
Unit US<br />
The measured transit time fi ring downstream (positive fl ow) on each path. Transit time is not corrected for transducer calibration.<br />
Raw transit time A 2 69 138 nS nS<br />
The measured transit time fi ring downstream (positive fl ow) on each path. Transit time is not corrected for transducer calibration.<br />
Raw transit time A 3 70 140 nS nS<br />
The measured transit time fi ring downstream (positive fl ow) on each path. Transit time is not corrected for transducer calibration.<br />
Raw transit time A 4 71 142 nS nS<br />
The measured transit time fi ring downstream (positive fl ow) on each path. Transit time is not corrected for transducer calibration.<br />
Raw transit time A 5 72 144 nS nS<br />
The measured transit time fi ring downstream (positive fl ow) on each path. Transit time is not corrected for transducer calibration.<br />
Raw transit time A 6 73 146 nS nS<br />
The measured transit time fi ring downstream (positive fl ow) on each path. Transit time is not corrected for transducer calibration.<br />
Raw transit time Diff B-A 1 74 148 nS nS<br />
Difference in transit time between upstream and downstream. Positive number means positive fl ow.<br />
Raw transit time Diff B-A 2 75 150 nS nS<br />
Difference in transit time between upstream and downstream. Positive number means positive fl ow.<br />
Raw transit time Diff B-A 3 76 152 nS nS<br />
Difference in transit time between upstream and downstream. Positive number means positive fl ow.<br />
Raw transit time Diff B-A 4 77 154 nS nS<br />
Difference in transit time between upstream and downstream. Positive number means positive fl ow.<br />
Raw transit time Diff B-A 5 78 156 nS nS<br />
Difference in transit time between upstream and downstream. Positive number means positive fl ow.<br />
Raw transit time Diff B-A 6 79 158 nS nS<br />
Difference in transit time between upstream and downstream. Positive number means positive fl ow.<br />
Page 48 • <strong>MNLS001</strong><br />
Issue/Rev. 0.5 (8/12)
Section VII – Appendix – Ultra 6 and Ultra 4 Database Listing<br />
Profile<br />
Description<br />
Winscreen<br />
Object #<br />
Modbus<br />
Register<br />
Issue/Rev. 0.5 (8/12) <strong>MNLS001</strong> • Page 49<br />
Unit Sl<br />
Uncorrected fl ow velocity 1 80 160 m/s ft/sec<br />
Same as object 14-19, but not corrected for path substitution.<br />
Uncorrected fl ow velocity 2 81 162 m/s ft/sec<br />
Same as object 14-19, but not corrected for path substitution.<br />
Uncorrected fl ow velocity 3 82 164 m/s ft/sec<br />
Same as object 14-19, but not corrected for path substitution.<br />
Uncorrected fl ow velocity 4 83 166 m/s ft/sec<br />
Same as object 14-19, but not corrected for path substitution.<br />
Uncorrected fl ow velocity 5 84 168 m/s ft/sec<br />
Same as object 14-19, but not corrected for path substitution.<br />
Uncorrected fl ow velocity 6 85 170 m/s ft/sec<br />
Same as object 14-19, but not corrected for path substitution.<br />
Uncorrected velocity of sound 1 86 172 m/s ft/sec<br />
Same as object 20-25, but not corrected for path substitution.<br />
Uncorrected velocity of sound 2 87 174 m/s ft/sec<br />
Same as object 20-25, but not corrected for path substitution.<br />
Uncorrected velocity of sound 3 88 176 m/s ft/sec<br />
Same as object 20-25, but not corrected for path substitution.<br />
Uncorrected velocity of sound 4 89 178 m/s ft/sec<br />
Same as object 20-25, but not corrected for path substitution.<br />
Uncorrected velocity of sound 5 90 180 m/s ft/sec<br />
Same as object 20-25, but not corrected for path substitution.<br />
Uncorrected velocity of sound 6 91 182 m/s ft/sec<br />
Same as object 20-25, but not corrected for path substitution.<br />
Velocity profi le factor 1 92 184 – –<br />
Reference fl ow profi le used for check and correction/substitution of path velocity and VOS.<br />
Velocity profi le factor 2 93 186 – –<br />
Reference fl ow profi le used for check and correction/substitution of path velocity and VOS.<br />
Velocity profi le factor 3 94 188 – –<br />
Reference fl ow profi le used for check and correction/substitution of path velocity and VOS.<br />
Velocity profi le factor 4 95 190 – –<br />
Reference fl ow profi le used for check and correction/substitution of path velocity and VOS.<br />
Velocity profi le factor 5 96 192 – –<br />
Reference fl ow profi le used for check and correction/substitution of path velocity and VOS.<br />
Velocity profi le factor 6 97 194 – –<br />
Reference fl ow profi le used for check and correction/substitution of path velocity and VOS.<br />
Travel time correction count 1 204 408 – –<br />
Indicates how many times the travel time on that specifi c path have been substituted.<br />
Travel time correction count 2 205 410 – –<br />
Indicates how many times the travel time on that specifi c path have been substituted.<br />
Travel time correction count 3 206 412 – –<br />
Indicates how many times the travel time on that specifi c path have been substituted.<br />
Unit US
Section VII – Appendix – Ultra 6 and Ultra 4 Database Listing<br />
Profile – Continued<br />
Description<br />
Winscreen<br />
Object #<br />
Modbus<br />
Register<br />
Unit Sl<br />
Travel time correction count 4 207 414 – –<br />
Indicates how many times the travel time on that specifi c path have been substituted.<br />
Travel time correction count 5 208 416 – –<br />
Indicates how many times the travel time on that specifi c path have been substituted.<br />
Travel time correction count 6 209 418 – –<br />
Indicates how many times the travel time on that specifi c path have been substituted.<br />
Unit US<br />
S/N <strong>Measurement</strong>s<br />
Description<br />
Winscreen<br />
Object #<br />
Modbus<br />
Register<br />
Unit Sl<br />
S/N ratio raw signal 1 50 100 dB dB<br />
Measured ratio between the raw noise and the used signal in dB. Each 6dB means half the amplitude.<br />
S/N ratio raw signal 2 51 102 dB dB<br />
Measured ratio between the raw noise and the used signal in dB. Each 6dB means half the amplitude.<br />
S/N ratio raw signal 3 52 104 dB dB<br />
Measured ratio between the raw noise and the used signal in dB. Each 6dB means half the amplitude.<br />
S/N ratio raw signal 4 53 106 dB dB<br />
Measured ratio between the raw noise and the used signal in dB. Each 6dB means half the amplitude.<br />
S/N ratio raw signal 5 54 108 dB dB<br />
Measured ratio between the raw noise and the used signal in dB. Each 6dB means half the amplitude.<br />
S/N ratio raw signal 6 55 110 dB dB<br />
Measured ratio between the raw noise and the used signal in dB. Each 6dB means half the amplitude.<br />
S/N ratio used signal 1 56 112 dB dB<br />
Measured ratio between the noise (after signal processing) and the used signal in dB. Each 6dB means half the amplitude.<br />
S/N ratio used signal 2 57 114 dB dB<br />
Measured ratio between the noise (after signal processing) and the used signal in dB. Each 6dB means half the amplitude.<br />
S/N ratio used signal 3 58 116 dB dB<br />
Measured ratio between the noise (after signal processing) and the used signal in dB. Each 6dB means half the amplitude.<br />
S/N ratio used signal 4 59 118 dB dB<br />
Measured ratio between the noise (after signal processing) and the used signal in dB. Each 6dB means half the amplitude.<br />
S/N ratio used signal 5 60 120 dB dB<br />
Measured ratio between the noise (after signal processing) and the used signal in dB. Each 6dB means half the amplitude.<br />
S/N ratio used signal 6 61 122 dB dB<br />
Measured ratio between the noise (after signal processing) and the used signal in dB. Each 6dB means half the amplitude.<br />
Turbulence level 1 62 124 % %<br />
Level of path velocity turbulence calculated as standard deviation of last 10 seconds.<br />
Turbulence level 2 63 126 % %<br />
Level of path velocity turbulence calculated as standard deviation of last 10 seconds.<br />
Turbulence level 3 64 128 % %<br />
Level of path velocity turbulence calculated as standard deviation of last 10 seconds.<br />
Unit US<br />
Page 50 • <strong>MNLS001</strong><br />
Issue/Rev. 0.5 (8/12)
Section VII – Appendix – Ultra 6 and Ultra 4 Database Listing<br />
S/N <strong>Measurement</strong>s – Continued<br />
Description<br />
Winscreen<br />
Object #<br />
Modbus<br />
Register<br />
Unit Sl<br />
Turbulence level 4 65 130 % %<br />
Level of path velocity turbulence calculated as standard deviation of last 10 seconds.<br />
Turbulence level 5 66 132 % %<br />
Level of path velocity turbulence calculated as standard deviation of last 10 seconds.<br />
Turbulence level 6 67 134 % %<br />
Level of path velocity turbulence calculated as standard deviation of last 10 seconds.<br />
Unit US<br />
Standard Calculations<br />
Description<br />
Winscreen<br />
Object #<br />
Modbus<br />
Register<br />
Unit Sl<br />
Unit US<br />
Prove Run No. 100 200 – –<br />
Average Flow Rate 101 202 m 3 /h bph<br />
MM Factor 102 204 pulses/m 3 pulses/BBL<br />
Prove Time 103 206 sec sec<br />
Accumulated Prove Volume 104 208 m 3 BBL<br />
Accumulated Master Meter Pulses 105 210 – –<br />
VPC X 106 212 – –<br />
VPC Correction 107 214 % %<br />
Issue/Rev. 0.5 (8/12) <strong>MNLS001</strong> • Page 51
Section VII – Appendix – Ultra 6 and Ultra 4 Database Listing<br />
IO Values<br />
Description<br />
Winscreen<br />
Object #<br />
Modbus<br />
Register<br />
Unit Sl<br />
Pulse out requested frequency 110 220 Hz Hz<br />
Current frequency generated on the pulse output.<br />
Time Stamp 111 222 sec sec<br />
Time stamp of last frequency change.<br />
Pulse out total count forward 112 224 – –<br />
Internal pulse counter inside the AVR processor. If this is moving, the AVR is.<br />
Pulse In 1 Count 113 226 – –<br />
Received number of pulses on the digital input 1.<br />
Pulse In 2 Count 114 228 – –<br />
Received number of pulses on the digital input 2.<br />
Freq In 1 115 230 – –<br />
Current frequency on digital input 1.<br />
Freq In 2 116 232 – –<br />
Current frequency on digital input 2.<br />
Slot 1 Count Value 120 240 – –<br />
The digital value read/sent to the analog module.<br />
Slot 2 Count Value 121 242 – –<br />
The digital value read/sent to the analog module.<br />
Analog Temperature Input 122 244 °C °F<br />
Unit US<br />
Temperature value read from temperature transmitter.<br />
The selector object (707) needs to be set to analog to use this value.<br />
Analog Pressure Input 123 246 bara psiA<br />
Pressure value read from pressure transmitter.<br />
The selector object (706) needs to be set to analog to use this value.<br />
Line Pressure, Modbus 130 260 bara psiA<br />
Temperature value received from modbus link.<br />
The selector object (707) needs to be set to modbus to use this value.<br />
Line Temperature, Modbus 131 262 °C °F<br />
Pressure value received from modbus link.<br />
The selector object (706) needs to be set to modbus to use this value.<br />
Time Consumption Total 140 280 ms ms<br />
Time consumption objects are used to verify that different parts of the DSP algorithms does not consume too much processor time.<br />
Page 52 • <strong>MNLS001</strong><br />
Issue/Rev. 0.5 (8/12)
Section VII – Appendix – Ultra 6 and Ultra 4 Database Listing<br />
Status / Errors<br />
Description<br />
Winscreen<br />
Object #<br />
Modbus<br />
Register<br />
Unit Sl<br />
Log Count 200 400 – –<br />
Unit US<br />
This counter is incremented by one each time the meter has calculated a new fl ow rate.<br />
Rolls over at 65536.<br />
Alarm Status 201 402 – –<br />
The alarm status is a bit coded value.<br />
Each alarm has a value, and the values are added.<br />
1=Too high fl ow<br />
2=Electronics failure<br />
4=Transducer failure<br />
8=Calculation error<br />
16=Signal % low<br />
32=Gain error<br />
64=VOS difference<br />
128=Path substitution<br />
256=Parameter error<br />
512=S/N ratio low<br />
1024=Turbulence level high<br />
2048=Profi le deviation high<br />
Currently used transducer calibration node 202 404 – –<br />
Transducer calibration node is selected based on used temperature and pressure.<br />
Profi le Learner State 203 406 – –<br />
Indicates the current status for recording of the current profi le.<br />
0=Learning<br />
1=Flow velocity outside learning range (No learning).<br />
2=Unstable fl ow profi le (No learning)<br />
3=Low quality of measurements (No learning).<br />
Too Low Flow 216 432 – –<br />
This alarm is set when the fl ow velocity is higher than the alarm limit set in object 433.<br />
0=OK 1=Alarm<br />
Too High Flow 217 434 – –<br />
This alarm is set when the fl ow velocity is higher than the alarm limit set in object 434.<br />
0=OK 1=Alarm<br />
Electronics Failure 218 436 – –<br />
This alarm is set when the electronics have detectable internal problem i.e. inter-processor communication or checksum errors.<br />
Bit code: 1=Pulse module error 2=DSP Checksum Error 4=CP Checksum Error 8=Avr Checksum Error 16=Database Checksum Error<br />
32=Hardware Lock Open<br />
Transducer Failure 219 438 – –<br />
When the signal % is low or gain is high, the transducer failure alarm is set.<br />
Bit code: 1=1A, 2=2B, 4=2A, 8=2B, 16=3A, 32=3B, 64=4A, 128=4B, 256=5A, 512=5B, 1024=6A, 2048=6B<br />
Calculation Error 220 440 – –<br />
This alarm is set when it is impossible to calculate a fl ow.<br />
Bit code: 1=Path 1, 2=Path 2, 4=Path 3, 8=Path 4, 16=Path 5, 32=Path 6<br />
Signal % Low 221 442 – –<br />
This alarm is set when the signal % is lower than the alarm limit set in object 435.<br />
Bit code: 1=Path 1, 2=Path 2, 4=Path 3, 8=Path 4, 16=Path 5, 32=Path 6<br />
Gain High 222 444 – –<br />
This alarm is set when the gain is higher than the alarm limit set in object 436.<br />
Bit code: 1=1A, 2=1B, 4=2A, 8=2B, 16=3A, 32=3B, 64=4A, 128=4B, 256=5A, 512=5B, 1024=6A, 2048=6B<br />
Gain Deviation 223 446 – –<br />
This alarm is set when the gain of the path differs more from the median than the alarm limit set in object 437.<br />
Bit code: 1=1A, 2=1B, 4=2A, 8=2B, 16=3A, 32=3B, 64=4A, 128=4B, 256=5A, 512=5B, 1024=6A, 2048=6B<br />
Issue/Rev. 0.5 (8/12) <strong>MNLS001</strong> • Page 53
Section VII – Appendix – Ultra 6 and Ultra 4 Database Listing<br />
Status / Errors – Continued<br />
Description<br />
Winscreen<br />
Object #<br />
Modbus<br />
Register<br />
Unit Sl<br />
VOS Difference 224 448 – –<br />
This alarm is set when the VOS of the path differs more from the median than the alarm limit set in object 438.<br />
Bit code: 1=Path 1, 2=Path 2, 4=Path 3, 8=Path 4, 16=Path 5, 32=Path 6<br />
Path Substitution Indication 225 450 – –<br />
This alarm is set if the path velocity and VOS is substituted because of wrong measurement.<br />
Bit code: 1=Path 1, 2=Path 2, 4=Path 3, 8=Path 4, 16=Path 5, 32=Path 6<br />
S/N Ratio Low 226 452 – –<br />
This alarm is set when the S/N level of the used (processed) signal is lower than the alarm limit set in object 439.<br />
Bit code: 1=Path 1, 2=Path 2, 4=Path 3, 8=Path 4, 16=Path 5, 32=Path 6<br />
Turbulence Level High 227 454 – –<br />
This alarm is set when the turbulence level of the path is higher than the alarm limit set in object 440.<br />
Bit code: 1=Path 1, 2=Path 2, 4=Path 3, 8=Path 4, 16=Path 5, 32=Path 6<br />
Flow Profi le Deviation 228 456 – –<br />
This alarm is set when the fl ow profi le differs more from the reference profi le than the alarm limit set in object 441-443.<br />
Bit code: 1=Profi le Flatness Alarm, 2=Profi le Symmetry Alarm, 4=Swirl Flow Alarm, 8=Cross Flow Alarm<br />
Unit US<br />
Hi-Res Accumulators<br />
Description<br />
Winscreen<br />
Object #<br />
Modbus<br />
Register<br />
Unit Sl<br />
Accumulated Volume Forward (m3) 230 460 – –<br />
Non-resettable Accumulator for forward fl ow. (Integer part)<br />
Accumulated Volume Forward (m3*1E-9) 231 462 – –<br />
Non-resettable Accumulator for forward fl ow. (Fraction part)<br />
Accumulated Volume Reverse (m3) 232 464 – –<br />
Non-resettable Accumulator for reverse fl ow. (Integer part)<br />
Accumulated Volume Reverse (m3*1E-9) 233 466 – –<br />
Non-resettable Accumulator for reverse fl ow. (Fraction part)<br />
Accumulated Error Volume Forward (m3) 234 468 – –<br />
Non-resettable Accumulators. Only accumulating when there is an active alarm.<br />
Accumulated Error Volume Forward (m3*1E-9) 235 470 – –<br />
Non-resettable Accumulators. Only accumulating when there is an active alarm.<br />
Accumulated Error Volume Reverse (m3) 236 472 – –<br />
Non-resettable Accumulators. Only accumulating when there is an active alarm.<br />
Accumulated Error Volume Reverse (m3*1E-9) 237 474 – –<br />
Non-resettable Accumulators. Only accumulating when there is an active alarm.<br />
Unit US<br />
External Input<br />
Description<br />
Winscreen<br />
Object #<br />
Modbus<br />
Register<br />
Unit Sl<br />
External Update of Line Pressure 1000 2000 bara psiA<br />
Write only register from Modbus for continuous update of this value. Set the selector to Modbus to use this value.<br />
Note that register 10000-10028 is containing the same set of registers as 1000-1028 (for backward compatibility).<br />
External Update of Line Temperature 1001 2002 °C °F<br />
Write only register from Modbus for continuous update of this value. Set the selector to Modbus to use this value.<br />
Unit US<br />
Page 54 • <strong>MNLS001</strong><br />
Issue/Rev. 0.5 (8/12)
Section VIII – Related Publications<br />
The following literature can be obtained from <strong>FMC</strong> <strong>Technologies</strong> <strong>Measurement</strong> <strong>Solutions</strong>, Inc. Literature Fulfillment at<br />
measurement.fulfillment@fmcti.com or online at www.fmctechnologies.com/measurementsolutions.<br />
When requesting literature from Literature Fulfi llment, please reference the appropriate bulletin number and title.<br />
Specifications – Ultra 6 ......................................................................................................................Bulletin SSLS001<br />
Specifications – Ultra 4 ......................................................................................................................Bulletin SSLS002<br />
Winscreen Manual .......................................................................................................................... Bulletin MN0A001<br />
External Communication, MPU Series B and Ultra Series Procedure Manual............................... Bulletin MN0A002<br />
Issue/Rev. 0.5 (8/12) <strong>MNLS001</strong> • Page 55
Revisions included in <strong>MNLS001</strong> Issue/Rev. 0.5 (8/12):<br />
Page 6: Updated Electrical Installation section - For ATEX and IEC Ex Installations.<br />
The specifications contained herein are subject to change without notice and any user of said specifications should verify from the manufacturer that the specifications are currently<br />
in effect. Otherwise, the manufacturer assumes no responsibility for the use of specifications which may have been changed and are no longer in effect.<br />
Contact information is subject to change. For the most current contact information, visit our website at www.fmctechnologies.com/measurementsolutions and click on the<br />
“Contact Us” link in the left-hand column.<br />
Headquarters:<br />
500 North Sam Houston Parkway West, Suite 100, Houston, TX 77067 USA, Phone: +1 (281) 260 2190, Fax: +1 (281) 260 2191<br />
<strong>Measurement</strong> Products and Equipment:<br />
Erie, PA USA +1 (814) 898 5000<br />
Ellerbek, Germany +49 (4101) 3040<br />
Barcelona, Spain +34 (93) 201 0989<br />
Beijing, China +86 (10) 6500 2251<br />
Burnham, England +44 (1628) 603205<br />
Dubai, United Arab Emirates +971 (4) 883 0303<br />
Los Angeles, CA USA +1 (310) 328 1236<br />
Melbourne, Australia +61 (3) 9807 2818<br />
Moscow, Russia +7 (495) 5648705<br />
Singapore, +65 6861 3011<br />
Visit our website at www.fmctechnologies.com/measurementsolutions<br />
Printed in U.S.A. © 8/12 <strong>FMC</strong> <strong>Technologies</strong> <strong>Measurement</strong> <strong>Solutions</strong>, Inc. All rights reserved. <strong>MNLS001</strong> Issue/Rev. 0.5 (8/12)<br />
Integrated <strong>Measurement</strong> Systems:<br />
Corpus Christi, TX USA +1 (361) 289 3400<br />
Kongsberg, Norway +47 (32) 286700<br />
Dubai, United Arab Emirates +971 (4) 883 0303