RCN 47 for pdf - Steve Briggs
RCN 47 for pdf - Steve Briggs
RCN 47 for pdf - Steve Briggs

Create successful ePaper yourself
Turn your PDF publications into a flip-book with our unique Google optimized e-Paper software.
<strong>RCN</strong><br />
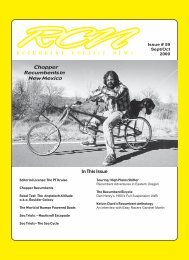
A Budget Basic Bolt-on BMX Build<br />
Ever since I started researching<br />
recumbents on the internet, I have been<br />
fascinated by how many people have<br />
built their own, the innovative materials<br />
used, and the ingenuity of the builders. The<br />
bikes created match the building requirements<br />
and skills of the builders. I have seen bikes<br />
made of wood, bikes made without welding,<br />
and bikes where just about every part of the<br />
frame was machined by the builder.<br />
My first recumbent was a mail order<br />
BikeE, the only recumbent I could find at the<br />
time which looked like it could fit my 5’ tall,<br />
105 pound, 26” inseam, 36” x-seam self. I<br />
was right. None of the other bikes I have tried<br />
since have fit (Vision, Rans, Quetzal...) Riding<br />
the BikeE around <strong>for</strong> a year taught me that I<br />
preferred a more closed pedaling position than<br />
BikeE offered, and that I wanted a smaller,<br />
more compact bike as well. The Vision and<br />
Rans SWB that I tried didn’t fit, but allowed<br />
me to see that I would probably like a SWB<br />
bike, but I wasn't sure. What if I made a mistake<br />
and didn't like it? Budget considerations<br />
also wouldn't allow me to do the serial/multiple<br />
recumbent ownership thing—I just can't<br />
af<strong>for</strong>d it. I also couldn't envisage making my<br />
own until I came across Kent Peterson's noweld<br />
homebuilt SWB at www.halcyon.com/<br />
peterson/bentkent.html. After seeing that a<br />
bike could be knocked together using the<br />
skills that I had (saw, file, drill), I decided to<br />
give the project a go.<br />
I started gathering supplies: a friend of<br />
my brother's donated a Kuwahara BMX<br />
frame, I found a junked bike in the trash to<br />
cut up, I had an old backpack frame, some<br />
wood, and assorted bike parts from past bikes.<br />
I did have to buy some parts, like wheels and<br />
<strong>for</strong>ks and tires and chains. I think that I managed<br />
to keep my costs to below $300 Can<br />
(about $200 US).<br />
After doing research on the internet and<br />
picking the brains of several people on the<br />
HPV list (thanks, guys), I had a design drawn<br />
up <strong>for</strong> a high BB, ASS bike. What made this<br />
BMX conversion so simple was the frame<br />
itself, which has a gusset between the top and<br />
down tubes, with holes cut out of it <strong>for</strong> lightness<br />
(which is a joke, as the frame weighs<br />
around 7 pounds. All I had to do was to bolt a<br />
boom to this gusset and I had myself a SWB<br />
frame.<br />
I took a tip from Mark Colliton’s <strong>RCN</strong><br />
BMX conversions Flat Black article (reprinted<br />
this issue) and flipped the frame upside down.<br />
This laid back the head angle to a relaxed 70<br />
16<br />
by Ming Dinh<br />
emari@intouch.bc.ca<br />
degrees and lowered the seat height somewhat.<br />
I used a 16” wheel in front, fitted with a 16” x<br />
1-3/8” Primo. The <strong>for</strong>k offset was around<br />
25mm, giving me a trail of 65mm. The handling<br />
of this combination is very stable and predictable<br />
and I'm very happy with how it rides.<br />
The boom of the bike is made from a road<br />
<strong>for</strong>k that has had the tips cut off (they make great<br />
bottle openers) and the blades drilled to accept<br />
two 4” x 3/16” bolts. I cut a couple of wooden<br />
boards to fit exactly in the space between the<br />
head and down tubes on either side of the gusset<br />
and screwed them together through some<br />
holes in the gusset. That held them in place.<br />
Next, I drilled a hole <strong>for</strong> the <strong>for</strong>ward-most bolt.<br />
I squeezed the <strong>for</strong>k blades until they were parallel<br />
and bolted them to the frame. I could then<br />
swing the boom up and eyeball where I wanted<br />
to position the BB <strong>for</strong> heel clearance. I decided<br />
on a 24” BB height. I then marked off where to<br />
position the second hole on my wood block/<br />
gusset and finished drilling and bolting the<br />
boom on. The nice thing about this setup is<br />
that it allows me to play around with BB height.<br />
For instance, I think I may want to experiment<br />
with a higher BB height. Flipping the cut-off<br />
<strong>for</strong>k around will give me a 25” BB height, due<br />
to the orientation of the <strong>for</strong>k offset. If I want an<br />
even higher BB height, I will just cut off some<br />
more wood blocks and drill new holes <strong>for</strong> the<br />
new boom position. The BB was made from<br />
cutting up the junked bike frame. I believe that<br />
this is where being short came in handy <strong>for</strong> me.<br />
I have read other people’s accounts of how they<br />
made their boom from a BB attached to a length<br />
Recumbent Cyclist News #<strong>47</strong><br />
Ming Dinh and the BMX “Shopper”—Ming Dinh<br />
of seat tube and had it bend. Because I'm<br />
short, I was able to keep the boom length<br />
short (around 12”) and boom flex (or bending)<br />
hasn't been a problem <strong>for</strong> me. That may<br />
also be due to knee problems <strong>for</strong>cing me to<br />
remain very low powered in my pedaling.<br />
The seat tube portion slips nicely over the<br />
<strong>for</strong>k steerer tube (boom) to allow seat to<br />
pedal adjustment. I used a seat clamp to hold<br />
it on. It twisted when I put pressure on the<br />
pedal, so I cut a shim from a plastic soda<br />
bottle that solved the problem.<br />
The seat was made from an old backpack<br />
frame and plywood. The seat bottom<br />
was made from a triangular piece of plywood<br />
that I have trimmed repeatedly until there is<br />
as little wood left as possible to still give me<br />
a com<strong>for</strong>table seat. This allowed me to get<br />
a good shape to be able to easily put a foot<br />
down flat at a stop. The mesh fabric that I<br />
used <strong>for</strong> the seat back was window screening.<br />
This is temporary as it really isn't strong<br />
enough <strong>for</strong> the purpose, even when doubled.<br />
I added a wooden seat horn to the plywood<br />
to prevent sliding <strong>for</strong>ward during pedaling.<br />
Cushioning and ersatz suspension is provided<br />
by a Thermarest Sportseat and a couple<br />
of layers of 5mm closed-cell foam. I have<br />
this cushion positioned in such a way that it<br />
supports my lower back too, so when I am<br />
riding over rough spots, I just lean <strong>for</strong>ward<br />
and let the bike rock and roll under me while<br />
I sit totally suspended on a cushion of air. I<br />
suspect this also works well due to my small<br />
size.