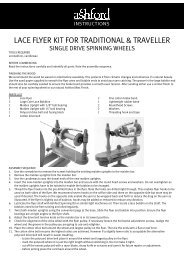
download assembly guidelines - Ashford Handicrafts
download assembly guidelines - Ashford Handicrafts
download assembly guidelines - Ashford Handicrafts

You also want an ePaper? Increase the reach of your titles
YUMPU automatically turns print PDFs into web optimized ePapers that Google loves.
For more information, helpful hints<br />
and inspiration we recommend<br />
the <strong>Ashford</strong> Book of Weaving for<br />
Knitters (25 easy and exciting scarf<br />
patterns) and the <strong>Ashford</strong> book of<br />
Rigid Heddle Weaving. Both written<br />
by Rowena Hart.<br />
Learn to weave<br />
on the Knitters Loom<br />
<strong>Ashford</strong> <strong>Handicrafts</strong> Limited<br />
Factory and Showroom: 415 West Street<br />
P O Box 474, Ashburton, New Zealand<br />
Telephone: +64 3 308 9087<br />
Facsimile: +64 3 308 8664<br />
Email: sales@ashford.co.nz<br />
Internet: http://www.ashford.co.nz
Welcome to the wonderful<br />
world of weaving ...<br />
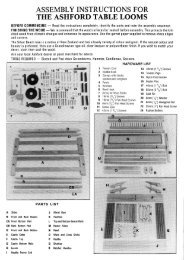
warp sticks<br />
back roller<br />
warp stick ties<br />
YOUR FIRST PROJECT – A SCARF<br />
You will need:<br />
A pair of sharp scissors<br />
A measuring tape<br />
Cardboard strips 20cm (8ins) wide<br />
Two tables<br />
Yarn<br />
For this project we have used <strong>Ashford</strong> Tekapo, a smooth DK<br />
(double knit) sports weight yarn with a slightly textured<br />
handspun look, for the warp, and a fancy yarn for the weft.<br />
Quantity<br />
<strong>Ashford</strong> Tekapo DK yarn in bright pink – 100gm ball<br />
Fancy yarn – 100gm balls<br />
You will not use all of the yarn for this scarf, there will be plenty<br />
left over for the next project.<br />
Warp<br />
Use <strong>Ashford</strong> Tekapo throughout<br />
Length – 1.90m (75ins)<br />
This length allows 23cm (9ins) at each end for fringe.<br />
Number of ends – 48<br />
Finished width – 14cm (5 1 /2ins)<br />
Weft<br />
Weave with fancy yarn throughout.<br />
WARP & WEFT<br />
These are 2 terms you will<br />
need to know as they form the<br />
basis of all weaving. The warp<br />
threads are put onto the loom<br />
first. They are held on the loom<br />
under tension between the<br />
front and back roller. The weft<br />
threads pass over and under<br />
the warp threads to form the<br />
woven fabric.<br />
WARPING OPTION<br />
If you do not have two tables, clamp the loom to one table and<br />
place the warp threads around a chair. A straight backed chair<br />
works well.<br />
TWISTED FRINGE<br />
Separate out four threads<br />
to be twisted. Divide into<br />
two groups and twist both<br />
sets of two threads to the<br />
right. It is a rolling action<br />
between the thumb and<br />
first two fingers. Now twist<br />
both sets of two together<br />
in the opposite direction.<br />
Wind each set over and<br />
over until you have the look you want. Experiment. The more<br />
twist, the lighter and narrower the cord will be. When you are<br />
happy with the look, tie an overhand knot at the end of the<br />
fringe to hold the twist in place. When finished all ends you may<br />
wish to trim to neaten.<br />
ACCESSORIES<br />
Reeds with 5, 7.5, 10 and 12.5dpi, 20, 30, 40 and 50/10cm allow<br />
you to weave almost any yarn or project.<br />
shuttles<br />
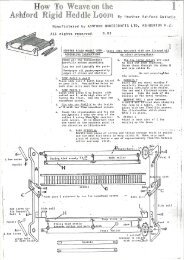
THE LOOM<br />
heddle hook<br />
The reed has large holes and slots to accommodate fancy yarns.<br />
This is used to create the woven fabric and to beat the rows of<br />
weaving into place. The warp threads pass through the holes<br />
and slots. This reed sets the threads at 30 threads to each 10cm<br />
reed<br />
front roller<br />
reed hook<br />
warping peg<br />
section of reed or 7.5 threads to 1 inch. The shuttle is used to<br />
carry the weft yarn from side to side to make the fabric.<br />
The warping tools, of a warping peg, 2 threading hooks and<br />
2 clamps, are used to thread the warp into the loom.<br />
clamps<br />
warping<br />
peg base
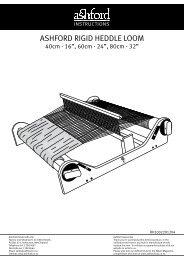
01 02<br />
05 06<br />
The loom folded.<br />
Loosen the side knobs and unfold the loom.<br />
Connect the front and back warp sticks to the rollers using<br />
the warp stick ties. Firstly push the arrowhead of the nylon<br />
ties through the holes in the warp sticks.<br />
Now push the arrowhead ends into the wide<br />
flat edge on the back and front rollers.<br />
03 04 07 08<br />
up<br />
rest<br />
down<br />
travel<br />
Front Back Front brake Back brake notch<br />
Swing the reed support blocks into the upright position.<br />
Tighten the side knobs. Note the four positions on the reed<br />
support block.<br />
Place the reed into the rest position. Make sure the front and<br />
back brakes are on. When we say put the brake on, we mean<br />
the pawl should be clicked into the ratchet on the handle.<br />
Assemble the clamps. Clamp the<br />
back of the loom to the table.<br />
The back of the loom has notches in the lower back edge.
09 10 13 14<br />
1.90m (75ins)<br />
Insert the warping peg into the base and clamp it to a table.<br />
Adjust the tables until the warping peg is 1.90m (75ins)<br />
from the back stick on the loom.<br />
Take the thread through the first slot with the starter marker<br />
in it. Catch the yarn with the reed hook and pull a loop<br />
through the slot.<br />
Take the yarn to the warping peg and loop it over. The ball<br />
of yarn is on the floor.<br />
11 12 15 16<br />
8cm<br />
Tie a starter marker to the reed 10 slots from one side.<br />
There are 48 warp ends in this scarf. That is 24 double<br />
threads that first go through the slots in the reed. Tie the<br />
warp yarn to the back warp stick directly behind the starter<br />
marker. The back warp stick should be approximately 8cm<br />
(3 1 /2ins) from the back roller.<br />
Go to the warp stick again. Take the yarn UNDER the back<br />
warp stick and make another loop and pull through the next<br />
slot. Place this loop over the warping peg in the same way.<br />
Go back to the warp stick again. Take the yarn OVER the<br />
back stick, through the next slot and over the warping peg.<br />
Continue this way, one thread under, one thread over<br />
until you have 24 double loops/threads through the<br />
slots (48 ends).
17 18 21 22<br />
a<br />
b<br />
Cut the last thread at the back of the loom and tie to the<br />
back warp stick.<br />
Take a 15cm (6ins) length of yarn. Tie the yarn around all the<br />
warp threads in the front of the warping peg. Tie firmly with<br />
a knot you can easily undo later.<br />
a. Stand at the back of the loom. Wind the back handle towards<br />
you until the back warp stick goes around the roller once. Insert<br />
a cardboard warp stick. b. Wind the back handle a little more<br />
than one full rotation, insert another cardboard strip. This<br />
separates the threads and keeps the tension even. Add more<br />
cardboard strips as you go.<br />
Stop when the tie your friend is holding is just past the front<br />
of the loom. Remove the tie. Do not wind any further!<br />
19 20 23<br />
BE CAREFUL. DON'T PULL TOO<br />
24<br />
HARD AND BREAK THE THREAD!<br />
Cut all the threads at the warping peg.<br />
Ask a friend to hold the warp ends for you. They must hold<br />
the threads at the tie and move forward as you wind the<br />
warp on the loom.<br />
Unclamp the loom from the table. Loosen the side knobs<br />
and lift the back of the loom until the 2 L blocks engage.<br />
Check that the reed support blocks are upright. Retighten<br />
the side knobs.<br />
Lift the first 2 threads on the left to the top of the slot. Look<br />
behind the reed and gently pull the left hand thread out of the<br />
slot. The other thread stays in the slot. Use the threading hook to<br />
pull this thread through the hole to the left of the slot. Continue<br />
across all slots. Now threads are in both holes and slots.
25 26 29 30<br />
Move the loom toward the front of the table. Divide the<br />
threads into four groups, 12 threads in each group. Start<br />
with a centre group. Take a group of 12 threads over and<br />
around the front stick. Divide it in two.<br />
Tie in a flat SINGLE knot.<br />
Tie the second half of the knots to secure. Use half a bow<br />
tie. You want to be able to undo this knot easily when your<br />
scarf is finished.<br />
Rest the loom on your knee with the back of the loom<br />
against the table.<br />
27 28 31 32<br />
Tie the other three groups in the same way. Check the<br />
tension. All the threads should be the same. Tighten all the<br />
threads by winding the front handle towards you.<br />
Adjust the knots until all groups are the same tension.<br />
There are 2 weaving positions at the front of the reed<br />
support block. First lift the reed into the up position.<br />
Insert a cardboard strip or a piece of folded paper into the<br />
weaving space. Slide it to the front of the loom.<br />
Change the reed to down weaving position. Insert a cardboard<br />
strip and slide to the front of the loom. If you want longer<br />
tassles repeat, inserting additional cardboard strips.
33 34 37<br />
BEAT GENTLY! THERE MUST BE A<br />
38<br />
SMALL SPACE BETWEEN THE ROWS.<br />
Change the reed to the down weaving position. This makes<br />
the second weaving space.<br />
Wind the weft yarn onto the shuttle.<br />
Weave another row. Push this row into place with the reed.<br />
We need to leave room for the texture on the fancy yarns to<br />
open up when the work is off the loom. To keep the edges<br />
straight, do not pull the weft thread too tight – pass the<br />
shuttle through the weaving space, and leave at an angle of<br />
20 degrees before beating.<br />
35 36 39 40<br />
a<br />
b<br />
a. Take the shuttle and pass it<br />
through the weaving space.<br />
b. Leave the end of the yarn out<br />
approx 5cm (2ins).<br />
Bring the reed forward and gently push the first row into<br />
place. Put the reed into the top position.<br />
Continue weaving until your work is approx 10cm (4ins) from<br />
the reed. Now it is time to move the weaving onto the front<br />
roller. PLACE THE REED INTO THE REST POSITION. Release the<br />
back brake handle and unwind some of the warp.<br />
Turn the front brake handle to wind the weaving onto the<br />
front roller. Continue moving the work in this way.
41 42<br />
FINISHING<br />
The woven work should be washed so the threads open up and<br />
fill the spaces to give the fabric a ‘finished’ look.<br />
WASHING<br />
Wash the scarf gently in warm water with a little detergent. Push<br />
up and down for a minute. Let the soapy water drain away and<br />
rinse the scarf in warm, clean water. Hang out to dry. Place the<br />
work over a towel so you don’t get a fold line on the fabric. While<br />
the work is still damp, cover it with a soft cotton cloth and press<br />
with a warm iron. Hang again until thoroughly dry. You did it!<br />
You can now proudly wear your first handwoven scarf!<br />
Fixing a Broken Warp Thread<br />
Continue weaving until you are approx 13cm (9ins) from the<br />
end of the warp. Cut the weft yarn and leave the end out.<br />
Cut the warp yarns along the back stick. Take care not to cut<br />
the warp stick ties.<br />
43 44<br />
Release the front brake and unwind the weaving from the<br />
front roller.<br />
HELPFUL HINTS<br />
Tying Knots<br />
When you tie any knot during weaving you will need to undo it<br />
again at some stage. Always tie a knot that you can undo easily.<br />
Beating<br />
Always beat gently. Sometimes the work will look a little open.<br />
Remember, the work is under tension on the loom and will come<br />
together when taken off. Also, the washing process will close<br />
the gaps a little.<br />
Joining a New Thread<br />
Overlap the last and<br />
next thread.<br />
FOLD AND GO<br />
Undo the knots at the front stick and remove the work from<br />
the loom. Take out the cardboard strips.<br />
Lay your work on the table and tie the<br />
ends in groups of six. Use overhand<br />
knots. Darn the end thread into your<br />
work using a wool needle.<br />
Put the shuttle into<br />
the open shed.<br />
Push the reed down<br />
into the travel position.<br />
The travel position is<br />
at the back of the reed<br />
support block.<br />
Loosen the side knobs<br />
and disengage the L<br />
blocks with your thumbs.<br />
Pull up the back of the<br />
loom and bring forward<br />
until lying flat.<br />
Tighten the side<br />
knobs and go!