Restorative Manual PureForm Ceramic System - Zimmer Dental
Restorative Manual PureForm Ceramic System - Zimmer Dental
Restorative Manual PureForm Ceramic System - Zimmer Dental

You also want an ePaper? Increase the reach of your titles
YUMPU automatically turns print PDFs into web optimized ePapers that Google loves.
<strong>Restorative</strong> <strong>Manual</strong><br />
<strong>PureForm</strong> <strong>Ceramic</strong> <strong>System</strong>
<strong>Restorative</strong> options with <strong>PureForm</strong> <strong>Ceramic</strong> <strong>System</strong><br />
The <strong>PureForm</strong> <strong>Ceramic</strong> <strong>System</strong> is designed to fabricate single-unit fixed restorations in areas of the mouth with<br />
high esthetic demands specifically the anterior and premolar regions. This product should not be splinted together<br />
for multiple-unit cases, removable partial dentures or bridgework.<br />
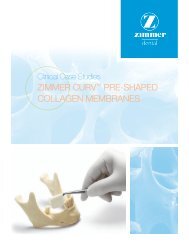
The <strong>PureForm</strong> <strong>Ceramic</strong> <strong>System</strong> consists of a <strong>Ceramic</strong> Coping (Fig. 1), a titanium alloy<br />
metal Core Abutment (Fig. 2) and an abutment (retaining) screw (Fig. 3).<br />
Fig. 1<br />
<strong>Ceramic</strong> Coping<br />
(6 configurations)<br />
The <strong>Ceramic</strong> Copings are molded from a material with a base composition of 70%<br />
Alumina and 30% Zirconia. The material has an A2 shade which is added to the<br />
material prior to the forming and sintering process. The copings are molded to resemble<br />
the proportionally undersized shape of natural teeth to lend support to the porcelain<br />
veneering material: central incisor, lateral incisor, canine and premolar. Two additional<br />
shapes are available to assist with angled implants, molded to form a 17º preangled<br />
lateral incisor and a 17º preangled central incisor. The undersized shape of the copings<br />
allows the technician in many cases to apply an even thickness of ceramic veneering<br />
material without further modification. In case the <strong>Ceramic</strong> Copings need to be reduced,<br />
they can be prepared to a wall thickness of 0.5mm. Internally the coping has a conical<br />
shape with one flat surface on the buccal/labial wall. This flat will interdigitate with the<br />
corresponding flat of the try-in and Core Abutment.<br />
The Core Abutment is available for the Tapered Screw-Vent and Screw-Vent 3.5mmD<br />
and 4.5mmD platforms. Each Core Abutment has a base with a hex configuration<br />
having 1-degree tapered flats enabling it to friction-fit to the hex of the implant. The profiled upper portion (cuff)<br />
flares to a standard 4.5mmD and can be used with any shape of <strong>Ceramic</strong> Coping. The height of the Core<br />
Abutment is 4.9mm above the cuff which is available in two heights: 0.5mm and 1.5mm. The conical upper<br />
portion has a flat surface on one side which is oriented to the buccal/labial when connecting to the implant. The<br />
Core Abutment comes packaged with the abutment screw [MHLAS].<br />
To assist the technician and the clinician in the selection of the correct height of Core Abutment and <strong>Ceramic</strong><br />
Coping the following try-in kits are available:<br />
Core Abutment<br />
1) Abutment Try-In Kit [CAHKIT]: Metal try-ins manufactured to similar specifications as the core abutments.<br />
Supplied in the two available heights and implant platform diameters (4 pieces in total). They are color coded<br />
to ensure ease of use. The kit comes packaged with the two separate abutment screws.<br />
2) Plastic Try-In Kit [PTKIT]: Plastic components molded to the same shapes as the six <strong>Ceramic</strong> Copings. These<br />
parts are used to determine shape, contour and angle of the required <strong>Ceramic</strong> Coping as well as if the ceramic<br />
abutment system is the best restorative option prior to acquiring the components.<br />
Contraindications<br />
Not for screw-retained prosthetics. Not to be used to restore molars. Metal Core Abutment should not be prepped.<br />
Plastic try-ins should not be used for temporary restorations.<br />
Fig. 2<br />
Fig. 3<br />
Abutment Screw<br />
48 <strong>PureForm</strong> <strong>Ceramic</strong> <strong>System</strong>
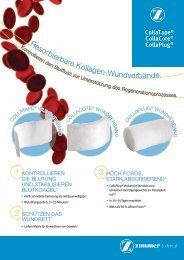
Components for <strong>PureForm</strong> <strong>Ceramic</strong> <strong>System</strong><br />
3.5mmD Platform<br />
Internal Hex Implant<br />
Implant Top<br />
4.5mmD Platform<br />
Internal Hex Implant<br />
Core Abutment Try-in Kit<br />
for internal hex<br />
[CAHKIT]<br />
Core Abutments<br />
for internal hex<br />
[CAH3S]<br />
[CAH3L]<br />
[CAH4S]<br />
[CAH4L]<br />
Plastic Try-in Kit<br />
[PTKIT]<br />
Plastic Try-in<br />
Plastic Try-in<br />
Plastic Try-in<br />
Plastic Try-in<br />
Plastic Try-in<br />
Plastic Try-in<br />
Large Incisor<br />
Large Incisor, 17˚<br />
Small Incisor<br />
Small Incisor, 17˚<br />
Canine<br />
Premolar<br />
[PTLG]<br />
[PTLG17]<br />
[PTSM]<br />
[PTSM17]<br />
[PTCN]<br />
[PTPM]<br />
<strong>Ceramic</strong><br />
Copings<br />
<strong>Ceramic</strong> Coping<br />
<strong>Ceramic</strong> Coping<br />
<strong>Ceramic</strong> Coping<br />
<strong>Ceramic</strong> Coping<br />
<strong>Ceramic</strong> Coping<br />
<strong>Ceramic</strong> Coping<br />
Large Incisor<br />
Large Incisor, 17˚<br />
Small Incisor<br />
Small Incisor, 17˚<br />
Canine<br />
Premolar<br />
10.5mmL<br />
10.4mmL<br />
9.8mmL<br />
9.6mmL<br />
10.8mmL<br />
8.8mmL<br />
[CCLG]<br />
[CCLG17]<br />
[CCSM]<br />
[CCSM17]<br />
[CCCN]<br />
[CCPM]<br />
<strong>PureForm</strong> <strong>Ceramic</strong> <strong>System</strong> 49
<strong>PureForm</strong> <strong>Ceramic</strong> <strong>System</strong><br />
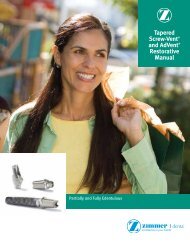
Aligning the implant<br />
Aligning the implant<br />
Align the flat of the implant’s internal hex at the time of placement.<br />
This is achieved by orienting the flat of the preattached Fixture<br />
Mount/Transfer toward the buccal or labial surface which aligns<br />
the flat of the internal hex of the implant in the correct orientation.<br />
A Surgical Try-in Pin [CCSTP] is also available for use after the<br />
pilot drill to help with proper spatial alignment of the implant.<br />
Aligning the implant<br />
The above step will help ensure that the flat of the abutment<br />
is aligned properly for the restoration. The <strong>PureForm</strong> <strong>Ceramic</strong><br />
<strong>System</strong> consists of a metal abutment (core) and a ceramic tooth<br />
shaped coping that is indexed to the flat on the abutment.<br />
Porcelain is applied directly to the coping and fired. No wax-up or<br />
casting is required to create a coping.<br />
Placing the healing component<br />
Place a healing collar or provisional restoration in a single stage<br />
procedure to accelerate soft tissue contouring if so desired.<br />
Alternatively these can be placed at implant uncovering following<br />
the traditional two-stage protocol. Once hard and soft tissues<br />
have healed, remove the healing collar or provisional restoration<br />
to proceed with the restorative phase.<br />
Attaching the transfer<br />
Attach the implant level transfer and tighten the screw using a<br />
1.25mmD Hex Tool and finger pressure. Block out the screw<br />
access channel to prevent the ingress of impression material.<br />
50 <strong>PureForm</strong> <strong>Ceramic</strong> <strong>System</strong>
<strong>PureForm</strong> <strong>Ceramic</strong> <strong>System</strong><br />
Selecting the abutment<br />
Making an impression<br />
Record a traditional implant level impression. An elastomeric<br />
impression material is recommended, such as vinyl polysiloxane.<br />
Inject light-body impression material around the transfer and fill<br />
the closed tray with heavier body impression material. Make a<br />
full-arch impression, and allow the material to set according to<br />
the manufacturer’s recommendations before removing.<br />
Unthread the transfers from the implants in the patient’s mouth.<br />
Make interocclusal records and an impression of the opposing<br />
arch. Send the impressions and transfer assemblies to the<br />
laboratory for fabrication of the working casts. Replace the<br />
healing collar and/or the provisional restoration on the implant.<br />
Fabricating the working cast<br />
Use soft tissue replication material when pouring the impression.<br />
Lubricate the impression with a separating medium, and place<br />
soft tissue replication material around the junctions of the<br />
assembled Implant Analogs and the transfers inside the<br />
impression. Take care not to cover the retention grooves of<br />
the Implant Analogs with the material. After the material sets,<br />
use a sharp instrument to create mechanical retention or<br />
undercut areas.<br />
Pour the impression in the traditional manner with die stone and<br />
allow to set.<br />
Selecting the Core Abutment<br />
Select the appropriate Core Abutment diameter that<br />
corresponds to the implant platform being restored.<br />
Two cuff heights are available for each diameter:<br />
0.5mm and 1.5mm to allow for placement of the<br />
junction of the Core Abutment and the <strong>Ceramic</strong><br />
Coping at the desired sub-gingival level. A set of color<br />
coded metal abutment try-ins is available: green -<br />
3.5mmD platform and purple - 4.5mmD platform.<br />
Seat the Core Abutment or Abutment Try-in of choice<br />
on the working cast with the retaining screw. Orient<br />
the flat of the abutment or try-in to the buccal surface.<br />
Removing the Core Abutment<br />
The laboratory technician has the choice to continue<br />
the prosthesis fabrication on the try-in component or<br />
place the final abutment on the working cast.<br />
The try-in component does not have a friction-fit<br />
connection to the Implant Analog. If using the Core<br />
Abutment which has a friction-fit, use the Hex Tool to<br />
loosen and remove the abutment screw [MHLAS].<br />
Thread the Removal Tool [TLRT2] through the access<br />
channel in the abutment and rotate in a clockwise<br />
direction. Continued rotation of the tool will result in<br />
the abutment lifting off the implant.<br />
<strong>PureForm</strong> <strong>Ceramic</strong> <strong>System</strong> 51
<strong>PureForm</strong> <strong>Ceramic</strong> <strong>System</strong><br />
Selecting and preparing the <strong>Ceramic</strong> Coping<br />
Selecting the <strong>Ceramic</strong> Coping<br />
Use the replicas provided in the Plastic Try-in Kit [PTKIT] to<br />
select the coping closest to the size and geometry of the final<br />
tooth being replaced. The plastic replicas in the try-in kit<br />
represent the size and shape of the <strong>Ceramic</strong> Copings.<br />
Six shapes are available: straight large incisor [PTLG] and 17˚<br />
angled large incisor [PTLG17]), straight small incisor [PTSM]<br />
and 17˚ angled small incisor [PTSM17], canine [PTCN] and<br />
premolar [PTPM].<br />
Each <strong>Ceramic</strong> Coping flares from 4.5mmD at the base and will fit<br />
any size Core Abutment.<br />
Ordering the <strong>Ceramic</strong> Coping<br />
Order the <strong>Ceramic</strong> Coping that corresponds to the try-in selected.<br />
Part numbers are etched on each Plastic Try-in replica for easy<br />
identification and reference. A table inside the try-in kit lists the<br />
corresponding <strong>Ceramic</strong> Coping part numbers for easy reference<br />
and ordering.<br />
Orienting the <strong>Ceramic</strong> Coping<br />
Remove the coping from the plastic holder.<br />
Align the flat on the try-in or Core Abutment with the flat inside the<br />
<strong>Ceramic</strong> Coping.<br />
Preparing the <strong>Ceramic</strong> Coping<br />
Reduce the <strong>Ceramic</strong> Coping to the correct dimensions to allow<br />
for the required thickness of porcelain veneering material. Use<br />
the appropriate finishing burs to finesse the profile as required.<br />
The plastic holder supplied with the coping is used to assist<br />
holding the coping while trimming.<br />
Care must be taken not to overheat the <strong>Ceramic</strong> Coping<br />
during preparation.<br />
52 <strong>PureForm</strong> <strong>Ceramic</strong> <strong>System</strong>
<strong>PureForm</strong> <strong>Ceramic</strong> <strong>System</strong><br />
Fabricating the restoration<br />
Trimming the <strong>Ceramic</strong> Coping<br />
Utilize standard laboratory procedures to ensure the additional<br />
trimming of the <strong>Ceramic</strong> Coping does not reduce the wall<br />
thickness to less than 0.5mm.<br />
Sand blast the surface of the coping with 120 micron aluminum<br />
oxide at 35-38 PSI and clean the coping with steam or distilled<br />
water in the ultrasonic cleaning unit.<br />
Applying porcelain<br />
When applying porcelain to the coping follow the manufacturer’s<br />
guidelines for application of color modifiers, ceramic build-up<br />
and firing temperatures. The coefficient of thermal expansion of<br />
the <strong>Ceramic</strong> Coping is 8.1x10 -6 /˚C between 0-500˚C (932˚F).<br />
Applied porcelains should be selected to accommodate for the<br />
parameters of the underlying coping.<br />
Finishing the restoration<br />
Complete the restoration using conventional laboratory<br />
techniques for “full ceramic” crowns.<br />
Tightening the Core Abutment<br />
Remove the prosthesis from the working cast. Unthread the<br />
abutment screw with the 1.25mmD Hex Tool and remove the<br />
Core Abutment. Sterilize the components according to standard<br />
clinical procedures.<br />
Remove the healing components and seat the metal Core<br />
Abutment into the implant. Be sure the flat of the Core Abutment<br />
is oriented to the buccal/labial. Tighten the abutment screw to<br />
30 Ncm with a calibrated torque wrench. Take an x-ray to<br />
confirm that the Core Abutment is fully seated.<br />
<strong>PureForm</strong> <strong>Ceramic</strong> <strong>System</strong> 53
<strong>PureForm</strong> <strong>Ceramic</strong> <strong>System</strong><br />
Delivering the final prosthesis<br />
Delivering the final prosthesis<br />
Block out the screw access channel in the abutment with cotton<br />
pellets and light-curing resilient material or gutta-percha. This will<br />
ensure easy access to the screw head.<br />
Delivering the final prosthesis<br />
Seat the final prosthesis onto the abutment. Confirm esthetics,<br />
fit, contour and check the occlusion. Verify that no additional<br />
finishing or adjustment is required.<br />
Apply cement and seat the crown onto the Core Abutment in a<br />
typical fashion as when seating any all ceramic crown on an<br />
implant abutment or natural tooth.<br />
Note: Cements that are known to expand during setting are<br />
not recommended.<br />
Delivering the final prosthesis<br />
Adjust the occlusion and bite on the crown after it is cemented.<br />
Remove any exuded cement from the margin area.<br />
Provide the patient with oral hygiene instructions prior to release.<br />
54 <strong>PureForm</strong> <strong>Ceramic</strong> <strong>System</strong>