Software Manual - G4JNT
Software Manual - G4JNT
Software Manual - G4JNT

Create successful ePaper yourself
Turn your PDF publications into a flip-book with our unique Google optimized e-Paper software.
<strong>Software</strong> <strong>Manual</strong><br />
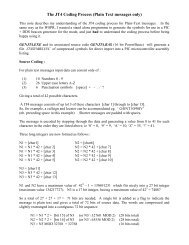
This note describes the installation and use of the PIC software currently available for the General<br />
Purpose PIC Controller. Three Ready-to-Go packages can be supplied, either as .ASM/ HEX code<br />
for you to do your programming, or (at additional cost) as ready programmed PICs.<br />
Note on Assembly Files and structure<br />
All PIC assembler code is supplied with these packages for you to play with and use as a basis for<br />
modifying and developing your own code. Many routines in here are common across most of the<br />
software designed for this module. A list of the most used ones are given at the end. I strongly<br />
advise you to at least look at the code in the .ASM files, in conjunction with a data sheet for the PIC<br />
device open at the Instruction Set Summary. See also ‘A Bit More on (my) Assembly File Structure’<br />
at the end of this document<br />
4-Channel Voltmeter<br />
A 16F819 device with its integral A/D converter contains the code 4chanVmeter This PIC has a<br />
maximum of 5 analogue input channels, although for our purposes one of these, A3, is allocated to<br />
the voltage reference. A MAX6004 4.096V precision reference should be installed on the PCB in the<br />
position marked.<br />
The remaining four analogue inputs go to pins labelled 0,1,2,4 on the 8-way header, which pass to<br />
the PICs pins via optional series resistors and filtering / attenuation. For voltages in the range 0 –<br />
4.095, connect a resistor in the range 300Ω to 1kΩ in series in the R1 – R3 and R5 position). R4<br />
should no be installed unless you need to make use of the voltage reference output for any external<br />
analogue conditioning such as adding voltage offsets. Capacitors whose values are non-critical can<br />
be added as nose filtering in the C1-C3 and C5 positions.<br />
The 4chanVmeter software allows the position of the decimal point in the display to be shifted to<br />
cope with voltage dividers of 10, 100 and 1000. For 10X, allowing voltages of 0 – 40.95V to be<br />
displayed, a 10:1 potential divider can be made from a 9.1kΩ resistor in parallel with a 820kΩ in the<br />
R1-R5 positions (piggy-back the two) and by adding 1kΩ resistor in the C1-C5 positions. If filtering<br />
capacitors are still wanted here, they can be piggy backed on top of the resistors.<br />
For X100 operation, the divider is made up from the same 1kΩ resistors to ground, but the series<br />
resistor of 99kΩ is best made up from three 33kΩ resistors mounted off board to allow the higher<br />
voltage to be shared across all of them, and keep it away from the sensitive PIC module. This is<br />
certainly essential for X1000 4kV measurements!<br />
Changing the Display Format<br />
<strong>G4JNT</strong> PIC Controller <strong>Software</strong> <strong>Manual</strong>. Page 1
When turned on the display will briefly show an introductory message, then start showing the four<br />
voltages in a display similar to that shown. Chan 1 is the voltage on the pin labelled 0 on the 4-way<br />
header, Chan 2 that on pin 1, Chan 3 on pin 2 and Chan 4 on pin 4.<br />
To change the position of the decimal point in any channel, push down and hold the push button for<br />
two seconds. The display should then change to that of Figure 2 .<br />
Rotating the rotary controller will then shift the display between 00000/0.000/00.00/000.0 When<br />
it is showing the correct format for Channel , press the button briefly, and the display will change to<br />
showing the format for channel 2. Rotate the knob to obtain the desired format and push briefly to<br />
store the format for this channel. Repeat for channels 3 and 4. Pressing the button will rotate<br />
through all four channels repeatedly allowing you to alter the position of the decimal point. When<br />
all are set to your satisfaction, press and hold down the button for 2 seconds to save the format in<br />
non-volatile memory. These settings will remain until altered again in the same way.<br />
Voltmeter <strong>Software</strong> Details<br />
Refer to the source code listing in 4chanVmeter.asm . The PIC code selects each analogue channel<br />
input in turn and connects this to the internal 10-bit A/D converter. The A/D output is a number in<br />
the range 0 – 1023, corresponding to 0 – 4.092V on the input with a step size of 4mV. In the<br />
subroutine ReadADAv 16 successive measurements are made on the selected channel and the<br />
results summed to give a total in the range 0 – 16383. This combining of 16 readings performs<br />
averaging on the input signal and serves to increase the measurement resolution. According to the<br />
maths of statistics, an improvement equal to the square root of the averaging factor can be<br />
expected; so 16 times averaging ought to give four times, or two extra bits worth of resolution.<br />
Which is very convenient, as the resulting 12 bits effective accuracy from the A/D is equal 4096,<br />
which just happens to be the reference voltage!<br />
In the routine ReadScaledAD the summed result is multiplied by a constant number stored in one of<br />
four EEProm locations – one corresponding to each channel. The default values for all four are fixed<br />
<strong>G4JNT</strong> PIC Controller <strong>Software</strong> <strong>Manual</strong>. Page 2
at 64 for each channel, so the final measurement for the first channel is a number in the range zero<br />
to 16383 * 64 = 104851 This is divided by 256 by the simple expedient of throwing away the least<br />
significant byte, leaving a two byte value holding a number in the range 0 – 4095. This is converted<br />
to BCD and sent to the display. The whole process is then repeated for the other three<br />
measurement channels<br />
The main loop is continually testing the button input line press and measuring the duration of any<br />
press. Action is then taken on long or short presses accordingly. Study the source code listing for<br />
full details. The names of all the appropriate subroutines should be self explanatory, and all<br />
relevant sections of the PIC code are commented.<br />
To gain experience with PIC programming, try adjusting the four constants stored in EEProm to give<br />
scaling factors other than just the powers of 10 corresponding to decimal point placement. A value<br />
of 32 stored in the appropriate location, for example, will cause a value to be displayed in the range<br />
0 – 2.047 (or 20.47, or 204.7) for that channel. Other numbers can be selected for arbitrary scaling<br />
in the range 1 – 255, allowing multiplication of between 1/64 to 255/64 (.0156 to 3.98) to be<br />
applied to the displayed value. To change these EEProm –stored values, a PIC programmer such as<br />
the PicKit 2 and a code assembler like MPASM will be needed .<br />
For further enhancements, modify the code to for stored offsets – addition subtraction routines can<br />
be found in other listings within this archive.<br />
Auto SWR Bridge Display<br />
To be able to use this PIC code, you will first have to make/obtain/modify an RF head to deliver two<br />
DC output voltages corresponding to Forward and Return signals. Ensure this is properly balanced,<br />
ie gives similar voltages on FWD and REF when the direction of RF flow is reversed, and that the<br />
voltage output during normal operation, including under mismatch conditions does nor exceed<br />
4.09V For accuracy and linearity, it is usually better to design for a higher voltage out from the<br />
diodes and use a potential divider to bring this down to the input voltage range – which also allows<br />
for calibration and balancing.<br />
Three analogue measurement channels are needed for the full SWR and power indication; Chan 1<br />
(Pin-0 on the 8-way header ) takes the FWD voltage, Pin-1 the REF and pin-2 the power calibration<br />
input. The power calibration uses the 4.096V reference output, so a resistor of a value determined<br />
below needs to be installed in the R4 position. Non-critical valued resistors of a few hundred ohms<br />
to 1kΩ can be installed at R1 – R3 positions with C1-C3 to add RF decoupling and filtering.<br />
SWR is calculated by measuring the voltage on the FWD and REF inputs and calculating the ratio<br />
between them. Provided the analogue channels are matched, no other calibration is needed. Power<br />
measurement, on the other hand, requires user calibration, which can only really be made in<br />
conjunction with another, calibrated power meter. Therefore, the digital power reading here is<br />
obtained by measuring the FWD voltage reading, squaring it (as Power is proportional to V 2 ) then<br />
multiplying by a value obtained by measuring a voltage on the third channel. This is turn is set<br />
<strong>G4JNT</strong> PIC Controller <strong>Software</strong> <strong>Manual</strong>. Page 3
during the calibration process and can be defined by a preset resistor, or preferably by select-on-test<br />
fixed resistors. Several switched resistors can even be substituted for use with different RF heads,<br />
and the individual ones can even be built into the heads themselves, with a standard multiway<br />
connector connection used to carry the DC voltages, allowing plug-and-play swapping.<br />
There is no setup on the PIC Module; after switch on and the introductory message, the display<br />
jumps straight to that shown:<br />
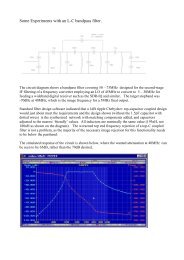
The top line reads shows the input voltage to FWD and<br />
REF channels (in mV) with the second line indicating the<br />
VSWR calculated from these. In the example shown<br />
VSWR = (3120 + 412) / (3120 - 412) = 1.30<br />
The bottom line shows the A/D converter output on<br />
channel 3, the power calibration input, on a scale of 0 – 1023. The power calculation is formed<br />
from the forward voltage reading and this calibration as described below.<br />
SWR and RF Power Display <strong>Software</strong> Details<br />
Refer to the source code listing in SwrMeter.asm . Inside the main loop the FWD and REF values<br />
are read and converted to mV for the first line of the display, in a manner similar to that for the<br />
voltmeter described above, except that the A/D is just read once with no averaging.<br />
The power calibration voltage is read and multiplied by a constant value of 16 (stored in EEProm to<br />
allow for a later change) to give a Power calculation constant in the range 0 – 16368<br />
The ReadPwr routine is then called which makes 16 consecutive readings of the FWD voltage and<br />
sums them to generate a 14 bit number in the range 0 – 16383. This is multiplied by itself<br />
(squared) and the lowest byte of the result thrown away (divide by 256) to generate a value from 0 –<br />
4095 which is multiplied by the Power cal constant above. The resulting number, is interpreted as<br />
Watts * 65536. So the lowest two bytes are thrown away (divide by 65536) and the result in the<br />
range 0 – 1022 is interpreted as Watts, converted to BCD and displayed.<br />
This gives an upper bound to the power display. If the channel 2 cal voltage is at full scale, 4.095V,<br />
then a FWD voltage of 4.095V will correspond to 1022 watts. By changing the Cal voltage input,<br />
this power level can be made any value. Once calibrated for a known FWD voltage / power<br />
combination, provided the Cal voltage remains fixed, and change in FWD will result in a correctly<br />
tracking power reading. (See the note at the end about diode drops and linearity)<br />
In the ReadSWR routine, FWD and REF voltages are again read as 16 summed and averaged values.<br />
The FWD reading is multiplied by 2 16 by appending two zero low-order bytes and FWD divided by<br />
REF in the routine Divide32x16 The output from this is the reflection coefficient, Rho’ , as a value<br />
from 0 – 65535. Any spurious or erroneous values are checked for (like REF greater than FWD – it<br />
can happen with badly adjusted SWR heads) and substitute default values inserted.<br />
<strong>G4JNT</strong> PIC Controller <strong>Software</strong> <strong>Manual</strong>. Page 4
The calculation 100* (64K + Rho’) / (64K – Rho’) is then made which is converted to BCD, a decimal<br />
point inserted and sent to the display as VSWR in the range 0 to 99.99 Refer to the .ASM listing for<br />
full details, as the promotion and scaling needed for the integer maths gets a bit involved.<br />
Hopefully the comments in the assembler listing explain the processes satisfactorily.<br />
Linearity and Diode Drops<br />
The SWR and power calculations assume the voltage in is linearly related to RF power which is not<br />
the case for diode power detectors. While it would be possible to insert a fixed value of diode drop<br />
into the PIC calculation, or even a first or second order approximation without too much effort it<br />
was decided this would complicate things too much. If the SWR head is designed to give 10 – 15V<br />
for full output power, then the effect of the diode drop on the resulting SWR and Power values is<br />
minimal. Accuracy worsens at lower power levels as voltage drops, but reading accuracy, especially<br />
SWR, are in most practical cases of less importance here.<br />
As an exercise in programming, try adding a fixed ‘diode drop’ voltage to the FWD and REF readings.<br />
Assume say 0.65V constant drop, and work this out in terms of a 4.096V reference with a 10 bit A/D<br />
(all right, its equal to 162). Adding this to each raw A/D reading is the simplest solution.<br />
Frequency Counter<br />
The FreqMeter software implements a frequency counter with selectable gate times of 10ms,<br />
100ms and 1s allowing 100Hz, 10Hz and 1Hz frequency readout resolution respectively.<br />
The 16F628 PIC is used in this design ( although the 16F819 has all the necessary peripherals there<br />
are a few subtle differences in setting up and EEProm reading). A useful peripheral function inside<br />
this PIC is a 16 bit counter / timer – TIMER1 - that can be clocked at several tens of MHz from an<br />
external source, and read by the PIC . The vagaries of allocation of I/O pins means the input has to<br />
be made via PORTB, 6 which is one of those brought out to the 4-pin header otherwise used for incircuit<br />
programming . The one labelled C. This has a Schmitt trigger input, so add an external pair of<br />
resistors of around 1kΩ each to bias at Vcc / 2 and AC couple the RF onto this pin though a capacitor<br />
of 100nF. A RF input of 4dBm or more in then enough to operate the counter.<br />
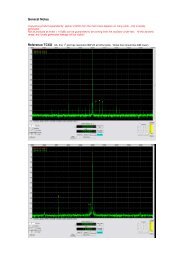
The data sheet is a bit vague about the maximum speed capability of this counter – suggesting it is<br />
20MHz, the same as the processor clock. However, actual tests (on a not-very-statistically-valid set<br />
of two chips from the same batch) show that it will run at frequencies up to about 80MHz; so to<br />
play safe lets just call it 50MHz maximum.<br />
For normal operation with the stored IF offset, turn on<br />
and after an introductory message the display shown<br />
will appear. To toggle gate times press the button to<br />
shift though 10/100/1000ms. On the 1s gate time<br />
setting, the button may have to be held pressed for up<br />
to 1s before it is detected.<br />
<strong>G4JNT</strong> PIC Controller <strong>Software</strong> <strong>Manual</strong>. Page 5
IF Offset<br />
A user defined IF offset which can be added to, or subtracted from, the input frequency can be<br />
stored in the PIC in EEProm. To change the stored value, hold down the pushbutton while<br />
switching on, or resetting the controller. Keep pressing the button until the introductory message<br />
goes and the display goes blank. On releasing the button, the IF offset setup display will appear;<br />
Press the button briefly to move through the digit<br />
to be changed, as indicated by the cursor. The<br />
rotary control is then used to set that digit. When<br />
under the sign, the rotary control is used to toggle<br />
between plus ‘+’ or minus ‘-‘ offset. TO<br />
complete the entry, press and hold the button for<br />
2 seconds, whereupon the new value will be stored to EEProm and normal operation resumes.<br />
Negative Frequencies<br />
The stored IF offset is added to, or subtracted from the input frequency. If a negative IF offset is<br />
stored that is significantly greater than the input frequency, the resulting display will correctly show<br />
a negative frequency. This capability has been included for upconverting receivers where the IF lies<br />
above the input band. In this situation , F IF = F RF + F LO , so the wanted indicated frequency (F RF ) is<br />
obtained by measuring F LO and subtracting the higher value of F IF to give a negative result.<br />
Frequency Meter <strong>Software</strong> details<br />
Refer to the source code listing FreqMeter.asm. As the TIMER1 counter is only 16 bits in length,<br />
it has to be continually tested for overflow by testing the flag in the interrupt enable register. Each<br />
time the counter overflows, another 16 bit counter made up of the two registers FreqCountHi/Lo are<br />
incremented, giving a 32 bit count overall.<br />
The main loop first calls the critical timing part of this software, the routine MeasureFreq Inside<br />
this routine, the combined 32 bit counter is first cleared and TIMER1 enabled to start it counting<br />
from the input signal. Another 16 bit counter GVHi/Lo is preloaded with a value defining the gate<br />
period. A loop is organised so is continually testing for overflow and decrementing a loop counter<br />
for each pass though with all branches and tests being carefully equalised to have constant length<br />
(number of clock cycles) by padding out with strategically placed nop statements. A constant delay<br />
of 16 clocks is achieved for each pass though. After the gate defining counter has decremented to<br />
zero after the required number of passes though the loop, TIMER1 is stopped and the resulting<br />
value frozen. The value to be prestored in Gv in therefore equal to the gate period in seconds,<br />
multiplied by the clock frequency of 1MHz and divided by the 16 clocks in the loop. 1s requires a<br />
value of 62500 (which just fits into a 16 bit count), 100ms gate period needs GV = 6250, and 10ms<br />
GV = 625<br />
The 32 bit count now holds the number of input cycles in either 10ms, 100ms or 1s gate time and<br />
needs to be corrected by the IF offset before display. The IF offset is stored in EEProm in units of<br />
<strong>G4JNT</strong> PIC Controller <strong>Software</strong> <strong>Manual</strong>. Page 6
1Hz, so at the lower gate times, the stored value has to be first divided by 10 or 100 before being<br />
added to or subtracted from the measured count. The result of the calculation is then converted to<br />
BCD, a decimal point inserted at the appropriate place for showing the frequency in kHz, and sent to<br />
the display. The main loop also tests for button presses, and when detected, changes the gate value<br />
accordingly, restarting the counter.<br />
At start up the button is tested and if pressed the PIC enters the UserSetup block of code. This<br />
monitors for short or long button presses, and reads the rotary encoder for count-up or count-down<br />
pulses. The rotary encoder is read as an interrupt driven routine which also makes use of the<br />
Timer0 peripheral in the PIC device for contact debouncing. See FreqMeter.asm for more details.<br />
Accuracy and Resolution<br />
Ultimate frequency measurement accuracy depends on the crystal oscillator being set to 4MHz for a<br />
resulting 1MHz clock rate. A trimmer capacitor can be installed on the PCB to facilitate this. Use a<br />
separate receiver or frequency counter to set this as accurately as possible. Try to use RF leakage<br />
only to detect the signal for setting purposes. Any probe capacitance on the PICs osc pins will shift<br />
the frequency leading to inaccurate setting.<br />
All frequency counters have an inherent counting uncertainty of one count, but there is another<br />
annoying error in this particular application that is not easy to correct for. In order to read the<br />
TIMER1 register, the PICs internal load has to be synchronised with an edge of its 1MHz clock. This<br />
results in an additional delay on the gating period of ‘about’ half a clock cycle, or around 0.5us. At<br />
1s gate period, this corresponds to 0.5 parts per million loss in accuracy, so introduces 5Hz error on a<br />
10MHz signal. At shorter gate periods the error is less noticeable as it is now below the inherent<br />
LSB resolution) Since the error introduced is now related to the input frequency it can’t be<br />
corrected by subtracting a constant offset. It also can’t be corrected by tweaking either the clock<br />
frequency, or the loop delays as the tweak would have to be changed for each gate period. So I<br />
ignore it and just accept a reading a bit on the low side at maximum resolution. This is one<br />
reason, (amongst several others) that a 10s gate time is not made available.<br />
As a more advanced programming exercise, change the PIC crystal frequency (anything up to 20MHz<br />
is OK, and in practice even higher values can work). Identify the values in the software to change<br />
to correct the display. Cope with the GV counter needing to have a higher value than can fit into a<br />
16 bit counter . A higher clock will reduce the effect of the annoying synchronisation error . Note<br />
that certain delays are needed within the LCD writing routines, so the other programmed delay<br />
routines (such as DelayNms ) will need to be changed<br />
<strong>G4JNT</strong> PIC Controller <strong>Software</strong> <strong>Manual</strong>. Page 7
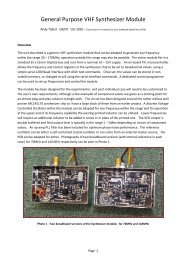
Synthesiser Controller<br />
The software mfgctl_02 is of more specialist nature. It will control two independent synthesiser<br />
chips of the TSA5505, SP5505, or U6239 type that use an I2C two-wire bus for programming. Such<br />
devices are in widespread use for TV, satellite and cable TV tuners, and many of the 2.4GHz Rx and<br />
Tx modules. This design was specifically intended for control of a pair of G1MFG FM TV tuner<br />
modules, allowing, for example, independent tuning for transmit and receive.<br />
Ports A0-3 are configured for digital operation (use a low value resistor in series with each for<br />
protection) and connected to the synthesiser chip SCL and SDA programming lines according to<br />
Table 1. On the MFG TV modules, the existing PIC is removed so the connections from the<br />
controller can conveniently be made pins 1 and 2 on the now-empty IC socket.<br />
Table 1 Connections for dual I2C bus synthesizer chip programming.<br />
Controller Conn Synth Unit I2C Bus Line G1MFG Module Connection<br />
A0 1 SDA 1 Module A Pin 1<br />
A1 1 SCL 1 Module A Pin 2<br />
A2 2 SDA 2 Module B Pin 1<br />
A3 2 SCL 2 Module B Pin 2<br />
Freq 1 or Freq2 are selected in turn, and may be altered in 125kHz or 4MHz steps. Selection is made<br />
by repeatedly pressing the pushbutton to cycle though each frequency tuning option.<br />
Please note that contrary to the statement in the RadCom article, IF Offsets and tuning limits<br />
cannot be changed using the rotary control / pushbuttons. This was too complicated to<br />
implement at the time of writing. Instead, these values are stored as constants in the PIC and can<br />
only be changed with a PIC programmer. See mfgctl_02.asm .<br />
The relevant code appears at the start of the listing, and is repeated here. This version shows an<br />
IF offset of 479.5MHz included within the Rx module. All values are stored as integer multiples of<br />
125kHz. Note the ability of the assembler to perform simple (integer) maths to make the storing of<br />
variables and constants a bit more easily understood.<br />
<strong>G4JNT</strong> PIC Controller <strong>Software</strong> <strong>Manual</strong>. Page 8
;Rx Module<br />
IFOFFSET1 = d'479' * 8 + 4 ;479.5MHz IF, arithmetic can't do 0.5MHz !<br />
DMAX1 = d'2700' * 8 - IFOFFSET1 ;Determined by measurements<br />
DMIN1 = d'2250' * 8 - IFOFFSET1 ; max/min lock range<br />
STARTFREQ1 =<br />
d'2500' * 8 - IFOFFSET1 ;Stored starting freq after assembly<br />
;Tx Module<br />
IFOFFSET2 = 0<br />
DMAX2 = d'2650' * 8 - IFOFFSET2 ;Determined by measurements<br />
DMIN2 = d'1950' * 8 - IFOFFSET2 ; max/min lock range<br />
STARTFREQ2 =<br />
d'2500' * 8 - IFOFFSET2 ;Stored starting freq after assembly<br />
As an advanced programming exercise, first arrange for the IF offsets and tuning limits to all be<br />
stored in EEPROM rather than being called up as constants. Then work out a way of adding the<br />
facility to alter these with the rotary encoder – perhaps by going into a setting routine while holding<br />
the pushbutton down at switch on.<br />
When you have managed this, please let me know and consider adding your code, (with full credits<br />
of course) to this website.<br />
A Bit More on (my) Assembly File Structure<br />
Over the 16 or so years I have been programming PICs, the resulting assembly code has fallen into a<br />
common structure which aids readability and understanding.<br />
1) It starts at Org 0 and usually jumps straight to startup.<br />
2) Then comes any interrupt service routines (which have to lie at prog-memory location 4).<br />
Even if no interrupts are used, a retfie instruction is usually placed here “just in case” some<br />
catastrophe happens later down the line and interrupts do appear.<br />
3) Then the Startup section, jumped into from the reset point at location 0. This is where all<br />
initialisation of ports, peripherals and variables is performed and startup variables<br />
initialised.<br />
4) Followed by a MainLoop which the code loops round repeatedly, or looks for user<br />
interaction, or... or....<br />
5) Below this are all the subroutines, all given meaningful names<br />
<strong>G4JNT</strong> PIC Controller <strong>Software</strong> <strong>Manual</strong>. Page 9
6) Any code that requires either computed goto statements or lookup tables are located at the<br />
end of programme memory, usually in page 0x700 for the devices used here . This is so I can<br />
keep control of the high order byte of the programme counter in such calls.<br />
7) Tables always use the assembler abbreviation dt (for define table). This offers far more<br />
flexibility in laying out tables and text etc in a sensible way than a huge list of retlw<br />
commands.<br />
8) Extensive use is made of #define statements to give meaningful names to I/O lines.<br />
Annoyingly these have to be placed at the start of the listing<br />
9) Variables are defined in a cblock section at the end. Contrary to many other PIC<br />
programmers listings , each variable does not have to be individually assigned a value, and<br />
certainly not using the ‘equ’ statement. Also, register names can be put on a single line<br />
separated by commas, which certainly helps readability. Not a lot of other programmers<br />
seem to know this.<br />
10) I don’t like multiple return statements in subroutines, and certainly not in interrupt<br />
handlers. Although they do just occasionally make life easier. More often, a jump to an<br />
‘out of routine’ label is preferred. And always in interrupts.<br />
In the assembly listing, separators are included as comments at all strategic points. The characters<br />
making up the lines show what is being separated:<br />
;--------------- is used to separate independent subroutines from each other, and also areas of the<br />
main code that perform differing tasks, and reached by separate routes. Normal<br />
programme flow rarely crosses this boundary – one exception is sometimes the<br />
transition from startup to main areas.<br />
;========= serves as a boundary between completely separate areas of code. Interrupt service,<br />
Main, subroutines, and table areas get this break type. Programme flow never<br />
crosses it; always a call or goto command<br />
;.............. is used to separate short chunks the programme flow will never pass over . They will<br />
always be reached by a break in the direct flow, for example goto statements and<br />
skipped instructions.<br />
Single line gaps separate small chunks of code doing each task.<br />
Timing critical code usually has its clock cycle count spelled out.<br />
PICs often have quite a lot of oddities in their startup and initialisation and register addressing. In<br />
many cases comments in the assembly listing explain these – such comments are usually themselves<br />
usually because I copy and paste my code repeatedly, so some comments could be 16 years old.<br />
.......<br />
These rules are flexible and mostly, but not always rigidly, applied.<br />
<strong>G4JNT</strong> PIC Controller <strong>Software</strong> <strong>Manual</strong>. Page 10