
You also want an ePaper? Increase the reach of your titles
YUMPU automatically turns print PDFs into web optimized ePapers that Google loves.
OUT<br />
LOCK<br />
L<br />
L<br />
L<br />
OFF<br />
OPEN<br />
POWER<br />
AC IN<br />
R<br />
R<br />
R<br />
R<br />
R<br />
ON<br />
MIC<br />
LINE<br />
MIC<br />
LINE<br />
MIC<br />
LINE<br />
MIC<br />
LINE<br />
CH1-4<br />
LIMIT<br />
LIMIT<br />
+6<br />
+3<br />
HIGH<br />
HIGH<br />
HIGH<br />
HIGH<br />
HIGH<br />
HIGH<br />
HIGH<br />
OUT<br />
0<br />
-6<br />
-20<br />
LOW<br />
LOW<br />
LOW<br />
LOW<br />
LOW<br />
LOW<br />
LOW<br />
LOCK<br />
OPEN<br />
7/8<br />
5/6<br />
4<br />
3<br />
2<br />
1<br />
Introduction<br />
Caution<br />
Caution<br />
LOCK<br />
LOCK<br />
OPEN<br />
LOCK<br />
OPEN<br />
OPEN<br />
LOCK<br />
LOCK<br />
OPEN<br />
OPEN<br />
EN<br />
<strong>500</strong><br />
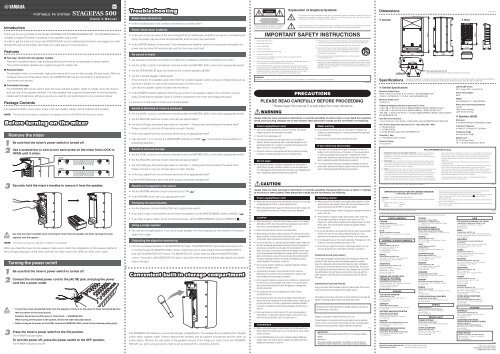
Thank you for your purchase of the Yamaha PORTABLE PA SYSTEM <strong>STAGEPAS</strong> <strong>500</strong>. The <strong>STAGEPAS</strong> <strong>500</strong> is a<br />
versatile, compact PA system consisting of two speakers and a mixer.<br />
In order to get the most out of your new <strong>STAGEPAS</strong> <strong>500</strong> and its sophisticated functions, we suggest you read<br />
through this manual thoroughly. Also keep it in a safe place for future reference.<br />
Features<br />
•<br />
Two-way, 10-inch (25 cm) speaker system<br />
The built-in speakers deliver high-quality powerful sound from an exceptionally compact cabinet.<br />
The scratch-resistant speakers are rugged enough for outdoor use.<br />
•<br />
Powered mixer<br />
The powered mixer is a convenient, high-performance all-in-one unit that includes EQ and reverb. With four<br />
monaural inputs and three stereo inputs, the <strong>STAGEPAS</strong> <strong>500</strong> can be connected to a wide range of<br />
instruments and devices.<br />
•<br />
Convenient storage<br />
The <strong>STAGEPAS</strong> <strong>500</strong> can be used in even the most cramped quarters, inside or outside, since the mixer is<br />
built into one of the speaker cabinets. The other speaker has a special compartment for storing speaker<br />
cables and microphones, letting you put all you need for your performance in one convenient place.<br />
Package Contents<br />
Two speakers (<strong>500</strong>S), mixer, panel, power cord, two speaker cables, Owner’s <strong>Manual</strong> (this booklet)<br />
NOTE:<br />
1<br />
Be<br />
2<br />
Use<br />
3<br />
Securely<br />
NOTE:<br />
The mixer and the panel are installed in the speakers when the <strong>STAGEPAS</strong> <strong>500</strong> leaves the factory.<br />
Before turning on the mixer<br />
Remove the mixer<br />
sure that the mixer’s power switch is turned off.<br />
a screwdriver or coin to turn each screw on the mixer from LOCK to<br />
OPEN until it clicks.<br />
hold the mixer’s handles to remove it from the speaker.<br />
Use only the mixer's handles when removing the mixer from the speaker and when carrying the mixer<br />
separate from the speaker.<br />
The mixer can also be used when installed in the speaker.<br />
When you install the mixer into the speaker, make sure to match the indentations on the speaker cabinet to<br />
the corresponding parts on the mixer, and then turn each screw from OPEN to LOCK until it clicks.<br />
1<br />
Be<br />
2<br />
Connect<br />
3<br />
Press<br />
Turning the power on/off<br />
sure that the mixer’s power switch is turned off.<br />
Owner’s <strong>Manual</strong><br />
the included power cord to the [AC IN] jack, and plug the power<br />
cord into a power outlet.<br />
• To avoid any loud, unexpected noise from the speakers, first turn on the power to those connected devices<br />
that are closest to the sound source.<br />
Example: Sound source (CD player or instrument) → <strong>STAGEPAS</strong> <strong>500</strong><br />
When turning off the power to the system, reverse the order described above.<br />
• Before turning on the power, set the LEVEL controls and MASTER LEVEL control to their minimum setting (zero).<br />
the mixer’s power switch to the ON position.<br />
The POWER indicator lights.<br />
To turn the power off, press the power switch to the OFF position.<br />
The POWER indicator turns off.<br />
Troubleshooting<br />
Power does not turn on<br />
• Is the included power cord correctly connected to a power outlet?<br />
Power shuts down suddenly<br />
• Is the vent on the top panel of the mixer blocked? Since inadequate ventilation can result in overheating the<br />
mixer, the power may be turned off automatically and the mixer may reset itself.<br />
• Is the LIMITER flashes continuously? If the internal power amplifier section is excessively overloaded, the<br />
power may be turned off automatically and the mixer may reset itself.<br />
No sound is heard<br />
• Are external instruments (including a microphone) or speakers correctly connected to the mixer?<br />
• Are the LEVEL controls of all relevant channels and/or the MASTER LEVEL control set to appropriate levels?<br />
• Are the SPEAKERS L/R jacks connected to the included speakers (<strong>500</strong>S)?<br />
• Are the included speaker cables used?<br />
If the connector of a speaker cable other than the included speaker cable touches any metal parts such as<br />
the mixer's handle, no sound may result because of a short circuit.<br />
Use only the speaker cables included with the device.<br />
• Is the POWER indicator flashing? There may be a short in the speaker cable or the connection may be<br />
faulty. Check that the speaker cable is correctly connected to the mixer and reapply the power.<br />
• If sound is not still output, contact your Yamaha dealer.<br />
Sound is distorted or noise is produced<br />
• Are the LEVEL controls of all relevant channels and/or the MASTER LEVEL control set to appropriate levels?<br />
• Are the MIC/LINE switches of each channels set appropriately?<br />
• Are both XLR type and phone type jacks on channels 1–4 being used (connected) at the same time?<br />
Please connect to only one of these jacks on each channel.<br />
• Is the input signal from the connected device set to an appropriate level?<br />
• Use channels 1 or 2, and set the LIMIT/COMP switches to COMP (<br />
preventing distortion.<br />
Sound is not loud enough<br />
). Compression may be effective in<br />
• Are the LEVEL controls of all relevant channels and/or the MASTER LEVEL control set to appropriate levels?<br />
• Are the MIC/LINE switches of each channels set appropriately?<br />
• Are both XLR type and phone type jacks on channels 1–4 being used (connected) at the same time?<br />
Please connect to only one of these jacks on each channel.<br />
• Is the input signal from the connected device set to an appropriate level?<br />
• Is the PHANTOM switch set to ON when using a condenser microphone?<br />
Reverb is not applied to the sound<br />
• Are the REVERB switches of each channels set to ON ( )?<br />
• Is the REVERB control set to an appropriate level?<br />
Changing the sound quality<br />
• Are the Equalizer controls (HIGH/LOW) set to appropriate levels?<br />
• If you want to get a more powerful sound from the speakers, set the SPEECH/MUSIC switch to MUSIC ( ).<br />
• If you want to get a clearer sound for announcements, set the SPEECH/MUSIC switch to SPEECH ( ).<br />
Using a single speaker<br />
• You can use a single speaker. If you use a single speaker, the mixer outputs just one channel of the stereo<br />
signal, left or right.<br />
Outputting the signal for monitoring<br />
• Connect a powered speaker to the MONITOR OUT jack. The MONITOR OUT jack outputs the signal prior<br />
to routing through the MASTER LEVEL control. Adjust the level of output signal from the MONITOR OUT<br />
jack with the MONITOR OUT control. The MONITOR OUT control does not affect the MASTER LEVEL<br />
control. If only the L (left) MONITOR OUT jack is used, the mixer mixes the left and right signals and sends<br />
them to the jack.<br />
Convenient built-in storage compartment<br />
The <strong>STAGEPAS</strong> <strong>500</strong> features a convenient storage compartment in the speaker box for packing the included<br />
power cable, speaker cable, Owner’s <strong>Manual</strong> (this booklet), and an optional microphone and the cable, as<br />
shown above. Remove the rear panel of the speaker and put in the things you need. Carry the <strong>STAGEPAS</strong><br />
<strong>500</strong> with you, and you’ve got all you need to set up and perform—anywhere, anytime.<br />
CAUTION<br />
RISK OF ELECTRIC SHOCK<br />
DO NOT OPEN<br />
CAUTION: TO REDUCE THE RISK OF<br />
ELECTRIC SHOCK, DO NOT REMOVE<br />
COVER (OR BACK). NO USER-SERVICEABLE<br />
PARTS INSIDE. REFER SERVICING TO<br />
QUALIFIED SERVICE PERSONNEL.<br />
The above warning is located on the bottom<br />
of the mixer and the rear of the speakers.<br />
Explanation of Graphical Symbols<br />
The lightning flash with arrowhead symbol within an equilateral triangle is intended to alert the user to the<br />
presence of uninsulated "dangerous voltage" within the product's enclosure that may be of sufficient<br />
magnitude to constitute a risk of electric shock to persons.<br />
The exclamation point within an equilateral triangle is intended to alert the user to the presence of important<br />
operating and maintenance (servicing) instructions in the literature accompanying the product.<br />
IMPORTANT SAFETY INSTRUCTIONS<br />
1 Read these instructions.<br />
2 Keep these instructions.<br />
3 Heed all warnings.<br />
4 Follow all instructions.<br />
5 Do not use this apparatus near water.<br />
6 Clean only with dry cloth.<br />
7 Do not block any ventilation openings. Install in accordance with the<br />
manufacturer's instructions.<br />
8 Do not install near any heat sources such as radiators, heat registers, stoves, or<br />
other apparatus (including amplifiers) that produce heat.<br />
9 Do not defeat the safety purpose of the polarized or grounding-type plug. A<br />
polarized plug has two blades with one wider than the other. A grounding type<br />
plug has two blades and a third grounding prong. The wide blade or the third<br />
prong are provided for your safety. If the provided plug does not fit into your<br />
outlet, consult an electrician for replacement of the obsolete outlet.<br />
WARNING<br />
TO REDUCE THE RISK OF FIRE OR ELECTRIC SHOCK, DO NOT EXPOSE THIS APPARATUS TO RAIN OR MOISTURE.<br />
PRECAUTIONS<br />
10 Protect the power cord from being walked on or pinched particularly at plugs,<br />
convenience receptacles, and the point where they exit from the apparatus.<br />
11 Only use attachments/accessories specified by the manufacturer.<br />
12 Use only with the cart, stand, tripod, bracket, or table specified<br />
by the manufacturer, or sold with the apparatus. When a cart is<br />
used, use caution when moving the cart/apparatus combination<br />
to avoid injury from tip-over.<br />
13 Unplug this apparatus during lightning storms or when unused<br />
for long periods of time.<br />
14 Refer all servicing to qualified service personnel. Servicing is required when the<br />
apparatus has been damaged in any way, such as power-supply cord or plug is<br />
damaged, liquid has been spilled or objects have fallen into the apparatus, the<br />
apparatus has been exposed to rain or moisture, does not operate normally, or<br />
has been dropped.<br />
PLEASE READ CAREFULLY BEFORE PROCEEDING<br />
* Please keep this manual in a safe place for future reference.<br />
WARNING<br />
(98-6<strong>500</strong>)<br />
Always follow the basic precautions listed below to avoid the possibility of serious injury or even death from electrical<br />
shock, short-circuiting, damages, fire or other hazards. These precautions include, but are not limited to, the following:<br />
Power supply/Power cord<br />
• Only use the voltage specified as correct for the device. The required<br />
voltage is printed on the name plate of the device.<br />
• Use only the included power cord.<br />
• Do not place the power cord near heat sources such as heaters or<br />
radiators, and do not excessively bend or otherwise damage the cord,<br />
place heavy objects on it, or place it in a position where anyone could<br />
walk on, trip over, or roll anything over it.<br />
• Be sure to connect to an appropriate outlet with a protective grounding<br />
connection. Improper grounding can result in electrical shock.<br />
Do not open<br />
• Do not open the device or attempt to disassemble the internal parts or<br />
modify them in any way. The device contains no user-serviceable parts.<br />
If it should appear to be malfunctioning, discontinue use immediately and<br />
have it inspected by qualified Yamaha service personnel.<br />
CAUTION<br />
Water warning<br />
• Do not expose the device to rain, use it near water or in damp or wet<br />
conditions, or place containers on it containing liquids which might spill<br />
into any openings.<br />
• Never insert or remove an electric plug with wet hands.<br />
If you notice any abnormality<br />
• If the power cord or plug becomes frayed or damaged, or if there is a<br />
sudden loss of sound during use of the device, or if any unusual smells<br />
or smoke should appear to be caused by it, immediately turn off the<br />
power switch, disconnect the electric plug from the outlet, and have the<br />
device inspected by qualified Yamaha service personnel.<br />
• If this device should be dropped or damaged, immediately turn off the<br />
power switch, disconnect the electric plug from the outlet, and have the<br />
device inspected by qualified Yamaha service personnel.<br />
Always follow the basic precautions listed below to avoid the possibility of physical injury to you or others, or damage<br />
to the device or other property. These precautions include, but are not limited to, the following:<br />
Power supply/Power cord<br />
• Remove the electric plug from the outlet when the device is not to be used<br />
for extended periods of time, or during electrical storms.<br />
• When removing the electric plug from the device or an outlet, always hold<br />
the plug itself and not the cord. Pulling by the cord can damage it.<br />
Location<br />
• When transporting or moving the device, always use two or more people.<br />
Attempting to lift the device by yourself may damage your back, result in<br />
other injury, or cause damage to the device itself.<br />
• Before moving the device, remove all connected cables.<br />
• When setting up the device, make sure that the AC outlet you are using is<br />
easily accessible. If some trouble or malfunction occurs, immediately turn<br />
off the power switch and disconnect the plug from the outlet.<br />
• Do not use the device in a confined, poorly-ventilated location. Make sure<br />
that there is adequate space between the mixer and surrounding walls or<br />
other devices: at least 30 cm at the sides, 30 cm behind and 30 cm<br />
above. If the mixer is to be used installed into the speaker cabinet, make<br />
sure to allow adequate space between the speaker and the surrounding<br />
walls or other devices: at least 30 cm at the sides, 30 cm behind and 30<br />
cm above. Inadequate ventilation can result in overheating, possibly<br />
causing damage to the device(s), or even fire.<br />
• Do not use the speaker's handles for suspended installation. Doing so<br />
can result in damage or injury.<br />
• Avoid setting all equalizer controls and faders to their maximum.<br />
Depending on the condition of the connected devices, doing so may<br />
cause feedback and may damage the speakers.<br />
• Do not expose the device to excessive dust or vibrations, or extreme cold<br />
or heat (such as in direct sunlight, near a heater, or in a car during the<br />
day) to prevent the possibility of panel disfiguration or damage to the<br />
internal components.<br />
• Do not place the device in an unstable position where it might<br />
accidentally fall over.<br />
• Do not block the vents. This mixer has ventilation holes at the top to<br />
prevent the internal temperature from becoming too high. In particular, do<br />
not place the device on its side or upside down. Inadequate ventilation<br />
can result in overheating, possibly causing damage to the device(s), or<br />
even fire.<br />
• Do not use the device in the vicinity of a TV, radio, stereo equipment,<br />
mobile phone, or other electric devices. Doing so may result in noise,<br />
both in the device itself and in the TV or radio next to it.<br />
Connections<br />
• Before connecting the device to other devices, turn off the power for all<br />
devices. Before turning the power on or off for all devices, set all volume<br />
levels to minimum.<br />
• For the SPEAKERS jacks, Use only the included speakers (<strong>500</strong>S) and<br />
speaker cables. Use of other types of speakers and cables may result in<br />
damage to the device(s), or even fire.<br />
Handling caution<br />
• When turning on the AC power in your audio system, always turn on the<br />
device LAST, to avoid speaker damage. When turning the power off, the<br />
device should be turned off FIRST for the same reason.<br />
• Do not insert your fingers or hands in any gaps or openings on the device<br />
(vents,, ports, etc.).<br />
• Avoid inserting or dropping foreign objects (paper, plastic, metal, etc.)<br />
into any gaps or openings on the device (vents, ports, etc.) If this<br />
happens, turn off the power immediately and unplug the power cord from<br />
the AC outlet. Then have the device inspected by qualified Yamaha<br />
service personnel.<br />
• Do not use the device for a long period of time at a high or uncomfortable<br />
volume level, since this can cause permanent hearing loss. If you<br />
experience any hearing loss or ringing in the ears, consult a physician.<br />
• Do not operate the device if the sound is distorting. Prolonged use in this<br />
condition could cause overheating and result in fire.<br />
• Do not rest your weight on the device or place heavy objects on it, and<br />
avoid use excessive force on the buttons, switches or connectors.<br />
Protective Circuit (poly switch)<br />
All full-range loudspeakers are fitted with a self-resetting poly switch that<br />
protects the high-frequency driver from damage caused by excessive<br />
power. If a loudspeaker cabinet loses high-frequency output, immediately<br />
remove power from the unit and wait for two to three minutes. This should<br />
be long enough to allow the poly switch to reset. Reapply power and check<br />
the performance of the high frequency driver before continuing, with the<br />
power reduced to a level that does not cause the poly switch to interrupt<br />
the signal.<br />
Interference From Cell Phones<br />
Using a cell phone near the speaker system can induce noise. If this occurs,<br />
move the cell phone further away from the speaker system.<br />
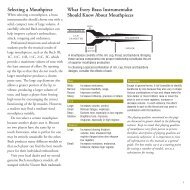
Air blowing out of the bass reflex ports is normal, and often occurs when the<br />
speaker is handling program material with heavy bass content.<br />
Yamaha cannot be held responsible for damage caused by improper use<br />
or modifications to the device.<br />
Always turn the power off when the device is not in use.<br />
The performance of components with moving contacts, such as switches,<br />
volume controls, and connectors, deteriorates over time. Consult qualified<br />
Yamaha service personnel about replacing defective components.<br />
(5)-3<br />
IMPORTANT<br />
Please record the serial number of this unit in the space below.<br />
Model:<br />
Serial No.:<br />
The serial number is located on the bottom or rear of the unit.<br />
Retain this <strong>Owner's</strong> <strong>Manual</strong> in a safe place for future reference.<br />
Dimensions<br />
• Speaker<br />
152<br />
2-M8 x 25<br />
Specifications<br />
342<br />
120<br />
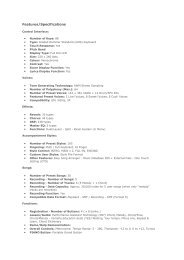
• General Specifications<br />
Maximum Output Power<br />
250 W + 250 W (±10 %)/4Ω @ 10 % THD at 1 kHz (SPEAKERS L/R)<br />
200 W + 200 W/4Ω @ 1 % THD at 1 kHz (SPEAKERS L/R)<br />
Maximum Output Level<br />
116 dB (1 m)<br />
Frequency Response (Nomimal output level @ 1 kHz)<br />
-3 dB, 0 dB, +1 dB @ 20 Hz-20 kHz (MUSIC/SPEECH=MUSIC) (MONITOR OUT)<br />
-3 dB, 0 dB, +1 dB @ 80 Hz-20 kHz (MUSIC/SPEECH = SPEECH) (REC OUT)<br />
-3dB, 0dB, +1 dB @ 20 Hz-20 kHz, 1 W Output (MUSIC/SPEECH=MUSIC, without Speaker<br />
EQ) (SPEAKERS L/R)<br />
Total Harmonic Distortion<br />
0.5 % @ 20 Hz, 1 kHz, 20 kHz +14 dBu GAIN= nominal (MONITOR OUT, REC OUT)<br />
Hum & Noise (Equivalent Input Noise, Rs = 150Ω, MIC/LINE = MIC)<br />
-106 dBu (CH1/2)<br />
-112 dBu (CH3/4)<br />
-65 dBu Residual output noise (SPEAKERS L/R)<br />
Crosstalk (1 kHz)<br />
-70 dB between input channels<br />
Phantom Voltage<br />
+15 V (CH1-4)<br />
544.5<br />
298<br />
• Mixer<br />
MONITOR<br />
SPEAKERS<br />
L L<br />
(MONO) L<br />
L (MONO)<br />
R R<br />
PHANTOM<br />
LIMITER<br />
COMP<br />
COMP<br />
OFF ON<br />
MONITOR<br />
–15 +15 –15 +15 –15 +15 –15 +15 –15 +15 –15 +15 –15 +15<br />
0 10<br />
REVERB<br />
175<br />
Tripod pole diameter 35-36<br />
* Use of the stand should refer to stand manufacturer's instructions.<br />
POWER<br />
–15 +15 –15 +15 –15 +15 –15 +15 –15 +15 –15 +15 –15 +15<br />
REVERB REVERB REVERB REVERB<br />
0 10<br />
SPEECH<br />
MUSIC<br />
LEVEL<br />
LEVEL<br />
LEVEL<br />
LEVEL<br />
LEVEL<br />
LEVEL<br />
LEVEL<br />
LEVEL<br />
0 10<br />
9/10<br />
0 10<br />
0 10<br />
0 10<br />
0 10<br />
0 10<br />
0 10<br />
0 10<br />
MASTER<br />
330.0<br />
LIMIT/COMP switch<br />
ON = Comp, OFF = Limit (CH1/2)<br />
Power Consumption<br />
65 W<br />
Weight<br />
24 kg (Speaker x 2 + Powered Mixer)<br />
Stereo Input Channel Equalization<br />
±15 dB<br />
HIGH 10 kHz shelving<br />
LOW 100 Hz shelving<br />
111.5<br />
Unit: mm<br />
Specifications and descriptions in this owner's manual are for information purposes only. Yamaha Corp. reserves the right to change or modify products or specifications at<br />
any time without prior notice. Since specifications, equipment or options may not be the same in every locale, please check with your Yamaha dealer.<br />
1. IMPORTANT NOTICE: DO NOT MODIFY THIS UNIT!This product, when installed as<br />
indicated in the instructions contained in this manual, meets FCC requirements.<br />
Modifications not expressly approved by Yamaha may void your authority, granted by<br />
the FCC, to use the product.<br />
2. IMPORTANT: When connecting this product to accessories and/or another product<br />
use only high quality shielded cables. Cable/s supplied with this product MUST be<br />
used. Follow all installation instructions. Failure to follow instructions could void your<br />
FCC authorization to use this product in the USA.<br />
3. NOTE: This product has been tested and found to comply with the requirements listed<br />
in FCC Regulations, Part 15 for Class "B" digital devices. Compliance with these<br />
requirements provides a reasonable level of assurance that your use of this product in<br />
a residential environment will not result in harmful interference with other electronic<br />
devices. This equipment generates/uses radio frequencies and, if not installed and<br />
used according to the instructions found in the users manual, may cause interference<br />
harmful to the operation of other electronic devices. Compliance with FCC regulations<br />
FCC INFORMATION (U.S.A.)<br />
• Speakers (<strong>500</strong>S)<br />
Enclosure<br />
2 way bass-reflex type, Polypropylene, Black<br />
Crossover Frequency<br />
4.0 kHz (LF: 12 dB/oct, HF: 12 dB/oct)<br />
Frequency Range<br />
55 Hz-20 kHz (-10 dB)<br />
Speaker Unit<br />
LF: 10" (25 cm) Cone<br />
HF: 1" (2.54cm) Compression Driver<br />
does not guarantee that interference will not occur in all installations. If this product is<br />
found to be the source of interference, which can be determined by turning the unit<br />
"OFF" and "ON", please try to eliminate the problem by using one of the following<br />
measures:Relocate either this product or the device that is being affected by the<br />
interference.<br />
Utilize power outlets that are on different branch (circuit breaker or fuse) circuits or<br />
install AC line filter/s.<br />
In the case of radio or TV interference, relocate/reorient the antenna. If the antenna<br />
lead-in is 300 ohm ribbon lead, change the lead-in to co-axial type cable.<br />
If these corrective measures do not produce satisfactory results, please contact the<br />
local retailer authorized to distribute this type of product. If you can not locate the<br />
appropriate retailer, please contact Yamaha Corporation of America, Electronic Service<br />
Division, 6600 Orangethorpe Ave, Buena Park, CA90620<br />
The above statements apply ONLY to those products distributed by Yamaha<br />
Corporation of America or its subsidiaries.<br />
* This applies only to products distributed by YAMAHA CORPORATION OF AMERICA. (class B)<br />
IMPORTANT NOTICE FOR THE UNITED KINGDOM<br />
Connecting the Plug and Cord<br />
WARNING: THIS APPARATUS MUST BE EARTHED<br />
IMPORTANT. The wires in this mains lead are coloured in accordance with the following<br />
code:<br />
GREEN-AND-YELLOW : EARTH<br />
BLUE<br />
: NEUTRAL<br />
BROWN<br />
: LIVE<br />
• This applies only to products distributed by Yamaha Music U.K. Ltd.<br />
For details of products, please contact your nearest Yamaha representative or the authorized distributor listed below.<br />
NORTH AMERICA<br />
CANADA<br />
Yamaha Canada Music Ltd.<br />
135 Milner Avenue, Scarborough, Ontario,<br />
M1S 3R1, Canada<br />
Tel: 416-298-1311<br />
U.S.A.<br />
Yamaha Corporation of America<br />
6600 Orangethorpe Ave., Buena Park, Calif. 90620,<br />
U.S.A.<br />
Tel: 714-522-9011<br />
CENTRAL & SOUTH AMERICA<br />
MEXICO<br />
Yamaha de México S.A. de C.V.<br />
Calz. Javier Rojo Gómez #1149,<br />
Col. Guadalupe del Moral<br />
C.P. 09300, México, D.F., México<br />
Tel: 55-5804-0600<br />
BRAZIL<br />
Yamaha Musical do Brasil Ltda.<br />
Rua Joaquim Floriano, 913 - 4' andar, Itaim Bibi,<br />
CEP 04534-013 Sao Paulo, SP. BRAZIL<br />
Tel: 011-3704-1377<br />
ARGENTINA<br />
Yamaha Music Latin America, S.A.<br />
Sucursal de Argentina<br />
Olga Cossettini 1553, Piso 4 Norte<br />
Madero Este-C1107CEK<br />
Buenos Aires, Argentina<br />
Tel: 011-4119-7000<br />
PANAMA AND OTHER LATIN<br />
AMERICAN COUNTRIES/<br />
CARIBBEAN COUNTRIES<br />
Yamaha Music Latin America, S.A.<br />
Torre Banco General, Piso 7, Urbanización Marbella,<br />
Calle 47 y Aquilino de la Guardia,<br />
Ciudad de Panamá, Panamá<br />
Tel: +507-269-5311<br />
EUROPE<br />
THE UNITED KINGDOM<br />
Yamaha Music U.K. Ltd.<br />
Sherbourne Drive, Tilbrook, Milton Keynes,<br />
MK7 8BL, England<br />
Tel: 01908-366700<br />
GERMANY<br />
Yamaha Music Europe GmbH<br />
Siemensstrasse 22-34, 25462 Rellingen, Germany<br />
Tel: 04101-3030<br />
SWITZERLAND/LIECHTENSTEIN<br />
Yamaha Music Europe GmbH<br />
Branch Switzerland in Zürich<br />
Seefeldstrasse 94, 8008 Zürich, Switzerland<br />
Tel: 01-383 3990<br />
AUSTRIA<br />
Yamaha Music Europe GmbH Branch Austria<br />
Schleiergasse 20, A-1100 Wien, Austria<br />
Tel: 01-60203900<br />
CZECH REPUBLIC/SLOVAKIA/<br />
HUNGARY/SLOVENIA<br />
Yamaha Music Europe GmbH Branch Austria<br />
Schleiergasse 20, A-1100 Wien, Austria<br />
Tel: 01-602039025<br />
Yamaha Pro Audio global web site: http://www.yamahaproaudio.com/<br />
Yamaha <strong>Manual</strong> Library:<br />
http://www.yamaha.co.jp/manual/<br />
POLAND<br />
Yamaha Music Europe GmbH<br />
Branch Sp.z o.o. Oddzial w Polsce<br />
ul. 17 Stycznia 56, PL-02-146 Warszawa, Poland<br />
Tel: 022-868-07-57<br />
THE NETHERLANDS/<br />
BELGIUM/LUXEMBOURG<br />
Yamaha Music Europe Branch Benelux<br />
Clarissenhof 5-b, 4133 AB Vianen, The Netherlands<br />
Tel: 0347-358 040<br />
FRANCE<br />
Yamaha Musique France<br />
BP 70-77312 Marne-la-Vallée Cedex 2, France<br />
Tel: 01-64-61-4000<br />
ITALY<br />
Yamaha Musica Italia S.P.A.<br />
Combo Division<br />
Viale Italia 88, 20020 Lainate (Milano), Italy<br />
Tel: 02-935-771<br />
SPAIN/PORTUGAL<br />
Yamaha Música Ibérica, S.A.<br />
Ctra. de la Coruna km. 17, 200, 28230<br />
Las Rozas (Madrid), Spain<br />
Tel: 91-639-8888<br />
SWEDEN<br />
Yamaha Scandinavia AB<br />
J. A. Wettergrens Gata 1, Box 30053<br />
S-400 43 Göteborg, Sweden<br />
Tel: 031 89 34 00<br />
DENMARK<br />
YS Copenhagen Liaison Office<br />
Generatorvej 6A, DK-2730 Herlev, Denmark<br />
Tel: 44 92 49 00<br />
NORWAY<br />
Norsk filial av Yamaha Scandinavia AB<br />
Grini Næringspark 1, N-1345 Østerås, Norway<br />
Tel: 67 16 77 70<br />
RUSSIA<br />
Yamaha Music (Russia)<br />
Room 37, bld. 7, Kievskaya street, Moscow, 121059,<br />
Russia<br />
Tel: 495 626 <strong>500</strong>5<br />
OTHER EUROPEAN COUNTRIES<br />
Yamaha Music Europe GmbH<br />
Siemensstrasse 22-34, 25462 Rellingen, Germany<br />
Tel: +49-4101-3030<br />
AFRICA<br />
Yamaha Corporation,<br />
Asia-Pacific Sales & Marketing Group<br />
Nakazawa-cho 10-1, Naka-ku, Hamamatsu,<br />
Japan 430-8650<br />
Tel: +81-53-460-2303<br />
MIDDLE EAST<br />
TURKEY/CYPRUS<br />
Yamaha Music Europe GmbH<br />
Siemensstrasse 22-34, 25462 Rellingen, Germany<br />
Tel: 04101-3030<br />
OTHER COUNTRIES<br />
Yamaha Music Gulf FZE<br />
LOB 16-513, P.O.Box 17328, Jubel Ali,<br />
Dubai, United Arab Emirates<br />
Tel: +971-4-881-5868<br />
As the colours of the wires in the mains lead of this apparatus may not correspond with the<br />
coloured markings identifying the terminals in your plug proceed as follows:<br />
The wire which is coloured GREEN-and-YELLOW must be connected to the terminal in the plug<br />
which is marked by the letter E or by the safety earth symbol or colored GREEN or<br />
GREEN-and-YELLOW.<br />
The wire which is coloured BLUE must be connected to the terminal which is marked with the<br />
letter N or coloured BLACK.<br />
The wire which is coloured BROWN must be connected to the terminal which is marked with the<br />
letter L or coloured RED.<br />
ASIA<br />
THE PEOPLE'S REPUBLIC OF CHINA<br />
Yamaha Music & Electronics (China) Co.,Ltd.<br />
2F, Yunhedasha, 1818 Xinzha-lu, Jingan-qu,<br />
Shanghai, China<br />
Tel: 021-6247-2211<br />
INDIA<br />
Yamaha Music India Pvt. Ltd.<br />
5F Ambience Corporate Tower Ambience Mall Complex<br />
Ambience Island, NH-8, Gurgaon-122001, Haryana, India<br />
Tel: 0124-466-5551<br />
INDONESIA<br />
PT. Yamaha Music Indonesia (Distributor)<br />
PT. Nusantik<br />
Gedung Yamaha Music Center, Jalan Jend. Gatot<br />
Subroto Kav. 4, Jakarta 12930, Indonesia<br />
Tel: 21-520-2577<br />
KOREA<br />
Yamaha Music Korea Ltd.<br />
8F, 9F, Dongsung Bldg. 158-9 Samsung-Dong,<br />
Kangnam-Gu, Seoul, Korea<br />
Tel: 080-004-0022<br />
MALAYSIA<br />
Yamaha Music Malaysia, Sdn., Bhd.<br />
Lot 8, Jalan Perbandaran, 47301 Kelana Jaya,<br />
Petaling Jaya, Selangor, Malaysia<br />
Tel: 3-78030900<br />
SINGAPORE<br />
Yamaha Music Asia Pte., Ltd.<br />
#03-11 A-Z Building<br />
140 Paya Lebor Road, Singapore 409015<br />
Tel: 747-4374<br />
TAIWAN<br />
Yamaha KHS Music Co., Ltd.<br />
3F, #6, Sec.2, Nan Jing E. Rd. Taipei.<br />
Taiwan 104, R.O.C.<br />
Tel: 02-2511-8688<br />
THAILAND<br />
Siam Music Yamaha Co., Ltd.<br />
4, 6, 15 and 16th floor, Siam Motors Building,<br />
891/1 Rama 1 Road, Wangmai,<br />
Pathumwan, Bangkok 10330, Thailand<br />
Tel: 02-215-2626<br />
OTHER ASIAN COUNTRIES<br />
Yamaha Corporation,<br />
Asia-Pacific Sales & Marketing Group<br />
Nakazawa-cho 10-1, Naka-ku, Hamamatsu,<br />
Japan 430-8650<br />
Tel: +81-53-460-2303<br />
OCEANIA<br />
AUSTRALIA<br />
Yamaha Music Australia Pty. Ltd.<br />
Level 1, 99 Queensbridge Street, Southbank,<br />
Victoria 3006, Australia<br />
Tel: 3-9693-5111<br />
COUNTRIES AND TRUST<br />
TERRITORIES IN PACIFIC OCEAN<br />
Yamaha Corporation,<br />
Asia-Pacific Sales & Marketing Group<br />
Nakazawa-cho 10-1, Naka-ku, Hamamatsu,<br />
Japan 430-8650<br />
Tel: +81-53-460-2303<br />
HEAD OFFICE<br />
Yamaha Corporation, Pro Audio Division<br />
Nakazawa-cho 10-1, Naka-ku, Hamamatsu,<br />
Japan 430-8650<br />
Tel: +81-53-460-2441<br />
(3 wires)<br />
PA26'<br />
U.R.G., Pro Audio Division<br />
©2006-2010 Yamaha Corporation<br />
008MW-D0 Printed in China
L<br />
R<br />
Quick Guide<br />
Connection Example<br />
Controls and Functions<br />
Getting sound out of the system<br />
The <strong>STAGEPAS</strong> <strong>500</strong> can be used in a wide variety of sound reinforcement applications, from a full-band<br />
performance onstage to solo street performance—providing a powerful, high-performance system in an<br />
exceptionally compact and portable package. Connect a guitar or a microphone to the monaural input jacks<br />
(channels 1 to 4) and connect a keyboard to the stereo input jacks (channels 5/6 to 9/10).<br />
If you have a powered speaker, you can connect it to the MONITOR OUT jack for monitoring your vocals. For<br />
the included speakers and your instruments to the mixer.<br />
optimum results in band performance applications and to create a more powerful sound for music, make sure<br />
Connect the included speakers (<strong>500</strong>S) to the SPEAKERS L/R jack. Connect the sources (guitar, other to set the SPEECH/MUSIC switch to MUSIC.<br />
instruments) to the input jacks. For details, see “Connection Example.”<br />
NOTE: For best results when connecting an electric guitar or bass guitar to the mixer, use a direct box, preamp (guitar<br />
amp), or amp simulator.<br />
Before connecting any devices, make sure to turn off the power for all devices (including microphones).<br />
Caution Also, before turning the power on or off, set the volume levels on all devices to minimum.<br />
Included speakers (<strong>500</strong>S)<br />
Keyboard, etc.<br />
NOTE: For best results when connecting an electric guitar or bass guitar to the mixer, use a direct box, preamp<br />
Microphones<br />
(guitar amp), or amp simulator.<br />
the mixer’s LEVEL controls and MASTER LEVEL control to the minimum (zero).<br />
LEVEL<br />
LEVEL LEVEL LEVEL LEVEL LEVEL LEVEL LEVEL<br />
0 10 0 10 0 10 0 10 0 10 0 10 0 10 0 10<br />
MASTER 1 2 3 4 5/6 7/8 9/10<br />
R<br />
L<br />
L R<br />
Bass Guitar<br />
on the device used, set the MIC/LINE switch to MIC ( ) or LINE<br />
( ) as appropriate.<br />
For low-level signals (such as that of microphones), set the switch to the MIC ( ) position.<br />
For high-level signals (such as keyboard instruments and audio equipment), set the switch to the<br />
Powered SP<br />
LINE ( ) position.<br />
CD Player<br />
MIC<br />
MIC<br />
MIC<br />
MIC<br />
LINE<br />
LINE<br />
LINE<br />
LINE<br />
L<br />
R<br />
NOTE: When using a condenser microphone, set the PHANTOM switch to ON.<br />
R<br />
L<br />
the power on<br />
First, turn on the power to any connected devices, then turn the <strong>STAGEPAS</strong> <strong>500</strong> power on.<br />
If you’ve connected powered speakers to the mixer, turn on the power of the mixer first, then the<br />
powered speakers.<br />
POWER<br />
DI<br />
OFF<br />
ON<br />
To avoid any loud, unexpected noise from the speakers, first turn on the power to those connected<br />
R<br />
L R<br />
L<br />
L R L<br />
R<br />
Caution devices that are closest to the sound source.<br />
Example: Sound source (CD player or instrument) → <strong>STAGEPAS</strong> <strong>500</strong> → (Power amplifier)<br />
When turning off the power to the system, reverse the order described above.<br />
the MASTER LEVEL control to the optimum position (indicated by the arrow).<br />
MONITOR<br />
OUT<br />
SPEAKERS<br />
L L (MONO)<br />
LEVEL<br />
LEVEL LEVEL LEVEL LEVEL LEVEL LEVEL LEVEL<br />
L<br />
L (MONO) L L L<br />
0 10 0 10 0 10 0 10 0 10 0 10 0 10 0 10<br />
R<br />
R<br />
R<br />
R<br />
MASTER 1 2 3 4 5/6 7/8 9/10<br />
R<br />
R R<br />
PHANTOM MIC<br />
MIC<br />
MIC<br />
MIC<br />
CH1-4<br />
LINE<br />
LINE<br />
LINE<br />
LINE<br />
LIMITER<br />
playing your instrument or singing into the microphone, adjust the<br />
LIMIT<br />
LIMIT<br />
OFF ON<br />
+6<br />
COMP COMP<br />
LEVEL control of the corresponding channel.<br />
+3<br />
MONITOR HIGH<br />
HIGH<br />
HIGH<br />
HIGH<br />
HIGH<br />
HIGH<br />
HIGH<br />
0<br />
OUT<br />
Adjust the LEVEL Control of the corresponding channel so that the “0” LED lights up momentarily.<br />
-6<br />
-20<br />
0 10 –15 +15 –15 +15 –15 +15 –15 +15 –15 +15 –15 +15 –15 +15<br />
LEVEL<br />
LEVEL LEVEL LEVEL LEVEL LEVEL LEVEL LEVEL<br />
REVERB LOW<br />
LOW<br />
LOW<br />
LOW<br />
LOW<br />
LOW<br />
LOW<br />
POWER<br />
0 10 0 10 0 10 0 10 0 10 0 10 0 10 0 10<br />
0 10 –15 +15 –15 +15 –15 +15 –15 +15 –15 +15 –15 +15 –15 +15<br />
REVERB REVERB REVERB REVERB<br />
MASTER 1 2 3 4 5/6 7/8 9/10<br />
SPEECH<br />
MUSIC<br />
LEVEL<br />
LEVEL LEVEL LEVEL LEVEL LEVEL LEVEL LEVEL<br />
the MASTER LEVEL control to adjust the overall volume.<br />
0 10 0 10 0 10 0 10 0 10 0 10 0 10 0 10<br />
MASTER 1 2 3 4 5/6 7/8 9/10<br />
If the LIMITER indicator flashes continuously, the internal power amplifier section is being<br />
Caution excessively overloaded and may malfunction.<br />
LEVEL<br />
LEVEL LEVEL LEVEL LEVEL LEVEL LEVEL LEVEL<br />
0 10 0 10 0 10 0 10 0 10 0 10 0 10 0 10<br />
MASTER 1 2 3 4 5/6 7/8 9/10<br />
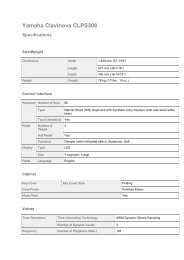
Block Diagram<br />
OFF/ ON<br />
PHANTOM +15V<br />
INPUT<br />
[-8dBu]<br />
(CH1-2)<br />
HA COMP/LIMT EQ<br />
BA<br />
[-60~+20dBu]<br />
PAD: 30dB<br />
MIC/ LINE<br />
LOW HIGH LEVEL<br />
[-50~+30dBu]<br />
LIMIT/ COMP<br />
REVERB<br />
INPUT<br />
(CH3-4)<br />
[-8dBu]<br />
HA<br />
EQ<br />
BA<br />
[-60~+20dBu]<br />
each channel you want to apply reverb, set the corresponding REVERB<br />
PAD: 30dB<br />
MIC/ LINE<br />
LOW HIGH<br />
LEVEL<br />
switch to ON ( ).<br />
[-50~+30dBu]<br />
REVERB<br />
[-8dBu]<br />
MASTER LEVEL<br />
BA<br />
EQ<br />
BA<br />
[-8dBu]<br />
[+12dBu]<br />
[+25dBu]<br />
L/MONO<br />
SP EQ<br />
LIMITER BA<br />
PA<br />
L<br />
LIMITER<br />
LOW HIGH<br />
LEVEL<br />
REVERB LOW<br />
LOW<br />
LOW<br />
LOW<br />
LOW<br />
INPUT<br />
(CH5/6)<br />
[-20~+20dBu]<br />
SPEAKERS OUT<br />
BA<br />
EQ<br />
BA<br />
R<br />
SP EQ<br />
LIMITER B A<br />
-1 PA<br />
R<br />
0 10 –15 +15 –15 +15 –15 +15 –15 +15 –15 +15<br />
REVERB REVERB REVERB REVERB<br />
[-8dBu]<br />
BA<br />
EQ<br />
BA<br />
L<br />
HPF<br />
LOW HIGH LEVEL<br />
[+4dBu]<br />
L<br />
SPEECH<br />
INPUT<br />
BA<br />
SUM<br />
(CH7/8)<br />
MUSIC<br />
L/MONO<br />
[-20~+20dBu]<br />
BA<br />
EQ<br />
BA<br />
MONITOR<br />
R<br />
MUSIC<br />
OUT<br />
HPF<br />
MONITOR OUT<br />
R<br />
SPEECH<br />
BA<br />
SUM<br />
MUSIC<br />
R<br />
SPEECH/ MUSIC<br />
the REVERB control to adjust the overall reverb. L<br />
BA<br />
EQ<br />
BA<br />
[-10dBu]<br />
L<br />
INPUT<br />
(CH9/10)<br />
LOW HIGH<br />
LEVEL<br />
REC OUT<br />
[-20~+20dBu]<br />
R<br />
REVERB LOW<br />
LOW<br />
LOW<br />
LOW<br />
LOW<br />
R<br />
BA<br />
EQ<br />
BA<br />
Using the included speakers, set up the system and try it out.<br />
1<br />
Connect<br />
2<br />
Set<br />
3<br />
Depending<br />
4<br />
Turning<br />
5<br />
Set<br />
6<br />
While<br />
7<br />
Use<br />
Applying reverb or echo to the sound<br />
Reverb recreates the warm ambience of an actual performance space, such as a concert hall or a<br />
night club.<br />
1<br />
For<br />
2<br />
Use<br />
0 10<br />
–15 +15<br />
REVERB<br />
–15 +15<br />
REVERB<br />
–15 +15<br />
REVERB<br />
–15 +15<br />
REVERB<br />
–15 +15<br />
AC IN<br />
OFF<br />
ON<br />
POWER<br />
DIGITAL<br />
EFFECT<br />
BA<br />
REVERB<br />
EFFECT<br />
SUM<br />
OPEN<br />
OPEN<br />
LOCK<br />
LOCK<br />
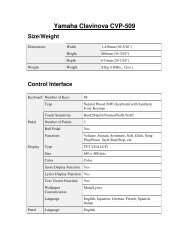
1 AC IN jack<br />
Connect the included power cord here.<br />
Caution<br />
Be sure to use the included power cord. Use of other cords may result in malfunction, heat<br />
generation, or fire.<br />
2 POWER switch<br />
For turning the power to the mixer on and off.<br />
* LEVEL meter<br />
The LEVEL meter shows the level of<br />
the output signal from the SPEAKERS<br />
L/R jacks.<br />
If the LIMITER flashes<br />
Caution continuously, the internal<br />
power amplifier section is<br />
being excessively overloaded<br />
and may malfunction.<br />
Reduce the output level with<br />
the MASTER LEVEL control<br />
so that the indicator flashes<br />
only briefly on the highest<br />
transient peaks.<br />
( POWER indicator<br />
This lights when the POWER switch is<br />
ON. When the indicator flashes, the<br />
protection circuit is operating. Check<br />
that the speaker cable is correctly<br />
connected to the mixer and reapply<br />
the power.<br />
AC IN<br />
OFF<br />
ON<br />
1 2<br />
POWER<br />
SPEAKERS<br />
L<br />
R<br />
*<br />
(<br />
& MONITOR OUT Control<br />
Determines the signal level output from the<br />
MONITOR OUT jacks.<br />
3<br />
LIMITER<br />
+6<br />
+3<br />
0<br />
-6<br />
-20<br />
POWER<br />
SPEECH<br />
MUSIC<br />
NOTE: The MASTER LEVEL Control does not<br />
affect the signal via the MONITOR OUT<br />
Control.<br />
MONITOR<br />
OUT 6 7<br />
4 5<br />
L L (MONO)<br />
L (MONO)<br />
R<br />
^<br />
9<br />
&<br />
LEVEL<br />
R<br />
PHANTOM<br />
CH1-4<br />
OFF<br />
MONITOR<br />
OUT<br />
0 10<br />
REVERB<br />
0 10<br />
#<br />
0 10<br />
MASTER<br />
3 SPEAKERS L/R jacks<br />
(for included speakers (<strong>500</strong>S) only)<br />
These output the mixed signal channels from<br />
1 to 9/10, and the level is adjusted with the<br />
MASTER LEVEL control. Connect only the<br />
included speakers (<strong>500</strong>S).<br />
4 REC OUT L/R jacks<br />
These output the mixed signal channels from<br />
1 to 9/10, and the level is unaffected by the<br />
MASTER LEVEL control. You can use these<br />
jacks, for example, to connect to an external<br />
recorder.<br />
5 MONITOR OUT L (MONO) /R jacks<br />
These output the mixed signal channels from<br />
1 to 9/10, and the level is adjusted with the<br />
MONITOR OUT control. These jacks are<br />
convenient for connecting an external<br />
powered speaker for monitoring purposes.<br />
ON<br />
%<br />
MIC<br />
LINE<br />
LIMIT<br />
COMP<br />
HIGH<br />
HIGH<br />
HIGH<br />
HIGH<br />
HIGH<br />
–15 +15 –15 +15 –15 +15 –15 +15 –15 +15 –15 +15 –15 +15<br />
LOW<br />
LOW<br />
LOW<br />
LOW<br />
–15 +15 –15 +15 –15 +15 –15 +15 –15 +15 –15 +15 –15 +15<br />
REVERB<br />
LEVEL<br />
0 10<br />
1<br />
MIC<br />
LINE<br />
LIMIT<br />
COMP<br />
REVERB<br />
LEVEL<br />
0 10<br />
2<br />
MIC<br />
LINE<br />
)<br />
REVERB<br />
LEVEL<br />
0 10<br />
3<br />
^ SPEECH/MUSIC switch<br />
Set this switch to SPEECH ( ) to optimize<br />
the mixer settings and sound quality for<br />
speech purposes and announcements.<br />
Set this to MUSIC ( ) to optimize the mixer<br />
for musical performance. The switch lights up<br />
in yellow when it is set to MUSIC ( ).<br />
MIC<br />
LINE<br />
REVERB<br />
LEVEL<br />
0 10<br />
4<br />
R<br />
8<br />
HIGH<br />
LOW<br />
@<br />
LEVEL<br />
Caution<br />
Caution<br />
0 10<br />
5/6<br />
6 Channel input jacks (CH 1 to 4)<br />
For connecting a guitar, microphone, keyboard or other instrument/device. Set the MIC/LINE switch to MIC<br />
or LINE for channels 1 to 4, depending on the level of the input signal.<br />
XLR-type connectors are wired as follows (IEC60268 standard): pin 1: ground, pin 2: hot (+), and pin 3: cold (-).<br />
NOTE: On any given channel, you may use either XLR or phone jack, but not both. Please connect to only one of<br />
these jacks on each channel.<br />
7 Stereo channel input jacks (CH 5/6, 7/8, 9/10)<br />
Input the left and right channels of a stereo signal into the respective odd and even channels of the mixer.<br />
These inputs are intended mainly for use with instruments and equipment having stereo outputs, such as a<br />
synthesizer or CD player.<br />
NOTE: The channel 7/8 input provides two sets of jacks—both phone jacks and RCA-pin jacks. Either one of<br />
these jacks may be used, but not both at the same time. Please connect to only one of these jacks on<br />
each channel.<br />
8 MIC/LINE switch<br />
Set this switch to MIC or LINE for channels 1 to 4, depending on the level of the input signal. For low-level<br />
signals (such as that of microphones), set the switch to the MIC ( ) position. For high-level signals (such<br />
as keyboard instruments and audio equipment), set the switch to the LINE ( ) position.<br />
Caution<br />
L<br />
R<br />
HIGH<br />
LOW<br />
LEVEL<br />
To avoid damage to speakers, be sure to turn off amplifiers (or powered speakers) before setting<br />
this switch to MIC or LINE. We also recommend that you turn the MASTER LEVEL control to the<br />
minimum setting before operating the switch, to avoid excessively loud noises that could cause<br />
hearing loss or device damage.<br />
9 PHANTOM switch<br />
If you set the switch on, the mixer supplies phantom power on to the XLR mic input jacks on the channels 1 to 4.<br />
• Be sure to leave this switch OFF if the device or instrument that you are using does not require<br />
phantom power.<br />
• When using phantom power, do not connect any devices other than condenser microphones to<br />
the XLR input jacks. Other devices may be damaged if connected to phantom power. This<br />
precaution does not apply to balanced dynamic microphones, however, as these will not be<br />
affected by phantom power.<br />
• To avoid damage to speakers, be sure to turn off amplifiers (or powered speakers) before turning<br />
this switch on or off. We also recommend that you turn the MASTER LEVEL control to the<br />
minimum setting before operating the switch, to avoid excessively loud noises that could cause<br />
hearing loss or device damage.<br />
L<br />
R<br />
0 10<br />
7/8<br />
LOW<br />
L<br />
R<br />
LEVEL<br />
!<br />
$<br />
0 10<br />
9/10<br />
OPEN<br />
OPEN<br />
$ LEVEL control<br />
Use these controls to adjust the volume<br />
balance among the various channels.<br />
To reduce noise, set any LEVEL<br />
controls on unused channels to<br />
the minimum.<br />
LOCK<br />
LOCK<br />
% MASTER LEVEL Control<br />
Determines the volume of the signal output<br />
from the SPEAKERS L/R jacks. This allows<br />
you to adjust the overall volume without<br />
changing the relative volume balance<br />
among the various channels (made with the<br />
LEVEL controls) or the tone settings (made<br />
with the Equalizer).<br />
) LIMIT/COMP switch<br />
Set this switch to COMP ( ) to apply compression,<br />
or set it to LIMIT ( ) to apply limiting.<br />
By compressing excessive peaks of input signals and<br />
bringing up the level of overly soft parts, compression<br />
raises the overall volume without introducing<br />
distortion. Compression can be used to make a mix<br />
sound louder and have more punch. The Limiter is<br />
used to suppress excessive input signals and bring<br />
them down to an adequate level. The switch lights up<br />
in yellow when it is set to COMP ( ).<br />
! Equalizer<br />
HIGH: Determines the level of the high frequency band<br />
for each channel. Rotating the knob clockwise boosts<br />
the high frequencies and produces a clearer, crisper<br />
sound. If you start getting feedback (a high-pitched<br />
squealing sound) or you want to make the sound softer<br />
and less harsh, turn the knob counterclockwise slightly.<br />
LOW: Determines the level of the low frequency band<br />
for each channel. Rotating the knob clockwise boosts<br />
the low frequencies and produces a deeper, warmer<br />
sound. If you start getting feedback or you want to make<br />
the sound less boomy, turn the knob counterclockwise<br />
slightly.<br />
@ REVERB switch<br />
Set this switch to ON to recreate the rich ambience<br />
of various performance environments, such as a<br />
concert hall or a night club. The switch lights up in<br />
green when REVERB is ON ( ).<br />
# REVERB control<br />
Determines the overall level of the reverb or echo<br />
that is applied to the output signal. For best results,<br />
this level should not be set very high, to avoid<br />
possible feedback and to prevent the sound from<br />
becoming “muddy” with too much reverb.