slides
slides
slides

Create successful ePaper yourself
Turn your PDF publications into a flip-book with our unique Google optimized e-Paper software.
Introduction to Renderman<br />
using the Python API<br />
Saturday, 23 October 2010
Introduction to Renderman<br />
• When Renderman was first proposed it was a C like API for the<br />
development of scene descriptions to be rendered<br />
• The description file produced is usually called a RIB (Renderman<br />
Interface Byte stream) file and this is then passed to the renderer<br />
• The description of how the surface is to be textured and shaded is<br />
determined by a number of files called shaders<br />
• These can describe surfaces, displacements, lights, volumes.<br />
Saturday, 23 October 2010
Renderman Python<br />
• As of Version 14 (2008) renderman now has a python API<br />
• It is similar to the C API and running a python script will output a<br />
rib file<br />
• Alternatively we can render directly from within the python<br />
script<br />
• All of the notes presented will use the Python API to generate<br />
the rib files so we have the dual advantage of learning Python and<br />
prman at the same time.<br />
Saturday, 23 October 2010
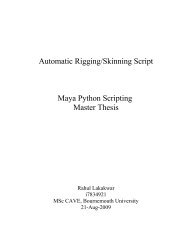
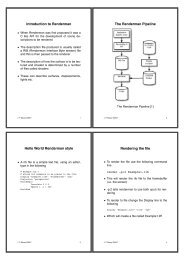
The<br />
Renderman<br />
Pipeline<br />
The Renderman Pipeline [1]<br />
Saturday, 23 October 2010
Hello World Renderman style<br />
• A rib file is a simple text file, using an editor, type in the following<br />
1 ##RenderMan RIB<br />
2 #Comments start with a #<br />
3 #File HelloWorld.rib #<br />
4 #Created by jmacey<br />
5 #Creation Date: Thu Sep 25 09:43:12 2008<br />
6 version 3.04<br />
7 Display "HelloWorld.exr" "framebuffer" "rgba"<br />
8 Format 720 575 1<br />
9 Projection "perspective"<br />
10 WorldBegin<br />
11 #move our world back 2 in the z so we can see it<br />
12 Translate 0 0 2<br />
13 #draw a sphere primitive<br />
14 Sphere 1 -1 1 360<br />
15 #end our world<br />
16 WorldEnd<br />
Saturday, 23 October 2010
Rendering the file<br />
• To render the file use the following command line<br />
render -t:2 simple.rib<br />
• This will render the rib file to the framebuffer (i.e. the screen)<br />
• • -t:2 tells renderman to use both cpu's for rendering (if you have<br />
more increase the value -t:8 !<br />
• To render to file change the Display line to the following<br />
Display "HelloWorld.exr" "file" "rgba"<br />
• Which will create a file called HelloWorld.exr<br />
•<br />
We can then use the sho program to view it (sho HelloWorld.exr)<br />
Saturday, 23 October 2010
Python Version<br />
• The python script to generate the rib file is a lot larger as<br />
we need to do some initial setup for the interface<br />
• All rib commands belong to the namespace ri and are<br />
prefixed with ri<br />
• Apart from that the function names are the same as the<br />
raw rib commands<br />
• The following file was used to create the HelloWorld rib<br />
file<br />
Saturday, 23 October 2010
1 #!/usr/bin/python<br />
2 # for bash we need to add the following to our .bashrc<br />
3 # export PYTHONPATH=$PYTHONPATH:$RMANTREE/bin<br />
4 import getpass<br />
5 import time<br />
6 # import the python renderman library<br />
7 import prman<br />
8<br />
9 ri = prman.Ri() # create an instance of the RenderMan interface<br />
10<br />
11 filename = "HelloWorld.rib"<br />
12 # this is the begining of the rib archive generation we can only<br />
13 # make RI calls after this function else we get a core dump<br />
14 ri.Begin(filename)<br />
15 # ArchiveRecord is used to add elements to the rib stream in this case comments<br />
16 # note the function is overloaded so we can concatinate output<br />
17 ri.ArchiveRecord(ri.COMMENT, 'Comments start with a #')<br />
18 ri.ArchiveRecord(ri.COMMENT, 'File HelloWorld.rib #')<br />
19 ri.ArchiveRecord(ri.COMMENT, "Created by " + getpass.getuser())<br />
20 ri.ArchiveRecord(ri.COMMENT, "Creation Date: " +time.ctime(time.time()))<br />
21<br />
22 # now we add the display element using the usual elements<br />
23 # FILENAME DISPLAY Type Output format<br />
24 ri.Display("HelloWorld.exr", "framebuffer", "rgba")<br />
25 # Specify PAL resolution 1:1 pixel Aspect ratio<br />
26 ri.Format(720,575,1)<br />
27 # now set the projection to perspective<br />
28 ri.Projection(ri.PERSPECTIVE)<br />
29<br />
30 # now we start our world<br />
31 ri.WorldBegin()<br />
32 # move back 2 in the z so we can see what we are rendering<br />
33 ri.ArchiveRecord(ri.COMMENT, 'move our world back 2 in the z so we can see it')<br />
34 ri.Translate(0,0,2)<br />
35 ri.ArchiveRecord(ri.COMMENT, 'draw a sphere primitive')<br />
36 ri.Sphere (1,-1, 1, 360)<br />
37 # end our world<br />
38 ri.ArchiveRecord(ri.COMMENT, 'end our world')<br />
39 ri.WorldEnd()<br />
40 # and finally end the rib file<br />
41 ri.End()<br />
As you can see<br />
The rib file created<br />
from the python API<br />
has no indentation<br />
1 ##RenderMan RIB<br />
2 #Comments start with a #<br />
3 #File HelloWorld.rib #<br />
4 #Created by jmacey<br />
5 #Creation Date: Thu Sep 25 09:51:00 2008<br />
6 version 3.04<br />
7 Display "HelloWorld.exr" "framebuffer" "rgba"<br />
8 Format 720 575 1<br />
9 Projection "perspective"<br />
10 WorldBegin<br />
11 #move our world back 2 in the z so we can see it<br />
12 Translate 0 0 2<br />
13 #draw a sphere primitive<br />
14 Sphere 1 -1 1 360<br />
15 #end our world<br />
16 WorldEnd<br />
Saturday, 23 October 2010
Python Path<br />
1 #!/usr/bin/python<br />
• The first line of the program is called a hash bang (#!)<br />
• it is used to tell the shell where to look for the interpreter for the<br />
current script (in this case python)<br />
• On most systems python lives in the /usr/bin/python directory so<br />
we use put this as the first line of the python script<br />
Saturday, 23 October 2010
Finding renderman<br />
1 export PYTHONPATH=$PYTHONPATH:$RMANTREE/bin<br />
• Renderman ships with a python interface to the renderman<br />
library, we need to tell the python shell where to find this interface<br />
• The python shell uses an environment variable called<br />
PYTHONPATH to search for python libraries, when using python<br />
for renderman we must tell python to search in the $RMANTREE/<br />
bin directory for the python library<br />
• This can be done by setting the line above for our shell (usually<br />
in .profile or .bashrc)<br />
Saturday, 23 October 2010
Basic Renderman commands<br />
1 import prman<br />
Load the prman library<br />
2<br />
3 ri = prman.Ri()<br />
4<br />
5<br />
6 filename = "TeapotPY.rib"<br />
Create an instance of the<br />
prman interface and assign it<br />
to the variable ri<br />
7 ri.Begin(filename)<br />
8<br />
9<br />
0<br />
1<br />
2<br />
Scene generation<br />
code goes here<br />
Begin our scene<br />
called “TeapotPY.rib”<br />
finally finish our scene<br />
3 ri.End()<br />
will cause the rib file to<br />
be written<br />
Saturday, 23 October 2010
direct rendering<br />
• In the previous example a file name is passed to the ri.Begin()<br />
function<br />
• If we wish to render the scene directly without generating the<br />
rib file we can do the following<br />
1 filename = "__render"<br />
2 ri.Begin(filename)<br />
Saturday, 23 October 2010
Rib layout<br />
• When writing rib files it is best to use indentation for the<br />
different Begin/End block to make it more human readable<br />
• This is not needed by prman but for us when de-bugging<br />
ribs<br />
• To make the ribs easier to read we can add the following<br />
code<br />
1 # Add Tabs to the rib output<br />
2 ri.Option("rib", {"string asciistyle": "indented"})<br />
Saturday, 23 October 2010
i. Commands<br />
• There is usually a direct correlation between the rib commands<br />
and the prman_for_python commands<br />
• The prman_for_python commands belong to the class prman<br />
which we usually assign the prefix pi. and are now functions which<br />
may require parameters<br />
• In some cases the commands will also require extra parameter<br />
lists which are pass using a python dictionary<br />
• The following code show some of the commands used to initialise<br />
the display and the perspective projection<br />
Saturday, 23 October 2010
Set the display options<br />
(file,display driver,format)<br />
Set image<br />
1 ri.Display("Teapot.exr", "framebuffer", "rgba")<br />
2<br />
3 ri.Format(720,576,1)<br />
4<br />
5 ri.Projection(ri.PERSPECTIVE,{"fov":[35]})<br />
Format<br />
(W,H, aspect)<br />
Set projection using built in<br />
identifier ri.PERSPECTIVE<br />
and a dictionary for attributes<br />
Saturday, 23 October 2010
Moving Things Around<br />
• In the first example the command Translate is used to move the<br />
object 2 in the Z.<br />
• Renderman treats +ve Z as going into the screen (opposite to<br />
OpenGL)<br />
• Renderman (and ribs) work with a Fixed Camera and the world<br />
must be moved to be in the correct position for the fixed<br />
camera<br />
• This can be counter intuitive at first but you soon get used to it.<br />
Saturday, 23 October 2010
Transforms<br />
1 ##RenderMan RIB<br />
2 #File transform1.rib<br />
3 #Created by jmacey<br />
4 #Creation Date: Thu Sep 25 10:16:50 2008<br />
5 version 3.04<br />
6 Display "transform1.exr" "framebuffer" "rgba"<br />
7 Format 720 575 1<br />
8 Projection "perspective"<br />
9 WorldBegin<br />
10 Translate 0 0 2<br />
11 Translate -1 0 0<br />
12 Sphere 1 -1 1 360<br />
13 Translate 1 0 0<br />
14 Sphere 1 -1 1 360<br />
15 WorldEnd<br />
1 #!/usr/bin/python<br />
2 # for bash we need to add the following to our .bashrc<br />
3 # export PYTHONPATH=$PYTHONPATH:$RMANTREE/bin<br />
4 import getpass<br />
5 import time<br />
6 # import the python renderman library<br />
7 import prman<br />
8<br />
9 ri = prman.Ri() # create an instance of the RenderMan interface<br />
10<br />
11 filename = "transform1.rib"<br />
12 # this is the begining of the rib archive generation we can only<br />
13 # make RI calls after this function else we get a core dump<br />
14 ri.Begin(filename)<br />
15 # ArchiveRecord is used to add elements to the rib stream in this case<br />
comments<br />
16 # note the function is overloaded so we can concatinate output<br />
17 ri.ArchiveRecord(ri.COMMENT, 'File ' +filename)<br />
18 ri.ArchiveRecord(ri.COMMENT, "Created by " + getpass.getuser())<br />
19 ri.ArchiveRecord(ri.COMMENT, "Creation Date: " +time.ctime(time.time()))<br />
20<br />
21 # now we add the display element using the usual elements<br />
22 # FILENAME DISPLAY Type Output format<br />
23 ri.Display("transform1.exr", "framebuffer", "rgba")<br />
24 # Specify PAL resolution 1:1 pixel Aspect ratio<br />
25 ri.Format(720,575,1)<br />
26 # now set the projection to perspective<br />
27 ri.Projection(ri.PERSPECTIVE)<br />
28<br />
29 # now we start our world<br />
30 ri.WorldBegin()<br />
31 # move back 2 in the z so we can see what we are rendering<br />
32 ri.Translate( 0,0,2)<br />
33 ri.Translate(-1,0,0)<br />
34 ri.Sphere(1,-1,1,360)<br />
35 ri.Translate(1,0,0)<br />
36 ri.Sphere(1,-1,1,360)<br />
37 ri.WorldEnd()<br />
38 # and finally end the rib file<br />
39 ri.End()<br />
Saturday, 23 October 2010
Grouping Transforms<br />
• To group transforms we use the TransformBegin and<br />
TransformEnd commands<br />
• These are similar to the OpenGL glPushMatrix() and<br />
glPopMatrix() and preserve the current transformation<br />
state<br />
Saturday, 23 October 2010
ouping Transforms<br />
1 ##RenderMan RIB<br />
2 #File transform2.rib<br />
3 #Created by jmacey<br />
4 #Creation Date: Thu Sep 25 10:22:19 2008<br />
5 version 3.04<br />
6 Display "transform2.exr" "framebuffer" "rgba"<br />
7 Format 720 575 1<br />
8 Projection "perspective"<br />
9 WorldBegin<br />
10 Translate 0 0 2<br />
11 TransformBegin<br />
12 Translate -1 0 0<br />
13 Sphere 1 -1 1 360<br />
14 TransformEnd<br />
15 TransformBegin<br />
16 Translate 1 0 0<br />
17 Sphere 1 -1 1 360<br />
18 TransformEnd<br />
19 WorldEnd<br />
1 #!/usr/bin/python<br />
2 # for bash we need to add the following to our .bashrc<br />
3 # export PYTHONPATH=$PYTHONPATH:$RMANTREE/bin<br />
4 import getpass<br />
5 import time<br />
6 # import the python renderman library<br />
7 import prman<br />
8<br />
9 ri = prman.Ri() # create an instance of the RenderMan interface<br />
10<br />
11 filename = "transform2.rib"<br />
12 # this is the begining of the rib archive generation we can only<br />
13 # make RI calls after this function else we get a core dump<br />
14 ri.Begin(filename)<br />
15 # ArchiveRecord is used to add elements to the rib stream in this case<br />
comments<br />
16 # note the function is overloaded so we can concatinate output<br />
17 ri.ArchiveRecord(ri.COMMENT, 'File ' +filename)<br />
18 ri.ArchiveRecord(ri.COMMENT, "Created by " + getpass.getuser())<br />
19 ri.ArchiveRecord(ri.COMMENT, "Creation Date: " +time.ctime(time.time()))<br />
20<br />
21 # now we add the display element using the usual elements<br />
22 # FILENAME DISPLAY Type Output format<br />
23 ri.Display("transform2.exr", "framebuffer", "rgba")<br />
24 # Specify PAL resolution 1:1 pixel Aspect ratio<br />
25 ri.Format(720,575,1)<br />
26 # now set the projection to perspective<br />
27 ri.Projection(ri.PERSPECTIVE)<br />
28<br />
29 # now we start our world<br />
30 ri.WorldBegin()<br />
31 # move back 2 in the z so we can see what we are rendering<br />
32 ri.Translate( 0,0,2)<br />
33 ri.TransformBegin()<br />
34 ri.Translate(-1,0,0)<br />
35 ri.Sphere(1,-1,1,360)<br />
36 ri.TransformEnd()<br />
37 ri.TransformBegin()<br />
38 ri.Translate(1,0,0)<br />
39 ri.Sphere(1,-1,1,360)<br />
40 ri.TransformEnd()<br />
41 ri.WorldEnd()<br />
42 # and finally end the rib file<br />
43 ri.End()<br />
Saturday, 23 October 2010
Other Affine Transforms<br />
• Scale x y z : scales the current active elements in x y and z<br />
• Rotate [angle] x y z : rotate around the axis by [angle] degrees<br />
• Identity : restores the transformation matrix to what is was<br />
before world begin<br />
1 # scale around the origin x,y,z<br />
2<br />
3 ri.Scale(1,2,1)<br />
4<br />
5 #rotate -90 degrees around the vector [1 0 0] (x)<br />
6<br />
7 ri.Rotate(-90,1,0,0)<br />
8<br />
9 # set the transform to the idenity matrix<br />
10 # [ 1 0 0 0]<br />
11 # [ 0 1 0 0]<br />
12 # [ 0 0 1 0]<br />
13 # [ 0 0 0 1]<br />
14 ri.Identity()<br />
Saturday, 23 October 2010
Affine Transforms<br />
1 import prman<br />
2<br />
3 ri = prman.Ri()<br />
4<br />
5 filename = "affine.rib"<br />
6 ri.Begin(filename)<br />
7 ri.Display("affine.exr", "framebuffer", "rgba")<br />
8 ri.Format(720,575,1)<br />
9 ri.Projection(ri.PERSPECTIVE)<br />
10<br />
11 ri.WorldBegin()<br />
12<br />
13 ri.Translate(0,0,2)<br />
14 ri.TransformBegin()<br />
15 ri.Translate(-1,0,0)<br />
16 ri.Scale(0.3,0.3,0.3)<br />
17 ri.Rotate(45,0,1,0)<br />
18 ri.Geometry("teapot")<br />
19 ri.Identity()<br />
20 ri.Translate(1,-0.5,2)<br />
21 ri.Scale(0.3,0.8,0.3)<br />
22 ri.Rotate(-90,1,0,0)<br />
23 ri.Rotate(35,0,0,1)<br />
24 ri.Geometry("teapot")<br />
25 ri.TransformEnd()<br />
26<br />
27 ri.WorldEnd()<br />
28 ri.End()<br />
1 Display "affine.exr" "framebuffer" "rgba"<br />
2 Format 720 575 1<br />
3 Projection "perspective"<br />
4 WorldBegin<br />
5 Translate 0 0 2<br />
6 TransformBegin<br />
7 Translate -1 0 0<br />
8 Scale 0.3 0.3 0.3<br />
9 Rotate 45 0 1 0<br />
10 Geometry "teapot"<br />
11 Identity<br />
12 Translate 1 -0.5 2<br />
13 Scale 0.3 0.8 0.3<br />
14 Rotate -90 1 0 0<br />
15 Rotate 35 0 0 1<br />
16 Geometry "teapot"<br />
17 TransformEnd<br />
18 WorldEnd<br />
Saturday, 23 October 2010
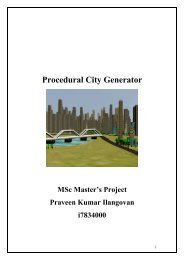
Shape Primitives<br />
• The rib specification has 7 parametric Quadrics commands<br />
that allows for the specification of a 7 surfaces<br />
• These are<br />
1 Sphere radius zmin zmax sweepangle<br />
2<br />
3 Cylinder radius zmin zmax sweepangle<br />
4<br />
5 Cone height radius sweepangle<br />
6<br />
7 Paraboloid topradius zmin zmax sweepangle<br />
8<br />
9 Hyperboloid point1 point2 sweepangle<br />
10<br />
11 Disk height radius sweepangle<br />
12<br />
13 Torus majorrad minorrad phimin phimax sweepangle<br />
Saturday, 23 October 2010
Primitives<br />
Renderman Primitives [2]<br />
Saturday, 23 October 2010
Primitives<br />
Renderman Primitives [2]<br />
Saturday, 23 October 2010
Note Hyperboloid<br />
takes two Points as<br />
arguments<br />
represented as lists<br />
1 ri.WorldBegin()<br />
2<br />
3 ri.Translate(0,0,10)<br />
4 ri.TransformBegin()<br />
5 ri.Translate(-4,2,0)<br />
6 ri.Sphere(1,-1,1,360)<br />
7 ri.TransformEnd()<br />
8 ri.TransformBegin()<br />
9 ri.Translate(-4,-2,0)<br />
10 ri.Rotate(90,1,0,0)<br />
11 ri.Cylinder(1,-0.5,0.5,360)<br />
12 ri.TransformEnd()<br />
13 ri.TransformBegin()<br />
14 ri.Translate(-1,2,0)<br />
15 ri.Rotate(-90,1,0,0)<br />
16 ri.Cone(2,1.0,360)<br />
17 ri.TransformEnd()<br />
18 ri.TransformBegin()<br />
19 ri.Translate(-1,-2,0)<br />
20 ri.Rotate(-90,1,0,0)<br />
21 ri.Paraboloid(1.0,1.0,2.0,360)<br />
22 ri.TransformEnd()<br />
23 ri.TransformBegin()<br />
24 ri.Translate(2,2,0)<br />
25 ri.Rotate(-90,1,0,0)<br />
26 p1=[1.0,0.0,0.5]<br />
27 p2=[1.0,0.0,-0.5]<br />
28 ri.Hyperboloid(p1,p2,270)<br />
29 ri.TransformEnd()<br />
30 ri.TransformBegin()<br />
31 ri.Translate(2,-2,0)<br />
32 ri.Rotate(-90,1,0,0)<br />
33 ri.Disk(0,1,360)<br />
34 ri.TransformEnd()<br />
35 ri.TransformBegin()<br />
36 ri.Translate(3 ,0,0)<br />
37 ri.Rotate(45,1,0,0)<br />
38 ri.Torus(1.00,0.5,0,360,360)<br />
39 ri.TransformEnd()<br />
40<br />
41 ri.WorldEnd()<br />
1 WorldBegin<br />
2 Translate 0 0 10<br />
3 TransformBegin<br />
4 Translate -4 2 0<br />
5 Sphere 1 -1 1 360<br />
6 TransformEnd<br />
7 TransformBegin<br />
8 Translate -4 -2 0<br />
9 Rotate 90 1 0 0<br />
10 Cylinder 1 -0.5 0.5 360<br />
11 TransformEnd<br />
12 TransformBegin<br />
13 Translate -1 2 0<br />
14 Rotate -90 1 0 0<br />
15 Cone 2 1 360<br />
16 TransformEnd<br />
17 TransformBegin<br />
18 Translate -1 -2 0<br />
19 Rotate -90 1 0 0<br />
20 Paraboloid 1 1 2 360<br />
21 TransformEnd<br />
22 TransformBegin<br />
23 Translate 2 2 0<br />
24 Rotate -90 1 0 0<br />
25 Hyperboloid 1 0 0.5 1 0 -0.5 270<br />
26 TransformEnd<br />
27 TransformBegin<br />
28 Translate 2 -2 0<br />
29 Rotate -90 1 0 0<br />
30 Disk 0 1 360<br />
31 TransformEnd<br />
32 TransformBegin<br />
33 Translate 3 0 0<br />
34 Rotate 45 1 0 0<br />
35 Torus 1 0.5 0 360 360<br />
36 TransformEnd<br />
37 WorldEnd<br />
Saturday, 23 October 2010
Parameter Lists<br />
• Each of the primitives have the ability to pass<br />
parameters to them<br />
Name Declared Type Description<br />
“P” vertex point Position<br />
“Pw” vertex hpoint Position in homogeneous cords<br />
“N” varying Normal Phong shading normals<br />
“Cs” varying colour Surface Colour (overrides rib colour)<br />
“Os” varying colour Surface opacity (overrides rib opacity)<br />
“st” varying float[2] Texture Co-ordinates<br />
Saturday, 23 October 2010
Parameter Lists<br />
• The parameters are passed as a Python Dictionary<br />
structure.<br />
• The format is as follows<br />
1 dict ={key : value}<br />
2<br />
3 colours=[1,1,1,.5,.9,1,.2,.9,0,.5,.2,0]<br />
4<br />
5 ri.Sphere(1,-1,1,360,{"Cs":colours})<br />
Saturday, 23 October 2010
Coloured Sphere<br />
1 ##RenderMan RIB<br />
2 #File Param.rib<br />
3 #Created by jmacey<br />
4 #Creation Date: Thu Sep 25 12:27:52 2008<br />
5 version 3.04<br />
6 Display "Param.exr" "framebuffer" "rgba"<br />
7 Format 720 575 1<br />
8 Projection "perspective" "uniform float fov" [50]<br />
9 WorldBegin<br />
10 Translate 0 0 3<br />
11 TransformBegin<br />
12 Sphere 1 -1 1 360 "Cs" [1 0 0 0 0 1 1 0 0 0 1 0]<br />
13 TransformEnd<br />
14 WorldEnd<br />
1 # now we start our world<br />
2 ri.WorldBegin()<br />
3<br />
4 ri.Translate(0,0,3)<br />
5 ri.TransformBegin()<br />
6 colours=[1,0,0,0,0,1,1,0,0,0,1,0]<br />
7 #ri.Rotate(90,1,1,1)<br />
8 ri.Sphere(1,-1,1,360,{"Cs":colours})<br />
9 ri.TransformEnd()<br />
10 ri.WorldEnd()<br />
11 # and finally end the rib file<br />
12 ri.End()<br />
Saturday, 23 October 2010
What No Cube?<br />
• PRman uses patches and we can combine them to make a cube.<br />
Patch “type” [parameterlist]<br />
• Define a single patch. type can be either "bilinear" or "bicubic". parameterlist is a<br />
list of token-array pairs where each token is one of the standard geometric<br />
primitive variables<br />
• Four points define a bilinear patch, and 16 define a bicubic patch. The order of<br />
vertices for a bilinear patch is (0,0),(1,0),(0,1),(1,1).<br />
• Note that the order of points defining a quadrilateral is different depending on<br />
whether it is a bilinear patch or a polygon.<br />
• The vertices of a polygon would normally be in clockwise (0,0),(0,1),(1,1),(1,0)<br />
order.<br />
Saturday, 23 October 2010
1 TransformBegin<br />
2 Translate -2 0 0<br />
3 Rotate 25 0 1 0<br />
4 ObjectInstance "Cube"<br />
5 TransformEnd<br />
6<br />
7 TransformBegin<br />
8 Translate 0 0 0<br />
9 Rotate 25 1 1 0<br />
10 ObjectInstance "Cube"<br />
11 TransformEnd<br />
12<br />
13 TransformBegin<br />
14 Translate 2 0 0<br />
15 Rotate -25 1 1 1<br />
16 Scale 0.2 2.0 0.2<br />
17 ObjectInstance "Cube"<br />
18 TransformEnd<br />
1 Declare "Cube" "string"<br />
2<br />
3 ObjectBegin "Cube"<br />
4 Patch "bilinear" "P" [-0.5 -0.5 0.5 -0.5 0.5 0.5 0.5 -0.5 0.5 0.5 0.5 0.5]<br />
5 Patch "bilinear" "P" [-0.5 -0.5 -0.5 -0.5 0.5 -0.5 0.5 -0.5 -0.5 0.5 0.5 -0.5]<br />
6 Patch "bilinear" "P" [-0.5 -0.5 -0.5 -0.5 0.5 -0.5 -0.5 -0.5 0.5 -0.5 0.5 0.5]<br />
7 Patch "bilinear" "P" [0.5 -0.5 -0.5 0.5 0.5 -0.5 0.5 -0.5 0.5 0.5 0.5 0.5]<br />
8 Patch "bilinear" "P" [0.5 -0.5 0.5 0.5 -0.5 -0.5 -0.5 -0.5 0.5 -0.5 -0.5 -0.5]<br />
9 Patch "bilinear" "P" [0.5 0.5 0.5 0.5 0.5 -0.5 -0.5 0.5 0.5 -0.5 0.5 -0.5]<br />
10 ObjectEnd<br />
Saturday, 23 October 2010
Python Cube Function<br />
• The previous example used the Object instance rib<br />
command<br />
• This allowed us to repeat a series of rib commands.<br />
• With python this can be replaced with a python<br />
function instead<br />
Saturday, 23 October 2010
1 def Cube(width,height,depth) :<br />
2 w=width/2.0<br />
3 h=height/2.0<br />
4 d=depth/2.0<br />
5 ri.ArchiveRecord(ri.COMMENT, 'Cube Generated by Cube Function')<br />
6 #rear<br />
7 face=[-w,-h,d,-w,h,d,w,-h,d,w,h,d]<br />
8 ri.Patch("bilinear",{'P':face})<br />
9 #front<br />
10 face=[-w,-h,-d,-w,h,-d,w,-h,-d,w,h,-d]<br />
11 ri.Patch("bilinear",{'P':face})<br />
12 #left<br />
13 face=[-w,-h,-d,-w,h,-d,-w,-h,d,-w,h,d]<br />
14 ri.Patch("bilinear",{'P':face})<br />
15 #right<br />
16 face=[w,-h,-d,w,h,-d,w,-h,d,w,h,d]<br />
17 ri.Patch("bilinear",{'P':face})<br />
18 #bottom<br />
19 face=[w,-h,d,w,-h,-d,-w,-h,d,-w,-h,-d]<br />
20 ri.Patch("bilinear",{'P':face})<br />
21 #top<br />
22 face=[w,h,d,w,h,-d,-w,h,d,-w,h,-d]<br />
23 ri.Patch("bilinear",{'P':face})<br />
24 ri.ArchiveRecord(ri.COMMENT, '--End of Cube Function--')<br />
25<br />
26<br />
27<br />
28 # now we start our world<br />
29 ri.WorldBegin()<br />
30<br />
31 ri.Translate(0,0,5)<br />
32 ri.TransformBegin()<br />
33 ri.Translate(-2,0,0)<br />
34 ri.Rotate(25,0,1,0)<br />
35 Cube(1,1,1)<br />
36 ri.TransformEnd()<br />
37 ri.TransformBegin()<br />
38 ri.Translate( 0,0,0)<br />
39 ri.Rotate( 25,1,1,0)<br />
40 Cube(1,1,1)<br />
41 ri.TransformEnd()<br />
42 ri.TransformBegin()<br />
43 ri.Translate(2,0,0)<br />
44 ri.Rotate(-25,1,1,1)<br />
45 Cube(0.2,2,0.2);<br />
46 ri.TransformEnd()<br />
47<br />
48 ri.WorldEnd()<br />
1 WorldBegin<br />
2 Translate 0 0 5<br />
3 TransformBegin<br />
4 Translate -2 0 0<br />
5 Rotate 25 0 1 0<br />
6 #Cube Generated by Cube Function<br />
7 Patch "bilinear" "P" [-0.5 -0.5 0.5 -0.5 0.5 0.5 0.5 -0.5 0.5 0.5 0.5 0.5]<br />
8 Patch "bilinear" "P" [-0.5 -0.5 -0.5 -0.5 0.5 -0.5 0.5 -0.5 -0.5 0.5 0.5 -0.5]<br />
9 Patch "bilinear" "P" [-0.5 -0.5 -0.5 -0.5 0.5 -0.5 -0.5 -0.5 0.5 -0.5 0.5 0.5]<br />
10 Patch "bilinear" "P" [0.5 -0.5 -0.5 0.5 0.5 -0.5 0.5 -0.5 0.5 0.5 0.5 0.5]<br />
11 Patch "bilinear" "P" [0.5 -0.5 0.5 0.5 -0.5 -0.5 -0.5 -0.5 0.5 -0.5 -0.5 -0.5]<br />
12 Patch "bilinear" "P" [0.5 0.5 0.5 0.5 0.5 -0.5 -0.5 0.5 0.5 -0.5 0.5 -0.5]<br />
13 #--End of Cube Function--<br />
14 TransformEnd<br />
15 TransformBegin<br />
16 Translate 0 0 0<br />
17 Rotate 25 1 1 0<br />
18 #Cube Generated by Cube Function<br />
19 Patch "bilinear" "P" [-0.5 -0.5 0.5 -0.5 0.5 0.5 0.5 -0.5 0.5 0.5 0.5 0.5]<br />
20 Patch "bilinear" "P" [-0.5 -0.5 -0.5 -0.5 0.5 -0.5 0.5 -0.5 -0.5 0.5 0.5 -0.5]<br />
21 Patch "bilinear" "P" [-0.5 -0.5 -0.5 -0.5 0.5 -0.5 -0.5 -0.5 0.5 -0.5 0.5 0.5]<br />
22 Patch "bilinear" "P" [0.5 -0.5 -0.5 0.5 0.5 -0.5 0.5 -0.5 0.5 0.5 0.5 0.5]<br />
23 Patch "bilinear" "P" [0.5 -0.5 0.5 0.5 -0.5 -0.5 -0.5 -0.5 0.5 -0.5 -0.5 -0.5]<br />
24 Patch "bilinear" "P" [0.5 0.5 0.5 0.5 0.5 -0.5 -0.5 0.5 0.5 -0.5 0.5 -0.5]<br />
25 #--End of Cube Function--<br />
26 TransformEnd<br />
27 TransformBegin<br />
28 Translate 2 0 0<br />
29 Rotate -25 1 1 1<br />
30 #Cube Generated by Cube Function<br />
31 Patch "bilinear" "P" [-0.1 -1 0.1 -0.1 1 0.1 0.1 -1 0.1 0.1 1 0.1]<br />
32 Patch "bilinear" "P" [-0.1 -1 -0.1 -0.1 1 -0.1 0.1 -1 -0.1 0.1 1 -0.1]<br />
33 Patch "bilinear" "P" [-0.1 -1 -0.1 -0.1 1 -0.1 -0.1 -1 0.1 -0.1 1 0.1]<br />
34 Patch "bilinear" "P" [0.1 -1 -0.1 0.1 1 -0.1 0.1 -1 0.1 0.1 1 0.1]<br />
35 Patch "bilinear" "P" [0.1 -1 0.1 0.1 -1 -0.1 -0.1 -1 0.1 -0.1 -1 -0.1]<br />
36 Patch "bilinear" "P" [0.1 1 0.1 0.1 1 -0.1 -0.1 1 0.1 -0.1 1 -0.1]<br />
37 #--End of Cube Function--<br />
38 TransformEnd<br />
39 WorldEnd<br />
Saturday, 23 October 2010
Python Dictionaries<br />
• Python dictionaries are a powerful key / value data structure<br />
which allows the storing of different data types in the same data<br />
set<br />
• RenderMan's variable-length parameter list is represented in<br />
prman_for_python as a standard Python dictionary whose keys<br />
are the parameter declaration and whose values are scalars or<br />
sequences whose length is governed by the declaration and<br />
standard binding semantics<br />
Saturday, 23 October 2010
1 #!/usr/bin/python<br />
2<br />
3 Dictionary={<br />
4 "red":[1.0,0.0,0.0],<br />
5 "green":[0.0,1.0,0.0],<br />
6 "blue":[0.0,0.0,1.0],<br />
7 "white":[1.0,1.0,1.0],<br />
8 "black":[0.0,0.0,0.0]<br />
9 }<br />
10<br />
11 print Dictionary.get("red")<br />
12 print Dictionary.get("white")<br />
13 print Dictionary.get("purple")<br />
Create a dictionary of<br />
colour lists<br />
“key”:[r,g,b]<br />
Use the .get(“key”)<br />
method to find the<br />
value<br />
1 [1.0, 0.0, 0.0]<br />
2 [1.0, 1.0, 1.0]<br />
3 None<br />
note “None” returned<br />
if “key” not found<br />
Saturday, 23 October 2010
Adding Colour<br />
• To change the colour of a primitive we use the Color command<br />
passing in the RGB components<br />
• For example to create a red object we use<br />
[RIB] Color 1 0 0 [Python] ri.Color([1,0,0])<br />
• Colour is an attribute and as such will remain the currently active<br />
colour until changed.<br />
• To group colours (or any other attributes) we use the<br />
AttributeBegin and AttributeEnd block<br />
Saturday, 23 October 2010
Attributes<br />
1 ri.AttributeBegin()<br />
2 ri.Color([1,0,0])<br />
3 ri.Geometry("teapot")<br />
4 ri.AttributeEnd()<br />
Saturday, 23 October 2010
Attributes<br />
1 WorldBegin<br />
2 Translate 0 0 5<br />
3 Color [1 1 1]<br />
4 Opacity [1 1 1]<br />
5 TransformBegin<br />
6 Translate -0.5 0 0<br />
7 AttributeBegin<br />
8 Color [0 1 1]<br />
9 Opacity [0.2 0.2 0.2]<br />
10 Sphere 1 -1 1 360<br />
11 AttributeEnd<br />
12 TransformEnd<br />
13 TransformBegin<br />
14 Translate 0.5 0 0<br />
15 Sphere 1 -1 1 360<br />
16 TransformEnd<br />
17 WorldEnd<br />
1 # now we start our world<br />
2 ri.WorldBegin()<br />
3<br />
4 ri.Translate(0,0,5)<br />
5 ri.Color([1,1,1])<br />
6 ri.Opacity([1,1,1])<br />
7 ri.TransformBegin()<br />
8 ri.Translate(-0.5,0,0)<br />
9 ri.AttributeBegin()<br />
10 ri.Color([0,1,1])<br />
11 ri.Opacity([0.2,0.2,0.2])<br />
12 ri.Sphere(1,-1,1,360)<br />
13 ri.AttributeEnd()<br />
14 ri.TransformEnd()<br />
15 ri.TransformBegin()<br />
16 ri.Translate(0.5,0,0)<br />
17 ri.Sphere(1,-1,1,360)<br />
18 ri.TransformEnd()<br />
19<br />
20 ri.WorldEnd()<br />
Saturday, 23 October 2010
Rib file Structure Conventions<br />
• Following is a structured list of components for a conforming<br />
RIB file that diagrams the "proper" use of RIB.<br />
• Some of the components are optional and will depend greatly<br />
on the resource requirements of a given scene.<br />
• Indentation indicates the scope of the following command.<br />
Saturday, 23 October 2010
1 Preamble and global variable declarations (RIB requests:version,declare)<br />
2<br />
3 Static options and default attributes (image and display options,camera options)<br />
4<br />
5 Static camera transformations (camera location and orientation)<br />
6<br />
7 Frame block (if more than one frame)<br />
8<br />
9 Frame-specific variable declarations<br />
10<br />
11 Variable options and default attributes<br />
12<br />
13 Variable camera transforms<br />
14<br />
15 World block<br />
16<br />
17 (scene description)<br />
18 User Entity (enclosed within AttributeBegin/AttributeEnd)<br />
19 User Entity (enclosed within AttributeBegin/AttributeEnd)<br />
20 User Entity<br />
21 more frame blocks<br />
Saturday, 23 October 2010
Rib file Structure<br />
• This structure results from the vigourous application of the<br />
following Scoping Conventions:<br />
• No attribute inheritance should be assumed unless implicit in the<br />
definition of the User Entity (i.e., within a hierarchy).<br />
• No attribute should be exported except to establish either global<br />
or local defaults.<br />
• The RenderMan Specification provides block structuring to<br />
organize the components of a RIB file.<br />
• Although the use of blocks is only required for frame and world<br />
constructs by the Specification, the liberal use of attribute and<br />
transform blocks is encouraged.<br />
Saturday, 23 October 2010
Attributes<br />
• Attributes are flags and values that are part of the graphics state,<br />
and are therefore associated with individual primitives.<br />
• The values of these attributes are pushed and popped with the<br />
graphics state.<br />
• This is done with the AttributeBegin and AttributeEnd<br />
commands<br />
• The attribute block is the fundamental block for encapsulating<br />
user entities.<br />
Saturday, 23 October 2010
Attributes II<br />
• Within an attribute block, the structure is simple. All attribute settings should<br />
follow immediately after the AttributeBegin request.<br />
• Geometric transformations are considered attributes in the RenderMan<br />
Interface and should also precede any geometry.<br />
• Depending on the internal architecture of the modeling software, user entities<br />
may be described around a local origin. In this case, a modeling transformation<br />
commonly transforms the entity from object space to world space.<br />
• If this is not the case, the modeler will probably be working entirely in world<br />
space and no modeling transform will be present.<br />
• After setting all of the attributes for the entity, the geometry should<br />
immediately follow<br />
Saturday, 23 October 2010
Shading Rate<br />
• This is probably the second most critical factor in the speed performance of<br />
RenderMan (exceeded only by the resolution).<br />
• This is due to two factors.<br />
• First, it governs how often the shading language interpreter runs. Smaller<br />
numbers mean the shaders must be evaluated at more places on the surface of<br />
the primitives.<br />
• Second, it governs how many polygons (micropolygons) are passed through the<br />
hidden-surface algorithm.<br />
• Smaller numbers mean more micropolygons, requiring more hidden-surface<br />
evaluation and more memory to store temporary results.<br />
• The end result of all this is that doubling the Shading Rate usually gets you<br />
nearly twice the rendering speed. Pretty good!<br />
Saturday, 23 October 2010
Shading Rate II<br />
• The default for shading rate is 0.25, which is much smaller than is<br />
necessary for most images.<br />
• A much more typical number for final rendering is 1.0 to 4.0, and<br />
test renderings can usually be done at 16.0 or even larger.<br />
• What is the disadvantage?<br />
• A shading rate that is too large tends to give blocky looking<br />
colours and excessive blur on textures.<br />
• The blockiness can often be alleviated by turning on Gouraud<br />
shading with the ShadingInterpolation "smooth" call.<br />
Saturday, 23 October 2010
Shading Rate III<br />
• As long as the colour of an object changes slowly and smoothly<br />
across its surface, this will look fine.<br />
• Only if the surface has drastic colour changes, such as sharpedged<br />
patterns in its textures, will these results be<br />
unsatisfactory.<br />
• And an object with a shading rate of 16.0 and Gouraud shading<br />
will render much faster than an object with a shading rate of 1.0.<br />
Saturday, 23 October 2010
Shading Rate III<br />
• One of the most important things to remember about the Shading Rate and<br />
Shading Interpolation values is that they are Attributes.<br />
• That is, they can be changed from one primitive to the next.<br />
• So, if you have a finely patterned vase sitting in a room with flat white walls,<br />
the vase can have a small shading rate (like 1.0) to capture its detail<br />
• while the walls can have a very large shading rate (like 64.0) to save time<br />
(with no visible problems).<br />
• This is a very powerful technique that amounts to telling the renderer which<br />
objects to spend time getting right and which objects are boring and can be<br />
handled simply.<br />
Saturday, 23 October 2010
Objects<br />
• A single geometric primitive or a list of geometric primitives may be retained by<br />
enclosing them with ObjectBegin and ObjectEnd.<br />
• The RenderMan Interface allocates and re-turns an ObjectHandle for each<br />
retained object defined in this way.<br />
• This handle can subsequently be used to reference the object when creating<br />
instances with ObjectInstance.<br />
• Objects are not rendered when they are defined within an ObjectBegin-<br />
ObjectEnd block; only an internal definition is created.<br />
• Transformations, and even Motion blocks, may be used inside an Object block,<br />
though they obviously imply a relative transformation to the coordinate system<br />
active when the Object is instanced.<br />
• All of an object's attributes are inherited at the time it is instanced, not at the<br />
time at which it is created.<br />
Saturday, 23 October 2010
Saturday, 23 October 2010<br />
1 #declare a string so we can refer to the Object by name<br />
2 Declare "Spheres" "string"<br />
3 # Now we actually create the Object<br />
4<br />
5 ObjectBegin "Spheres"<br />
6 Sphere 1 -1 1 360<br />
7 Translate 0 0 2<br />
8 Scale 0.5 0.5 0.5<br />
9 Sphere 1 -1 1 360<br />
10 ObjectEnd<br />
11<br />
12 Display "min.tiff" "framebuffer" "rgba"<br />
13 Projection "perspective" "fov" [30]<br />
14<br />
15 # start our world<br />
16 WorldBegin<br />
17 Translate 0 0 14 #move the global view position<br />
18 Rotate 90 1 0 0<br />
19 Color [1 0 0]<br />
20 Attribute "identifier" "name" ["Spheres1"]<br />
21 ObjectInstance "Spheres"<br />
22 Color [0 1 0]<br />
23 Translate 3.2 0 0<br />
24 Attribute "identifier" "name" ["Spheres2"]<br />
25 ObjectInstance "Spheres"<br />
26 Color [0 0 1]<br />
27 Translate -6.2 0 0<br />
28 Attribute "identifier" "name" ["Spheres3"]<br />
29 ObjectInstance "Spheres"<br />
30 #end our world<br />
31 WorldEnd
Named Primitives<br />
• It is occasionally useful to give names to individual primitives. For example,<br />
when a primitive won't split at the eye plane (see Section 4.8 prman docs) it<br />
can be desirable to know which primitive is causing the problem.This can be<br />
done using the attribute identifier with the parameter name, as in:<br />
1 RtString name[1] = {"Gigi"};<br />
2 RiAttribute("identifier","name",(RtPointer)name,RI_NULL);<br />
3<br />
4 or<br />
5<br />
6 Attribute "identifier" "name" ["Spheres3"]<br />
• All defined primitives will have this name until the graphics stack is popped (with<br />
RiAttributeEnd) or another such RiAttribute call is made.<br />
• The error message would then contain a reference to a specific primitive name<br />
instead of the mysterious .<br />
Saturday, 23 October 2010
Python ObjectBegin / End<br />
• At present there is a bug in the python version of<br />
ObjectInstance which does not allow rib file generation<br />
• However it will work in direct mode where the rib stream<br />
is fed directly into the renderer<br />
• To do this we use the following<br />
1 # if we use __render as the file name we go to<br />
2 # immediate mode and the rib stream is passed directly to<br />
3 # the renderer.<br />
4 # if we specify framebuffer in the Dispalay option we render to screen<br />
5 # if we specify file we render to file<br />
6 filename = "__render"<br />
7<br />
8 ri.Begin(filename)<br />
Saturday, 23 October 2010
1 ri = prman.Ri() # create an instance of the RenderMan interface<br />
2 ri.Option("rib", {"string asciistyle": "indented"})<br />
3<br />
4 filename = "__render"<br />
5 ri.Begin(filename)<br />
6<br />
7<br />
8 #declare a string so we can refer to the Object by name<br />
9 ri.Declare( "Spheres" ,"string")<br />
10 # Now we actually create the Object<br />
11 ObjHandle=ri.ObjectBegin()<br />
12 print ObjHandle<br />
13 ri.Sphere(1,-1,1,360)<br />
14 ri.Translate(0,0,2)<br />
15 ri.Scale(0.5,0.5,0.5)<br />
16 ri.Sphere(1,-1,1,360)<br />
17 ri.ObjectEnd()<br />
18<br />
19<br />
20 # start our world<br />
21 ri.WorldBegin()<br />
22 ri.Translate(0,0,14) #move the global view position<br />
23 ri.Rotate(90,1,0,0)<br />
24 ri.Color(colours["red"])<br />
25 ri.Attribute ("identifier",{"name": "Spheres1"})<br />
26 ri.ObjectInstance(ObjHandle)<br />
27 ri.Color(colours["green"])<br />
28 ri.Translate(3.2,0,0)<br />
29 ri.Attribute( "identifier",{ "name" :"Spheres2"})<br />
30 ri.ObjectInstance(ObjHandle)<br />
31 ri.Color(colours["blue"])<br />
32 ri.Translate(-6.2,0,0)<br />
33 ri.Attribute("identifier",{ "name" : "Spheres3"})<br />
34 ri.ObjectInstance("%s"%(ObjHandle))<br />
35 ri.ArchiveRecord("ribfile", "ObjectInstance " +ObjHandle)<br />
36<br />
37 #end our world<br />
38<br />
39 ri.WorldEnd()<br />
40 # and finally end the rib file<br />
41 ri.End()<br />
ObjectBegin returns a handle<br />
This is generated by prman and is<br />
unique each time :<br />
8a5644f8-8bae-11dd-9428-001b639ea4ff<br />
We then use the Object Handle in the instance<br />
call<br />
Saturday, 23 October 2010
Options<br />
• Options are parameters that affect the rendering of an entire<br />
image.<br />
• They must be set before calling WorldBegin, since at that point<br />
options for a specific frame are frozen.<br />
• The PRMan Quick Reference includes a table that summarizes<br />
summarizes the options available in PhotoRealistic RenderMan.<br />
• Note that some of the defaults listed can be overridden by<br />
configuration files.<br />
Saturday, 23 October 2010
Frame Buffer Control<br />
• There are several options which can be enabled through the<br />
parameter list of the RiDisplay call. These options, naturally<br />
enough, influence the use of the display device.<br />
• Output Compression<br />
• The TIFF driver also accepts an option to set the compression<br />
type, which may be "lzw", "packbits", "zip" (the default),<br />
"pixarlog", or "none":<br />
1 Display "min.tiff" "TIFF" "rgba" "compression" "lzw"<br />
Saturday, 23 October 2010
OpenEXR Display Driver<br />
• This driver supports OpenEXR, a high dynamic-range image,<br />
floating point file format developed by Industrial Light & Magic.<br />
• When using this display driver for rgba or Z output, you should<br />
turn rgba and Z quantization off by using a floating point<br />
Quantize statement, ie:<br />
1 Quantize "rgba" 0 0 0 0<br />
2 Quantize "z" 0 0 0 0<br />
3<br />
4 ri.Quantize("rgba",0,0,0,0)<br />
5 ri.Quantize("z",0,0,0,0)<br />
Saturday, 23 October 2010
OpenEXR Driver<br />
• This display driver also supports the output of image channels other than<br />
rgba using the Arbitrary Output Variable mechanisms.<br />
• This driver maps Renderman's output variables to image channels as<br />
follows:<br />
output variable name image channel name<br />
type<br />
"r" "R" preferred type<br />
"g" "G" preferred type<br />
"b" "B" preferred type<br />
"a" "A" preferred type<br />
"z" "Z" FLOAT<br />
other<br />
same as output variable name preferred type<br />
Saturday, 23 October 2010
Setting Display Parameters<br />
• By default, the "preferred" channel type is the value float (32-bit).<br />
• The preferred type can be changed by adding an "exrpixeltype" or "type"<br />
argument to the Display command in the RIB file.<br />
1 # Store point positions in HALF format<br />
2 Display "Points.exr" "openexr" "P" "string exrpixeltype" "half"<br />
3 ri.Display("Points.exr", "openexr", "P" ,{"string exrpixeltype" :"half"})<br />
• Compression defaults to "zip"<br />
• You can select a different compression method by adding an "exrcompression"<br />
argument or simply the "compression" argument to the Display command.<br />
1 # Store RGBA using run-length encoding<br />
2 Display "rle.rgba.exr" "openexr" "rgba" "string exrcompression" "rle"<br />
3 ri.Display("rle.rgba.exr", "openexr", "rgba" ,{"string exrcompression" :"rle"})<br />
Saturday, 23 October 2010
Search Paths<br />
• PhotoRealistic RenderMan searches specific paths for shader<br />
definitions, texture map files and Pixar Looks® masters and<br />
instances.<br />
• The search path is a colon-separated list of directories that are<br />
used in searching for files.<br />
• Example<br />
1 Option "searchpath" "string shader" ["/mapublic/shaders"]<br />
2<br />
3 ri.Option("searchpath", {"string shader":"/mapublic/shaders"})<br />
Saturday, 23 October 2010
Search Paths<br />
• The valid search paths are:<br />
• shader :- Used by the renderer to find all shader .slo files.<br />
• texture :- Used by the renderer to find all texture files.<br />
• archive :- Used by the renderer to find RIB archives.<br />
• procedural :- Used by the renderer to find procedural primitive<br />
DSOS.<br />
• display :- Used by the renderer to find display drivers.<br />
Saturday, 23 October 2010
ReadArchive<br />
• The ReadArchive command allows us to read another rib file<br />
into the current position of the RIB stream<br />
1 ri.Begin(filename)<br />
2 ri.Option("searchpath", {"string archive":"./Archive/"})<br />
3<br />
4 ri.Attribute ("identifier",{"name": "Wave1"})<br />
5 ri.ReadArchive("Archive.rib")<br />
6<br />
7<br />
8 Option "searchpath" "string archive" ["./Archive/"]<br />
9<br />
10 Attribute "identifier" "name" ["Wave1"]<br />
11 ReadArchive "Archive.rib"<br />
Saturday, 23 October 2010
• Archives may also be specified within the current rib file using the<br />
following<br />
1 ri.Begin(filename)<br />
2<br />
3 ri.ArchiveBegin("Wave")<br />
4 ri.Rotate(90,1,0,0)<br />
5 ri.Sphere(0.030303,-0.030303,0,360)<br />
6 ri.Torus(0.0606061,0.030303,0,180,360)<br />
7 ri.Torus(0.121212,0.030303,180,360,360)<br />
8 ri.Torus(0.181818,0.030303,0,180,360)<br />
9 ri.Torus(0.242424,0.030303,180,360,360)<br />
10 ri.Torus(0.30303,0.030303,0,180,360)<br />
11 ri.Torus(0.363636,0.030303,180,360,360)<br />
12 ri.Torus(0.424242,0.030303,0,180,360)<br />
13 ri.Torus(0.484848,0.030303,180,360,360)<br />
14 ri.Torus(0.545455,0.030303,0,180,360)<br />
15 ri.Torus(0.606061,0.030303,180,360,360)<br />
16 ri.Torus(0.666667,0.030303,0,180,360)<br />
17 ri.Torus(0.727273,0.030303,180,360,360)<br />
18 ri.Torus(0.787879,0.030303,0,180,360)<br />
19 ri.Torus(0.848485,0.030303,180,360,360)<br />
20 ri.ArchiveEnd()<br />
21<br />
22 ri.Attribute ("identifier",{"name": "Wave1"})<br />
23 ri.ReadArchive("Wave")<br />
1 ArchiveBegin "Wave"<br />
2 Rotate 90 1 0 0<br />
3 Sphere 0.030303 -0.030303 0 360<br />
4 Torus 0.0606061 0.030303 0 180 360<br />
5 Torus 0.121212 0.030303 180 360 360<br />
6 Torus 0.181818 0.030303 0 180 360<br />
7 Torus 0.242424 0.030303 180 360 360<br />
8 Torus 0.30303 0.030303 0 180 360<br />
9 Torus 0.363636 0.030303 180 360 360<br />
10 Torus 0.424242 0.030303 0 180 360<br />
11 Torus 0.484848 0.030303 180 360 360<br />
12 Torus 0.545455 0.030303 0 180 360<br />
13 Torus 0.606061 0.030303 180 360 360<br />
14 Torus 0.666667 0.030303 0 180 360<br />
15 Torus 0.727273 0.030303 180 360 360<br />
16 Torus 0.787879 0.030303 0 180 360<br />
17 Torus 0.848485 0.030303 180 360 360<br />
18 ArchiveEnd<br />
19<br />
20 WorldBegin<br />
21 Attribute "identifier" "name" ["Wave1"]<br />
22 ReadArchive "Wave"<br />
23 WorldEnd<br />
Saturday, 23 October 2010
Procedural Geometry<br />
• The torus wave in the last examples was generated from an<br />
example in the renderman companion<br />
• The function was re-written from the original C into python as<br />
shown below<br />
1 def TorusWave(ri,nwaves,thetamax) :<br />
2 if(nwaves < 1) :<br />
3 print "need positive number of waves"<br />
4 return<br />
5 innerrad = 2.0/(8.0 * nwaves +2)<br />
6 ri.Rotate(90.0,1.0,0.0,0.0)<br />
7 ri.Sphere(innerrad,-innerrad,0,thetamax)<br />
8 outerrad =0.0<br />
9 for wave in range(1,nwaves) :<br />
10 outerrad=outerrad+(innerrad*2)<br />
11 ri.Torus(outerrad,innerrad,0.0,180.0,thetamax)<br />
12 outerrad=outerrad+(innerrad*2)<br />
13 ri.Torus(outerrad,innerrad,180.0,360.0,thetamax)<br />
14<br />
1 ri = prman.Ri()<br />
2<br />
3 filename = "Archive.rib"<br />
4 ri.Begin(filename)<br />
5<br />
6 TorusWave(ri,8,360.0)<br />
7 # and finally end the rib file<br />
8 ri.End()<br />
Saturday, 23 October 2010
Creating Sequences<br />
• Renderman allows for sequences of frames to be created within<br />
the rib structure by using FrameBegin / FrameEnd<br />
• However it is usually better to create a sequence of individual rib<br />
files per frame as these can be distributed on the render farm.<br />
• The best method for doing this is to use a frame counter and<br />
export Rib / frame using the format file.###.rib -><br />
image.###.exr<br />
1 for frame in range(1,30) :<br />
2 filename = "Wave.%03d.rib" %(frame)<br />
3 ri.Begin(filename)<br />
4<br />
5 ri.Display("ProcGeom.%03d.exr" %(frame), "file", "rgba")<br />
6<br />
Saturday, 23 October 2010
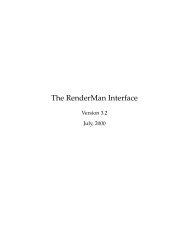
Exercise<br />
• Try to build this Scene using python functions<br />
Saturday, 23 October 2010
Saturday, 23 October 2010
References<br />
• [1] Ian Stephenson. Essential Renderman Fast. Springer-Verlag, 2003.<br />
• [2] Larry Gritz Anthony A Apodaca. Advanced Renderman (Creating<br />
CGI for Motion Pictures). Morgan Kaufmann, 2000.<br />
• Upstill S “The Renderman Companion” Addison Wesley 1992<br />
• Renderman Documentation Appendix D - RenderMan Interface<br />
Bytestream Conventions<br />
• Application Note #3 How To Render Quickly Using PhotoRealistic<br />
RenderMan<br />
Saturday, 23 October 2010