MTX-L - Innovate Motorsports
MTX-L - Innovate Motorsports
MTX-L - Innovate Motorsports

Create successful ePaper yourself
Turn your PDF publications into a flip-book with our unique Google optimized e-Paper software.
The complete instruction manual is on the CD<br />
<strong>MTX</strong>-L<br />
QUICK START GUIDE<br />
To gain access to the complete <strong>MTX</strong>-L manual please<br />
install the software provided on the CD which was<br />
included as part of your kit.<br />
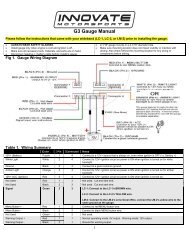
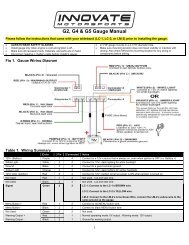
Wiring<br />
1. Connect the RED wire to a switched 12V source. A switched<br />
12V source goes on as soon as the ignition on the car is on.<br />
Make sure the connection is fused with a minimum fuse size<br />
of 3A.<br />
2. Connect the BLACK wire to a ground source. Avoid noisy<br />
ground sources, such as grounds used for radio and or<br />
ignition sources.<br />
3. Connect the WHITE wire to a headlight power wire (a wire<br />
that supplies current to the headlights). This enables the<br />
display to dim for better nighttime viewing. DO NOT<br />
CONNECT THIS WIRE TO THE HEADLIGHT DIMMING<br />
WIRE. Connection to this rheostat type of switch will cause<br />
the gauge to malfunction. If you chose not to utilize the<br />
dimming feature, connect the WHITE wire to ground.<br />
4. Optionally, the YELLOW (Analog out 1) and/or BROWN<br />
(Analog out 2) can be connected to the analog inputs of other<br />
devices such as data loggers or ECUs. If either one or both of<br />
these wires are not being used isolate and tape the wire(s) out<br />
of the way. The default analog outputs are as follows: Analog<br />
output one (yellow) is 0V = 7.35 AFR and 5V = 22.39 AFR.<br />
Analog output two (brown) is 1.1V = 14 AFR and .1V = 15<br />
AFR. This is a simulated narrowband signal.<br />
Sensor Calibration<br />
1. The calibration procedure requires that the oxygen sensor be<br />
in free air, not in the exhaust.<br />
2. With the sensor disconnected from the <strong>MTX</strong>-L, apply<br />
power to the <strong>MTX</strong>-L. When power is applied, all three digits<br />
will light up and the needle bar will sweep once through all<br />
LEDs. Then the status light will turn red and the numeric<br />
display will read “E2”. This is an error code, indicating that<br />
no sensor is detected. Leave unit powered on for minimum<br />
30 seconds.<br />
3. Power down the <strong>MTX</strong>-L and attach the oxygen sensor using<br />
the cable provided. Again, make sure that the sensor is in<br />
free air (not in the exhaust).<br />
4. Power up the <strong>MTX</strong>-L.<br />
Again, the display should ‘sweep’, but instead of an error, the<br />
display will display “Htr”. This indicates that the sensor is<br />
being heated up to operating temperature. After 30-60<br />
seconds, the display will switch from “Htr” to “CAL”,<br />
indicating that the sensor is being calibrated. A few seconds<br />
later, your <strong>MTX</strong>-L will begin displaying AFR. Since the<br />
sensor is in free air, the gauge will default to the upper limit<br />
of 22.4.<br />
The calibration procedure has completed and the system is<br />
now ready for use.<br />
Important: You can disconnect and reconnect the sensor and<br />
sensor cable for installation without losing your calibration.<br />
However, if you power up the <strong>MTX</strong>-L without a sensor<br />
connected, your calibration will be reset (see step #1<br />
above).<br />
11-0129