Operations Manual - TE 7-C Rotary Hammer Drill - Home Depot
Operations Manual - TE 7-C Rotary Hammer Drill - Home Depot
Operations Manual - TE 7-C Rotary Hammer Drill - Home Depot

Create successful ePaper yourself
Turn your PDF publications into a flip-book with our unique Google optimized e-Paper software.
The outer casing of the power tool is made from<br />
impact-resistant plastic. Sections of the grip are made<br />
from a synthetic rubber material.<br />
Never operate the power tool when the ventilation<br />
slots are blocked. Clean the ventilation slots carefully<br />
using a dry brush. Do not permit foreign objects to<br />
enter the interior of the power tool. Clean the outside<br />
of the power tool at regular intervals with a slightly<br />
damp cloth. Do not use a spray, steam pressure<br />
cleaning equipment or running water for cleaning.<br />
This may negatively affect the electrical safety of the<br />
power tool.<br />
8.3 Cleaning or replacing the dust shield<br />
Clean the dust shield on the chuck with a dry, clean<br />
cloth at regular intervals. Clean the sealing lip by<br />
wiping it carefully and then grease it again lightly<br />
with Hilti grease. It is essential that the dust shield<br />
is replaced if the sealing lip is found to be damaged.<br />
Push the tip of a screwdriver under the edge of the<br />
dust shield and prise it out toward the front. Clean<br />
the area of the chuck in contact with dust shield and<br />
then fit a new dust shield. Press it in firmly until it<br />
engages.<br />
8.4 Maintenance<br />
WARNING<br />
Repairs to the electrical section of the power tool<br />
may be carried out only by trained electrical specialists.<br />
Check all external parts of the power tool for damage<br />
at regular intervals and check that all controls operate<br />
faultlessly. Do not operate the power tool if parts<br />
are damaged or when the controls do not function<br />
faultlessly. If necessary, the power tool should be<br />
repaired by Hilti Service.<br />
8.5 Checking the power tool after care and<br />
maintenance<br />
After carrying out care and maintenance work on<br />
the power tool, check that all protective and safety<br />
devices are fitted and that they function faultlessly.<br />
en<br />
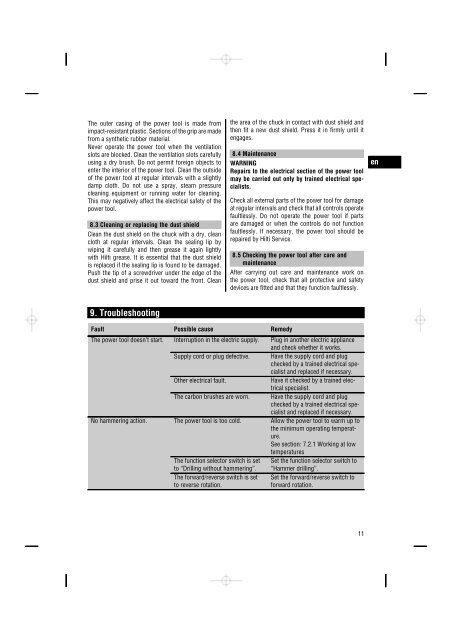
9. Troubleshooting<br />
Fault Possible cause Remedy<br />
The power tool doesn’t start. Interruption in the electric supply. Plug in another electric appliance<br />
and check whether it works.<br />
Supply cord or plug defective. Have the supply cord and plug<br />
checked by a trained electrical specialist<br />
and replaced if necessary.<br />
Other electrical fault.<br />
Have it checked by a trained electrical<br />
specialist.<br />
The carbon brushes are worn. Have the supply cord and plug<br />
checked by a trained electrical specialist<br />
and replaced if necessary.<br />
No hammering action. The power tool is too cold. Allow the power tool to warm up to<br />
the minimum operating temperature.<br />
See section: 7.2.1 Working at low<br />
temperatures<br />
The function selector switch is set<br />
to “<strong>Drill</strong>ing without hammering”.<br />
Set the function selector switch to<br />
“<strong>Hammer</strong> drilling”.<br />
The forward/reverse switch is set<br />
to reverse rotation.<br />
Set the forward/reverse switch to<br />
forward rotation.<br />
11