Permanent HEPA Air Purifier - Hunter Fan
Permanent HEPA Air Purifier - Hunter Fan
Permanent HEPA Air Purifier - Hunter Fan

You also want an ePaper? Increase the reach of your titles
YUMPU automatically turns print PDFs into web optimized ePapers that Google loves.
5. If the Pre-Filter needs to be cleaned, It may be<br />
submerged in warm soapy water to clean. Gently lift<br />
and submerge the filter several times to clean.<br />
6. When complete, rinse the filter with warm water and<br />
allow to dry completely.<br />
Note: Wet parts placed into the unit can cause damage<br />
to the filters and or the motor of the <strong>Air</strong> <strong>Purifier</strong>.<br />
Check or Clean Your Filter<br />
1. Turn the <strong>Air</strong> <strong>Purifier</strong> off and disconnect from the wall.<br />
2. Remove the rear grill on the back of the unit by<br />
pressing the tab at the top of the unit, under the<br />
handle and pull the rear grill outward. Figure 7.<br />
3. Remove the <strong>Permanent</strong> <strong>HEPA</strong> Filter from the unit.<br />
4. Check the Filter for particle build-up.<br />
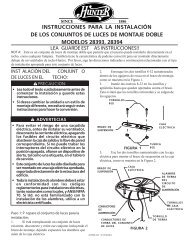
5. To clean, use a vacuum cleaner with an upholstery<br />
brush attachment, gently run the upholstery brush<br />
over the cleanable filter until all particles are removed<br />
from the filter. An arrow indicating which side to clean<br />
is present on the top of the filter. Figure 8.<br />
Note: Filter discoloration is normal and will not be<br />
removed by vacuuming. Do not attempt to wash the filter<br />
as damage to the filter or <strong>Air</strong> <strong>Purifier</strong> may occur.<br />
Replace The UVC Bulb<br />
The UVC light should be replaced once yearly. Follow<br />
these instructions to remove and replace the UVC bulb.<br />
1. Unplug the unit from the wall outlet and turn it over, so<br />
the bottom of the unit is visible.<br />
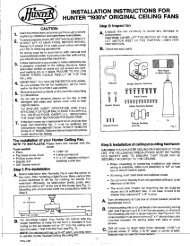
2. Using a small phillips screwdriver remove the 2 screws<br />
holding the UVC Cover in place. Figure 9.<br />
3. Gently push the tab on the UVC Cover and lift it away.<br />
Figures 9. and 10.<br />
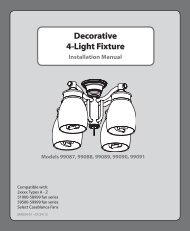
4. Locate the UVC Bulb Carrier and turn it 45 o counterclockwise.<br />
Figure 11.<br />
Screws<br />
Tab<br />
Figure 8.<br />
Figure 9.<br />
Figure 10.<br />
Figure 11.<br />
©2010 <strong>Hunter</strong> <strong>Fan</strong> Co. 8<br />
44091-01 20101005