View / Download American Valor Fabrics Collection
View / Download American Valor Fabrics Collection
View / Download American Valor Fabrics Collection

Create successful ePaper yourself
Turn your PDF publications into a flip-book with our unique Google optimized e-Paper software.
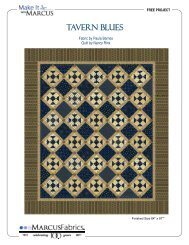
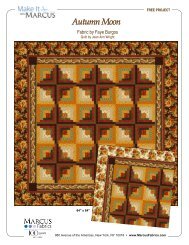
FREE PROJECT<br />
REVISED APRIL 1, 2011<br />
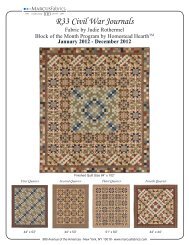
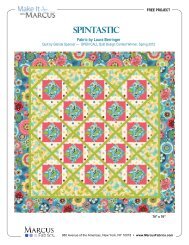
<strong>American</strong> <strong>Valor</strong> <strong>Fabrics</strong> <strong>Collection</strong><br />
Fabric by Faye Burgos<br />
Quilt by Nancy Rink<br />
66" x 81"<br />
980 Avenue of the Americas, New York, NY 10018 www.Marcus<strong>Fabrics</strong>.com
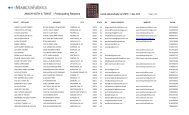
<strong>American</strong> <strong>Valor</strong> <strong>Fabrics</strong> <strong>Collection</strong><br />
FABRIC REQUIREMENTS & CUTTING GUIDE<br />
Fabric by Faye Burgos Quilt by Nancy Rink<br />
Page 2 of 4<br />
REVISED APRIL 1, 2011<br />
Navy Texture 3562-0110<br />
1 ¼ yds<br />
Panel 3556-0110<br />
1 panel<br />
Red Texture 3562-0111<br />
1 ¼ yds<br />
Red & Cream Floral 3558-0129<br />
1 FQ<br />
Beige Texture 3562-0142<br />
1 ½ yds<br />
Navy Dot 3559-0110<br />
1 FQ<br />
Medium Blue Stars 3560-01103<br />
Cream Stars 3561-0142<br />
1/2 yard<br />
5/8 yard<br />
Strip-It 3557-0110 1 ½ yds<br />
Backing 3563-0110<br />
5 yds<br />
Partial Panel Trimming Guide<br />
Trim on the outside edge of red<br />
line on both the top and bottom<br />
of the panel<br />
Using a long ruler, trim<br />
1¼” away from the outermost<br />
bold red line on both sides of<br />
the panel<br />
April 1, 2011
<strong>American</strong> <strong>Valor</strong> <strong>Fabrics</strong> <strong>Collection</strong><br />
Fabric by Faye Burgos Quilt by Nancy Rink<br />
Page 3 of 4<br />
Cutting Directions<br />
REVISED APRIL 1, 2011<br />
Note: "WOF" = Width of Fabric<br />
From the Panel Fabric,<br />
Trim one panel<br />
(see Partial Panel Trimming Guide Diagram, Page 2)<br />
From the Red & Cream Stars, cut:<br />
2 (2-3/8” x 20”) strips<br />
12 (3” x 3”) C squares<br />
From the Navy Dot, cut:<br />
2 (2-3/8” x 20”) strips<br />
8 (3” x 3”) C squares<br />
From the Medium Blue Stars, cut:<br />
4 (2-3/8” X WOF) strips, then recut into:<br />
64 (2-3/8” x 2-3/8”) A squares<br />
From the Cream Stars, cut:<br />
2 (1 ¾” x WOF) side border strips<br />
2 (2-3/8” x WOF) strips, recut into 32 (2-3/8” x 2-3/8”) A<br />
squares<br />
2 (4 ¼” x WOF) strips, recut into 32 (2-3/8” x 4 ¼”) B<br />
rectangles<br />
From the Navy Texture, cut:<br />
11 (3” x WOF) strips. Piece end-to-end, then recut into,<br />
2 (3” x 46 ½”) side borders<br />
2 (3” x 37”) top/bottom borders<br />
2 (3” x 52”) top/bottom borders<br />
2 (3” x 66 ½”) side borders<br />
From the Red Texture, cut:<br />
4 (4” x WOF) borders<br />
8 (2 ½” x WOF) strips, pieced end-to-end for double fold<br />
binding<br />
From the Beige Texture, cut:<br />
7 (5 ½” x WOF) strips. Piece end-to-end, then recut into,<br />
2 (5 ½” x 57”) borders<br />
2 (5 ½” x 71 ½”) borders<br />
From the Stripe, cut: (see Stripe Cutting Tip)<br />
1 (15” x WOF) strip, recut into:<br />
4 (8” x 15”) rectangles<br />
1 (22 ¼” X WOF) strip, recut into:<br />
4 (8’ x 22 ¼”) rectangles<br />
From the Backing, cut:<br />
2 (90” x WOF) panels<br />
Strips are<br />
cut 8”<br />
wide—<br />
place a<br />
light<br />
stripe in<br />
the center<br />
and cut<br />
the<br />
specified<br />
lengths<br />
Stripe Cutting Tip<br />
The width of the stripe strips that you’ll be cutting<br />
is 8”. Because the stripes are 2 ½” wide, that<br />
means that you’ll be cutting ¼” beyond the edge<br />
of three stripes. Center a light stripe in the middle.<br />
Cut ¼” beyond<br />
printed line of dark<br />
and light fabric<br />
Sewing Directions<br />
Pieced Star Block (finished size 7 ½”)<br />
1. Sew together a red & cream floral 2-3/8” x 20” strip and a navy dot 2-<br />
3/8” x 20” strip. Press seam toward the navy dot fabric. Repeat with the<br />
remaining strips. Cross-cut strips into 16 (2-3/8”) wide segments.<br />
2-3/8”<br />
2. Sew together the segments into a four-patch, as shown. Maketotal of 8.<br />
3. To make a flying geese unit, lay a medium blue stars fabric (A) square<br />
on top of a cream stars fabric (B) rectangle, right sides together. Draw a<br />
seam line diagonally from corner to corner of the small square. Sew on<br />
the line. Trim seam allowance to ¼” and press open. Repeat stitch and<br />
flip method, by placing an (A) square on the right hand side of the (B) rectangle.<br />
Make a total of thirty-two flying geese units.<br />
A<br />
A<br />
B<br />
4. Arrange the block patches as shown. Sew together in rows, then sew<br />
together the rows. Make a total of 8 blocks.<br />
April 1, 2011
<strong>American</strong> <strong>Valor</strong> <strong>Fabrics</strong> <strong>Collection</strong><br />
Fabric by Faye Burgos Quilt by Nancy Rink<br />
Page 4 of 4<br />
REVISED APRIL 1, 2011<br />
Border Four-Patch<br />
5. Join the navy dot (C) 3” squares and the red & cream floral (C) 3”square to make 4 four-patch blocks. Set aside<br />
for borders.<br />
Quilt Assembly<br />
6. Measure height of panel. Trim the (1 ¾” x WOF) cream stars border strips AND two of the red texture 4” wide<br />
strips to this length. First, sew the cream star border strips to the sides of the center panel. Press seams open.<br />
Then, sew the red texture border to the sides, pressing seams away from the center of the quilt.<br />
Measure the width of the quilt. Trim the remaining two (4” x WOF) red texture strips to this length. Sew to top/<br />
bottom of quilt, again pressing seams away from the center of the quilt.<br />
7. Trim the quilt so that it measures 32” wide<br />
and 46 ½” high.<br />
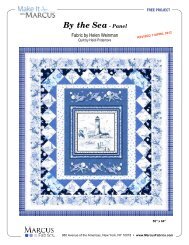
5 ½” x 57”<br />
8. Sew the 46 ½” long navy texture border to<br />
quilt sides and the 37” long borders to the top/<br />
bottom, pressing all seams toward outside edge<br />
of quilt.<br />
9. To make the side stars and stripes borders,<br />
sew together two pieced stars alternately with 2<br />
(22 ¼”) long stripe rectangles. Press seams<br />
toward stripe fabric. Make a total of two. These<br />
borders will be attached using a “partial seam”<br />
in order to achieve an overlapping look. Begin<br />
sewing at the end with the pieced star, aligning<br />
the border with the edge of the quilt. Stitch the<br />
seam, stopping approximately 5” from the end<br />
of the quilt top.<br />
10. To make the top/bottom stars and stripes<br />
borders, sew together two pieced stars alternately<br />
with 2 (15”) long stripe rectangles. Press<br />
seams toward stripe fabric. Attach these borders<br />
to the top and bottom of the quilt.<br />
5<br />
½<br />
”<br />
x<br />
71<br />
3”<br />
x<br />
66<br />
½”<br />
8”<br />
x<br />
22<br />
¼”<br />
3”<br />
x<br />
46<br />
½”<br />
3” x 52”<br />
8” x 15”<br />
3” x 37”<br />
11. Finish sewing the seams on the side stars<br />
and stripe borders.<br />
12.Add 66 ½” long navy texture borders to<br />
sides. Sew a red & cream floral (C) square to<br />
both ends of the remaining navy texture borders.<br />
Add to top and bottom of quilt,<br />
pressing all seams toward outside edge.<br />
13.Sew long beige texture borders to sides.<br />
Sew the four-patch border blocks to ends of<br />
remaining beige texture borders, noting orientation<br />
of four-patch blocks. Add to top and bottom of quilt,<br />
pressing all seams inward toward navy borders.<br />
Quilt Assembly Diagram<br />
Finishing<br />
14. Layer top, batting, and backing. Quilt as desired. Bind with the red texture fabric.<br />
April 1, 2011