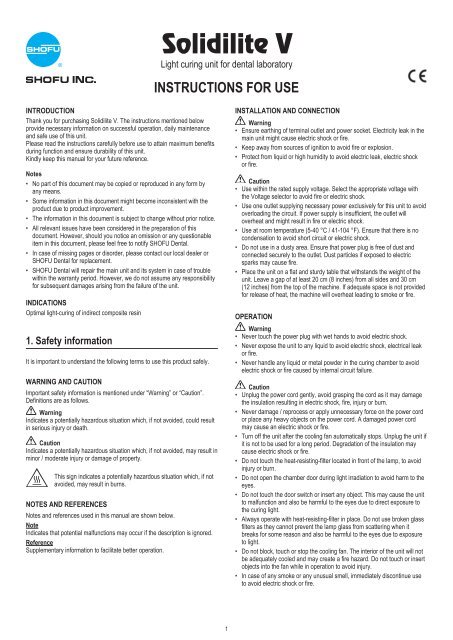
Solidilite V Instructions For Use - SHOFU Dental GmbH
Solidilite V Instructions For Use - SHOFU Dental GmbH
Solidilite V Instructions For Use - SHOFU Dental GmbH
Create successful ePaper yourself
Turn your PDF publications into a flip-book with our unique Google optimized e-Paper software.
<strong>Solidilite</strong> V<br />
Light curing unit for dental laboratory<br />
INSTRUCTIONS FOR USE<br />
INTRODUCTION<br />
Thank you for purchasing <strong>Solidilite</strong> V. The instructions mentioned below<br />
provide necessary information on successful operation, daily maintenance<br />
and safe use of this unit.<br />
Please read the instructions carefully before use to attain maximum benefits<br />
during function and ensure durability of this unit.<br />
Kindly keep this manual for your future reference.<br />
Notes<br />
• No part of this document may be copied or reproduced in any form by<br />
any means.<br />
• Some information in this document might become inconsistent with the<br />
product due to product improvement.<br />
• The information in this document is subject to change without prior notice.<br />
• All relevant issues have been considered in the preparation of this<br />
document. However, should you notice an omission or any questionable<br />
item in this document, please feel free to notify <strong>SHOFU</strong> <strong>Dental</strong>.<br />
• In case of missing pages or disorder, please contact our local dealer or<br />
<strong>SHOFU</strong> <strong>Dental</strong> for replacement.<br />
• <strong>SHOFU</strong> <strong>Dental</strong> will repair the main unit and its system in case of trouble<br />
within the warranty period. However, we do not assume any responsibility<br />
for subsequent damages arising from the failure of the unit.<br />
INDICATIONS<br />
Optimal light-curing of indirect composite resin<br />
1. Safety information<br />
It is important to understand the following terms to use this product safely.<br />
WARNING AND CAUTION<br />
Important safety information is mentioned under “Warning” or “Caution”.<br />
Definitions are as follows.<br />
Warning<br />
Indicates a potentially hazardous situation which, if not avoided, could result<br />
in serious injury or death.<br />
Caution<br />
Indicates a potentially hazardous situation which, if not avoided, may result in<br />
minor / moderate injury or damage of property.<br />
This sign indicates a potentially hazardous situation which, if not<br />
avoided, may result in burns.<br />
NOTES AND REFERENCES<br />
Notes and references used in this manual are shown below.<br />
Note<br />
Indicates that potential malfunctions may occur if the description is ignored.<br />
Reference<br />
Supplementary information to facilitate better operation.<br />
INSTALLATION AND CONNECTION<br />
Warning<br />
• Ensure earthing of terminal outlet and power socket. Electricity leak in the<br />
main unit might cause electric shock or fire.<br />
• Keep away from sources of ignition to avoid fire or explosion.<br />
• Protect from liquid or high humidity to avoid electric leak, electric shock<br />
or fire.<br />
Caution<br />
• <strong>Use</strong> within the rated supply voltage. Select the appropriate voltage with<br />
the Voltage selector to avoid fire or electric shock.<br />
• <strong>Use</strong> one outlet supplying necessary power exclusively for this unit to avoid<br />
overloading the circuit. If power supply is insufficient, the outlet will<br />
overheat and might result in fire or electric shock.<br />
• <strong>Use</strong> at room temperature (5-40 °C / 41-104 °F). Ensure that there is no<br />
condensation to avoid short circuit or electric shock.<br />
• Do not use in a dusty area. Ensure that power plug is free of dust and<br />
connected securely to the outlet. Dust particles if exposed to electric<br />
sparks may cause fire.<br />
• Place the unit on a flat and sturdy table that withstands the weight of the<br />
unit. Leave a gap of at least 20 cm (8 inches) from all sides and 30 cm<br />
(12 inches) from the top of the machine. If adequate space is not provided<br />
for release of heat, the machine will overheat leading to smoke or fire.<br />
OPERATION<br />
Warning<br />
• Never touch the power plug with wet hands to avoid electric shock.<br />
• Never expose the unit to any liquid to avoid electric shock, electrical leak<br />
or fire.<br />
• Never handle any liquid or metal powder in the curing chamber to avoid<br />
electric shock or fire caused by internal circuit failure .<br />
Caution<br />
• Unplug the power cord gently, avoid grasping the cord as it may damage<br />
the insulation resulting in electric shock, fire, injury or burn.<br />
• Never damage / reprocess or apply unnecessary force on the power cord<br />
or place any heavy objects on the power cord. A damaged power cord<br />
may cause an electric shock or fire.<br />
• Turn off the unit after the cooling fan automatically stops. Unplug the unit if<br />
it is not to be used for a long period. Degradation of the insulation may<br />
cause electric shock or fire.<br />
• Do not touch the heat-resisting-filter located in front of the lamp, to avoid<br />
injury or burn.<br />
• Do not open the chamber door during light irradiation to avoid harm to the<br />
eyes.<br />
• Do not touch the door switch or insert any object. This may cause the unit<br />
to malfunction and also be harmful to the eyes due to direct exposure to<br />
the curing light.<br />
• Always operate with heat-resisting-filter in place. Do not use broken glass<br />
filters as they cannot prevent the lamp glass from scattering when it<br />
breaks for some reason and also be harmful to the eyes due to exposure<br />
to light.<br />
• Do not block, touch or stop the cooling fan. The interior of the unit will not<br />
be adequately cooled and may create a fire hazard. Do not touch or insert<br />
objects into the fan while in operation to avoid injury.<br />
• In case of any smoke or any unusual smell, immediately discontinue use<br />
to avoid electric shock or fire.<br />
1
• Do not use the unit if it falls off the table. Halogen lamps, viewing window<br />
and filters, etc might be damaged which can cause injury. This may also<br />
result in smoke or fire.<br />
• Do not use for any purpose other than specifically outlined in the<br />
“Indications” in these instructions for use.<br />
MAINTENANCE AND CHECKS<br />
Warning<br />
• When checking, cleaning or replacing lamps and fuses, always turn off<br />
and unplug the unit. Leave the unit off for at least 10 minutes to ensure<br />
that the unit has cooled completely to avoid electric shock, burn, fire or<br />
injury due to damage to lamps.<br />
• Never disassemble, repair or overhaul except to replace lamps and fuses.<br />
Improper assembly or repair may cause the unit to malfunction and pose<br />
the risk of electric shock or fire.<br />
• <strong>Use</strong> only designated lamps and fuses. Using lamps and fuses other than<br />
those specified for the unit may cause injury, electric shock or fire due to<br />
malfunction of the lamps or circuit.<br />
• Hold the socket firmly while installing or replacing the lamps to avoid<br />
electric shock or fire.<br />
2. Package and Part Names<br />
MAIN UNIT<br />
ACCESSORIES<br />
17 18 AC 125V type AC 250V type<br />
19<br />
20<br />
17 Halogen lamp (4 pcs.)<br />
18 Power cord (for AC125V model or AC250V model)<br />
19 <strong>SHOFU</strong> Post Stand P<br />
20 <strong>SHOFU</strong> Post set (3 pcs each for 5 kinds)<br />
21 <strong>Instructions</strong> for use<br />
22 Adapter<br />
* 18 Power cord: Only one power cord (exclusively for either AC125V<br />
model or AC250V model) is provided.<br />
* <strong>For</strong> packaging of 19 and 20 , kindly refer to the <strong>Instructions</strong> for <strong>Use</strong> of the<br />
respective product.<br />
* 22 Adapter: <strong>For</strong> use in Japan only.<br />
21<br />
3. Installation and Connection<br />
22<br />
8<br />
3<br />
1<br />
2<br />
LOCATION<br />
• Place the unit in a clean, dry, well-ventilated room to ensure safe use of<br />
the unit.<br />
• The optimal environment (temperature and humidity) is specified under<br />
section “8. Specifications” of the machine.<br />
• Place the unit on a flat and sturdy table. Leave a gap of at least 20 cm<br />
(8 inch) from all sides and 30 cm (12 inch) from the top of the machine.<br />
Do not place any objects around the inlet.<br />
4<br />
30cm (12in)<br />
5<br />
6<br />
7<br />
20cm (8in)<br />
14<br />
12 11<br />
10<br />
20cm<br />
(8in)<br />
20cm<br />
(8in)<br />
13<br />
15<br />
: 16<br />
1 Chamber door<br />
2 Viewing window<br />
3 Top cover<br />
4 Power switch ( : ON / : OFF)<br />
5 Inlet<br />
6 Fuse case<br />
7 Voltage selector<br />
8 Cooling fan<br />
9<br />
9 Programmable timer key<br />
10 Timer dial / Start/Stop button<br />
11 Time display<br />
12 Indicator of bulb life<br />
13 Lever for turn table<br />
14 Turn table<br />
15 Door switch<br />
16 Curing chamber<br />
INSTALLATION OF LAMPS<br />
1. Turn off and unplug the unit.<br />
2. Unscrew the 3 screws that fix the top cover of the unit 1 .<br />
3. Slowly open the chamber door 2 .<br />
4. Gently remove the top cover as directed by arrow 3 .<br />
5. Remove the protective cushioning from the lamp holders and sockets.<br />
6. Carefully insert the lamp terminals into the sockets 4 .<br />
7. Pull down the lever 5 and insert the lamp 6 as directed by arrows.<br />
Top cover<br />
3<br />
2<br />
1<br />
2
Lamp socket<br />
Halogen lamp<br />
4 5<br />
6<br />
Lever<br />
Lamp holder<br />
Note<br />
• <strong>Use</strong> only designated lamps. <strong>Use</strong> of lamps other than those designed<br />
specifically for <strong>Solidilite</strong> V may result in insufficient curing, filament<br />
burnout or explosion of bulb.<br />
• Do not touch the bulbs and the mirror with bare hands to avoid<br />
adhesion of sebum. If the bulb is contaminated with any type of oil or<br />
sebum, the bulb might explode due to high temperature while the unit<br />
is being operated.<br />
• Handle the lamps carefully. Any direct impact including a fall will<br />
shorten the life of the lamp.<br />
Table 1: Supply voltage, voltage selection, fuse and power cord<br />
for each model<br />
Model Supply voltage<br />
Voltage<br />
selection<br />
Fuse Power cord<br />
AC 110V<br />
100V<br />
AC 125V AC 110/115/120V 115V<br />
6.3A<br />
AC 125V type<br />
AC 127V 127V *<br />
AC 200V<br />
200V<br />
AC 250V AC 210/220V<br />
220V<br />
3.15A AC 250V type<br />
AC 230/240V<br />
240V<br />
* When using with AC127V, prepare compatible power cord.<br />
CONNECTION OF POWER CORD<br />
1. Make sure that the power outlet is compatible with the unit.<br />
2. Turn off the unit.<br />
3. Insert the connector into the inlet on the back of the body and plug the<br />
power cord into a ground terminal outlet.<br />
Reference<br />
The adapter provided is for use in Japan only.<br />
8. Replace the top cover as directed by arrow 7 .<br />
9. Gently slide the top cover as directed by arrow 8 and refix with the<br />
screws.<br />
Top cover<br />
Front<br />
Back<br />
Back plate<br />
Inlet<br />
AC 125V type<br />
or<br />
Connection<br />
notch<br />
8<br />
7<br />
Connector<br />
AC 250V type<br />
4. Directions for <strong>Use</strong><br />
SETTING OF VOLTAGE SELECTOR<br />
1. Turn off and unplug the unit.<br />
2. Set the selector to appropriate voltage using a coin or flathead<br />
screwdriver.<br />
BASIC OPERATION<br />
1. Turn on the unit 1 . The time display lights up.<br />
Note<br />
If the voltage is selected incorrectly, an error message, “Err.0”, appears<br />
on the display with continuous beeping. Immediately turn off the unit and<br />
select the appropriate voltage.<br />
2. Slowly open the chamber door 2 and place the restoration on the turn<br />
table 3 .<br />
Note<br />
Compatible voltage is different between AC125V model and AC250V<br />
model. Do not use the voltage other than specified in the Table 1 below.<br />
Reference<br />
• A short beep sound is heard when the door is opened.<br />
• <strong>Use</strong> Post Set and Post Stand P provided. <strong>For</strong> selection of post, refer to<br />
the Post Set’s <strong>Instructions</strong> for <strong>Use</strong>.<br />
3<br />
2<br />
Post Stand with<br />
restorations<br />
Turn table<br />
1<br />
Power switch<br />
3
3. Gently press and move the lever for turn table to the right or the left to<br />
position the restoration within the curing area.<br />
Reference<br />
The shaded area indicates the curing area. Prostheses are optimally<br />
light-cured when positioned at the height of the ditches on the reflective<br />
plate (inside wall).<br />
6. Set the desired curing time and press start/stop button. Bulbs light up and<br />
start irradiation.<br />
Lever for turn table<br />
Curing area<br />
upper limit<br />
lower limit<br />
recommended<br />
height<br />
Start/Stop button<br />
Reference<br />
Bulbs light up slowly (soft start function) and take about 2-4 seconds to<br />
reach 100% output. Curing time is counted down only after light output<br />
reaches 100%.<br />
Caution<br />
Do not open the chamber door during light irradiation to avoid harming<br />
the eyes.<br />
4. Slowly close the chamber door.<br />
Reference<br />
Short beep is heard when the door is completely closed.<br />
5. Press the programmable timer key (P1, P2 or P3) or turn the timer dial to<br />
set curing time.<br />
Reference<br />
Initial curing times preset in the programmable timer keys are:<br />
P1:1 minute, P2:3 minutes and P3: 5 minutes. Curing time in the<br />
programmable timer can range between 20 seconds and 20 minutes with<br />
10-second intervals. Refer to the standard curing time for <strong>SHOFU</strong>’s<br />
“SOLIDEX” and “CERAMAGE”.<br />
Programmable timer key<br />
Table 2: Standard curing time (SOLIDEX / CERAMAGE)<br />
Operation<br />
or<br />
Timer dial<br />
Time (min.)<br />
7. After curing is completed, slowly open the door to remove the optimally<br />
cured restoration.<br />
Reference<br />
• In order to terminate operation, press start/stop button again.<br />
• When the curing time is counted down to 0, the bulbs turn off<br />
automatically.<br />
8. Ensure that the cooling fan has finished working before turning off the unit.<br />
Reference<br />
The cooling fan works approximately 3 minutes after the bulbs turn off.<br />
RECORDING OF USER-SPECIFIED CURING TIMES ON THE<br />
PROGRAMMABLE TIMER KEY<br />
Three user-specified curing times can be recorded on 3 programmable timer<br />
keys (P1, P2 and P3), overwriting their initial settings.<br />
1. Turn the timer dial to set the desired curing time on the display 1 .<br />
2. Press the start/stop button and any one of programmable timer keys<br />
(P1, P2 or P3) simultaneously for a minimum of 2 seconds 2 . Three<br />
beeps sound when recording is completed.<br />
Reference<br />
Once recorded, the curing time will not be erased even when the power is<br />
switched off.<br />
Programmable timer keys cannot be reset. In order to set back to the initial<br />
time, record manually (P1: 1 minute, P2: 3 minutes, P3: 5 minutes).<br />
Primer Paste (PreOpaque) curing 1<br />
Opaque curing 3<br />
Base (pontic) curing 3<br />
Preliminary curing of C&B composite resin<br />
(Cervical, Body, Incisal etc)<br />
1<br />
Preliminary curing of Flowable composite resin 1<br />
Stain curing 1<br />
Final curing 3<br />
Preliminary curing: Initial light-curing during build-up of composite.<br />
Reference<br />
When programmable timer key is pressed for 2 seconds or more,<br />
irradiation starts immediately without pressing start/stop button.<br />
Example:<br />
Recording on<br />
P2 key<br />
2<br />
1<br />
4
5. Maintenance and Checks<br />
BULB LIFE<br />
Total irradiation time of the bulb is approximately 160 hours. However, this<br />
is just a rough estimate and cannot be guaranteed. Bulb life varies<br />
depending on the conditions of use (handling of the unit and lamps,<br />
frequency and duration of each curing, etc).<br />
INDICATOR OF BULB LIFE<br />
Signal flashes on the display when any of the bulbs is dead.<br />
DISPLAY OF TOTAL IRRADIATION TIME<br />
When P1 and P3 are pressed at the same time for a few seconds, total<br />
irradiation time from the installation of new lamps is displayed.<br />
Example: 70 hours<br />
RESET OF TOTAL IRRADIATION TIME<br />
Reset the total irradiation time, every time new lamps are placed.<br />
Note<br />
If the time is not reset, total irradiation time will be accumulated.<br />
Note<br />
• Disconnection or burnout of even one bulb reduces the light intensity<br />
and may cause under curing of the restoration.<br />
Immediately replace all the lamps with new ones.<br />
• If the filament of one bulb burns out in the unit used with 200-240V, it<br />
may cause the other lamp connected in the series to blow out.<br />
REPLACEMENT OF LAMPS<br />
1. Turn off and unplug the unit. Leave for a minimum of 10 minutes and<br />
make sure that the unit has completely cooled down.<br />
2. Remove the top cover as mentioned under section “3. Installation and<br />
Connection – Installation of lamps”.<br />
3. Pull up the lamp holder lever as directed by arrow 1<br />
and remove the lamp 2 .<br />
Detach the socket from the lamp 3 .<br />
1. Press start/stop button and turn on the unit at the same time.<br />
2. When „ (rst?)” appears on the display, release the start/stop button<br />
and press P1 key.<br />
3. Press P1 and P3 at the same time for over 2 seconds. Bring the total time<br />
to 0 before resetting the new curing times.<br />
REPLACEMENT OF FUSE<br />
1. Turn off and unplug the unit.<br />
2. Remove the screw at the back of the unit using a flathead screwdriver.<br />
3. Replace old fuses with new ones.<br />
4. Replace the screw onto the fuse case in the reverse order of procedure 2.<br />
Lamp<br />
socket<br />
1<br />
Lever<br />
3<br />
Fuse<br />
2<br />
OK<br />
NO<br />
Note<br />
Please refer to “8. Specifications” for the specification of fuse.<br />
Note<br />
Hold the socket firmly and pull out carefully from the lamp.<br />
4. Place new lamps and replace the top cover as mentioned in procedures<br />
6-9 under section “3. Installation and Connection”.<br />
Note<br />
• Always replace all the lamps at the same time. Do not mix old and<br />
new lamps.<br />
• <strong>Use</strong> only designated lamps (refer to “9. Related Products (sold<br />
separately) and Consumables”).<br />
MAINTENANCE<br />
• Cleaning inside the chamber<br />
Curing efficacy will be reduced if the white reflective plate (inside wall)<br />
becomes dirty. Periodically clean with alcohol-moistened soft cloth.<br />
If resin adheres to any part of the curing chamber, never fail to remove it<br />
prior to light-curing.<br />
• Cleaning of the body<br />
Do not use organic solvents including benzene and thinner. Dilute a<br />
neutral detergent with water and soak a soft cloth with it. Squeeze out the<br />
excess detergent from the cloth and gently wipe the unit.<br />
5
6. Troubleshooting<br />
Trouble Cause Measures<br />
Time display does not<br />
light up even if the unit is<br />
turned on.<br />
When the unit is turned<br />
on, beep comes on and<br />
“Err.0” appears on the<br />
display.<br />
Bulbs do not light up even<br />
if the Start/Stop button is<br />
pressed.<br />
Bulb life indicator flashes.<br />
„Err.1“ – „Err.9“ appears<br />
on the display.<br />
Blowout of fuse.<br />
Voltage setting is<br />
incorrect.<br />
Socket is not connected<br />
properly to the lamp.<br />
Chamber is open.<br />
Improperly placed top<br />
cover.<br />
Bulb filament is burnt out.<br />
Socket is detached.<br />
Ordinary lamps that are<br />
not specified for the<br />
machine are placed.<br />
7. EU Declaration of Conformity<br />
Manufacturer:<br />
<strong>SHOFU</strong> Inc.<br />
Head Office<br />
11 Kamitakamatsu-Cho, Fukuine Higashiyama-Ku<br />
Kyoto 605-0983 Japan<br />
Replace with new fuse.<br />
Immediately turn off the<br />
unit and select<br />
appropriate voltage.<br />
Attach sockets properly to<br />
the lamps.<br />
Ensure the door is closed<br />
properly.<br />
Place the top cover<br />
properly.<br />
Replace with new lamps.<br />
Attach the socket properly<br />
to the lamp.<br />
Replace with the<br />
designated lamps.<br />
Immediately discontinue use and turn off the unit.<br />
Contact our customer service and mention the error<br />
number that is displayed.<br />
Product:<br />
<strong>Solidilite</strong> V<br />
The product <strong>Solidilite</strong> V has been built and tested according to the following<br />
relevant EU norms and specifications.<br />
Standard:<br />
Safety: EN61010-1:2001<br />
EMC: EN61326-1:2006, EN55011:2007 + A2:2007 (Group 1, Class A)<br />
EN61000-3-2:2006, EN61000-3-3:1995 + A1:2001 + A2:2005<br />
EN61326-1:2006 (Table 2)<br />
8. Specifications<br />
Model<br />
Rated supply voltage<br />
Power supply<br />
Lamp<br />
Fuse<br />
SSLV-1<br />
AC100/110/115/120/127/200/210/220/230/240V<br />
±10%, 50/60Hz<br />
760VA<br />
JCR 110V 150W/S x4<br />
AC125V model: Time-lag, AC250V 6.3A x2<br />
AC250V model: Time-lag, AC250V 3.15A x2<br />
Dimensions 230 mm (w) x 252 mm (d) x 354 mm (h) /<br />
9.1 in. (w) x 9.9 in. (d) x 13.9 in. (h)<br />
Weight<br />
approx. 9.5 kg / approx. 21 lb<br />
Operating conditions Temperature: 5-40 °C / 41-104 °F<br />
Humidity: 30-80%<br />
Altitude: up to 2,000 m<br />
Pollution degree: 2<br />
Overvoltage category: II<br />
Indoor use only<br />
Storage conditions Temperature: 0-40 °C / 32-104 °F<br />
Humidity: 10-85%<br />
Specifications above may be changed without prior notice due to product improvement.<br />
9. Related Products (sold separately)<br />
and Consumables<br />
• Related products (sold separately)<br />
<strong>SHOFU</strong> Post Stand P<br />
<strong>SHOFU</strong> Post Set<br />
• Consumables<br />
Halogen lamp (JCR 110V 150W/S)<br />
10. Warranty<br />
This product has undergone strict inspection before shipping. Should this<br />
product, under normal operating conditions, prove defective within one year<br />
from the date of purchase, it will be repaired free of charge, except for the<br />
halogen lamps.<br />
EC Directive:<br />
Safety: LVD 2006/95/EC<br />
EMC: EMC 2004/108/EC<br />
Authorized representative in EU:<br />
<strong>SHOFU</strong> <strong>Dental</strong> <strong>GmbH</strong><br />
Am Brüll 17, 40878 Ratingen, Germany<br />
Telephone: +49 (0) 21 02 / 86 64-0<br />
Fax: +49 (0) 21 02 / 86 64-65<br />
Homepage: www.shofu.de<br />
<strong>SHOFU</strong> INC. 11 Kamitakamatsu-cho, Fukuine, Higashiyama-ku, Kyoto 605-0983, Japan<br />
<strong>SHOFU</strong> INC. Singapore Branch 10 Science Park Road, #03-12 The Alpha, Science Park ll, Singapore 117684<br />
<strong>SHOFU</strong> DENTAL TRADING (SHANGHAI) CO., LTD. No. 645 Jiye Road, Sheshan Industrial Park, Songjiang, Shanghai 201602, China<br />
<strong>SHOFU</strong> DENTAL CORPORATION 1225 Stone Drive, San Marcos, CA 92078-4059, USA<br />
<strong>SHOFU</strong> UK Riverside House, River Lawn Road, Tonbridge, Kent, TN9 1EP, UK<br />
<strong>SHOFU</strong> DENTAL <strong>GmbH</strong> Am Brüll 17, 40878 Ratingen, Germany (www.shofu.de)<br />
419902 · 02/2010<br />
6


