Cercon® ceram Kiss - DeguDent
Cercon® ceram Kiss - DeguDent
Cercon® ceram Kiss - DeguDent

You also want an ePaper? Increase the reach of your titles
YUMPU automatically turns print PDFs into web optimized ePapers that Google loves.
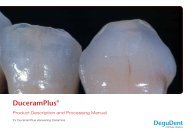
Cercon ® <strong>ceram</strong> <strong>Kiss</strong><br />
Product Description and Processing Manual<br />
for Cercon ® <strong>ceram</strong> <strong>Kiss</strong> veneering <strong>ceram</strong>ics
2 Indications<br />
General Notes<br />
Last modified: November 2009<br />
Cercon ® <strong>ceram</strong> kiss<br />
0124<br />
Purpose<br />
■ Cercon <strong>ceram</strong> kiss is a <strong>ceram</strong>ic veneering<br />
material developed specifically and exclusively<br />
for veneering zirconia (Y-TZP) crowns and<br />
bridges with a coefficient of thermal expansion<br />
of 10.5 µm/m·K (25–500 °C), preferably made<br />
of Cercon base.<br />
■ Cercon <strong>ceram</strong> kiss is also suitable for veneer -<br />
ing zirconia frameworks overpressed with<br />
Cercon <strong>ceram</strong> press.<br />
■ For dental use only.<br />
Contraindications<br />
■ Cercon <strong>ceram</strong> kiss is not suitable for veneering<br />
titanium or other metal frameworks.<br />
■ Cercon <strong>ceram</strong> kiss is not compatible with any<br />
other veneering <strong>ceram</strong>ics.<br />
■ Cercon <strong>ceram</strong> kiss is contraindicated in brux -<br />
ism or other types of parafunction.<br />
■ In addition, Cercon <strong>ceram</strong> kiss is contrain di -<br />
cated in situations where the interocclusal<br />
dimension is insufficient.<br />
Technical specifications<br />
■ CTE dentine: 9.2 µm/m·K (25–500 °C)<br />
■ Dental <strong>ceram</strong>ic material: Type 1,<br />
Class 2–8 according to DIN EN ISO 6872<br />
Release date: February 2005<br />
Cercon ® <strong>ceram</strong> press<br />
0124<br />
General instructions on processing<br />
Cercon <strong>ceram</strong> press<br />
■ For information on indications for use, contraindications,<br />
warnings, precautions, adverse<br />
reactions, technical data, transport and storage<br />
conditions, explanations of symbols on<br />
the product labels and combinable liquids,<br />
please consult the Instructions for Use for<br />
Cercon <strong>ceram</strong> press.<br />
■ For firing recommendations, please refer to<br />
the Instructions for Use of Cercon <strong>ceram</strong><br />
press.<br />
Precautionary Notes for Medical Products<br />
Adverse effects and interactions<br />
We are not aware of any risks or adverse effects<br />
related to Cercon <strong>ceram</strong> kiss veneering <strong>ceram</strong>ics<br />
or Cercon <strong>ceram</strong> press pressable <strong>ceram</strong>ics. If<br />
properly processed and used, adverse effects of<br />
these medical products will be highly unlikely.<br />
However, reactions of the immune system (such<br />
as allergies) or localized paraesthesia (such as an<br />
irritating taste or irritation of the oral mucosa) cannot<br />
be completely excluded in principle. Should<br />
you hear or be informed of any adverse effects –<br />
even when doubtful – we would like to request<br />
notification. In patient hypersensitivity to Cercon<br />
<strong>ceram</strong> kiss veneering <strong>ceram</strong>ics or Cercon <strong>ceram</strong><br />
press pressable <strong>ceram</strong>ics or one of their ingredients,<br />
this medical product may not be used or<br />
only under the particular scrutiny of the dentist<br />
or physician in charge. Known cross-reactions<br />
or interactions of this medical product with other<br />
medical products or material already present<br />
in the oral environment must be taken into<br />
consider ation by the dentist or physician in<br />
charge when selecting this medical product.<br />
Notify the dentist or physician in charge of all<br />
factors described above if you use this medical<br />
product for a custom construction.<br />
When working with these materials, make sure<br />
to comply with the Instructions for Use and the<br />
pertinent Material Safety Data Sheets (MSDS).<br />
Safety notes<br />
■ Do not inhale dust particles during grinding.<br />
Transport and storage<br />
■ Liquids: Store containers tightly closed at<br />
temperatures above 10 °C.<br />
10 °C Lower temperature limit<br />
■ Protect powders and pellets from moisture.<br />
Keep dry<br />
Symbols on product labels<br />
REF Catalogue number<br />
LOT Batch code<br />
Use by<br />
Attention, see Instructions for Use<br />
Do not re-use.<br />
Consult instructions for use<br />
Combinable liquids<br />
■ Paste opaque:<br />
Fluid Paste Opaque<br />
■ Margins<br />
Ducera ® Liquid Quick<br />
■ Dentines/incisals, etc.:<br />
Ducera ® Liquid Blend<br />
Ducera ® Liquid SD<br />
Ducera ® Liquid Form<br />
■ Paints/glazes:<br />
Ducera ® Liquid Stain improved<br />
■ Isolation<br />
Ducera ® Sep Isolating Fluid
Contents 3<br />
2 Indications, Contraindications<br />
Safety Notes, Precautionary Notes for Medical Products<br />
4 <strong>Kiss</strong> – a Better Veneering Concept<br />
9 Cercon smart <strong>ceram</strong>ics – Concept<br />
10 Instructions for Use<br />
10 Framework Preparation<br />
12 Build-up – Aesthetic Line Base<br />
16 Build-up/Finishing – Aesthetic Line Base<br />
18 Completed Restoration – Aesthetic Line Basic<br />
20 Ceramic Shoulder – Aesthetic Line Individual<br />
22 Aesthetic Line Individual – Characteristic aged teeth<br />
26 Press to-technique – Aesthetic Line Individual<br />
28 Young teeth – Aesthetic Line Individual<br />
36 Firing/Pressing Recommendations
4 <strong>Kiss</strong> – a Better Veneering Concept<br />
<strong>Kiss</strong> – a Better Veneering Concept<br />
Aesthetic/cosmetic dentistry is intricately linked<br />
with all-<strong>ceram</strong>ic dental restorations. When it<br />
comes to prosthetic dentistry, all-<strong>ceram</strong>ic materials<br />
are the ideal materials to meet the requirements<br />
associated with patients’ and dentists’<br />
aesthetic and cosmetic needs.<br />
Choosing Cercon <strong>ceram</strong> kiss gives you a <strong>ceram</strong>ic<br />
veneering material developed specifically for<br />
zirconia frameworks. When we developed this<br />
material, we integrated the fundamental principles<br />
represented by our conventional veneering<br />
<strong>ceram</strong>ics, Duceragold <strong>Kiss</strong> and Du<strong>ceram</strong> <strong>Kiss</strong>,<br />
which have met with the approval of large numbers<br />
of users.<br />
With Cercon <strong>ceram</strong> kiss, all <strong>DeguDent</strong> veneering<br />
<strong>ceram</strong>ics can be processed in exactly the same<br />
manner.<br />
Any attempt to describe the high quality of<br />
Cercon <strong>ceram</strong> kiss on paper and in a few words<br />
would appear futile. “Beauty is in the eye of the<br />
beholder.” We will let users, and especially the<br />
dental technicians, describe and judge the qual -<br />
ity of this dental <strong>ceram</strong>ic veneering material.<br />
However, there are a few attributes we would like<br />
to point out:<br />
■ Veneering <strong>ceram</strong>ics for a broad range of individual<br />
applications<br />
■ Reduced-masses concept for rational and<br />
economical use<br />
■ Can be combined with Cercon <strong>ceram</strong> press<br />
Special features<br />
Cercon <strong>ceram</strong> kiss is equally well suited for use in<br />
Cercon base (white) and Cercon base colored<br />
frameworks. Whether or not you use the liner is<br />
entirely up to you. It serves exclusively to prime<br />
the framework. Leaving it off has no negative<br />
effect on the bond between the framework and<br />
the veneering <strong>ceram</strong>ics.<br />
The <strong>Kiss</strong> system<br />
Cercon <strong>ceram</strong> kiss expands the range of zirconia<br />
framework applications within the <strong>Kiss</strong> system.<br />
It includes a build-up scheme for the five frame -<br />
wo rk materials that are going to be the most<br />
important ones. You will be able to use Duceragold<br />
<strong>Kiss</strong> for highly expansive alloys (Degunorm)<br />
and pressable <strong>ceram</strong>ics (Cergo <strong>Kiss</strong>), Du<strong>ceram</strong><br />
<strong>Kiss</strong> for the “classical” and the “biological”,<br />
Duceratin <strong>Kiss</strong> for titanium alloys and of course<br />
Cercon <strong>ceram</strong> kiss for zirconia, the framework<br />
material of the future.<br />
Along with the uniform build-up technique, the<br />
<strong>Kiss</strong> system offers a number of other advantages<br />
in everyday use:<br />
■ No extra training cost or learning curve when<br />
switching from one framework material to<br />
another.<br />
■ Exactly matched shades across <strong>ceram</strong>ic lines.<br />
You will have no problem processing or veneer -<br />
ing different framework materials, e.g. a zirconia<br />
bridge framework and a pressable-<strong>ceram</strong> -<br />
ics single crown for a single patient case.<br />
■ Each <strong>ceram</strong>ic veneering material within the<br />
<strong>Kiss</strong> system is associated with closely match -<br />
ed framework materials offering you a maxi -<br />
mum of processing safety. The <strong>Kiss</strong> system is<br />
intertwined with the <strong>DeguDent</strong> system brands<br />
such as GoldenGate System or Cercon smart<br />
<strong>ceram</strong>ics.<br />
Jürgen Braunwarth,<br />
Master Dental<br />
Technician,<br />
Stuttgart
<strong>Kiss</strong> – a Better Veneering Concept 5<br />
The natural aesthetics of Cercon <strong>ceram</strong> kiss are thoroughly convincing.<br />
Peter Finke,<br />
Master Dental<br />
Technician,<br />
Erlangen<br />
Carsten Fischer,<br />
Certified Dental<br />
Technician,<br />
Frankfurt am Main<br />
Darryl Millwood,<br />
Certified Dental<br />
Technician,<br />
Garmisch-Partenkirchen<br />
Klaus Müterthies,<br />
Certified Dental<br />
Technician,<br />
Gütersloh<br />
Jochen Peters,<br />
Master Dental<br />
Technician,<br />
Neuss
6 <strong>Kiss</strong> – a Better Veneering Concept<br />
<strong>Kiss</strong> – the veneering concept<br />
Shade variety in a system with simple<br />
mixing ratios<br />
The six fluorescent power chromas can reproduce<br />
the bulk of all cervical and mamelon effects<br />
as well as increases in chroma. Simple 1:1<br />
mixtures between these power chromas result<br />
in an additional 15 intermediate shades. Even<br />
the smallest color gradients can be emulated<br />
rapidly and in a systematic manner.<br />
The Stand-by multifunctional material is a strongly<br />
transparent opal effect that is one of the key -<br />
stones of the <strong>Kiss</strong> system. It can be used by it self<br />
or mixed with any other materials.<br />
The three opal effects, Ocean, Sky and Fog, con -<br />
trol value and opalescence in blueish and greyish<br />
incisal regions.<br />
Sunset and Sunrise are suitable for incisal<br />
characterization and for subdued transparent<br />
chroma gradations in the body region.<br />
The individual incisals within the <strong>Kiss</strong> system<br />
allow the emulation of all natural opalescent and<br />
fluorescent effects.<br />
Opal incisals 1 and 2 are intended for lighter<br />
(OS 1) and darker (OS 2) shades. For intermediate<br />
shades, the two materials are simply mixed<br />
at a 1:1 ratio.<br />
The same principle holds for Flu Inside 1 and 2.<br />
As their name suggests, these highly fluorescent<br />
materials are designed for the inner layers,<br />
covering the opaque even where space is at a<br />
premium, while at the same time increasing<br />
brightness in the incisal area.<br />
White Surface (WS) is a whitish opalescent effect<br />
used to increase surface value (brightness).<br />
Here, too the effect can be attenuated by 50%<br />
by adding Stand-by. To reproduce the effects of<br />
teeth that have been bleached, Bleach Opaque<br />
and Bleach Dentine are available.<br />
A particularly successful and versatile correction<br />
material is the transparent Final <strong>Kiss</strong>. By mixing<br />
Gum 1 and Gum 2 with selected effects (see<br />
chart), natural gingival effects can be emulated<br />
very closely and simply.<br />
The power chroma color identification system<br />
PC 1 1 + 2 1 + 3 1 + 4 1 + 5 1 + 6<br />
PC 2 2 + 3 2 + 4 2 + 5 2 + 6<br />
PC 3 3 + 4 3 + 5 3 + 6<br />
PC 4 4 + 5 4 + 6<br />
PC 5 5 + 6<br />
PC 6<br />
5 incisals for individual value control<br />
0S 1 0S 2 Flu 1 Flu 2<br />
1 : 1 1 : 1<br />
WS S by Bleach<br />
Bleach<br />
opaque<br />
1 : 1<br />
F-<strong>Kiss</strong>
<strong>Kiss</strong> – a Better Veneering Concept 7<br />
5 Opal effects<br />
OE Ocean OE Sky OE Fog<br />
OE Sunset<br />
OE Sunrise<br />
+ S by<br />
1 : 1<br />
1 : 1<br />
+ S by<br />
1 : 1<br />
+ S by<br />
1 : 1<br />
+ S by<br />
1 : 1<br />
1 : 1<br />
+ S by<br />
1 : 1<br />
Two gums for individual gingival tints<br />
Shade variations are due to print quality.<br />
+ OE Sunrise<br />
1 : 1<br />
+ OE Ocean<br />
1 : 1<br />
+ OE Sky<br />
1 : 1<br />
+ OE Sunset<br />
1 : 1<br />
+ OE Sunset<br />
1 : 1<br />
+ OE Sunrise<br />
1 : 1<br />
+ OE Ocean<br />
1 : 1<br />
+ OE Sky<br />
1 : 1<br />
Gum 1<br />
+ WS<br />
1 : 1<br />
Opaque<br />
Gum 2<br />
+ WS<br />
1 : 1<br />
+ S by<br />
1 : 1<br />
+ S by<br />
1 : 1
8 <strong>Kiss</strong> – a Better Veneering Concept<br />
<strong>Kiss</strong> – a Better Veneering Concept<br />
Shade combination table<br />
Shade A1 A2 A3 A3,5 A4 B1 B2 B3 B4 C1 C2 C3 C4 D2 D3 D4<br />
Standard build-up technique<br />
Opaque X X X X X X X X X X X X X X X X<br />
Dentine X X X X X X X X X X X X X X X X<br />
Incisal 1 2 3 3 5 1 1 4 6 1 5 5 6 2 4 4<br />
Individual build-up technique<br />
Opaque X X X X X X X X X X X X X X X X<br />
Opaque Orange<br />
Opaque Bleach<br />
Opaque Gum<br />
For characterizing occlusal, cervical and palatal regions.<br />
For extremely bright/bleached teeth. Normally used with a bleach dentine only.<br />
For gingival aspects.<br />
Margin SM/F SM 1 2 2 + 3 2 + 4 3 + 4 1 1 + 3 3 3 + 5 1 1 + 4 2 + 4 4 1 + 4 2 + 4 3 + 4<br />
Dentine X X X X X X X X X X X X X X X X<br />
Power Chroma 1<br />
Power Chroma 2<br />
Power Chroma 3<br />
Power Chroma 4<br />
1 + 2 2 2 + 5 3 + 5 4 + 6 1 1 + 3 2 + 3 3 + 6 1 + 6 2 + 6 3 + 6 5 + 6 1 + 6 2 + 6 3 + 6<br />
Power Chroma 5<br />
Power Chroma 6<br />
The Power Chromas are highly chromatic, fluorescent intensives for individual shade reproduction. All Power Chromas are used for shade support in the cervical,<br />
palatal and occlusal regions. They are used as is or mixed at a 1:1 ratio. When mixed with Stand-by, they are also very appropriate for mamelons.<br />
Color assignments are indicative only.<br />
Flu Inside 1 X X<br />
X X<br />
X<br />
X<br />
Mix Mix<br />
Mix<br />
Mix<br />
Mix<br />
Flu Inside 2 X X X X X<br />
Opal Incisal 1 X X<br />
X X<br />
Mix Mix<br />
Mix Mix Mix Mix Mix<br />
Opal Incisal 2 X X X X X<br />
Stand-by<br />
OE Sunset<br />
OE Sunrise<br />
OE Ocean<br />
OE Sky<br />
OE Fog<br />
White Surface<br />
Final <strong>Kiss</strong><br />
Highly opalescent, almost transparent multifunctional material. Stand-by can be used by itself or mixed with all other materials within the <strong>Kiss</strong> system.<br />
Stand-by thus has a key function within the system.<br />
Opalescent effect for orange-colored/reddish incisal aspects; very well suited for increasing chroma during the second or third dentine firing.<br />
Predominantly for A colors; can be attenuated using Stand-by.<br />
Opalescent effect for yellow incisal aspects; very well suited for increasing chroma during the second or third dentine firing.<br />
Predominantly for B colors; can be attenuated using Stand-by.<br />
Opalescent effect for intense, deep blue incisal aspects; can be attenuated using Stand-by.<br />
Opalescent effect for delicate blue incisal aspects; can be attenuated using Stand-by.<br />
Opalescent effect for grey incisal aspects; can be attenuated using Stand-by.<br />
Whitish opalescent effect for emphasizing posterior cusps and anterior palatal/lingual ridges;<br />
can be attenuated using Stand-by.<br />
Low-fusing transparent correction material; firing temperature 680 °C.
Cercon smart <strong>ceram</strong>ics 9<br />
Cercon ® smart <strong>ceram</strong>ics<br />
Classical? Virtual? Individual.<br />
Perfectly synchronized fabrication steps<br />
During each step of the process, the Cercon<br />
system proves its value as a professional hightech<br />
system that ensures convincing results.<br />
Materials, devices, times, temperatures – every -<br />
thing matches perfectly, all calculations are<br />
automated, and everything works together to<br />
support more seamless craftsmanship at the<br />
dental laboratory. What counts is the better<br />
results – whether obtained the classical or the<br />
virtual way.<br />
Choose the process that matches your style<br />
You love classical? In this case you probably<br />
prefer to model your crown or bridge framework<br />
manually, in wax. This method is ideal when<br />
fabricating large-span bridges or connectors,<br />
letting you feel and enjoy the full potential of<br />
Cercon. But you can also decide on the virtual<br />
method, designing your framework on the screen.<br />
Cercon brain<br />
■ Perfect unity of laser scanner and milling unit.<br />
Laser: Class II, 1 mW of power, precision in the<br />
µm range<br />
■ Software-controlled data processing, enlargement<br />
factor calculation, and implementation in<br />
the form of programmed milling commands.<br />
■ The dust created by the milling process is<br />
removed by Cercon clean.<br />
Cercon art<br />
■ Hardware and software for the virtual fabrication<br />
of crowns and bridges.<br />
■ Computer-assisted design via Cercon brain;<br />
milling using circular strategies.<br />
■ Highly economical nesting concept; several<br />
frameworks can be optimally arranged within a<br />
larger blank.<br />
Cercon base (white), Cercon base colored<br />
■ Blanks adapted to the anatomical lengths of<br />
the bridges – 12, 30, 38 and 47 mm.<br />
■ Available in white and in ivory.<br />
■ Cercon base 47: A special blank for anterior<br />
bridge designs, wide arches, and narrow po s -<br />
terior curvatures; maximum length is 47 mm.<br />
Also appropriate for implant-supported superstructures.<br />
Cercon heat<br />
■ Sintering furnaces specifically for the Cercon<br />
system.<br />
■ At 1350 °C, the milled objects will shrink to<br />
their ideal size and attain their final strength<br />
within approximately six hours. The zirconia<br />
will achieve a density of 100 %.<br />
Cercon move<br />
■ 3-D navigation system – for viewing objects on<br />
the screen from all angles.<br />
Cercon eye<br />
■ Single module for scanning individual dies or<br />
segments.
10 Instructions for use<br />
Framework preparation<br />
1<br />
Framework preparation and cleaning<br />
Figure 1: There is no need to finish the sintered<br />
Cercon base framework with rotary instruments.<br />
The framework surface is rendered sufficiently<br />
rough by the milling process to facilitate a mechanical<br />
bond.<br />
Minor final corrections, e.g. marginal corrections,<br />
should be performed using diamond instruments.<br />
To avoid microcracks, any grinding or cutting of<br />
the framework should be performed using a<br />
high-speed motor and water-cooling. Keep the<br />
pressure on the framework material to a minimum<br />
in order not to overheat it.<br />
To avoid tension in the <strong>ceram</strong>ic veneer, any sharp<br />
edges or corners of the frameworks must be<br />
rounded.<br />
Frameworks with cracks or holes are unsuitable<br />
for processing; an error-free, durable veneer of<br />
such frameworks is not possible.<br />
The prepared zirconia frameworks are sandblasted<br />
with alumina (110 –125 µm, 3–3.5 bar).<br />
Then the frameworks are cleaned by steam or in<br />
a clean ultrasonic bath.<br />
Applying the liner<br />
Figures 2–6: The Cercon base structure ce ramic<br />
material is first prepared by applying the liner.<br />
This will give the crown its basic underlying shade.<br />
Applying the liner as two thin but covering layers is<br />
recommended for the standard build-up technique<br />
and for an accurate reproduction of the V shades<br />
both for non-colored frameworks (Cercon base)<br />
and for colored frameworks (Cercon base colored).<br />
In the individual build-up technique, the liner can<br />
be applied in a single layer or left out completely.<br />
The liner does not influence the bond strength,<br />
which is not reduced if the liner is omitted. When<br />
working with only one layer of liner or with no
Instructions for use 11<br />
2 3 4<br />
liner at all, please note that the base shade will be<br />
modified by the framework shade as well as by<br />
the natural tooth structure and other materials.<br />
The liner is available as a paste.<br />
5<br />
6<br />
After the first or second liner firing, the crown<br />
framework has a uniformly colored, fully covering<br />
and matte surface.<br />
When processing the liner and during all subsequent<br />
build-up steps, please remember that you<br />
are dealing with all-<strong>ceram</strong>ic restorations characterized<br />
by a surprising degree of translucency<br />
(with zirconia even with thin layers 0.4 mm),<br />
which may result in shade differences between<br />
the laboratory situation (due to the shade of the<br />
dye) and the intraoral situation (due to the shade<br />
of the adhesive cement). It might be worthwhile<br />
to remember that there are more than 40 dif -<br />
ferent phosphate cements, some of them with<br />
different shades. The same is true when using<br />
adhesive resins.
12 Instructions for use<br />
Build-up – Aesthetic Line Basic<br />
When using Cercon base (white), the technician<br />
with many years of experience in (metallo-)<strong>ceram</strong> -<br />
ics will probably find the monochromatic white<br />
underlying color rather unusual at first. Cercon<br />
base colored frameworks also require some<br />
men tal adjustment to the basic shade of the<br />
material.<br />
Cercon <strong>ceram</strong> kiss is a zirconia veneering material<br />
perfectly adapted to either framework colors<br />
right from the start, including the liners and dentines.<br />
In the standard build-up technique, you can work<br />
in the identical manner as when building up<br />
Duceragold <strong>Kiss</strong> or Du<strong>ceram</strong> <strong>Kiss</strong>.<br />
Using only two materials – dentine and incisal –<br />
highly aesthetic veneers can be created on the<br />
liner-prepped framework within a minimum of time.<br />
7 8<br />
Aesthetic Line Basic – step by step<br />
Figure 7: Start building the dentine in the body<br />
region. It is recommended to apply larger quantities<br />
of the <strong>ceram</strong>ic material to ensure a good<br />
distribution of moisture during the build-up process.<br />
The Cercon <strong>ceram</strong> kiss materials are char -<br />
acterized by a high degree of stability in their original<br />
state, which can be further increased by<br />
adding the Form modelling liquid. Using this<br />
liquid, shaping the <strong>ceram</strong>ic material on the crown<br />
while still wet is sheer pleasure.<br />
10<br />
Figures 8–9: The dentine core is now systematically<br />
build up further. The marginal ridges are built<br />
up first to determine the correct size ratios for the<br />
tooth (length and width).<br />
Figures 10–11: The tooth shape is completed<br />
further until the tooth has been contoured in dentine<br />
to full anatomical shape.<br />
Figure 12: This is followed by cutting back the<br />
dentine core. The dentine is cut back specifically<br />
to determine the subsequent proportions of the<br />
incisal aspect. This is the only way to determine<br />
the size of the incisal part of the build-up.
Instructions for use 13<br />
9<br />
12<br />
11
14 Instructions for use<br />
Build-up – Aesthetic Line Basic<br />
Figures 13–17: The cut-back dentine core is<br />
now completed with the incisal (S1–S6 depend -<br />
ing on the V shade, see shade assignment<br />
table). Here, too, working in a structured and<br />
well-organized manner helps ensure good shade<br />
and firing resu lts and obtain the correct tooth<br />
shape to be reconstructed.<br />
Start building the marginal ridges again, once<br />
again determining the dimensions of the tooth<br />
shape. In this manner it is also possible to determine<br />
and control the thickness of the incisal layer.<br />
13 14<br />
In the ridge region, the incisal can include the<br />
cervical third, just as with natural teeth. In the<br />
body region, the incisal should taper off to a thin<br />
layer in order for the basic shade not to be alter -<br />
ed too much.<br />
Figures 18: This is followed by the first dentine<br />
firing as per the firing recommendations on<br />
pages 36–39. After firing, the tooth should ex -<br />
hibit a matte lustre and a homogenous surface.<br />
However, all ridges and prominent details should<br />
be preserved and not flattened<br />
15 16
Instructions for use 15<br />
17<br />
18
16 Instructions for use<br />
Build-up/Finishing – Aesthetic Line Base<br />
19 20 21<br />
24 25<br />
Figure 19: In the cervical region, some supplementary<br />
dentine can be applied to the tooth if needed.<br />
In this case, care must be taken to ensure<br />
that the dentine tapers off very thinly in an incisal<br />
direction so there is no discontinuity in the layers.<br />
Figure 19–23: The remainder of the tooth is<br />
once again augmented by the amount of firing<br />
contraction using enough incisal to rebuild the<br />
tooth to full contour.<br />
Figure 24: This is followed by the second dentine<br />
firing. As after the first dentine firing, the tooth<br />
should exhibit a matte lustre and stable surface<br />
structures.<br />
Finishing:<br />
Figure 25: If you use the same structured ap -<br />
proach in finishing, you will see that you get<br />
excellent results with the “keep it simple and<br />
safe” <strong>Kiss</strong> philosophy:<br />
First, adjust the contacts and place the crowns<br />
back on the model. Before addressing further<br />
details of shape and surface, the function should<br />
be checked, as incisal and occlusal form is to<br />
a very large extent determined by function.
Instructions for use 17<br />
22 23<br />
26 27 28<br />
Figure 26: It is only now that you should turn to<br />
the details of the tooth. Dusting with silver powder<br />
is a good idea, since this will reduce the<br />
appearance of the nascent restoration to its<br />
pure shape.<br />
You should use other tools such as a pencil or<br />
similar to find and draw out the line of the marginal<br />
ridges.<br />
If the shape is internally consistent, you should<br />
address the surface one more time, because<br />
the reflections on the surface contribute sub -<br />
s tantially toward a harmonious integration of the<br />
restoration with the remainder of the dentition.<br />
When judging the surface, take a close look at<br />
the adjacent teeth to find out exactly how their<br />
surface is structured.<br />
Figure 27: Before the glaze firing, the crown can<br />
be polished one more time using standard<br />
rubber polishing wheels or points. This will make<br />
the surface even more homogenous, and you<br />
can set a lower temperature for glaze firing.<br />
Figure 28: It is also recommended to check the<br />
final shape and surface of the entire restoration<br />
one last time by applying silver powder.<br />
Clean the restoration thoroughly with steam and<br />
glaze as per the firing recommendations.
18 Instructions for use<br />
Completed Restoration – Aesthetic Line Basic<br />
29<br />
30<br />
The finished restoration (Figure 29) under ultraviolet<br />
light and in transillumination offers even more<br />
interesting information.<br />
Ultraviolet light (Figure 30) emphasizes the natural<br />
florescence as created by a prudent use of<br />
liners and dentines. The progression from the<br />
cervical to the incisal aspects is continuous.<br />
Transillumination (Figure 31) shows the effect of<br />
the liner. Two layers of liner were used for tooth<br />
31, allowing only a small amount of light to pass<br />
through the crown. This effect can be exploited in<br />
a beneficial manner, e.g. in case of discolored<br />
preparations.<br />
Tooth 32 with its single layer of liner appears<br />
much closer to nature – but from the point of<br />
view of light transmission, working without any<br />
liner is the ideal way, as we will see in the follow -<br />
ing description of an individual build-up.
31<br />
Instructions for use 19
20 Instructions for use<br />
Ceramic Shoulder – Aesthetic Line Individual<br />
Build-up – Aesthetic Line Individual<br />
32<br />
Of course, Cercon <strong>ceram</strong> kiss also offers you all<br />
the options of an individual build-up. The next<br />
two restorations described here will let you follow<br />
the development of a more youthful and a more<br />
aged tooth, step by step.<br />
In the individual build-up technique, the liner can<br />
be applied in a single layer or left out completely.<br />
The liner does not influence the bond strength,<br />
which is not reduced if the liner is omitted. When<br />
working with only one layer of liner or with no liner<br />
at all, please note that the base color will be<br />
modified by the framework color as well as by the<br />
natural tooth structure and other materials.<br />
Ceramic shoulder:<br />
The margin (shoulder) materials permit perfect an<br />
adaptation of the tooth shade in the marginal<br />
region of the crown, even if the preparation margin<br />
is placed supragingivally. Here, these margins<br />
also create perfect tooth-and-gum aesthetics.<br />
Advantages and benefits of the margin materials:<br />
■ Simple handling<br />
■ High stability<br />
■ Stability even after multiple firings<br />
■ Controlled translucency<br />
■ “Chameleon” effect<br />
■ Excellent bonding with framework<br />
■ Gingiva-friendly<br />
… step-by-step …<br />
When using margin (shoulder) materials, we rec o m -<br />
mend designing the coping such that the crown<br />
margin ends 0.5–0.8 mm above the preparation<br />
margin border (see Figure 32).<br />
Of course, this reduction can be performed<br />
mechanically at a later point. This work should<br />
be performed with water-cooled medium-grain<br />
diamonds. The marginal transitions should be soft<br />
to avoid tension as far as possible.
Instructions for use 21<br />
33 34<br />
35 36<br />
■ Cut back the crown margin by approximately<br />
0.5–0.8 mm.<br />
■ Sandblast the framework on the inside (especially<br />
the margins) and on the outside.<br />
■ Then clean the framework (with steam).<br />
■ Mark the preparation margin using a graphitefree<br />
pencil, and seal it as usual, e.g. using a<br />
stone hardener or similar.<br />
■ Apply Ducera-Sep isolation liquid. Allow the<br />
isolation liquid to air-dry and then apply a<br />
second layer.<br />
■ Mix the margin material with SD Quick modelling<br />
liquid and generously apply to the reduced<br />
area between the die and the coping (see<br />
Figures 33 and 34). Allow the margins to dry,<br />
using a heat source if preferred.<br />
■ Place the object on the special firing pins.<br />
Make sure that the margin material does not<br />
contact the pins.<br />
As with any <strong>ceram</strong>ic material, contraction is un -<br />
avoidable (see Figure 35). Compensate for this<br />
contraction in a second firing (see Figure 36).<br />
■ Complete the <strong>ceram</strong>ic shoulder, ensuring sufficient<br />
thickness in the overlap area on the liner<br />
or coping.<br />
■ Use <strong>ceram</strong>ic stones and diamonds for finishing<br />
the shoulder.<br />
■ Finish and fit the shoulder, making sure no<br />
heat develops. (Use only rubber polishing<br />
wheels and tips in the marginal region.)<br />
■ Clean the restoration and start building up the<br />
veneer.<br />
Select the shade of the margin material intra -<br />
or ally, using the indicator. For more details and the<br />
margin shade assignment table, see page 27.
22 Instructions for use<br />
Characteristic aged teeth –<br />
Aesthetic Line Individual<br />
37 38<br />
39<br />
Individual build-up: an aged tooth<br />
Figure 37: When working without liner, you<br />
should always begin the build-up by placing a<br />
highly chromatic and fluorescent material such<br />
as a <strong>Kiss</strong> power chroma (for the assignment<br />
table see page 8), independently of whether you<br />
are veneering a Cercon base or a Cercon base<br />
colored framework. Power chromas give the<br />
restoration a warm natural shade emanating<br />
from the depth of the restoration and will show<br />
natural luminescence under ultraviolet light. Use<br />
the power chromas to build the tooth to a reduced<br />
anatomical shape.<br />
40<br />
41<br />
Figure 38: This is followed by the dentine layer,<br />
as usual. As shown in Figure 12, it may be<br />
easier – especially when working with thin layers –<br />
to initially build up only one-half of the tooth in<br />
dentine in order to gain better control of the layer<br />
thickness.<br />
Even with individual build-ups, it is recommend -<br />
ed to build up the dentine to full contour that is<br />
then cut back to accommodate the incisals.<br />
Once the built-up dentine has been appropriately<br />
conditioned (Figure 39), the individual build-up<br />
of the incisal can begin. It will be based on your<br />
own shade-matching results.
Instructions for use 23<br />
42 43<br />
44<br />
45<br />
An aged tooth could be built up as follows<br />
(example):<br />
To give the tooth a natural opalescence including<br />
halo in the incisal region, you might start with the<br />
highly opalescent Stand-by material, as shown<br />
in Figure 40.<br />
Depending on the desired effect, final corrections<br />
(Figure 43/44) can be made using Stand-by<br />
or opal incisals or any of the opal effects. White<br />
Surface is excellent for highlighting whitish palatal<br />
ridges; depending on the intensity of the de -<br />
sired effect, White Surface can be attenuated<br />
using Stand-by.<br />
It is in this stage that the <strong>Kiss</strong> opal effects are<br />
used, all of which are highly opalescent in themselves<br />
but feature an additional yellowish/orange<br />
or bluish/greyish tint. The OE Sunset opal effect<br />
is particularly suited to support the shade of<br />
aged teeth in the body region (see Figure 41).<br />
This is followed by the first dentine firing. After<br />
firing, as with the standard build-up technique,<br />
the tooth should exhibit a matte lustre and a<br />
dimensionally stable surface (Figure 45).<br />
The OE Sky/Ocean opal effect is used to create<br />
marginal ridges with a bluish effect.<br />
Further build-up of the incisal area can be done<br />
using opal incisals 1 and 2 (Figure 42). Care must<br />
be taken to ensure not to overlay the opal effects<br />
so they are not attenuated.
24 Instructions for use<br />
Characteristic aged teeth –<br />
Aesthetic Line Individual<br />
After the first firing, augment the contracted<br />
areas and recreate the shape using the appropriate<br />
<strong>ceram</strong>ic materials. Start in the cervical<br />
region by adding the dentine used before the first<br />
firing or by adding power chroma (Figure 46<br />
and 47). Here, too, you should ensure that the<br />
material tapers off to a very thin layer in an incisal<br />
direction. This helps avoid discontinuity in the<br />
build-up. The rest of the tooth can be built back<br />
up with the corresponding opals or opal effects,<br />
depending on the shade taken. This is followed<br />
by the second dentine firing. Finishing is perform -<br />
ed as described for the standard build-up technique.<br />
First of all, adjust the contacts and occlusal<br />
movements.<br />
Form generates function – this is particularly true<br />
of aged teeth. The direction of the incisal edge<br />
and the angle of the abrasion surface are determined<br />
exclusively by function (Figure 48). From<br />
time to time, you should make use of tools such<br />
as the silver powder described for the standard<br />
build-up technique. You will be able to concentrate<br />
on shapes, and you will be able to create<br />
excellent surfaces and shapes in a minimum of<br />
time. The anatomical tubercle, too, deserves a<br />
closer look (Figure 48). Detail the abrasion areas<br />
and the ridges so that they look natural and<br />
anatomically correct. This will help you create a<br />
harmonic overall restoration.<br />
46 47<br />
50<br />
Looking at the cervical region, with aged teeth it<br />
is often the case that the clinical crown is longer<br />
than the anatomical crown – the exact opposite<br />
of what is usually the case in young teeth. Due to<br />
the recession of the gingiva, the cervical region is<br />
exposed and has to be restored along with the<br />
anatomical crown. As shown in Figures 48 and<br />
49, the neck is distinguished primarily by the<br />
different cervical color, but it should also be<br />
otherwise replicated in its natural shape at the<br />
interface of the crown and the root. The marginal
Instructions for use 25<br />
48 49 ridges on the labial side deserve maximum attention.<br />
Defining or moving the mesial and distal<br />
marginal ridges defines the width of the tooth or<br />
allows you to influence the shape of the tooth,<br />
that is, to give it its basic shape. By positioning<br />
the ridges in an appropriate manner, the dysharmony<br />
between the shape of the preparation and<br />
the shape of the tooth that is so frequently encountered<br />
can be compensated for.<br />
Other structures of the labial surface – growth<br />
ridges or similar – are usually weakened in aged<br />
teeth, due to years of natural abrasion. Aged<br />
teeth often exhibit a very smooth and homogenous<br />
enamel surface that needs to be replicated<br />
(Figure 49).<br />
51<br />
The next firing step is glazing. Through well-considered<br />
use of paints and glazes, different shades,<br />
different types of lustre and other characteristics<br />
can be achieved. It is important when glazing<br />
that you determine and adjust your own glazing<br />
temperature as a function of how the sur face<br />
was prepared (polishing, application of glaze).<br />
The temperature shown in the tables can only be<br />
a rough guideline. Any minor correction required<br />
in the marginal region can still be performed after<br />
glazing using the final margin materials that fuse<br />
at 680 °C. This is approximately 120 °C below the<br />
glaze-firing temperature, so that the rest of the<br />
restoration remains completely stable.<br />
The completed restoration (Figures 50 and 51)<br />
clearly shows the different effects. The anatomical<br />
tubercle and the cervical region are characterized<br />
by power chromas. The incisal region is a fine<br />
example of opal effects, which have remained<br />
stable during subsequent firing cycles. The trans -<br />
illuminated mesial and distal flanges show a<br />
natural bluish opal visual impression. All in all an<br />
excellent shade composition. Thanks to <strong>Kiss</strong>.
26 Instructions for use<br />
Press to-technique – Aesthetic Line Individual<br />
Individual build-up: a young tooth<br />
52<br />
Young teeth are certainly the most difficult teeth to<br />
reconstruct. This is due to their generally si m ple,<br />
but elegant and clear shape and to the frequently<br />
monochromatic shade and corresponding translucency.<br />
The following is a demanding but still<br />
typical build-up for a young tooth.<br />
In order to achieve a natural light transmission<br />
in the cervical region, the following example – like<br />
the aged tooth described earlier – was de signed<br />
with a <strong>ceram</strong>ic margin (shoulder) using the<br />
Cercon <strong>ceram</strong> press pressing technique.<br />
Why press to zirconia?<br />
■ More economical creation of <strong>ceram</strong>ic margins,<br />
especially for larger restorations<br />
■ No contraction<br />
■ The dentine core can be pressed to simultaneously<br />
■ Fast and simple incisal build-up<br />
■ Fewer contraction and cracking problems<br />
during build-up<br />
■ Time economy when fabricating more extensive<br />
restorations or several single crowns concurrently<br />
■ Fully anatomical pressing for optimized gnathology<br />
Procedure:<br />
1. Begin by reducing the zirconia coping in the<br />
same technique as when creating a conventional<br />
<strong>ceram</strong>ic margin (Figure 52). Design the frame -<br />
wo r ks such that the crown margin ends<br />
ap proximately 0.5–0.8 mm above the pre pa -<br />
ration margin proper. Distortions may occur<br />
when com pletely over pressing large-dimension<br />
pressed <strong>ceram</strong>ic margins.<br />
2. This is followed by modellation in wax, as in<br />
the conventional pressing or noble-metal restorable<br />
technique. Use only pattern wax for allce<br />
ramic restorations that burns out without any<br />
re sidue. The minimum thickness of the walls in<br />
the overpressed region is 0.4 mm. That the wall<br />
(with the underlying framework) is initially relative<br />
thick is not a problem, since you are already<br />
including the dentine core. When building up the<br />
dentine core, the reduced final anatomical contour<br />
should be considered (Figures 53 and 54). The<br />
object is now sprued at the incisal edge (Figure<br />
55) in order to ensure a complete pressing of t he<br />
mould. Select a wax sprue (wire) at least 3.5 mm<br />
in diameter and 5 to no more than 6 mm in length.<br />
3. The wax modellation is now invested together<br />
with the zirconia coping. Any investment com -<br />
pound designed for pressable <strong>ceram</strong>ics can<br />
be used. We recommend Cergo ® fit (Speed) at a<br />
concentration of 80 %. Please follow the recommendations<br />
of the respective investment man u -<br />
fac turer with regard to mixing, setting and heating<br />
times.<br />
4. This is followed by the pressing itself, proceed -<br />
ing as in the conventional pressing technique<br />
with pressing parameters as follows. For detailed<br />
pressing parameters for Cergo series furnaces
Instructions for use 27<br />
53 54 55<br />
or for Touch+Press furnaces, please refer to the<br />
Appendix on Page 36.<br />
56 57<br />
5. Divesting: Remove the pressing muffle from<br />
the pressing furnace immediately at the end of<br />
the pressing process. Allow the muffle to cool<br />
and carefully divest the object. Divesting the objects<br />
and removing residual investment com -<br />
pound must be performed only using glass beads<br />
(50 µm) at initially 4 bar, reducing to 2 bar as the<br />
object is reached.<br />
6. The sprue is now carefully severed from the<br />
pressed restoration (Figure 56) using a watercooled<br />
diamond disc. The sprue contacts are<br />
smoothed out using a water-cooled fine-grain<br />
diamond. Before veneering, the framework is<br />
once again carefully sand-blasted with glass beads<br />
(at 2 bar of pressure) and cleaned with steam.<br />
7. The framework thus prepared (Figure 57) can<br />
be veneered directly.
28 Instructions for use<br />
Young teeth – Aesthetic Line Individual<br />
Young teeth:<br />
58<br />
You may start building up the incisal region di -<br />
rectly on the overpressed framework or – space<br />
permitting – thinly layer the coping with power<br />
chromas or dentines first. Less experienced<br />
<strong>ceram</strong>ists should first build up the entire tooth<br />
to fill contour in dentine and define the incisal<br />
portion by cutting back, taking the nature-like<br />
mamelons into due considerations (Figure 58).<br />
It is now time to build up the incisal part. The initially<br />
build-up so-called incisal plate is particularly<br />
important in young teeth. The incisal plate is built<br />
up in undiluted opalescent Stand-by from the<br />
palatal/lingual aspect to the incisal aspect, extending<br />
the dentine core. This incisal plate creates<br />
and ensures the halo effect, the opalescent<br />
incisal seam so prominent in young teeth. Standby<br />
can subsequently also be extended to thinly<br />
cover part of the dentine core on the labial side.<br />
This results in a kind of separating layer between<br />
the dentine and the incisal, which creates a particularly<br />
natural effect (Figure 59).<br />
The remainder of the incisal portion is built up according<br />
to the shade of the patient’s teeth. This is<br />
also where the opal effects come into the picture.<br />
The incisal seam can be reinforced using OE Sky<br />
or OE Ocean (Figure 60); in the cervical regions,<br />
OE Sunrise or OE Sunset can be used, depend -<br />
ing on shade (Figure 61).<br />
The whole tooth is finally coated with opal incisal<br />
and completed (Figures 62 and 63).
Instructions for use 29<br />
59 60<br />
61 62 63
30 Instructions for use<br />
Young teeth – Aesthetic Line Individual<br />
64<br />
When building up the tooth, make sure you do not<br />
concentrate on the labial surface only, but take in<br />
the tooth as a whole, completing the build-up on<br />
the proximal and palatal/lingual aspects using<br />
the appropriate materials. This is the only way to<br />
achieve a harmonic overall restoration.<br />
65
Instructions for use 31
32 Instructions for use<br />
Young teeth – Aesthetic Line Individual<br />
66<br />
The firing contraction is compensated for during<br />
the second firing using the respective <strong>ceram</strong>ic<br />
materials.<br />
67<br />
In the cervical third you can simply add some<br />
more dentines or power chromas. The remainder<br />
of the tooth is completed using the appropriate<br />
incisals, opals or opal effects (Figure 66).<br />
This is followed by the second dentine firing<br />
(Figure 67).
Instructions for use 33
34 Instructions for use<br />
Young teeth – Aesthetic Line Individual<br />
Completing the restoration:<br />
68<br />
When finishing, proceed as described and illus -<br />
trated for the standard technique, paying special<br />
attention to the shape and surface texture of the<br />
adjacent teeth. Use all the auxiliary tools you<br />
have: transfer the ridges and surface structures<br />
from the adjacent teeth to the restoration using<br />
a pen or similar to get your bearings. Check and<br />
re-check your work as you go along by eli mi -<br />
nating the effect of shade using silver powder,<br />
concentrating solely on the shape and surface.<br />
This step is followed by glazing, where an op -<br />
tional glaze can be used as described for the<br />
standard build-up technique (Figure 68/69).
69<br />
Instructions for use 35
36 Firing/Pressing recommendations<br />
Firing/Pressing recommendations<br />
General firing instructions<br />
After the firing chamber is closed and<br />
the pre-heating time has passed, the<br />
full vacuum should take effect to avoid<br />
microporosities caused by air trapped<br />
in the <strong>ceram</strong>ic material; this could restrict<br />
the transparency of the <strong>ceram</strong>ic<br />
material and adversely affect its shade<br />
(paler and brighter).<br />
The heating rate should be set to<br />
55 °C/min.<br />
Because of their low thermal conductivity,<br />
the zirconia frameworks must<br />
be placed on the special firing pins<br />
before firing.<br />
The Cercon <strong>ceram</strong> kiss correction<br />
material can be used for minor corrections<br />
of the final shape or for building<br />
contacts.<br />
The correction material is mixed with<br />
SD modelling liquid and fired under<br />
vacuum. Thanks to its low firing<br />
temperature of 680 °C, the existing<br />
shapes and contours remain intact.<br />
Cercon <strong>ceram</strong> kiss – General firing recommendations<br />
Pre-heating Drying time Heating rate Final Holding time Vacuum Long-term<br />
Pre-heating temperature cooling<br />
time<br />
°C min °C/min °C min hPa<br />
Paste liner 1 575 8:00 55 970 1:00 50 –<br />
Paste liner 2 575 8:00 55 960 1:00 50 –<br />
Margin 1 450 6:00 55 850 1:00 50 –<br />
Margin 2 450 6:00 55 850 2:00 50 –<br />
Dentine 1 450 5:00 55 830 1:30 50 –<br />
Dentine 2 450 5:00 55 820 1:30 50 –<br />
Glaze 450 3:00 55 800 1:00 – 6:00<br />
Correction (Final <strong>Kiss</strong>) 450 5:00 55 680 1:00 50 6:00<br />
Final Shoulder (F-SM) 450 5:00 55 680 1:00 50 6:00<br />
Slow cooling is mandatory after the last firing; this includes correction firings of restorations after try-in.<br />
The firing temperature must be adapted to the number of units fired in the same cycle. 5 to 9 units require an<br />
increase by 5 °C to 10 °C; 10 or more units require an increase by 10 °C to 20 °C.<br />
The values listed here are intended for orientation only and should be regarded only as guidelines. Your firing results may differ. All<br />
firing results depend on the performance of the furnace used, which in turn depends on the make, model and age of the furnace.<br />
Therefore, the guideline values will have to be adapted individually for each firing.<br />
We recommend running a test firing cycle to evaluate the performance of the furnace used. We have compiled and checked all<br />
values and other data with great care. However, we cannot under any circumstances be liable for your results.<br />
For up-to-date firing recommendations please visit www.kiss-<strong>ceram</strong>ics.com<br />
Cercon <strong>ceram</strong> kiss – Firing recommendations, Cergo compact/Cergo press<br />
Drying Closing Pre-heating Heating Vacuum Final temp. Holding Cooling<br />
cont./ on off<br />
°C min min °C min °C/min off °C °C °C V min min °C min<br />
Paste liner 1 135 6:00 2:00 575 3:00 55 cont. 575 970 970 – 1:00 – –<br />
Paste liner 2 135 6:00 2:00 575 3:00 55 cont. 575 960 960 – 1:00 – –<br />
Margin 1 135 3:00 3:00 450 3:00 55 cont. 450 850 850 – 1:00 – –<br />
Margin 2 135 3:00 3:00 450 3:00 55 cont. 450 850 850 – 2:00 – –<br />
Dentine 1 135 2:00 3:00 450 3:00 55 cont. 450 830 830 – 1:30 – –<br />
Dentine 2 135 2:00 3:00 450 3:00 55 cont. 450 820 820 – 1:30 – –<br />
Glaze 135 0:00 3:00 450 2:00 55 off – – 800 – 1:00 – 6:00<br />
Correction (Final <strong>Kiss</strong>) 135 2:00 3:00 450 3:00 55 cont. 450 680 680 – 1:00 – 6:00<br />
Final Shoulder (F-SM) 135 2:00 3:00 450 3:00 55 cont. 450 680 680 – 1:00 – 6:00<br />
Slow cooling is mandatory after the last firing; this includes correction firings of restorations after try-in.<br />
The firing temperature must be adapted to the number of units fired in the same cycle. 5 to 9 units require an<br />
increase by 5 °C to 10 °C; 10 or more units require an increase by 10 °C to 20 °C.<br />
The values listed here are intended for orientation only and should be regarded only as guidelines. Your firing results may differ. All<br />
firing results depend on the performance of the furnace used, which in turn depends on the make, model and age of the furnace.<br />
Therefore, the guideline values will have to be adapted individually for each firing.<br />
We recommend running a test firing cycle to evaluate the performance of the furnace used. We have compiled and checked all<br />
values and other data with great care. However, we cannot under any circumstances be liable for your results.<br />
For up-to-date firing recommendations please visit www.kiss-<strong>ceram</strong>ics.com
Firing/Pressing recommendations 37<br />
Cercon <strong>ceram</strong> kiss – Firing recommendations, Multimat Touch&Press/Touch&Press 2, Multimat NT, Multimat NT press<br />
Pre- Drying Pre- Vacuum Heating Vaccum Firing Firing Cooling<br />
heating heating time rate time tempe- time<br />
temp. time rature<br />
°C min min hPa °C/min min °C min<br />
Paste liner 1 575 7:00 4:00 50 55 1:00 970 2:00 –<br />
Paste liner 2 575 7:00 4:00 50 55 1:00 960 2:00 –<br />
Margin 1 450 5:00 4:00 50 55 1:00 850 2:00 –<br />
Margin 2 450 5:00 4:00 50 55 2:00 850 3:00 –<br />
Dentine 1 450 3:00 4:00 50 55 1:30 830 2:30 –<br />
Dentine 2 450 3:00 4:00 50 55 1:30 820 2:30 –<br />
Glaze 450 2:00 3:00 – 55 0:00 800 2:00 1<br />
Correction (Final <strong>Kiss</strong>) 450 2:00 4:00 50 55 1:00 680 2:00 1<br />
Final Shoulder (F-SM) 450 2:00 4:00 50 55 1:00 680 2:00 1<br />
Slow cooling is mandatory after the last firing; this includes correction firings of restorations after try-in.<br />
The firing temperature must be adapted to the number of units fired in the same cycle. 5 to 9 units require an<br />
increase by 5 °C to 10 °C; 10 or more units require an increase by 10 °C to 20 °C.<br />
The values listed here are intended for orientation only and should be regarded only as guidelines. Your firing results may differ. All<br />
firing results depend on the performance of the furnace used, which in turn depends on the make, model and age of the furnace.<br />
Therefore, the guideline values will have to be adapted individually for each firing.<br />
We recommend running a test firing cycle to evaluate the performance of the furnace used. We have compiled and checked all<br />
values and other data with great care. However, we cannot under any circumstances be liable for your results.<br />
For up-to-date firing recommendations please visit www.kiss-<strong>ceram</strong>ics.com<br />
Please observe these notes on<br />
pre-drying restorations that have<br />
been tried in<br />
Heat the objects to about 80–90 ºC<br />
and allow to pre-dry for 30 minutes,<br />
or 90 minutes for larger objects, until<br />
the moisture and organic residue ac -<br />
crued during try-in have dried.<br />
Depending on the degree of contamination,<br />
steam down or sandblast<br />
lightly with 50 µm alumina to remove<br />
any organic residue.<br />
Heat the restoration to 450 °C at a<br />
heating rate of 5–10ºC per minute<br />
and pre-heat for one hour.<br />
This is followed by the normal ce -<br />
ramic firing.<br />
Cercon <strong>ceram</strong> kiss – Firing recommendations, Mach 2 furnaces<br />
Pre- Drying Pre- Vacuum Firing Firing Heating Vacuum Cooling<br />
heating heating time time tempe- rate<br />
temp. time rature<br />
°C min min min min °C °C/min hPa<br />
Paste liner 1 575 7 4 1 2 970 55 50 –<br />
Paste liner 2 575 7 4 1 2 960 55 50 –<br />
Margin 1 450 5 4 1 2 850 55 50 –<br />
Margin 2 450 5 4 2 3 850 55 50 –<br />
Dentine 1 450 3 4 1.5 2.5 830 55 50 –<br />
Dentine 2 450 3 4 1.5 2.5 820 55 50 –<br />
Glaze 450 2 3 0 1 800 55 – 2<br />
Correction (Final <strong>Kiss</strong>) 450 2 4 1 2 680 55 50 2<br />
Final Shoulder (F-SM) 450 2 4 1 2 680 55 50 2<br />
Slow cooling is mandatory after the last firing; this includes correction firings of restorations after try-in.<br />
The firing temperature must be adapted to the number of units fired in the same cycle. 5 to 9 units require an<br />
increase by 5 °C to 10 °C; 10 or more units require an increase by 10 °C to 20 °C.<br />
The values listed here are intended for orientation only and should be regarded only as guidelines. Your firing results may differ. All<br />
firing results depend on the performance of the furnace used, which in turn depends on the make, model and age of the furnace.<br />
Therefore, the guideline values will have to be adapted individually for each firing.<br />
We recommend running a test firing cycle to evaluate the performance of the furnace used. We have compiled and checked all<br />
values and other data with great care. However, we cannot under any circumstances be liable for your results.<br />
For up-to-date firing recommendations please visit www.kiss-<strong>ceram</strong>ics.com
38 Firing/Pressing recommendations<br />
Firing recommendations<br />
Cercon <strong>ceram</strong> kiss – Firing recommendations, Austromat 3001<br />
Paste liner 1<br />
Paste liner 2<br />
Margin 1<br />
Margin 2<br />
Dentine 1<br />
Dentine 2<br />
Glaze<br />
Correction (Final <strong>Kiss</strong>)<br />
Final Shoulder (F-SM)<br />
C575 T360 T180 • L9 T180 V9 T055 • C970 V0 T60 C0 L0 T2 C450<br />
C575 T360 T180 • L9 T180 V9 T055 • C960 V0 T60 C0 L0 T2 C450<br />
C450 T180 T180 • L9 T180 V9 T055 • C850 V0 T60 C0 L0 T2 C450<br />
C450 T180 T180 • L9 T180 V9 T055 • C850 V0 T120 C0 L0 T2 C450<br />
C450 T120 T180 • L9 T180 V9 T055 • C830 V0 T90 C0 LO T2 C450<br />
C450 T120 T180 • L9 T180 V9 T055 • C820 V0 T90 C0 LO T2 C450<br />
C450 T180 • L9 T120 T055 • C800 T60 C0 L7 T360 • LO T2 C450<br />
C450 T120 T180• L9 T180 V9 T055• C680 V0 T60 C0 L7 T360 • LO T2 C450<br />
C450 T120 T180• L9 T180 V9 T055• C680 V0 T60 C0 L7 T360 • LO T2 C450<br />
Slow cooling is mandatory after the last firing; this includes correction firings of restorations after try-in.<br />
The firing temperature must be adapted to the number of units fired in the same cycle. 5 to 9 units require an<br />
increase by 5 °C to 10 °C; 10 or more units require an increase by 10 °C to 20 °C.<br />
The values listed here are intended for orientation only and should be regarded only as guidelines. Your firing results may differ. All<br />
firing results depend on the performance of the furnace used, which in turn depends on the make, model and age of the furnace.<br />
Therefore, the guideline values will have to be adapted individually for each firing.<br />
We recommend running a test firing cycle to evaluate the performance of the furnace used. We have compiled and checked all<br />
values and other data with great care. However, we cannot under any circumstances be liable for your results.<br />
For up-to-date firing recommendations please visit www.kiss-<strong>ceram</strong>ics.com<br />
Cercon <strong>ceram</strong> kiss – Firing recommendations, Austromat M<br />
START Dry ➔ Vac<br />
➔<br />
➔<br />
°C<br />
min<br />
END ➔<br />
1<br />
➔<br />
➔<br />
2<br />
Paste liner 1 575 6 2 3 9 55 970 1:00 0 0<br />
Paste liner 2 575 6 2 3 9 55 960 1:00 0 0<br />
Margin 1 450 3 3 3 9 55 850 1:00 0 0<br />
Margin 2 450 3 3 3 9 55 850 2:00 0 0<br />
Dentine 1 450 2 3 3 9 55 830 1:30 0 0<br />
Dentine 2 450 2 3 3 9 55 820 1:30 0 0<br />
Glaze 450 0 3 2 0 55 800 1:00 0 6<br />
Correction (Final <strong>Kiss</strong>) 450 0 2 3 9 55 680 1:00 0 6<br />
Final Shoulder (F-SM) 450 0 2 3 9 55 680 1:00 0 6<br />
Slow cooling is mandatory after the last firing; this includes correction firings of restorations after try-in.<br />
The firing temperature must be adapted to the number of units fired in the same cycle. 5 to 9 units require an<br />
increase by 5 °C to 10 °C; 10 or more units require an increase by 10 °C to 20 °C.<br />
The values listed here are intended for orientation only and should be regarded only as guidelines. Your firing results may differ. All<br />
firing results depend on the performance of the furnace used, which in turn depends on the make, model and age of the furnace.<br />
Therefore, the guideline values will have to be adapted individually for each firing.<br />
We recommend running a test firing cycle to evaluate the performance of the furnace used. We have compiled and checked all<br />
values and other data with great care. However, we cannot under any circumstances be liable for your results.<br />
For up-to-date firing recommendations please visit www.kiss-<strong>ceram</strong>ics.com
Firing/Pressing recommendations 39<br />
Cercon <strong>ceram</strong> kiss – Firing recommendations, Vacumat 200/250/300/500/2500<br />
Standby Final Pre-drying Heating time Holding time Vacuum time Cooling<br />
temperature temperature time level<br />
°C °C min min min min<br />
Paste liner 1 575 970 9:00 6:00 1:00 6:00 –<br />
Paste liner 2 575 960 9:00 6:00 1:00 6:00 –<br />
Margin 1 450 850 9:00 6:00 1:00 6:00 –<br />
Margin 2 450 850 9:00 6:00 2:00 6:00 –<br />
Dentine 1 450 830 9:00 6:00 1:30 – 2:30 6:00 –<br />
Dentine 2 450 820 9:00 6:00 1:00 – 2:00 6:00 –<br />
Glaze 450 800 9:00 6:00 1:00 0:00 1*<br />
Correction (Final <strong>Kiss</strong>) 450 680 9:00 6:00 1:00 6:00 1*<br />
Final Shoulder (F-SM) 450 680 9:00 6:00 1:00 6:00 1*<br />
* Enter an additional two minutes holding time. For Vacumat 200: Correction, Final Shoulder/program group 8. Glaze/program group 7.<br />
Slow cooling is mandatory after the last firing; this includes correction firings of restorations after try-in.<br />
The firing temperature must be adapted to the number of units fired in the same cycle. 5 to 9 units require an<br />
increase by 5 °C to 10 °C; 10 or more units require an increase by 10 °C to 20 °C.<br />
The values listed here are intended for orientation only and should be regarded only as guidelines. Your firing results may differ. All firing results depend<br />
on the performance of the furnace used, which in turn depends on the make, model and age of the furnace. Therefore, the guideline values will<br />
have to be adapted individually for each firing.<br />
We recommend running a test firing cycle to evaluate the performance of the furnace used. We have compiled and checked all values and other data<br />
with great care. However, we cannot under any circumstances be liable for your results.<br />
For up-to-date firing recommendations please visit www.kiss-<strong>ceram</strong>ics.com<br />
Cercon <strong>ceram</strong> kiss – Firing recommendations, Programat furnaces<br />
Standby Temperature Firing Closing Holding Vacuum Vacuum Long-term<br />
tempe- increase tempe- time time on off cooling<br />
rature<br />
rature<br />
°C °C/min °C min min °C °C °C<br />
Paste liner 1 300 55 970 6:00 1:00 450 969 –<br />
Paste liner 2 300 55 960 6:00 1:00 450 959 –<br />
Margin 1 300 55 850 6:00 1:00 450 849 –<br />
Margin 2 300 55 850 6:00 2:00 450 849 –<br />
Dentine 1 300 55 830 6:00 1:00 – 2:00 450 829 –<br />
Dentine 2 300 55 820 6:00 1:00 – 2:00 450 819 –<br />
Glaze 300 55 800 6:00 1:00 – – 550<br />
Correction (Final <strong>Kiss</strong>) 300 55 680 6:00 1:00 450 679 550<br />
Final Shoulder (F-SM) 300 55 680 6:00 1:00 450 679 550<br />
Slow cooling is mandatory after the last firing; this includes correction firings of restorations after try-in.<br />
The firing temperature must be adapted to the number of units fired in the same cycle. 5 to 9 units require an<br />
increase by 5 °C to 10 °C; 10 or more units require an increase by 10 °C to 20 °C.<br />
The values listed here are intended for orientation only and should be regarded only as guidelines. Your firing results may differ. All<br />
firing results depend on the performance of the furnace used, which in turn depends on the make, model and age of the furnace.<br />
Therefore, the guideline values will have to be adapted individually for each firing.<br />
We recommend running a test firing cycle to evaluate the performance of the furnace used. We have compiled and checked all<br />
values and other data with great care. However, we cannot under any circumstances be liable for your results.<br />
For up-to-date firing recommendations please visit www.kiss-<strong>ceram</strong>ics.com
For more information or for ordering, please visit:<br />
www.kiss-<strong>ceram</strong>ics.com<br />
www.cercon-smart-<strong>ceram</strong>ics.com<br />
GB<br />
28081/1106/DB<br />
Last revision: 06/2011<br />
<strong>DeguDent</strong> GmbH<br />
Rodenbacher Chaussee 4<br />
63457 Hanau-Wolfgang<br />
Germany<br />
www.degudent.com<br />
DENTSPLY International Inc.<br />
570 West College Ave.<br />
York, PA 17405-0872<br />
www.<strong>ceram</strong>co.com