STARWATCH iTDC PRO I⢠Software User Manual - Bulcom2000.com
STARWATCH iTDC PRO I⢠Software User Manual - Bulcom2000.com
STARWATCH iTDC PRO I⢠Software User Manual - Bulcom2000.com

Create successful ePaper yourself
Turn your PDF publications into a flip-book with our unique Google optimized e-Paper software.
<strong>STARWATCH</strong> ITDC <strong>PRO</strong> I<br />
5F, Ace Techno Tower B/D Phone : 82 2 2659 0055<br />
684-1 Deungchon-Dong Fax : 82 2 2659 0086<br />
Gangseo-Gu<br />
Web : www.idteck.com<br />
Seoul, Korea<br />
<strong>STARWATCH</strong> <strong>iTDC</strong> <strong>PRO</strong> I<br />
<strong>Software</strong> <strong>User</strong> <strong>Manual</strong>
Table of Contents<br />
<strong>STARWATCH</strong> ITDC <strong>PRO</strong> I<br />
SOFTWARE CONFIGURATION FLOW CHART ...............................................................................................................3<br />
<strong>STARWATCH</strong> ITDC <strong>PRO</strong> I INTRODUCTION.............................................................................................................6<br />
<strong>STARWATCH</strong> <strong>iTDC</strong> <strong>PRO</strong> I Main Functions........................................................................................................... 6<br />
<strong>STARWATCH</strong> <strong>iTDC</strong> <strong>PRO</strong> I Installation Environment........................................................................................... 8<br />
Other Configuration (Network, Modem) ................................................................................................................ 10<br />
Installation Preparation.............................................................................................................................................. 11<br />
<strong>STARWATCH</strong> <strong>iTDC</strong> <strong>PRO</strong> I Installation ................................................................................................................. 11<br />
<strong>STARWATCH</strong> ITDC <strong>PRO</strong> I STRUCTURE.............................................................................................................. 15<br />
<strong>iTDC</strong> Main Window .................................................................................................................................................... 15<br />
Title bar and Menu...................................................................................................................................................... 16<br />
Shortcut Icon................................................................................................................................................................ 20<br />
Status bar ..................................................................................................................................................................... 21<br />
Standard Icon .............................................................................................................................................................. 21<br />
Program Folder ........................................................................................................................................................... 22<br />
Database Structure .................................................................................................................................................... 22<br />
<strong>STARWATCH</strong> ITDC <strong>PRO</strong> I INITIAL SETUP ........................................................................................................... 23<br />
Program Login............................................................................................................................................................. 23<br />
Program Configuration .............................................................................................................................................. 23<br />
System.......................................................................................................................................................................... 41<br />
Database ...................................................................................................................................................................... 78<br />
Access Control............................................................................................................................................................ 98<br />
View............................................................................................................................................................................. 132<br />
Report.......................................................................................................................................................................... 136<br />
<strong>STARWATCH</strong> ITDC <strong>PRO</strong> I TIME/ATTENDANCE ................................................................................................. 153<br />
Time/Attendance....................................................................................................................................................... 153<br />
<strong>STARWATCH</strong> ITDC <strong>PRO</strong> I TCP/IP COMMUNICATION ....................................................................................... 185<br />
TCP/IP Communication .......................................................................................................................................... 185<br />
In Usage Case of External TCP/IP converter..................................................................................................... 185<br />
In Usage Case of Internal TCP/IP Module.......................................................................................................... 190<br />
<strong>Software</strong> Configuration............................................................................................................................................ 193<br />
<strong>STARWATCH</strong> ITDC <strong>PRO</strong> I DIAL-UP COMMUNICATION ...................................................................................... 197<br />
System Requirement............................................................................................................................................... 197<br />
Dial-Up Communication Layout ............................................................................................................................ 198<br />
Modem Configuration .............................................................................................................................................. 198<br />
Serial Interface Pin Definitions............................................................................................................................... 200<br />
Cable ........................................................................................................................................................................... 200<br />
<strong>Software</strong> Configuration............................................................................................................................................ 201<br />
<strong>STARWATCH</strong> ITDC <strong>PRO</strong> I MAINTENANCE AND MANAGEMENT.......................................................................... 208<br />
<strong>STARWATCH</strong> <strong>iTDC</strong> <strong>PRO</strong> I Database Maintenance and Management ...................................................... 208<br />
<strong>STARWATCH</strong> ITDC <strong>PRO</strong> I MULTI LANGUAGE SETUP........................................................................................ 214<br />
Using Multi Language Setup Program................................................................................................................. 214<br />
Add Functions ........................................................................................................................................................... 223<br />
Monitoring................................................................................................................................................................... 224<br />
System Management............................................................................................................................................... 238<br />
Time & Attendance................................................................................................................................................... 252<br />
System Management............................................................................................................................................... 254<br />
Cardholder Management........................................................................................................................................ 265<br />
2
Chapter<br />
1 Configuration<br />
<strong>STARWATCH</strong> ITDC <strong>PRO</strong> I<br />
<strong>Software</strong> Configuration Flow Chart<br />
Page 19<br />
Log In<br />
ID : admin, without password and<br />
Enter<br />
Page 19<br />
Database – Area/Floor<br />
Definition<br />
Define Area/Floor Definition<br />
Page 21<br />
Set Up - Port Definition<br />
Define the serial ports used on each<br />
PC and the network connection if<br />
you use LAN communication and<br />
the Dial Up connection if you use<br />
Dial Up communication.<br />
Page 23<br />
Set Up – Controller<br />
Definition<br />
Define each controller address and<br />
information on the system<br />
Page 55<br />
Set Up – Dial Up Chain<br />
Definition<br />
If you defined to use Dial Up<br />
communication on the second step,<br />
you should set up this step. If you<br />
are not, go to next step.<br />
Page 25<br />
Set Up – Door/Reader<br />
Definition<br />
Define Door/Reader information for<br />
each controller on the system.<br />
3
<strong>STARWATCH</strong> ITDC <strong>PRO</strong> I<br />
Page 66<br />
Set Up – Map Definition<br />
Define Map Definition for each<br />
Area/Floor if you want to use it. You<br />
can define Door and Sensor. (Before<br />
you define sensor, you should go<br />
Set up – Input/Output Point Set up –<br />
Input/Output Definition. After that you<br />
should set up sensor)<br />
Page 45<br />
Set Up – Input/Output Point<br />
Set up – Input/Output<br />
Definition<br />
If you use other devices (like sensor,<br />
exit button, etc) on the input, you can<br />
set up this step.<br />
Page 49<br />
Set Up – Input/Output Point<br />
Set up – Input/Output<br />
Timeschedule Definition<br />
If you want to define operation time<br />
for the input and output using<br />
timeschedule, you can set up this<br />
step.<br />
Page 60<br />
Database – Company<br />
Definition<br />
Define Company List<br />
Page 81<br />
Access Control – Holiday<br />
Definition<br />
Define Holiday<br />
Page 86<br />
Access Control –<br />
Timeschedule Definition –<br />
Time zone Definition<br />
Define Time zone<br />
Page 90<br />
Access Control –<br />
Timeschedule Definition –<br />
Timeschedule Definition<br />
Define Timeschedule<br />
4
Page 96<br />
Access Control – Access<br />
Group Definition<br />
<strong>STARWATCH</strong> ITDC <strong>PRO</strong> I<br />
Define Access Groups<br />
Page 101<br />
Access Control – Card<br />
Holder Management<br />
Define Card Holder Management<br />
Configuration Completed<br />
5
Chapter<br />
2<br />
<strong>STARWATCH</strong> ITDC <strong>PRO</strong> I<br />
<strong>STARWATCH</strong> <strong>iTDC</strong> <strong>PRO</strong><br />
Introduction<br />
<strong>STARWATCH</strong> <strong>iTDC</strong> <strong>PRO</strong> I Introduction<br />
This chapter explains <strong>iTDC</strong> main functions and installation environment.<br />
<strong>STARWATCH</strong> <strong>iTDC</strong> <strong>PRO</strong> I Main Functions<br />
This program connects the <strong>iTDC</strong> controller and PC via Serial and TCP/IP communication to send<br />
and receive data. It uses the data received to run its many functions.<br />
The device and program are mutually connected to provide access control for higher security. It<br />
also has a variety of applied additional functions to manage access control. The user’s event data<br />
can be used as basis for time attendance reporting, as well as access control in corporate<br />
environments.<br />
• Multi Port Support<br />
This configuration can be applied from address 01 up to 99. Using Serial or TCP/IP<br />
communication, you can connect up to 99 communication loops. One port can connect up to<br />
32 devices (change of communication chip expands to 255 devices). However, if you go over<br />
the fixed number of devices in a communication loop, the PC resources may not support the<br />
setup. Use the port to gain the best possible communication management depending on the<br />
environment.<br />
• Multi Language Support<br />
Multi Language support has two main languages as default (Korean, English). Additionally, 5<br />
other languages are supported through user’s input. Using a separate multi language<br />
definition program, the user can change the English characters into their own language as<br />
default to use the <strong>STARWATCH</strong> <strong>iTDC</strong> <strong>PRO</strong> I in their own language.<br />
• Card Holder Management Function Combinations<br />
Card Holder Management gives you the user’s basic information (name, company, dept, etc.)<br />
in addition, access group and time attendance data , fingerprint data can be input and modified<br />
in one screen.<br />
Also, registration and deletion date can be scheduled for automatic deletion on set date.<br />
Specific user can be deleted through card holder management, and can be recovered later on<br />
by managing separately. The deleted user current status can be known.<br />
• Deleted <strong>User</strong> Managing Function<br />
The deleted user from card holder management is processed separately, and can be<br />
recovered to put into normal status, without any need to reenter the user data. Also, deleted<br />
user’s current status can be seen as a report by making an inquiry.<br />
6
<strong>STARWATCH</strong> ITDC <strong>PRO</strong> I<br />
• Visitor Management Function<br />
Visitor management is processed by identifying the user as non regular card holder. Visitor’s<br />
data contains company, name, reason for visit, visitor, visiting dept. Access area and time can<br />
be controlled by access group.<br />
Automatic delete function through specific date and time registered will erase card number.<br />
Also, visitor’s current status can be seen as a report by making an inquiry.<br />
• Map Function<br />
Map can be setup using area and floor as basis to the corresponding floor. Door and sensors<br />
are shown as icons, and depending on user options, the time of day when an event occurs will<br />
be shown automatically on the map.<br />
• TCP/IP and Serial Communication Simultaneous Support<br />
Using multi port function, network and serial communication can be activated simultaneously.<br />
Set port 1 as serial and port 2 as network configuration to activate simultaneously using both<br />
ports.<br />
• Alarm Event Acknowledgement<br />
Using Alarm Event Acknowledgement, when an event occurs, the manager can input detail of<br />
information to acknowledge the alarm.<br />
All alarm events must be acknowledged by the manager to have the alarm event cancelled.<br />
The acknowledged result is stored in database for later retrieval as a report.<br />
• Alarm Event Type Color Indication<br />
Using color to differentiate alarm event type gives easy monitoring in one screen. The alarm<br />
event acknowledged by the manager is shown in black.<br />
• Various Access Control Reports<br />
The program contains reports of card holder, deleted user, access current status, alarm<br />
current status, visitor current status, user permitted per authorized door, individual permitted<br />
door, and final access area giving variety of access control reports.<br />
• Work Attendance and Various Related Reports<br />
Work attendance management function is included in basic form, therefore a separate<br />
program is not necessary.<br />
Individual work hour and holiday setup is possible. You can configure expiration for date,<br />
month, and year to support report retrieval by making an inquiry for work hour data.<br />
Using the work hour data, you can calculate work hour, tardiness, leave of absence, overtime,<br />
holiday/weekend overtime, days worked, days of tardiness, and days of leave absence.<br />
<strong>User</strong> can modify the user data to reflect on expiration day, month, and year after the final<br />
worker ends the shift for the day.<br />
7
<strong>STARWATCH</strong> ITDC <strong>PRO</strong> I<br />
All work hour data can be sent to Excel file or text file to be used in other applications such as<br />
ERP.<br />
Reports support type by individual, day, month, month detail, yearly, and can be converted to<br />
look like HTML, PDF, and Excel format.<br />
• Various Export and Converting Function<br />
ITDC supports export and converting function through inquiry and report function.<br />
The file is sent as text or Excel format. In this case, connecting the file to other applications<br />
(time attendance, wage, and ERP) can be efficient.<br />
In converting function, the report is converted to Excel, HTML, and PDF in its original form. In<br />
this case, the file can be converted to be sent to the internet and email for data report transfer.<br />
• Various Options<br />
<strong>User</strong> can setup various options.<br />
You can setup event type indication, and saved database existence. By setting up .wav file for<br />
each event type, you can have an alarm event sound.<br />
Also, when an event occurs, email dispatch function can be used if email server is present at<br />
location. Email dispatch will be sent out to up to 3 people in matters to alarm event current<br />
status.<br />
Map indication existence can be setup by event type.<br />
• Uniformed <strong>User</strong> Interface<br />
<strong>User</strong> interface is uniformed by, using an icon for each function with one click operation for<br />
overall ease of use without difficulty. Also, button key by menu type and function can be setup<br />
to operate function at once.<br />
<strong>STARWATCH</strong> <strong>iTDC</strong> <strong>PRO</strong> I Installation Environment<br />
Operating System<br />
<strong>STARWATCH</strong> <strong>iTDC</strong> <strong>PRO</strong> I is a 32 bit Windows compatible S/W. It operates in Windows98SE,<br />
Windows 2000 Professional, Server Edition and higher versions, along with Windows XP Home<br />
and Professional Edition.<br />
<strong>STARWATCH</strong> <strong>iTDC</strong> <strong>PRO</strong> I does not support Windows 95, 98, ME, and NT 4.0.<br />
It is recommended the <strong>STARWATCH</strong> <strong>iTDC</strong> <strong>PRO</strong> I to be installed in Windows 2000 Professional or<br />
Windows XP Professional. These operating systems are powerful and stable for <strong>STARWATCH</strong><br />
<strong>iTDC</strong> <strong>PRO</strong> I operations.<br />
8
Minimum Configuration<br />
<strong>STARWATCH</strong> ITDC <strong>PRO</strong> I<br />
Minimum configuration is no more than 10 panels and 40 readers for the system. One or two port<br />
usage is suitable. Maximum users of no more than 100-200 users recommended in configuration.<br />
Memory expansion improves system functions therefore, having more memory is beneficial.<br />
<br />
<br />
<br />
<br />
<br />
<br />
CPU: Pentium III-700 Mhz or Higher<br />
Memory: 128 Mb or Higher<br />
HDD: 2 Gig.<br />
Port: 2 serial port or Higher<br />
Network: 1 ethernet card<br />
OS: Microsoft Windows 2000 Professional or Windows XP Home<br />
Recommended Configuration<br />
Recommended configuration is no more than 60 panels and 240 readers for the system. Four port<br />
usage is suitable. Maximum users of no more than 500 users recommended in configuration. In<br />
this case, it is good to have a separate PC to operate independently. It is recommended to use<br />
general PC mfrs and servers matching configurations below. Memory expansion improves system<br />
functions therefore, having more memory is beneficial.<br />
<br />
<br />
<br />
<br />
<br />
<br />
CPU: Pentium 4 or Higher<br />
Memory: 256 Mb or Higher<br />
HDD: 4 Gig or Higher<br />
Port: 4 serial port (Needs Multi Port card) or Higher<br />
Network: 1 ethernet card<br />
OS: Microsoft Windows 2000 Professional or Windows XP Professional<br />
Performance Configuration<br />
Performance configuration is no less than 60 panels and 240 readers for mid to large size system.<br />
Also, 8 ports or no less is suitable for operation. Maximum users of no less than 500 users<br />
recommended in configuration. In this case, it is good to have a separate PC to operate<br />
independently. It is recommended to use general PC mfrs and servers matching configurations<br />
below. Memory expansion improves system functions therefore, having more memory is beneficial.<br />
<br />
<br />
<br />
<br />
<br />
<br />
CPU: Pentium 4 or Dual processors.<br />
Memory: 512 Mb or Higher<br />
HDD: 8 Gig or Higher<br />
Port: 8 serial port (Needs Multi Port card) or Higher<br />
Network: 1 ethernet card<br />
OS: Microsoft Windows 2000 server or Windows XP Professional<br />
9
<strong>STARWATCH</strong> ITDC <strong>PRO</strong> I<br />
Other Configuration (Network, Modem)<br />
Besides using serial communication, <strong>iTDC</strong> can use TCP/IP and Dial Up using a modem for<br />
communications.<br />
In TCP/IP communication, there is an external converter (NetEye 1000S) or an internal module on<br />
the main board (Optional) giving you 2 types of converters.<br />
To use TCP/IP communication, you will need either an external converter or internal module, and<br />
the PC have to be able to use the network.<br />
If using a modem, you need to use an external modem. For assurance of tech support and device<br />
compatibility, we recommend 3 COM’s US Robotics 56K External Modem or NetComm<br />
(http://www.netcomm.com.au/) Roadster V92 External Modem.<br />
For detailed explanation regarding TCP/IP and modem communication, please refer to chapter 7<br />
(TCP/IP communication) and chapter 8 (Dial Up communication).<br />
10
Chapter<br />
3<br />
<strong>STARWATCH</strong> ITDC <strong>PRO</strong> I<br />
<strong>STARWATCH</strong> <strong>iTDC</strong> <strong>PRO</strong> I<br />
Installation Environment<br />
<strong>STARWATCH</strong> <strong>iTDC</strong> <strong>PRO</strong> I Introduction<br />
This chapter explains <strong>STARWATCH</strong> <strong>iTDC</strong> <strong>PRO</strong> I installation.<br />
Installation Preparation<br />
Operating System<br />
The following is the <strong>STARWATCH</strong> <strong>iTDC</strong> <strong>PRO</strong> I installation OS.<br />
Microsoft Windows 2000 Professional Edition (SP2)<br />
Microsoft Windows 2000 Server Edition (SP2)<br />
Microsoft Windows XP Home Edition<br />
Microsoft Windows XP Professional Edition<br />
Also, it is not necessary, but we recommend installing Internet Explorer 6. If you do not have this<br />
browser, you can download at Microsoft Web Site.<br />
http://www.microsoft.com/downloads/search.aspx?displaylang=en<br />
Microsoft Office 2000 Program<br />
<strong>STARWATCH</strong> <strong>iTDC</strong> <strong>PRO</strong> I uses the Microsoft Access 2000 database within the Microsoft Office<br />
2000 application.<br />
Microsoft Office 2000 program is not necessary, but for database and user operation, it makes it<br />
convenient. (Microsoft Office XP installation works the same)<br />
Installation is recommended, if program is obtained.<br />
<strong>STARWATCH</strong> <strong>iTDC</strong> <strong>PRO</strong> I Installation<br />
Find the <strong>iTDC</strong>.msi file in the software CD and click it to initialize its installation.<br />
1) As the following window shows on the screen, click “Next” in order to star the installation<br />
process.<br />
11
<strong>STARWATCH</strong> ITDC <strong>PRO</strong> I<br />
2) Click “Next” to install it in the default directory. In order to change its install directory, click”<br />
Browse” and choose a folder to install the <strong>iTDC</strong> software.<br />
3) Click “Next” to start its process.<br />
4) During the process it shows its status. Please wait.<br />
12
<strong>STARWATCH</strong> ITDC <strong>PRO</strong> I<br />
5) If completed, it shows as below. Click “ Close” to finish it.<br />
You may see the following message during the installation process in Microsoft Windows<br />
2000 or Window XP<br />
13
<strong>STARWATCH</strong> ITDC <strong>PRO</strong> I<br />
In this case, just click “ Continue” in order to complete the installation.<br />
After completion of its installation, please find MDAC_TYP of the language of the<br />
OS(Window) that used now.<br />
14
Chapter<br />
4<br />
<strong>STARWATCH</strong> ITDC <strong>PRO</strong> I<br />
<strong>STARWATCH</strong> <strong>iTDC</strong> <strong>PRO</strong> I<br />
Structure<br />
<strong>STARWATCH</strong> <strong>iTDC</strong> <strong>PRO</strong> I Structure<br />
This chapter explains <strong>STARWATCH</strong> <strong>iTDC</strong> <strong>PRO</strong> I structure. It explains main<br />
screen structure, menu, standard icon, directory, and database file.<br />
<strong>iTDC</strong> Main Window<br />
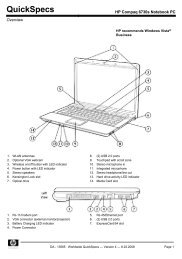
<strong>iTDC</strong> main screen is differentiated into 4 parts.<br />
Top section consists of menu and tool bar, and middle contains screen activated by function.<br />
Bottom section shows status, and through the main screen, the user can initiate functions quickly<br />
and efficiently.<br />
Title Bar and Menu<br />
Menu which allows to<br />
practice title of program<br />
and/or all functions of<br />
<strong>iTDC</strong> is existed. Able to<br />
practice only by<br />
contracted key, for that<br />
contracted key is set up<br />
at each menu.(contracted<br />
key table reference)<br />
Short Cut Icon<br />
Function used frequently is able to<br />
be practiced at once by setting up<br />
short cut icon.<br />
Program Area<br />
The screen of function selected<br />
in menu or short cut icon is<br />
shown in program practice<br />
area. The functions users want<br />
is executed through this area.<br />
Status Icons<br />
The date of computer, time and<br />
language selected currently etc. are<br />
shown. And log-in ID of log-in user<br />
is shown.<br />
15
Title bar and Menu<br />
<strong>STARWATCH</strong> ITDC <strong>PRO</strong> I<br />
Title bar and Menu<br />
Title bar shows program title and current version.<br />
Menu is categorized into 8 sections. Each menu contains sub-menus, which the user can activate<br />
functions by selecting the correlating sub-menu.<br />
Menu Structure and Short Cut Key<br />
• System<br />
It contains functions for communication relation, device definition, dial up setup, system log on<br />
(off), and quit.<br />
System<br />
Port Definition<br />
Panel Definition<br />
Door/Reader Definition<br />
System<br />
Shortcut<br />
Key<br />
ALT + S<br />
CTRL + A<br />
CTRL + B<br />
CTRL + C<br />
Input/Output Definition Input/Output Point Definition CTRL + E<br />
Input/Output Timeschedule/Type Definition<br />
CTRL + F<br />
System Set Time CTRL + G<br />
Dial-Up Chain Definition<br />
Logon<br />
Logoff<br />
Quit<br />
Set Initialize<br />
CTRL + H<br />
CTRL + I<br />
CTRL + J<br />
CTRL + K<br />
CTRL + Q<br />
16
• Database<br />
<strong>STARWATCH</strong> ITDC <strong>PRO</strong> I<br />
Database contains definition for company, department, title, area setup, map setup, user<br />
registration, management and options. Inputting the default user data will be used in user<br />
management. It also contains map function to setup by area and floor. Database management<br />
contains backup, recovery, and compression for data.<br />
Database<br />
Database<br />
Company Definition<br />
Department Definition<br />
Title Definition<br />
Access Type Definition<br />
Area/Floor Definition<br />
Map Definition<br />
<strong>User</strong> Definition<br />
Database Management<br />
Option<br />
Short Cut Key<br />
ALT + D<br />
CTRL + L<br />
CTRL + M<br />
CTRL + N<br />
CTRL + O<br />
CTRL + P<br />
CTRL + R<br />
CTRL + S<br />
CTRL + T<br />
CTRL + U<br />
• Access Control<br />
Access Control menu contains sub functions for managing access control. It contains setup for<br />
work holiday, time schedule, user group, user management, and visitor management.<br />
Access Control<br />
Access Control<br />
Short Cut Key<br />
ALT + A<br />
Holiday Definition<br />
F2<br />
Timeschedule Definition Time Zone Definition F3<br />
Timeschedule Definition F4<br />
17
Access Group Definition<br />
F5<br />
Card Holder Management<br />
F6<br />
Deleted Card(ID) Management F7<br />
Visitor Management<br />
F8<br />
<strong>STARWATCH</strong> ITDC <strong>PRO</strong> I<br />
• View<br />
View menu contains access door control status, event transaction status, and communication<br />
status to monitor functions.<br />
View<br />
View<br />
Access Door Control/Status<br />
Transaction Status<br />
Communication Status<br />
Event Status Windoe<br />
Video Surveillance<br />
Short Cut Key<br />
ALT + V<br />
CTRL + F1<br />
CTRL + F2<br />
CTRL + F3<br />
• Report<br />
Report menu contains sub-menus for various reports. You can have 8 types of access control<br />
reports.<br />
Report<br />
Card Holder Report<br />
Report<br />
Deleted Card Holder Report<br />
Event History Report<br />
Alarm History Report<br />
18<br />
Short Cut Key<br />
ALT + R<br />
CTRL + F4<br />
CTRL + F5<br />
CTRL + F6<br />
CTRL + F7<br />
Accessible Door Report for<br />
CTRL + F8<br />
Individual<br />
Accessible ID Report for Door CTRL + F9
Visitor Event History Report<br />
Last Access Event Report<br />
<strong>STARWATCH</strong> ITDC <strong>PRO</strong> I<br />
CTRL + F11<br />
CTRL + F12<br />
• Time & Attendance<br />
Time & Attendance menu consists of sub-menus relating to the time attendance with the<br />
system. It contains definition for work time, work holiday, work type, data (daily, monthly,<br />
yearly) expiration, report, and work options to operate functions easily.<br />
Time/Attendance<br />
Work Time Definition<br />
Work Holiday Definition<br />
Work Type Definition<br />
Time / Attendance<br />
Daily Data Management<br />
Monthly Data Management<br />
Yearly Data Management<br />
Short Cut<br />
Key<br />
ALT + T<br />
SHIFT + F2<br />
SHIFT + F3<br />
SHIFT + F4<br />
SHIFT + F5<br />
SHIFT + F6<br />
SHIFT + F7<br />
Report ID/Daily Attendance Report SHIFT + F8<br />
Work Option<br />
Monthly/Yearly Attendance Report<br />
SHIFT + F9<br />
SHIFT + F11<br />
• Window<br />
Window menu gives you options for horizontal or vertical viewing in a row.<br />
Window<br />
Horizontal<br />
Vertical<br />
Window<br />
• Language<br />
Language menu contains multiple languages to change language of program for user.<br />
19
<strong>STARWATCH</strong> ITDC <strong>PRO</strong> I<br />
Language<br />
Language<br />
Korean<br />
English<br />
<strong>User</strong> Language 1<br />
<strong>User</strong> Language 2<br />
<strong>User</strong> Language 3<br />
<strong>User</strong> Language 4<br />
<strong>User</strong> Language 5<br />
Shortcut Icon<br />
Shortcut icon lets the user perform frequently used functions to quickly initiate jobs.<br />
The black label to the right of shortcut icons displays current activity data of program operation.<br />
Here are the types of shortcut icons.<br />
Short Cut Icons<br />
Time Zone<br />
Timeschedule<br />
Access Group<br />
Card Holder<br />
Visitor<br />
Transaction<br />
Door Control<br />
Map Definition<br />
Report<br />
Language<br />
Logoff<br />
Create access time code and access time setup.<br />
Setup time schedule by day of the week access time code.<br />
Create group in access area.<br />
Input, edit, and delete card holder data.<br />
Input, edit, and delete visitor data.<br />
Monitor current event transaction in real time.<br />
Monitor door control status and manual control doors.<br />
Setup item location and area/floor map definition.<br />
Access control report inquiry and print out report.<br />
Language setup.<br />
Logoff from program.<br />
20
<strong>STARWATCH</strong> ITDC <strong>PRO</strong> I<br />
Quit<br />
Quit program<br />
Status bar<br />
Status bar displays current date and time setup in PC. Also, it displays current language and user<br />
login ID.<br />
Standard Icon<br />
It explains standard icons used in <strong>iTDC</strong>. You can see general icons in every screens of <strong>iTDC</strong>.<br />
These icons perform their specified functions. The following explains each icon’s function.<br />
Standard Icon 1<br />
Find<br />
Add<br />
Modify<br />
Delete<br />
Close<br />
Finds the data by search condition.<br />
Used for adding data and activates additional screen.<br />
Used in modifying data and activates modify screen.<br />
Used in data deletion and deletes the data.<br />
Closes the current active screen.<br />
Standard Icon 2<br />
Transmit<br />
Batch Transmit<br />
Sends the current selected data to the device (<strong>iTDC</strong>)<br />
Sends the searched data and database info in batch format.<br />
Standard Icon 3<br />
Create Data<br />
Creates information result with original data.<br />
21
Standard Icon 4<br />
<strong>STARWATCH</strong> ITDC <strong>PRO</strong> I<br />
Print<br />
Export<br />
Searched information is printed out.<br />
Exports searched information text as Excel file format.<br />
Program Folder<br />
It explains the folder where <strong>STARWATCH</strong> <strong>iTDC</strong> <strong>PRO</strong> I is installed.<br />
<strong>STARWATCH</strong> <strong>iTDC</strong> <strong>PRO</strong> I is installed in C:\Program Files\<strong>iTDC</strong> folder. Also, depending on<br />
circumstance, it is installed in C:\Program Files\idteck\<strong>iTDC</strong>.<br />
<strong>User</strong> can change the drive and folder, where program is installed. During installation, it<br />
can install to other drive and folder if default folder is not used.<br />
Database Structure<br />
<strong>STARWATCH</strong> <strong>iTDC</strong> <strong>PRO</strong> I has 3 database files in structure, and all database file is created in<br />
Microsoft Access 2000 file.<br />
The following is the database file creation.<br />
• <strong>iTDC</strong>-ACS.mdb<br />
This database file contains all saved information of device data, user data, event current alarm<br />
data, and is the main database file of <strong>STARWATCH</strong> <strong>iTDC</strong> <strong>PRO</strong>’s access control system.<br />
This file is the most important database file, and needs user’s management. Refer to<br />
maintenance management chapter for detailed explanation.<br />
• <strong>iTDC</strong>-TAS.mdb<br />
This database file is <strong>STARWATCH</strong> <strong>iTDC</strong> <strong>PRO</strong>’s attendance file, and contains all saved<br />
information of time attendance, work holiday, work type, end of (day, month, year).<br />
This file is most important database file in attendance function, and needs user’s management.<br />
• <strong>iTDC</strong>-LANGUAGE.mdb<br />
This multi language database file in <strong>STARWATCH</strong> <strong>iTDC</strong> <strong>PRO</strong> I contains all characters<br />
information displayed on screen in saved files.<br />
22
Chapter<br />
5<br />
<strong>STARWATCH</strong> ITDC <strong>PRO</strong> I<br />
<strong>STARWATCH</strong> <strong>iTDC</strong> <strong>PRO</strong> I<br />
Initial Setup<br />
<strong>STARWATCH</strong> <strong>iTDC</strong> <strong>PRO</strong> I Initial Setup<br />
This chapter explains installation items setup, after installing <strong>STARWATCH</strong><br />
<strong>iTDC</strong> <strong>PRO</strong>.<br />
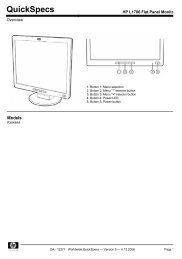
Program Login<br />
The following screen appears in initial program activation. Login gives program use<br />
authorization, and if this is first time login after installation, you will need to use default login<br />
information.<br />
Once the login screen appears, input admin for <strong>User</strong> ID. Password is without. Then press<br />
Enter or click Login button to go to main screen.<br />
Program Configuration<br />
Area/Floor Definition<br />
Area/Floor configuration is used for default data creation to distinguish access door, reader, and<br />
sensors by installed locations. Multiple buildings can be designated by area, and the floors correlating<br />
to the area can be distinguished.<br />
• Start<br />
• Add<br />
Click Database->Area/Floor definition or press Ctrl+P on keyboard.<br />
Add is used to create fresh data. Click Add to input data of area and floor through the input<br />
screen.<br />
23
<strong>STARWATCH</strong> ITDC <strong>PRO</strong> I<br />
1) Click Add and the screen below appear.<br />
2) Input area code. If already registered code is used, it will not register, but only a fresh area code.<br />
3) Input area name.<br />
Select floor then click Add button. It will show up in Floor List window. Repeat this procedure to<br />
add additional floors.<br />
4) If all the floors are added to the area, click Save button to save.<br />
5) Click Close to finish.<br />
Setup the area/floor definition prior to use, because the data is used in variety of ways for<br />
registration of access door, reader, input point of contact, and map configuration.<br />
24
Port Definition<br />
<strong>STARWATCH</strong> ITDC <strong>PRO</strong> I<br />
Port definition describes Serial and TCP/IP communication loop connected to the PC. It supports up<br />
to 99 ports, but keep in mind depending on PC performance, memory, and OS, supporting 99 ports<br />
may not be possible. It is recommended to use adequate number of ports for usage.<br />
• Start<br />
• Add<br />
Click Set up-> Port Definition or press Ctrl+A button on keyboard.<br />
Add is used to create fresh data. Click Add to add ports through the input screen.<br />
1) Click Add and the screen below appear.<br />
2) Select port number. It will indicate port numbers not used.<br />
3) Select communication type by Serial Chain, TCP/IP Chain, or Dial-Up Chain to setup<br />
communication.<br />
4) Check mark Active for the correspond port to be able to communicate.<br />
25
<strong>STARWATCH</strong> ITDC <strong>PRO</strong> I<br />
Decide if correspond port will be active for communication. Active check mark Port No<br />
communicates, but without a check mark will result in no communication.<br />
This option lets the user make the port inactive, if the port requires maintenance due to a<br />
problem in communication. <strong>User</strong> can fix the problem while other locations remain with active<br />
ports.<br />
If the port data is modified, you must close the program and restart.<br />
5) From Serial Chain tab, select Com Port, Speed, Parity Bit, Data Bit, and Stop Bit. Set the value<br />
as 9600 for Speed, none for Parity Bit, 8 for Data Bit, and 1 for Stop Bit as <strong>iTDC</strong> default set value.<br />
6) Selecting TCP/IP Chain tab will change the screen as follows.<br />
In the IP address window, input the address of the external or internal TCP/IP converter.<br />
Input 5000 as default value for TCP Port No.<br />
For Module Type, select internal or external (Neteye 1000s) as converter type.<br />
7) Selecting Bypass TCP/IP Chain tab will change the screen as follows.<br />
In the IP address window, input the IP address of the Webeye Controller.<br />
Input ‘80’ as default value for TCP Port No.<br />
Input admin ID(Default : admin). Input admin password (Default : admin).<br />
26
<strong>STARWATCH</strong> ITDC <strong>PRO</strong> I<br />
Select com port of webeye controller. Com port is port no. of webeye is connected with <strong>iTDC</strong><br />
controller.<br />
Select Speed, Parity Bit, Data Bit, and Stop Bit. Set the value as 9600 for Speed, none for Parity<br />
Bit, 8 for Data Bit, and 1 for Stop Bit as <strong>iTDC</strong> default set value.<br />
8) Click Save to save the port data input, and click Close to finish.<br />
For detailed explanation of TCP/IP communication, please refer to chapter 7 (TCP/IP<br />
communication) in <strong>STARWATCH</strong> <strong>iTDC</strong> <strong>PRO</strong>. Also, refer to chapter 8 regarding Dial-Up<br />
communication in <strong>STARWATCH</strong> <strong>iTDC</strong> <strong>PRO</strong>.<br />
Panel Definition<br />
Panel Definition explains data definition of <strong>iTDC</strong> board.<br />
Each <strong>iTDC</strong> device has its own communication address. By address type, the S/W data is defined and<br />
communicated. Also, each <strong>iTDC</strong> can have its own function options, and these options is sent to the<br />
devices for application.<br />
• Start<br />
• Add<br />
Click Set up->Panel Definition or press Ctrl+B button on keyboard.<br />
1) Add is used to create fresh data. Click Add to add panels through the input screen<br />
2) Click Add and the following screen appear.<br />
27
<strong>STARWATCH</strong> ITDC <strong>PRO</strong> I<br />
3) Select Port No. It will display the port numbers from port registration.<br />
4) Panel numbers not registered will be displayed in Unregistered Panel No. List. Select the Panel<br />
No. to register by clicking >> button or double clicking the panel number to add to the right hand<br />
side Registered Panel No. List window.<br />
Panel registration must be done one at a time. This means after registering one panel<br />
number, you need to input the panel’s default data. Once this is done, click Save button to<br />
save this panel’s definition to finish. Repeat the procedure to add additional panels.<br />
5) Select Panel Type as <strong>iTDC</strong>.<br />
6) Select Door Type as 2 Door, 3 Door, or 4 Door for operation.<br />
7) Input Panel Name. It must be done because it is used to locate which panel is having the event<br />
when an event occurs.<br />
8) Card memory definition is setup. The event memory is automatically defined depending on card<br />
memory. Define adequate card and event memory for operation.<br />
9) Panel Default value is optional (It is not necessary for operation)<br />
10) Click Save button to save data.<br />
11) Click Close button to finish.<br />
28
Biometrics Reader Definition<br />
<strong>STARWATCH</strong> ITDC <strong>PRO</strong> I<br />
Biometrics Reader Definition explains data definition of biometrics reader (FGR006, FINGER006).<br />
Each Biometrics Reader has its own communication address over 100. By address type, the software<br />
data is defined and communicated for biometrics data. Also, each biometrics reader can have its own<br />
function options, and these options are sent to the biometrics reader for application.<br />
• Start<br />
Click Set up->Biometrics Reader Definition or press Ctrl+C button on keyboard.<br />
• Find<br />
Find is used to get relevant information pertaining to the inquiry when information is available. It is<br />
used to edit and delete the existing data information.<br />
1) Select Loop No. and Biometrics Reader No. as appropriate.<br />
2) Click Find to make an inquiry. If inquired result is available, it will display the results.<br />
If find has no specific parameters, it will display the entire information<br />
29
• Add<br />
<strong>STARWATCH</strong> ITDC <strong>PRO</strong> I<br />
Add is used to create fresh data. Click Add button to add data through input screen.<br />
a. Click Add button, and the following screen appear.<br />
b. Select Loop No. It displays only the Loop No. that was registered in Loop Definition.<br />
30
<strong>STARWATCH</strong> ITDC <strong>PRO</strong> I<br />
c. Unregistered Biometrics Reader No. List displays items not selected from Loop No. Select the<br />
Controller No. to be registered choosing and clicking >> button or double click the Controller No.<br />
to select, and it will show up on the right hand side Registered Controller No. List.<br />
Biometrics Reader registration must be done one at a time to setup.<br />
It will register one biometrics reader number with its basic data for configuration. Click Save<br />
button to complete the process.<br />
Repeat the procedure to add additional biometrics readers.<br />
d. Select Biometrics Reader Type.<br />
e. Input Reader Name. This is a must in order to define the location, when an event occurs to a<br />
Controller.<br />
f. Configure Biometrics Reader Function. Each functions is explained in H/W manual<br />
2) Click Save button to save data.<br />
3) Click Transmit button to send setup data to biometrics reader.<br />
4) To change a master card, Input a master card no. to change. Click Change button.<br />
When setup is performed for all biometrics reader, software, and related data, it is not active<br />
until transmitted to biometrics. It is possible the transmit function may not work properly.<br />
Complete all initial setup and reboot the software, and make certain communication is<br />
established before using transmit function.<br />
5) Click Close button to finish.<br />
• Modify<br />
31
<strong>STARWATCH</strong> ITDC <strong>PRO</strong> I<br />
Modify is used to change existing data inputted. Find data to modify or to change registered<br />
biometrics reader category.<br />
Selected data is displayed as below figure in highlighted blue bar.<br />
1) Click Modify to see the following screen. The Modify is equal to registration screen. However, the<br />
Loop No. cannot be changed, and modify is possible to the selected one Controller address.<br />
Modify the items that need changing.<br />
2) Click Save button to save the modified information.<br />
32
<strong>STARWATCH</strong> ITDC <strong>PRO</strong> I<br />
3) Click Transmit button to send setup data to biometrics reader.<br />
When setup is performed for all biometrics reader, software, and related data, it is not active<br />
until transmitted to biometrics. It is possible the transmit function may not work properly.<br />
Complete all initial setup and reboot the software, and make certain communication is<br />
established before using transmit function.<br />
4) Click Close button to finish.<br />
• Delete<br />
Delete is used to delete existing inputted data. Find data to delete or to delete registered<br />
biometrics reader category data.<br />
Selected data is displayed as below figure in high-lighted blue bar.<br />
1) Click Delete button. Click Yes button to delete or No button to cancel.<br />
• Transmit<br />
33
<strong>STARWATCH</strong> ITDC <strong>PRO</strong> I<br />
This function is used to send the setup functions to the biometrics reader for activation. Use Find<br />
to search for data transmit or select the data from the registered biometrics reader categories to<br />
send.<br />
Selected data is displayed as below figure in highlighted blue bar.<br />
1) Click Transmit button. This will send the selected data to the corresponding biometrics reader No.<br />
for application.<br />
Door/Reader Definition<br />
Door/Reader definition explains door and reader data. Door and reader are connected to each <strong>iTDC</strong><br />
Controller. Therefore, software needs to be defined regarding the door and reader data to control<br />
event occurrence and <strong>iTDC</strong> controller.<br />
34
• Start<br />
<strong>STARWATCH</strong> ITDC <strong>PRO</strong> I<br />
Click Set up->Door/Reader Definition or press Ctrl+C button on keyboard.<br />
• Find<br />
Find is used to get relevant information pertaining to the inquiry when information is available. It is<br />
used to edit and delete the existing data information.<br />
1) Select Loop No. and Controller No. as appropriate.<br />
2) Click Find to make an inquiry. If inquired result is available, the following screen appears.<br />
If find has no specific parameters, it will display the entire information<br />
• Add<br />
Add is used to create fresh data. Click Add to add Door/Reader data through the input screen.<br />
35
<strong>STARWATCH</strong> ITDC <strong>PRO</strong> I<br />
1) Click Add button and the following screen appear.<br />
2) Select Loop No. and Controller No. Once Controller No. is selected, depending on door type<br />
definition, it will display as above example of 2 Door tabs (Access door 1, Access door 2)<br />
In 3 Door definition, it will display tabs (Access door 1, Access door 2, Access door 3)<br />
In 4 Door definition, it will display tabs (Access door 1, Access door 2, Access door 3, Access door<br />
4)<br />
3) Anti-Passback is configured. (For detailed explanation, refer to chapter 4 initial setup)<br />
4) Input Door Info with area, floor, and name. Area and floor data is according to current installed<br />
access doors. (Configure the area/floor of access door through Database->Area/Floor Definition)<br />
36
For Door Name, input easily identified name for definition.<br />
<strong>STARWATCH</strong> ITDC <strong>PRO</strong> I<br />
5) Access door contact type and lock type is optional.<br />
6) Select Duress Mode if to be used, and input a 2-digit password to use Duress.<br />
7) Input data for Reader (In) and Reader (Out).<br />
For Reader Name, input easily identified name for definition.<br />
For Reader Mode, select whether using card ID or card + password for operation. (You will need<br />
keypad reader to use this setup). For all time schedules upon selecting card + password<br />
selection, you can configure to use depending on time to use card ID or card + password in<br />
specified time to change automatically. (This function is connected to time schedule for detailed<br />
explanation, refer to chap. 4)<br />
Configure Reader (In) and Reader (Out), if using 1 access door with 2 readers as In and Out,<br />
but if using only 1 reader, configure Reader (In) only.<br />
If using 2 doors, configure In and Out reader or In only for all doors.<br />
If using 3 doors, 1 door can be configured as In and Out reader, and the 2 doors as In reader<br />
only.<br />
If using 4 doors, all doors are configured as In reader only.<br />
8) Use the above method to configure each door (Access door 1, Access door 2, Access door 3, and<br />
Access door 4) information for operation.<br />
9) Click Save button to save.<br />
10) Click Close button to transmit setup data to <strong>iTDC</strong> controller.<br />
When setup is performed for all controller, software, and related data, it is not active until<br />
transmitted to Controller. It is possible the transmit function may not work properly.<br />
Complete all initial setup and reboot the software, and make certain communication is<br />
established before using transmit function.<br />
11) Click Close button to finish.<br />
• Modify<br />
Modify is used to change existing data inputted. Find data to modify or to change registered<br />
reader category.<br />
Selected data is displayed as below figure in highlighted blue bar.<br />
37
<strong>STARWATCH</strong> ITDC <strong>PRO</strong> I<br />
1) Click Modify to see the following screen. The Reader/Door Definition is equal to registration<br />
screen. However, the Loop No. and Controller No cannot be modified.<br />
2) Modify category that needs changing. Once completed, click Save button to save modified data.<br />
3) Click Transmit button to send setup data to <strong>iTDC</strong> Controller.<br />
When setup is performed for all controller, software, and related data, it is not active until<br />
transmitted to Controller. It is possible the transmit function may not work properly.<br />
Complete all initial setup and reboot the software, and make certain communication is<br />
established before using transmit function.<br />
38
<strong>STARWATCH</strong> ITDC <strong>PRO</strong> I<br />
4) Click Close button to finish.<br />
• Delete<br />
Delete is used to delete existing inputted data. Find data to delete or to delete registered data.<br />
Selected data is displayed as below figure in highlighted blue bar.<br />
1) Click Delete button. Click Yes button to delete or No button to cancel.<br />
• Transmit<br />
This function is used to send the setup functions to the <strong>iTDC</strong> controller for activation. Use Find to<br />
search for data transmit or select the data from the registered reader categories to send.<br />
Selected data is displayed as below figure in highlighted blue bar.<br />
39
<strong>STARWATCH</strong> ITDC <strong>PRO</strong> I<br />
2) Click Transmit button. This will send the selected data to the corresponding Controller No for<br />
application.<br />
During transmit, if errors do not occur, there are no messages. This means the transmit was<br />
completed without disruption.<br />
If an error does occur, detailed explanation is displayed in a message box.<br />
In this case, retransmit the data, but if the error continues, check the communication and<br />
<strong>iTDC</strong> Controller for problems.<br />
40
Chapter<br />
6<br />
<strong>STARWATCH</strong> ITDC <strong>PRO</strong> I<br />
<strong>STARWATCH</strong> <strong>iTDC</strong> <strong>PRO</strong> I<br />
Access Control<br />
TARWATCH <strong>iTDC</strong> <strong>PRO</strong> I Access Control<br />
This chapter explains specific instructions on Access Control functions<br />
in <strong>STARWATCH</strong> <strong>iTDC</strong> <strong>PRO</strong>.<br />
System<br />
Port Definition<br />
System contains communications, <strong>iTDC</strong> device, and directly related functions. Configurations are<br />
setup for communication port, device data, reader, door, and various data. Also, the setup values are<br />
sent to the <strong>iTDC</strong> panel for application.<br />
System related functions are to precede after device and S/W initial installation, and these functions<br />
are not used frequently, but plays a critical part during initial setup.<br />
Port definition describes Serial and TCP/IP communication loop connected to the PC. It supports up<br />
to 99 ports, but keep in mind depending on PC performance, memory, and OS, supporting 99 ports<br />
may not be possible. It is recommended to use adequate number of ports for usage.<br />
• Start<br />
1) Click Set up-> Port Definition or press Ctrl+A button on keyboard.<br />
• Find<br />
Find is used to get relevant information pertaining to the inquiry when information is available. It is<br />
used to edit and delete the existing data information.<br />
41
<strong>STARWATCH</strong> ITDC <strong>PRO</strong> I<br />
1) Select Port No and Comm Type as appropriate.<br />
2) Click Find to make an inquiry. If inquired result is available, the following screen appears.<br />
If find has no specific parameters, it will display the entire information<br />
Find, Add, Modify, Delete functions are all applied equally in input/output screen. Once you<br />
familiarize these functions, you can easily understand them as they are used equally in other<br />
input/output screens.<br />
• Add<br />
Add is used to create fresh data. Click Add button to add work type data through input screen.<br />
6) Click Add button, and the following screen appear.<br />
42
<strong>STARWATCH</strong> ITDC <strong>PRO</strong> I<br />
7) Select Port No and it will indicate Port No not used. The Port No already in use is not displayed.<br />
8) Select Comm Type as Serial Chain for Serial, TCP/IP Chain for TCP/IP, and Dial-UP Chain for<br />
Dial-Up as communication type.<br />
9) Check mark Active for the correspond port to be able to communicate.<br />
Decide if correspond port will be active for communication. Active check mark Port No<br />
communicates, but without a check mark will result in no communication.<br />
This option lets the user make the port inactive, if the port requires maintenance due to a<br />
problem in communication. <strong>User</strong> can fix the problem while other locations remain with active<br />
ports.<br />
If the port data is modified, you must close the program and restart.<br />
10) Select from Serial Chain tab, Comm Port, Speed, Parity Bit, Data Bit, and Stop Bit. The default<br />
value is Speed 9600, Parity Bit None, Data Bit 8, and Stop Bit 1 for configuration.<br />
11) Input screen changes if TCP/IP Chain is selected.<br />
Input the IP Address from the external converter or internal converter for configuration.<br />
Input TCP Port No as default value 5000. (Port No is fixed at 5000)<br />
43
Select Module Type as internal or external version.<br />
<strong>STARWATCH</strong> ITDC <strong>PRO</strong> I<br />
For detailed instructions on TCP/IP communication, refer to chapter 7 <strong>STARWATCH</strong> <strong>iTDC</strong> <strong>PRO</strong> I<br />
TCP/IP Communication.<br />
12) Selecting Bypass TCP/IP Chain tab will change the screen as follows.<br />
In the IP address window, input the IP address of the Webeye Controller.<br />
Input ‘80’ as default value for TCP Port No.<br />
Input admin ID(Default : admin). Input admin password (Default : admin).<br />
Select com port of webeye controller. Com port is port no. of webeye is connected with <strong>iTDC</strong><br />
controller.<br />
Select Speed, Parity Bit, Data Bit, and Stop Bit. Set the value as 9600 for Speed, none for Parity<br />
Bit, 8 for Data Bit, and 1 for Stop Bit as <strong>iTDC</strong> default set value.<br />
13) Click Save to save the port data input, and click Close to finish.<br />
• Modify<br />
Modify is used to change existing data inputted. Find data to modify or to change registered work<br />
time category.<br />
Selected data is displayed as below figure in highlighted blue bar.<br />
44
<strong>STARWATCH</strong> ITDC <strong>PRO</strong> I<br />
1) Click Modify to see the above screen. The Port List is equal to registration screen. Therefore, the<br />
Port No cannot be changed.<br />
2) Modify the items that need changing. Once completed, click Save button to save the modify data.<br />
3) Click Close button to finish.<br />
• Delete<br />
Delete is used to delete existing inputted data. Find data to delete or to delete registered category<br />
list data.<br />
Selected data is displayed as below figure in highlighted blue bar.<br />
45
<strong>STARWATCH</strong> ITDC <strong>PRO</strong> I<br />
1) Click Delete button. The screen below will appear. Click Yes button to delete or No button to<br />
cancel.<br />
Deleting the registered port will erase all data of panel, access door, and reader. Please use<br />
extreme caution when using this function<br />
46
Panel Definition<br />
<strong>STARWATCH</strong> ITDC <strong>PRO</strong> I<br />
Panel Definition explains data definition of <strong>iTDC</strong> board. Each <strong>iTDC</strong> device has its own communication<br />
address. By address type, the S/W data is defined and communicated. Also, each <strong>iTDC</strong> can have its<br />
own function options, and these options is sent to the devices for application.<br />
• Start<br />
Click Set up->Panel Definition or press Ctrl+B button on keyboard.<br />
• Find<br />
Find is used to get relevant information pertaining to the inquiry when information is available. It is<br />
used to edit and delete the existing data information.<br />
3) Select Port No and Panel No as appropriate.<br />
4) Click Find to make an inquiry. If inquired result is available, it will display the results.<br />
If find has no specific parameters, it will display the entire information<br />
• Add<br />
Add is used to create fresh data. Click Add button to add work type data through input screen.<br />
47
<strong>STARWATCH</strong> ITDC <strong>PRO</strong> I<br />
1) Click Add button, and the following screen appear.<br />
2) Select Port No. It displays only the Port No that was registered in Port Registration.<br />
3) Unregistered Panel No. List displays items not selected from Port No. Select the Board No to be<br />
registered choosing and clicking >> button or double click the Board No to select, and it will show<br />
up on the right hand side Registered Panel No List.<br />
48
<strong>STARWATCH</strong> ITDC <strong>PRO</strong> I<br />
Panel registration must be done one at a time to setup.<br />
It will register one panel number with its basic data for configuration. Click Save button to<br />
complete the process.<br />
Repeat the procedure to add additional panels.<br />
4) Select Panel Type as <strong>iTDC</strong>.<br />
5) Select Door Type as 2 door, 3 door, or 4 door for operation.<br />
6) Input Panel Name. This is a must in order to define the location, when an event occurs to a panel.<br />
7) Configure card memory. Depending on card memory setup, the event memory is automatically<br />
setup. Configure adequate amount of card and event memory.<br />
8) Default Panel value is optional. It is not necessary for operation.<br />
9) Click Save button to save data.<br />
10) Click Transmit button to send setup data to panel.<br />
When setup is performed for all device, program, and related data, it is not active until<br />
transmitted to panel. It is possible the transmit function may not work properly.<br />
Complete all initial setup and reboot the program, and make certain communication is<br />
established before using transmit function.<br />
11) Click Close button to finish.<br />
• Modify<br />
Modify is used to change existing data inputted. Find data to modify or to change registered panel<br />
category.<br />
Selected data is displayed as below figure in highlighted blue bar.<br />
49
<strong>STARWATCH</strong> ITDC <strong>PRO</strong> I<br />
5) Click Modify to see the following screen. The Panel Modify is equal to registration screen.<br />
However, the Port No cannot be changed, and modify is possible to the selected one panel<br />
address.<br />
Modify the items that need changing.<br />
6) Click Save button to save the modified information.<br />
7) Click Transmit button to send setup data to panel.<br />
50
<strong>STARWATCH</strong> ITDC <strong>PRO</strong> I<br />
When setup is performed for all device, program, and related data, it is not active until<br />
transmitted to panel. It is possible the transmit function may not work properly.<br />
Complete all initial setup and reboot the program, and make certain communication is<br />
established before using transmit function.<br />
8) Click Close button to finish.<br />
• Delete<br />
Delete is used to delete existing inputted data. Find data to delete or to delete registered panel<br />
category data.<br />
Selected data is displayed as below figure in highlighted blue bar.<br />
2) Click Delete button. The screen below will appear. Click Yes button to delete or No button to<br />
cancel.<br />
Deleting the registered panel will erase all data of panel, access door, and reader. Please<br />
use extreme caution when using this function.<br />
• Transmit<br />
This function is used to send the setup functions to the <strong>iTDC</strong> device for activation. Use Find to<br />
search for data transmit or select the data from the registered panel categories to send.<br />
51
<strong>STARWATCH</strong> ITDC <strong>PRO</strong> I<br />
Selected data is displayed as below figure in highlighted blue bar.<br />
3) Click Transmit button. This will send the selected data to the corresponding Panel No for<br />
application.<br />
During transmit, if errors do not occur, there are no messages. This means the transmit was<br />
completed without disruption.<br />
If an error does occur, detailed explanation is displayed in a message box.<br />
In this case, retransmit the data, but if the error continues, check the communication and<br />
<strong>iTDC</strong> panel for problems.<br />
Biometrics Reader Definition<br />
Biometrics Reader Definition explains data definition of biometrics reader (FGR006, FINGER006).<br />
Each Biometrics Reader has its own communication address over 100. By address type, the software<br />
data is defined and communicated for biometrics data. Also, each biometrics reader can have its own<br />
function options, and these options are sent to the biometrics reader for application.<br />
• Start<br />
52
<strong>STARWATCH</strong> ITDC <strong>PRO</strong> I<br />
Click Set up->Biometrics Reader Definition or press Ctrl+C button on keyboard.<br />
• Find<br />
Find is used to get relevant information pertaining to the inquiry when information is available. It is<br />
used to edit and delete the existing data information.<br />
5) Select Loop No. and Biometrics Reader No. as appropriate.<br />
6) Click Find to make an inquiry. If inquired result is available, it will display the results.<br />
If find has no specific parameters, it will display the entire information<br />
• Add<br />
Add is used to create fresh data. Click Add button to add data through input screen.<br />
53
<strong>STARWATCH</strong> ITDC <strong>PRO</strong> I<br />
a. Click Add button, and the following screen appear.<br />
b. Select Loop No. It displays only the Loop No. that was registered in Loop Definition.<br />
c. Unregistered Biometrics Reader No. List displays items not selected from Loop No. Select the<br />
Controller No. to be registered choosing and clicking >> button or double click the Controller No.<br />
to select, and it will show up on the right hand side Registered Controller No. List.<br />
54
Biometrics Reader registration must be done one at a time to setup.<br />
<strong>STARWATCH</strong> ITDC <strong>PRO</strong> I<br />
It will register one biometrics reader number with its basic data for configuration. Click Save<br />
button to complete the process.<br />
Repeat the procedure to add additional biometrics readers.<br />
d. Select Biometrics Reader Type.<br />
e. Input Reader Name. This is a must in order to define the location, when an event occurs to a<br />
Controller.<br />
f. Configure Biometrics Reader Function. Each functions is explained in H/W manual<br />
14) Click Save button to save data.<br />
15) Click Transmit button to send setup data to biometrics reader.<br />
16) To change a master card, Input a master card no. to change. Click Change button.<br />
When setup is performed for all biometrics reader, software, and related data, it is not active<br />
until transmitted to biometrics. It is possible the transmit function may not work properly.<br />
Complete all initial setup and reboot the software, and make certain communication is<br />
established before using transmit function.<br />
17) Click Close button to finish.<br />
• Modify<br />
Modify is used to change existing data inputted. Find data to modify or to change registered<br />
biometrics reader category.<br />
Selected data is displayed as below figure in highlighted blue bar.<br />
55
<strong>STARWATCH</strong> ITDC <strong>PRO</strong> I<br />
9) Click Modify to see the following screen. The Modify is equal to registration screen. However, the<br />
Loop No. cannot be changed, and modify is possible to the selected one Controller address.<br />
Modify the items that need changing.<br />
10) Click Save button to save the modified information.<br />
11) Click Transmit button to send setup data to biometrics reader.<br />
When setup is performed for all biometrics reader, software, and related data, it is not active<br />
until transmitted to biometrics. It is possible the transmit function may not work properly.<br />
56
<strong>STARWATCH</strong> ITDC <strong>PRO</strong> I<br />
Complete all initial setup and reboot the software, and make certain communication is<br />
established before using transmit function.<br />
12) Click Close button to finish.<br />
• Delete<br />
Delete is used to delete existing inputted data. Find data to delete or to delete registered<br />
biometrics reader category data.<br />
Selected data is displayed as below figure in high-lighted blue bar.<br />
3) Click Delete button. Click Yes button to delete or No button to cancel.<br />
• Transmit<br />
This function is used to send the setup functions to the biometrics reader for activation. Use Find<br />
to search for data transmit or select the data from the registered biometrics reader categories to<br />
send.<br />
Selected data is displayed as below figure in highlighted blue bar.<br />
57
<strong>STARWATCH</strong> ITDC <strong>PRO</strong> I<br />
4) Click Transmit button. This will send the selected data to the corresponding biometrics reader No.<br />
for application.<br />
Door/Reader Definition<br />
Door/Reader definition explains door and reader data. Door and reader are connected to each <strong>iTDC</strong><br />
Controller. Therefore, software needs to be defined regarding the door and reader data to control<br />
event occurrence and <strong>iTDC</strong> controller.<br />
• Start<br />
Click Set up->Door/Reader Definition or press Ctrl+C button on keyboard.<br />
58
• Find<br />
<strong>STARWATCH</strong> ITDC <strong>PRO</strong> I<br />
Find is used to get relevant information pertaining to the inquiry when information is available. It is<br />
used to edit and delete the existing data information.<br />
3) Select Loop No. and Controller No. as appropriate.<br />
4) Click Find to make an inquiry. If inquired result is available, the following screen appears.<br />
If find has no specific parameters, it will display the entire information<br />
• Add<br />
Add is used to create fresh data. Click Add to add Door/Reader data through the input screen.<br />
59
<strong>STARWATCH</strong> ITDC <strong>PRO</strong> I<br />
12) Click Add button and the following screen appear.<br />
13) Select Loop No. and Controller No. Once Controller No. is selected, depending on door type<br />
definition, it will display as above example of 2 Door tabs (Access door 1, Access door 2)<br />
In 3 Door definition, it will display tabs (Access door 1, Access door 2, Access door 3)<br />
In 4 Door definition, it will display tabs (Access door 1, Access door 2, Access door 3, Access door<br />
4)<br />
14) Anti-Passback is configured. (For detailed explanation, refer to chapter 4 initial setup)<br />
15) Input Door Info with area, floor, and name. Area and floor data is according to current installed<br />
access doors. (Configure the area/floor of access door through Database->Area/Floor Definition)<br />
60
For Door Name, input easily identified name for definition.<br />
<strong>STARWATCH</strong> ITDC <strong>PRO</strong> I<br />
16) Access door contact type and lock type is optional.<br />
17) Select Duress Mode if to be used, and input a 2-digit password to use Duress.<br />
18) Input data for Reader (In) and Reader (Out).<br />
For Reader Name, input easily identified name for definition.<br />
For Reader Mode, select whether using card ID or card + password for operation. (You will need<br />
keypad reader to use this setup). For all time schedules upon selecting card + password<br />
selection, you can configure to use depending on time to use card ID or card + password in<br />
specified time to change automatically. (This function is connected to time schedule for detailed<br />
explanation, refer to chap. 4)<br />
Configure Reader (In) and Reader (Out), if using 1 access door with 2 readers as In and Out,<br />
but if using only 1 reader, configure Reader (In) only.<br />
If using 2 doors, configure In and Out reader or In only for all doors.<br />
If using 3 doors, 1 door can be configured as In and Out reader, and the 2 doors as In reader<br />
only.<br />
If using 4 doors, all doors are configured as In reader only.<br />
19) Use the above method to configure each door (Access door 1, Access door 2, Access door 3, and<br />
Access door 4) information for operation.<br />
20) Click Save button to save.<br />
21) Click Close button to transmit setup data to <strong>iTDC</strong> controller.<br />
When setup is performed for all controller, software, and related data, it is not active until<br />
transmitted to Controller. It is possible the transmit function may not work properly.<br />
Complete all initial setup and reboot the software, and make certain communication is<br />
established before using transmit function.<br />
22) Click Close button to finish.<br />
• Modify<br />
Modify is used to change existing data inputted. Find data to modify or to change registered<br />
reader category.<br />
Selected data is displayed as below figure in highlighted blue bar.<br />
61
<strong>STARWATCH</strong> ITDC <strong>PRO</strong> I<br />
5) Click Modify to see the following screen. The Reader/Door Definition is equal to registration<br />
screen. However, the Loop No. and Controller No cannot be modified.<br />
6) Modify category that needs changing. Once completed, click Save button to save modified data.<br />
7) Click Transmit button to send setup data to <strong>iTDC</strong> Controller.<br />
When setup is performed for all controller, software, and related data, it is not active until<br />
transmitted to Controller. It is possible the transmit function may not work properly.<br />
Complete all initial setup and reboot the software, and make certain communication is<br />
established before using transmit function.<br />
62
8) Click Close button to finish.<br />
<strong>STARWATCH</strong> ITDC <strong>PRO</strong> I<br />
• Delete<br />
Delete is used to delete existing inputted data. Find data to delete or to delete registered data.<br />
Selected data is displayed as below figure in highlighted blue bar.<br />
2) Click Delete button. Click Yes button to delete or No button to cancel.<br />
• Transmit<br />
This function is used to send the setup functions to the <strong>iTDC</strong> controller for activation. Use Find to<br />
search for data transmit or select the data from the registered reader categories to send.<br />
Selected data is displayed as below figure in highlighted blue bar.<br />
63
<strong>STARWATCH</strong> ITDC <strong>PRO</strong> I<br />
5) Click Transmit button. This will send the selected data to the corresponding Controller No for<br />
application.<br />
During transmit, if errors do not occur, there are no messages. This means the transmit was<br />
completed without disruption.<br />
If an error does occur, detailed explanation is displayed in a message box.<br />
In this case, retransmit the data, but if the error continues, check the communication and<br />
<strong>iTDC</strong> Controller for problems.<br />
In/Output Definition<br />
In/Output Definition configures signal activation for specific outputs when an input signal occurs. It<br />
also sets how long in seconds the output signal will activate.<br />
It is also possible to setup a user preferred text display, when an input signal type occurs.<br />
Depending on In/Output panel door type setup, the data in reference to In/Output signal using <strong>iTDC</strong><br />
default value is automatically created and stored in the database. For this reason, the user does not<br />
have to Add or Delete, but the In/Output signal, activated time, and point of input can be modified and<br />
transmitted.<br />
64
<strong>STARWATCH</strong> ITDC <strong>PRO</strong> I<br />
There is not add/delete function for input/output point information.<br />
Input/Output data are automatically selected based on door type entered from panel set up.<br />
Because this data is registered by default setting value of <strong>iTDC</strong>, user dose not need to add or<br />
delete data. Only modification is available to change setting value of input/output and<br />
download modified data to control <strong>iTDC</strong>. .<br />
Input/output data in selected <strong>iTDC</strong> are automatically deleted when user deletes panel from<br />
panel setting.<br />
Refer hardware manual to setting default value for input/out based on door type.<br />
• Start<br />
Click Set up->Input/Output Definition List or press shortcut key Ctrl+E.<br />
• Find<br />
Find is used to get relevant information pertaining to the inquiry when information is available. It is<br />
used to edit and delete the existing data information.<br />
1) Select Port No and Panel No as appropriate.<br />
2) Click Find to make an inquiry. If inquired result is available it will display the results.<br />
65
If find has no specific parameters, it will display the entire information<br />
<strong>STARWATCH</strong> ITDC <strong>PRO</strong> I<br />
• Modify<br />
Input/Output Point is automatically setup in default value depending on door type. However, if the<br />
user modifies the Input/Output status, you can activate the Point differently.<br />
Select the Input Point of the panel to be modified. Selected data is highlighted.<br />
1) Click Modify button.<br />
1) Input Point sets which outputs of the <strong>iTDC</strong> board will occur from receiving the input signal from the<br />
<strong>iTDC</strong> board.<br />
Also, when an Input Point type and corresponding Input Point occurs, the text display and<br />
specified time of signal occurrence success or failure can be setup.<br />
66
<strong>STARWATCH</strong> ITDC <strong>PRO</strong> I<br />
2) Select Area and Floor Location. Selecting the location of input signal occurrence lets the user<br />
check where the event location occurred.<br />
3) For Input Point name, input the letters displayed in the event window that corresponds to the input<br />
signal occurrence.<br />
4) Decide which outputs will activate in Output 1-15, when an input signal occurs. The input value<br />
for the Output is setup in seconds.<br />
00 sec for input will result in no signal for the corresponding output. Selecting from 01-99 sec will<br />
let the output activate for specified seconds.<br />
5) Click Save button to save.<br />
6) Click Transmit to send to <strong>iTDC</strong> device.<br />
When setup is performed for all device, program, and related data, it is not active until<br />
transmitted to panel. It is possible the transmit function may not work properly.<br />
Complete all initial setup and reboot the program, and make certain communication is<br />
established before using transmit function.<br />
7) Click Close button to finish.<br />
Normal setting defines input form other devices which are connected to <strong>iTDC</strong> and which<br />
output is activated based on input type which means input type can be changed by user.<br />
However, some of specific setting input values are fixed as exit and door contact depends on<br />
door type. (Refer hardware manual for detail)<br />
Advanced set-up dose not accept signal from other devices selected by user. Because<br />
advanced set up is fixed for internal input signal, specific value must be received.<br />
Therefore, Input type or name can not be entered when user modifies advanced set up.<br />
67
<strong>STARWATCH</strong> ITDC <strong>PRO</strong> I<br />
Modification of advanced set up allows changing output type and activation time based on<br />
input signal<br />
In/Output Timeschedule & Signal Type<br />
Configures Time Schedule of Input/Output Point activation. This is connected to the Time Schedule,<br />
and the user can modify the signal occurrence of Input/Output Point.<br />
Basically, <strong>iTDC</strong> create signal for all inputs when it receives input signal. Moreover <strong>iTDC</strong> create<br />
output signal when any output signal is received.<br />
However, input and output signal can be controlled by timeschedule. <strong>User</strong> may be able to<br />
activate input/output only based on time schedule.<br />
This function applied for connecting sensor in case of input, for connecting door lock in case<br />
of output.<br />
If you connect the sensor in specific input relay, it occurred event anytime, day and night<br />
detecting the situation.<br />
This case, surplus of event cause slowing the processing, which cause that the useless<br />
information would be stored.<br />
If you set the time schedule for input point connected sensor, like 08:00~18:00 which not<br />
works during set time. Sensor works during 18:01~07:59. Except above time , the event will<br />
not occurred ,even the sensor works.<br />
Incase of output, if you connect the door lock to certain output, depending on the output<br />
status, which keep the continuously lock or release.<br />
But in working hours (like day time), you can set up the open the door, after working hours,<br />
dawn, automatically keep the close the door, if the registered card is presented the door once<br />
open.<br />
In case output, within the time schedule, keep unlock, except this time, keep the lock the door.<br />
• Start<br />
Click Set up->Input/Output Definition List or press shortcut key Ctrl+E.<br />
• Find<br />
68
<strong>STARWATCH</strong> ITDC <strong>PRO</strong> I<br />
Find is used to get relevant information pertaining to the inquiry when information is available. It is<br />
used to edit and delete the existing data information.<br />
1) Select Port No and Panel No as appropriate.<br />
2) Click Find to make an inquiry. If inquired result is available it will display the results.<br />
If find has no specific parameters, it will display the entire information<br />
• Modify<br />
Select the Input Point of the panel to be modified. Selected data is highlighted.<br />
69
1) Click Modify button.<br />
<strong>STARWATCH</strong> ITDC <strong>PRO</strong> I<br />
2) Clicking the DropDownCombo of corresponding Input Point will display the contents setup in Time<br />
Schedule. Select the time schedule to apply.<br />
Default value for Time schedule content means it will not be applied. However, when an input<br />
occurs the signal is taken care of at that moment with a resulting event occur.<br />
3) Click Save button to save.<br />
4) Click Transmit button to send to <strong>iTDC</strong> device.<br />
When setup is performed for all device, program, and related data, it is not active until<br />
transmitted to panel. It is possible the transmit function may not work properly.<br />
Complete all initial setup and reboot the program, and make certain communication is<br />
established before using transmit function.<br />
5) Click Close button to finish.<br />
Output Point Time Schedule setup method and Input Point setup method is identical.<br />
70
<strong>STARWATCH</strong> ITDC <strong>PRO</strong> I<br />
Clicking the Dropdown Combo of corresponding Input Point will display the contents setup in<br />
Time Schedule. Select the time schedule to apply, then click Save and Transmit button to<br />
configure.<br />
You can configure signal handling method of <strong>iTDC</strong>, if the Input Point Type connected input<br />
devices (Exit, Contact, Sensor, etc..) signal is NO or NC.<br />
Clicking the Dropdown Combo of corresponding Input Point will display the NO and NC<br />
contents. Select the value to apply then click Save and Transmit button to configure.<br />
System Management (Set Date&Time)<br />
This function resets the device clock and date in <strong>iTDC</strong>. In general, initial installation of <strong>iTDC</strong> result in<br />
incorrect time data. Use this function to modify date and time.<br />
• Start<br />
71
<strong>STARWATCH</strong> ITDC <strong>PRO</strong> I<br />
Click Set up->System Management->Set Time or press shortcut key Ctrl+G.<br />
• Setup<br />
1) Change Date, Week, and Time value. (Displayed default value is time and date of PC based)<br />
2) Select System List to define which <strong>iTDC</strong> device to Transmit to.<br />
3) Click Transmit button to complete setup.<br />
System Initialize<br />
This function is used to setup default status for all stored data or specified part in <strong>iTDC</strong> device.<br />
System Initialize is differentiated as System Initialize, Card Data Initialize, Event Data Initialize, and<br />
Time Schedule Initialize.<br />
‣ System Initialize: Setup of all stored data in <strong>iTDC</strong> to default value.<br />
‣ Card Data Initialize: Setup of stored card data in <strong>iTDC</strong> to default value.<br />
‣ Event Data Initialize: Setup of stored event data in <strong>iTDC</strong> to default value.<br />
‣ Time Schedule Initialize: Setup of stored time schedule and work holiday data in <strong>iTDC</strong> to<br />
default value.<br />
• Start<br />
Click Set up->System Management->System Initialize or press shortcut key Ctrl+H.<br />
• Setup<br />
72
<strong>STARWATCH</strong> ITDC <strong>PRO</strong> I<br />
1) Select Initialize Type.<br />
2) Select the System List to initialize.<br />
3) Click Transmit button to initialize.<br />
You must make certain Initialize Type is correct, before activating it. Also, use the function<br />
with caution, because the data is deleted in this function.<br />
Dial-Up Connection<br />
Dial-Up Connection uses standard phone line to connect to a remote device for communication.<br />
External modems are required for each site at remote and host to connect by phone line.<br />
Also, Dial-Up Connection Management can be used to manage multiple location registration, and<br />
when needed initiate the location’s remote device and communication.<br />
Refer to chapter 8 (<strong>STARWATCH</strong> <strong>iTDC</strong> <strong>PRO</strong> I Dial-Up Communication) for detailed information.<br />
• Start<br />
Click Set up->System Management->Dial-Up Connection List or press shortcut key Ctrl+G.<br />
• Find<br />
Find is used to get relevant information pertaining to the inquiry when information is available. It is<br />
used to edit and delete the existing data information.<br />
73
<strong>STARWATCH</strong> ITDC <strong>PRO</strong> I<br />
1) Input Find Condition<br />
2) Click Find to make an inquiry. If inquired result is available, the following screen appears.<br />
If find has no specific parameters, it will display the entire information<br />
• Add<br />
Add is used to create fresh data. Click Add button to add Dial-Up Connection area data through<br />
input screen.<br />
1) Click Add button, and the following screen appears.<br />
74
<strong>STARWATCH</strong> ITDC <strong>PRO</strong> I<br />
2) Select Port No. You can only select the port that was configured for Dial-Up Connection.<br />
3) Input Dial-Up Chain Name.<br />
4) Check mark Out Line if setup, and input Out Line No.<br />
5) Input Remote Phone No. connected to remote modem.<br />
6) Check mark Auto Dial-Up Connection if setup, and configure connection and disconnection time.<br />
When configuring Auto Dial-Up Connection, make certain that connection and disconnection<br />
time does not overlap in multiple location setup. This will cause abnormal operation.<br />
7) Click Save button to save input data. Click Close button to finish.<br />
In Dial-Up Connection, connection failure can be frequent depending on phone line and<br />
modem status. This is a special characteristic occurrence, and if 2-3 reattempts are made<br />
normal connection is established.<br />
• Dial<br />
Dial can be used in Dial-Up Connection List, Add, and Modify screen, but we recommend use as<br />
possible in the Dial-Up Connection List screen.<br />
75
<strong>STARWATCH</strong> ITDC <strong>PRO</strong> I<br />
1) Use Find to locate connection or select from Dial categories to connect. Selected location is<br />
highlighted.<br />
2) Click Dial for connection attempt.<br />
• Hang Up<br />
1) Select current established connect location.<br />
2) Click Hang Up to disconnect.<br />
• Modify<br />
Modify is used to change existing data inputted. Find data to modify or to change registered<br />
content.<br />
76
<strong>STARWATCH</strong> ITDC <strong>PRO</strong> I<br />
1) Select data to Modify, then click Modify button.<br />
2) Click Save button after data is modified to save.<br />
3) Click Close button to finish.<br />
• Delete<br />
Delete is used to delete existing inputted data. Find data to delete or to delete registered content<br />
data.<br />
Selected data is displayed as below figure in highlighted blue bar.<br />
77
<strong>STARWATCH</strong> ITDC <strong>PRO</strong> I<br />
1) Click Delete button. The screen below will appear. Click Yes button to delete or No button to<br />
cancel.<br />
Database<br />
Database menu contains functions for Company, Department, Title, Area Data, Map Management,<br />
<strong>User</strong> Management, Database Management, and Access Control Option. It is recommended to input<br />
as possible all data, because they are used as basis in initial input data for Access Control and Time &<br />
Attendance.<br />
Company Definition<br />
Input company name using the system.<br />
• Start<br />
Click Database->Company List or press shortcut key Ctrl+L.<br />
• Find<br />
Find is used to get relevant information pertaining to the inquiry when information is available. It is<br />
used to edit and delete the existing data information.<br />
78
<strong>STARWATCH</strong> ITDC <strong>PRO</strong> I<br />
1) Input Company Code and Company Name as appropriate.<br />
2) Click Find to make an inquiry. If inquired result is available, the following screen appears.<br />
If find has no specific parameters, it will display the entire information<br />
• Add<br />
Add is used to create fresh data. Click Add button to add Dial-Up Connection area data through<br />
input screen.<br />
1) Click Add button, and the following screen appears.<br />
2) Input Company Code. If using a registered code, it will not register and a code being used<br />
message is displayed. Do not overlap the Company Code in use.<br />
3) Input Company Name.<br />
4) Click Save button to save and click Close button to finish.<br />
79
• Modify<br />
<strong>STARWATCH</strong> ITDC <strong>PRO</strong> I<br />
Modify is used to change existing data inputted. Find data to modify or to change registered<br />
content.<br />
Selected data is displayed as below figure in highlighted blue bar.<br />
1) Click Modify button and the following screen appears. This screen is identical to register screen.<br />
Company Code cannot be modified in this mode.<br />
2) Modify data.<br />
3) Click Save button to save data then click Close button to finish.<br />
• Delete<br />
Delete is used to delete existing inputted data. Find data to delete or to delete registered content<br />
data.<br />
Selected data is displayed as below figure in highlighted blue bar.<br />
80
<strong>STARWATCH</strong> ITDC <strong>PRO</strong> I<br />
1) Click Delete button. The screen below will appear. Click Yes button to delete or No button to<br />
cancel.<br />
Department, Title, and Access Type can be setup as identical process in Company<br />
registration. Detailed instruction is omitted.<br />
Area/Floor Definition<br />
Area/Floor configuration is used for default data creation to distinguish access door, reader, and<br />
sensors by installed locations. Multiple buildings can be designated by area, and the floors correlating<br />
to the area can be distinguished.<br />
• Start<br />
Click Database->Area/Floor definition or press Ctrl+P on keyboard.<br />
• Find<br />
Find is used to get relevant information pertaining to the inquiry when information is available. It is<br />
used to edit and delete the existing data information.<br />
1) Input or select Find condition.<br />
2) Click Find to make an inquiry. If inquired result is available, the following screen appears.<br />
If find has no specfic parameters, it will display the entire information<br />
81
• Add<br />
<strong>STARWATCH</strong> ITDC <strong>PRO</strong> I<br />
Add is used to create fresh data. Click Add to input data of area and floor through the input<br />
screen.<br />
1) Click Add and the screen below appear.<br />
2) Input area code. If already registered code is used, it will not register, but only a fresh area code.<br />
Do not overlap Area Code.<br />
3) Input area name.<br />
Select floor then click Add button. It will show up in Floor List window. Repeat this procedure to<br />
add additional floors.<br />
4) If all the floors are added to the area, click Save button to save.<br />
5) Click Close to finish.<br />
82
• Modify<br />
<strong>STARWATCH</strong> ITDC <strong>PRO</strong> I<br />
Modify is used to change existing data inputted. Find data to modify or to change registered<br />
content.<br />
Selected data is displayed as below figure in highlighted blue bar. Selecting the Area will display<br />
the corresponding floors on the right hand side content.<br />
1) Click Modify button and the following screen appears. This screen is identical to register screen.<br />
Area Code cannot be modified in this mode.<br />
2) Modify Area Name and data by Delete or Add function.<br />
3) Click Save button to save data, then click Close button to finish.<br />
• Delete<br />
83
<strong>STARWATCH</strong> ITDC <strong>PRO</strong> I<br />
Delete is used to delete existing inputted data. Find data to delete or to delete registered content<br />
data.<br />
Selected data is displayed as below figure in highlighted blue bar.<br />
Deleting the Area data will also delete the corresponding floor data.<br />
1) Click Delete button. The screen below will appear. Click Yes button to delete or No button to<br />
cancel.<br />
Map Definition<br />
This sets the map of each floor using the area/floor as basis. Door and sensor location can be<br />
designated on the map. This lets the user see which location the event occurred by the setup of the<br />
map to be displayed automatically, when the event occurs at the time.<br />
• Start<br />
Click Database->Map Definition or press shortcut key Ctrl+R.<br />
• Find<br />
Find is used to get relevant information pertaining to the inquiry when information is available. It is<br />
used to edit and delete the existing data information.<br />
84
<strong>STARWATCH</strong> ITDC <strong>PRO</strong> I<br />
1) Input or select Find condition.<br />
2) Click Find to make an inquiry. If inquired result is available, the following screen appears.<br />
If find has no specific parameters, it will display the entire information<br />
• Add<br />
Add is used to create fresh data. Click Add to input data of new map through the input screen.<br />
1) Click Add and the screen below appear.<br />
85
<strong>STARWATCH</strong> ITDC <strong>PRO</strong> I<br />
2) Input Map Code and Map Name.<br />
3) Select Area and Floor for the location to be implemented.<br />
4) Select Map File. <strong>User</strong> can select file as bmp, jpg, wmf and can check the image file as shown<br />
above before applying.<br />
5) Click Save button to save data.<br />
• Map Item Setup<br />
This function configures access door and sensor for the setup area/floor location. This sets the<br />
sensor and access door location to be displayed on the real map to check status of sensor.<br />
1) Click Map Item button.<br />
86
<strong>STARWATCH</strong> ITDC <strong>PRO</strong> I<br />
2) The following screen displays.<br />
87
<strong>STARWATCH</strong> ITDC <strong>PRO</strong> I<br />
The display of map setup is identical to real map in size. Also, as shown above, the current map’s<br />
corresponding access door and sensor is displayed as an icon.<br />
The door and sensor icon of corresponding map area data is automatically displayed. For a<br />
door, the setup of Reader/Door data during registration is inputted. It uses this data as basis<br />
to display the icons automatically on the corresponding map.<br />
Sensor uses identical method to display the icons automatically, by setup of the In/Output<br />
Point setup.<br />
3) Use the mouse to click and drag the door and sensor icon to the desired location. (Hold down the<br />
mouse button to drag, and release the button to set)<br />
Locate the door and sensor icon with the mouse pointer, and the door and sensor name is<br />
displayed by tool tip. At the bottom displays the <strong>iTDC</strong> panel connected to the current door and<br />
sensor, along with data including names and location.<br />
Use the above data as basis to control the location of door and sensor.<br />
4) If location is completed, then click (X) on the right hand corner.<br />
5) If location was changed, it will display the following message. Click Yes button to save.<br />
88
<strong>STARWATCH</strong> ITDC <strong>PRO</strong> I<br />
• Modify<br />
Modify is used to change existing data inputted. Find data to modify or to change registered<br />
content.<br />
Selected data is displayed as below figure in highlighted blue bar.<br />
1) Click Modify button and the following screen appears. This screen is identical to register screen.<br />
Map Code cannot be modified in this mode.<br />
89
<strong>STARWATCH</strong> ITDC <strong>PRO</strong> I<br />
2) Modify Data.<br />
3) Click Save button to save.<br />
4) Click Map Item button to setup location. Once completed, click Close button to finish.<br />
5) Click Close button to finish.<br />
• Delete<br />
Delete is used to delete existing inputted data. Find data to delete or to delete registered content<br />
data.<br />
Selected data is displayed as below figure in highlighted blue bar.<br />
90
<strong>STARWATCH</strong> ITDC <strong>PRO</strong> I<br />
1) Click Delete button. The screen below will appear. Click Yes button to delete or No button to<br />
cancel.<br />
<strong>User</strong> Definition<br />
This function registers the user to operate <strong>STARWATCH</strong> <strong>iTDC</strong> <strong>PRO</strong>. For default value (admin) is<br />
registered in the program, and you can register additional user or change authority of existing user.<br />
• Start<br />
• Add<br />
Click Database-><strong>User</strong> Management or press shortcut key Ctrl+S.<br />
Add is used to create fresh data. Click Add button to add new user through input screen.<br />
1) Click Add button and the following screen appears.<br />
91
<strong>STARWATCH</strong> ITDC <strong>PRO</strong> I<br />
2) Input <strong>User</strong> ID. <strong>User</strong> ID cannot be overlapped.<br />
3) Input <strong>User</strong> Name and <strong>User</strong> Password.<br />
4) Check mark Administrator option or not.<br />
Administrator option gives authority to Add, Modify, and Delete user. Only the <strong>User</strong> who has<br />
this authority can perform these functions. <strong>User</strong> with no authority can use allowed functions,<br />
but not the above functions.<br />
5) Click Save button to save then Close to finish.<br />
• Modify<br />
Modify is used to change existing data inputted. Select data to Modify.<br />
Selected data is displayed as below figure in highlighted blue bar.<br />
1) Click Modify to see the above screen. The Modify screen is equal to registration screen. <strong>User</strong> ID<br />
cannot be changed.<br />
2) Modify data to change.<br />
3) Click Save button to save data.<br />
4) Click Close button to finish.<br />
92
• Delete<br />
<strong>STARWATCH</strong> ITDC <strong>PRO</strong> I<br />
Delete is used to delete existing inputted data. Find data to delete or to delete registered content<br />
data. Selected data is displayed as below figure in highlighted blue bar.<br />
1) Click Delete button. The screen below will appear. Click Yes button to delete or No button to<br />
cancel.<br />
• Authority Setup<br />
This function sets the authority of use for each function type. <strong>User</strong> can only use functions with<br />
authority designation, and this function can setup entire function or parts of it.<br />
Authority Setup is categorized in menu type as shown above. <strong>User</strong> can setup use authority under<br />
each sub menu category under main category.<br />
1) For use authority, check mark the item and if canceling use authority, uncheck mark item.<br />
93
All Authority Grant: Setup all authority at once.<br />
<strong>STARWATCH</strong> ITDC <strong>PRO</strong> I<br />
<br />
<br />
<br />
All Authority Cancel: Setup all authority as cancelled.<br />
Total Select: Setup use authority of corresponding menu at once.<br />
Total Cancel: Cancel use authority of corresponding menu at once.<br />
2) Once completed, click Save button to save.<br />
3) Click Close button to finish.<br />
Database Management<br />
Database Management describes the backup, restore, and database compact function of data in<br />
using the <strong>STARWATCH</strong> <strong>iTDC</strong> <strong>PRO</strong>. Also, through backup, restore, and history, it gives out backup<br />
week cycle message from the last backup date. This is setup by the user at alert interval.<br />
Refer to chapter 9 <strong>STARWATCH</strong> <strong>iTDC</strong> <strong>PRO</strong> I Maintenance and Management for detailed information.<br />
Option<br />
Option lets the user activate additional functions on user setup. <strong>User</strong> can designate event type<br />
database store and display of data, and setup a separate sound file for playing out the sound during<br />
an event occurrence.<br />
Also, when the event occurs, the setup of designated email recipient will send out the event occur<br />
status automatically.<br />
Also, sets the option of map display when some event occurs with connection to the map display.<br />
• Start<br />
Click Database->Option or press shortcut key Ctrl+U.<br />
• Event Status Handling Option<br />
This sets the whether or not to save Event Type database and to display event in Event Status<br />
screen.<br />
94
<strong>STARWATCH</strong> ITDC <strong>PRO</strong> I<br />
1) Check mark the items for event occur display on monitor. If display is not necessary, cancel<br />
check mark.<br />
2) Check mark the items for event occur database save. If save is not necessary, cancel the check<br />
mark.<br />
3) Click Save button to save then click Close button to finish.<br />
4) Click Close button to finish.<br />
• Event Handling – Sound Option<br />
This designates sound file by event type. Once implemented, when an event occurs the setup<br />
sound file plays through a speaker with sound card in PC alerting the event status.<br />
95
<strong>STARWATCH</strong> ITDC <strong>PRO</strong> I<br />
1) Check mark the items for sound play during an event occurrence. If sound play is not necessary,<br />
cancel check mark.<br />
2) Click Search button on bottom to find sound file. Selecting the file displays in Select Sound<br />
(Alarm) window. Right hand side window displays the matched sound file.<br />
s<br />
Sound file can only be selected as wav. File. To play the sound, a PC with sound card and<br />
speaker is required.<br />
3) Click Save button to save.<br />
4) Click Close button to finish.<br />
• Event Handling – Email Transmit<br />
This function sends out email up to 3 recipients when a specific event occurs that was setup.<br />
Email contains date of event, time, event location, and type of event as data.<br />
To use this option, the operating PC must be connected to a network.<br />
This can be used with onsite mail server at company, and requires POP3 support to use this<br />
option. If POP3 is not supported, it will not work.<br />
96
<strong>STARWATCH</strong> ITDC <strong>PRO</strong> I<br />
1) Check marks the items for mail transaction during an event occurrence. If transaction is not<br />
necessary, cancel check mark.<br />
2) Input Mail Server (SMTP) address.<br />
3) Input Name and Email Address of up to 3 recipients.<br />
4) Click Save button to save.<br />
5) Click Close button to finish.<br />
• Event Handling – View Map<br />
If a map is setup, it will automatically display when a specified event occurs. Here the event type<br />
map display presence is setup. View Map Option needs to be setup to display map automatically.<br />
97
<strong>STARWATCH</strong> ITDC <strong>PRO</strong> I<br />
1) Check mark the items for map display during an event occurrence. If map display is not<br />
necessary, cancel check mark.<br />
2) Click Save button to save.<br />
3) Click Close button to finish.<br />
Access Control<br />
Access Control Management contains functions required for <strong>User</strong> Management. Details regarding<br />
access are setup and user registered. Setup data is transmitted to <strong>iTDC</strong>.<br />
Holiday Definition<br />
This function connects to Time Schedule to apply. Time Schedule can be setup from Mon-Sun with<br />
designated time for each day.<br />
For this function, the holiday data needs to be initially setup. Holiday Definition is to apply holiday to<br />
Time Schedule and transmit to <strong>iTDC</strong> to setup.<br />
• Start<br />
Click Access Control Management->Holiday Definition or press shortcut key F2.<br />
• Find<br />
Find is used to get relevant information pertaining to the inquiry when information is available. It is<br />
used to modify and delete the existing data information.<br />
98
<strong>STARWATCH</strong> ITDC <strong>PRO</strong> I<br />
1) Input Holiday Code and Holiday Name as appropriate.<br />
2) Click Find to make an inquiry. If inquired result is available, the following screen appears.<br />
• Add<br />
Add is used to create fresh data. Click Add button to add holiday through input screen.<br />
1) The following screen appears after clicking Add.<br />
99
<strong>STARWATCH</strong> ITDC <strong>PRO</strong> I<br />
2) Select Holiday Code. (Holiday Code can be used from 01-10 giving 10 codes for use)<br />
3) Input Holiday Name to be saved.<br />
4) Select the corresponding date, and double click the date on the calendar or click >> button.<br />
5) If an exception is needed on a selected Holiday, select the corresponding date and double click or<br />
click
<strong>STARWATCH</strong> ITDC <strong>PRO</strong> I<br />
1) Click Modify to see the following screen. The Modify screen is equal to registration screen.<br />
Holiday Code cannot be changed.<br />
2) Modify the items to be changed.<br />
3) Click Save button to save data, and click Close button to finish.<br />
• Delete<br />
Delete is used to delete existing inputted data. Find data to delete or to delete registered content<br />
list data.<br />
Selected data is displayed as below figure in highlighted blue bar.<br />
101
<strong>STARWATCH</strong> ITDC <strong>PRO</strong> I<br />
1) Click Delete button. The screen below will appear. Click Yes button to delete or No button to<br />
cancel.<br />
• Transmit<br />
This function is used to send the setup functions to the <strong>iTDC</strong> device for activation. Use Find to<br />
search for data transmit or select the data from the registered reader categories to send.<br />
Selected data is displayed as below figure in highlighted blue bar.<br />
1) Click Transmit button. This will send the selected data to the corresponding Panel No for<br />
application.<br />
102
<strong>STARWATCH</strong> ITDC <strong>PRO</strong> I<br />
During transmit, if errors do not occur, there are no messages. This means the transmit was<br />
completed without disruption. If an error does occur, detailed explanation is displayed in a<br />
message box.<br />
In this case, retransmit the data, but if the error continues, check the communication and<br />
<strong>iTDC</strong> panel for problems.<br />
Time Zone Definition<br />
This function sets the access time as 24 hours or divided into 5 time sections within 24 hours. These<br />
data is setup in Time Schedule as per day.<br />
• Start<br />
Click Access Control Management->Time Schedule->Time Code List or press shortcut key F3.<br />
• Find<br />
Find is used to get relevant information pertaining to the inquiry when information is available. It is<br />
used to modify and delete the existing data information.<br />
1) Input Time Code and Time Code Name as appropriate.<br />
2) Click Find to make an inquiry. If inquired result is available, the following screen appears.<br />
• Add<br />
103
<strong>STARWATCH</strong> ITDC <strong>PRO</strong> I<br />
Add is used to create fresh data. Click Add button to add work holiday through input screen.<br />
1) The following screen appears after clicking Add.<br />
2) Input Time Code.<br />
3) Input Time Code Name.<br />
4) Setup the time From/To for Time 1, Time 2, Time 3, Time 4, Time 5.<br />
For example, the screen below shows (Access granted 09:00-12:00 Sunday, 12:01-13:00 no<br />
access, 13:01-18:00 access granted)<br />
104
<strong>STARWATCH</strong> ITDC <strong>PRO</strong> I<br />
5) Click Save button to save and Close button to finish.<br />
The section of time schedule is set up within 24 hours of a day.<br />
Namely, if you intend to set up for 24 hours without division of 24 hours of a day, you have to<br />
input 0000-2400 in 1 st section. The rest section is set up as 0000-0000 automatically.<br />
If you want to divide and use 24 hours of a day, it is possible to divide as maximum 5<br />
sections. To divide hours is mainly used to control of access time and/or to work together with<br />
time schedule of input/output.<br />
Namely if you admit to access door at AM and don’t admit at PM, it is applied in this case.<br />
The division of time is needed, in case of application of Lock or Unlock of access door.<br />
• Modify<br />
Modify is used to change existing data inputted. Find data to modify or to change registered<br />
content category.<br />
Selected data is displayed as below figure in highlighted blue bar.<br />
105
<strong>STARWATCH</strong> ITDC <strong>PRO</strong> I<br />
1) Click Modify to see the following screen. The Time Code List screen is equal to registration<br />
screen. Time Code cannot be changed.<br />
2) Modify the items to change.<br />
3) Click Save button to save data, and click Close button to finish.<br />
• Delete<br />
Delete is used to delete existing inputted data. Find data to delete or to delete registered content<br />
list data.<br />
Selected data is displayed as below figure in highlighted blue bar.<br />
1) Click Delete button. The screen below will appear. Click Yes button to delete or No button to<br />
cancel.<br />
106
<strong>STARWATCH</strong> ITDC <strong>PRO</strong> I<br />
Timeschedule Definition<br />
This function uses Time Zone data to setup time schedule for each day. It is applied to the user to<br />
control access time, and is connected to the In/Output Point time schedule.<br />
Time Schedule can create up to 15 codes, and time schedule within the codes are sent to the <strong>iTDC</strong> for<br />
activation. Setup the time schedule needed.<br />
• Start<br />
Click Access Control Management->Time Schedule List or press shortcut key F4.<br />
• Find<br />
Find is used to get relevant information pertaining to the inquiry when information is available. It is<br />
used to modify and delete the existing data information.<br />
1) Input Timeschedule Code and Timeschedule Name as appropriate.<br />
2) Click Find to make an inquiry. If inquired result is available, the following screen appears.<br />
• Add<br />
Add is used to create fresh data. Click Add button to add Timeschedule through input screen.<br />
107
<strong>STARWATCH</strong> ITDC <strong>PRO</strong> I<br />
1) The following screen appears after clicking Add.<br />
2) Select Timeschedule Code. It will display only the registered codes. Use one of the 15 codes.<br />
3) Input Timeschedule Name<br />
4) Select Timeschedule Code to apply to each day.<br />
5) Select Holiday Code to apply holiday, and if not used select Not Use. If Holiday Code was<br />
selected, Timeschedule Code for holiday needs to be selected.<br />
Selecting the Timeschedule Code will display at the bottom screen location, current selected time<br />
range in hour format.<br />
108
<strong>STARWATCH</strong> ITDC <strong>PRO</strong> I<br />
6) Click Save button to save.<br />
7) Click Transmit button. This will send the selected data to the corresponding Panel No for<br />
application.<br />
8) Click Close button to finish.<br />
• Modify<br />
Modify is used to change existing data inputted. Find data to modify or to change registered<br />
content category.<br />
Selected data is displayed as below figure in highlighted blue bar.<br />
1) Click Modify to see the following screen. The Timeschedule List screen is equal to registration<br />
screen. Timeschedule Code cannot be changed.<br />
109
<strong>STARWATCH</strong> ITDC <strong>PRO</strong> I<br />
2) Modify the items to be changed.<br />
3) Click Save button to save data.<br />
4) Click Transmit button to send the selected data to the corresponding Panel No for application.<br />
5) Click Close button to finish.<br />
• Delete<br />
Delete is used to delete existing inputted data. Find data to delete or to delete registered content<br />
list data.<br />
Selected data is displayed as below figure in highlighted blue bar.<br />
110
<strong>STARWATCH</strong> ITDC <strong>PRO</strong> I<br />
1) Click Delete button. The screen below will appear. Click Yes button to delete or No button to<br />
cancel.<br />
• Transmit<br />
This function is used to send the setup functions to the <strong>iTDC</strong> device for activation. Use Find to<br />
search for data transmit or select the data from the registered reader categories to send.<br />
Selected data is displayed as below figure in highlighted blue bar.<br />
111
<strong>STARWATCH</strong> ITDC <strong>PRO</strong> I<br />
1) Click Transmit button. This will send the selected data to the corresponding Timeschedule Code<br />
for application.<br />
During transmit, if errors do not occur, there are no messages. This means the transmit was<br />
completed without disruption. If an error does occur, detailed explanation is displayed in a<br />
message box.<br />
In this case, retransmit the data, but if the error continues, check the communication and<br />
<strong>iTDC</strong> panel for problems.<br />
Access Group Definition<br />
When multiple units of <strong>iTDC</strong> are operated, by using each access door connected to the system, you<br />
can create Access Group to register user in a group type to control access area as a whole or control<br />
as is.<br />
• Start<br />
Click Access Control Management->Access Right List or press shortcut key F5.<br />
• Find<br />
Find is used to get relevant information pertaining to the inquiry when information is available. It is<br />
used to modify and delete the existing data information.<br />
112
<strong>STARWATCH</strong> ITDC <strong>PRO</strong> I<br />
1) Input Group Code and Group Name as appropriate.<br />
2) Click Find to make an inquiry. If inquired result is available, the following screen appears.<br />
• Add<br />
Add is used to create fresh data. Click Add button to add Access Group through input screen.<br />
1) The following screen appears after clicking Add.<br />
113
<strong>STARWATCH</strong> ITDC <strong>PRO</strong> I<br />
2) Input Access Group Code. Do not overlap this code.<br />
3) Input Access Group Name.<br />
4) Select Timeschedule to apply.<br />
5) Double click the Access Door from Available Access Door List, or click >> button to register and<br />
apply corresponding Timeschedule.<br />
Here the Timeschedule and Access Door work as a team to setup Access Group. This<br />
means the access door and setup Timeschedule correspond to using the setup access door.<br />
6) Repeat the above method to register additional Access Group.<br />
Cancel Access Door by double clicking on selected door or click
<strong>STARWATCH</strong> ITDC <strong>PRO</strong> I<br />
7) Click Save button to save data, and click Close button to finish.<br />
• Modify<br />
Modify is used to change existing data inputted. Find data to modify or to change registered<br />
group category.<br />
Selected data is displayed as below figure in highlighted blue bar.<br />
1) Click Modify to see the following screen. The Access Group is equal to registration screen.<br />
Therefore, the Access Group Code cannot be changed.<br />
2) Modify the items that need changing.<br />
3) Click Save button to save the modified information. Click Close button to finish.<br />
• Delete<br />
Delete is used to delete existing inputted data. Find data to delete or to delete registered content<br />
data.<br />
115
<strong>STARWATCH</strong> ITDC <strong>PRO</strong> I<br />
Selected data is displayed as below figure in highlighted blue bar.<br />
1) Click Delete button. The screen below will appear. Click Yes button to delete or No button to<br />
cancel.<br />
Card Holder Management<br />
This function registers user ID card. Also basic personal data is inputted to approve ID card, and<br />
related data is displayed and used as Find/Output data. At the time of registration, Access Group and<br />
Time Attendance is setup also.<br />
• Start<br />
Click Access Control Management->Card Holder Management or press shortcut key F6.<br />
• Find<br />
Find is used to get relevant information pertaining to the inquiry when information is available. It is<br />
used to edit and delete the existing data information.<br />
116
<strong>STARWATCH</strong> ITDC <strong>PRO</strong> I<br />
1) Click Delete button. The screen will appear. Click Yes button to delete or No button to cancel.<br />
2) Input Company, Employee No, Name, and Card No as appropriate.<br />
3) Select Sort By and Sort Order.<br />
4) Click Find to make an inquiry. If inquired result is available, the screen appears.<br />
• Add<br />
Add is used to create fresh data. Click Add button to add user data through input screen.<br />
1) The following screen appears after clicking Add.<br />
117
<strong>STARWATCH</strong> ITDC <strong>PRO</strong> I<br />
2) Input Employee No, Name, and Card No. This input is a requirement. Card No is the ID number,<br />
and depending on card type, the digits range from 8-10.<br />
Employee No must not overlap. It is used as a key to identify user.<br />
Input 4 digits Password if using card+pw to authenticate. If you do not input a password, the<br />
default value of 0000 is setup.<br />
3) Input user’s detailed information as basic data.<br />
4) Input Issuing and Expire date. Putting a check mark on Auto Delete on Expired Date will delete<br />
the corresponding ID number.<br />
This software has the function of auto-deletion of ID number at the expiration date by<br />
transferring deletion order through communication after check expiration date in S/W. Namely<br />
it is processed only in case that program is being operated normally.<br />
But even though that program was ended, when it is operated again, registered persons who<br />
expiry date is set at former date than the date of PC and auto-deletion is checked are deleted<br />
automatically.<br />
In case that communication error is occurred, it may not be processed automatically, for that<br />
this function is done through the communication of program.<br />
5) Click Access Right tab.<br />
This is used to limit the access area on the user by selecting placed Access Group or selecting<br />
Individual Access Door to limit the access area.<br />
118
<strong>STARWATCH</strong> ITDC <strong>PRO</strong> I<br />
In case that you limit the access through defined access group, choose defined access group<br />
and choose access group at the lower part. Then access door list is included in access group<br />
is indicated at the bottom.<br />
The setting of Individual access doors can be used at the access group setting mode in case<br />
that proper access group is not existed, or in case that you want to make and set the access<br />
group directly. In this case select setting of individual access doors and select the time<br />
schedule in the same method with access group setting, after that, double click door is<br />
admitted working together this time schedule..<br />
2) Select Time & Attendance tab.<br />
This is used to apply Time & Attendance by input of corresponding data. Refer to chapter 6<br />
<strong>STARWATCH</strong> <strong>iTDC</strong> <strong>PRO</strong> I Time Attendance for detailed information.<br />
119
<strong>STARWATCH</strong> ITDC <strong>PRO</strong> I<br />
Input Date Employed. Input Retirement Date if that is the case. For a user who is retired, cancel<br />
the time attendance by removing check mark in Apply Time & Attendance. This option<br />
determines whether or not data is created.<br />
If selecting Apply Time & Attendance, user needs to select Work Time and Work Holiday.<br />
Work Time is applied per individual by using the Work Code setup.<br />
Work Holiday is applied per individual to calculate attendance on a holiday work.<br />
Work Time and Work Holiday needs to be setup initially through work in registration and work<br />
holiday registration.<br />
Refer to chapter 6 <strong>STARWATCH</strong> <strong>iTDC</strong> <strong>PRO</strong> I Time and Attendance regarding setup for Work<br />
Time and Work Holiday.<br />
Click Save button to save data.<br />
Click Transmit button. This will send the selected data to the system for application.<br />
When it is transmitted, ID is registered only at admitted area as following the setting of access<br />
group. So if a lot of access areas are exited, it might take some time for transportation of data.<br />
And that in case of communication defect, transmission error or delay of time can be<br />
happened.<br />
And when the data is being transmitted, transmission status is indicated in the middle of<br />
screen.<br />
This function will be operated only for normal communication status so that if the<br />
communication is lost, then this function will not be operated properly.<br />
120
• Modify<br />
<strong>STARWATCH</strong> ITDC <strong>PRO</strong> I<br />
Modify is used to change existing data inputted. Find data to modify or to change registered<br />
content list.<br />
Selected data is displayed as below figure in highlighted blue bar.<br />
1) Click Modify to see the following screen. The screen is equal to registration screen. Therefore,<br />
the Employee No cannot be changed.<br />
2) Modify items to change. Modify Detailed Information, Access Right, and Time & Attendance.<br />
121
3) Click Save button to save data.<br />
<strong>STARWATCH</strong> ITDC <strong>PRO</strong> I<br />
4) Click Close button to finish.<br />
If card no or access group data was modified, you need to retransmit the data.<br />
• Delete<br />
Delete is used to delete existing inputted data. Find data to delete or to delete registered content<br />
list data.<br />
Selected data is displayed as below figure in highlighted blue bar.<br />
1) Click Delete button. The screen below will appear. Click Yes button to delete or No button to<br />
cancel.<br />
2) Clicking Yes button will delete all ID cards in <strong>iTDC</strong> device. Once completed, it will ask the user if<br />
the current data is going to be deleted from database in a message box.<br />
Clicking Yes will delete from database, and registered into Delete Management to be restored<br />
later.<br />
122
<strong>STARWATCH</strong> ITDC <strong>PRO</strong> I<br />
3) Click Close button to finish.<br />
• Individual Transmit<br />
This function transmits the selected data to the <strong>iTDC</strong> device, and activates the setup functions.<br />
<strong>User</strong> is selected from the corresponding access group to be sent to the registered access door.<br />
• Batch Transmit<br />
This transmits the entire data through Find in means of Find Condition to the <strong>iTDC</strong>. If find has no<br />
specific parameters, it will display the entire information. In this case, clicking Batch Transmit will<br />
send entire registered data, but if specific parameter is used to Find, it sends the found result<br />
completely.<br />
123
<strong>STARWATCH</strong> ITDC <strong>PRO</strong> I<br />
Deleted Card Management<br />
This function lets the user manage the deleted data from <strong>User</strong> Contents. If later on the deleted user is<br />
to be reinstated, this function recovers the data to register user without having to input all over again.<br />
• Start<br />
Click Access Control Management->Deleted Card Management or press shortcut key F7.<br />
• Find<br />
Find is used to get relevant information pertaining to the inquiry when information is available.<br />
124
<strong>STARWATCH</strong> ITDC <strong>PRO</strong> I<br />
1) Input Company, Employee No, Name, and Card No as appropriate.<br />
2) Select Sort By and Sort Order.<br />
3) Click Find to make an inquiry. If inquired result is available, the screen appears.<br />
• Recover<br />
This is used to recover delete user data. Use Find to locate or registered deleted user content to<br />
select data for recovery.<br />
Selected data is displayed as below figure in highlighted blue bar.<br />
125
<strong>STARWATCH</strong> ITDC <strong>PRO</strong> I<br />
1) Select data to recover from Find or Contents.<br />
2) Click Recover button to begin.<br />
• Delete<br />
Delete is used to delete existing inputted data. Find data to delete or to delete registered content<br />
list data.<br />
Selected data is displayed as below figure in highlighted blue bar.<br />
1) Click Delete button. The screen below will appear. Click Yes button to delete or No button to<br />
cancel.<br />
126
<strong>STARWATCH</strong> ITDC <strong>PRO</strong> I<br />
Visitor Management<br />
This function manages visitor access by means of temporary visit registration. The visitor is<br />
issued a card with setup of access area, and expires the access with input of Expire date<br />
automatically.<br />
• Start<br />
Click Access Control Management->Visitor Management or press shortcut key F8.<br />
• Find<br />
Find is used to get relevant information pertaining to the inquiry when information is available. It is<br />
used to edit and delete the existing data information.<br />
1) Input Company, Name, Telephone No, and Card No as appropriate.<br />
2) Select Sort By and Sort Order.<br />
3) Click Find to make an inquiry. If inquired result is available, the screen appears.<br />
• Add<br />
Add is used to create fresh data. Click Add button to add visitor information through input screen.<br />
127
<strong>STARWATCH</strong> ITDC <strong>PRO</strong> I<br />
1) The following screen appears after clicking Add.<br />
2) Input Company, Name, and Card No. This input is a requirement and must be done.<br />
3) Input visitor information.<br />
4) Setup Issuing Date and Expire Date. Expire Date activates the automatic deletion of visitor ID.<br />
This means if the Expire Date matches the current PC time, the ID is automatically deleted from<br />
the device through communication.<br />
128
<strong>STARWATCH</strong> ITDC <strong>PRO</strong> I<br />
The function of auto-deletion of ID number at the expiration date is transferred deletion order<br />
through communication after check expiration date in S/W. Namely it is processed only in<br />
case that program is being operated normally.<br />
This function will be operated only for normal communication status so that if the<br />
communication is lost, then this function will not be operated properly.<br />
3) Setup visitor access area. Select from the Access Group already in place. This function needs to<br />
be registered initially.<br />
5) Click Save button to save.<br />
6) Click Transmit to register the ID to <strong>iTDC</strong>.<br />
7) Click Close button to finish.<br />
• Modify<br />
Modify is used to change existing data inputted. Find data to modify or to change registered<br />
content category.<br />
Selected data is displayed as below figure in highlighted blue bar.<br />
1) Click Modify to see the following screen. The Visitor Management Modify is equal to registration<br />
screen. Therefore, Company and Name cannot be changed.<br />
129
<strong>STARWATCH</strong> ITDC <strong>PRO</strong> I<br />
2) Modify data. You must Transmit, if Card No and Access Group is changed.<br />
3) Click Save and Transmit button.<br />
4) Click Close button to finish.<br />
• Delete<br />
Delete is used to delete existing inputted data. Find data to delete or to delete registered content<br />
data.<br />
Selected data is displayed as below figure in highlighted blue bar.<br />
130
<strong>STARWATCH</strong> ITDC <strong>PRO</strong> I<br />
1) Click Delete button. The screen below will appear. Click Yes button to delete or No button to<br />
cancel.<br />
• Transmit<br />
This function is used to send the setup functions to the <strong>iTDC</strong> device for activation. Use Find to<br />
search for data transmit or select the data from the registered reader categories to send.<br />
Selected data is displayed as below figure in highlighted blue bar.<br />
131
<strong>STARWATCH</strong> ITDC <strong>PRO</strong> I<br />
1) Select from Visitor List.<br />
2) Click Transmit.<br />
3) Click Close to finish.<br />
View<br />
Access Door Status/Control<br />
This function lets the user monitor access door status in real time. The icon status changes displaying<br />
in real time (Door Open, Door Closed, Lock, and Unlock)<br />
Also, the user can control Lock, Unlock of access door by location of (entire, area type, floor type,<br />
individual type door)<br />
• Start<br />
Click View->Door Status/Control or press shortcut key Ctrl+F1.<br />
• Control<br />
This is used to control door of (entire, area type, floor type, individual type door)<br />
‣ Lock (Entire): Entire doors are locked.<br />
‣ Unlock (Entire): Entire doors are unlocked.<br />
‣ Lock (Area): Selected area doors are all locked.<br />
132
‣ Unlock (Area): Selected area doors are all unlocked.<br />
<strong>STARWATCH</strong> ITDC <strong>PRO</strong> I<br />
‣ Lock (Floor): Selected Floor doors are all locked.<br />
‣ Unlock (Floor): Selected Floor doors are all unlocked.<br />
Access door<br />
control buttons<br />
The status of all access doors is<br />
showed as text. Able to control each<br />
door, once you click right button of<br />
mouse at access door.<br />
Access doors included appropriate area or floor<br />
as following the condition of area and/or floor are<br />
indicated. Or the change of icon shows visually<br />
as following the status of doors.<br />
Able to control each door, once you click right<br />
button of mouse at access door.<br />
‣ Lock : Selected door is locked.<br />
‣ Unlock: Selected door is unlocked.<br />
‣ 3 sec Unlock: Selected door is unlocked for 3 sec.<br />
‣ 5 sec Unlock: Selected door is unlocked for 5 sec.<br />
‣ 10 sec Unlock: Selected door is unlocked for 10 sec.<br />
133
<strong>STARWATCH</strong> ITDC <strong>PRO</strong> I<br />
Transaction Status<br />
This function displays normal and alarm events when an event occurs. It lets the user check in real<br />
time the event status.<br />
• Start<br />
Click View->Event Status or press shortcut key Ctrl+F2.<br />
• Event Status<br />
This displays normal access events.<br />
• Alarm Status<br />
134
<strong>STARWATCH</strong> ITDC <strong>PRO</strong> I<br />
This displays various alarm events. It shows user misregistration event, timeschedule error, and<br />
other input/output events.<br />
Also, in the event of an alarm, there is an Admin acknowledgement function. <strong>User</strong> needs to<br />
acknowledge alarm status. If the alarm event was not checked, it will load into the alarm status<br />
when program is rebooted.<br />
The number of alarm status loaded into the program is 3000 listing the current as standard. If<br />
the user does not check the alarm status when reaching this limit, the alarm status will not<br />
display again.<br />
‣ Ack All: Acknowledge all alarm events currently displayed.<br />
‣ Ack : Acknowledge alarm event selected with a mouse.<br />
‣ Alarm Details: Acknowledge alarm event selected with a mouse can input details with<br />
Operator Comments. Once the alarm details are completed, click Ack button to acknowledge.<br />
135
<strong>STARWATCH</strong> ITDC <strong>PRO</strong> I<br />
Alarm Status is displayed in various colors depending on alarm event type. Also, when the<br />
Admin acknowledges an alarm event, the event is displayed in black to check whether or not<br />
the alarm event was acknowledged.<br />
Report<br />
Card Holder List Report<br />
The registered user status in Card Holder Management can be outputted.<br />
• Start<br />
Click Report->Card Holder List or press shortcut key Ctrl+F4.<br />
• Print<br />
This function uses registered Card Holder data as basis to print Card Holder contents in<br />
agreement to Find Condition.<br />
1) Select Report Type.<br />
Door Access Reports simply print employee’s number, name, company, department, title,<br />
and access group.<br />
Door Access Detail Reports print user’s personal information and their photo images. (It<br />
causes system overload if access data has many lists with photo images to print them out or<br />
pre-vie.<br />
136
<strong>STARWATCH</strong> ITDC <strong>PRO</strong> I<br />
2) Input Company, Employee No, Name, and Card No as appropriate.<br />
3) Select Sort By and Sort Order.<br />
4) Click Print button. If data is found, it will display how it will look when printed. The following<br />
screen will appear.<br />
Card Holder Report<br />
Card Holder Report(Detail)<br />
4) To obtain print out of this screen, click the Print button located in the top left hand side.<br />
• File Conversion<br />
137
<strong>STARWATCH</strong> ITDC <strong>PRO</strong> I<br />
All reports can be converted to variety of files. It can be converted to PDF, HTML, and Excel file.<br />
These converted files can be sent out via Internet and email to another person.<br />
<br />
<br />
Export To Excel: Excel report file is created as appearing in print image.<br />
Export To HTML: HTML report file is created as appearing in print image.<br />
Export To PDF: PDF report file is created as appearing in print image. You will need<br />
Adobe Acrobat Reader to view the PDF file.<br />
1) Click the button for the type of file conversion.<br />
2) The following screen will appear. Input the file name and designate a folder location.<br />
3) Click Save button. Depending on file conversion type, it may take some time to complete.<br />
138
<strong>STARWATCH</strong> ITDC <strong>PRO</strong> I<br />
There are instances where it may take some time for the procedure to complete, depending<br />
on conversion file type and number of pages.<br />
PDF and Excel file conversion takes some time. You will need to wait until the mouse’s<br />
cursor hourglass display is finished.<br />
4) Once conversion is completed, you can open the converted file to check file image.<br />
Opened converted to Excel file<br />
Opened converted to HTML<br />
file<br />
139
<strong>STARWATCH</strong> ITDC <strong>PRO</strong> I<br />
Opened converted to PDF file<br />
• Export<br />
This function is used to export specified file through Find data for storage.<br />
Clicking Export button can store data from Find in text and Excel file.<br />
1) Input Search Condition.<br />
2) Click Export button, and the following screen appears.<br />
140
<strong>STARWATCH</strong> ITDC <strong>PRO</strong> I<br />
3) Input file location, name, and select file format. Click Save button to save.<br />
Export in Excel format<br />
141
<strong>STARWATCH</strong> ITDC <strong>PRO</strong> I<br />
Export in Excel format<br />
Delete Card Holder Report<br />
The reports from deleted card holder in Card Holder Management are searched and printed. It<br />
searches and prints data registered in Delete Management.<br />
• Start<br />
Click Report->Deleted Card Holder List Report or press shortcut key Ctrl+F5.<br />
• Print<br />
This function prints the report of Deleted Card Holder List in agreement with registered deleted<br />
card holder data.<br />
142
<strong>STARWATCH</strong> ITDC <strong>PRO</strong> I<br />
1) Input Company, Employee No, Name, and Card No as appropriate.<br />
2) Select Sort By and Sort Order.<br />
3) Click Print button. If data is found, it will display how it will look when printed. The following<br />
screen will appear.<br />
4) To obtain print out of this screen, click the Print button located in the top left hand side.<br />
• Export and Conversion<br />
143
Event History Report<br />
<strong>STARWATCH</strong> ITDC <strong>PRO</strong> I<br />
These functions are used identically to methods explained formerly.<br />
This report is searched as normal access event data of date and time. This data prints out all users’<br />
access record through search. Use appropriate condition to search and print.<br />
• Start<br />
Click Report->Event History Report or press shortcut key Ctrl+F6.<br />
• Print<br />
This function prints the report of stored access status data in agreement with search data.<br />
1) Input Date (From), Date (To), and time period for each date.<br />
2) Select other items as appropriate.<br />
3) Click Print button. If data is found, it will display how it will look when printed. The following<br />
screen will appear.<br />
144
<strong>STARWATCH</strong> ITDC <strong>PRO</strong> I<br />
4) To obtain print out of this screen, click the Print button located in the top left hand side.<br />
Alarm History Report<br />
This report searches and prints alarm event data. All data related to alarm events are stored in<br />
database. Using date and time as Find Condition, the alarm event status is searched and printed.<br />
• Start<br />
Click Report->Alarm History Report or press shortcut key Ctrl+F7.<br />
• Print<br />
This function prints the report of stored alarm status data in agreement with search data.<br />
145
<strong>STARWATCH</strong> ITDC <strong>PRO</strong> I<br />
1) Input Date (From), Date (To), and time period for each date.<br />
2) Select other items as appropriate.<br />
3) Click Print button. If data is found, it will display how it will look when printed. The following<br />
screen will appear.<br />
4) To obtain print out of this screen, click the Print button located in the top left hand side.<br />
146
Individual Type Access Door Report<br />
<strong>STARWATCH</strong> ITDC <strong>PRO</strong> I<br />
This report uses setup Access Group data in Card Holder Registration, as basis to print out data of<br />
individual type access area/door status setup.<br />
• Start<br />
Click Report->Individual Type Access Door Report or press shortcut key Ctrl+F8.<br />
• Print<br />
It will print out Accessible Door List By Person.<br />
1) Input Date (From), Date (To), and time period for each date.<br />
2) Select other items as appropriate.<br />
3) Select Report Type.<br />
Defined Access Group & Individual Access Group report consists of designate access group<br />
setup data and individual door type list setup.<br />
Defined Access Group Only report consists of designate access group setup data.<br />
Individual Access Group Only report consists of individual door type list setup.<br />
4) Click Print button. If data is found, it will display how it will look when printed. The following<br />
screen will appear.<br />
147
<strong>STARWATCH</strong> ITDC <strong>PRO</strong> I<br />
5) To obtain print out of this screen, click the Print button located in the top left hand side.<br />
Accessible Door List by Person Report<br />
This report uses Accessible Door as basis to search and print out corresponding access door applied<br />
to give user authority.<br />
• Start<br />
Click Report->Accessible Door List by Person or press shortcut key Ctrl+F9.<br />
• Print<br />
It will print out Accessible Door List by Person.<br />
148
<strong>STARWATCH</strong> ITDC <strong>PRO</strong> I<br />
1) Input Date (From), Date (To), and time period for each date.<br />
2) Select other items as appropriate.<br />
3) Click Print button. If data is found, it will display how it will look when printed. The following<br />
screen will appear.<br />
4) To obtain print out of this screen, click the Print button located in the top left hand side.<br />
149
Visitor Event List<br />
<strong>STARWATCH</strong> ITDC <strong>PRO</strong> I<br />
This function searches and prints registered visitors’ access event status data. This data is stored in<br />
database and the user search and print this data using date and time as basis.<br />
• Start<br />
Click Report->Visitor Event List or press shortcut key Ctrl+F11.<br />
• Print<br />
It will print out Visitor Event List.<br />
1) Input Date(From), Date (To), and time period for each date.<br />
2) Select other items as appropriate.<br />
3) Click Print button. If data is found, it will display how it will look when printed. The following<br />
screen will appear.<br />
150
<strong>STARWATCH</strong> ITDC <strong>PRO</strong> I<br />
4) To obtain print out of this screen, click the Print button located in the top left hand side.<br />
Last Access Event Report<br />
This report is based on Last Access Event data to locate the current site the user is at, using the event<br />
occurrence data to search and print out.<br />
This data when used with <strong>iTDC</strong> device Antipassback function can create accurate data, but if<br />
Antipassback is not used, the resulting data cannot be seen as accurate.<br />
• Start<br />
Click Report->Last Access Event Report or press shortcut key Ctrl+F12.<br />
• Print<br />
It will print out Last Access Event Report.<br />
151
<strong>STARWATCH</strong> ITDC <strong>PRO</strong> I<br />
1) Input Date (From), Date (To), and time period for each date.<br />
2) Select other items as appropriate.<br />
3) Click Print button. If data is found, it will display how it will look when printed. The following<br />
screen will appear.<br />
4) To obtain print out of this screen, click the Print button located in the top left hand side.<br />
152
Chapter<br />
7 Time / Attendance<br />
<strong>STARWATCH</strong> ITDC <strong>PRO</strong> I<br />
<strong>STARWATCH</strong> <strong>iTDC</strong> <strong>PRO</strong> I Time/Attendance<br />
This chapter explains <strong>STARWATCH</strong> <strong>iTDC</strong> <strong>PRO</strong> I Time/Attendance in detailed use<br />
instruction.<br />
Time/Attendance<br />
Time/Attendance contains basic data configuration to create each individual time and attendance<br />
information. You can make inquiries to retrieve the information.<br />
You must configure this function to use Time/Attendance.<br />
Work Time Definition<br />
For Work Time Definition, work code is created to configure daily attendance, Saturday attendance,<br />
lunch hour, extension start hour, and next day standard hour.<br />
• Start<br />
Click Time/Attendance->Work Time Definition or press shortcut key Shift + F2.<br />
• Find<br />
Find is used to get relevant information pertaining to the inquiry when information is available. It is<br />
used to edit and delete the existing data information.<br />
1) Select the Work Time Code and input Work Time Name as appropriate.<br />
2) Click Find to make an inquiry. If inquired result is available, the following screen appears.<br />
153
• Add<br />
<strong>STARWATCH</strong> ITDC <strong>PRO</strong> I<br />
Add is used to create fresh data. Click Add button to add work time through input screen.<br />
1) The following screen appears after clicking Add.<br />
2) Input Work Time Code (It must not be duplicated)<br />
3) Input Work Time Name.<br />
4) Configure each Time.<br />
Configure Lunch Out/In time. This information will be used at monthly end category to deduct<br />
or include total time of lunch taken to calculate total hours worked.<br />
Overtime is described as work performed after end of work schedule.<br />
5) Once input is completed, click Save button to save data.<br />
154
6) Click Close button to finish.<br />
<strong>STARWATCH</strong> ITDC <strong>PRO</strong> I<br />
• Modify<br />
Modify is used to change existing data inputted. Find data to modify or to change registered work<br />
time category.<br />
Selected data is displayed as below figure in highlighted blue bar.<br />
1) Click Modify to see the above screen. The Work Time List is equal to registration screen.<br />
Therefore, the Work Time Code cannot be changed.<br />
2) Modify the items that need changing.<br />
3) Click Save button to save the modified information. Click Close button to finish.<br />
• Delete<br />
Delete is used to delete existing inputted data. Find data to delete or to delete registered port list<br />
data.<br />
Selected data is displayed as below figure in highlighted blue bar.<br />
155
<strong>STARWATCH</strong> ITDC <strong>PRO</strong> I<br />
4) Click Delete button. The screen below will appear. Click Yes button to delete or No button to<br />
cancel.<br />
Work Holiday Definition<br />
Work Holiday Definition function configures work holiday to exclude from total attendance calculation.<br />
• Start<br />
Click Time/Attendance->Work Holiday Definition or press shortcut key Shift+F3.<br />
• Find<br />
Find is used to get relevant information pertaining to the inquiry when information is available. It is<br />
used to modify and delete the existing data information.<br />
156
<strong>STARWATCH</strong> ITDC <strong>PRO</strong> I<br />
1) Select the appropriate Holiday Code and Holiday Name.<br />
2) Click Find to make an inquiry. If inquired result is available, the following screen appears.<br />
• Add<br />
Add is used to create fresh data. Click Add button to add work holiday through input screen.<br />
1) The following screen appears after clicking Add.<br />
157
<strong>STARWATCH</strong> ITDC <strong>PRO</strong> I<br />
2) Input Work Holiday Code. (It must not be duplicated)<br />
3) Input Work Holiday Name.<br />
4) Input Work Holiday Date Name.<br />
5) Click the work holiday date twice or select the date then press >> button.<br />
6) From the Selected Work Holiday Date list, delete the date by double clicking or selecting date and<br />
clicking
<strong>STARWATCH</strong> ITDC <strong>PRO</strong> I<br />
Modify is used to change existing data inputted. Find data to modify or to change registered work<br />
holiday category.<br />
Selected data is displayed as below figure in highlighted blue bar.<br />
1) Click Modify button.<br />
2) Click Modify to see the following screen. The Work Holiday screen is equal to registration screen.<br />
Therefore, the Work Holiday Code cannot be changed, except the holiday date included in selected<br />
holiday code.<br />
Modify the items to be changed.<br />
3) Click Save button to save data, and click Close button to finish.<br />
• Delete<br />
159
<strong>STARWATCH</strong> ITDC <strong>PRO</strong> I<br />
Delete is used to delete existing inputted data. Find data to delete or to delete registered work<br />
holiday list data.<br />
Selected data is displayed as below figure in highlighted blue bar.<br />
.<br />
1) Click Delete button. The screen below will appear. Click Yes button to delete or No button to<br />
cancel.<br />
Work Type Definition<br />
Work Type Definition configures late, leaving early, absence, business trip into work type code.<br />
• Start<br />
Click Time/Attendance->Work Type Definition or press shortcut key Shift+F4.<br />
• Find<br />
Find is used to get relevant information pertaining to the inquiry when information is available. It is<br />
used to modify and delete the existing data information.<br />
160
<strong>STARWATCH</strong> ITDC <strong>PRO</strong> I<br />
1) Select the appropriate Work Type Code and Work Type Name.<br />
2) Click Find to make an inquiry. If inquired result is available, the following screen appears.<br />
If find has no specific parameters, it will display the entire information.<br />
• Add<br />
Add is used to create fresh data. Click Add button to add work type data through input screen.<br />
1) Click Add button, and the following screen appear.<br />
161
<strong>STARWATCH</strong> ITDC <strong>PRO</strong> I<br />
2) Input Work Type Code.<br />
3) Input Work Type Name.<br />
4) Click Save button to save data.<br />
5) Click Close button to finish.<br />
• Modify<br />
Modify is used to change existing data inputted. Find data to modify or to change registered work<br />
type list.<br />
Selected data is displayed as below figure in highlighted blue bar.<br />
1) Click Modify to see the following screen. The Work Type Definition screen is equal to registration<br />
screen. Therefore, the Work Type Code cannot be changed.<br />
162
<strong>STARWATCH</strong> ITDC <strong>PRO</strong> I<br />
2) Modify Work Type Name.<br />
3) Click Save button to save data.<br />
4) Click Close button to finish.<br />
Work Type Code 01, 02, 03, and 04 is configured as default value for Normal, Late, Absence,<br />
and Holiday work. This value cannot be modified or deleted.<br />
• Delete<br />
Delete is used to delete existing inputted data. Find data to delete or to delete registered work<br />
holiday list data.<br />
Selected data is displayed as below figure in highlighted blue bar.<br />
1) Click Delete button. The screen below will appear. Click Yes button to delete or No button to<br />
cancel.<br />
163
Daily Data Management<br />
<strong>STARWATCH</strong> ITDC <strong>PRO</strong> I<br />
Daily Data Management creates data from individually configured work time and work holiday using<br />
present normal access event data. This is called daily end data.<br />
• Start<br />
Click Time/Attendance->Daily Data Management or press shortcut key Shift+F5.<br />
• Create Work Data<br />
Create Work Data creates data from individually configured work time and work holiday using<br />
normal access event data. The created data is differentiated from normal access event, and saved<br />
as a separate data.<br />
1) Select the From/To date for creating work data.<br />
164
<strong>STARWATCH</strong> ITDC <strong>PRO</strong> I<br />
2) Click Create Data button to begin work data.<br />
If there is no data, it will display a message as no data. If there is data, a progress bar is shown in<br />
relation to data creation progress.<br />
3) Once completed, click OK button to finish data creation.<br />
• Find Daily Work Data<br />
Find Daily Work Data is used to get relevant information pertaining to the inquiry when information<br />
is available. It is used to modify existing data information to send out, or when incorrect attendance<br />
data is found.<br />
165
<strong>STARWATCH</strong> ITDC <strong>PRO</strong> I<br />
1) Select the From/To date for creating work data.<br />
2) Sort by date, company, department, employee ID, name, and attendance type as appropriate.<br />
3) Select view format.<br />
4) Select as View Minute or View Hour to see late, absence, overtime, and special duty by attendance<br />
type.<br />
5) Click Find to make inquiry. If result is found, the data is displayed.<br />
166
• Abnormal Attendance Data Modification<br />
<strong>STARWATCH</strong> ITDC <strong>PRO</strong> I<br />
After performing work data, you can check the daily attendance result by inquiry. If modification is<br />
needed, double click the result to open the modification screen.<br />
Click the data to be modified with double click<br />
1) Click the data to be modified with 2 clicks on a mouse. It will activate the screen below.<br />
2) Entry Date, Employee ID, and Name cannot be modified. Work In Date/Time, Work Out Date/Time,<br />
Late, Early Leave, Overtime, Extra Time, and Work Type can be modified.<br />
3) If No Update is selected, the work data performed once more will not update the modified data.<br />
4) If modification is completed, click Save button to save data.<br />
167
5) Click Close button to finish.<br />
<strong>STARWATCH</strong> ITDC <strong>PRO</strong> I<br />
If the work-closing will be updated, event data is resorted by time & attendance setting value.<br />
But this will be available to update for event data when the modification date is the same of<br />
original entry date, otherwise it can not be update if the user check for invalid update when the<br />
all data closing.<br />
If modifying attendance data, you need to find the data results in minutes. Otherwise, the data<br />
results in hour cannot be modified. Find the data results in minutes to allow modification to the<br />
attendance data.<br />
Monthly work data uses Daily work data as basis. If daily work data is modified, it will reflect to<br />
monthly work data.<br />
• Export<br />
This function sends out work data as text file or Excel file format. The files exported can be used in<br />
other attendance and wage programs, or connected to an ERP system to be used efficiently.<br />
1) Click Find button to make inquiry.<br />
2) Click Export button, and the following screen appears.<br />
168
<strong>STARWATCH</strong> ITDC <strong>PRO</strong> I<br />
3) Designate folder to save into.<br />
4) Input file format.<br />
5) Select text file or Excel file for export format.<br />
6) Click Save button to save file.<br />
If text file is selected for export, the following screen appears.<br />
169
<strong>STARWATCH</strong> ITDC <strong>PRO</strong> I<br />
Monthly Data Management<br />
Monthly Data Management uses work data as basis to get total of individual type monthly attendance<br />
data.<br />
• Start<br />
Click Time/Attendance->Monthly Data Management or press shortcut key Shift+F6.<br />
• Create Data<br />
Work data is used as basis to create Monthly Work Data. Work data’s monthly total data is created<br />
by individual type monthly total data.<br />
1) Select Monthly Work Data. This data is calculated using time attendance option configuration as<br />
basis. If configuring date as 25 th end date, it will calculate from last month 26 th up to selected month<br />
of 25 th as end date.<br />
2) Click Create Data button begin data creation.<br />
170
<strong>STARWATCH</strong> ITDC <strong>PRO</strong> I<br />
• Find Monthly Work Data<br />
This is used to find data created in Monthly Work Data.<br />
1) Select Month, Company, Department, Employee ID, and Name as appropriate.<br />
2) Select view option as View Minute or View Hour.<br />
3) Click Find button to begin Monthly Work Data inquiry. If data is found, it will display in the screen.<br />
171
<strong>STARWATCH</strong> ITDC <strong>PRO</strong> I<br />
• Exporting Monthly Work Data<br />
Monthly Work Data can be exported in same manner as Work Data. It can be sent as text file or<br />
Excel file to be used in other programs.<br />
Yearly Data Management<br />
Yearly Data Management uses Monthly Data as basis to calculate total annual time attendance data for<br />
data creation. Data to be created is agreed with Monthly Data.<br />
• Start<br />
Click Time/Attendance->Yearly Work Data or press shortcut key Shift+F7.<br />
• Create Data<br />
Monthly data is used as basis for selected year’s monthly total data to create time attendance data.<br />
172
<strong>STARWATCH</strong> ITDC <strong>PRO</strong> I<br />
1) Select Year for yearly data.<br />
2) Click Create Data button to begin yearly work data creation.<br />
• Find Yearly Work Data<br />
This finds the completed yearly work data through inquiry. It is used to check yearly work data or<br />
exporting the data.<br />
173
<strong>STARWATCH</strong> ITDC <strong>PRO</strong> I<br />
1) Select Year, Company, Department, Employee ID, and Name as appropriate.<br />
2) Select view option as View Minute or View Hour, then click Find button.<br />
If data is found, it will display as following screen.<br />
• Exporting Yearly Work Data<br />
Yearly Work Data can be exported in same manner as Work Data. It can be sent as text file or<br />
Excel file to be used in other programs.<br />
Attendance Report (Individual/Daily)<br />
Individual/Daily Report is outputted using work attendance data as basis. This report displays Start<br />
work, Finish work, Late, Leave, Absence, and abnormal attendance modified data.<br />
• Start<br />
Click Time/Attendance->Individual/Daily Report or press Shift + F8 on keyboard.<br />
• Find and Print<br />
Input Find Condition to print appropriate data. Input the conditions in the top part of screen, and<br />
how the report will be printed can be seen at the bottom part of screen.<br />
174
<strong>STARWATCH</strong> ITDC <strong>PRO</strong> I<br />
1) Select type of Attendance Report.<br />
Individual Attendance Report find is From/To date of individual type data. Daily Attendance<br />
Report find is From/To date of daily type data.<br />
2) Input Find Condition.<br />
3) Click Print button. If data is found, it will display how it will look when printed. The following screen<br />
will appear.<br />
Individual Attendance Report<br />
175
<strong>STARWATCH</strong> ITDC <strong>PRO</strong> I<br />
Daily Attendance Report<br />
4) To obtain print out of this screen, click the Print button located in the top left hand side.<br />
You can operate the buttons next to the Print to zoom, compress, view multiple pages, and other<br />
options through these icons.<br />
• File Conversion (Export)<br />
All reports can be converted to variety of files. It can be converted to PDF, HTML, and Excel file.<br />
These converted files can be sent out via Internet and email to another person.<br />
<br />
Export To Excel: Excel report file is created as appearing in print image.<br />
176
<strong>STARWATCH</strong> ITDC <strong>PRO</strong> I<br />
Export To HTML: HTML report file is created as appearing in print image.<br />
Export To PDF: PDF report file is created as appearing in print image. You will need<br />
Adobe Acrobat Reader to view the PDF file.<br />
1) Click the button for the type of file conversion.<br />
2) The following screen will appear. Input the file name and designate a folder location.<br />
3) Click Save button. Depending on file conversion type, it may take some time to complete.<br />
There are instances where it may take some time for the procedure to complete, depending on<br />
conversion file type and number of pages.<br />
PDF and Excel file conversion takes some time. You will need to wait until the mouse’s cursor<br />
hourglass display is finished.<br />
4) Once conversion is completed, you can open the converted file to check file image.<br />
177
<strong>STARWATCH</strong> ITDC <strong>PRO</strong> I<br />
Opened converted to Excel file<br />
Opened converted to HTML file<br />
178
<strong>STARWATCH</strong> ITDC <strong>PRO</strong> I<br />
Opened converted to PDF file<br />
Attendance Report (Monthly/Yearly)<br />
Monthly/Yearly report can be printed using Monthly Data and Yearly Data as basis. This report is total<br />
calculation of Monthly and Yearly work attendance data. Through detailed report, Monthly report can be<br />
checked by individual type of 1 month time attendance.<br />
• Start<br />
Click Time/Attendance->Report->Monthly/Yearly Report or press Shift + F9 on keyboard.<br />
• Find and Print<br />
Input Find Condition to print appropriate data. Input the conditions in the top part of screen, and<br />
how the report will be printed can be seen at the bottom part of screen.<br />
179
<strong>STARWATCH</strong> ITDC <strong>PRO</strong> I<br />
1) Select Attendance Report type.<br />
Monthly Attendance Report uses as basis Monthly Work Data to display monthly attendance by<br />
individual type. Monthly Attendance Report (Day by Day) displays one month attendance at<br />
once to check data.<br />
Yearly Attendance Report uses Yearly Work Data to display current time attendance, and the<br />
data is agreed with Monthly Attendance Report.<br />
2) Input Find Condition.<br />
3) Click Print button. If data is found, it will display how it will look when printed. The following screen<br />
will appear.<br />
180
<strong>STARWATCH</strong> ITDC <strong>PRO</strong> I<br />
Monthly Attendance Report<br />
Monthly Attendance Report (Day by Day)<br />
181
<strong>STARWATCH</strong> ITDC <strong>PRO</strong> I<br />
Yearly Attendance Report<br />
4) To obtain print out of this screen, click the Print button located in the top left hand side.<br />
You can operate the buttons next to the Print to zoom, compress, view multiple pages, and other<br />
options through these icons.<br />
• File Conversion (Export)<br />
All reports can be converted to variety of files. It can be converted to PDF, HTML, and Excel file.<br />
These converted files can be sent out via Internet and email to another person.<br />
<br />
Export To Excel: Excel report file is created as appearing in print image.<br />
182
<strong>STARWATCH</strong> ITDC <strong>PRO</strong> I<br />
Export To HTML: HTML report file is created as appearing in print image.<br />
Export To PDF: PDF report file is created as appearing in print image. You will need<br />
Adobe Acrobat Reader to view the PDF file.<br />
1) Click the button for the type of file conversion.<br />
2) The following screen will appear. Input the file name and designate a folder location.<br />
3) Click Save button. Depending on file conversion type, it may take some time to complete.<br />
There are instances where it may take some time for the procedure to complete, depending on<br />
conversion file type and number of pages.<br />
PDF and Excel file conversion takes some time. You will need to wait until the mouse’s cursor<br />
hourglass display is finished.<br />
Work Options<br />
In Work Options, you can configure selection of monthly data end of day, and decide whether the lunch<br />
hour will be excluded or included from total work hour.<br />
• Monthly Data End of Day<br />
Monthly Data End of Day describes the end of date for month.<br />
For example, if monthly data end of day is selected as 25 th end date, it will calculate from last month<br />
26 th up to selected month of 25 th as end date basis create this month data.<br />
If 0 is selected, the correlating month’s last date is automatically calculated.<br />
For example, if you calculate on March, will calculate from 1 March to 31 March using daily data .<br />
183
<strong>STARWATCH</strong> ITDC <strong>PRO</strong> I<br />
• Lunch Hour Exclude Configuration<br />
Configure whether lunch hour is included in total work hour.<br />
Select Except lunch time in Total Work Time, if lunch hour is excluded from total work time.<br />
Otherwise, do not select if including into total work hour.<br />
Click Save button to save time attendance option, then click Close button to finish.<br />
If Monthly Data End of Day is not configured, Monthly End is not activated.<br />
184
Chapter<br />
8<br />
<strong>STARWATCH</strong> ITDC <strong>PRO</strong> I<br />
<strong>STARWATCH</strong> <strong>iTDC</strong> <strong>PRO</strong> I<br />
TCP/IP Communication<br />
<strong>STARWATCH</strong> <strong>iTDC</strong> <strong>PRO</strong> I TCP/IP Communication<br />
This chapter explains TCP/IP communication explanation, along with detailed<br />
configuration instruction and usage with <strong>STARWATCH</strong> <strong>iTDC</strong> <strong>PRO</strong>.<br />
TCP/IP Communication<br />
TCP/IP communication takes place of existing serial communication, by using the already established<br />
network to communicate with the <strong>iTDC</strong> device and program.<br />
TCP/IP communication method supported by <strong>iTDC</strong> is divided into 2 main types. First, there is an internal<br />
module that can be used, and an external converter called Neteye1000S using TCP/IP.<br />
If using internal type, each <strong>iTDC</strong> panel needs one module and one fixed IP for communication. For instance,<br />
if using 10 <strong>iTDC</strong> panels to communicate, it needs 10 modules and 10 fixed IP.<br />
If using external type, Neteye1000S RS422 communication with TCP/IP communication from program to<br />
device can be networked. It can connect 32 <strong>iTDC</strong> panel devices via RS422 for operation. For instance, if<br />
using external type converter, each converter can connect 32 units (Optional 255 units). In this case, one<br />
fixed IP is needed for the external TCP/IP converter.<br />
In Usage Case of External TCP/IP converter<br />
If using external converter, it can connect up to a maximum of 32 <strong>iTDC</strong> panel units. In this case, the<br />
communication must be connected via RS422 method. You can use RS232 or RS422 if external converter<br />
has only 1 unit of <strong>iTDC</strong> connected. If this is the case, it is more convenient to use the internal module<br />
instead.<br />
Connection method for external converter in RS232/RS422 is a bit different in wire connection and Piano<br />
Switch.<br />
Communication via RS232<br />
RS232 connection must be done in the following. Use a 9 pin female connector to the <strong>iTDC</strong> RS232<br />
communication as shown below.<br />
185
• Connection<br />
<strong>STARWATCH</strong> ITDC <strong>PRO</strong> I<br />
TXD<br />
RXD<br />
GROUND<br />
<strong>iTDC</strong> cable<br />
9 pin connector<br />
#2 pin (RXD)<br />
#3 pin (TXD)<br />
#5 pin (GRD)<br />
• Piano Switch Configuration<br />
Switch #<br />
Switch Status<br />
1 On(Down)<br />
2 Off(Up)<br />
3 On(Down)<br />
4 Off(Up)<br />
5 On(Down)<br />
6 Off(Up)<br />
Communication via RS422<br />
RS422 connection must be done in the following. Use a 9 pin female connector to the <strong>iTDC</strong> RS422<br />
communication as shown below.<br />
• Connection<br />
<strong>iTDC</strong><br />
TX+<br />
RX+<br />
TX-<br />
RX-<br />
9 pin connector<br />
#2 pin (RX+)<br />
#3 pin (TX+)<br />
#7 pin (RX-)<br />
#8 pin (TX-)<br />
186
<strong>STARWATCH</strong> ITDC <strong>PRO</strong> I<br />
• Piano Switch Configuration<br />
Switch #<br />
Switch Status<br />
1 Off(Up)<br />
2 On(Down)<br />
3 Off(Up)<br />
4 On(Down)<br />
5 Off(Up)<br />
6 On(Down)<br />
External Converter Configuration Program<br />
Using an external converter for TCP/IP communication requires a configuration program, along with an<br />
IP and some configuration processes.<br />
• Program Installation<br />
The CD provided contains LAN converter IP configuration and operation status check. Install the<br />
program to configure the LAN converter IP from the PC.<br />
1) Locate the NetEye1000_Setup.exe file in the CD and click on it to begin installation.<br />
187
<strong>STARWATCH</strong> ITDC <strong>PRO</strong> I<br />
2) Click Next button to move on to following step.<br />
3) Check the folder the program will be installed on to, then click Install button to begin.<br />
4) Once installation is completed, click OK button to finish.<br />
• IP Configuration<br />
Click Start->Program->NetEye1000 to run program.<br />
188
<strong>STARWATCH</strong> ITDC <strong>PRO</strong> I<br />
Once programming is running, it will display the following screen showing all LAN converters<br />
connected to the network.<br />
The figure below shows 2 LAN converters connected.<br />
Each LAN converter needs to configure IP, Gateway, Subnet Mask, and Port. From the above<br />
figure, selecting the converter to be configured by double clicking will display the following screen.<br />
<strong>User</strong> needs to configure the above categories with a value. Modify the IP Address, Gateway,<br />
Subnet Mask, but leave the rest with default values.<br />
Category<br />
Setup Value<br />
Mode<br />
Server<br />
IP Address IP Address received from network(No Duplication)<br />
Gateway<br />
Gateway received from network<br />
Subnet Mask<br />
Subnet Mask received from network<br />
Port 5000<br />
BPS 9600<br />
189
Parity<br />
None<br />
Data bit 8<br />
Stop bit 1<br />
<strong>STARWATCH</strong> ITDC <strong>PRO</strong> I<br />
Click OK button to finish configuration.<br />
In Usage Case of Internal TCP/IP Module<br />
If using internal module, the TCP/IP module needs to be inserted on to the <strong>iTDC</strong> main board. It uses 1<br />
network line and 1 fixed IP per <strong>iTDC</strong> panel.<br />
Internal Module Configuration Program<br />
Using an internal module for TCP/IP communication requires a configuration program, along with an IP<br />
and some configuration processes.<br />
• Program Installation<br />
The CD provided contains LAN converter IP configuration and operation status check. Install the<br />
program to configure the module of IP from the PC.<br />
1) Locate the file in the CD and click on it to begin installation.<br />
2) Click Next button to move on to following step.<br />
190
<strong>STARWATCH</strong> ITDC <strong>PRO</strong> I<br />
3) Check the folder the program will be installed on to, then click Install button to begin.<br />
4) Once installation is completed, click Finish button to complete.<br />
• IP Configuration<br />
Click Start->Program->IGM7100tool->IGM_Cfgtool to run program.<br />
191
<strong>STARWATCH</strong> ITDC <strong>PRO</strong> I<br />
1) Once programming is running, it will display the above screen.<br />
Click Find Board button to locate current connected boards.<br />
2) If the boards are found, it will display the message Finding complete. The Board List on the left<br />
hand side displays the found board’s Mac address.<br />
3) Click OK button.<br />
4) Select the board to configure.<br />
5) Check the selected module’s IP, Subnet, Gateway, Speed, Parity, Data Bit, Stop Bit, Flow, and<br />
Listen Port then modify if necessary. Also, you must use Server Mode for Mode Selection.<br />
192
<strong>STARWATCH</strong> ITDC <strong>PRO</strong> I<br />
Category<br />
Configuration Value<br />
Mode<br />
Server mode<br />
IP Address IP Address received from network(No Duplication)<br />
Gateway<br />
Gateway received from network<br />
Subnet Mask<br />
Subnet Mask received from network<br />
Listen Port 5000<br />
BPS 9600<br />
Parity<br />
None<br />
Data bit 8<br />
Stop bit 1<br />
6) If configuration is completed, click Setting button to input the data configuration to the module.<br />
When finished, it will display a message Setting complete. Click OK to finish.<br />
<strong>Software</strong> Configuration<br />
Port Definition<br />
Port Definition describes the PC connection to Serial and TCP/IP communication loop. It supports up to<br />
99 ports, but depending on PC performance, memory, and OS resources, it may not be possible to use<br />
99 ports. We recommend using adequate number of ports for operation.<br />
• Start<br />
• Add<br />
Click Set up->Port Definition or press shortcut key Ctrl+A.<br />
Add is used to create fresh data. If adding additional ports, click Add button and input data in the<br />
following screen.<br />
193
1) Click Add button, and the following screen appears.<br />
<strong>STARWATCH</strong> ITDC <strong>PRO</strong> I<br />
2) Select Comm Type as Serial Chain for Serial, TCP/IP Chain for TCP/IP and Dial-UP Chain for Dial-<br />
Up as communication type. You must be select TCP/IP Chain.<br />
3) Input activity or description<br />
4) Input screen changes if TCP/IP Chain is selected.<br />
Panel Definition<br />
Input the IP Address from the external converter or internal converter for configuration.<br />
Input TCP Port No as default value 5000.<br />
Select Module Type as internal or external version.<br />
5) Click Save button to save inputted data, and click Close button to finish.<br />
Panel Definition describes <strong>iTDC</strong> board’s data configuration.<br />
Each <strong>iTDC</strong> device has its own communication address. Data is configured in S/W to each address to<br />
communicate with <strong>iTDC</strong>. Each <strong>iTDC</strong> can be configured with a variety of function options by sending the<br />
data for application.<br />
• Start<br />
Click Set up->Panel Definition or press shortcut key Ctrl+B.<br />
194
• Add<br />
<strong>STARWATCH</strong> ITDC <strong>PRO</strong> I<br />
Add is used to create fresh data. If adding additional panels, click Add button and input data in the<br />
following screen.<br />
1) Click Add button, and the following screen appears.<br />
2) Select Port No. It displays only the Port No that was registered in Port Registration.<br />
3) Unregistered Panel No. List displays items not selected from Port No. Select the Board No to be<br />
registered choosing and clicking >> button or double click the Board No to select, and it will show up<br />
on the right hand side Registered Panel No List.<br />
Panel registration must be done one at a time to setup.<br />
195
<strong>STARWATCH</strong> ITDC <strong>PRO</strong> I<br />
It will register one panel number with its basic data for configuration. Click Save button to<br />
complete the process.<br />
Repeat the procedure to add additional panels.<br />
4) Select Panel Type as <strong>iTDC</strong>.<br />
5) Select Door Type as 2 door, 3 door, or 4 door for operation.<br />
6) Input Panel Name. This is a must in order to define the location, when an event occurs to a panel.<br />
7) Configure card memory. Depending on card memory setup, the event memory is automatically<br />
setup. Configure adequate amount of card and event memory.<br />
8) Default Panel value is optional. It is not necessary for operation.<br />
9) Click Save button to save data.<br />
10) Click Close button to finish.<br />
196
Chapter<br />
9<br />
<strong>STARWATCH</strong> ITDC <strong>PRO</strong> I<br />
<strong>STARWATCH</strong> <strong>iTDC</strong> <strong>PRO</strong> I<br />
Dial-Up Communication<br />
<strong>STARWATCH</strong> <strong>iTDC</strong> <strong>PRO</strong> I Dial-Up Communication<br />
This chapter explains Dial-Up communication explanation, along with detailed<br />
configuration instruction and usage with <strong>STARWATCH</strong> <strong>iTDC</strong> <strong>PRO</strong>.<br />
System Requirement<br />
Dial-Up communication requires some devices for operation. It needs 2 modems for host and remote site<br />
connection.<br />
Modem must be an external version for use, and the ability to auto answer function (Namely, when the<br />
host calls the remote modem, it answers to make connection)<br />
The <strong>iTDC</strong> system supports the following modem, and as possible uses this modem. Also, to have Dial-<br />
Up communication, it requires making of a separate communication cable one for the host site and one<br />
for the remote site.<br />
• 3Com U.S Robotics 56K Fax External Modem 2 (Remote Site, Host Site) or NetComm<br />
(http://www.netcomm.com.au/) Roadster V92 External Modem 2EA (Remote Site, Host Site).<br />
• Host, Remote Serial communication Cable<br />
197
Dial-Up Communication Layout<br />
<strong>STARWATCH</strong> ITDC <strong>PRO</strong> I<br />
Host Site<br />
Host Computer<br />
(with <strong>iTDC</strong> Access<br />
Control Program)<br />
RS232C Host Cable<br />
Remote Site<br />
Telephone Line<br />
Converter<br />
(RS422/RS232)<br />
RS232C Remote Cable<br />
Max32<br />
Modem Configuration<br />
Some configurations are required to setup the host and remote modem for operation. Configuration for<br />
communication speed and auto answer function is required.<br />
To configure the modem, it needs the manual, driver, and modem cable included in the modem package.<br />
To configure the modem environment, it requires the Hyper Terminal included in Windows.<br />
If Hyper Terminal is not installed, go to Control Panel and open Program Add/Delete file to install the<br />
program.<br />
Host Modem Setup<br />
To setup the Host Modem, all you need to do is modify the communication speed using the driver and<br />
cable.<br />
198
• Communication Speed Setup<br />
<strong>STARWATCH</strong> ITDC <strong>PRO</strong> I<br />
This function is used to calibrate communication speed between <strong>iTDC</strong> device and modem to be<br />
equal. When the modem is first installed, the speed value is setup at maximum speed. However,<br />
<strong>iTDC</strong> speed is 9600BPS, so the modem speed needs to be setup as 9600BPS for configuration.<br />
1) Install the modem to Window 2000 or XP, and then install the driver for modem recognition.<br />
2) Go to Control Panel and select Phone and Modem file. Click on modem properties and change the<br />
speed to 9600bps. (After driver installation, the speed is automatically setup at 115200bps)<br />
3) Use Hyper Terminal to send Initialize Command (ATZ) to the modem, and check the message OK<br />
appears.<br />
4) Once the above process is completed, turn the power off and disconnect<br />
cable for setup completion.<br />
Remote Modem Setup<br />
To configure the Remote Modem, it needs the driver and modem cable included in the modem package<br />
to setup the communication speed and auto answer.<br />
• Communication Speed Setup<br />
1) Install the modem to Window 2000 or XP, and then install the driver for modem recognition.<br />
2) Go to Control Panel and select Phone and Modem file. Click on modem properties and change the<br />
speed to 9600bps. (After driver installation, the speed is automatically setup at 115200bps)<br />
3) Use Hyper Terminal to send Initialize Command (ATZ) to the modem, and check the message OK<br />
appears.<br />
4) Once the above process is completed, turn the power off and disconnect<br />
cable for setup completion.<br />
• Auto Answer Setup<br />
1) Use Hyper Terminal to send Initialize Command (ATZ) to the modem, and check the message OK<br />
appears.<br />
2) When OK message appears, input ATS0=1 and check the message OK appears.<br />
3) When OK message appears, input AT&W and check the message OK appears.<br />
4) Once the above process is completed, turn the power off and disconnect<br />
cable for setup completion.<br />
199
Serial Interface Pin Definitions<br />
<strong>STARWATCH</strong> ITDC <strong>PRO</strong> I<br />
DB-25 DB-9 Circuit Function<br />
Signal Source<br />
Computer/Modem<br />
1 - AA Chassis Ground Both<br />
2 3 BA Transmitted Data Computer<br />
3 2 BB Received Data Modem<br />
4 7 CA Request to Send Computer<br />
5 8 CB Clear to Send Modem<br />
6 6 CC Data Set Ready Modem<br />
7 5 AB Signal Ground Both<br />
8 1 CF Carrier Detect Modem<br />
12 - SCF Speed Indicate Modem<br />
20 4 SD Data Terminal Ready Computer<br />
22 9 CE Ring Indicate Modem<br />
Cable<br />
Host Cable<br />
Dial-Up communication requires a separate making of a cable. Host and Remote cable making process<br />
is different to each other. Refer to the wire layout below for the procedure.<br />
200
Remote Cable<br />
<strong>STARWATCH</strong> ITDC <strong>PRO</strong> I<br />
<strong>Software</strong> Configuration<br />
Port Definition<br />
Port Definition describes the PC connection to Serial and TCP/IP communication loop. It supports up to<br />
99 ports, but depending on PC performance, memory, and OS resources, it may not be possible to use<br />
99 ports. We recommend using adequate number of ports for operation.<br />
• Start<br />
• Add<br />
Click Set up->Port Definition or press shortcut key Ctrl+A.<br />
Add is used to create fresh data. If adding additional ports, click Add button and input data in the<br />
following screen.<br />
201
<strong>STARWATCH</strong> ITDC <strong>PRO</strong> I<br />
1) Click Add button, and the following screen appears.<br />
Panel Definition<br />
2) Select Port No and it will indicate Port No not used.<br />
3) Select Comm Type as Serial Chain for Serial, TCP/IP Chain for TCP/IP and Dial-UP Chain for Dial-<br />
Up as communication type. You must be select Dial-Up Chain.<br />
4) Input activity or description<br />
5) Select from Serial Chain tab, Comm Port, Speed, Parity Bit, Data Bit, and Stop Bit. The default value<br />
is Speed 9600, Parity Bit None, Data Bit 8, and Stop Bit 1 for<br />
6) Click Save button to save inputted data, and click Close button to finish.<br />
Panel Definition describes <strong>iTDC</strong> board’s data configuration.<br />
Each <strong>iTDC</strong> device has its own communication address. Data is configured in S/W to each address to<br />
communicate with <strong>iTDC</strong>. Each <strong>iTDC</strong> can be configured with a variety of function options by sending the<br />
data for application.<br />
• Start<br />
Click Set up->Panel Definition or press shortcut key Ctrl+B.<br />
202
• Add<br />
<strong>STARWATCH</strong> ITDC <strong>PRO</strong> I<br />
Add is used to create fresh data. If adding additional panels, click Add button and input data in the<br />
following screen.<br />
1) Click Add button, and the following screen appears.<br />
2) Select Port No. It displays only the Port No that was registered in Port Registration.<br />
3) Unregistered Panel No. List displays items not selected from Port No. Select the Board No to be<br />
registered choosing and clicking >> button or double click the Board No to select, and it will show up<br />
on the right hand side Registered Panel No List.<br />
203
<strong>STARWATCH</strong> ITDC <strong>PRO</strong> I<br />
Panel registration must be done one at a time to setup.<br />
It will register one panel number with its basic data for configuration. Click Save button to<br />
complete the process.<br />
Repeat the procedure to add additional panels.<br />
4) Select Panel Type as <strong>iTDC</strong><br />
5) Select Door Type as 2 door, 3 door, or 4 door for operation.<br />
6) Input Panel Name. This is a must in order to define the location, when an event occurs to a panel.<br />
7) Configure card memory. Depending on card memory setup, the event memory is automatically setup.<br />
Configure adequate amount of card and event memory.<br />
8) Default Panel value is optional. It is not necessary for operation.<br />
9) Click Save button to save data.<br />
10) Click Close button to finish.<br />
Dial-Up Connection<br />
Dial-Up Connection uses standard phone line to connect to a remote device for communication. External<br />
modems are required for each site at remote and host to connect by phone line.<br />
Also, Dial-Up Connection Management can be used to manage multiple location registration, and when<br />
needed initiate the location’s remote device and communication.<br />
• Start<br />
Click Set up->System Management->Dial-Up Connection List or press shortcut key Ctrl+G.<br />
• Find<br />
Find is used to get relevant information pertaining to the inquiry when information is available. It is<br />
used to edit and delete the existing data information.<br />
204
<strong>STARWATCH</strong> ITDC <strong>PRO</strong> I<br />
1) Input Find Condition<br />
2) Click Find to make an inquiry. If inquired result is available, the following screen appears.<br />
If find has no specific parameters, it will display the entire information<br />
• Add<br />
Add is used to create fresh data. Click Add button to add Dial-Up Connection area data through input<br />
screen.<br />
1) Click Add button, and the following screen appear<br />
205
<strong>STARWATCH</strong> ITDC <strong>PRO</strong> I<br />
2) Select Port No. You can only select the port that was configured for Dial-Up Connection.<br />
3) Input Dial-Up Chain Name.<br />
4) Check mark Out Line if setup, and input Out Line No.<br />
5) Input Remote Phone No. connected to remote modem.<br />
6) Check mark Auto Dial-Up Connection if setup, and configure connection and disconnection time.<br />
When configuring Auto Dial-Up Connection, make certain that connection and disconnection time<br />
does not overlap in multiple location setup. This will cause abnormal operation.<br />
7) Click Save button to save input data. Click Close button to finish.<br />
In Dial-Up Connection, connection failure can be frequent depending on phone line and modem<br />
status. This is a special characteristic occurrence, and if 2-3 reattempts are made normal<br />
connection is established.<br />
• Dial<br />
Dial can be used in Dial-Up Connection List, Add, and Modify screen, but we recommend use as<br />
possible in the Dial-Up Connection List screen.<br />
206
<strong>STARWATCH</strong> ITDC <strong>PRO</strong> I<br />
1) Use Find to locate connection or select from Dial categories to connect. Selected location is<br />
highlighted.<br />
2) Click Dial for connection attempt.<br />
• Hang Up<br />
1) Select current established connect location.<br />
2) Click Hang Up to disconnect.<br />
207
Chapter<br />
10<br />
<strong>STARWATCH</strong> <strong>iTDC</strong> <strong>PRO</strong> I<br />
Maintenance<br />
<strong>STARWATCH</strong> ITDC <strong>PRO</strong> I<br />
<strong>STARWATCH</strong> <strong>iTDC</strong> <strong>PRO</strong> I Maintenance and Management<br />
This chapter explains instructions for optimized program use through proper<br />
management and maintenance.<br />
<strong>STARWATCH</strong> <strong>iTDC</strong> <strong>PRO</strong> I Database Maintenance and Management<br />
In using the <strong>STARWATCH</strong> <strong>iTDC</strong> <strong>PRO</strong>, it requires some management, especially ongoing database<br />
management. As the database becomes larger, it needs thorough managing by the user. Even if the<br />
data is few, database management is a requirement.<br />
The program running speed may become slower, as the database becomes larger, and abnormal closing<br />
of program may damage the database. The user should maintain ongoing database compression,<br />
backup, or copy the files to optimize program use.<br />
Database Management<br />
Database Management describes the compression, backup, and restore function of data in using the<br />
<strong>STARWATCH</strong> <strong>iTDC</strong> <strong>PRO</strong>.<br />
• Start<br />
Select Database->Database Management.<br />
• Data Backup<br />
The advantage of this function is blocking the damage to the database, and improving the program<br />
performance through Data Backup. After backup is completed, compress the database to improve<br />
the database speed.<br />
208
<strong>STARWATCH</strong> ITDC <strong>PRO</strong> I<br />
1) Select the Event Data, Alarm Data, or Visitor Event Data for Backup Option.<br />
Safekeeping event data is a must, because it is used later on in reports and as original data for<br />
time attendance function. Keeping the original data lets the user restore data in the event of data<br />
abnormality in time attendance and access control results.<br />
You can use Microsoft Access 2000 or XP to manage the access user and device data in<br />
addition to the above.<br />
2) Select the From/To of Backup Period Condition to define backup files.<br />
3) After database backup, check delete if deleting original data, and check compress if compressing<br />
original data.<br />
4) Click Backup button.<br />
5) Input file name and folder location to save in.<br />
6) Click Save button.<br />
• Data Restore<br />
209
<strong>STARWATCH</strong> ITDC <strong>PRO</strong> I<br />
It is used to restore the backup data. If original data was deleted during backup, specific period data<br />
is not found. In this case, use restore function to restore the backup data into the existing database<br />
file.<br />
If restoring the same file twice occurs, it makes a duplication data. Do not restore a file that was<br />
already restored.<br />
1) Select the data to be restored.<br />
2) Click File Open button.<br />
3) Locate the backup file folder and click Open button.<br />
210
<strong>STARWATCH</strong> ITDC <strong>PRO</strong> I<br />
4) Click Restore button.<br />
5) Restore status is shown on the progress bar.<br />
• Backup Option<br />
Backup Option configures backup alert presence. Each event type backup alert cycle can be<br />
configured in week units. This alert cycle is based on last backup date. When the user configured<br />
week is past, backup message is displayed.<br />
211
<strong>STARWATCH</strong> ITDC <strong>PRO</strong> I<br />
1) To use Backup Alarm, check mark Backup Alarm Use/Unuse.<br />
2) Configure Event Data for Backup Alarm in week units.<br />
3) Configure Alarm Data for Backup Alarm in week units.<br />
4) Configure Visitor Event Data for Backup Alarm in week units.<br />
5) Click Apply button to save.<br />
When the configured reminder to backup occurs, it will display the following screen message.<br />
• Database Management History<br />
This function manages history of backup and restore activities. Through this management, you will<br />
know when, who, and what did something to the database.<br />
212
<strong>STARWATCH</strong> ITDC <strong>PRO</strong> I<br />
While using the existing <strong>STARWATCH</strong> <strong>iTDC</strong> <strong>PRO</strong>, if reinstallation is needed, it is recommended<br />
to have a copy of the existing complete database.<br />
Backup and Restore function is limited to the event data. Therefore, it is recommended to have<br />
copy of complete database in a separate folder, if program is installed another PC or deleting the<br />
existing system and reinstallation is performed.<br />
Using Access Program to Manage Database<br />
The <strong>iTDC</strong> uses Access database contained in Microsoft Office 2000 and XP. If Access program is<br />
installed in a PC with <strong>STARWATCH</strong> <strong>iTDC</strong> <strong>PRO</strong> I installed and operating, it can manage the database<br />
files directly by opening it.<br />
• Database Compress and Restore<br />
This function initiates Compress and Restore of database where it may be damaged, and database<br />
with frequent add and delete history. In Restore, database file that may have been damaged due to<br />
abnormal closing of program in general can use this function, but if the damage is severe, restore<br />
may not be possible.<br />
This function is recommended in weekly basis, if frequent add and delete is done to the database. It<br />
does not matter how many times this function is performed, so set the cycle at intervals of 1 week, 1<br />
month, and 3 month to initiate.<br />
1) Compress and Restore database file is opened using Access program.<br />
2) Click Tools->Database Utilities->Compact and Repair Database to initiate compress and restore<br />
function as shown below.<br />
When using the function of Compact and Restore, you need to make certain the <strong>STARWATCH</strong><br />
<strong>iTDC</strong> <strong>PRO</strong> I is not running.<br />
If compacting database files in a server, or shared folder containing multiple user files, you need<br />
to make certain if anyone is opening the file that was selected for compact. To compact Access<br />
database, sole authority is needed to open/initiate correspond database.<br />
213
Chapter<br />
11 Multi Language Setup<br />
<strong>STARWATCH</strong> ITDC <strong>PRO</strong> I<br />
<strong>STARWATCH</strong> <strong>iTDC</strong> <strong>PRO</strong> I Multi Language Setup<br />
This chapter explains <strong>STARWATCH</strong> <strong>iTDC</strong> <strong>PRO</strong> I Multi Language Setup instruction.<br />
Using Multi Language Setup Program<br />
The <strong>iTDC</strong> Multi Language Setup Program is used to configure <strong>STARWATCH</strong> <strong>iTDC</strong> <strong>PRO</strong> I multi<br />
language support. It is here the user configures the language preference, form, menu, drop down list,<br />
and message functions to input and modify data.<br />
Screen Layout<br />
Initiating the <strong>iTDC</strong> Multi Language Setup Program will display the following screen.<br />
Main window consist of left hand side menu and right hand side function types.<br />
Menu<br />
Function setting<br />
menu of multilingual<br />
setting program of<br />
<strong>iTDC</strong><br />
Program Area<br />
The screen of function selected in<br />
menu is shown in program practice<br />
area. The functions users want is<br />
executed through this area<br />
Menu Layout<br />
Multi Language Setup Program menu, and its function types are the following.<br />
214
Set Language<br />
Configure language preference by character style.<br />
Set Menu<br />
Configure language preference for the top part menu display.<br />
Set Form<br />
<strong>STARWATCH</strong> ITDC <strong>PRO</strong> I<br />
Configure language preference for character in input/output on screen display.<br />
<br />
Set Message<br />
Configure language preference for character in message display.<br />
<br />
Set DropDown List<br />
Configure language preference for character in all Drop Down Combo display.<br />
<br />
Set Etc<br />
Configure language preference for the remaining categories.<br />
<br />
Exit<br />
Save configuration.<br />
Set Language<br />
Language configuration is setup of font for each language type.<br />
• Start<br />
Select Set Language from left hand side menu.<br />
• Setup<br />
1) Select language used in language category.<br />
2) Select Screen Font<br />
215
<strong>STARWATCH</strong> ITDC <strong>PRO</strong> I<br />
3) Click Save button to save data.<br />
Set Menu<br />
Setup language preference for top part of menu.<br />
216
<strong>STARWATCH</strong> ITDC <strong>PRO</strong> I<br />
• Start<br />
Select Set Menu from left hand side menu.<br />
• Setup<br />
Multi Language input screen display the following, and the Korean and English language can be<br />
seen. Input the user’s language with English as the standard base.<br />
For example, if using <strong>User</strong> Define 1 language, input the language preference by looking at the<br />
English Row.<br />
Input the user’s language<br />
with English as the standard<br />
base.<br />
The above input will display the following screen. If all inputs are completed, click<br />
Close button to finish. Inputs are saved automatically without a separate save<br />
function. All user needs to do is input data.<br />
217
<strong>STARWATCH</strong> ITDC <strong>PRO</strong> I<br />
As shown above, input the menu caption then select <strong>User</strong> Language 1 in <strong>iTDC</strong><br />
program, and it will display the following screen below.<br />
Set Form<br />
Setup of characters displayed in all input/output screen display.<br />
• Start<br />
Select Set Form from left hand side menu.<br />
• Setup<br />
Multi Language input screen display the following, and the Korean and English language can be<br />
seen. Input the user’s language with English as the standard base.<br />
For example, if using <strong>User</strong> Define 1 language, input the language preference by looking at the<br />
English Row.<br />
218
<strong>STARWATCH</strong> ITDC <strong>PRO</strong> I<br />
Input the user’s<br />
language with English<br />
as the standard base.<br />
As shown above, input the form caption then select <strong>User</strong> Language 1 in <strong>iTDC</strong><br />
program and it will display the following screen below.<br />
Set Message<br />
Setup of language message display in <strong>STARWATCH</strong> <strong>iTDC</strong> <strong>PRO</strong>.<br />
• Start<br />
Select Set Message from left hand side menu.<br />
• Setup<br />
Multi Language input screen display the following, and the Korean and English language can be<br />
seen. Input the user’s language with English as the standard base.<br />
219
<strong>STARWATCH</strong> ITDC <strong>PRO</strong> I<br />
For example, if using <strong>User</strong> Define 1 language, input the language preference by looking at the<br />
English Row.<br />
Input the user’s language with English as<br />
the standard base.<br />
Message box display of Language: 1.Korean setup.<br />
Message box display of Language: <strong>User</strong> Language1 setup.<br />
Set DropDownList<br />
Configure language preference for input/output in all Drop Down Combo display.<br />
• Start<br />
Select Set DropDownList from left hand side menu.<br />
• Setup<br />
Multi Language input screen display the following, and the Korean and English language can be<br />
seen. Input the user’s language with English as the standard base.<br />
For example, if using <strong>User</strong> Define 1 language, input the language preference by looking at the<br />
English Row.<br />
220
<strong>STARWATCH</strong> ITDC <strong>PRO</strong> I<br />
Input the user’s<br />
language with English<br />
as the standard base.<br />
DropDownList display of Language: 1.Korean setup.<br />
DropDownList display of Language: <strong>User</strong> Language1 setup.<br />
Set Etc<br />
Setup of language for default value input items.<br />
• Start<br />
Select Set Etc from left hand side menu.<br />
• Setup<br />
Initiating the Multi Language input screen will display the following. Input language preference in<br />
CAPTION column using REF CAPTION as base. A separate column for Etc is not available.<br />
These values cannot be setup due to fixed value setup in database.<br />
However, using REF CAPTION as base to modify the CAPTION column value, the fixed value of<br />
data language can be modified.<br />
221
<strong>STARWATCH</strong> ITDC <strong>PRO</strong> I<br />
REF CAPTION cannot be modified. This value is for reference to language modification. The<br />
actual character displayed in program is the CAPTION column value.<br />
Input the user’s<br />
language with REF<br />
CAPTION as the<br />
standard base.<br />
The modified details in <strong>iTDC</strong> Multi Language Setup Program is applied immediately without<br />
having to reboot the <strong>STARWATCH</strong> <strong>iTDC</strong> <strong>PRO</strong>.<br />
However, the current running screen needs to be closed and reopened to display the modified<br />
language.<br />
222
Chapter<br />
12<br />
<strong>STARWATCH</strong> ITDC <strong>PRO</strong> I<br />
<strong>STARWATCH</strong> <strong>iTDC</strong> <strong>PRO</strong> I<br />
Additional Function<br />
Functions added to <strong>STARWATCH</strong> <strong>iTDC</strong> <strong>PRO</strong> I<br />
: Applied only to <strong>STARWATCH</strong> ITDC <strong>PRO</strong> I v1.08 or over.<br />
Add Functions<br />
Monitoring<br />
• Total monitoring on one screen<br />
- All in one screen display of event status, alarm status, user data of current event with photo, map<br />
showing location of event with icons, video image of the event, events sorted by door at the same<br />
time.<br />
- Real time door status display and control with door icon on the map, video record data listing and<br />
its play.<br />
• Real time video monitoring and recording on access and alarm events<br />
- Real time video monitoring on the door with video devices.<br />
- Recorded video recording and play by event type.<br />
• Video monitoring on the map screen and map setting screen.<br />
- Camera icon setting playing its live view in order to find easily its location..<br />
- Event location display on the map screen with live video.<br />
• SMS Service<br />
- Event data message service to mobile phone numbers<br />
- Message service option by event types.<br />
System management<br />
• Output definition<br />
- All the devices connected to the outputs of controllers can be defined by user.<br />
ex: Emergency door , Alarm, siren etc.<br />
• Output status display and control<br />
- Real time monitoring of output status and control<br />
• Batch transmission of system setting data by specific controller<br />
- Useful to download controller system setting values at once in case of initial system setting or after<br />
initialization of controllers<br />
• Batch transmission of card holder data by specific controllers<br />
223
<strong>STARWATCH</strong> ITDC <strong>PRO</strong> I<br />
- Useful to download card holder data at once in case of initial system setting or after initialization of<br />
controllers.<br />
• Bio readers of FGR006SR , FINGER006SR, FACE006 management<br />
- FGR006SR , FINGER006SR, FACE006 system setting<br />
- FGR006SR , FINGER006SR, FACE006 fingerprint template upload/download<br />
Time & Attendance management<br />
• Work schedule setting by day<br />
- Work in, Work out, Lunch, extra work time setting by day<br />
- Holiday setting by day<br />
Card holder management<br />
• Bio template upload/download<br />
- Upload/download of bio templates of card holders registered in bio reader<br />
• Extra port for card reader only for registration<br />
- Automatic card registration by card reading<br />
- Direct connection to PC<br />
• Extra fields for user to define<br />
- Extra 10 user data field in the card holder management section besides basic card holder data field.<br />
- Data connection to ID Badging system<br />
• ID Badging integration<br />
- Pre-view of user card printing image<br />
- Interconnection of data base with ID Badging in pre-view screen<br />
A. Detailed description of functions added.<br />
Monitoring<br />
- Integrated monitoring on one screen<br />
- Live video monitoring and recording by event<br />
- Live video display on map setting screen and map screen<br />
- SMS Service<br />
o<br />
Integrated Monitoring Windows<br />
Display on one screen event status, map display, video image.<br />
• Start<br />
Choose View->Event status-> integrated monitoring<br />
• Integrated monitoring window<br />
224
<strong>STARWATCH</strong> ITDC <strong>PRO</strong> I<br />
Display alarm event<br />
list<br />
Display current access<br />
person data<br />
Display current event location<br />
on the map with various icons<br />
and its video image<br />
Display alarm and access<br />
event list of specific door<br />
and recorded video data<br />
listing of specific camera<br />
녹화 목록을 나타냅니다.<br />
Display access event<br />
list<br />
• Recorded video play<br />
It records video image by type of events according to user definition in condition that IDTECK web<br />
sever and CCD cameras are connected to the software.<br />
In case of an event occurrence, it records its video image and show the recorded video icon on the<br />
event list.<br />
In order to replay the recorded video, click the icon(<br />
) on the event list.<br />
225
<strong>STARWATCH</strong> ITDC <strong>PRO</strong> I<br />
Recorded video play icon<br />
- Recorded video play window provides various options of video control<br />
- Still vide cut image can be exported as an image file (JPG, bmp etc.)<br />
- Recorded video can be exported as an video file(avi, etc)<br />
• Live video monitoring<br />
It display live video image by type of events as user define in case that IDTECK web sever and<br />
cameras are connected.<br />
In case that an event occurs, it display live video of the site where the event occurs and the live<br />
video icon( ) shows on event list. In order to view the live video of the site of the event, click the<br />
live video icon.<br />
226
<strong>STARWATCH</strong> ITDC <strong>PRO</strong> I<br />
Live video icon<br />
- <strong>User</strong>s can adjust the size of live video window with screen size icon.<br />
- <strong>User</strong>s can control PAN/TILT/ZOOM (PTZ) in case of connection with cameras with PTZ function on<br />
the live video play screen.<br />
• Monitoring tap<br />
On the right side of map monitoring window, the monitoring tap provides various text information.<br />
Map list of places applied access control, access and alarm event list of specific door, recorded<br />
video image list of specific cameras.<br />
- Map list<br />
<strong>User</strong>s can choose a map to display on the map screen from their list.<br />
227
<strong>STARWATCH</strong> ITDC <strong>PRO</strong> I<br />
- Event list<br />
It displays the access events of the door chosen on the map screen by users.<br />
-Alarm list<br />
It displays the alarm events of the door chosen on the map screen by users.<br />
- Recorded video image list<br />
It displays the recorded video images of the camera chosen on the map<br />
screen by users.<br />
228
<strong>STARWATCH</strong> ITDC <strong>PRO</strong> I<br />
• Real time door status monitoring<br />
It shows the door open/close status in real time by door icon on the map.<br />
• Door control<br />
<strong>User</strong>s can open or close doors on the map screen. On the door icon, click right mouth button to<br />
control it.<br />
o<br />
Live video monitoring and recording on event status monitoring window.<br />
<strong>User</strong>s can operate live video play or recorded video play on the event status monitoring window.<br />
• Start<br />
Click view-> Event status ->Event monitoring screen<br />
229
• Event monitoring window<br />
<strong>STARWATCH</strong> ITDC <strong>PRO</strong> I<br />
Display alarm event<br />
list<br />
Display access event<br />
list<br />
Icons of live video monitoring and<br />
of recorded video play<br />
• Recorded video play<br />
It records video image by types of access or alarm event as defined by users in condition that video<br />
devices are connected to the site..<br />
When an event occurs, it records its video image and shows recorded video play icon on the list.<br />
To play the recorded video, click the icon( ).<br />
230
<strong>STARWATCH</strong> ITDC <strong>PRO</strong> I<br />
Video Record<br />
Icon<br />
IcIcon<br />
- Control image by image play button.<br />
- Able to send still image in image file (JPEG file and etc.)<br />
- Able to send recorded image in other image format files (AVI file and etc.).<br />
231
• Play real time image<br />
<strong>STARWATCH</strong> ITDC <strong>PRO</strong> I<br />
Real time monitoring is possible with view camera when normal/alarm event occurs.<br />
Image pops up in the map when event is occurred. Also, real time view icon is popped in event list.<br />
Click the camera icon( ) in event list to play real time images.<br />
Real time image icon<br />
- Able to change image sizes with magnifying icon in real time image.<br />
- Able to control camera with real time image view when camera supports PAN/TILT/ZOOM (PTZ)<br />
functions<br />
o<br />
Monitoring images in Map setting and Map screen<br />
Able to control angle of camera while monitoring images in map screen when view devices are installed.<br />
• Start<br />
Choose System->Map Setting-> Map Item<br />
• Camera set up in map screen<br />
Set angle of camera while monitoring images in map screen when view devices are installed.<br />
- Move camera icon to the place where the door is located<br />
232
<strong>STARWATCH</strong> ITDC <strong>PRO</strong> I<br />
Camera Icon<br />
- Real time view is possible by double clicking camera icon.<br />
Double click camera icon<br />
- Live video view is to show when camera icon is double clicked.<br />
233
<strong>STARWATCH</strong> ITDC <strong>PRO</strong> I<br />
Move camera icon<br />
- In case of an event occurrence, its door icon blinks on the map and its live video window pops up<br />
if a camera and web server is connected to the door.<br />
Indicates where event is occurring and plays live<br />
video window<br />
234
o<br />
SMS Service.<br />
Able to send event in SMS by using foreign SMS services.<br />
<strong>STARWATCH</strong> ITDC <strong>PRO</strong> I<br />
* Warning *<br />
This function does not support usage of Korean Language Program.<br />
You must register at ipipi.com in order to obtain this service. Set the given ID and<br />
Password which you have received when registering ipipi.com.<br />
• Star<br />
Choose Set Up-> SMS Definition<br />
• SMS Set up<br />
Set up information on SMS server and receiver.<br />
Choose when using SMS function.<br />
Type in the information which you<br />
have received from SMS service<br />
company.<br />
Type in SMS receiver’s information by<br />
clicking Add button.<br />
• How to set SMS<br />
- SMS server registration<br />
235
<strong>STARWATCH</strong> ITDC <strong>PRO</strong> I<br />
1) Choose SMS Active.<br />
2) Register information on server and user received from the SMS service providing company.<br />
3) Email Address is automatically stored as <strong>User</strong> name + Server name.<br />
- SMS receiver registration<br />
4) Register information on SMS receiver as below.<br />
a. Click Add button.<br />
b. Type in name and number of the receiver.(including country code)<br />
c. Click Save button then close to finish.<br />
- To delete SMS receiver<br />
5) Follow the instruction below when deleting SMS receiver.<br />
a. Choose the receiver which you wish to delete from recipient list.<br />
b. Click Delete button on the left.<br />
c. Click Yes to delete.<br />
• Card Event set up (Option)<br />
Set up card event and information which you wish to send through SMS. When chosen event occur<br />
the information which you have set up will be transferred to the receiver.<br />
236
<strong>STARWATCH</strong> ITDC <strong>PRO</strong> I<br />
Check when using SMS function.<br />
Choose event which you wish to send through SMS.<br />
Edit information on chosen SMS event.<br />
References for typing information in SMS.<br />
1) Choose Card Event Definition.<br />
2) Choose event that you wishes to send through SMS.<br />
3) In contents, edit information which you wish to send in occurrence of the event.<br />
4) Refer to below legend for editing.<br />
5) Click “save” to store information.<br />
6) Click “close” to finish.<br />
• Input/Output event set up<br />
Set up information and types of input/output events which you wish to send through SMS.<br />
When chosen event occur the information which you have set up will be transferred to the receiver.<br />
237
<strong>STARWATCH</strong> ITDC <strong>PRO</strong> I<br />
Check when using SMS function.<br />
Choose input/output event which you wish to send through SMS.<br />
Edit information on chosen SMS event.<br />
References for typing information in SMS.<br />
1) Choose I/O Event Definition.<br />
2) Choose I/O event which you wish to send through SMS.<br />
3) In Contents, edit information which you wish to send in occurrence of data.<br />
4) Refer to below Legend for editing.<br />
5) Click Save to store information<br />
6) Click Close to finish.<br />
System Management<br />
- Output set up function<br />
- Output status sign and control function<br />
- Transferring all system information per controllers<br />
- Transferring all system information per biometric readers<br />
- Transferring all data on users per controllers<br />
- Supports FGR006SR , FINGER006SR<br />
- Supports FACE006<br />
o<br />
Output Set Up<br />
<strong>User</strong>s can define all the type of devices connected to all the outputs of controllers.<br />
For example outputs can be set to be connected to emergency exit, alarm, or other systems depending<br />
on the user’s definition.<br />
238
• Start<br />
<strong>STARWATCH</strong> ITDC <strong>PRO</strong> I<br />
Choose System -> I/O set up -> Output interface function.<br />
• I/O Setup and transmit<br />
Once user choose port no and controller number, it shows current output setting information of the<br />
controller. Only those outputs essential for each door, as listed below, are not to be changed.<br />
- List of essential door related output that is unchangeable.<br />
Door Type 2 Door Type 3 Door Type 4 Door Type<br />
Set up<br />
unable<br />
output no.<br />
No.1 output – Lock<br />
No.2 output - Alarm<br />
No.3 output – Lock<br />
No.4 output – Alarm<br />
No.1 output – Lock<br />
No.2 output - Alarm<br />
No.8 output – Lock<br />
No.9 output – Alarm<br />
No.10 output – Lock<br />
No.11 output – Alarm<br />
No.1 output – Lock<br />
No.2 output - Alarm<br />
No.3 output – Lock<br />
No.4 output – Alarm<br />
No.8 output – Lock<br />
No.9 output – Alarm<br />
No.10 output – Lock<br />
No.11 output – Alarm<br />
Choose port no and controller ID number to<br />
see its current I/O setting.<br />
Choose Output<br />
Choose types of Output<br />
. Emergency door<br />
. Alarm<br />
. Other outputs<br />
In order to operate output on a<br />
certain schedule, set a time<br />
schedule .<br />
Output time for input should be<br />
typed in seconds.<br />
(0 sec ~ 98sec, 99 for infinitive)<br />
In case of emergency<br />
door, choose the<br />
interface between exit<br />
button and door contact<br />
for emergency<br />
door(option).<br />
- Set up information<br />
Interface No. Output number to set up. Must check to set up.<br />
Output type Devices to be connected to the output.<br />
Exit Button In case of emergency door, choose which exit button input should activate the<br />
output.<br />
Door Contact In case of emergency door choose which door contact input should activate the<br />
output.<br />
OP Time In case of emergency door, set output operation time once exit button is pressed.<br />
Timeschedule Automatically output control based on time schedule once it is set.<br />
239<br />
Choose location of the<br />
output device
Zone<br />
Location where the output device is installed.<br />
Floor<br />
Floor where the output device is connected.<br />
Name<br />
Name of the device connected to output<br />
.<br />
- Set up process<br />
1) Choose the controllers address and its port address.<br />
2) Output connecting point : Choose the output connecting point<br />
3) Output type : Set up types of the devices connected to the output<br />
<strong>STARWATCH</strong> ITDC <strong>PRO</strong> I<br />
(Emergency door , Alarm , normal output)<br />
* When emergency door is the output contact point.<br />
4) Exit Button : Choose the input contact point of the Exit button when exit button is installed on the<br />
emergency door.<br />
5) Door Contact : Choose the input contact point of the Door Contact when Door Contact is installed<br />
on the emergency door.<br />
6) OP Time : when exit button is installed on the emergency door choose the time(second) of Exit<br />
button. (0 sec.~98 sec. 99 for infinitive)<br />
7) Timeschedule : Automatically controls in time when setting is done in output of timeschedule.<br />
8) Zone, Floor, Name: Type the information on connected device.<br />
9) Click Save to store data base..<br />
10) Click Transfer button send to controller.<br />
o<br />
Output status indication and control.<br />
Real time check on output connected to controller(door, alarm, normal output). Also, remote control of<br />
output is possible.<br />
• Start<br />
Choose Status-> door status/control.<br />
• Check door status and control door<br />
Able to check door status in real time where door has been set up from Door/Reader and output<br />
contact point. Also, able to control lock device of door through program.<br />
‣ CANCEL (ALL) : Cancel all running output.<br />
‣ RUN (ALL) : Run all output.<br />
‣ CANCEL (AREA) : Cancel only chosen area of running output.<br />
‣ RUN (AREA) : Run only chosen area of output..<br />
‣ CANCEL (FLOOR) : Cancel only chosen floor of output.<br />
‣ RUN (FLOOR) : Run only chosen floor of output.<br />
‣ CANCEL (EACH) : Cancel chosen output..<br />
‣ RUN (EACH) : Run chosen output.<br />
‣ Operation by time(sec.): Run out put for selected time.<br />
However, to check door/emergency door status, door contact must be installed. Otherwise it will<br />
only check the lock device.<br />
240
<strong>STARWATCH</strong> ITDC <strong>PRO</strong> I<br />
- Door status<br />
- Door control : Click right button of the mouth on the screen where there is a door. Controls door by<br />
given situation.(lock, unlock, unlock for certain period)<br />
• To see alarm status and control alarm device<br />
241
<strong>STARWATCH</strong> ITDC <strong>PRO</strong> I<br />
Able to see the status of alarm device which has been set up in the output contact point in real time.<br />
Also, alarm can be controlled through program.<br />
- Alarm status<br />
- Control of Alarm : Click right button of the mouse on the screen where there is Alarm device.<br />
Controls alarm by given situation.(Alarm on, Alarm off, Alarm on for certain period)<br />
• To check and control normal output status.<br />
Able to see normal output devices which have been set up from the output contact point. Also,<br />
normal output can be controlled through program.<br />
242
<strong>STARWATCH</strong> ITDC <strong>PRO</strong> I<br />
- Door status<br />
- Door lock control: Click the right mouse on the screen of door.<br />
Runs chosen devices for door(lock, unlock, lock for certain period of time).<br />
o<br />
System Information Batch Transmission for Controller<br />
This is use to run information on system for transferring at once. Also, to install controller, choosing<br />
system and transferring information.<br />
• Start<br />
243
<strong>STARWATCH</strong> ITDC <strong>PRO</strong> I<br />
System->System management->Transferring information->Choose controller tap.<br />
• Batch transmission for controller<br />
This is used for transferring information at once.<br />
Choose controller for<br />
batch transmission.<br />
Check the information that<br />
you want to transfer...<br />
Shows transforming data.<br />
1) Choose controller for batch transmission form the system list.<br />
2) Chose the data to transfer.<br />
3) Click “transfer” to send the data to controller.<br />
4) The transferred data is shown on the result list as below..<br />
5) If the transmission is failed follow the error message instruction.<br />
If there is no system information on the Data Base, transmit after registering information. For cause<br />
of communication error, try it again or check the communication.<br />
Batch Transmission of system information<br />
System setting and data transmission after initial installation and initialization of Biometric readers<br />
Open<br />
System->System management-> Data Transmission-> Biometric Reader<br />
• Batch selection of Biometric readers<br />
244
<strong>STARWATCH</strong> ITDC <strong>PRO</strong> I<br />
Select the readers<br />
Select the data to transmit<br />
The result of transmission is returned on this window<br />
1) Select the readers from the list<br />
2) Select the data from the list<br />
3) Click “transmission“ button<br />
4) The transmission result is returned on the window<br />
5) If the transmission is not successful, check the database and the communication status..<br />
o<br />
Batch transmission of Cardholders’ data to the controller and the biometric reader<br />
• Open<br />
System->System management-> Data Transmission -> transmission to controllers<br />
• Batch transmission of Cardholders’ data<br />
245
<strong>STARWATCH</strong> ITDC <strong>PRO</strong> I<br />
Select controllers or<br />
readers<br />
Select the data to transmit<br />
The result will be returned on the list<br />
The result will be returned on this window.<br />
1) Select controllers or readers from the list<br />
• Data transmission<br />
Transmit cardholders’ information registered in program. Transmit data cardholders accessible to the<br />
selected system.<br />
246
<strong>STARWATCH</strong> ITDC <strong>PRO</strong> I<br />
2) Select ‘’ the transmission of all registered cardholders’ data”<br />
3) Click “Transmission” button.<br />
4) Select “ Yes” .<br />
5) Select transmission type.<br />
.<br />
5-1) Transmission after initialization : click “Yes” button<br />
Caution : All the card data will be erased before transmission.<br />
5-2) Transmission without deleting existing data : Select ‘No’<br />
Select transmission type. To delete and register the card data again, select “Yes”. To modify existing<br />
card data without deleting, select “No”.<br />
247
<strong>STARWATCH</strong> ITDC <strong>PRO</strong> I<br />
5-3) If you want to cancel the transmission, click ‘Cancel’ button.<br />
• Transmission of consecutive card numbers.<br />
Select the range of card numbers to transmit. It is very convenient to transmit the consecutive card<br />
numbers.<br />
Caution : Cardholders being registered to the controller automatically gain access to all the<br />
doors connected to the controller. When being registered to the biometric reader, not biometric<br />
data but card number and pass word (default :0000) will be registered. Biometric data can be<br />
registered later on.<br />
6) Select “ Consecutive card number transmission”<br />
7) Set the card number range to register. Select company and group to register the data collectively.<br />
8) Click “transmit” button.<br />
9) If the following message is given, select “Yes”.<br />
248
<strong>STARWATCH</strong> ITDC <strong>PRO</strong> I<br />
10) Decide whether to register the data collectively to the database. The data registered to the<br />
database will become the basic information.<br />
10-1) If the card number already exists, the following message will be given.<br />
To modify existing data, select “Yes”. If not, select “No”<br />
11) Select transmission type<br />
11-1) Transmission after initialization : Select ‘Yes’<br />
Caution : All the card data will be erased.<br />
11-2) Transmission without deleting existing data : Select ‘No’<br />
Select transmission type. To delete and register the card data again, select “Yes”. To modify<br />
existing card data without deleting, select “No”.<br />
11-3) Select ‘Cancel’ to cancel transmission<br />
12) The transmission result will be displayed on the list<br />
o FGR006(SR) , FINGER006(SR) .<br />
Biometric reader setting, operation and fingerprint management are feasible.<br />
• Open<br />
system->biometric reader setting<br />
• FGR006(SR)<br />
Click “Add/modify” button. Set the address of the biometric reader. To change FGR006(SR)’s<br />
setting values, save and transmit the changes. .<br />
249
<strong>STARWATCH</strong> ITDC <strong>PRO</strong> I<br />
• FINGER006(SR)<br />
Click “Add/modify” button. Select the address of the biometric reader. To change FINGER006(SR)’s<br />
setting values, save and transmit the changes.<br />
250
<strong>STARWATCH</strong> ITDC <strong>PRO</strong> I<br />
o<br />
FACE006(SR)<br />
FACE006(SR) setting, operation and face data management are feasible.<br />
• Open<br />
system->select “biometric reader”<br />
• FACE006(SR)<br />
Click “Add/modify” button. Select the address of the biometric reader. To change FACE006(SR)’s<br />
setting values, save and transmit the changes<br />
251
<strong>STARWATCH</strong> ITDC <strong>PRO</strong> I<br />
- Functions of (FGR006(SR), Finger006(SR)<br />
Functions<br />
Description<br />
Reader Mode RF Only<br />
RF + Fingerprint , Face (PW)<br />
RF + PW + Fingerprint , Face<br />
Fingerprint Mode Dual Mode : to register 2 different fingerprints under a single ID (low recognition<br />
effectiveness)<br />
Single Mode : to register a fingerprint twice<br />
Adaptive Mode Use : to enhance the effectiveness of fingerprint recognition ( recognition process is<br />
comparatively slow. The red light of the module blinks while scanning)<br />
Not Use : Disable Adaptive Mode<br />
Identification Mode By Auto Match( fingerprint only )<br />
Use : allows you to obtain access by using a fingerprint only<br />
Not Use : Disable identification mode<br />
Output Mode 26 Bit Wiegand<br />
ABA Track II<br />
Output Type Transmit the recognition result through the separate line<br />
Normal : Only after successful recognition, the card number will be sent out<br />
Extension : after recognition, the card number is sent out and the result will be sent out<br />
through the separate lines (Ok, Error)<br />
Function Mode Registration Mode : to register fingerprints<br />
Reader Mode : normal fingerprint reading mode<br />
LCD Display Status : the recognition result will be displayed<br />
Card No : Card number will be displayed.<br />
Key Pad<br />
Use : enter the card number by Key Pad<br />
Not Use : disable Key Pad<br />
006P<br />
Use : recognition process will be made by PIN without a card.<br />
Not Use : A card is needed in recognition process.<br />
Stand Alone This functions is not available by now. By default, set as “ Use “<br />
Time & Attendance<br />
252
<strong>STARWATCH</strong> ITDC <strong>PRO</strong> I<br />
- Establishing Work schedule<br />
o<br />
Establishing Work schedule<br />
The work schedule function is designed to apply different work schedules by day to each group of<br />
workers. The work schedule consists of arrival time, departure time, lunch time and night shift. It is<br />
designed to assign different holidays to each week..<br />
• Open<br />
Time & Attendance -> work schedule definition.<br />
• Assign work schedule by day<br />
- instruction<br />
1) Enter work schedule code<br />
2) Enter the name of work schedule<br />
3) Fill in work schedule field at your discretion<br />
4) Absence check function is not feasible for a holiday. Overtime work is applied to the employee<br />
working on a holiday.<br />
4) batch application : If the work schedules are regular during the week, set the time<br />
and click “ batch application” button.<br />
Card holder management<br />
• 2 Men Operation<br />
- If Administrator Card and Visitor Card had been read to reader, 2 Men Operation function would<br />
have been registered Administrator Card and Visitor Card to open access door.<br />
• Personal Tracking<br />
253
<strong>STARWATCH</strong> ITDC <strong>PRO</strong> I<br />
- Personal Tracking function monitors being permanently stationed passer at Access Control<br />
System.<br />
• Guard Tour<br />
- Guard Tour function register/manage patrolman card, patrol area and patrol time.<br />
And it manages to result according to patrol.<br />
A. Detailed description of added functions.<br />
System Management<br />
- Fire Group<br />
- Alarm Controller Arm/Disarm<br />
o<br />
Fire Group<br />
Set controller’s input point on fire signal.<br />
According to fire signal, Fire Group function sets up emergency (fire) exit.<br />
When fire signal occurs, set emergency (fire) exit will be open.<br />
In case of no set Fire Group, occurred fire signal will make open connected all access doors in system.<br />
- Fire Signal Definition<br />
Should set connected fire signal on controller’s input point to set Fire Group.<br />
• Start<br />
Set Up -> Input/Output Definition -> Set fire signal on<br />
connected input point with fire signal selecting controller’s input point Definition.<br />
• Set up Input Point Definition<br />
Input/ Output Definition set up mutual operational relation to occur signal for specific output when input<br />
signal occurs. And Input/Output sets seconds if output signal operates for some time.<br />
In addition, when input signal occurs, type of input signal and text of indicated customized definition<br />
can<br />
set.<br />
According to setting door type of input/output controller, relational information about input/output<br />
signal conception by standard controller default value was created and saved automatically on<br />
database.<br />
On this account, user cannot need addition and deletion. In case of changing only some information<br />
about mutual occurrence relation, operation time, input point of input/output signal, user can modify<br />
and transfer.<br />
• Find<br />
In case of existing set information already, Find is used when you search data in accordance with<br />
condition using Find condition. Therefore Find is used when you modify existing data.<br />
254
<strong>STARWATCH</strong> ITDC <strong>PRO</strong> I<br />
3) You select condition in accordance with Port No. and Controller No.<br />
4) You search clicking Find button. In case of existing found result, detail is indicated.<br />
• Modify<br />
To set by fire signal, you modify Input point which fire signal was inputted.<br />
And you select controller’s input point to modify.<br />
Selected data is indicated on selection.<br />
255
8) You click Modify button.<br />
<strong>STARWATCH</strong> ITDC <strong>PRO</strong> I<br />
9) You select Area(Location), Floor(Location) information. If you select location which<br />
input signal occurs, you can confirm which event occurred any location at event<br />
occurrence.<br />
10) Set input point’s type on ‘Fire’.<br />
<strong>STARWATCH</strong> V2.00.00 recognizes selected input point to fire signal.<br />
11) Input point name indicates showed text on event occurrence window when fire<br />
signal occurs<br />
12) From 1 to 15 output decides whether output separately operates or doesn’t<br />
operate when corresponding input signal (fire signal) occurs.<br />
Inputted value on output set time (seconds) that output operates.<br />
13) In case of inputting 00s, corresponding output signal doesn’t occur.<br />
When you input (select) from 01s to 99s range value, relative output as set<br />
second as operates.<br />
Access door can be open through controller by itself as well as <strong>STARWATCH</strong><br />
14) Save clicking a Save button.<br />
15) Transmit to controller clicking Transmit button.<br />
16) Finish clicking Close button.<br />
- Fire Group Definition<br />
When fire point occurs, Fire Group Definition appoints access door that will be open.<br />
256
• Start<br />
<strong>STARWATCH</strong> ITDC <strong>PRO</strong> I<br />
• Find<br />
Set Up -> Select Fire Group Definition.<br />
In case of having set information already, Find is used when you search data in<br />
accordance with condition inputting find condition.<br />
When you modify existing data, Find is used.<br />
• Add<br />
Add is used when you generate new data. When you supplement Fire Group, you input data<br />
clicking ‘Add’ button on data input screen.<br />
12) Click ‘Add’ button. Then registration screen about Fire Group is showed.<br />
257
<strong>STARWATCH</strong> ITDC <strong>PRO</strong> I<br />
13) Select fire point to register wished Fire Group. If fire point has set, fire point code is automatically<br />
allocated.<br />
14) If set fire point doesn’t exist, you can’t set Fire Group.<br />
Fire point code is order of port number, controller number and input point number.<br />
258
<strong>STARWATCH</strong> ITDC <strong>PRO</strong> I<br />
15) When you input fire point signal, you select access door wished to open.<br />
Add to Fire Group clicking ‘>>’ button or cancel clicking‘
<strong>STARWATCH</strong> ITDC <strong>PRO</strong> I<br />
Alarm Controller Arm/Disarm is function to set/release boundary signal connecting Alarm Controller. After<br />
entering set/release code (2 digit) using reader (-RFK101 etc.) which sends 8bit Burst signal, you can<br />
set/release boundary signal if card has been read.<br />
When Alarm Controller Arm/Disarm sets, output operates according to set output. Although card<br />
make read all reader, output etc. don’t operate. Arm/Disarm card is only read. If you don’t use Alarm<br />
controller Arm/Disarm function, you can set general card<br />
to disable person. If set card on disable card is read, exit can be open as well as set output time in input<br />
point definition separately.<br />
- Controller Definition<br />
You should do boundary set/release on connected controller with alarm controller.<br />
You actively set Alarm Controller Arm/Disarm function and then do Arm code (2 digit) and Disarm code (2 digit).<br />
If you don’t set Alarm Controller Arm/Disarm function, general card can be used on disable person mode.<br />
• Start<br />
Set up-> Controller Definition.<br />
• Alarm controller connected setting, Arm number, Disarm number setting<br />
You set up Alarm Controller Arm/Disarm function.<br />
You set up Arm code and Disarm code.<br />
1) Select controller wished to set on controller contents.<br />
2) Click ‘Modify’ button.<br />
3) When connecting with alarm controller, you select Alarm Controller Arm/Disarm.<br />
If you select Alarm Controller Arm/Disarm, setting field of Use Arm/Disarm, Arm code and Disarm<br />
code will show.<br />
260
<strong>STARWATCH</strong> ITDC <strong>PRO</strong> I<br />
Input usable 2 digits code on each mode. If card is read after pushing set code on keypad,<br />
Arm/Disarm will be activated.<br />
When setting Arm/Disarm mode, set output generates on Input/Output Point Definition. Besides it<br />
processes not to access about being read card through reader until reading Arm/Disarm card.<br />
- Input / Output Point Definition<br />
When you set Alarm Controller Arm/Disarm, Input / Output Point Definition set output to operate.<br />
Classified by each reader of controller, you can set output according to Alarm Controller Arm/Disarm.<br />
For example, when you set Alarm Controller Arm/Disarm on number 1 reader, it makes output of<br />
number 2 and 4 operate.<br />
Operation time setting is possible until 98 s from 01s.<br />
Output of each reader doesn’t operate on 00s and means infinite operation on 99s.<br />
If Alarm Controller Arm/Disarm doesn’t use, Input/Output Point Definition will be output about disable<br />
person.<br />
• Start<br />
Set up -> Input/Output Definition -> Input Point Definition<br />
• Output Definition by Arm/Disarm Mode Definition<br />
Set output to operate when setting Alarm Controller Arm/Disarm.<br />
If Alarm Controller Arm/Disarm hasn’t been set, it would be output about disable person card.<br />
1) Select Advance (Special ID) on Input/Output Point Definition contents.<br />
261
<strong>STARWATCH</strong> ITDC <strong>PRO</strong> I<br />
2) After selecting part of wished output according to Alarm Controller Arm/Disarm setting, click ‘Modify’<br />
button.<br />
Example)<br />
Input/Output Definition set up is window to set output at Arm/Disarm(Disable Person Mode)<br />
setting on 01 port and number 1 RF reader of 000 Controller.<br />
3) Set Board Output to operate at Arm/Disarm (Disable Person Mode) setting. Do about each output.<br />
Setting about Operation second is possible from 01s to 98s.<br />
Output doesn’t operate on 00s and operates infinitely on 99s.<br />
4) Save data clicking ‘Save’ button.<br />
5) Apply to controller clicking ‘Transmit’ button.<br />
262
<strong>STARWATCH</strong> ITDC <strong>PRO</strong> I<br />
- Arm / Disarm Card , Disable Card Definition<br />
Set card to operate Arm/Disarm Mode. If you set not to use Arm/Disarm Mode of controller, it will be<br />
set about disable person.<br />
• Start<br />
Access Control -> Card Holder Management<br />
• Arm/Disarm Card Definition<br />
Set card to definite Arm/Disarm Mode.<br />
1) Click ‘Add’ button on Card Holder List.<br />
2) Input card information to definite Arm/Disarm Code.<br />
(Be similar with Employee Card’s registration.)<br />
3) Select to Card Option tab.<br />
If you select to Arm/Disarm Mode in controller setting, Card Option will show as shown below.<br />
4) If you use registered card to Arm/Disarm Card, you must select to Arm/Disarm Mode.<br />
5) Save data clicking ‘Save’ button.<br />
6) Apply to controller clicking Transmit button.<br />
• Arm / Disarm Card Operation<br />
1) Arm: Read card after inputting setting code of Arm/Disarm Mode in Arm/Disarm setting reader<br />
(keypad reader usable of RFK101 etc.).<br />
According to Arm/Disarm setting, output operates and reader doesn’t read other card except<br />
Disarm Card.<br />
2) Disarm: Read card after inputting setting code of Arm/Disarm Mode in Arm/Disarm setting reader<br />
(keypad reader usable of RFK101 etc.).<br />
Arm Mode is released and output is operated according to setting. Reader reads all cards.<br />
263
<strong>STARWATCH</strong> ITDC <strong>PRO</strong> I<br />
※ Caution: In case of Arm/Disarm Card, if you don’t input Arm/Disarm code, card will be used as<br />
Employee Card.<br />
• Disable Card Definition.<br />
Set Disable Card to operate output by setting time.<br />
1) Click ‘Add’ button on Card Holder List.<br />
2) Input information about Disable Person. (Be similar with Employee Card Registration)<br />
3) Select Card Option tab.<br />
If you don’t select Arm/Disarm Mode in controller setting, option button of Disable Person Card as<br />
shown below will show.<br />
4) If you use registered card to Disable Person Card, you must select Disable Person Card.<br />
5) Save data clicking ‘Save’ button.<br />
6) Apply to controller clicking Transmit button.<br />
264
<strong>STARWATCH</strong> ITDC <strong>PRO</strong> I<br />
Cardholder Management<br />
- 2 Men Operation.<br />
- Personal Tracking<br />
- Guard Tour<br />
o<br />
2 Men Operation.<br />
Register Management Card and Visitor Card to open access door when Management Card and Visitor<br />
Card are read in the reader.<br />
If Management Card and Visitor Card is read in the reader, it can function to open access door.<br />
• Start<br />
Access Control -> Card Holder Management<br />
• Management Card Registration<br />
Register Management Card to use in 2Men Operation.<br />
1) Click ‘Add’ button in Card Holder List.<br />
2) Input information about Management Card of 2Men Operation Card Holder Management screen.<br />
(Be similar with Employee Card’s registration)<br />
3) Move to Card Option tab.<br />
265
<strong>STARWATCH</strong> ITDC <strong>PRO</strong> I<br />
4) Initial Card Option became Employee Card.<br />
Select ‘Management Card’ option to register 2Men Operation’s Management Card.<br />
5) Save data clicking ‘Save’ button.<br />
6) Transmit to controller clicking Transmit button.<br />
266
<strong>STARWATCH</strong> ITDC <strong>PRO</strong> I<br />
• Visitor Card Registration<br />
Register Visitor Card to use in 2Men Operation.<br />
1) Click Add button on Visitor List.<br />
2) Input information about Visitor Card of 2Men Operation on Visitor Management<br />
screen. (Be similar with Employee Card.)<br />
3) Move to Card Option tab.<br />
4) Initial Card Option became only Visitor Card. Select ‘Visitor Card + Management<br />
Card’ to use Visitor Card of 2Men Operation.<br />
267
<strong>STARWATCH</strong> ITDC <strong>PRO</strong> I<br />
5) Save data clicking ‘Save’ button.<br />
6) Transmit to controller clicking ‘Transmit’ button.<br />
• 2Men Operation<br />
1) Make Management Card or Visitor Card read in the reader that is wished to access.<br />
2) After Being read first 2Men Operation Card, Management Card or Visitor Card is read within 5s.<br />
268
<strong>STARWATCH</strong> ITDC <strong>PRO</strong> I<br />
3) If same card is read repeatedly or other card isn’t read within 5s, alarm about Time Out will occur.<br />
o<br />
Personal Tracking<br />
Personal Tracking monitors that access person has been stationed permanently.<br />
• Start<br />
Set Up -> Personal Tracking Reader Definition<br />
• Personal Tracking Reader Definition<br />
269
<strong>STARWATCH</strong> ITDC <strong>PRO</strong> I<br />
Set IN and OUT Reader List in appointed space for check-in management.<br />
Can understand that check-in condition about read and entered access person<br />
through set reader by space’s IN Reader.<br />
Check-out is processed about read and went out access person through set reader to space’s OUT<br />
Reader.<br />
1) Execute on the reader’s registration about check-in management.<br />
2) In Available Reader List, select IN Reader of space that has been wished to check-in management.<br />
3) Select IN Reader List clicking ‘>>’ button.<br />
270
<strong>STARWATCH</strong> ITDC <strong>PRO</strong> I<br />
4) In Available Reader List, select Out Reader of space that has been wished check-in<br />
management.<br />
271
• Personal Tracking Report<br />
<strong>STARWATCH</strong> ITDC <strong>PRO</strong> I<br />
Finds/ Prints personal tracking report during check-in.<br />
Do leaving process about incorrect data too.<br />
1) Report -> Personal Tracking Report<br />
2) Click ‘Find’ button after you select Find Condition.<br />
And then it shows personal tracking report, final area and time during check-in.<br />
272
<strong>STARWATCH</strong> ITDC <strong>PRO</strong> I<br />
3) If you want to print about Personal Tracking Report, you must click ‘Print’ button.<br />
4) If incorrect results come out real check-in condition differently, you can manage<br />
forcibly leaving process. You do leaving process selecting incorrect data and clicking ‘Yes’ button<br />
about inquiry that “Delete the data you select?”<br />
o<br />
Guard Tour<br />
273
Register/Manage card, area and time of Guard Tour.<br />
<strong>STARWATCH</strong> ITDC <strong>PRO</strong> I<br />
Manage result according to Guard Tour.<br />
• Start<br />
Access Control -> Guard Tour<br />
• Guard Tour Definition<br />
Set employee, course and time etc. for guard tour.<br />
1) Access Control -> Guard Tour -> Guard Tour Definition<br />
2) Select Guard List tab on Guard Tour List. Click ‘Add’ button to register employee for guard tour.<br />
3) Select employee for guard tour among registered access persons. Add employee for<br />
guard tour clicking ‘Add’ button in Guard Tour List.<br />
274
<strong>STARWATCH</strong> ITDC <strong>PRO</strong> I<br />
4) Close to register employee for Guard Definition clicking ‘Save’ button.<br />
5) Select Guard Tour List tab on Guard Tour List window. Click ‘Add’ button to register course and<br />
time for guard tour.<br />
6) Select Guard Tour List tab on Guard Tour List window.<br />
7) Input Guard Tour Code and Guard Tour Name.<br />
275
<strong>STARWATCH</strong> ITDC <strong>PRO</strong> I<br />
8) If order is appointed, option that ‘Sequenced Guard Tour’ will be selected.<br />
If you check option that ‘Sequenced Guard Tour’, you can appoint ‘Check Time’. And employee for<br />
guard tour should progress patrol fitting Check Time.<br />
8-1) In case of ‘Sequenced Guard Tour’, Set ‘Tour Time’. Set ‘Tolerance for Early Arrival’ and<br />
‘Tolerance for Late Arrival’.<br />
For standard ‘Tolerance for Early Arrival’, Guard Tour Employee patrols more early than ‘Tolerance<br />
for Early Arrival’.<br />
For standard ‘Tolerance for Late Arrival’, Guard Tour Employee patrols more<br />
late than ‘Tolerance for Late Arrival’.<br />
9) After selecting ‘Selected Check Point’, register Area for Guard Tour clicking ‘->’ button.<br />
10) Save data clicking ‘Save’ button.<br />
• Guard Tour Status<br />
Use at real guard tour. Can start a guard tour and can see a guard tour list.<br />
1) Access Control -> Guard Tour -> Guard Tour Status<br />
276
<strong>STARWATCH</strong> ITDC <strong>PRO</strong> I<br />
2) Select ‘Guard Tour Code’ that you wish to guard tour.<br />
3) Select ‘Guard Tour Name’.<br />
4) Start clicking ‘start a guard tour’. Selected person as guard tour employee makes card read in the<br />
reader which is selected as area for guard tour.<br />
5) If Guard Tour Employee patrols, Touring List and Detail Touring List will show on the screen.<br />
277
<strong>STARWATCH</strong> ITDC <strong>PRO</strong> I<br />
6) If you cancel guard tour, you must select ‘Guard Tour’ wished to cancel in Detail<br />
Touring List. Cancel ‘Guard Tour’ clicking ‘Cancel’ button. Canceled Detail Touring List was not<br />
recorded.<br />
7) If guard tour is completed, you must select guard tour that is wished to complete in<br />
Detail Touring List. Complete guard tour clicking ‘Close’ button. Completed detail touring list can be<br />
confirmed in Guard Tour Report.<br />
※ Caution : If registered card for guard tour employee don’t try ‘start a guard tour’,<br />
it will be used as Employee Card. Only try to ‘start a guard tour’, it is recognized as guard tour.<br />
• Guard Tour Report<br />
Find about completed guard tour report<br />
1) Select Report -> Guard Tour Report.<br />
2) Select ‘Find Condition’. That is Date(From), Date(To), Guard Tour Code and Guard Tour Name etc.<br />
278
3) Print ‘Guard Touring Report’ clicking ‘Print’ button.<br />
<strong>STARWATCH</strong> ITDC <strong>PRO</strong> I<br />
279