Shaker Tall Clock.pdf - Fine Woodworking
Shaker Tall Clock.pdf - Fine Woodworking
Shaker Tall Clock.pdf - Fine Woodworking

You also want an ePaper? Increase the reach of your titles
YUMPU automatically turns print PDFs into web optimized ePapers that Google loves.
24 in.<br />
24 in.<br />
Side<br />
31/2 in.<br />
Side<br />
1 ⁄ in.<br />
31/2 in.<br />
1 ⁄ in.<br />
17 in.<br />
17 in.<br />
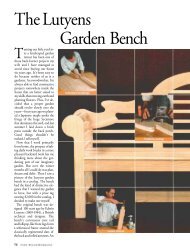
ou can thank Mike Pekovich,<br />
<strong>Fine</strong> <strong>Woodworking</strong>’s art director,<br />
for designing this simple but<br />
stylish bookcase. He took a straightforward<br />
form--an oak bookcase with dado<br />
and rabbet joints--and added nice proportions<br />
and elegant curves.<br />
We agreed that screws would reinforce<br />
the joints nicely, and that gave us a design<br />
option on the sides. Choose oak<br />
plugs, and align the grain carefully, and<br />
the plugs disappear. Make them from a<br />
contrasting wood, like walnut, and the<br />
rows of plugs add a nice design feature<br />
to the broad sides, hinting at the construction<br />
in a subtle way.<br />
By design the bookcase contains a<br />
number of fundamental lessons for<br />
would-be furniture-makers, and like the<br />
other projects in this video series, the<br />
whole thing can be built with just a few<br />
portable power tools: a circular saw, a<br />
drill, and a router<br />
The shelves attach to the sides with<br />
simple dadoes, and the back and backsplash<br />
drop into rabbets. Screws reinforce<br />
the dado joints and also attach the<br />
lower stretcher, and wood plugs cover<br />
the screw holes. Smaller wood screws<br />
are used to attach the plywood back.<br />
Curves add life to rectangular pieces<br />
of furniture, and Pekovich worked in<br />
three types, each irregular and organic<br />
(as opposed to radius curves that can<br />
seem mechanical). At the top are gentle<br />
curves that speed up as they move<br />
forward, each taken from a section of<br />
a French curve. At the bottom are two<br />
long curves formed with a flexible wood<br />
batten, one extending end to end on the<br />
lower stretcher, and the other a short<br />
graceful arch at the bottom of the sides,<br />
ending at a straight step at each end to<br />
suggest legs.<br />
--Asa Christiana, editor, <strong>Fine</strong> <strong>Woodworking</strong><br />
1 ⁄ in.<br />
11/2 in.<br />
1 ⁄ in.<br />
2 ⁄ in.<br />
11/2 in.<br />
2 ⁄ in.<br />
VideOs<br />
9 ⁄ in.<br />
10 in.<br />
9 ⁄ in.<br />
10 in.<br />
B y A s A C h r i s t i A n A<br />
Lumber and hardware List<br />
Part QtY size materiaL<br />
sides<br />
sheLVes<br />
62 in.<br />
back sPLash<br />
arched<br />
stretcher<br />
back<br />
screws FOr<br />
sheLVes<br />
screws FOr<br />
back<br />
62 in.<br />
41 in.<br />
41 in.<br />
48 in.<br />
48 in.<br />
3 ⁄ in.<br />
3 ⁄ in.<br />
4 in.<br />
1 ⁄ in.<br />
1 ⁄ in.<br />
4 in.<br />
1 ⁄ in.<br />
33 ⁄ in.<br />
1 ⁄ in.<br />
TAUNTON’S<br />
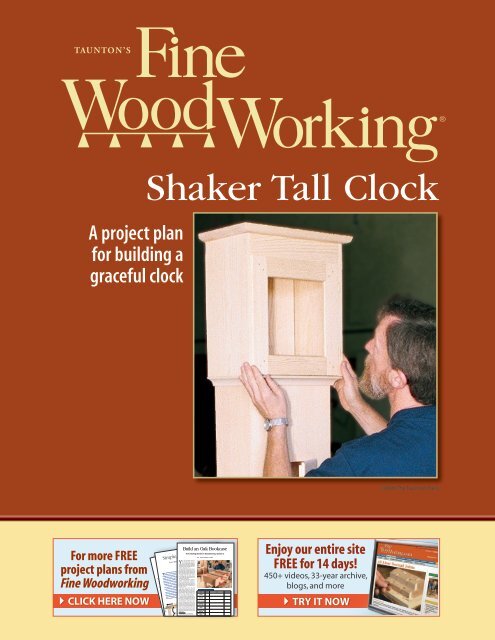
W<strong>Shaker</strong> <strong>Tall</strong> <strong>Clock</strong><br />
A project plan<br />
for building a<br />
graceful clock<br />
©2009 The Taunton Press<br />
For more FREE<br />
project plans from<br />
<strong>Fine</strong> <strong>Woodworking</strong><br />
click here now<br />
S i m p l e , S t u r d y Wo r k b e n c h<br />
T<br />
S i m p l e , S t u r d y Wo r k b e n c h<br />
T<br />
From Getting Started in <strong>Woodworking</strong>, Season 2<br />
From Getting Started in <strong>Woodworking</strong>, Season 2<br />
his workbench is easy and inexpensive<br />
to build, yet is sturdy and versatile<br />
enough for any woodworker. The base is<br />
construction lumber (4x4s and 2x4s), joined<br />
simply with long bolts and short dowels. The<br />
top is two layers of MDF (medium-density<br />
fiberboard), cut from a single sheet, with<br />
enough left over to make a handy shelf.<br />
The only tools needed to make this bench<br />
are a dri l/driver, a circular saw, and a handheld<br />
router or a router table.<br />
There is room at one end for a smal castiron<br />
woodworking vise, which is an essential<br />
tool in any woodworking shop. The vise is<br />
fitted with non-maring wooden jaws, and the<br />
jaws and benchtop receive dog holes, sized<br />
to fit a variety of handy bench accessories.<br />
stretchers<br />
ViDeOs<br />
B y A s A C h r i s t i A n A<br />
B y A s A C h r i s t i A n A<br />
his workbench is easy and inexpensive<br />
to build, yet is sturdy and versatile<br />
enough for any woodworker. The base is<br />
construction lumber (4x4s and 2x4s), joined<br />
simply with long bolts and short dowels. The<br />
top is two layers of MDF (medium-density<br />
fiberboard), cut from a single sheet, with<br />
enough left over to make a handy shelf.<br />
The only tools needed to make this bench<br />
are a dri l/driver, a circular saw, and a handheld<br />
router or a router table.<br />
There is room at one end for a sma l castiron<br />
woodworking vise, which is an essential<br />
tool in any woodworking shop. The vise is<br />
fitted with non-maring wooden jaws, and the<br />
jaws and benchtop receive dog holes, sized<br />
to fit a variety of handy bench accessories.<br />
stretchers<br />
ViDeOs<br />
Y<br />
Build an Oak Bookcase<br />
From Getting Started in <strong>Woodworking</strong>, Season 2<br />
LuMber, harDware anD suppLies LisT<br />
4 8-ft.-long 2x4s, kiln-dried<br />
2 8-ft.-long 4x4s, kiln-dried<br />
1 4x8 sheet of MDF<br />
2 Hardwood pieces for vise jaws, 71/2 in. long by 3 in. wide. Front jaw can be<br />
between 1 in. and 11/2 in. thick and the rear jaw is 3/4 in. thick.<br />
1 Filer block for mounting vise, 3/4-in.-thick plywood, 4 in. wide by 6 in. long<br />
1 bo tle of yelow glue<br />
1 7-in. Groz Rapid-Action <strong>Woodworking</strong> Vise (www.woodcraft.com)<br />
4 6-ft. lengths of ⁄ -in.-dia. threaded rod<br />
16 ⁄ -in. washers<br />
16 ⁄ -in. nuts<br />
2 2-in.-long 1/4-20 bolts, nuts, washers for a taching front jaw of vise<br />
2 11/2-in.-long, 1/4-20 flathead screws for a taching rear jaw<br />
1 Box of 11/4-in.-long drywal screws for laminating benchtop<br />
4 ⁄ -in.-dia., 21/2-in.-long lag screws and washers, for a taching vise<br />
16 S-clip-type tabletop fasteners<br />
16 ⁄ -in.-dia. dowels, roughly 3 in. long<br />
LuMber, harDware anD suppLies LisT<br />
4 8-ft.-long 2x4s, kiln-dried<br />
2 8-ft.-long 4x4s, kiln-dried<br />
1 4x8 sheet of MDF<br />
2 Hardwood pieces for vise jaws, 71/2 in. long by 3 in. wide. Front jaw can be<br />
between 1 in. and 11/2 in. thick and the rear jaw is 3/4 in. thick.<br />
1 Filer block for mounting vise, 3/4-in.-thick plywood, 4 in. wide by 6 in. long<br />
1 bo tle of yelow glue<br />
1 7-in. Groz Rapid-Action <strong>Woodworking</strong> Vise (www.woodcraft.com)<br />
4 6-ft. lengths of ⁄ -in.-dia. threaded rod<br />
16 ⁄ -in. washers<br />
16 ⁄ -in. nuts<br />
2 2-in.-long 1/4-20 bolts, nuts, washers for a taching front jaw of vise<br />
2 11/2-in.-long, 1/4-20 flathead screws for a taching rear jaw<br />
1 Box of 11/4-in.-long drywal screws for laminating benchtop<br />
4 ⁄ -in.-dia., 21/2-in.-long lag screws and washers, for attaching vise<br />
16 S-clip-type tabletop fasteners<br />
16 ⁄ -in.-dia. dowels, roughly 3 in. long<br />
Long stretchers<br />
Long stretchers<br />
33 ⁄ in.<br />
9 in. 9 ⁄ in.<br />
9 in. 9 ⁄ in.<br />
Visit us online at <strong>Fine</strong>woodworking.com/star to watch a two-part video detailing how to build this workbench from star to finish.<br />
Visit us online at <strong>Fine</strong>woodworking.com/star to watch a two-part video detailing how to build this workbench from star to finish.<br />
Enjoy our entire site<br />
FREE for 14 days!<br />
450+ videos, 33-year archive,<br />
blogs, and more<br />
try it now
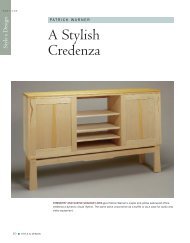
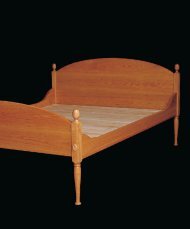
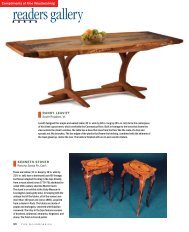
Order, punctuality and the timely completion of tasks were<br />
the rules of the day in <strong>Shaker</strong> communities. Even so,<br />
watches were considered inappropriate under the dictates<br />
of the faith. <strong>Tall</strong> clocks as well as wall-hung clocks were another<br />
story. They readily found a place in the community dwelling<br />
houses of the <strong>Shaker</strong>s. Usually found in central hallways, tall<br />
clocks could be viewed easily by <strong>Shaker</strong> brothers and sisters as<br />
they went about their chores.<br />
<strong>Shaker</strong> clocks, especially tall clocks, are most often associated<br />
with the Watervliet community in upstate New York. This is where<br />
Benjamin Youngs, a skilled clockmaker, became a convert to <strong>Shaker</strong>ism.<br />
Youngs had been an apprentice to his father, a clockmaker<br />
in Hartford, Conn. Benjamin converted to the <strong>Shaker</strong> faith after he<br />
moved his family to a farm near the Watervliet community.<br />
Brother Benjamin's early clocks, made before and shortly after<br />
his conversion, show an awareness of the fashion of the day. After<br />
his conversion, his clocks have the straightforward, functional and<br />
modest properties associated with <strong>Shaker</strong> design.<br />
You don't need hard-to-find stock<br />
The clock shown on the facing page is based on one that's believed<br />
to be the work of Benjamin Youngs. That clock is illustrated<br />
in John Kassay's The Book of <strong>Shaker</strong> Furniture (University of Massachusetts<br />
Press, 1980). Kassay's measured drawings, in meticulous<br />
detail, give accurate dimensions of the parts down to a thirtysecond<br />
of an inch. I modified the dimensions slightly, so I could<br />
get the required parts from clear pine in nominal 1 in. thicknesses.<br />
I can make this clock from standard lumberyard material, sur-
faced on all four sides (S4S), with only a small amount of waste. It<br />
pays to take your time at the lumberyard when selecting stock.<br />
Because some pieces, like the case front, are made with the full<br />
width of standard dimensioned material, you should pick only<br />
stock with straight, parallel sides. It's a good idea to take a straightedge<br />
with you to make sure the material is flat across its face.<br />
The original clock was made with pine, and so is this one. The<br />
front and back of the case are made from 1xl2s. The remaining<br />
parts are made from standard 1x10 and 1x8 pine. A painted finish is<br />
simple and authentic. I've also used hardwood with a clear finish.<br />
Case joinery is simple but strong<br />
I begin construction of the clock case by ripping the -in. sides<br />
from 1xl0s, saving the rippings for later use. After carefully squaring<br />
the sides to length, I make a simple doweling jig (see the top<br />
photo on p. 87) from some square -in. by -in. material. The<br />
outside faces of the case sides must be exactly in. apart. By<br />
orienting the jig along baselines accurately laid out on the case<br />
bottom and across the end grain of the case sides, I can bore holes<br />
guaranteed to align (see the center photo on p. 87). A stop on the<br />
drill bit prevents boring all the way through the bottom. I use -in.<br />
dowels, cutting them to length carefully so they don't bottom out<br />
in the holes.<br />
The front of the case is made from the full width of a 1x12, which<br />
is actually in. I attach the front to the sides with a nailed and<br />
glued rabbet joint. I often cut the rabbet at the tablesaw with a<br />
-in.-wide dado head. But for this case, I used a router with a rabbeting<br />
bit. The rabbet is cut in. deep and runs the entire length
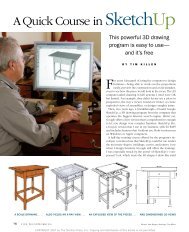
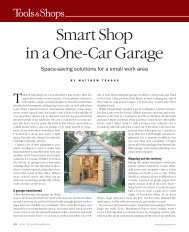
BUILDING THE CASE,<br />
Case joinery is simple.<br />
Sides are glued and nailed<br />
into rabbets cut in the case<br />
front. The back is screwed<br />
on, and the case is joined to<br />
the base with glue dowels.
of the front. Then I cut out the opening for the case door with a<br />
hand-held scroll saw at the bench.<br />
While the dado head is still in the saw, I cut rabbets in the back<br />
edge of the case sides to accommodate the back. I keep the width<br />
at in., but I increase the depth to in. (I leave the back thickness<br />
at in., though it easily can be reduced to in.) I rip the<br />
back to width from a 1x12. Ultimately, I will screw the back onto<br />
the case. Before doing so, I attach narrow filler strips, cut from the<br />
side rippings, to the top to span the gap created by the difference<br />
in width between the case and the hood.<br />
Gluing up the case and applying the molding<br />
Before gluing the case together, I round over the front and ends of<br />
the case bottom with a -in.-radius router bit. I also give all case<br />
parts a preliminary sanding. You'll need a few long bar clamps to<br />
glue the dowel joints at the bottom of the case. The front is glued<br />
and nailed, and the back is simply screwed on. The front and back<br />
will help to hold the assembly square while the glue has time to<br />
dry. After the glue has dried and the nail holes have been filled,<br />
the case can be given its final sanding.<br />
There was one part of this clock I couldn't cut from my standard<br />
material: the transitional cove molding attached to the top of the<br />
case. But in keeping with the frugal nature of this exercise, I took<br />
the molding from some rippings left over from a Windsor chair<br />
seat blank. I cut the molding profile with a -in.-radius cove bit in<br />
the router. For safety's sake, I left the blank wide, cut the profile<br />
and then ripped the molding to width.<br />
Of the myriad ways to attach the molding, my choice was one<br />
of the simplest: gluing the miters and screwing the length of<br />
the molding to the case through slotted holes from the inside. Although<br />
there's no guarantee the miters will never open up, the<br />
slotted holes give the case a way to expand and contract seasonally<br />
without cracking. The case door is lipped and rabbeted all the<br />
way around and attached with offset hinges, like those often<br />
found on kitchen cabinets.<br />
Sliding dovetails join hood top and sides<br />
As in most tall clocks, the hood of this one is removable, providing<br />
access to the movement. After double-checking the dimensions,<br />
I cut the sides and top of the hood from a length of 1x10.<br />
The joint of the side to top easily could be the dowel joint used<br />
in the case, but for variety, I used a sliding dovetail on this clock<br />
(see the drawings on p. 88). Easily cut with a router inverted in a<br />
table, the sliding dovetail is a strong and appropriate joint.<br />
Location of the joint is critical. The outside face of the hood sides<br />
must line up with the outside edge of the transitional molding. I<br />
mark the location of the joint on the underside of the hood top<br />
and set the height of the in. dovetail bit at in. Then I carefully<br />
adjust the fence on the router table. With soft pine, there is no<br />
need to plow out a dado before cutting the dovetail; the joint is cut<br />
with one pass of the dovetail bit. A stop placed on the fence limits<br />
the length of the cut.<br />
After cutting both ends of the top, I relocate the fence while the<br />
height of the bit remains constant. I extend the height of the fence<br />
to provide stability while cutting the hood sides. Using a piece<br />
of scrap pine the same thickness as the hood sides, I dicker with<br />
the fence until the joint is a firm press-fit. When satisfied, I cut the<br />
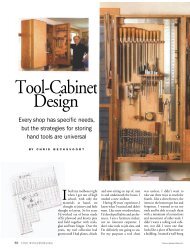
Doweling jig—Holes bored in a<br />
hardwood scrap guide the bit as<br />
the author drills out a case side<br />
for glue dowels.<br />
Flip jig, and drill bottom. The<br />
jig, with its fence removed, is<br />
flipped over and aligned with<br />
layout lines on the case bottom<br />
to drill matching holes.<br />
Test-fit. The jig ensures that<br />
dowels line up correctly, even<br />
if guide holes are not perfectly<br />
spaced or centered.
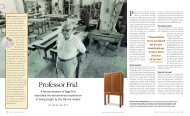
BUILDING THE BONNET AND DOOR<br />
Slide-on bonnet—The bonnet<br />
for this <strong>Shaker</strong> tall clock rests<br />
on transitional molding at the<br />
top of the case. It slides on and<br />
off to provide access to the<br />
clock's movement.
dovetails on the ends of the boards. Even though the dovetails extend<br />
across the entire width of the boards, the first inch closest to<br />
the front edge must be trimmed off for the rabbet cut into the inside<br />
faces of the sides.<br />
Protect the clock movement from dust<br />
The rabbets cut into the inside faces on the sides have a double<br />
purpose. First, they act as a door stop, and second, they keep out<br />
dust, the main adversary of clock movements. I cut the rabbets in<br />
the same manner as I cut the ones in the clock case. Before gluing<br />
up the hood, I rout the front and ends of the top with the same<br />
roundover bit I had used on the case bottom.<br />
The hood has no bottom, so for rigidity, I added a rail at the bottom<br />
of the hood behind the-bottom door rail. I simply glue and nail<br />
the rail in place (see the drawing on the facing page). The upper<br />
rail, located above the door, is cut to fit within the rabbets and<br />
also is glued and nailed in place. An inner rail is glued and nailed<br />
behind the upper rail to act as a dust stop. The three rails are taken<br />
from what's left after ripping the case sides.<br />
Hood door is rabbeted for a glass insert<br />
The hood door is assembled with the ubiquitous mortise-and-tenon<br />
joint. Because this clock has only one door, and a small one at that,<br />
I cut the joints by hand. After cutting the door parts to size from the<br />
rippings left over from the case sides, I lay out the joint using a<br />
square and a marking gauge. I rout the edge with a -in. roundover<br />
bit and cut the rabbet for the glass before cutting the joint.<br />
The joint is easily cut by boring out the mortise with a brace and<br />
bit and then clearing out the waste with sharp chisels. I use a backsaw<br />
to cut the tenons on the ends of the rails, first making the<br />
cheek cuts and then supporting the rails in a bench hook to make<br />
the shoulder cuts.<br />
Trimming the miters at the joints requires a mitering template to<br />
guide the chisel (see the top photo). With the template cut to an<br />
accurate 45° and set at the layout line, it's a simple matter to cut a<br />
perfectly fitting miter (see the center and bottom photos). I make<br />
the door slightly oversized and trim it to a close fit after glue-up.<br />
Once I'm satisfied with the fit, I hang the door in the hood with<br />
simple butt hinges.<br />
I bought the weight-driven, eight-day movement for this clock<br />
from Frei and Borel (126 2nd St., Oakland, CA 94607; 510-832-<br />
8148). It sits on top of a seat board made from three pieces of the<br />
wood I had left over. Appearing as the letter C sitting on its side, the<br />
seat board is attached to the ends of the case sides with dowels and<br />
without glue. Holes are bored into the seat for the pendulum as<br />
well as the weight chains. Another option would have been to extend<br />
the case sides and place a horizontal board bridging the sides<br />
where the movement would have been. The clock face, painted<br />
onto wood, is screwed to the seat board. The time ring on this dial<br />
is 7 in. dia. Paper dials are available from mail-order houses.<br />
According to Kassay, the original clock was painted red, so I<br />
followed suit. I used Covered Bridge red paint available from<br />
Primrose Distributing, 54445 Rose Road, South Bend, IN 46628;<br />
(800) 222-3092.<br />
For clean<br />
miters, use a<br />
guide. Rabbets<br />
on door stiles<br />
and rails meet<br />
in a miter at<br />
inside corners.<br />
For tight-fitting<br />
joints, the<br />
author pares<br />
pieces with the<br />
help of a guide<br />
block cut to a<br />
45° angle.<br />
Clamp and<br />
pare. With the<br />
rabbet cut<br />
away at the end<br />
of the door stile,<br />
the author<br />
pares the miter<br />
with a sharp<br />
chisel.The mi-<br />
tering template<br />
is clamped to<br />
the stile along<br />
the layout line.<br />
The fit is<br />
right. The<br />
mitered rabbet<br />
at each corner<br />
is a pleasing<br />
construction debuilding<br />
a door<br />
tail, and a practical<br />
means of<br />
frame that will<br />
accommodate a<br />
piece of glass.<br />
Robert Treanor lives in San Francisco where he builds <strong>Shaker</strong><br />
furniture and writes about woodworking.