

Using RTSP on QC Series DVRs 1. Create the RTSP ... - Q-See
Using RTSP on QC Series DVRs 1. Create the RTSP ... - Q-See
Using RTSP on QC Series DVRs 1. Create the RTSP ... - Q-See

You also want an ePaper? Increase the reach of your titles
YUMPU automatically turns print PDFs into web optimized ePapers that Google loves.
<str<strong>on</strong>g>Using</str<strong>on</strong>g> <str<strong>on</strong>g>RTSP</str<strong>on</strong>g> <strong>on</strong> <strong>QC</strong> <strong>Series</strong> <strong>DVRs</strong><br />
<strong>1.</strong> <strong>Create</strong> <strong>the</strong> <str<strong>on</strong>g>RTSP</str<strong>on</strong>g> Command<br />
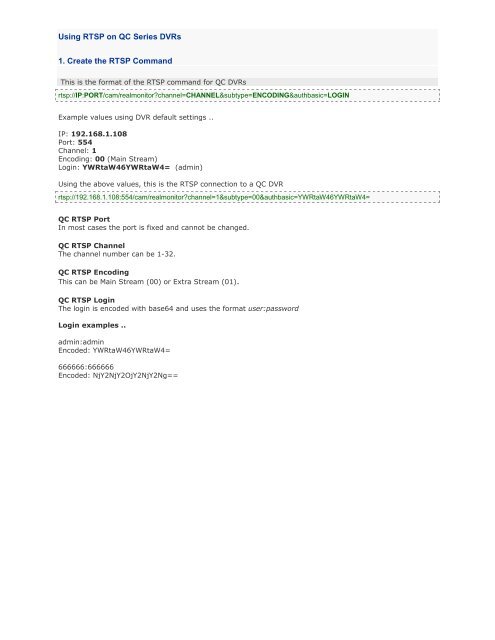
This is <strong>the</strong> format of <strong>the</strong> <str<strong>on</strong>g>RTSP</str<strong>on</strong>g> command for <strong>QC</strong> <strong>DVRs</strong><br />
rtsp://IP:PORT/cam/realm<strong>on</strong>itor?channel=CHANNEL&subtype=ENCODING&authbasic=LOGIN<br />
Example values using DVR default settings ..<br />
IP: 192.168.<strong>1.</strong>108<br />
Port: 554<br />
Channel: 1<br />
Encoding: 00 (Main Stream)<br />
Login: YWRtaW46YWRtaW4= (admin)<br />
<str<strong>on</strong>g>Using</str<strong>on</strong>g> <strong>the</strong> above values, this is <strong>the</strong> <str<strong>on</strong>g>RTSP</str<strong>on</strong>g> c<strong>on</strong>necti<strong>on</strong> to a <strong>QC</strong> DVR<br />
rtsp://192.168.<strong>1.</strong>108:554/cam/realm<strong>on</strong>itor?channel=1&subtype=00&authbasic=YWRtaW46YWRtaW4=<br />
<strong>QC</strong> <str<strong>on</strong>g>RTSP</str<strong>on</strong>g> Port<br />
In most cases <strong>the</strong> port is fixed and cannot be changed.<br />
<strong>QC</strong> <str<strong>on</strong>g>RTSP</str<strong>on</strong>g> Channel<br />
The channel number can be 1-32.<br />
<strong>QC</strong> <str<strong>on</strong>g>RTSP</str<strong>on</strong>g> Encoding<br />
This can be Main Stream (00) or Extra Stream (01).<br />
<strong>QC</strong> <str<strong>on</strong>g>RTSP</str<strong>on</strong>g> Login<br />
The login is encoded with base64 and uses <strong>the</strong> format user:password<br />
Login examples ..<br />
admin:admin<br />
Encoded: YWRtaW46YWRtaW4=<br />
666666:666666<br />
Encoded: NjY2NjY2OjY2NjY2Ng==
<strong>Create</strong> your <str<strong>on</strong>g>RTSP</str<strong>on</strong>g> command ..<br />
Enter IP address<br />
192.168.<strong>1.</strong>108<br />
Enter Port<br />
554<br />
Select Channel<br />
1<br />
Select Encoding<br />
Main Stream<br />
Enter user:password<br />
admin:admin<br />
This is your <str<strong>on</strong>g>RTSP</str<strong>on</strong>g> command<br />
<strong>Create</strong> <strong>on</strong>ly <strong>the</strong> base64 login ..<br />
Enter user:password<br />
admin:admin<br />
Base64 encoded login<br />
2. IP Camera <str<strong>on</strong>g>RTSP</str<strong>on</strong>g> Command<br />
The <str<strong>on</strong>g>RTSP</str<strong>on</strong>g> command for <strong>QC</strong> IP Cameras sends <strong>the</strong> login as plain text.<br />
This is <strong>the</strong> format of <strong>the</strong> <str<strong>on</strong>g>RTSP</str<strong>on</strong>g> command for <strong>QC</strong> IP Cameras ..<br />
rtsp://LOGIN@IP:PORT/cam/realm<strong>on</strong>itor?channel=CHANNEL&subtype=ENCODING<br />
<str<strong>on</strong>g>Using</str<strong>on</strong>g> <strong>the</strong> above format, this is a sample <str<strong>on</strong>g>RTSP</str<strong>on</strong>g> c<strong>on</strong>necti<strong>on</strong> to a <strong>QC</strong> IP camera ..<br />
rtsp://admin:admin@192.168.<strong>1.</strong>108:554/cam/realm<strong>on</strong>itor?channel=1&subtype=1<br />
Important<br />
1) For remote access, forward <strong>the</strong> <str<strong>on</strong>g>RTSP</str<strong>on</strong>g> port in your router settings<br />
2) Verify <strong>the</strong> user account actually exists and is not locked
3. Play Live Video with VLC<br />
Download VLC for your particular operating system.<br />
Run VLC and select "Media", "Open Network Stream".<br />
Enter your full <str<strong>on</strong>g>RTSP</str<strong>on</strong>g> command in <strong>the</strong> network URL box.<br />
Click "Play" to begin streaming live video from <strong>the</strong> DVR.
4. Stream Live Video with Media Player<br />
Open VLC if it is not already open, or stop any previous video.<br />
Select "Media", "Open Network Stream", and enter your full <str<strong>on</strong>g>RTSP</str<strong>on</strong>g> command as before.<br />
This time you will select "Stream" from <strong>the</strong> drop down menu.
You will <strong>the</strong>n see <strong>the</strong> Stream Output window appear.<br />
The Source tab will show your <str<strong>on</strong>g>RTSP</str<strong>on</strong>g> command. This cannot be edited.<br />
If you need to make changes click "Cancel" and start again.<br />
Click <strong>the</strong> "Next" butt<strong>on</strong> to c<strong>on</strong>tinue.<br />
Under <strong>the</strong> Destinati<strong>on</strong>s tab select "MS-WMSP (MMSH)" from <strong>the</strong> drop down box.<br />
To view live video <strong>on</strong> this computer check <strong>the</strong> "Display locally" box (not recommended).<br />
Click "Add" to show <strong>the</strong> Network opti<strong>on</strong>s.<br />
Here you can change <strong>the</strong> default port or leave it as is - this step must be completed ei<strong>the</strong>r way.<br />
For remote access to <strong>the</strong> live stream this port must be forwarded to <strong>the</strong> computer running VLC.
Under Transcoding Opti<strong>on</strong>s select "Video - WMV + WMA (ASF)" from <strong>the</strong> drop down box.<br />
Verify <strong>the</strong> "Activate Transcoding" box is checked.<br />
Click "Stream" to begin streaming live video from <strong>the</strong> DVR.<br />
If you selected "Display locally" you will see live video.<br />
O<strong>the</strong>rwise you can just minimize <strong>the</strong> VLC window.
Open Windows Media Player <strong>on</strong> your remote computer.<br />
Verify HTTP is enabled in <strong>the</strong> Network opti<strong>on</strong>s.<br />
Goto "File", "Open URL", and enter <strong>the</strong> IP/Domain and port number of your VLC computer.
Click "Ok" to begin streaming live video from VLC.<br />
5. Stream Live Video <strong>on</strong> a Webpage<br />
Open VLC if it is not already open, or stop any previous video.<br />
Select "Media", "Open Network Stream", and enter your full <str<strong>on</strong>g>RTSP</str<strong>on</strong>g> command as before.<br />
Select "Stream" from <strong>the</strong> drop down menu.<br />
You will <strong>the</strong>n see <strong>the</strong> Stream Output window appear.<br />
The Source tab will show your <str<strong>on</strong>g>RTSP</str<strong>on</strong>g> command. This cannot be edited.<br />
If you need to make changes click "Cancel" and start again.
Skip "Destinati<strong>on</strong>s" and click <strong>the</strong> "Opti<strong>on</strong>s" tab.<br />
Enter <strong>the</strong> VLC stream output string and click "Stream".<br />
I will provide you with example strings below.<br />
JW Player in Google Chrome ..<br />
You can now stream this video from compatible players such as JW Player or FlowPlayer.<br />
This allows you to embed it into your website using JavaScript and Flash.<br />
The stream format would be http://IP:PORT/FILE<br />
VLC Stream Output Strings ..<br />
I will will show you 3 examples for <strong>QC</strong> <strong>DVRs</strong> - FLV and H.264 encoded.<br />
All 3 examples will output FLV (flash) files for live streaming video.<br />
Adjust <strong>the</strong> scale value based <strong>on</strong> your original encode size.<br />
To use <strong>the</strong> original encode size you can simply leave out <strong>the</strong> scale setting.<br />
Incorrect scale/bitrate/fps values result in a corrupted video stream.
Example 1: FLV Codec (CIF)<br />
This is better suited for busy websites.<br />
VLC Stream Output String:<br />
:sout=#transcode{vcodec=FLV1,vb=256,fps=7,scale=1,acodec=n<strong>on</strong>e}:std{access=http,dst=:8061/stream<strong>1.</strong>flv}<br />
<str<strong>on</strong>g>RTSP</str<strong>on</strong>g> C<strong>on</strong>necti<strong>on</strong><br />
Stream Type Extra Stream (01)<br />
<strong>QC</strong> Device Settings<br />
Encode<br />
Extra Stream<br />
Encode Size CIF<br />
Encode FPS 7<br />
Encode Type VBR<br />
Encode Bitrate 256<br />
Encode Quality Highest<br />
VLC Stream Output Settings<br />
Video Codec FLV1<br />
Video Bitrate 256<br />
Video FPS 7<br />
Video Scale <strong>1.</strong>0 (n<strong>on</strong>e)<br />
Video Size 352x240<br />
Deinterlace No<br />
Audio<br />
No<br />
Player URL http://mydomain.com:8061/stream<strong>1.</strong>flv<br />
Example 2: FLV Codec (D1)<br />
This is for websites that want higher quality.<br />
VLC Stream Output String:<br />
:sout=#transcode{vcodec=FLV1,vb=1024,fps=7,acodec=n<strong>on</strong>e}:std{access=http,dst=:8062/stream2.flv}<br />
<str<strong>on</strong>g>RTSP</str<strong>on</strong>g> C<strong>on</strong>necti<strong>on</strong><br />
Stream Type Main Stream (00)<br />
<strong>QC</strong> Device Settings<br />
Encode<br />
Main Stream<br />
Encode Size D1<br />
Encode FPS 7<br />
Encode Type VBR / CBR<br />
Encode Bitrate 640 / 1024<br />
VLC Stream Output Settings<br />
Video Codec FLV1<br />
Video Bitrate 640 / 1024<br />
Video FPS 7<br />
Video Scale 0.5 / No<br />
Video Size 352x240 / 704x480<br />
Deinterlace No<br />
Audio<br />
No<br />
Player URL http://mydomain.com:8062/stream2.flv
Example 3: H.264 Codec (D1)<br />
This is higher quality deinterlaced video.<br />
The video can take l<strong>on</strong>ger to start.<br />
VLC Stream Output String:<br />
:sout=#transcode{vcodec=h264,vb=1024,fps=7,deinterlace,acodec=n<strong>on</strong>e}:std{access=http,dst=:8063/stream3.flv}<br />
<str<strong>on</strong>g>RTSP</str<strong>on</strong>g> C<strong>on</strong>necti<strong>on</strong><br />
Stream Type Main Stream (00)<br />
<strong>QC</strong> Device Settings<br />
Encode<br />
Main Stream<br />
Encode Size D1<br />
Encode FPS 7<br />
Encode Type CBR<br />
Encode Bitrate 1024<br />
VLC Stream Output Settings<br />
Video Codec H264<br />
Video Bitrate 1024<br />
Video FPS 7<br />
Video Scale No<br />
Video Size 704x480<br />
Deinterlace Yes<br />
Audio<br />
No<br />
Player URL http://mydomain.com:8063/stream3.flv<br />
The above settings are just examples to show you how it works.<br />
You will need to adjust this for your own device and applicati<strong>on</strong>.<br />
TIP - If you d<strong>on</strong>'t have a static IP or DDNS server or just want to use a domain name instead;<br />
purchase a domain name through a domain name registrar, sign up for a free account at<br />
FreeDNS.afraid.org, add <strong>the</strong> afraid.org name servers to your domain name registrar account,<br />
<strong>the</strong>n download <strong>on</strong>e of <strong>the</strong> FreeDNS update programs at afraid.org.
JW Player Sample Code ..<br />
Click here for full details <strong>on</strong> embedding flash video with JW Player<br />
<br />
<br />
JW Player Example<br />
<br />
<br />
<br />
<br />
<br />
<br />
<br />
<br />
<br />
<br />
<br />
<br />
<br />
<br />
name="player1"<br />
src="player.swf"<br />
width="352"<br />
height="264"<br />
allowscriptaccess="always"<br />
allowfullscreen="true"<br />
flashvars="file=http://mydomain.com:8061/stream<strong>1.</strong>flv&autostart=true&bufferlength=1"<br />
No Static IP? No Domain Name?<br />
With VLC <strong>on</strong> your home PC streaming <strong>the</strong> video, schedule a script to hit a webpage <strong>on</strong> your remote server<br />
every 30 minutes or so to update <strong>the</strong> IP. That webpage saves your updated IP to a database or text file, <strong>the</strong><br />
main video page <strong>on</strong> <strong>the</strong> remote server always grabs that latest IP.
6. Auto start VLC streaming<br />
<strong>Create</strong> a single VLC stream ..<br />
Example: create a new text document and name it Stream<strong>1.</strong>cmd<br />
Right click "Edit" and enter <strong>the</strong> following <strong>the</strong>n hit save.<br />
@ECHO OFF<br />
set vlc="%PROGRAMFILES%\VideoLAN\VLC\vlc.exe"<br />
set<br />
rtsp="rtsp://192.168.<strong>1.</strong>108:554/cam/realm<strong>on</strong>itor?channel=1&subtype=01&authbasic=YWRtaW46YWRta<br />
W4="<br />
set<br />
sout=":sout=#transcode{vcodec=FLV1,vb=256,fps=7,scale=1,acodec=n<strong>on</strong>e}:std{access=http,dst=:8<br />
061/stream<strong>1.</strong>flv}"<br />
ECHO VLC LOADING ...<br />
start "" %vlc% %rtsp% %sout%<br />
exit<br />
Track when <strong>the</strong> stream is open and closed ..<br />
Before <strong>the</strong> batch file starts VLC, write <strong>the</strong> number "1" to a log file.<br />
Start VLC and wait for it to exit by adding "/wait" in <strong>the</strong> start line.<br />
Then when VLC exits write "0" to say <strong>the</strong> stream is offline.<br />
Example based <strong>on</strong> <strong>the</strong> above code.<br />
This example will wait until VLC exits before closing <strong>the</strong> command window.<br />
@ECHO OFF<br />
set vlc="%PROGRAMFILES%\VideoLAN\VLC\vlc.exe"<br />
set<br />
rtsp="rtsp://192.168.<strong>1.</strong>108:554/cam/realm<strong>on</strong>itor?channel=1&subtype=01&authbasic=YWRtaW46YWRta<br />
W4="<br />
set<br />
sout=":sout=#transcode{vcodec=FLV1,vb=256,fps=7,acodec=n<strong>on</strong>e}:std{access=http,dst=:8061/stre<br />
am<strong>1.</strong>flv}"<br />
set log=c:\inetpub\wwwroot\logs\stream<strong>1.</strong>log<br />
title VLC STREAM 1 ..<br />
echo 1 >%log%<br />
cls<br />
ECHO.<br />
ECHO =====================================================<br />
ECHO VLC Streaming ...<br />
ECHO -----------------------------------------------------<br />
ECHO INPUT : 192.168.<strong>1.</strong>108, Port 554, Ch-1, Extra Stream<br />
ECHO OUTPUT : FLV1, 256, 7fps, 8061, Stream<strong>1.</strong>flv<br />
ECHO =====================================================<br />
ECHO.
start "" /wait %vlc% %rtsp% %sout%<br />
echo 0 >%log%<br />
exit<br />
You could <strong>the</strong>n read that log file <strong>on</strong> your server to see if it is streaming or not.<br />
It is not a 100% fail safe method but it should do <strong>the</strong> job.<br />
<strong>Create</strong> multiple streams ..<br />
You can create separate files for each channel using <strong>the</strong> above code.<br />
However each <strong>on</strong>e will run a separate instance of VLC.<br />
Therefore you could instead create a c<strong>on</strong>figurati<strong>on</strong> file and load that from <strong>the</strong> command line.<br />
It would <strong>on</strong>ly be <strong>on</strong>e instance of VLC for multiple channels.<br />
TIP - if you want to track whe<strong>the</strong>r each channel is <strong>on</strong>line or offline,<br />
separate files may be preferred<br />
Example: create a new text document and name it vlm.vlm<br />
Right click "Edit" and enter <strong>the</strong> following <strong>the</strong>n hit save.<br />
Then copy this vlm file to <strong>the</strong> VLC path.<br />
new channel1 broadcast enabled<br />
setup channel1 input<br />
rtsp://192.168.<strong>1.</strong>108:554/cam/realm<strong>on</strong>itor?channel=1&subtype=01&authbasic=YWRtaW46YWRtaW4=<br />
setup channel1 output<br />
#transcode{vcodec=FLV1,vb=256,fps=7,acodec=n<strong>on</strong>e}:std{access=http,dst=:8061/stream<strong>1.</strong>flv}<br />
new channel2 broadcast enabled<br />
setup channel2 input<br />
rtsp://192.168.<strong>1.</strong>108:554/cam/realm<strong>on</strong>itor?channel=2&subtype=01&authbasic=YWRtaW46YWRtaW4=<br />
setup channel2 output<br />
#transcode{vcodec=FLV1,vb=256,fps=7,acodec=n<strong>on</strong>e}:std{access=http,dst=:8062/stream2.flv}<br />
new channel3 broadcast enabled<br />
setup channel3 input<br />
rtsp://192.168.<strong>1.</strong>108:554/cam/realm<strong>on</strong>itor?channel=3&subtype=01&authbasic=YWRtaW46YWRtaW4=<br />
setup channel3 output<br />
#transcode{vcodec=FLV1,vb=256,fps=7,acodec=n<strong>on</strong>e}:std{access=http,dst=:8063/stream3.flv}<br />
new channel4 broadcast enabled<br />
setup channel4 input<br />
rtsp://192.168.<strong>1.</strong>108:554/cam/realm<strong>on</strong>itor?channel=4&subtype=01&authbasic=YWRtaW46YWRtaW4=<br />
setup channel4 output<br />
#transcode{vcodec=FLV1,vb=256,fps=7,acodec=n<strong>on</strong>e}:std{access=http,dst=:8064/stream4.flv}<br />
c<strong>on</strong>trol channel1 play<br />
c<strong>on</strong>trol channel2 play<br />
c<strong>on</strong>trol channel3 play<br />
c<strong>on</strong>trol channel4 play<br />
Next create ano<strong>the</strong>r new text document and name it StreamAll.cmd<br />
Edit and paste <strong>the</strong> following into it and hit save.
@ECHO OFF<br />
ECHO VLC LOADING ...<br />
start "" vlc --extraintf telnet --vlm-c<strong>on</strong>f vlm.vlm<br />
exit<br />
Copy this cmd file to <strong>the</strong> VLC path and make a shortcut to your desktop.<br />
When you run this it will start streaming all 4 channels.


