IMPORTANT NOTES! WARNING - Ramsey Winch
IMPORTANT NOTES! WARNING - Ramsey Winch
IMPORTANT NOTES! WARNING - Ramsey Winch

You also want an ePaper? Increase the reach of your titles
YUMPU automatically turns print PDFs into web optimized ePapers that Google loves.
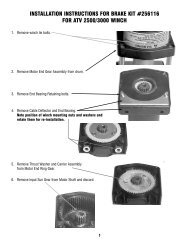
STEP 2<br />
Remove (4) bumper bracket bolts from each side of bumper. This allows bumper to move forward to<br />
provide access to lower bracket bolts. Use (3) 1/2-13NC x 1-1/2 lg. capscrews #13, with lockwashers<br />
#21 through bottom of vehicle frame and into nut plate attached to bracket assemblies, each side.<br />
Tighten hardware to full torque. (See torque value chart, page 6).<br />
Reattach bumper to bumper brackets and tighten all hardware to full torque. Use bracket assembly<br />
#7 & #8 as a template to drill (2) 9/16 DIA. holes through bumper brackets, as shown below. Install<br />
(2) 1/2-13NC x 1-1/2lg. capscrews #13, with lockwashers #21, nuts #19 and nut strips #1, each side.<br />
Reattach vehicle tow hooks to underside of bracket assembly #7 & #8 using M12 x 1.75 x 50mm<br />
capscrews. Discard the existing bolts. Tighten to full torque. (See torque value chart, page 6).<br />
Reattach splashguard.<br />
2