Ostheosynthesis cannulated screw for small fragments. - Biotech ortho
Ostheosynthesis cannulated screw for small fragments. - Biotech ortho
Ostheosynthesis cannulated screw for small fragments. - Biotech ortho

Create successful ePaper yourself
Turn your PDF publications into a flip-book with our unique Google optimized e-Paper software.
V17<br />
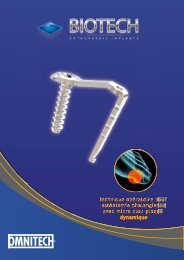
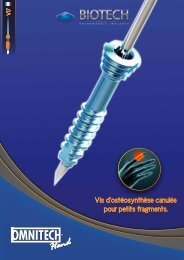
<strong>Ostheosynthesis</strong> <strong>cannulated</strong><br />
<strong>screw</strong> <strong>for</strong> <strong>small</strong> <strong>fragments</strong>.
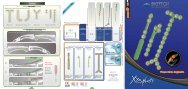
V17 Protocol (Phalanx fracture)<br />
1. Fracture reduction<br />
a<br />
b<br />
a<br />
b<br />
Reduce the fracture and hold with the<br />
reduction clamp.<br />
Measure <strong>screw</strong> length from the reduction clamp.<br />
b<br />
2. K-wire insertion<br />
a<br />
a Place the K-wire guide into the barrel of the<br />
reduction clamp.<br />
b<br />
b<br />
Insert a 0.7mm K-wire and secure it into the<br />
opposite cortex<br />
3. Screw insertion<br />
c<br />
a<br />
b<br />
c<br />
a<br />
Remove the K-wire guide from the barrel.<br />
Slide the appropriate length <strong>screw</strong> and driver over the wire.<br />
Drive the <strong>screw</strong> through the barrel of the reduction clamp<br />
b<br />
4. Compression<br />
a<br />
a Drive the <strong>screw</strong> until its head is flush with the near<br />
cortex .<br />
b Remove the K-wire and reduction clamp .
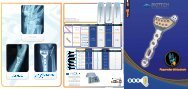
V23, VC30, VC35 Protocol (Scaphoid fracture)<br />
b<br />
a<br />
1. K-wire insertion<br />
a<br />
Reduce a displaced fracture.<br />
b Per<strong>for</strong>ate the two cortex with a second k-wire, that will guide the positionning<br />
of the <strong>screw</strong> and avoid any risk of <strong>fragments</strong> rotation.<br />
At that point, the distal extremity is at the level of the distal.<br />
2. Measure<br />
It is recommended that fluoroscopy is used to confirm drill depth and <strong>screw</strong> length<br />
3. Drilling<br />
b<br />
b<br />
a<br />
a<br />
b<br />
Place the K-wire gauge<br />
on contact with the<br />
proximal cortex .<br />
Measure the <strong>screw</strong> lenght.<br />
a<br />
b<br />
a<br />
Introduce the appropriate drill<br />
over the guide wire .<br />
Screw lenght can also be checked<br />
directly from the drill, as soon as<br />
contact with the opposite cortex is<br />
made and be<strong>for</strong>e per<strong>for</strong>ating it.<br />
4. Countersink 5. Screw insertion<br />
a<br />
a<br />
a<br />
Prepare the external cortex with<br />
the <strong>cannulated</strong> countersink<br />
through the cartilage so the<br />
<strong>screw</strong> head will be flush.<br />
a<br />
The two K-wires stil in place,<br />
insert the <strong>screw</strong> with the<br />
<strong>cannulated</strong> <strong>screw</strong>driver.<br />
6. Compression<br />
a<br />
a<br />
Drive <strong>screw</strong> until head is<br />
flush with near cortex.<br />
The <strong>screw</strong> head must not go past<br />
the cartilage.<br />
b<br />
Remove the K-wires.
Illustrations <strong>for</strong> in<strong>for</strong>mation.<br />
The drill, countersink and <strong>screw</strong>driver<br />
shaft have a color coded ring that<br />
corresponds to the <strong>screw</strong> diameter it<br />
serves.<br />
Screw Length K-wire Drill Countersink<br />
Screwdriver<br />
V 17<br />
V23<br />
VC 30<br />
VC 35<br />
From 8 to 14 mm<br />
1 mm increment.<br />
Ø 1.7 mm<br />
From 10 to 20 mm<br />
2 mm increment.<br />
From 20 to 28 mm<br />
1 mm increment.<br />
Ø 2.3 mm<br />
Ø 3.0 mm<br />
Ø 3.5 mm<br />
NB: No 27 mm length.<br />
From 10 to 20 mm<br />
2 mm increment.<br />
From 20 to 26 mm<br />
1 mm increment.<br />
From 26 to 32 mm<br />
2 mm increment.<br />
From 14 to 20 mm<br />
2 mm increment.<br />
From 20 to 26 mm<br />
1 mm increment.<br />
From 26 to 32 mm<br />
2 mm increment.<br />
From 35 to 45 mm<br />
5 mm increment.<br />
BR 070<br />
BR 080<br />
BR 120<br />
BR 120<br />
Self drilling<br />
FT 230<br />
FT 310C<br />
FT<br />
350C<br />
FR 170<br />
FR 230<br />
FR 300C<br />
FR 350C<br />
TV 170<br />
TV 230<br />
TV 300C<br />
TV 300C<br />
Further in<strong>for</strong>mation<br />
The K-wire guide GB 070 is to be used<br />
exclusively with the V17.<br />
The good lenght <strong>screw</strong> can be checked with the<br />
K-wire gauge JD 000.<br />
K-wire diameter can be checked with the<br />
K-wire diameter gauge PB 000.<br />
O R T H O P A E D I C I M P L A N T S<br />
305, Allées de Craponne<br />
13300 Salon de Provence<br />
France<br />
Tél. : 33 (0)4 90 44 60 60<br />
Fax : 33 (0)4 90 44 60 61<br />
www.biotech-international.com<br />
info@biotech-international.com<br />
0459<br />
TO - 0103OMNITECHHAND - rév.00 - 12/2011 - EN