Service Manual - Expert-CM
Service Manual - Expert-CM
Service Manual - Expert-CM

You also want an ePaper? Increase the reach of your titles
YUMPU automatically turns print PDFs into web optimized ePapers that Google loves.
HD7824/50/B<br />
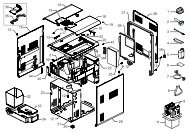
DISASSEMBLY- AND RE-ASSEMBLY ADVISE<br />
To remove the back cover, follow below steps:<br />
- Remove Screw A (see exploded view).<br />
- Remove valve outlet.<br />
- Start at the upper side of the back cover and stick a<br />
screwdriver into the 2 snap locks positions and gently pull<br />
the back cover from the appliance so that a little chink<br />
between back cover and brew chamber becomes visible.<br />
- Put the screwdriver into the 4 rectangular holes (snap locks)<br />
at the back and gently pull the screwdriver such away that<br />
the lips of the snap locks are bent outwards.<br />
- If all clicks positions are loose, it is possible to remove the<br />
back cover.<br />
- Reassemble follow steps backwards.<br />
To reach the components placed on the base (for example<br />
exchange the NTC temperature sensor) follow below steps:<br />
- First remove back cover, brew chamber, 3-way valve and<br />
boiler.<br />
- Remove both Torx T15 screws B (see exploded view).<br />
- Bend the 2 click snap locks with a screwdriver (see base),<br />
the housing can now be removed.<br />
- To remove the rest of the housing unlock the last 4 snap<br />
locks at the base and gently pull of the front cover.<br />
- To reassemble follow above steps backwards.<br />
OPTIONAL (accessories)<br />
- No specific issues.<br />
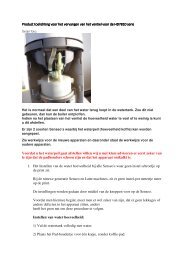
REPAIR INSTRUCTION<br />
Descaling<br />
Regular descaling will prolong the life of your appliance and<br />
will guarantee optimal brewing results for a long time.<br />
• Follow the steps in the section headed “Preparing the<br />
appliance for use” see DFU (Direction for Use manual)<br />
• Instead of only water use a mix of water and Lemon sour.<br />
• For the best result leave the mix of water and Lemon sour<br />
for about 30 Minutes in the appliance, before you start with<br />
flushing the appliance.<br />
• To get the best results repeat above-mentioned step once or<br />
twice.<br />
• When finished, flush the appliance twice by repeating the<br />
above-mentioned steps only use water instead.<br />
Volume adjustment<br />
The new PCB circuit board makes it possible to adjust the<br />
volume output by means of pushing the one-cup and two-cup<br />
user controls.<br />
How to adjust the volume output:<br />
1. Be sure the boiler is filled properly, other wise perform fill<br />
procedure see DFU for instructions.<br />
2. Switch appliance on and wait until the unit is ready to<br />
brew.<br />
3. Be sure a pod holder is placed, but without a Coffee<br />
POD. (Only adjusting with plain water)<br />
4. Place a cup on the drip tray cover and push the one-cup<br />
button.<br />
5. When the appliance has finished it is stabilized to perform<br />
the volume adjustment.<br />
6. Empty the cup, podholder and push again for one cup<br />
setting, measure the volume output with a graduated<br />
beaker. In the table you can find the requirements for<br />
the minimum / maximum volume output cc/mL values<br />
depending from the country version:<br />
Min. water cc/mL Max. water cc/mL<br />
France version 104 120<br />
General version 125 141<br />
7. Unplug the appliance from the mains.<br />
8. Press the 1- and 2 cup button simultaneously and plug the<br />
mains on.<br />
9. When above step succeeded the LED will turn on<br />
continuously.<br />
10. Depending if the volume has to de- or increase you have<br />
to push the 1- or 2 cup button.<br />
Every time you push the 1- or 2 cup button the LED will<br />
turn off for 0.5 second (feedback to user) and the pump<br />
time will be shortened or lengthened for 0.5 seconds<br />
depending which button was pushed.<br />
Pushing 1 cup button pump, time will be shorten with<br />
0.5 sec is approximately − 3.5 cc/mL (less coffee)<br />
Pushing 2 cup button pump, time will be lengthen with<br />
0.5 sec is approximately + 3.5 cc/mL (more coffee)<br />
When the volume has to increase with 10 cc for example,<br />
push the 2 cup button 3 times.<br />
The new value will be stored when you switch the<br />
appliance off by pushing the main switch.<br />
(LED will turn off)<br />
11. Turn appliance on again and brew one cup, measure the<br />
volume. In case the volume is not within specification<br />
repeat steps 6 - 11.<br />
12. End.<br />
2-5