

How to setup Email Notification on the QC Series DVR - Q-See
How to setup Email Notification on the QC Series DVR - Q-See
How to setup Email Notification on the QC Series DVR - Q-See

Create successful ePaper yourself
Turn your PDF publications into a flip-book with our unique Google optimized e-Paper software.
<str<strong>on</strong>g>How</str<strong>on</strong>g> <str<strong>on</strong>g>to</str<strong>on</strong>g> <str<strong>on</strong>g>setup</str<strong>on</strong>g> <str<strong>on</strong>g>Email</str<strong>on</strong>g> <str<strong>on</strong>g>Notificati<strong>on</strong></str<strong>on</strong>g> <strong>on</strong> <strong>the</strong> <strong>QC</strong> <strong>Series</strong> <strong>DVR</strong><br />
**Make sure <strong>the</strong> <strong>DVR</strong> is already <str<strong>on</strong>g>setup</str<strong>on</strong>g> for Moti<strong>on</strong> Recording. You can download instructi<strong>on</strong>s <strong>on</strong> how <str<strong>on</strong>g>to</str<strong>on</strong>g> <str<strong>on</strong>g>setup</str<strong>on</strong>g> <strong>the</strong> <strong>DVR</strong><br />
for moti<strong>on</strong> recording from our web site at:<br />
http://www.q-see.com/files/<str<strong>on</strong>g>How</str<strong>on</strong>g>ToFiles/C-Moti<strong>on</strong> Detecti<strong>on</strong> Recording.pdf **<br />
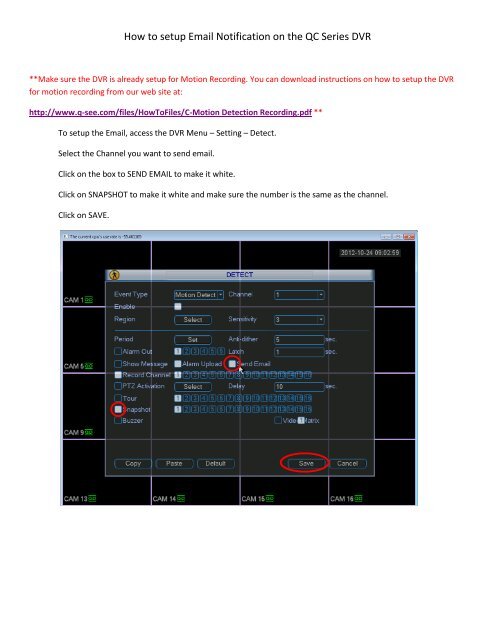
To <str<strong>on</strong>g>setup</str<strong>on</strong>g> <strong>the</strong> <str<strong>on</strong>g>Email</str<strong>on</strong>g>, access <strong>the</strong> <strong>DVR</strong> Menu – Setting – Detect.<br />
Select <strong>the</strong> Channel you want <str<strong>on</strong>g>to</str<strong>on</strong>g> send email.<br />
Click <strong>on</strong> <strong>the</strong> box <str<strong>on</strong>g>to</str<strong>on</strong>g> SEND EMAIL <str<strong>on</strong>g>to</str<strong>on</strong>g> make it white.<br />
Click <strong>on</strong> SNAPSHOT <str<strong>on</strong>g>to</str<strong>on</strong>g> make it white and make sure <strong>the</strong> number is <strong>the</strong> same as <strong>the</strong> channel.<br />
Click <strong>on</strong> SAVE.
Go <str<strong>on</strong>g>to</str<strong>on</strong>g> <strong>the</strong> Menu – Setting – Network.<br />
Make sure that <strong>on</strong> <strong>the</strong> DNS address below, you have <str<strong>on</strong>g>to</str<strong>on</strong>g> put <strong>the</strong> correct DNS address that you can find in <strong>the</strong><br />
Router Status Tab or call your ISP.<br />
Below is <strong>the</strong> example of <strong>the</strong> DNS address found in <strong>the</strong> router status.
Go <str<strong>on</strong>g>to</str<strong>on</strong>g> <strong>the</strong> Menu – Setting – Network – <str<strong>on</strong>g>Email</str<strong>on</strong>g>.<br />
Input your email settings from your <str<strong>on</strong>g>Email</str<strong>on</strong>g> service that you are going <str<strong>on</strong>g>to</str<strong>on</strong>g> be using.<br />
Example Input from Gmail<br />
SMTP server: smtp.gmail.com<br />
Port: 465<br />
User Name: (email@gmail.com)<br />
Password: Gmail Password<br />
Receiver: Different email from<br />
above (email@yahoo.com)<br />
Sender: (email@gmail.com)<br />
Encrypt Type: SSL


