SUPER DIGITAL
SUPER DIGITAL SUPER DIGITAL
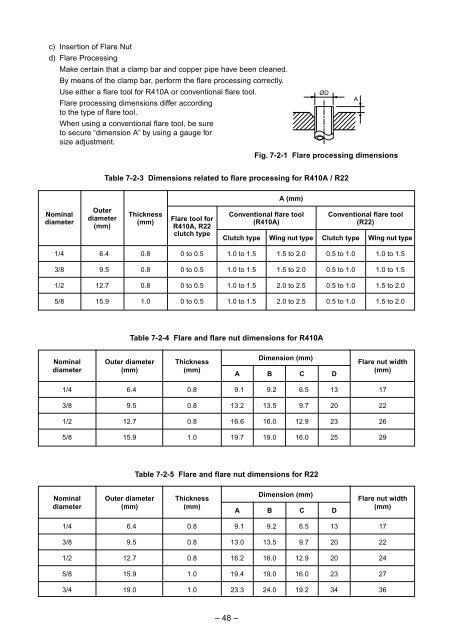
c) Insertion of Flare Nut d) Flare Processing Make certain that a clamp bar and copper pipe have been cleaned. By means of the clamp bar, perform the flare processing correctly. Use either a flare tool for R410A or conventional flare tool. ØD A Flare processing dimensions differ according to the type of flare tool. When using a conventional flare tool, be sure to secure “dimension A” by using a gauge for size adjustment. Fig. 7-2-1 Flare processing dimensions Table 7-2-3 Dimensions related to flare processing for R410A / R22 A (mm) Nominal diameter Outer diameter (mm) Thickness (mm) Flare tool for R410A, R22 clutch type Conventional flare tool (R410A) Clutch type Wing nut type Conventional flare tool (R22) Clutch type Wing nut type 1/4 6.4 0.8 0 to 0.5 1.0 to 1.5 1.5 to 2.0 0.5 to 1.0 1.0 to 1.5 3/8 9.5 0.8 0 to 0.5 1.0 to 1.5 1.5 to 2.0 0.5 to 1.0 1.0 to 1.5 1/2 12.7 0.8 0 to 0.5 1.0 to 1.5 2.0 to 2.5 0.5 to 1.0 1.5 to 2.0 5/8 15.9 1.0 0 to 0.5 1.0 to 1.5 2.0 to 2.5 0.5 to 1.0 1.5 to 2.0 Table 7-2-4 Flare and flare nut dimensions for R410A Nominal diameter Outer diameter (mm) Thickness (mm) Dimension (mm) A B C D Flare nut width (mm) 1/4 6.4 0.8 9.1 9.2 6.5 13 17 3/8 9.5 0.8 13.2 13.5 9.7 20 22 1/2 12.7 0.8 16.6 16.0 12.9 23 26 5/8 15.9 1.0 19.7 19.0 16.0 25 29 Table 7-2-5 Flare and flare nut dimensions for R22 Nominal diameter Outer diameter (mm) Thickness (mm) Dimension (mm) A B C D Flare nut width (mm) 1/4 6.4 0.8 9.1 9.2 6.5 13 17 3/8 9.5 0.8 13.0 13.5 9.7 20 22 1/2 12.7 0.8 16.2 16.0 12.9 20 24 5/8 15.9 1.0 19.4 19.0 16.0 23 27 3/4 19.0 1.0 23.3 24.0 19.2 34 36 – 48 –
43˚to 45˚ 45˚to 46˚ B A C D Fig. 7-2-2 Relations between flare nut and flare seal surface 2. Flare Connecting Procedures and Precautions a) Make sure that the flare and union portions do not have any scar or dust, etc. b) Correctly align the processed flare surface with the union axis. c) Tighten the flare with designated torque by means of a torque wrench. The tightening torque for R410A is the same as that for conventional R22. Incidentally, when the torque is weak, the gas leakage may occur. When it is strong, the flare nut may crack and may be made non-removable. When choosing the tightening torque, comply with values designated by manufacturers. Table 7-2-6 shows reference values. NOTE: When applying oil to the flare surface, be sure to use oil designated by the manufacturer. If any other oil is used, the lubricating oils may deteriorate and cause the compressor to burn out. Table 7-2-6 Tightening torque of flare for R410A [Reference values] Nominal diameter Outer diameter (mm) Tightening torque N•m (kgf•m) Tightening torque of torque wrenches available on the market N•m (kgf•m) 1/4 6.4 14 to 18 (1.4 to 1.8) 16 (1.6), 18 (1.8) 3/8 9.5 33 to 42 (3.3 to 4.2) 42 (4.2) 1/2 12.7 50 to 62 (5.0 to 6.2) 55 (5.5) 5/8 15.9 63 to 77 (6.3 to 7.7) 65 (6.5) – 49 –
- Page 1 and 2: SERVICE MANUAL FILE NO. A07-003 Rev
- Page 3 and 4: 7. REFRIGERANT R410A ..............
- Page 5 and 6: WARNING Check earth wires. Prohibit
- Page 7 and 8: • New Refrigerant (R410A) This ai
- Page 9 and 10: 1. SPECIFICATIONS Revised 2: Jun.,
- Page 11 and 12: Revised 2: Jun., 2008 Indoor unit
- Page 13 and 14: 1-1-2. Concealed Duct Type Model I
- Page 15 and 16: 1-1-3. Under Ceiling Type Revised
- Page 17 and 18: 1-1-4. High Wall Type Revised 2: J
- Page 19 and 20: 1-1-5. Compact 4-Way Cassette (600
- Page 21 and 22: 1-1-6. Slim Duct Type Model Coolin
- Page 23 and 24: Revised 2: Jun., 2008 Indoor unit 1
- Page 25 and 26: 1-2. Outdoor Unit Model name Outdo
- Page 27 and 28: 1-3. Operation Characteristic Curve
- Page 29 and 30: 2. CONSTRUCTION VIEWS (EXTERNAL VIE
- Page 31 and 32: Revised 2: Jun., 2008 RAV-SM1104UT-
- Page 33 and 34: - 33 - 365 17.5 17.5 74 Drain hole
- Page 35 and 36: RAV-TWP30E2, RAV-TWP50E2 (Simultane
- Page 37 and 38: 3-2. Outdoor Unit RAV-SP1104AT-E, S
- Page 39 and 40: 4-1. Slim Duct (Filter Attached) 4.
- Page 41 and 42: 5-1-2. Slim Duct Type RAV-SM404SDT-
- Page 43 and 44: - 43 - CAUTION : HIGH VOLTAGE The h
- Page 45 and 46: 6-2. Outdoor Unit (Parts Ratings) R
- Page 47: Table 7-2-1 Thicknesses of annealed
- Page 51 and 52: 1) Be sure to make setting so that
- Page 53 and 54: 7-6. Instructions for Re-use Piping
- Page 55 and 56: Revised 2: Jun., 2008 7-6-6. Handli
- Page 57 and 58: 7-6-8. Recovery method of refrigera
- Page 59 and 60: 8-1-2. Connection of Wireless Remot
- Page 61 and 62: 8-2. Control Specifications No. Ite
- Page 63 and 64: No. Item Outline of specifications
- Page 65 and 66: No. Item Outline of specifications
- Page 67 and 68: No. Item Outline of specifications
- Page 69 and 70: No. Item Outline of specifications
- Page 71 and 72: No. Item Outline of specifications
- Page 73 and 74: No. Item Outline of specifications
- Page 75 and 76: Optional power supply CN309 (Yellow
- Page 77 and 78: - 77 - L-phase power supply lead (B
- Page 79 and 80: 3. Outdoor fan control SP110 SP140
- Page 81 and 82: 7. Current release value shift cont
- Page 83 and 84: 1. Pulse Motor Valve (PMV) control
- Page 85 and 86: 2) Heating fan control The outdoor
- Page 87 and 88: 10-1. Summary of Troubleshooting 1
- Page 89 and 90: 10-2. Troubleshooting 10-2-1. Outli
- Page 91 and 92: 10-2-2. Others (Other than Check Co
- Page 93 and 94: - 93 - Check Code List (Outdoor) Re
- Page 95 and 96: Error mode detected by indoor unit
- Page 97 and 98: Error mode detected by outdoor unit
c) Insertion of Flare Nut<br />
d) Flare Processing<br />
Make certain that a clamp bar and copper pipe have been cleaned.<br />
By means of the clamp bar, perform the flare processing correctly.<br />
Use either a flare tool for R410A or conventional flare tool.<br />
ØD<br />
A<br />
Flare processing dimensions differ according<br />
to the type of flare tool.<br />
When using a conventional flare tool, be sure<br />
to secure “dimension A” by using a gauge for<br />
size adjustment.<br />
Fig. 7-2-1 Flare processing dimensions<br />
Table 7-2-3 Dimensions related to flare processing for R410A / R22<br />
A (mm)<br />
Nominal<br />
diameter<br />
Outer<br />
diameter<br />
(mm)<br />
Thickness<br />
(mm)<br />
Flare tool for<br />
R410A, R22<br />
clutch type<br />
Conventional flare tool<br />
(R410A)<br />
Clutch type<br />
Wing nut type<br />
Conventional flare tool<br />
(R22)<br />
Clutch type<br />
Wing nut type<br />
1/4<br />
6.4<br />
0.8<br />
0 to 0.5<br />
1.0 to 1.5 1.5 to 2.0<br />
0.5 to 1.0 1.0 to 1.5<br />
3/8<br />
9.5<br />
0.8<br />
0 to 0.5<br />
1.0 to 1.5 1.5 to 2.0<br />
0.5 to 1.0 1.0 to 1.5<br />
1/2<br />
12.7<br />
0.8<br />
0 to 0.5<br />
1.0 to 1.5 2.0 to 2.5<br />
0.5 to 1.0 1.5 to 2.0<br />
5/8<br />
15.9<br />
1.0<br />
0 to 0.5<br />
1.0 to 1.5 2.0 to 2.5<br />
0.5 to 1.0 1.5 to 2.0<br />
Table 7-2-4 Flare and flare nut dimensions for R410A<br />
Nominal<br />
diameter<br />
Outer diameter<br />
(mm)<br />
Thickness<br />
(mm)<br />
Dimension (mm)<br />
A B C D<br />
Flare nut width<br />
(mm)<br />
1/4<br />
6.4<br />
0.8<br />
9.1 9.2 6.5 13 17<br />
3/8<br />
9.5<br />
0.8<br />
13.2 13.5 9.7 20 22<br />
1/2<br />
12.7<br />
0.8<br />
16.6 16.0 12.9 23 26<br />
5/8<br />
15.9<br />
1.0<br />
19.7 19.0 16.0 25 29<br />
Table 7-2-5 Flare and flare nut dimensions for R22<br />
Nominal<br />
diameter<br />
Outer diameter<br />
(mm)<br />
Thickness<br />
(mm)<br />
Dimension (mm)<br />
A B C D<br />
Flare nut width<br />
(mm)<br />
1/4<br />
6.4<br />
0.8<br />
9.1 9.2 6.5 13 17<br />
3/8<br />
9.5<br />
0.8<br />
13.0 13.5 9.7 20 22<br />
1/2<br />
12.7<br />
0.8<br />
16.2 16.0 12.9 20 24<br />
5/8<br />
15.9<br />
1.0<br />
19.4 19.0 16.0 23 27<br />
3/4<br />
19.0<br />
1.0<br />
23.3 24.0 19.2 34 36<br />
– 48 –


