SUPER DIGITAL
SUPER DIGITAL
SUPER DIGITAL

Create successful ePaper yourself
Turn your PDF publications into a flip-book with our unique Google optimized e-Paper software.
No.<br />
Part name<br />
Procedure<br />
Remarks<br />
6<br />
Compressor<br />
Compressor<br />
lead<br />
(Continued)<br />
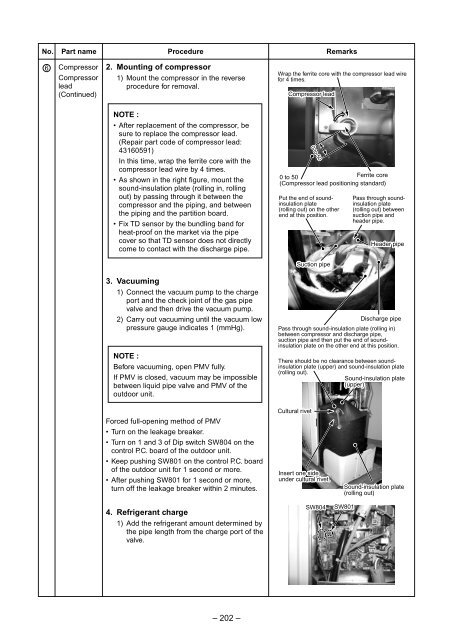
2. Mounting of compressor<br />
1) Mount the compressor in the reverse<br />
procedure for removal.<br />
Wrap the ferrite core with the compressor lead wire<br />
for 4 times.<br />
Compressor lead<br />
NOTE :<br />
• After replacement of the compressor, be<br />
sure to replace the compressor lead.<br />
(Repair part code of compressor lead:<br />
43160591)<br />
In this time, wrap the ferrite core with the<br />
compressor lead wire by 4 times.<br />
• As shown in the right figure, mount the<br />
sound-insulation plate (rolling in, rolling<br />
out) by passing through it between the<br />
compressor and the piping, and between<br />
the piping and the partition board.<br />
• Fix TD sensor by the bundling band for<br />
heat-proof on the market via the pipe<br />
cover so that TD sensor does not directly<br />
come to contact with the discharge pipe.<br />
0 to 50<br />
0 to 50<br />
Ferrite core<br />
(Compressor lead positioning standard)<br />
Put the end of soundinsulation<br />
plate<br />
(rolling out) on the other<br />
end at this position.<br />
Pass through soundinsulation<br />
plate<br />
(rolling out) between<br />
suction pipe and<br />
header pipe.<br />
Header pipe<br />
Suction pipe<br />
3. Vacuuming<br />
1) Connect the vacuum pump to the charge<br />
port and the check joint of the gas pipe<br />
valve and then drive the vacuum pump.<br />
2) Carry out vacuuming until the vacuum low<br />
pressure gauge indicates 1 (mmHg).<br />
NOTE :<br />
Before vacuuming, open PMV fully.<br />
If PMV is closed, vacuum may be impossible<br />
between liquid pipe valve and PMV of the<br />
outdoor unit.<br />
Discharge pipe<br />
Pass through sound-insulation plate (rolling in)<br />
between compressor and discharge pipe,<br />
suction pipe and then put the end of soundinsulation<br />
plate on the other end at this position.<br />
There should be no clearance between soundinsulation<br />
plate (upper) and sound-insulation plate<br />
(rolling out).<br />
Sound-insulation plate<br />
(upper)<br />
Forced full-opening method of PMV<br />
• Turn on the leakage breaker.<br />
• Turn on 1 and 3 of Dip switch SW804 on the<br />
control P.C. board of the outdoor unit.<br />
• Keep pushing SW801 on the control P.C. board<br />
of the outdoor unit for 1 second or more.<br />
• After pushing SW801 for 1 second or more,<br />
turn off the leakage breaker within 2 minutes.<br />
4. Refrigerant charge<br />
1) Add the refrigerant amount determined by<br />
the pipe length from the charge port of the<br />
valve.<br />
Cultural rivet<br />
Insert one side<br />
under cultural rivet.<br />
SW804<br />
Sound-insulation plate<br />
(rolling out)<br />
SW801<br />
– 202 –
![Service-Handbuch [20522 kB]](https://img.yumpu.com/23967369/1/184x260/service-handbuch-20522-kb.jpg?quality=85)
![Preisliste [3476 kB] - Krüger and Co](https://img.yumpu.com/23967351/1/184x260/preisliste-3476-kb-kra-1-4-ger-and-co.jpg?quality=85)
![Prospekt [1268 kB]](https://img.yumpu.com/23967350/1/184x260/prospekt-1268-kb.jpg?quality=85)
![Mode d'emploi [759 kB]](https://img.yumpu.com/23967349/1/184x260/mode-demploi-759-kb.jpg?quality=85)
![Mode d'emploi [4761 kB]](https://img.yumpu.com/23967346/1/184x260/mode-demploi-4761-kb.jpg?quality=85)