SUPER DIGITAL
SUPER DIGITAL
SUPER DIGITAL

Create successful ePaper yourself
Turn your PDF publications into a flip-book with our unique Google optimized e-Paper software.
No.<br />
Part name<br />
Procedure<br />
Remarks<br />
6<br />
Compressor<br />
Compressor<br />
lead<br />
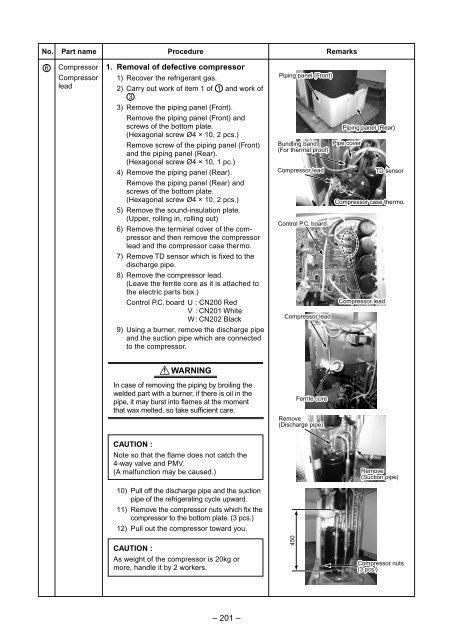
1. Removal of defective compressor<br />
1) Recover the refrigerant gas.<br />
2) Carry out work of item 1 of 1 and work of<br />
3 .<br />
3) Remove the piping panel (Front).<br />
Remove the piping panel (Front) and<br />
screws of the bottom plate.<br />
(Hexagonal screw Ø4 × 10, 2 pcs.)<br />
Remove screw of the piping panel (Front)<br />
and the piping panel (Rear).<br />
(Hexagonal screw Ø4 × 10, 1 pc.)<br />
4) Remove the piping panel (Rear).<br />
Remove the piping panel (Rear) and<br />
screws of the bottom plate.<br />
(Hexagonal screw Ø4 × 10, 2 pcs.)<br />
5) Remove the sound-insulation plate.<br />
(Upper, rolling in, rolling out)<br />
6) Remove the terminal cover of the compressor<br />
and then remove the compressor<br />
lead and the compressor case thermo.<br />
7) Remove TD sensor which is fixed to the<br />
discharge pipe.<br />
8) Remove the compressor lead.<br />
(Leave the ferrite core as it is attached to<br />
the electric parts box.)<br />
Control P.C. board U : CN200 Red<br />
V : CN201 White<br />
W: CN202 Black<br />
9) Using a burner, remove the discharge pipe<br />
and the suction pipe which are connected<br />
to the compressor.<br />
Piping panel (Front)<br />
Piping panel (Rear)<br />
Bundling band<br />
Pipe cover<br />
(For thermal proof)<br />
Compressor lead<br />
TD sensor<br />
Compressor case thermo.<br />
Control P.C. board<br />
Compressor lead<br />
Compressor lead<br />
X WARNINGX<br />
In case of removing the piping by broiling the<br />
welded part with a burner, if there is oil in the<br />
pipe, it may burst into flames at the moment<br />
that wax melted, so take sufficient care.<br />
Ferrite core<br />
Remove<br />
(Discharge pipe)<br />
CAUTION :<br />
Note so that the flame does not catch the<br />
4-way valve and PMV.<br />
(A malfunction may be caused.)<br />
Remove<br />
(Suction pipe)<br />
10) Pull off the discharge pipe and the suction<br />
pipe of the refrigerating cycle upward.<br />
11) Remove the compressor nuts which fix the<br />
compressor to the bottom plate. (3 pcs.)<br />
12) Pull out the compressor toward you.<br />
CAUTION :<br />
As weight of the compressor is 20kg or<br />
more, handle it by 2 workers.<br />
450<br />
Compressor nuts<br />
(3 pcs.)<br />
– 201 –
![Service-Handbuch [20522 kB]](https://img.yumpu.com/23967369/1/184x260/service-handbuch-20522-kb.jpg?quality=85)
![Preisliste [3476 kB] - Krüger and Co](https://img.yumpu.com/23967351/1/184x260/preisliste-3476-kb-kra-1-4-ger-and-co.jpg?quality=85)
![Prospekt [1268 kB]](https://img.yumpu.com/23967350/1/184x260/prospekt-1268-kb.jpg?quality=85)
![Mode d'emploi [759 kB]](https://img.yumpu.com/23967349/1/184x260/mode-demploi-759-kb.jpg?quality=85)
![Mode d'emploi [4761 kB]](https://img.yumpu.com/23967346/1/184x260/mode-demploi-4761-kb.jpg?quality=85)