General Information Gates/Rohloff - Koga Signature
General Information Gates/Rohloff - Koga Signature
General Information Gates/Rohloff - Koga Signature

You also want an ePaper? Increase the reach of your titles
YUMPU automatically turns print PDFs into web optimized ePapers that Google loves.
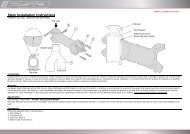
mounting<br />
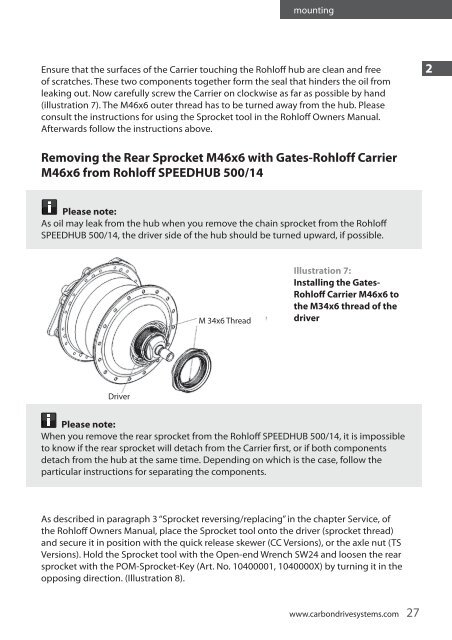
Ensure that the surfaces of the Carrier touching the <strong>Rohloff</strong> hub are clean and free<br />
of scratches. These two components together form the seal that hinders the oil from<br />
leaking out. Now carefully screw the Carrier on clockwise as far as possible by hand<br />
(illustration 7). The M46x6 outer thread has to be turned away from the hub. Please<br />
consult the instructions for using the Sprocket tool in the <strong>Rohloff</strong> Owners Manual.<br />
Afterwards follow the instructions above.<br />
2<br />
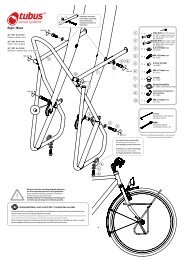
Removing the Rear Sprocket M46x6 with <strong>Gates</strong>-<strong>Rohloff</strong> Carrier<br />
M46x6 from <strong>Rohloff</strong> SPEEDHUB 500/14<br />
Please note:<br />
As oil may leak from the hub when you remove the chain sprocket from the <strong>Rohloff</strong><br />
SPEEDHUB 500/14, the driver side of the hub should be turned upward, if possible.<br />
M 34x6 Thread<br />
Illustration 7:<br />
Installing the <strong>Gates</strong>-<br />
<strong>Rohloff</strong> Carrier M46x6 to<br />
the M34x6 thread of the<br />
driver<br />
Driver<br />
Please note:<br />
When you remove the rear sprocket from the <strong>Rohloff</strong> SPEEDHUB 500/14, it is impossible<br />
to know if the rear sprocket will detach from the Carrier first, or if both components<br />
detach from the hub at the same time. Depending on which is the case, follow the<br />
particular instructions for separating the components.<br />
As described in paragraph 3 “Sprocket reversing/replacing” in the chapter Service, of<br />
the <strong>Rohloff</strong> Owners Manual, place the Sprocket tool onto the driver (sprocket thread)<br />
and secure it in position with the quick release skewer (CC Versions), or the axle nut (TS<br />
Versions). Hold the Sprocket tool with the Open-end Wrench SW24 and loosen the rear<br />
sprocket with the POM-Sprocket-Key (Art. No. 10400001, 1040000X) by turning it in the<br />
opposing direction. (Illustration 8).<br />
www.carbondrivesystems.com<br />
27