MAINTENANCE MANUAL - Koga Signature
MAINTENANCE MANUAL - Koga Signature
MAINTENANCE MANUAL - Koga Signature

You also want an ePaper? Increase the reach of your titles
YUMPU automatically turns print PDFs into web optimized ePapers that Google loves.
<strong>MAINTENANCE</strong><br />
<strong>MANUAL</strong><br />
ALFINE 11-SPEED | ALFINE 8-SPEED | NEXUS 8-SPEED | NEXUS 7-SPEED | NEXUS 3-SPEED<br />
02 11-SPEED: Oil maintenance: Draining the Old Oil<br />
03 11-SPEED: Oil maintenance: Cleaning and Adding New Oil<br />
04 3-7-8-SPEED: Disassemby and Assembly of the Internal Unit<br />
05 3-7-8-SPEED: Oil Maintenance Kit
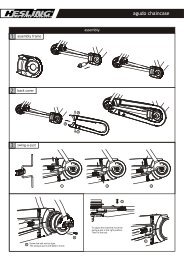
maintenance manual<br />
<strong>MAINTENANCE</strong> ALFINE 11-SPEED<br />
For longer durability, smooth turning and shifting,<br />
the ALFINE 11-Speed SG-S700 hub uses oil lubrication.<br />
Maintenance is very easy as the oil can be replaced<br />
without even removing the wheel from the bicycle.<br />
Procedures:<br />
1. Draining the old oil<br />
2. Cleaning the inside<br />
3. Adding new oil<br />
Service intervals Alfine 11-speed:<br />
_ After the first 1000 km of usage<br />
_ Then after each 5000 km or every 2 years<br />
(whatever comes first)<br />
When the bike is used in severe (weather)<br />
conditions, it may be necessary to shorten this<br />
interval.<br />
2. CLEANING THE INSIDE<br />
After draining the old oil and before adding the new<br />
oil, the inside of the hub should be cleaned first.<br />
Please follow steps 1 to 7 from the procedure<br />
described below. With this cleaning procedure,<br />
the last remaining old oil is removed from the hub too.<br />
Finally the new oil can be injected which makes the<br />
bike ready for another 2 years or 5000 km.<br />
1. DRAINING THE OLD OIL<br />
1 2<br />
1<br />
2<br />
With the oil port in the upper position, remove the oil port bolt with O-ring using<br />
a 3 mm Allen key.<br />
Attach the bleed nipple with O-ring and tube and tighten it using a 10 mm<br />
spanner. Tightening torque: 1-3 Nm.<br />
Fill the syringe with 25 ml SG-S700 oil.<br />
Assemble the bleed nipple with tube and attach the syringe.<br />
Push the piston slowly to inject the new oil into the hub.<br />
3 4 3<br />
4<br />
With the oil port still in the upper position, attach the syringe with its piston fully<br />
pushed in.<br />
Turn the wheel slowly, until the oil port is in the lower position.<br />
To reduce the pressure inside the hub, periodically pull the piston back a little.<br />
Once all the oil has been pushed out of the syringe, detach it from the tube to let<br />
the remaining oil in the tube flow into the hub.<br />
5 6 5<br />
6<br />
Wait 5 minutes until the oil has settled. Pull the syringe’s piston slowly to drain all<br />
the old oil from the hub.<br />
Turn the wheel slowly, until the oil port is in the upper position.<br />
Remove the bleed nipple with O-ring and the tube.<br />
Reassemble the oil port bolt with O-ring and tighten it with a 3 mm Allen key.<br />
Tightening torque: 2-3 Nm.<br />
7<br />
7 Now turn the wheel for 1 minute while shifting the gears up and down. By<br />
doing this, the new oil will mix with the old oil which was possibly left in the hub.<br />
Remove the oil used for cleaning the inside, following the procedure “DRAINING<br />
THE OLD OIL” as described on page 02.<br />
3. ADDING NEW OIL<br />
Inject 25 ml of new SG-S700 oil into the hub following<br />
the steps 1-6 from the procedure described on this<br />
page. Finally clean any oil that may have been spilled<br />
on the hub, etc.<br />
Carefully remove the syringe and tube containing the old oil.<br />
TL-S703 (Syringe)<br />
Code number: Y-13098023<br />
SG-S700 Oil (1 l)<br />
Code number: Y-13098480<br />
SG-7S700 Oil (50 ml)<br />
02 Code number: Y-13098481<br />
03
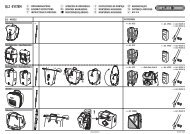
maintenance manual<br />
<strong>MAINTENANCE</strong> 3-, 7-, AND 8-SPEED<br />
To perform maintenance on the 3-, 7-, 8-Speed NEXUS and 8-Speed ALFINE hubs, the internal unit first needs to<br />
be removed from the hub.<br />
In the basic instructions below we show the main points for attention. The pictures are from various models<br />
but can be used as a guideline for the others models too.<br />
OIL <strong>MAINTENANCE</strong> KIT FOR<br />
3-, 7-, and 8-Speed<br />
Shimano recommends performing maintenance on an<br />
internal geared hub every 5000 km or every 2 years.<br />
When the bike is used in severe (weather) conditions,<br />
it may be necessary to shorten this interval.<br />
WB Maintenance Oil<br />
Code number: Y00298010<br />
1<br />
DISASSEMBLY<br />
2<br />
3<br />
4<br />
We offer a genuine oil dipping kit for this. Simply dip the<br />
internal unit into the special oil for 90 seconds. Next, let the<br />
surplus oil drip from the unit and reassemble it in the<br />
wheel.<br />
Lock nut for<br />
left-hand cone<br />
Use this procedure for a quick and complete maintenance.<br />
As every part is lubricated continuously, a higher durability<br />
of the internal mechanism is the result.<br />
Left-hand cone<br />
Hold the two flat surfaces of the hub<br />
axle in a vice. Note: Do not damage the<br />
threads of the axle. Carefully remove the<br />
right-hand dust cap.<br />
On ALFINE 8-Speed hubs, use the special<br />
tool TL-AF10 to remove the dust cap.<br />
Note the direction!<br />
Turn the hub around and remove the lefthand<br />
lock nut and cone.<br />
For coaster brake hubs, remove the 2<br />
left-hand lock nuts to remove the brake<br />
arm unit.<br />
Dipping Vessel<br />
Code number: Y00201100<br />
Oil Can<br />
Code number: Y00201000<br />
5<br />
6<br />
7<br />
8<br />
1<br />
2<br />
3<br />
max. level<br />
Remove the brake arm unit.<br />
While turning the hubshell left and right,<br />
move it upwards to remove it.<br />
Do not use any force!<br />
On coaster brake hubs, the brake shoe<br />
unit must be removed before dipping the<br />
unit in the oil.<br />
Now the internal unit can be used for the<br />
oil maintenance procedure as described<br />
on page 05.<br />
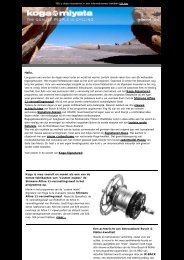
ASSEMBLY<br />
1<br />
2<br />
3<br />
4<br />
Fill the dipping vessel with WB oil.<br />
For coaster brake hubs, first remove the brake shoe<br />
unit! Immerse the internal unit into the oil from the left<br />
side. Immerse until the oil reaches up to the top of the<br />
ring gear unit.<br />
Keep the internal unit immersed in this way for<br />
approximately 90 seconds.<br />
Hold the two flat surfaces of the hub<br />
axle in a vice. Note: Do not damage the<br />
threads of the axle.<br />
Check to make sure that the slide spring is<br />
correctly positioned in the brake shoe unit.<br />
While turning the hubshell left and right,<br />
move it carefully downwards to place it.<br />
Do not use any force!<br />
Align the notches of the brake arm unit<br />
with the serrations of the brake shoe unit.<br />
Place the brake arm unit.<br />
4<br />
5<br />
6<br />
5<br />
6<br />
7<br />
8<br />
Remove the internal unit from the oil.<br />
Let the excess oil drain off for approximately<br />
60 seconds.<br />
Reassemble the brake shoe and grease it with<br />
NEXUS grease (code number: Y-04120800).<br />
Assemble the left-hand cone and lock nut. Always adjust the hub so that the shell Turn the hub around and attach the righthand<br />
On ALFINE 8-Speed hubs, use the special<br />
can be turned smoothly without any play<br />
dust cap.<br />
tool TL-AF10 to tighten the dust cap.<br />
after tightening.<br />
Note the direction!<br />
04 05
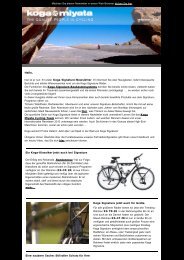
maintenance manual<br />
ADJUSTING THE GEARS<br />
3-SPEED<br />
CASSETTE JOINT<br />
7-SPEED<br />
1<br />
2<br />
3<br />
4<br />
Standard<br />
Advanced cable sealing<br />
Shift up from gear 1 to gear 2.<br />
7-SPEED<br />
Check whether the red line on the push<br />
rod is aligned with the end of the axle.<br />
If the red line is not visible, then check if<br />
the yellow marking is in between the two<br />
white lines.<br />
By turning the cable adjustment bolt, the<br />
setting can be changed.<br />
After shifting up from 1 to 2, reconfirm<br />
the setting.<br />
8-SPEED<br />
CJ-NX10<br />
CJ-NX40<br />
1<br />
2<br />
3<br />
4<br />
CJ-8S20<br />
CJ-8S40<br />
Shift up from gear 1 to gear 4.<br />
Check the alignment of the markings in<br />
the window of the cassette joint.<br />
If the alignment is not correct, adjust it<br />
with the cable adjustment bolt on the<br />
shifter.<br />
If the markings are aligned, the cable is<br />
correctly adjusted. After shifting up from<br />
1 to 4, reconfirm the setting.<br />
101 mm 127 mm<br />
8-SPEED<br />
1<br />
2<br />
3<br />
4<br />
NOTE: Always use an<br />
aluminium endcap!<br />
63 mm or less<br />
TL-CJ40<br />
Code number: Y70898020<br />
Shift up from gear 1 to gear 4.<br />
Check the alignment of the markings in<br />
the window of the cassette joint.<br />
If the alignment is not correct, adjust it<br />
with the cable adjustment bolt on the<br />
shifter.<br />
If the markings are aligned, the cable is<br />
correctly adjusted. After shifting up from<br />
1 to 4, reconfirm the setting.<br />
11-SPEED<br />
11-SPEED ALFINE<br />
184 mm<br />
1<br />
2<br />
3<br />
4<br />
80.5 mm or less<br />
CJ-S700<br />
Shift down from gear 11 to gear 6.<br />
Check the alignment of the markings on<br />
the cassette joint.<br />
If the alignment is not correct, adjust it<br />
with the cable adjustment bolt on the<br />
shifter.<br />
If the markings are aligned, the cable is<br />
correctly adjusted. After shifting down<br />
from 11 to 6, reconfirm the setting.<br />
TL-S700<br />
Code number: Y13098024<br />
06 07
HTTP://TECHDOCS.SHIMANO.COM<br />
Visit http://techdocs.shimano.com for all the<br />
technical information on our products, such as:<br />
• Service Instructions<br />
• Exploded Views<br />
Available in 29 languages.<br />
GB 02/11<br />
Issued by Shimano Europe B.V.<br />
Check the Service Instruction for more information.<br />
Errors and omissions excepted.<br />
www.shimano.com