Temperature Regulators
Temperature Regulators
Temperature Regulators

Create successful ePaper yourself
Turn your PDF publications into a flip-book with our unique Google optimized e-Paper software.
<strong>Temperature</strong> <strong>Regulators</strong><br />
®<br />
Models OB-30 and OB-31<br />
These instructions should be used by experienced personnel!<br />
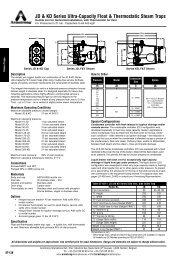
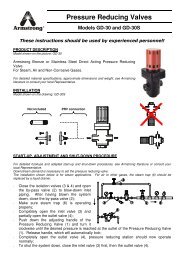
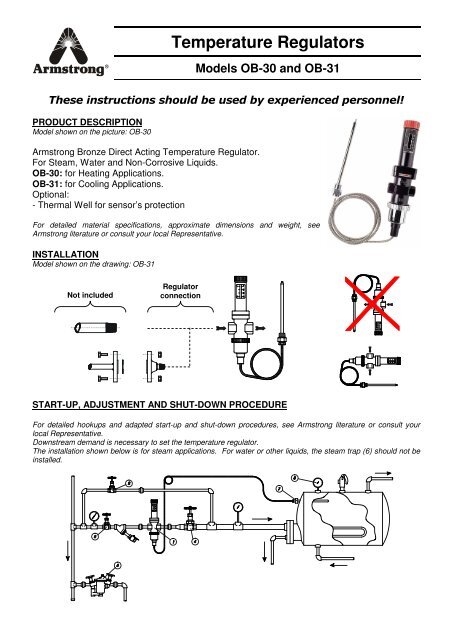
PRODUCT DESCRIPTION<br />
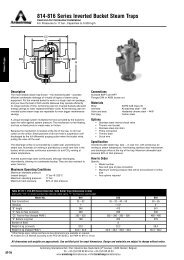
Model shown on the picture: OB-30<br />
Armstrong Bronze Direct Acting <strong>Temperature</strong> Regulator.<br />
For Steam, Water and Non-Corrosive Liquids.<br />
OB-30: for Heating Applications.<br />
OB-31: for Cooling Applications.<br />
Optional:<br />
- Thermal Well for sensor’s protection<br />
For detailed material specifications, approximate dimensions and weight, see<br />
Armstrong literature or consult your local Representative.<br />
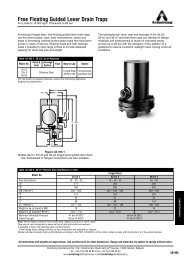
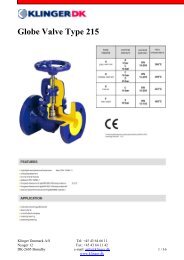
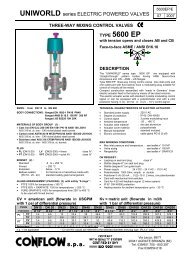
INSTALLATION<br />
Model shown on the drawing: OB-31<br />
Not included<br />
Regulator<br />
connection<br />
START-UP, ADJUSTMENT AND SHUT-DOWN PROCEDURE<br />
For detailed hookups and adapted start-up and shut-down procedures, see Armstrong literature or consult your<br />
local Representative.<br />
Downstream demand is necessary to set the temperature regulator.<br />
The installation shown below is for steam applications. For water or other liquids, the steam trap (6) should not be<br />
installed.
- Close the isolation valves (3 & 4) and open the by-pass valve (2) to blow-down inlet piping.<br />
After having blown the system down, close the by-pass valve (2);<br />
- OB-30 on steam application: Make sure steam trap (6) is operating properly;<br />
- Completely open the inlet valve (3) and partially open the outlet valve (4);<br />
- Turn the adjusting handle of the <strong>Temperature</strong> Regulator (1) clockwise until the desired<br />
temperature is reached on the thermometer (5). The temperature will decrease if the handle<br />
is turned counterclockwise;<br />
- Completely open the outlet valve (4) and adjust temperature if necessary. The temperature<br />
regulating system should now operate normally;<br />
- To shut the system down, close the inlet valve (3) first, then the outlet valve (4).<br />
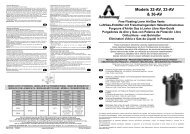
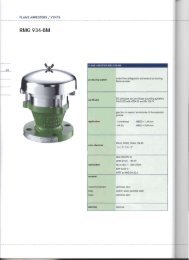
MAINTENANCE<br />
For troubleshooting, testing methods, frequency of maintenance and detailed spare parts list, see Armstrong<br />
literature or consult your local Representative.<br />
EQUIPMENT UNDER PRESSURE<br />
OPERATING TEMPERATURE >100°C<br />
MAKE SURE TEMPERATURE REGULATOR IS COLD BEFORE HANDLING<br />
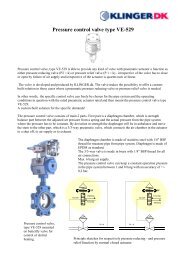
Model shown on the drawing: OB-30<br />
I. Disassembly Procedure:<br />
- Turn the handle (17) counterclockwise in order to free the regulating spring (12);<br />
- Unscrew the union nut (22) and remove the sensor (21) from valve body. Make sure the<br />
thermal bellows receiver (20) is not lost;<br />
- Unscrew bolts (2) and remove spring chamber (1). Make sure that spring plate (14) and<br />
regulating spring (12) are not lost;<br />
- Remove guides (10 & 11);<br />
- Unscrew nuts (9) located at the top of the spindle (7). All inner parts, excluding valve seat<br />
(5) can be removed;<br />
- Unscrew valve seat (5). Clean or replace internal parts for which it is necessary;<br />
- Assemble in opposite order. Replace gaskets if necessary (make sure to tighten guide (11)<br />
on the bottom of the body with the spring chamber (1) removed).<br />
Armstrong International, S.A., Parc Industriel des Hauts-Sarts, 4040 Herstal – Belgium Ph: +32.4.240.90.90 Fax: +32.4.248.13.61<br />
IOM-1113-A 10/02 www.armstrong.be Printed in Belgium