Bedienungsanleitungen - Gustav Klauke GmbH
Bedienungsanleitungen - Gustav Klauke GmbH
Bedienungsanleitungen - Gustav Klauke GmbH

Create successful ePaper yourself
Turn your PDF publications into a flip-book with our unique Google optimized e-Paper software.
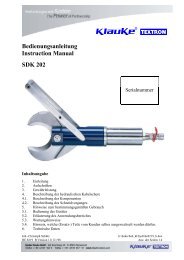
Instruction Manual<br />
EK 60UNV-L<br />
2K<br />
The compact ergonomically formed design consists<br />
of 2 components. The grip area is rubber coated<br />
and therefore slip resistent. The housing design is<br />
optimized in respect of the center of gravity which<br />
improves the handling and supports fatique-proof<br />
working.<br />
Li-Ion batteries do neither have a memory effect nor<br />
self discharge. Even after long periods of non operation<br />
the tool is always ready to operate. In addition<br />
we see a lower power weight ratio with 50% more<br />
capacity and shorter charging cycles compared to<br />
NiMH batteries.<br />
The oil used in our tool is particularly environmentally<br />
friendly and and has been rewarded „The Blue<br />
Angel“. The oil is also suitable for low temperatures<br />
and has excellent lubrication characteristics.<br />
Compatability to all common crimping dies (60 kN)<br />
by using special adapters.<br />
Use of special dies and adapters including customer<br />
specifi c die designs.<br />
3.3 Description of the tool indication<br />
This tool is equipped with a special circuit board incorporating<br />
several important features to inform the user about<br />
the current status of the unit. Please see Table 1 for more<br />
details.<br />
Prior to operating the unit the charging level of the battery<br />
(pic. 1.2) should have been tested2. A low charging level<br />
can be detected by the fl ashing of the LED (pic. 1.1) for<br />
20 s at the end of a crimping cycle.<br />
4. Remarks in respect of the determined<br />
use<br />
Before starting any work on electrical appliances it must<br />
be safeguarded that there are no live parts in the immediate<br />
assembly area of the user. If this not possible special<br />
precaution measures1 for working near live parts must<br />
be provided.<br />
4.1 Operation of the unit<br />
First you have to select the right adapter for the type of<br />
dies you intend to use respectively the cutting blades.<br />
Attention<br />
The crimping process can be interrupted at any<br />
moment by releasing the trigger.<br />
In case of error or emergency the dies/blades can be returned<br />
into the starting position by actuating the retract<br />
button (pic. 1.4).<br />
The working cycle is terminated when either the crimping<br />
force is reached or the cable/conductor (pic. 26, 28, 30),<br />
DIN rail, threaded rod is cut.<br />
Afterwards a second working cycle can be initiated or the<br />
it can be fi nished by opening the latch (pic. 1.7).<br />
Attention<br />
After having terminated the working cycle<br />
and prior to changing the dies/blades remove<br />
battery to avoid unintended use.<br />
4.1.1 Use of crimping dies<br />
When using the 22 style dies (see tab 2 and 3) the retaining<br />
clips have to be actuated while the dies will be inserted<br />
consequtively from the side into the head respectively<br />
the adapter (see pic. 19).<br />
During the crimping process the connecting material is<br />
positioned in the stationary half of the die whereas the<br />
moving part of the die is approaching the compression<br />
point3.<br />
After having reached the maximum crimping force the<br />
dies return into the starting position automatically.<br />
4.1.2 Use of cutting dies<br />
Three diffent types of cutting dies are available (pic. 26,<br />
28, 30). The UC 26 is optimised on copper and aluminium<br />
cables/conductors ≤ 26 mm Ø. The UC 40 can cut<br />
all copper and aluminium cables/conductors < 40 mm Ø.<br />
The larger cables/conductors show the best results respectively<br />
the least deformations.<br />
Attention<br />
Do only cut copper and aluminium cables/conductors<br />
with UC 26 and UC 40!<br />
For cutting ACSR conductors you must only use the<br />
UCACSR cutting blades.<br />
Attention<br />
Cutting ACSR conductors or steel fortified<br />
cables do always wear safety glasses.<br />
Fractions of reenforced steel conductors can be propelled<br />
towards the operator with high speed and could cause<br />
severe injuries.<br />
When cutting threaded rods they must be in a right angle<br />
to the cutting blades to provide a clean cut. The threaded<br />
rods must be cleaned of chips prior to cutting. The<br />
cutting cycle should be proceeded until the blades have<br />
reached their fi nal position in order to provide clean cutting<br />
edges.<br />
The DIN rail cutting dies are equipped with a sheet metal<br />
guide which facilitate a cut in a right angle.<br />
When the cut is completed the retraction is provided by<br />
actuating the retract button (pic. 1.4) once.<br />
4.1.3 Use of the punch adapter<br />
The advance (penetration) of the punch into the die must<br />
be observed carefully. As soon as the sheet metal is punched<br />
the punching cycle must be terminated by releasing<br />
the trigger (pic. 1.3).<br />
The retraction is provided by actuating the retract button<br />
(pic. 1.4) once.<br />
Attention<br />
If the punching cycle is not terminated after the<br />
sheet metal is punched the punch will contact<br />
the die which might result in fracture of one or<br />
the other.<br />
HE.13423_B © 09/2010<br />
GB<br />
2