LittleLife Arc 2 Travel Cot - Kiddicare
LittleLife Arc 2 Travel Cot - Kiddicare
LittleLife Arc 2 Travel Cot - Kiddicare

Create successful ePaper yourself
Turn your PDF publications into a flip-book with our unique Google optimized e-Paper software.
BAGGAGE CARE INSTRUCTIONS<br />
To remove dirt, lightly brush with a soft brush or wet cloth using water and mild liquid soap. Do not machine wash. Do not<br />
iron. Do not bleach. Do not store when damp. Always remove poles and detachable items before handwashing. Whilst all<br />
components, material and stitching are guaranteed against manufacturing defects, we recommend that parents check these<br />
points regularly for wear or damage.<br />
INSTRUCTION MANUAL<br />
GEBRUIKSAANWIJZING<br />
GEBRAUCHSANLEITUNG<br />
MANUEL D’INSTRUCTIONS<br />
WARNINGS & SAFETY NOTICES<br />
Injury may result if you do not follow these safety precautions.<br />
Injury may result from improper use.<br />
h<br />
• Before assembling your <strong>Travel</strong> <strong>Cot</strong>, read and understand the instructions.<br />
• Before each use, ensure that your <strong>Travel</strong> <strong>Cot</strong> is correctly assembled. Incorrect assembly may compromise your child’s safety.<br />
• Do NOT use your <strong>Travel</strong> <strong>Cot</strong> if any part is broken, torn, or missing.<br />
• Ensure that your child does not climb out of the <strong>Travel</strong> <strong>Cot</strong>. Injury may result from your child falling from the <strong>Travel</strong> <strong>Cot</strong>.<br />
• Make sure your child is clear of the <strong>Travel</strong> <strong>Cot</strong> before assembly or dis-assembly.<br />
• Do NOT use your <strong>Travel</strong> <strong>Cot</strong> near a heater, cooking device, open fire or exposed flame.<br />
• The <strong>Travel</strong> <strong>Cot</strong> should be kept away from trailing cords and flexes.<br />
• Do NOT modify <strong>Travel</strong> <strong>Cot</strong> or use accessories not designed for <strong>Travel</strong> <strong>Cot</strong>. They may be unsafe.<br />
Please contact your dealer if you are unsure.<br />
• Your <strong>Travel</strong> <strong>Cot</strong> is supplied with a mattress. Use only the mattress supplied.<br />
• Do NOT use an extra mattress, or one different from that supplied. Using an additional mattress, or a mattress of the<br />
wrong size or thickness, may create hazardous gaps and will affect the internal height of your <strong>Travel</strong> <strong>Cot</strong>.<br />
This could result in suffocation and falls from the cot.<br />
• Do NOT leave anything in the cot which could provide a foothold or present a danger of suffocation or strangulation.<br />
• Always use pegs to secure your <strong>Travel</strong> <strong>Cot</strong> to the ground when using outdoors.<br />
• Use furniture loops indoors to prevent movement of the cot when in use.<br />
• Ensure the top and side entrances are closed securely whilst the cot is unattended.<br />
• Caution: Curved poles are under tension and should be released with extreme care. Keep clear of pole ends.<br />
Mattress Dimensions: 495 x 1150 x 25 mm<br />
Manufactured for / Hergestellt für / Vervaardigd voor / Construit pour:<br />
Lifemarque ® Limited, Aldermaston, Berkshire RG7 8EN, United Kingdom<br />
Tel: 00 44 (0) 118 981 1433 . Fax: 00 44 (0) 118 981 1406 . www.littlelife.co.uk<br />
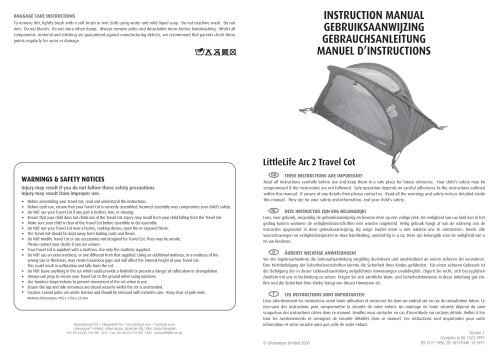
<strong>LittleLife</strong> <strong>Arc</strong> 2 <strong>Travel</strong> <strong>Cot</strong><br />
THESE INSTRUCTIONS ARE IMPORTANT!<br />
Read all instructions carefully before use and keep them in a safe place for future reference. Your child’s safety may be<br />
compromised if the instructions are not followed. Safe operation depends on careful adherence to the instructions outlined<br />
within this manual. If unsure of any details then please contact us. Read all the warnings and safety notices detailed inside<br />
this manual. They are for your safety and information, and your child’s safety.<br />
DEZE INSTRUCTIES ZIJN ERG BELANGRIJK!<br />
Lees, voor gebruik, zorgvuldig de gebruiksaanwijzing en bewaar deze op een veilige plek. De veiligheid van uw kind kan in het<br />
geding komen wanneer de veiligheidsvoorschriften niet worden nageleefd. Veilig gebruik hangt af van de naleving van de<br />
instructies opgesomd in deze gebruiksaanwijzing. Bij enige twijfel moet u niet nalaten ons te contacteren. Neem alle<br />
waarschuwingen en veiligheidsaspecten in deze handleiding, aandachtig in u op. Deze zijn belangrijk voor de veiligheid van u<br />
en uw kinderen.<br />
ÄUßERST WICHTIGE ANWEISUNGEN!<br />
Vor der Ingebrauchnahme die Gebrauchsanleitung sorgfältig durchlesen und anschließend an einem sicheren Ort verwahren.<br />
Eine Nichtbefolgung der Sicherheitsvorschriften könnte die Sicherheit Ihres Kindes gefährden. Für einen sicheren Gebrauch ist<br />
die Befolgung der in dieser Gebrauchsanleitung aufgeführten Anweisungen unabdinglich. Zögern Sie nicht, sich bei jeglichen<br />
Zweifeln mit uns in Verbindung zu setzen. Prägen Sie sich sämtliche Warn- und Sicherheitshinweise in diese Anleitung gut ein.<br />
Ihre und die Sicherheit Ihrer Kinder hängt von diesen Hinweisen ab.<br />
CES INSTRUCTIONS SONT IMPORTANTES!<br />
Lisez attentivement les instructions avant toute utilisation et conservez les dans un endroit sûr en cas de consultation future. Le<br />
non-suivi des instructions peut compromettre la sécurité de votre enfant. Un montage en toute sécurité dépend du suivi<br />
scrupuleux des instructions citées dans ce manuel. Veuillez nous contacter en cas d'incertitude sur certains détails. Veillez à lire<br />
tous les avertissements et consignes de sécurité détaillés dans ce manuel. Ces instructions sont importantes pour votre<br />
information et votre sécurité ainsi que celle de votre enfant.<br />
© Lifemarque Limited 2006<br />
Version 2<br />
Complies to BS 7423:1999<br />
BS 7177:1996, BS 1877:PART 10:1997
GB / English<br />
GB / English<br />
ASSEMBLY<br />
CHECK COMPONENTS<br />
Open the carry bag of your travel cot and remove<br />
contents from within the rolled-up mattress. The poles<br />
and pegs are located in a sleeve on the inside of the<br />
carry bag. Check the contents:<br />
1 x Shock-corded blue pole<br />
1 x Shock-corded silver pole<br />
1 x Fabric cot<br />
4 x Pegs<br />
1 x Mattress<br />
If you find that there is resistance at a seam, stop and<br />
gently feed the pole past the difficult point. Do not<br />
force the pole as this may cause damage. Continue to<br />
feed the pole through until it comes out of the other<br />
end of the sleeve. Do not bend the pole into position<br />
at this stage.<br />
Locate one of the grey webbing straps on the opposite<br />
side of the cot and repeat this procedure with the<br />
silver pole. Do not bend either of the poles into<br />
position at this stage.<br />
BEND THE POLES INTO POSITION<br />
Fig. 3<br />
Fig. 5<br />
Make sure that no component appears damaged.<br />
Complete all assembly procedures and read all<br />
warnings and safety notices before use.<br />
ASSEMBLE THE POLES<br />
Make sure that your child is clear of the travel cot<br />
before assembly or disassembly.<br />
Each pole is folded into sections and joined with a<br />
shock-cord. Align each section with the next; click<br />
together to form a smooth join.<br />
INSERT THE POLES<br />
Lay the fabric cot flat and locate one of the blue<br />
webbing straps which can be found at the corners of<br />
the cot. Starting from that tab, push the blue pole<br />
through the sleeve across the fabric cot. Do not<br />
attempt to pull the pole through the sleeve as this will<br />
cause the sections of the pole to become disjointed.<br />
Use one hand to help guide the pole through the<br />
sleeve (fig 1).<br />
Ensure all webbing straps are extended to their full<br />
length so that the eyelet is as far away from the edge<br />
of the cot as possible. This will aid assembly.<br />
Starting with the silver pole that you have just<br />
inserted, put the end of the pole into the eyelet on the<br />
grey webbing straps (fig 2).<br />
Fig. 2<br />
Now move to the opposite end of the cot and take hold<br />
of the other end of the pole using one hand. In the<br />
other hand, grab the furniture loop on the end of the<br />
webbing strap. Now elevate the end of the cot so that<br />
it is at 45-60 degrees, making sure that the opposite<br />
end of the cot is firmly on the floor. Apply gentle<br />
downwards pressure to the pole and carefully guide<br />
the eyelet over the end of the pole (fig 3).<br />
FIT THE MATTRESS<br />
Unzip the top mesh panel and place the mattress into<br />
the base of the cot. The mattress is held in place with<br />
Velcro tabs on the underside. These tabs are located in<br />
the centre of the mattress to allow sheets to be tucked<br />
in at the corners. Press the mattress down firmly into<br />
position. The side mesh panel can also be unzipped;<br />
however, if the cot is left unattended with the child in<br />
it, all entry points should be fully closed.<br />
Fig. 4<br />
Unlocked<br />
Locked<br />
The side mesh panel should be locked using the zippuller<br />
and toggle (fig 4).<br />
INDOOR & OUTDOOR USE<br />
For indoor use, attach the cot to an immobile object<br />
using at least 2 of the 4 furniture loops located on the<br />
webbing straps. If using only 2 loops, make sure that<br />
they are attached at opposite corners of the cot. This<br />
is to prevent movement during use. Use the pegs<br />
provided to secure the cot when it is erected outdoors.<br />
The travel cot is now assembled. Check that it matches<br />
the diagram above (fig 5). Note: Due to the poles<br />
developing a memory of their tensioned position,<br />
subsequent assemblies will become easier.<br />
DISASSEMBLY<br />
Disassembly is the reverse of the assembly procedure<br />
described.<br />
Store all components in the carry bag to prevent loss or<br />
damage. Ensure that all children are at a safe distance<br />
before proceeding to disassemble the cot.<br />
Caution: Curved poles are under tension and should be<br />
released with extreme care. Keep clear of pole ends.<br />
With the silver pole in position, repeat this procedure<br />
with the blue pole on the opposite side of the cot.<br />
Caution: Curved poles are under tension and should be<br />
handled with extreme care. Keep clear of pole ends.<br />
Fig. 1