Digital Piano - Kawai Technical Support
Digital Piano - Kawai Technical Support
Digital Piano - Kawai Technical Support

You also want an ePaper? Increase the reach of your titles
YUMPU automatically turns print PDFs into web optimized ePapers that Google loves.
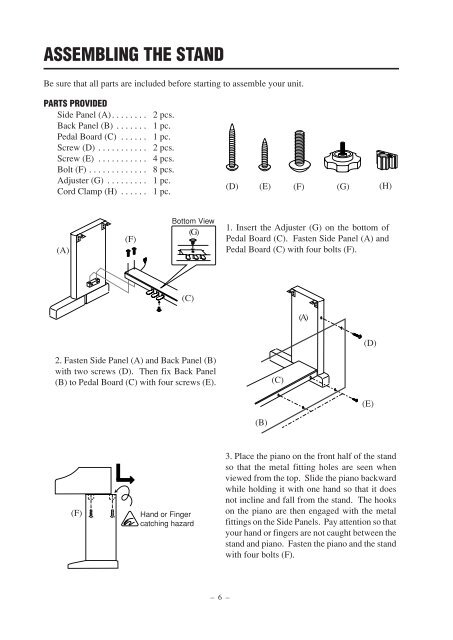
ASSEMBLING THE STAND<br />
Be sure that all parts are included before starting to assemble your unit.<br />
PARTS PROVIDED<br />
Side Panel (A). . . . . . . . 2 pcs.<br />
Back Panel (B) . . . . . . . 1 pc.<br />
Pedal Board (C) . . . . . . 1 pc.<br />
Screw (D) . . . . . . . . . . . 2 pcs.<br />
Screw (E) . . . . . . . . . . . 4 pcs.<br />
Bolt (F) . . . . . . . . . . . . . 8 pcs.<br />
Adjuster (G) . . . . . . . . . 1 pc.<br />
Cord Clamp (H) . . . . . . 1 pc.<br />
(D)<br />
(E)<br />
(F)<br />
(G)<br />
(H)<br />
(A)<br />
(F)<br />
Bottom View<br />
(G)<br />
1. Insert the Adjuster (G) on the bottom of<br />
Pedal Board (C). Fasten Side Panel (A) and<br />
Pedal Board (C) with four bolts (F).<br />
(C)<br />
(A)<br />
(D)<br />
2. Fasten Side Panel (A) and Back Panel (B)<br />
with two screws (D). Then fix Back Panel<br />
(B) to Pedal Board (C) with four screws (E).<br />
(C)<br />
(E)<br />
(B)<br />
(F)<br />
Hand or Finger<br />
catching hazard<br />
3. Place the piano on the front half of the stand<br />
so that the metal fitting holes are seen when<br />
viewed from the top. Slide the piano backward<br />
while holding it with one hand so that it does<br />
not incline and fall from the stand. The hooks<br />
on the piano are then engaged with the metal<br />
fittings on the Side Panels. Pay attention so that<br />
your hand or fingers are not caught between the<br />
stand and piano. Fasten the piano and the stand<br />
with four bolts (F).<br />
– 6 –