N 2 Series Electric Cylinders - Kalatec Automação
N 2 Series Electric Cylinders - Kalatec Automação
N 2 Series Electric Cylinders - Kalatec Automação

Create successful ePaper yourself
Turn your PDF publications into a flip-book with our unique Google optimized e-Paper software.
KALATEC AUTOMAÇÃO LTDA<br />
N 2 <strong>Series</strong><br />
<strong>Electric</strong><br />
<strong>Cylinders</strong><br />
User's Manual<br />
P/N CUS10048 Rev. 1.01 07/03<br />
www.kalatec.com.br
KALATEC AUTOMAÇÃO LTDA<br />
Table of Contents<br />
1. PRODUCT OVERVIEW.................................................................................................................... 1<br />
N2 SERIES FEATURES AND SPECIFICATIONS...................................................................................... 1<br />
ELECTRIC CYLINDER CONSTRUCTION (TYPICAL) ................................................................................ 2<br />
CYLINDER PART NUMBERS - IDENTIFYING A CYLINDER....................................................................... 3<br />
CYLINDER CONFIGURATION GUIDE .................................................................................................... 5<br />
2. MOUNTING YOUR N2 CYLINDER.................................................................................................. 6<br />
MOUNTING REQUIREMENTS............................................................................................................... 6<br />
CYLINDER MOUNTING STYLES........................................................................................................... 6<br />
MOUNTING ROD ENDS ...................................................................................................................... 6<br />
ATTACHING THE LOAD TO THE ROD END ........................................................................................... 7<br />
ALIGNING THE ACTUATOR WITH THE LOAD ......................................................................................... 8<br />
INSTALLING POSITION SENSORS FOR OVERTRAVEL PROTECTION ....................................................... 9<br />
POSITION SENSOR DIMENSIONS AND MOUNTING LOCATIONS............................................................ 10<br />
SENSOR-TO-CONTROLLER CONNECTIONS........................................................................................ 10<br />
3. APPLICATION CONSIDERATIONS.............................................................................................. 11<br />
MAXIMUM THRUST LOAD................................................................................................................. 11<br />
CRITICAL SPEED............................................................................................................................. 11<br />
DUTY CYCLE LIMITS ....................................................................................................................... 12<br />
ENVIRONMENTAL SPECIFICATIONS................................................................................................... 12<br />
TEMPERATURE RATINGS ................................................................................................................. 12<br />
PREVENTING EXPOSURE TO CONTAMINANTS ................................................................................... 12<br />
4. OPTIONAL EQUIPMENT - SPECIFICATIONS, DIMENSIONS, AND WIRING ............................ 13<br />
BRAKE ON LEADSCREW OPTION (-BS24, -BS115, -BS230) ............................................................ 13<br />
BRAKE ON MOTOR OPTION (-BM24, -BM115, -BM230) .................................................................. 14<br />
ENCODER OPTION (-EMK/-EM) ...................................................................................................... 15<br />
LINEAR POTENTIOMETER OPTION (-L) ............................................................................................. 16<br />
5. FACTORY SERVICE AND ROUTINE FIELD MAINTENANCE..................................................... 17<br />
PERFORMING INSPECTIONS AND ROUTINE MAINTENANCE................................................................. 17<br />
ROUTINE MAINTENANCE PROCEDURES............................................................................................ 18<br />
PREVENT INJURY TO PERSONNEL.................................................................................................... 18<br />
HARDWARE TORQUE....................................................................................................................... 18<br />
LUBRICANTS AND ADHESIVES.......................................................................................................... 18<br />
INSTALLING A PULLEY, PINION, OR COUPLING.................................................................................. 19<br />
LUBRICATING THE LEADSCREW ....................................................................................................... 20<br />
CHECKING/ADJUSTING DRIVE BELT TENSION................................................................................... 21<br />
LUBRICATING GEARS ...................................................................................................................... 22<br />
ALIGNING MOTOR PINION................................................................................................................ 23<br />
6. MOUNTING A CUSTOMER SUPPLIED MOTOR.......................................................................... 24<br />
7. TROUBLESHOOTING ................................................................................................................... 25<br />
8. PARTS LIST AND EXPLODED PARTS DIAGRAMS ................................................................... 30<br />
EXPLODED PARTS DIAGRAM - PARALLEL MOTOR MOUNTING............................................................ 31<br />
EXPLODED PARTS DIAGRAM - PARALLEL MOTOR MOUNTING............................................................ 32<br />
EXPLODED PARTS DIAGRAM - INLINE MOTOR MOUNTING ................................................................. 33<br />
EXPLODED PARTS DIAGRAM - INLINE MOTOR MOUNTING ................................................................. 34<br />
9. WARRANTY AND SERVICE COVERAGE.................................................................................... 35<br />
www.kalatec.com.br<br />
i
KALATEC AUTOMAÇÃO LTDA<br />
N2 <strong>Electric</strong> Cylinder - User’s Manual<br />
1. Product Overview<br />
IDC’s N2 <strong>Series</strong> <strong>Electric</strong> <strong>Cylinders</strong> are designed for use in a wide variety of industrial, scientific, and commercial<br />
applications requiring precise control of linear thrust, speed, or position. This manual will help you install, operate,<br />
and maintain your N2 <strong>Series</strong> Cylinder.<br />
N2 <strong>Series</strong> Features<br />
Following are just a few of the N2’s more desirable features:<br />
• Highest Customization<br />
The N2 is both flexible and robust to accommodate almost every industrial motion control application. In<br />
fact, the N2 offers the most available custom options of all IDC products.<br />
• Improved Anti-Rotation System<br />
A significant N2 improvement lies in the newly designed anti-rotation guide flange, which is six times as<br />
strong as the previous N <strong>Series</strong> version.<br />
• No Extra Charge for Nonstandard Stroke Length<br />
Our manufacturing process can quickly respond to custom stroke length requests, which ensures that you<br />
can always specify the length of cylinder that best fits your application.<br />
• Smaller, More Economical Limit Switches<br />
Our limit switches have also been updated for the N2. The new limit switches are smaller, better sealed<br />
(IP67), and less expensive.<br />
• Same Mounting Footprint as N <strong>Series</strong><br />
N2s retain the compact size (very low overall length per usable stroke), and are footprint-compatible with<br />
the N <strong>Series</strong>.<br />
• N2 Compatibility with IDC Controls<br />
IDC controls are designed to optimize the performance of N2 cylinders. See the “Compatible Controls” section<br />
of the table below to ensure that you are using the correct IDC control with your N2 cylinder. If you are<br />
not currently using an IDC control, please consult the table below and consider upgrading your application.<br />
N2 Specifications<br />
The following are maximum values for the N2 <strong>Series</strong>. See the IDC Catalog for full specifications.<br />
Parameter<br />
Motor Type<br />
N2 Configurations<br />
N2-D N2-H N2-S/P N2-B<br />
24 VDC Permanent<br />
Magnet<br />
160 VDC Permanent<br />
Magnet Servo<br />
1.8° Hybrid<br />
Stepper<br />
Rare Earth Magnet<br />
Brushless Servo<br />
Performance Curves<br />
See Latest IDC Catalog<br />
Load Capacity lbs [N] 600 [2,670] 600 [2,670] 600 [2,670] 600 [2,670]<br />
Max No Load Speed<br />
24 [610] 25 [635] 25 [635] 30 [760]<br />
in/s [mm/s]<br />
Repeatability in [mm] ±0.005 [.127] ±0.005 [.127] ±0.0005 [.0127] ±0.001 [.025]<br />
Compatible IDC Controls<br />
D2200<br />
D2300<br />
D2400<br />
D2500*<br />
SmartStep<br />
B8961<br />
*This application (control + cylinder) requires the Linear Pot. (-L) option.<br />
www.kalatec.com.br<br />
1
N2 <strong>Electric</strong> Cylinder - User’s Manual<br />
KALATEC AUTOMAÇÃO LTDA<br />
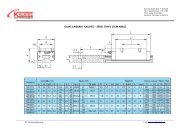
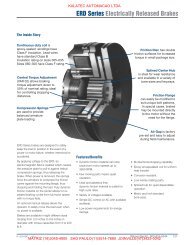
<strong>Electric</strong> Cylinder Construction (Typical)<br />
This cylinder cross-section, with motor attached, is provided to illustrate the typical components of an IDC electric<br />
cylinder. Refer to Section 7, Parts List and Exploded Parts Diagrams, for more detailed information on the N2<br />
cylinder.<br />
2<br />
1<br />
3<br />
N <strong>Series</strong> Cylinder<br />
11<br />
4 5 6 7 8 9<br />
10<br />
1. Motor (may be customer supplied)<br />
2. Bearing Housing<br />
3. Drive Train (belt drive shown)<br />
4. Thrust Bearings<br />
5. Leadscrew<br />
6. Drive Nut<br />
7. Internal Guide Flange (including<br />
magnets)<br />
8. Rod End Sleeve Bearing<br />
9. Thrust Tube Wiper<br />
10. Thrust Tube<br />
11. Guide Cylinder<br />
2<br />
www.kalatec.com.br
KALATEC AUTOMAÇÃO LTDA<br />
N2 <strong>Electric</strong> Cylinder - User’s Manual<br />
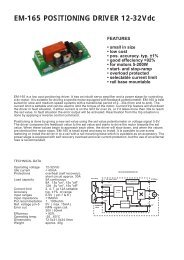
Cylinder Part Numbers - Identifying a Cylinder<br />
Your new N2 cylinder will arrive with an IDC factory label attached as shown below. The factory label provides<br />
a detailed breakdown of the cylinder model with all of its mechanical characteristics. This section can be used to:<br />
1) identify a cylinder’s mechanical characteristics based on the factory label, or 2) order a new N2 cylinder with<br />
different mechanical characteristics.<br />
Label Location<br />
Locations of Labels on Different Motor-Mounting Configurations<br />
Industrial Devices Corp.<br />
3925 Cypress Dr, Petaluma, CA 94954<br />
800-747-0064 Fax: 707-789-0175<br />
<strong>Electric</strong> Cylinder Model:<br />
N2-H-10-5B-4-MP2-MT1-Q-W<br />
Serial Number: 950125 90048 1<br />
Voltage: 160 V Rated Current: 2 A<br />
Label<br />
Parallel<br />
Inline<br />
Label<br />
Model Number Example<br />
Rod-Type<br />
Cylinder<br />
N2<br />
Base Model Number<br />
Motor<br />
Type<br />
Drive<br />
Ratio<br />
Screw<br />
Pitch,Type<br />
Stroke<br />
Length<br />
Cylinder<br />
Mounting<br />
Rod<br />
End<br />
Options<br />
H 10 5B 4 MP2 MT1 Q W<br />
N2 = Product <strong>Series</strong><br />
H = H Motor, 160 VDC, 2 Amp, Permanent Magnet MP2 = Rear Double Clevis Mount<br />
10 = 1.0 to 1 Drive Ratio - Belt/Pulley MT1 = Male Threaded Rod End<br />
5B = 5 Pitch (0.2” lead) Ballscrew<br />
Q = Quick Disconnect Option<br />
4 = 4-inch stroke W = Water Resistant Seal Option<br />
Identify Your N2 Cylinder Using the Cylinder Configuration Guide<br />
This fill-in-the-box section is provided for users who want to identify an existing N2 cylinder or perhaps order a<br />
new N2 cylinder. To identify the mechanical characteristics of an existing N2 cylinder, photocopy this page and<br />
transcribe the model number from the factory label to boxes 2 through 8. To reconfigure or order a new N2, fill in<br />
boxes 2 - 8 with codes for the new cylinder. Refer to the Cylinder Configuration Guide on the following pages<br />
for boxes 2 - 8. Please see IDC’s latest catalog for additional information.<br />
Rod-Type<br />
Cylinder<br />
Base Model Number<br />
Motor<br />
Type<br />
Drive<br />
Ratio<br />
Screw<br />
Pitch,Type<br />
Stroke<br />
Length<br />
Cylinder<br />
Mounting<br />
Rod<br />
End<br />
Options<br />
N2<br />
1 2 3 4 5 6 7 8<br />
www.kalatec.com.br<br />
3
N2 <strong>Electric</strong> Cylinder - User’s Manual<br />
KALATEC AUTOMAÇÃO LTDA<br />
Cylinder Configuration Guide<br />
2<br />
Motor Type<br />
D<br />
H<br />
P22[*x]<br />
S32[*x]<br />
B23<br />
X<br />
24VDC, 4.5 Amp, Permanent Magnet Motor<br />
160VDC, 2 Amp, Permanent Magnet Motor<br />
NEMA 23 Frame, Step Motor, 3 Stack<br />
NEMA 34 Frame, Step Motor, 2 Stack<br />
23 Frame Brushless Servo Motor<br />
Customer Supplied Motor ( motor described<br />
in “Options” element of part number)<br />
*Insert one of the following for x:<br />
N = 8 leads (windings can be wired in<br />
<strong>Series</strong> or Parallel)<br />
T = Windings pre-wired in <strong>Series</strong><br />
V = Windings pre-wired in Parallel<br />
3 Drive Ratio<br />
10 1.0:1 Drive Belt/Pulley (1.0:1 exact ratio)<br />
15 1.5:1 Drive Belt/Pulley (1.5:1 exact ratio)<br />
20 2.0:1 Drive Belt/Pulley (2.0:1 exact ratio)<br />
25 2.5:1 Helical Gear (2.5:1 exact ratio)<br />
31 3.1:1 Helical Gear (3.125 exact, or 50:16 ratio)<br />
120 12.0:1 Helical Gear (12:1 exact ratio)<br />
10L 1.0:1 Inline Coupling [Note: Direct 1:1 coupling is the<br />
only ratio available for Inline Models<br />
4 Screw Type<br />
5A<br />
8A<br />
2B<br />
5B<br />
5 Pitch (.2” lead) acme leadscrew<br />
8 Pitch (.125” lead) acme leadscrew<br />
2 Pitch (.5” lead) ballscrew<br />
5 Pitch (.2” lead) ballscrew<br />
5 Stroke Length - Specified in inches<br />
6 Mounting<br />
Styles<br />
MF1*<br />
MF2*<br />
MF3*<br />
MP2<br />
MP3<br />
Front Rectangular Flange<br />
Rear Rectangular Flange<br />
Front & Rear Rectangular Flange<br />
Rear Double Clevis Mount (shown)<br />
Rear Double Clevis Mount<br />
with Pivot Base<br />
MS1<br />
Side End Angles<br />
MS2<br />
Side Lugs<br />
MS6*<br />
Side Tapped Mounting Holes<br />
MT4<br />
Trunnion Mount<br />
(Inline versions only)<br />
*Add M suffix for Metric version (e.g. MF1M, MS6M, etc.)<br />
4<br />
www.kalatec.com.br
KALATEC AUTOMAÇÃO LTDA<br />
N2 <strong>Electric</strong> Cylinder - User’s Manual<br />
Cylinder Configuration Guide<br />
7 Rod Ends<br />
FC2<br />
Clevis (includes MT1)<br />
FE2<br />
Female Eye (includes FT1)<br />
FS2<br />
Spherical Joint (includes FT1)<br />
FT1*<br />
Female Thread<br />
MT1*<br />
Male Thread<br />
*Add M suffix for metric version (e.g. FT1M, MT1M, etc.)<br />
Note: Rod-End dimensions can be found in the latest IDC Catalog<br />
8 Cylinder<br />
Options<br />
BM<br />
BS<br />
DB<br />
EM<br />
EMK<br />
F<br />
H<br />
L<br />
PB<br />
PN<br />
Q<br />
Brake on Motor<br />
Brake on Leadscrew<br />
Double Bearing<br />
Encoder on Motor (500 line)<br />
Encoder on Motor (1000 line)<br />
Subfreezing<br />
High Temperature<br />
Linear Potentiometer<br />
Protective Boot<br />
Pre-loaded Nut<br />
Quick Disconnect<br />
W Water Resistant Seal<br />
Motor Mod Codes for X Motors (customer supplied)<br />
also found in option part of Part Number<br />
www.kalatec.com.br<br />
5
N2 <strong>Electric</strong> Cylinder - User’s Manual<br />
KALATEC AUTOMAÇÃO LTDA<br />
2. Mounting Your N2 Cylinder<br />
Warning! Ensure that power to the electric cylinder is OFF before attempting any installation,<br />
adjustment, or modification to the cylinder mounting, rod end attachment, or the load.<br />
Mounting Requirements<br />
1. The structure on which the cylinder is mounted must be capable of holding three times (3X) the cylinder<br />
load and be rigid enough to prevent undue deflection or distortion of the cylinder or its supporting members.<br />
2. The cylinder must be mounted parallel to the travel of the load to ensure proper alignment (this is especially<br />
important with externally guided loads using rails, bearings, etc.).<br />
3. All mounting surfaces must be flat and clean to provide secure and stable fittings.<br />
4. Units with flat surface mounts (MF1, MF2, MF3, MS1, MS6) must be rigidly mounted.<br />
Cylinder Mounting Styles<br />
Each cylinder mounting style presents different application considerations. Find your mounting style(s) in the<br />
table below and pay special attention to the corresponding “Application Requirements” column.<br />
Cylinder Mounting Style<br />
Application Requirements<br />
MF1 - Front Flange Not recommended for use in horizontal applications with stroke lengths greater than 12<br />
inches unless there is additional support in the rear of the cylinder.<br />
MF2 - Rear Flange Not recommended for use in horizontal applications with stroke lengths greater than 12<br />
inches unless there is additional support in the front of the cylinder.<br />
MF3 - Front & Rear Flange Do not allow the body of the cylinder to twist while aligning the front and rear mounting<br />
flanges to their mating surfaces.<br />
MP2 - Rear Clevis<br />
Use a flexible rod end or load attachment to compensate for system misalignment.<br />
Example: FC2, FE2, or FS2 rod ends<br />
MS1 - Side End Angle Brackets Mounting screws must be able to withstand a shearing force of 1000 lbs.<br />
MS2 - Side Lugs<br />
Mounting screws must be able to withstand a shearing force of 1000 lbs.<br />
MS6 - Side Tapped Holes Mounting screws (used with Side Tapped Holes) must resist a peak shear force of up to<br />
1000 lbs. This mounting alone is not recommended for loads in excess of 500 lbs.<br />
MT4 - Trunnion Mount<br />
Use a flexible rod end or load attachment to compensate for system misalignment.<br />
Mounting Rod Ends<br />
As with mounting styles, different rod ends also require certain application considerations. Find your rod end(s)<br />
in the table below and pay special attention to the corresponding “Application Requirements” column.<br />
Rod End Style<br />
FC2 - Clevis w/MT1 Thread<br />
FE2 - Female Eye<br />
FS2 - Spherical Joint<br />
FT1 - Female Thread<br />
MT1 - Male Thread<br />
Application Requirements<br />
Clevis must be secured by its locknut when in desired position. The mounting pin must be<br />
secured with a cotter pin after it is inserted into the double clevis holes.<br />
Adjust for maximum thread engagement.<br />
Not recommended if stiff or rigid load attachment is required.<br />
Maximum thread depth is 3/8 inch. Exceeding maximum thread depth may cause contact<br />
with leadscrew or cause damage when the thrust tube is fully retracted.<br />
Any attachment to an MT1 rod end must be secured in place by a locknut<br />
6<br />
www.kalatec.com.br
KALATEC AUTOMAÇÃO LTDA<br />
N2 <strong>Electric</strong> Cylinder - User’s Manual<br />
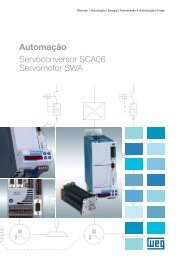
Attaching the Load to the Rod End<br />
Warning!<br />
Do Not Exceed the Maximum Torque Limits on the Thrust Tube when attaching the load to<br />
the rod end. Failure to heed this warning could cause irreparable damage to the internal guide<br />
flange. Maximum torque limits are shown on the drawing below.<br />
Hexagonal flats are provided at the end of the thrust tube to prevent rotation while the rod end<br />
attachment is being secured.<br />
Do Not Exceed 50 in lbs torque in the<br />
Counter Clockwise (CCW) direction<br />
Do Not Exceed 50 ft lbs torque in<br />
the Clockwise (CW) direction<br />
Use wrench on flats to prevent<br />
rotation of thrust tube during<br />
load attachment<br />
www.kalatec.com.br<br />
7
N2 <strong>Electric</strong> Cylinder - User’s Manual<br />
KALATEC AUTOMAÇÃO LTDA<br />
Aligning the Actuator to the Load<br />
Load-travel alignment is critical for the prevention of binding and premature wear of internal components. The<br />
following alignment procedures and specifications have been developed for users who demand the highest level<br />
of precision and longest life from their IDC electric cylinders.<br />
Alignment Using MF1, MF2, MF3, MP2, MP3, or MT4 Cylinder Mounting Styles<br />
1. Ensure that the mounting surface is within .001 inches from perpendicular to the travel of the guided load.<br />
See illustrations below.<br />
2. Mount the actuator loosely to the mounting surface, i.e. all mounting screws are installed but they are loose<br />
enough to allow the actuator to move in the mounting.<br />
3. Attach the guided load system to the cylinder rod end.<br />
4. Reduce as much weight as possible from the guided load system.<br />
5. Run the actuator for 5 to 10 cycles, allowing the actuator to align itself to the guided load system.<br />
6. Tighten the actuator mounting screws according to the torque specifications for your specific hardware.<br />
Mounting Surface<br />
.001<br />
load travel<br />
Mounting<br />
Surface<br />
load travel<br />
.001<br />
Alignment Using MS1, MS2, or MS6 Cylinder Mounting Styles<br />
1. Ensure that the mounting surface is within “X” inches from parallel to the travel of the guided load. See<br />
table and illustration below.<br />
2. Mount the actuator loosely to the mounting surface, i.e. all mounting screws are installed but they are loose<br />
enough to allow the actuator to move from side to side.<br />
3. Attach the guided load system to the cylinder rod end.<br />
4. Reduce as much weight as possible from the guided load system.<br />
5. Run the actuator for 5 to 10 cycles, allowing the actuator to align itself to the guided load system.<br />
6. Tighten the actuator mounting screws according to the torque specifications for your specific hardware.<br />
Cylinder Length X inches<br />
2 .002<br />
4 .002<br />
6 .003<br />
8 .004<br />
10 .004<br />
12 .005<br />
18 .007<br />
"X"<br />
Mounting Surface<br />
load travel<br />
8<br />
www.kalatec.com.br
KALATEC AUTOMAÇÃO LTDA<br />
N2 <strong>Electric</strong> Cylinder - User’s Manual<br />
Installing Position Sensors for Overtravel Protection<br />
Although an “elastomeric spring” inside the actuator is designed to prevent actuator jams, position sensors (aka<br />
limit switches) are required to prevent such potentially damaging jam conditions. If the motor is accidentally<br />
commanded to move toward a hard-stop, position sensors can signal a stop before a collision occurs. To work<br />
properly, position sensors must be positioned inward from the hard-stop, and wired correctly to the motor<br />
controller.<br />
Note: Using the physical limits of the cylinder (hard stops) will reduce cylinder life and can cause premature<br />
component failure.<br />
Position Sensor Specifications for Sensors Used on N2 <strong>Electric</strong> <strong>Cylinders</strong><br />
Sensor <strong>Series</strong> PSR-1 PSR-2 PSN-1 PSN-2 *PSP-1 *PSP-2<br />
Sensor Type Mechanical Reed Hall-Effect<br />
Output Type Contact Closure Sinking, Open Collector (NPN) Sourcing (PNP)<br />
Connection Norm. Open Norm. Closed Norm. Open Norm. Closed Norm. Open Norm. Closed<br />
LED Color Green Red Green Red Yellow Red<br />
Leads (wiring) 2 + shield, 26 AWG, 3 meters 3 + shield, 26 AWG, 3 meters<br />
Supply<br />
Voltage 4 - 120V (AC or DC) 10 - 24 VDC<br />
Current<br />
5 mA @ 12 VDC; 10 mA @ 24 VDC<br />
Power<br />
0.24 W<br />
Leakage Current (max.)<br />
0.01 mA<br />
DC Maximum 120 VDC 24 VDC<br />
Output<br />
AC Maximum<br />
120 VAC<br />
Current Max. 50 mA 100mA<br />
Power Max. 6 W 3 W<br />
Operating Temp.<br />
-4˚ to 158˚F [-20˚ to 70˚C]<br />
Storage Temp.<br />
-4˚ to 176˚F [-20˚ to 80˚C]<br />
Environmental Rating<br />
IEC Standard IP67<br />
*Not compatible with IDC motion controllers<br />
Mounting Location - Deceleration Distance<br />
The position sensor’s location along the cylinder is associated with the beginning of a deceleration, not the final<br />
stopping point. Therefore, position sensors must be mounted inward of the cylinder hard-stops to provide a<br />
slowdown area to prevent jamming. The faster the approach speed, the longer it takes to stop the cylinder, so<br />
deceleration distance varies with actuator speed, load, and cylinder/control type. A small amount of adjustment<br />
may be necessary during initial setup.<br />
Important Installation Notes<br />
1. Position sensors may be mounted along either side of an N2 cylinder. Note: Position sensors can be mounted<br />
on only one side of a cylinder equipped with the Linear Potentiometer (-L) option.<br />
2. Distance between sensors should be 1.50 inches or more. If sensors are located closer than 1.50 inches apart,<br />
they may trigger at the same time.<br />
3. Using position sensors for end-of-travel protection reduces effective travel distance. Consult the factory.<br />
4. IDC s D2200, D2300 and D2400 series controls use only PSR-1 and PSN-1 position sensors.<br />
CAUTION<br />
When installing a position sensor, tighten the clamp screw to a maximum 7.0 oz-in of torque. Failure<br />
to heed this caution could cause irreparable damage to the sensor. Tighten the clamp screw gently and<br />
only to the point where the sensor assembly feels secure and does not slide along the cylinder wall.<br />
www.kalatec.com.br<br />
9
N2 <strong>Electric</strong> Cylinder - User’s Manual<br />
KALATEC AUTOMAÇÃO LTDA<br />
Position Sensor Dimensions and Mounting Locations<br />
The illustrations below show sensor mounting locations when cylinder magnet and sensor are physically aligned.<br />
These locations are recommended as a starting point when setting up a cylinder for the first time. Depending on<br />
the speed and payload of the application, sensors may be moved inward to prevent hard-stop crash when the load<br />
travels at full speed past a limit switch.<br />
TopView of N2 Cylinder<br />
See Caution on previous page before<br />
attempting to tighten the installation<br />
screws on a position sensor<br />
0.44<br />
[11.2]<br />
Phillips Head<br />
Screw<br />
A<br />
1.16<br />
[29.5]<br />
0.39<br />
[9.9]<br />
B<br />
Dimensions “A” and “B” are approximate end-of-stroke<br />
locations for the position sensors.<br />
N2 Screw Type Dim A Dim B<br />
Acme 1.00 [25.4] 0.70 [17.8]<br />
Ball 1.40 [35.6] 0.30 [7.6]<br />
Side View of N2 Cylinder<br />
Sensor-to-Controller Connections<br />
The sensor connection diagrams below show wiring color codes and controller inputs for connecting each type of<br />
position sensor.<br />
PSR<br />
Reed<br />
Sensor<br />
2 CONDUCTOR<br />
SHIELDED CABLE<br />
Brown<br />
CONTROLLER<br />
INPUT<br />
CONTROLLER<br />
Internal<br />
Supply<br />
Note: The black wire in Quick Disconnect cables is<br />
not used with any version of the PSR (Reed) sensor.<br />
In the above drawing, only the blue wire, brown wire,<br />
and shield are connected.<br />
Blue<br />
COM<br />
SENSOR<br />
(REED)<br />
Shield<br />
PSN<br />
Hall-Effect<br />
Sensor<br />
3 CONDUCTOR<br />
SHIELDED CABLE<br />
DETECTOR<br />
Brown<br />
Black<br />
Blue<br />
CONTROLLER<br />
+12/24V<br />
DC Supply<br />
CONTROLLER<br />
INPUT<br />
COM<br />
SENSOR<br />
(Hall-Effect)<br />
Shield<br />
PSP*<br />
Hall-Effect<br />
Sensor<br />
3 CONDUCTOR<br />
SHIELDED CABLE<br />
DETECTOR<br />
Brown<br />
Black<br />
Blue<br />
CONTROLLER<br />
+12/24V DC Supply<br />
CONTROLLER<br />
INPUT<br />
COM<br />
*PSP sensor is not compatible with IDC controls.<br />
SENSOR<br />
(Hall-Effect)<br />
Shield<br />
10<br />
www.kalatec.com.br
KALATEC AUTOMAÇÃO LTDA<br />
N2 <strong>Electric</strong> Cylinder - User’s Manual<br />
3. Application Considerations<br />
Certain conditions can limit cylinder performance and should be addressed prior to installation and operation.<br />
Adherence to the following application guidelines will ensure a successful application.<br />
Maximum Thrust Load<br />
Exceeding the maximum thrust load will cause the leadscrew to buckle and become permanently damaged.<br />
Maximum Thrust Load for all configurations of N2 cylinders is 600 lbs [2670 N]<br />
Thrust Load<br />
Critical Speed<br />
All leadscrew systems have a rotational speed limit at which harmonic vibrations begin to occur. Sustained<br />
operation beyond this critical speed may cause the leadscrew to vibrate or whip violently, eventually bending or<br />
warping the screw. The critical speed limit is typically caused by unsupported leadscrew length.<br />
Speed Limitations Due to Stroke Length<br />
Screw<br />
Type<br />
Max. Speed per Cylinder Stroke<br />
Speed = in/sec [mm/sec]<br />
< 12'' < 18''<br />
2B 36.7 [932]<br />
5B 15 [381]<br />
5A 15 [381] 13.8 [351]<br />
8A 9.4 [239]<br />
L<br />
Application Note:<br />
IDC programmable controls have a maximum velocity<br />
parameter that can be configured not to exceed<br />
the “critical speed.”<br />
www.kalatec.com.br<br />
11
N2 <strong>Electric</strong> Cylinder - User’s Manual<br />
KALATEC AUTOMAÇÃO LTDA<br />
Duty Cycle Limits<br />
Duty cycle is the percentage of ON Time divided by Total Cycle Time for the worst-case 10-minute period.<br />
During operation, duty cycle represents the maximum acceptable power dissipation of the motor and the frictional<br />
heat losses of the internal cylinder components, primarily the leadscrew/drivenut assembly. In general, ballscrew<br />
actuators are rated for 100% duty cycle and acme screws are rated for a maximum of 60%. Your motor may also<br />
have duty cycle limitations. Consult your IDC Catalog for more information on duty cycles. Exceeding the<br />
recommended duty cycle will damage the motor or internal cylinder components.<br />
Environmental Specifications<br />
The following environmental specifications must be observed for optimal cylinder performance.<br />
Temperature Ratings<br />
Standard N2 Cylinder<br />
High Temp Option (-H)<br />
Sub-Freezing Option (-F)<br />
32˚ to 140˚F [0˚ to 60˚C]<br />
32˚ to 160˚F [0˚ to 71˚C]<br />
-20˚ to 105˚F [-29˚ to 41˚C]<br />
Preventing Exposure to Contaminants<br />
Liquids: Standard N2 <strong>Series</strong> <strong>Cylinders</strong> are not water (nor any liquid) resistant. If liquid or moisture contaminates<br />
internal components, damage may occur. A Water Resistant option (-W) is available for environments with a slight<br />
mist on the cylinder body but not on the thrust tube.<br />
The Protective Boot option (-PB), which includes the -W option, is available to protect the thrust tube/wiper<br />
interface. The -W and -PB options provide a seal between the motor and cylinder body, but do not protect the<br />
motor itself.<br />
For applications where exposure is unavoidable with a corrosive liquid or a pressurized liquid, an external<br />
protective enclosure is recommended. Consult the factory for assistance.<br />
Solid Particles: Rod-type cylinders are generally well protected against particle contaminants. For environments<br />
with exposure to fine or abrasive particles, the Water Resistant (-W) option provides added resistance to entry by<br />
sealing mating surfaces with RTV sealant during assembly. The Protective Boot (-PB) option is recommended<br />
when the thrust tube/sleeve bearing interface is exposed to abrasive particles or water spray.<br />
12<br />
www.kalatec.com.br
KALATEC AUTOMAÇÃO LTDA<br />
N2 <strong>Electric</strong> Cylinder - User’s Manual<br />
4. Optional Equipment - Specifications, Dimensions, and Wiring<br />
Brake on Leadscrew Option (-BS24, -BS115, -BS230)<br />
This brake option provides a spring-set, electrically-released friction brake mounted to an extension of the<br />
leadscrew. It prevents backdriving when the unit is at rest, or in case of power failure. Without power, the brake is<br />
engaged. Applying power releases the brake, allowing motion to occur.<br />
Application Note: This option is used only for in-position holding, it should not be used for stopping a moving<br />
load.<br />
Specifications<br />
Specification<br />
Leadscrew-Mounted Brake Configurations<br />
Parameters<br />
-BS24 -BS115 -BS230<br />
Voltage 24 VDC 115 VAC 230 VAC<br />
Current (Amps) 0.667 0.14 0.07<br />
Power (Watts) 16<br />
Holding Torque (in lbs) 30<br />
Cable Length (ft) 12<br />
Holding Force<br />
Screw Type and Pitch<br />
2B (2 Pitch Ballscrew)<br />
5B (5 Pitch Ballscrew)<br />
5A (5 Pitch Acme Screw)<br />
8A (8 Pitch Acme Screw)<br />
Holding Force<br />
240 [1100]<br />
600 [2670]<br />
600 [2670]<br />
600 [2670]<br />
Dimensions<br />
Cable: Dia 0.17 [4.3], 0.25R [6.4R]<br />
MINIMUM BEND RADIUS<br />
0.55<br />
[14.0]<br />
Dia 3.08<br />
[78.2] 2.04<br />
[51.8]<br />
2.73<br />
[69.3]<br />
1.00<br />
[25.4]<br />
<strong>Electric</strong>al<br />
Connections<br />
Brake<br />
Coil<br />
+<br />
Rectifier<br />
115VAC (-BS115)<br />
230 VAC (-BS230)<br />
–<br />
Brake<br />
Coil<br />
24 VDC (-BM24)<br />
www.kalatec.com.br<br />
13
N2 <strong>Electric</strong> Cylinder - User’s Manual<br />
KALATEC AUTOMAÇÃO LTDA<br />
Brake on Motor Option (-BM24, -BM115, -BM230)<br />
The motor shaft-mounted brake can be an advantage because brake torque is multiplied by the belt or gear<br />
reduction and does not interfere with certain rear cylinder-mounting options. A broken drive belt will render the<br />
motor-mounted brake inoperable.<br />
Note: This brake option is used only for in-position holding, it should not be used for stopping a moving load.<br />
Specifications<br />
Brake Option Availability by N2 Configuration<br />
Specificaiton<br />
Parameters<br />
N2-H (H Motor)<br />
N2-B (B23)<br />
-BM24 -BM115 -BM230 -BM24<br />
Voltage 24 VDC 115 VAC 230 VAC 24 VDC<br />
Current (Amps) 0.25 0.05 0.03 0.21<br />
Power (Watts) 6 5<br />
Holding Torque (in lbs) 10 10<br />
Cable Length (ft) 12 See Note<br />
Holding Force<br />
Consult the Factory<br />
Note: Brake wiring included in B23 motor cable. Motor cable available in 12’, 25’, and 50’ lengths.<br />
Dimensions<br />
3.12<br />
7.48 MAX<br />
H Motor with Brake<br />
12' Brake Cable<br />
B23 Motor with Brake<br />
2.00 MAX<br />
2.25 SQ. 7.95 MAX<br />
<strong>Electric</strong>al<br />
Connections<br />
Brake<br />
Coil<br />
+<br />
Rectifier<br />
115VAC (-BM115)<br />
230 VAC (-BM230)<br />
–<br />
Brake<br />
Coil<br />
+<br />
24 VDC (-BM24)<br />
–<br />
Note:<br />
Observe polarity<br />
when using a -BM24<br />
Brake with a B23 Mo-<br />
14<br />
www.kalatec.com.br
KALATEC AUTOMAÇÃO LTDA<br />
N2 <strong>Electric</strong> Cylinder - User’s Manual<br />
Encoder Option (-EMK/-EM)<br />
The encoder option for the N2 cylinder provides an incremental rotary encoder, factory-mounted directly to the<br />
rear of the D, H, P22, and S32 motors. The -EMK encoder is an industry-standard, 1000-line version, while the -<br />
EM encoder is a reverse-compatible 500-line version. The digital pulse output is used to provide position feedback<br />
to external devices such as motor controllers, counters, or PLC’s. The only other IDC motor available with the N2<br />
cylinder is the B23, which comes already equipped with a 2000-line encoder (specs shown below for reference).<br />
Specifications per N2-Applicable IDC Motor<br />
Parameter D, H, P22, S32 Motors *B23 Motor<br />
Pulses per Revolution<br />
-EMK 1000 line (4000 post-quad) Standard 2000 line (8000 post-quad)<br />
-EM 500 line (2000 post-quad)<br />
Output Pulse Format<br />
Incremental, Dual Square Wave Quadrature, with Index Pulse<br />
Cable Length/Type m [ft] 3.7 [12]/Leads 3.7 [12]/MS Connector<br />
Voltage 5 VDC ±5%<br />
Current 120 mA 200 mA<br />
Max. Speed<br />
6000 rpm<br />
Weight kg [oz] 0.17 [6.0] 0.25 [8.8]<br />
Inertia kg-m 2 [oz-in-sec 2 ] 5.1 x 10 -9 [7.3 x 10 -7 ] 1.0 x 10 -6 [1.4 x 10 -4 ]<br />
Operating Temperature ºC [ºF] -10 to +70 [+14 to +158] -20 to +100 [-4 to +212]<br />
Storage Temperature ºC [ºF] -20 to +80 [-4 to +176] -25 to +100 [-13 to +212]<br />
*Not an option. Encoder is standard equipment on the B23 motor.<br />
Dimensions<br />
S32, B23 Motors: Encoder is enclosed within the standard motor housing. No dimensional changes<br />
H Motor<br />
D, P22 Motor<br />
1.2<br />
[31.2]<br />
1.00<br />
[25.4]<br />
3.14<br />
[79.8]<br />
2.13<br />
[54.1]<br />
Encoder Cover<br />
Encoder Cover<br />
<strong>Electric</strong>al<br />
Connections<br />
Ch Z+<br />
Ch Z-<br />
Ch B+<br />
Ch B-<br />
Ch A+<br />
Ch A-<br />
+5VDC<br />
COM<br />
GND<br />
(Yellow)<br />
(Orange)<br />
(Green)<br />
(Blue)<br />
(Red)<br />
(Pink)<br />
(White)<br />
(Black)<br />
(Shield)<br />
www.kalatec.com.br<br />
15
N2 <strong>Electric</strong> Cylinder - User’s Manual<br />
KALATEC AUTOMAÇÃO LTDA<br />
Linear Potentiometer Option (-L)<br />
The Linear Potentiometer resides within the cylinder housing and is energized by an external DC power supply.<br />
The potentiometer wiper moves in conjunction with the cylinder thrust tube providing an analog voltage feedback<br />
signal which is proportional to the linear displacement.<br />
Example: Using a 5 volt supply, 0VDC = 0% Stroke; 2.5VDC = 50% Stroke; and 5 VDC = 100% Stroke<br />
Application Notes<br />
1. This option is not recommended for high vibration environments.<br />
2. This option is required when the N2 is used with IDC’s D2500 series controls.<br />
3. For improved accuracy, users may want to “map” or calibrate each unit.<br />
Specifications<br />
Stroke (inches) Resistance (ohms) Max. Non-Linearity<br />
2 3000 ± 20% ±1%<br />
4 6000 ± 20% ±1%<br />
6 9000 ± 20% ±1%<br />
8 9000 ± 30% ±1%<br />
10 9000 ± 30% ±1%<br />
12 7000 ± 30% ±1% (5% to 95% of function)<br />
18-DB (16.5 actual) 7000 ± 30% ±1% (5% to 95% of function)<br />
Dimensions<br />
(side-mounted Linear Pot)<br />
2.00 [50.8]<br />
1.15 [29.2]<br />
0.57 [14.6]<br />
A<br />
CABLE:<br />
0.15 [3.9], R 0.51 [13.0]<br />
MINIMUM BEND RADIUS<br />
0.40 [10.2]<br />
0.50 [12.7]<br />
0.25 [6.4]<br />
N2<br />
Cylinder Type<br />
DIM A with<br />
2, 4, 6, 8, 10 Stroke<br />
in [mm]<br />
DIM A with<br />
12, 18 Stroke<br />
in [mm]<br />
ACME 1.69 [42.9] 1.69 [42.9]<br />
BALL 1.25 [31.7] 1.38 [35.1]<br />
<strong>Electric</strong>al<br />
Connections<br />
+VDC<br />
Wiper Feedback<br />
GND<br />
Brown<br />
Black<br />
Blue<br />
Shield<br />
16<br />
www.kalatec.com.br
KALATEC AUTOMAÇÃO LTDA<br />
N2 <strong>Electric</strong> Cylinder - User’s Manual<br />
5. Factory Service and Routine Field Maintenance<br />
While we recommend factory service in most cases, we recognize that it may occasionally be necessary to perform<br />
minor repairs or maintenance in the field. Such cases include replacing worn or broken components (i.e. belts, rod<br />
ends, or mounting hardware) and lubrication of leadscrew or gears as required in extreme applications.<br />
All routine maintenance procedures must be performed by qualified personnel, using only IDC-supplied or<br />
IDC-recommended parts and supplies. Improper routine maintenance which causes damage or premature<br />
wear will void the factory warranty.<br />
The table below is provided as a quick reference to help users decide whether to return a unit to the factory or<br />
allow qualified personnel to perform routine maintenance in the field.<br />
Factory Service Required Routine Maintenance Procedures Page #<br />
Belt/Pulley Ratio Conversion (1:1, 1.5:1, 2:1) Pulley and Pinion Installation 19<br />
Helical Gear System Ratio Conversion (2.5:1, 3.1:1,<br />
3.5:1, 12:1)<br />
Lubricating the Leadscrew (excluding -W, -BS, -L options,<br />
or cylinders with gear reduction)<br />
Leadscrew Modification Checking and Adjusting Drive Belt Tension* 21<br />
Motor Orientation Modification Lubricating Gears 22<br />
Mounting or Rod End Modification Aligning Motor Pinion* 23<br />
Cylinder Option Modification (-W, -BS, -L)<br />
20<br />
Any Repair to Motor Pulley, Drive Belt, Gear, Motor<br />
Pinion, Intermediate Gear, or Inline Coupling/Sleeve<br />
*This procedure was developed for users of IDC motors, but it may<br />
also be applicable to certain customer-supplied motors.<br />
Performing Inspections and Routine Maintenance<br />
¥ Why Perform Inspections and Routine Maintenance in the Field?<br />
Periodic inspection and routine maintenance can extend the life of your cylinder, especially under extreme<br />
operating conditions.<br />
¥ What are Extreme Operating Conditions?<br />
Applications such as continuous high speed operation, high speed stops/starts, or exposure to harsh environments.<br />
¥ When Should Routine Maintenance be Performed?<br />
In such extreme applications, it is recommended that the leadscrew and gears be re-lubricated, and an internal<br />
inspection be completed every 1,000,000 inches of cylinder travel. Inspection/re-lubrication typically consists of<br />
partial disassembly, followed by cleaning, visual evaluation, and lubrication.<br />
www.kalatec.com.br<br />
17
N2 <strong>Electric</strong> Cylinder - User’s Manual<br />
KALATEC AUTOMAÇÃO LTDA<br />
Routine Maintenance Procedures<br />
Routine maintenance procedures are provided in the remainder of this section. Order parts and supplies from your<br />
local IDC Distributor.<br />
Prevent Injury to Personnel<br />
Do not attempt to perform any routine maintenance procedure while power is connected to the motor/<br />
cylinder.<br />
Hardware Torque<br />
Before attempting any routine maintenance procedure, become familiar with the Torque Specification Table<br />
below. Always refer to this table before applying torque to any of the listed parts.<br />
Torque Specification Table<br />
Description of Part<br />
Reference #<br />
(see Exploded Parts<br />
Diagrams)<br />
Hardware<br />
Size<br />
Maximum Torque<br />
(in-lbs)<br />
Screw, Guide Cylinder 16, 22, 32, 44 1/4 - 20 UNC 50<br />
Screw, Set, Coupler 45 1/4 - 20 UNC 40<br />
Screw, Motor Mounting 24 10 - 32 UNF<br />
8 - 32 UNC<br />
Screw, Set, Pulley/Pinion 29 8 - 32 UNC 20<br />
Screw, Cover Plate 28, 35 8 - 32 UNC 20<br />
32<br />
20<br />
Lubricants and Adhesives<br />
When a specific lubricant or adhesive is required, it will be specified within the applicable procedure.<br />
18<br />
www.kalatec.com.br
KALATEC AUTOMAÇÃO LTDA<br />
N2 <strong>Electric</strong> Cylinder - User’s Manual<br />
Installing a Pulley, Pinion, or Coupling<br />
Refer to the appropriate illustration and/or<br />
table for your pulley, pinion, or coupling.<br />
Pulley Spacing<br />
.480"<br />
1. Clean the motor shaft and bore free of any<br />
grease.<br />
2. Apply Loctite #680 (green) to the motor<br />
shaft and the bore of the pulley, pinion, or<br />
coupling.<br />
3. Slide pulley, pinion, or coupling onto the<br />
motor shaft with a rotating motion to<br />
evenly distribute the Loctite.<br />
4. Position pulley, pinion, or coupling<br />
according to the appropriate “spacing”<br />
table or drawing (see App. Note #2).<br />
5. Ensure that one setscrew is positioned on a<br />
flat, in a dimple, over a key or keyway.<br />
6. Apply Loctite #262 (red) to the setscrew(s).<br />
7. Tighten setscrew(s).<br />
8. Refer to the motor-mounting procedure on<br />
the previous page.<br />
Pulley spacing (.480'') must be measured<br />
from the inner face of the pulley to the face<br />
of the mounting plate (see App. Note #2)<br />
Pinion Spacing<br />
(see table below drawing)<br />
“A” must be measured from the outer edge<br />
of the pinion to the face of the mounting<br />
plate (see App. Note #2)<br />
“B” must be measured from the inner edge<br />
of the pinion to the face of the mounting<br />
plate (see App. Note #2)<br />
“A”<br />
“B”<br />
Application Notes<br />
1. WARNING! The combination of pulley<br />
placement and operating torque may exceed<br />
motor shaft load capacity. It is the user’s<br />
responsibility to verify adequate shaft load<br />
capacity.<br />
2. If a supplemental mounting plate or adapter<br />
is used, it must be installed before<br />
measuring pulley, pinion, or coupling<br />
spacing.<br />
3. All spacing dimensions for pulleys, pinions,<br />
or couplings have a tolerance of ±.005<br />
inches.<br />
Gear Ratio<br />
Dimension A<br />
Pinion Spacing<br />
2.5:1 1.018''<br />
3.1:1 1.018''<br />
Dimension B<br />
Pinion Spacing<br />
3.1:1 (H Motor only) .155''<br />
12:1 .233''<br />
Coupling Spacing<br />
(inline motors)<br />
.075"<br />
Coupling spacing (.075'') must be measured<br />
from the inner face of the coupling to the face<br />
of the mounting plate (see Application Note)<br />
www.kalatec.com.br<br />
19
N2 <strong>Electric</strong> Cylinder - User’s Manual<br />
KALATEC AUTOMAÇÃO LTDA<br />
Lubricating the Leadscrew<br />
Note: Do not attempt to lubricate the leadscrew of a cylinder with the -L (Linear Potentiometer) Option.<br />
This procedure must be done at the factory.<br />
Recommended Lubricants<br />
Type of Leadscrew<br />
Ballscrews With 2B and 5B Screws<br />
Acme Screws with Bronze Acme Nut (5A and 8A<br />
Screws)<br />
Acme Screws with Polyacetal Plastic Acme Nut (5A<br />
and 8A Screws)<br />
Type of Lubricant<br />
NLGI Grade 2, Synthetic Base Lithium Grease<br />
NLGI Grade 2, Synthetic Base Grease with PTFE Additive<br />
NLGI Grade 2, Synthetic Base Lithium Grease<br />
1. Remove upper cover plate from the gear housing by removing two (2) mounting-screws (8/32 Phillips).<br />
2. Remove lower cover plate by removing two (2) mounting-screws (8/32 Phillips) and two (2) socket head cap<br />
screws (1/4-20). The two SHCS are also used to secure the lower part of the guide housing.<br />
3. Remove two (2) SHCS (inside gear housing) that secure the upper part of the guide housing.<br />
4. Remove guide housing by sliding it away from the thrust tube.<br />
5. Move the drive nut (attached to thrust tube) to the far end of the leadscrew.<br />
6. Remove as much of the old grease from the cylinder as possible.<br />
7. With most of the leadscrew exposed, apply a thin coat (no more than 1/32 '') of the recommended lubricant<br />
over the length of the screw. Run the drivenut over the screw length to spread the grease evenly. Wipe off any<br />
excess grease that the drivenut expels from the leadscrew. Reassemble Unit.<br />
1<br />
4<br />
3<br />
6<br />
5<br />
2<br />
20<br />
www.kalatec.com.br
KALATEC AUTOMAÇÃO LTDA<br />
N2 <strong>Electric</strong> Cylinder - User’s Manual<br />
Checking/Adjusting Drive Belt Tension<br />
1. Remove upper and lower cover plates. For cover plate removal, refer to steps 1 and 2 in “Lubricating the<br />
Leadscrew” on the previous page.<br />
2. Using finger pressure, push the drive belt inward. The belt should not deflect more than 1/8 inch from a<br />
stationary centerline. If the drive belt deflects more than 1/8 inch, proceed to the following section that<br />
applies to your motor.<br />
Adjusting Belt Tension on D and H Motors<br />
1. Loosen two (2) motor-adjustment screws (shown below) just enough to allow the motor to move. Both<br />
screws are in slots which allows up/down movement of the motor to change belt tension.<br />
2. Move the motor up or down to adjust belt tension. While maintaining proper tension by hand, tighten both<br />
screws. Check belt tension again and reassemble unit.<br />
Adjusting Belt Tension on P22, S32, and B23 Motors<br />
1. Loosen four (4) motor mounting/adjustment screws (not shown) just enough to allow the motor to move. All<br />
screws are in clearance holes which allow just enough up/down movement to adjust the belt tension.<br />
2. Move the motor up or down to adjust belt tension. While maintaining proper tension by hand, tighten all<br />
screws. Check belt tension again and reassemble unit.<br />
Motor<br />
Adjustment<br />
Screw<br />
Motor<br />
Adjustment<br />
Screw<br />
1/8'' maximum belt deflection<br />
www.kalatec.com.br<br />
21
N2 <strong>Electric</strong> Cylinder - User’s Manual<br />
KALATEC AUTOMAÇÃO LTDA<br />
Lubricating Gears<br />
Recommended Lubricant: NLGI Grade 2, Synthetic Base Lithium Complex EP Grease<br />
1. Remove upper cover plate by removing two mounting-screws (8/32 Phillips) securing cover plate to<br />
housing.<br />
Note: Cylinder with -BS (Brake on Leadscrew) option requires removal of the top cover plate only. If your<br />
cylinder has the -BS option, proceed to step 3.<br />
2. Remove lower cover plate by removing two mounting-screws (8/32 Phillips) and two Hex Cap Screws (1/4-<br />
20).<br />
3. Remove as much of the old grease from the gears as possible.<br />
4. With the gears exposed, apply an ample amount of lubricant (1/4'' or more) to all surface contact areas of<br />
gear train. Reassemble unit.<br />
1<br />
3<br />
2<br />
22<br />
www.kalatec.com.br
KALATEC AUTOMAÇÃO LTDA<br />
N2 <strong>Electric</strong> Cylinder - User’s Manual<br />
Aligning Motor Pinion<br />
1. Ensure power to the motor is OFF.<br />
2. Remove upper and lower cover plates for inspection. For cover plate removal, refer to steps 1 and 2 in<br />
“Lubricating Gears” on the previous page. Reinstall lower cover plate.<br />
Aligning Motor Pinion on D, and H Motors (shown below)<br />
1. Loosen two (2) mounting/alignment screws just enough to allow the motor to move. Both screws are in slots<br />
which allow up/down movement of the motor to align the motor pinion.<br />
2. Move the motor pinion into the fully-meshed or seated position against the intermediate gear (i.e. pinion will<br />
not move any farther). See #2 in photo below.<br />
3. From the fully-meshed position, back off or move the pinion gear away from the intermediate gear .003 to<br />
.008 inch. See #3 in photo below.<br />
4. While maintaining proper position by hand, tighten mounting/alignment screws. Install upper cover plate.<br />
Aligning Motor Pinion on P22, S32, and B23 Motors (not shown)<br />
1. Loosen four (4) mounting/adjusting screws (not shown) just enough to allow the motor to move. All screws<br />
are in clearance holes which allow just enough up/down movement to adjust the motor pinion.<br />
2. Move the motor pinion into the fully-meshed or seated position against the intermediate gear (i.e. pinion will<br />
not move any farther).<br />
3. From the fully-meshed position, back off or move the pinion gear away from the intermediate gear .003 to<br />
.008 inch.<br />
4. While maintaining proper position by hand, tighten mounting/alignment screws. Install upper cover plate.<br />
Mounting/Alignment Screw<br />
2 3<br />
Mounting/Alignment Screw<br />
.003 to .008'' gap between<br />
pinion and intermediate gears<br />
www.kalatec.com.br<br />
23
N2 <strong>Electric</strong> Cylinder - User’s Manual<br />
KALATEC AUTOMAÇÃO LTDA<br />
6. Mounting a Customer Supplied Motor<br />
This procedure is provided for the user who will be mounting a non-IDC motor on a N2 Cylinder. For this<br />
procedure it is assumed that the N2 cylinder has been received without a motor.<br />
1. Remove upper cover plate from the gear housing by removing two mounting-screws (8/32 Phillips).<br />
Note: Step 1 applies only to parallel-mounted motors.<br />
2. Remove motor-mounting screws and washers from the cylinder motor mount.<br />
Note: If motor mounting screws and washers are not installed in the motor mount, they can be found<br />
packaged in a separate bag.<br />
3. Install the motor pulley, gear pinion, or inline coupling per the installation procedure on the next page.<br />
4. Using the following method appropriate to your application, insert the motor shaft and motor pilot into the<br />
gear housing through the hole in the mounting plate.<br />
Drive Belt: As you slide the motor and pulley through the mounting plate, lift the drive belt onto the teeth of<br />
the drive pulley. Refer to “Checking/Adjusting Drive Belt Tension” in section 5.<br />
Gear Drive: As you slide the motor and gear pinion through the mounting plate, gently engage and mesh the<br />
pinion with the intermediate gear. Refer to “Aligning Motor Pinion” in section 5.<br />
Inline Mounting: As you slide the motor and coupling through the mounting plate, rotate the motor<br />
coupling until it lines up the coupling sleeve inside the actuator.<br />
5. Continue to slide the motor shaft through the mounting plate until motor flange is flush with the motor<br />
mounting plate and the motor pilot is centered inside the mounting plate.<br />
6. Secure the motor to the mounting plate using the motor mounting hardware previously removed.<br />
1<br />
3<br />
2<br />
6<br />
4<br />
5<br />
24<br />
www.kalatec.com.br
KALATEC AUTOMAÇÃO LTDA<br />
N2 <strong>Electric</strong> Cylinder - User’s Manual<br />
7. Troubleshooting<br />
This section offers assistance when troubleshooting basic cylinder problems related to mechanical operation.<br />
When troubleshooting cylinder problems, the cause may be related to the drive or motor used with the cylinder.<br />
Refer to your drive/control user’s manual for additional assistance on troubleshooting your system.<br />
The following categories are covered in this section:<br />
A. Audible Noise Emitting from Cylinder<br />
B. Cylinder Motion<br />
C. Positioning and Travel Length<br />
D. Thrust Tube<br />
E. Cylinder Parts and Options<br />
Category/Symptom Possible Cause Possible Remedy<br />
A. Audible Noise Emitting from Cylinder<br />
Knocking, squealing or grinding<br />
during operation<br />
B. Cylinder Motion<br />
Stalls/Binds/Sticks during a move<br />
(erratic motion)<br />
Running rough, not running<br />
smoothly<br />
Extends when it should retract (and<br />
visa versa)<br />
Misalignment of internal components<br />
Excessive Side-loading<br />
Internal lubrication dried<br />
Entry of foreign matter into cylinder<br />
body<br />
Load too great for cylinder/motor<br />
Excessive thrust tube side-loading<br />
Motor pulley, gear pinion, or coupling<br />
slipping<br />
Erratic motor/controller operation<br />
Drive nut or internal bearing seizing<br />
(locking up) typically due to excessive<br />
duty cycle/temperature or entry of<br />
foreign matter into cylinder<br />
Misalignment of internal components<br />
Excessive side-loading<br />
Internal lubrication dried<br />
Entry of foreign matter into cylinder<br />
body<br />
Motor polarity reversed<br />
Send back to factory for evaluation.<br />
Check side-load rating. Reduce<br />
side-load.<br />
Remove old lubricant. Re-lubricate<br />
the leadscrew and/or gear.<br />
Send back to factory for evaluation.<br />
Check cylinder rating. Reduce<br />
load.<br />
Check side-load rating. Reduce<br />
side load.<br />
Re-install pulley, gear, or coupling<br />
onto the motor.<br />
Ensure functionality of the controller.<br />
Replace motor.<br />
Send back to factory for evaluation.<br />
Send back to factory for evaluation.<br />
Check side-load ratings. Reduce<br />
side-load.<br />
Remove old lubricant. Re-lubricate<br />
the leadscrew and/or gear.<br />
Send back to factory for evaluation.<br />
Reverse motor polarity at the control.<br />
www.kalatec.com.br<br />
25
N2 <strong>Electric</strong> Cylinder - User’s Manual<br />
KALATEC AUTOMAÇÃO LTDA<br />
Category/Symptom Possible Cause Possible Remedy<br />
Vibrates during motion<br />
No motor movement when<br />
commanded to move<br />
Does not move (or is erratic)<br />
although motor is rotating<br />
Motor Unstable (servo gains, stepper<br />
resonance)<br />
Cylinder being operated at critical<br />
speed<br />
Misalignment of internal components<br />
Motor not connected or is damaged<br />
Load too great for cylinder/motor<br />
Problem with drive/control<br />
Gear pinion, pulley, or coupling not<br />
secured to motor shaft<br />
Belt is loose or damaged<br />
Bad gear alignment<br />
Stripped teeth on gear<br />
Threads are stripped on the drive nut<br />
(Acme)<br />
Reduce motor gain for servomotors.<br />
Increase step resolution<br />
for step motors.<br />
Check critical speed limit. Reduce<br />
speed to less than critical speed.<br />
Send back to factory for evaluation.<br />
Reconnect the motor. Replace the<br />
motor.<br />
Check the load limit. Reduce the<br />
load.<br />
Check output of drive/controller.<br />
Secure gear pinion, pulley, or coupling<br />
to the motor shaft.<br />
Adjust belt tension. Replace belt<br />
Adjust gear pinion placement.<br />
Send back to factory for evaluation.<br />
Send back to factory for evaluation<br />
Not running at rated speed Load is too great for desired speed Ensure cylinder is being operated<br />
below the speed/thrust curve.<br />
Decrease the load.<br />
C. Positioning and Travel Length<br />
Cylinder backdriving (without holding<br />
torque on motor)<br />
Cylinder backdriving (with holding<br />
torque on the motor<br />
Limited by critical speed (oscillation) of<br />
screw<br />
Incorrect screw pitch or drive ratio<br />
Backdriving force generated by load is<br />
greater than the static holding capacity<br />
of the cylinder<br />
Excessive external vibration<br />
Backdriving force generated by load is<br />
greater than the holding capacity of<br />
the screw/nut of the cylinder and the<br />
holding torque of the motor<br />
Loss of motor holding torque (servo<br />
and steppers)<br />
Check the critical speed limits.<br />
Reduce the speed.<br />
Enter the correct screw-pitch or<br />
drive ratio the controller.<br />
Check the rated backdriving force<br />
for the cylinder. Reduce backdriving<br />
force.<br />
Mounting requires modification to<br />
isolate or reduce vibration<br />
Reduce backdriving force.<br />
Recycle power to the motor and<br />
controller<br />
26<br />
www.kalatec.com.br
KALATEC AUTOMAÇÃO LTDA<br />
N2 <strong>Electric</strong> Cylinder - User’s Manual<br />
Category/Symptom Possible Cause Possible Remedy<br />
Not enough travel<br />
Expected linear travel distance not<br />
corresponding to number of motor<br />
revs<br />
Expected stop position not repeatable<br />
(in same direction)<br />
Position-Sensors reducing “actual”<br />
travel<br />
Cylinder option (e.g. -DB option) may<br />
be limiting stroke. -DB (Double Bearing)<br />
option reduces usable cylinder<br />
travel by 1.5 inches.<br />
Excessive side-loading<br />
Customer mounting is physically<br />
limiting travel<br />
Incorrect screw pitch or drive ratio<br />
Incorrect scaling factor<br />
(programmable controllers)<br />
Load varies from cycle to cycle.<br />
Erratic Motor/Control operation<br />
Adjust sensors to increase cylinder<br />
travel without allowing cylinder<br />
to hit its internal hard-stop<br />
bumper.<br />
Return cylinder to factory for modification<br />
(remove -DB option).<br />
Your application may require a cylinder<br />
with longer travel.<br />
Check side-load rating for the cylinder.<br />
Reduce side-load.<br />
Re-design mounting<br />
Check screw-pitch and drive ratio<br />
of the cylinder. Enter correct pitch<br />
and ratio in the controller<br />
Enter correct scaling factor in the<br />
controller<br />
Change load to be more consistent<br />
from cycle to cycle<br />
Contact motor/control vendor for<br />
more information.<br />
D. Thrust Tube<br />
Wobbles during extension Leadscrew or thrust tube is bent Send back to factory for evaluation<br />
Excessive wear on leadscrew/nut Send back to factory for evaluation<br />
Improper mounting of cylinder Ensure cylinder travel is aligned<br />
with the travel of the load<br />
Deflects too much during extension<br />
(Excessive lateral endplay)<br />
Bent thrust tube<br />
Leadscrew/nut or internal bearings are<br />
worn<br />
Excessive side-loading<br />
Improper cylinder mounting<br />
Load too great for cylinder<br />
Excessive side-loading<br />
Improper cylinder mounting<br />
Send back to factory for evaluation<br />
Check side-load rating. Reduce<br />
side load.<br />
Ensure that cylinder travel is in<br />
line with the travel of the load<br />
Send back to factory for evaluation<br />
Rotates (excessive radial play) Internal guide flange is damaged Send back to factory for evaluation<br />
Thrust tube not fully engaged on<br />
drivenut<br />
Rotate thrust tube clockwise until<br />
it stops turning. The maximum<br />
torque exerted on the thrust tube<br />
is 50 ft. lbs.<br />
www.kalatec.com.br<br />
27
N2 <strong>Electric</strong> Cylinder - User’s Manual<br />
KALATEC AUTOMAÇÃO LTDA<br />
Category/Symptom Possible Cause Possible Remedy<br />
Stuck in fully extended or retracted<br />
position<br />
Excessive axial endplay (system<br />
backlash)<br />
E. Cylinder Parts and Options<br />
Driving belt breaking or gears<br />
stripping<br />
Position Sensors not being activated<br />
by internal magnet<br />
Linear Potentiometer (LP) not<br />
reading properly<br />
Drive nut physically jammed into end<br />
of travel<br />
Load too great for cylinder/motor<br />
Excessive side loading<br />
Pulley, gear, or coupling slipping<br />
Erratic motor/drive operation<br />
Leadscrew/nut is worn<br />
Gears worn<br />
Belt stretching<br />
Motor torque is too great<br />
Motor accel/decel too great for given<br />
load<br />
Load is too great for cylinder<br />
Excessive shock loading (running into<br />
physical hardstop, rapid change in<br />
direction)<br />
Misalignment of internal components<br />
Remove both rear covers and<br />
rotate the leadscrew, gear, pulley,<br />
or coupling until the leadscrew<br />
turns freely. If jammed in extend,<br />
rotate CW. If jammed in retract,<br />
rotate CCW.<br />
Check cylinder load rating.<br />
Reduce load<br />
Check side-load rating. Reduce<br />
side-load.<br />
Re-install pulley, gear, or coupling<br />
onto the motor.<br />
Contact motor/drive vendor for<br />
more information<br />
Send back to factory for evaluation<br />
Send back to factory for evaluation<br />
Re-tension belt<br />
Reduce Accel and Decel<br />
Reduce load<br />
Reduce Accel or Decel<br />
Check load rating of cylinder.<br />
Reduce load.<br />
Reduce Accel/Decel of cylinder.<br />
Stop motion just before the hard<br />
stop.<br />
Send back to factory for evaluation<br />
Weak or missing internal magnet Send back to factory for evaluation<br />
Switch/sensor is damaged or miswired Check/correct switch wiring<br />
Send back to factory for evaluation<br />
Cylinder speed too fast<br />
Reduce cylinder speed<br />
LPO wiper lifting off track (misalignment<br />
or LP bending due to excessive<br />
load<br />
Damaged / contaminated LP (by<br />
liquid/particle)<br />
Ensure cylinder travel is in line<br />
with travel of the load<br />
Reduce load<br />
Send back to factory for evaluation<br />
28<br />
www.kalatec.com.br
KALATEC AUTOMAÇÃO LTDA<br />
N2 <strong>Electric</strong> Cylinder - User’s Manual<br />
Category/Symptom Possible Cause Possible Remedy<br />
Motor overheating Duty cycle too high Check duty cycle rating. Reduce<br />
duty cycle<br />
High ambient temperature<br />
Use an external fan to cool the<br />
motor<br />
Incorrect current setting on drive Check the control/drive user’s<br />
manual for correct current settings.<br />
Reset the control/drive with<br />
correct current setting.<br />
Brake not holding load<br />
Brake not coupled to motor or leadscrew<br />
properly<br />
Load exceeds holding capacity of cylinder/brake<br />
Brake damaged<br />
Brake wired incorrectly<br />
Send back to factory for evaluation<br />
Check brake load rating. Reduce<br />
the load.<br />
Send back to factory for evaluation<br />
Check wiring and make corrections<br />
or repairs<br />
Encoder reading improperly Encoder damaged Send back to factory for evaluation<br />
Encoder wired incorrectly<br />
Check wiring and make corrections<br />
or repairs<br />
Incorrect supply voltage to encoder Check encoder voltage rating.<br />
Ensure correct voltage is supplied<br />
to the encoder.<br />
www.kalatec.com.br<br />
29
N2 <strong>Electric</strong> Cylinder - User’s Manual<br />
KALATEC AUTOMAÇÃO LTDA<br />
8. Parts List and Exploded Parts Diagrams<br />
Parts can be ordered through your local IDC distributor. Kits include all essential parts and instructions. Item<br />
numbers below correspond with numbered items on the Exploded Parts Diagrams (see following pages).<br />
Reference # on<br />
Exploded Parts<br />
Description of Part<br />
Diagram<br />
1 Nut, Jam, Rear<br />
2 Key, Pulley, Gear, or Coupling<br />
3 Pulley (Driven), Gear (Driven), or Coupling (Driven)<br />
4 Bearing, Leadscrew<br />
5 Bearing Spacer<br />
6 Drive Housing<br />
7 Drive Nut<br />
8 Guide Flange Body<br />
9 Guide Flange Bushings<br />
10 Magnet, Limit Switch<br />
11 Leadscrew<br />
12 Washer<br />
13 Bumper<br />
14 Bushing, Leadscrew<br />
15 Nut, Jam, Front<br />
16 Screw, Guide Cylinder, Upper, Rear<br />
17 Thrust Tube<br />
18 Spacer, Bumper (Optional)<br />
19 Rod End<br />
20 Guide Cylinder<br />
21 Assembly, Rod End Housing<br />
22 Screw, Guide Cylinder, Front<br />
23 Belt, Timing<br />
24 Screw, Motor Mounting<br />
25 Washer, Lock, Motor Mounting<br />
26 Washer, Motor Mounting<br />
27 Plate, Motor Mounting<br />
28 Screw, Motor Mounting Plate<br />
29 Drive Pulley or Gear Pinion<br />
30 Motor<br />
31 Brushes, Motor<br />
32 Screw, Guide Cylinder, Lower, Rear<br />
33 Washer, Lock, Guide Cylinder Screws<br />
34 Label, IDC Decal<br />
35 Screw, Rear Cover Plate<br />
36 Quick Disconnect<br />
37 Plate, Cover, Lower<br />
38 Plate, Cover, Upper<br />
39 Label, IDC Serial Tag<br />
40 Label, Limit Switch (Positioning Sensor)<br />
41 Assembly, Gear, First Stage<br />
42 Assembly, Gear, Second Stage<br />
43 Snap Ring, Internal<br />
44 Screw, Guide Cylinder, Rear<br />
45 Coupling, Drive<br />
46 Sleeve, Coupling<br />
30<br />
www.kalatec.com.br
KALATEC AUTOMAÇÃO LTDA<br />
N2 <strong>Electric</strong> Cylinder - User’s Manual<br />
Exploded Parts Diagram - Parallel Motor Mounting<br />
Parallel Motor Mounting<br />
9 10<br />
2x<br />
7<br />
3<br />
5<br />
4<br />
8<br />
9<br />
1<br />
4<br />
6<br />
15<br />
2<br />
12<br />
13<br />
14<br />
12<br />
11<br />
17<br />
2x 16<br />
22 4x<br />
21<br />
20<br />
18<br />
19<br />
www.kalatec.com.br<br />
31
N2 <strong>Electric</strong> Cylinder - User’s Manual<br />
KALATEC AUTOMAÇÃO LTDA<br />
Exploded Parts Diagram - Parallel Motor Mounting<br />
Parallel Motor Mounting<br />
30<br />
4x 28<br />
27<br />
2x 26<br />
29<br />
31 2x<br />
2x 25<br />
2x<br />
24<br />
23<br />
39<br />
38<br />
29<br />
36<br />
41<br />
34<br />
4x 35<br />
42<br />
40<br />
3<br />
37<br />
33 2x<br />
32 2x<br />
32<br />
www.kalatec.com.br
KALATEC AUTOMAÇÃO LTDA<br />
N2 <strong>Electric</strong> Cylinder - User’s Manual<br />
Exploded Parts Diagram - Inline Motor Mounting<br />
Inline Motor Mounting<br />
4<br />
6<br />
7<br />
4<br />
43<br />
2<br />
9<br />
1<br />
8<br />
3<br />
11<br />
5<br />
13<br />
12<br />
12<br />
14<br />
15<br />
10<br />
9<br />
17<br />
4x<br />
44<br />
22 4x<br />
21<br />
20<br />
19<br />
18<br />
www.kalatec.com.br<br />
33
N2 <strong>Electric</strong> Cylinder - User’s Manual<br />
KALATEC AUTOMAÇÃO LTDA<br />
Exploded Parts Diagram - Inline Motor Mounting<br />
Inline Motor Mounting<br />
46<br />
45<br />
30<br />
4x 26<br />
4x 25<br />
4x 24<br />
34<br />
www.kalatec.com.br
KALATEC AUTOMAÇÃO LTDA<br />
N2 <strong>Electric</strong> Cylinder - User’s Manual<br />
9. Warranty and Service Coverage<br />
IDC warrants all N2 <strong>Cylinders</strong> to be free of defects in material & workmanship for a period of one year from the<br />
date of shipment to the user. Products returned prepaid to the factory will be repaired or replaced at our option at<br />
no charge, and returned prepaid to the user.<br />
Products that fail due to improper use or misapplication are not subject to the terms of this warranty.<br />
Technical Support<br />
IDC offers technical support through its factory authorized and trained Distributors, and through its factory-based<br />
Applications Engineering and Inside Sales department.<br />
If an application problem exists or if the product has failed, contact your Distributor or IDC for technical<br />
assistance. Contact our factory at 1-800-227-1066, outside the U.S. at 603-893-0588.<br />
Factory Repair Service<br />
Product repairs are performed at our factory in Salem, NH. Prior approval by IDC is required before returning a<br />
product for any reason. All returned products must be accompanied by an IDC supplied RMA (Return Material<br />
Authorization) number.<br />
In Case of Failure<br />
1. Get the Model and Serial Number of the defective unit, and document the nature of the failure using the RMA<br />
Data Form to help us repair the unit.<br />
2. Prepare a purchase order for the repair cost in case the unit is out of warranty.<br />
3. Contact your IDC Distributor or IDC (at 1-800-227-1066) for an RMA#.<br />
4. Ship the unit prepaid, with the RMA number and documentation to:<br />
Danaher Motion<br />
7C Raymond Avenue<br />
Salem, NH 03079<br />
Attn.: RMA # ___________<br />
www.kalatec.com.br<br />
35
KALATEC AUTOMAÇÃO LTDA<br />
Danaher Motion<br />
7C Raymond Avenue<br />
Salem, NH 03079<br />
TEL: (800) 227-1066 · FAX: (603) 893-8280 · OUTSIDE THE U.S. CALL (603) 893-0588<br />
E-mail:sales@idcmotion.com Web Site: www.idcmotion.com<br />
www.kalatec.com.br