DEFINITY Communications System Generic 2 and System 85
DEFINITY Communications System Generic 2 and System 85
DEFINITY Communications System Generic 2 and System 85

You also want an ePaper? Increase the reach of your titles
YUMPU automatically turns print PDFs into web optimized ePapers that Google loves.
<strong>DEFINITY</strong> ® <strong>Communications</strong> <strong>System</strong><br />
<strong>Generic</strong> 2 <strong>and</strong> <strong>System</strong> <strong>85</strong><br />
8434DX Voice Terminal User’s Guide<br />
555-104-767<br />
Comcode 1079<strong>85</strong>525<br />
Issue 2<br />
October 1997
NOTICE<br />
While reasonable efforts were made to ensure that the information in this document<br />
was complete <strong>and</strong> accurate at the time of printing, Lucent Technologies can assume no<br />
responsibility for any errors. Changes or corrections to the information contained in<br />
this document may be incorporated into future issues.<br />
TO ORDER COPIES OF THIS DOCUMENT<br />
Contact: Lucent Technologies BCS Publications Center<br />
2<strong>85</strong>5 N. Franklin Road<br />
Indianapolis, IN 46219<br />
Domestic: 1 800 457-1235 International: 1 317 322-6411<br />
Domestic Fax: 1 800 457-1764 International Fax: 1 317 322-6699<br />
Order: Document No. 555-104-767<br />
Issue 2, October 1997<br />
For more information about related documents, see Business <strong>Communications</strong><br />
<strong>System</strong>s Publications Catalog, 555-000-010.<br />
HEARING AID COMPATIBILITY<br />
This voice terminal is Hearing Aid Compatible (HAC). In addition, some units have<br />
“HAC” printed on them.<br />
YOUR RESPONSIBILITY FOR YOUR SYSTEM’S SECURITY<br />
You are responsible for the security of your system. Lucent Technologies does not<br />
warrant that this product is immune from or will prevent unauthorized use of<br />
common-carrier telecommunication services or facilities accessed through or<br />
connected to it. Lucent Technologies will not be responsible for any charges that<br />
result from such unauthorized use. Product administration to prevent unauthorized<br />
use is your responsibility <strong>and</strong> your system manager should read all documents<br />
provided with this product to fully underst<strong>and</strong> the features available that may<br />
reduce your risk of incurring charges.<br />
TRADEMARKS<br />
<strong>DEFINITY</strong> <strong>and</strong> AUDIX are registered trademarks of Lucent Technologies<br />
REFERENCES TO AT&T<br />
Any references within this text to American Telephone <strong>and</strong> Telegraph Corporation or<br />
AT&T should be interpreted as references to Lucent Technologies Incorporated. The<br />
exception is cross-references to books published prior to December 31, 1996, which<br />
retain their original AT&T titles.<br />
Prepared by<br />
BCS Product Documentation Development<br />
Middletown, New Jersey 07748-9972<br />
© 1997 Lucent Technologies<br />
All Rights Reserved<br />
Printed in USA
Your 8434DX Voice Terminal<br />
The 8434DX voice terminal is designed so you can conveniently use the many<br />
features of the Lucent Technologies <strong>DEFINITY</strong> ® <strong>Communications</strong> <strong>System</strong> <strong>Generic</strong> 2<br />
as well as the features of <strong>System</strong> <strong>85</strong>.<br />
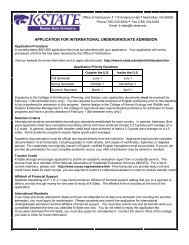
Figure 1 <strong>and</strong> Figure 2 show two different versions of the 8434DX.<br />
• On the 8434DX voice terminal shown in Figure 1, the Shift button allows you<br />
to access two additional features. You can select a personalized ringing pattern for<br />
your voice terminal by pressing Shift <strong>and</strong> then Hold . With this version of the<br />
8434DX, you can also manually adjust the acoustical quality of the built-in<br />
speakerphone for its surrounding environment (the Reset Speakerphone feature)<br />
by pressing Shift followed by Speaker .<br />
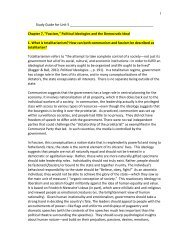
• The version of the 8434DX voice terminal shown in Figure 2 has a Ring button<br />
which allows you to select a personalized ringing pattern for your voice terminal.<br />
You do not need to manually reset your speakerphone with this version.<br />
Before using your 8434DX voice terminal, look at Figures 1 <strong>and</strong> 2 below <strong>and</strong> on the<br />
next page in order to familiarize yourself with the type of voice terminal you are<br />
using <strong>and</strong> then read the description <strong>and</strong> procedures for each feature you wish to<br />
access.<br />
Softkeys<br />
Display control<br />
buttons<br />
Display<br />
H<strong>and</strong>set<br />
10 Call<br />
appearance<br />
feature buttons<br />
Menu<br />
Exit<br />
Prev<br />
Next<br />
EX MOD<br />
Expansion<br />
module jack<br />
(on back of<br />
of voice<br />
terminal)<br />
Volume control<br />
button<br />
Transfer button<br />
Shift button<br />
Conference<br />
button<br />
Test button<br />
Drop button<br />
Mute button<br />
Volume<br />
Shift Transfer<br />
Test Conf<br />
Mute Drop<br />
Speaker Hold<br />
Reset Spkr Ring<br />
ABC<br />
DEF<br />
1 2 3<br />
GHI<br />
Message<br />
JKL<br />
MNO<br />
4 5 6<br />
PQRS TUV WXYZ<br />
7 8 9<br />
*<br />
O #<br />
LINE<br />
24 Call<br />
appearance/<br />
feature<br />
buttons<br />
Line jack<br />
(on back<br />
of voice<br />
terminal)<br />
H<strong>and</strong>set jack<br />
Speaker/<br />
Reset<br />
Speaker<br />
button<br />
Dial pad<br />
Message light<br />
Hold/Ring button<br />
Speakerphone/headset<br />
adapter jack (on back<br />
of voice terminal)<br />
Figure 1. One Version of the 8434DX Voice Terminal<br />
1
Softkeys<br />
Display control<br />
buttons<br />
Display<br />
H<strong>and</strong>set<br />
10 Call appearance/<br />
feature buttons<br />
Menu<br />
Exit<br />
Prev<br />
Next<br />
EX MOD<br />
Expansion<br />
module jack<br />
(on back<br />
of voice<br />
terminal)<br />
Volume control<br />
button<br />
Transfer button<br />
Ring button<br />
Conference<br />
button<br />
Test button<br />
Drop button<br />
Mute button<br />
Speaker button<br />
Volume<br />
Ring Transfer<br />
Test Conf<br />
Mute Drop<br />
Speaker Hold<br />
ABC<br />
DEF<br />
1 2 3<br />
GHI<br />
JKL<br />
MNO<br />
4 5 6<br />
PQRS TUV WXYZ<br />
7 8 9<br />
*<br />
O #<br />
LINE<br />
24 Call<br />
appearance/<br />
feature<br />
buttons<br />
Line jack<br />
(on back<br />
of voice<br />
terminal)<br />
Dial pad<br />
Hold button<br />
Message<br />
light<br />
Speakerphone/headset<br />
adapter jack (on back of<br />
voice terminal)<br />
H<strong>and</strong>set jack<br />
Figure 2. Another Version of the 8434DX Voice Terminal<br />
The following features on the 8434DX voice terminal shown in Figures 1 <strong>and</strong> 2 are<br />
listed alphabetically for your convenience. Explanations for each feature are also<br />
provided.<br />
Conference button<br />
Dial pad<br />
Display<br />
For setting up conference calls. This button is labeled<br />
Conf .<br />
The st<strong>and</strong>ard 12-button pad for dialing phone numbers<br />
<strong>and</strong> accessing features. The letters “Q” <strong>and</strong> “Z” have been<br />
added to the appropriate dial pad keys for directory access,<br />
<strong>and</strong> the “5” button on your dial pad has raised bars for<br />
visually-impaired users.<br />
A 2-line by 40-character display.<br />
Display control buttons These four buttons are labeled Menu , Exit , Prev ,<br />
<strong>and</strong> Next .<br />
Menu is used to enter Softkey Mode <strong>and</strong> access<br />
the first feature option screen.<br />
Exit is used for exiting the Display Mode <strong>and</strong> returning to<br />
Normal (call-h<strong>and</strong>ling) Mode.<br />
Prev <strong>and</strong> Next are used to go back <strong>and</strong> forth through<br />
the feature option screens.<br />
Drop button<br />
For disconnecting from a call or dropping the last party<br />
added to a conference call.<br />
2
Expansion Module jack<br />
(on back of voice terminal)<br />
H<strong>and</strong>set<br />
H<strong>and</strong>set jack<br />
(on back of<br />
voice terminal)<br />
The “EX MOD” jack cannot be used on voice terminals<br />
connected to a <strong>DEFINITY</strong> <strong>Generic</strong> 2 or to a <strong>System</strong> <strong>85</strong>.<br />
A h<strong>and</strong>set is provided for placing <strong>and</strong> receiving calls.<br />
(The h<strong>and</strong>set is also known as the receiver.) In most cases,<br />
you must lift the h<strong>and</strong>set (go off-hook) or activate the<br />
speaker or speakerphone before you can use a feature.<br />
This jack is for connecting a h<strong>and</strong>set to your voice terminal.<br />
The jack is labeled .<br />
Hold button<br />
(On some 8434DX voice<br />
terminals, this can be used<br />
as a Hold/Ring button)<br />
Line jack<br />
(on back of voice terminal)<br />
Message light<br />
Mute button<br />
A red button for putting a call on hold.<br />
If your 8434DX has a Shift button, you can press Shift<br />
<strong>and</strong> then Hold to select a personalized ring for your voice<br />
terminal from eight possible ringing patterns.<br />
This jack is used for connecting a line cord to your voice<br />
terminal. The jack is labeled “LINE.”<br />
A red light which goes on steadily when a message has been<br />
left for you. This button may be labeled Message or .<br />
For turning off the microphone associated with the h<strong>and</strong>set<br />
or the built-in speakerphone so the other person on the call<br />
cannot hear you.<br />
Ring button If your 8434DX has a Ring button, you can use this button<br />
to select a personalized ringing pattern from eight possible<br />
ringing patterns.<br />
Shift button<br />
Softkeys<br />
A blue button on some 8434DX voice terminals which can be<br />
used to access two additional features (when Shift is<br />
active, the red light next to the button is on):<br />
When used with Hold , you can select a personalized ring<br />
from among eight available patterns.<br />
When used with Speaker , you can perform an acoustic test<br />
of the environment <strong>and</strong> adjust the speakerphone to the<br />
surrounding acoustic environment for optimal performance<br />
(for the built-in speakerphone option only). Note: This<br />
feature needs to be used only on those 8434DX voice<br />
terminals on which the Reset Spkr label appears under the<br />
Speaker button.<br />
The five buttons located below the display <strong>and</strong> labeled with<br />
arrows ( ), correspond to words on the display screen. You<br />
can use the softkeys along with display control keys to<br />
access up to 15 features on your voice terminal in addition<br />
to those features administered on the call appearance/<br />
feature buttons.<br />
For a list of the features that can be accessed with the<br />
softkeys, check with your system manager. For procedures<br />
for using these softkey features, see “Using the Display,<br />
Softkeys, <strong>and</strong> Display Control Buttons” later in this guide.<br />
3
Speaker button<br />
(On some 8434DX voice<br />
terminals, this can be used<br />
as a Speaker/Reset Spkr<br />
button)<br />
Speakerphone/headset<br />
adapter jack (on back of<br />
voice terminal)<br />
10 Call appearances/<br />
feature buttons (on left)<br />
For accessing the built-in 2-way speakerphone.<br />
Note: Your voice terminal can be set for either the Speaker<br />
(listen-only) feature or the Speakerphone (listen <strong>and</strong> talk)<br />
feature. Check with your system manager to see how your<br />
Speaker button is to be used.<br />
If your 8434DX has the Reset Spkr label under the Speaker<br />
button, you can also use the Reset Speakerphone feature.<br />
When you press Shift <strong>and</strong> then Speaker (your voice<br />
terminal must be on-hook, <strong>and</strong> it must be set for the<br />
Speakerphone feature), you hear a set of tones as the<br />
speakerphone performs an acoustic test of the environment.<br />
When the tones stop, your speakerphone has finished<br />
adjusting itself for optimal performance <strong>and</strong> is ready for<br />
use.<br />
This jack is used for connecting an external speakerphone<br />
(such as an S101A or S201A Speakerphone) or a headset<br />
adapter (such as a 500A Headset Adapter) to your voice<br />
terminal. The jack is labeled .<br />
At least three of these 10 buttons on the top left of the voice<br />
terminal are devoted to incoming <strong>and</strong> outing calls (call<br />
appearances) <strong>and</strong> are labeled with an extension number.<br />
The remaining buttons can also be call appearance buttons,<br />
or they can access features (feature buttons) <strong>and</strong> are<br />
therefore labeled with a feature name.<br />
Test button<br />
24 Call appearances/<br />
feature buttons (on right)<br />
Transfer button<br />
When the voice terminal is initially powered up, the green<br />
light next to Test flashes if the link with the <strong>DEFINITY</strong><br />
switch or with <strong>System</strong> <strong>85</strong> is not (or not yet) operational. The<br />
light changes to steady green when the voice terminal is<br />
able to communicate with the <strong>DEFINITY</strong> switch or with<br />
<strong>System</strong> <strong>85</strong>, <strong>and</strong> then goes off after a short period of time.<br />
After the voice terminal is powered up, you can press Test<br />
to test the lights <strong>and</strong> the display on your voice terminal.<br />
These 24 buttons on the right of the voice terminal can be<br />
used either for incoming or outgoing calls (call<br />
appearances) <strong>and</strong> are labeled with an extension number or<br />
for accessing features (feature buttons) <strong>and</strong> are labeled<br />
with a feature name. Each has a red light telling you this is<br />
the line you are using or this is the line you will get when<br />
you lift your h<strong>and</strong>set. The green status light next to each<br />
call appearance <strong>and</strong> feature button tells you the line or<br />
feature is being used.<br />
For transferring a call to another voice terminal.<br />
4
Volume control button<br />
For adjusting the volume of the following:<br />
• The speakerphone or speaker when a call is in progress<br />
using the 2-way speakerphone or 1-way speaker<br />
• The h<strong>and</strong>set receiver level while a call is in progress<br />
using the h<strong>and</strong>set<br />
• The tone ringer when the speaker is off <strong>and</strong> either the<br />
h<strong>and</strong>set is inactive or the tone ringer is active<br />
Note: When the speaker is active, the ringer volume is<br />
automatically reduced to a low setting. The volume is<br />
restored when the speaker is turned off.<br />
Remember: The Volume control button on your voice<br />
terminal does not control the volume level of adjunct<br />
equipment.<br />
5
A Quick Look at the Features<br />
Here are brief descriptions of both voice features <strong>and</strong> display features that can be<br />
used with the 83434DX voice terminal. Each description includes what each feature<br />
does <strong>and</strong> how you might want to use it.<br />
Note: You will automatically have the following features on your voice terminal:<br />
Conference, Drop, Hold, Message, Mute, Select Ring, Test, <strong>and</strong> Transfer voice<br />
features <strong>and</strong> Normal Mode/Exit feature (labeled Exit on the voice terminal) among<br />
the display features. You may also be able to use the Speakerphone (<strong>and</strong> Reset<br />
Speakerphone) or the Speaker feature. Check with your system manager to see what<br />
other features you can use with the <strong>DEFINITY</strong> <strong>Generic</strong> 2 or with <strong>System</strong> <strong>85</strong>.<br />
You may also be able to use up to 15 other features accessed with the softkeys <strong>and</strong><br />
display control buttons. These features are in addition to the features administered<br />
on the call appearance/feature buttons on your voice terminal. Check with your<br />
system manager to see which softkey features are available to you.<br />
Voice Features<br />
Abbreviated Dialing (AD) Allows you to store selected telephone numbers for quick<br />
<strong>and</strong> easy dialing. Each number can be a complete or partial telephone number, an<br />
extension number, or a feature or trunk code. There are three possible types of<br />
lists — personal, group, <strong>and</strong> system — <strong>and</strong> you can have a total of three lists.<br />
Numbers on a personal list are programmable by you; numbers on all other lists are<br />
programmable only by the system manager. Use this feature as a timesaver for<br />
dialing frequently called, lengthy, or emergency numbers. Note: Check with your<br />
system manager for the types of lists you have <strong>and</strong> how many of each list.<br />
Automatic Callback Sends you a special 3-burst ring indicating a previously busy<br />
or unanswered extension is now available. Use to avoid constant redialing when you<br />
wish to speak to someone who is frequently busy on the telephone. Note: You can<br />
use this feature only for extensions, not for outside numbers.<br />
Bridging/Manual Exclusion Permits you to answer or join in calls to someone else's<br />
extension by pressing a bridged appearance button on your voice terminal. This<br />
button can be any call appearance button labeled with another user’s primary<br />
extension number, as assigned to you by your system manager. Use to assist in<br />
h<strong>and</strong>ling calls for a designated coworker. Note: You can use the Manual Exclusion<br />
feature to keep other users with whom you have a bridged call appearance from<br />
listening in on an existing call.<br />
Call Coverage/Consult Provides automatic redirection of certain calls to your voice<br />
terminal for answering. (Your system manager determines which calls will be sent to<br />
you.) Use to answer calls for other extensions for whom you provide coverage. Call<br />
Coverage can also automatically redirect your calls when your voice terminal is busy,<br />
you are out of the office, or you have pressed the Send All Calls button.<br />
Note: If you are a covering user, you can use the Consult feature, after answering a<br />
coverage call, to call the principal (the person for whom you are answering calls) for<br />
private consultation. Then, you can add the calling party to the conversation,<br />
transfer the call to the principal, or return to the calling party.<br />
6
Call Forwarding — Busy/Don’t Answer Temporarily forwards all your calls to<br />
another extension or to the attendant if your voice terminal is busy or you do not<br />
answer your calls within a preset number of rings. Use when you want your calls to<br />
be forwarded to a telephone number of your choice.<br />
Call Forwarding — Follow Me Temporarily forwards all your calls to another<br />
extension or to an outside number, depending on your system. Use when you want<br />
your calls to be automatically forwarded to a telephone number of your choice.<br />
Call Park Puts a call on hold at your voice terminal, for retrieval at any extension.<br />
Use when you need to go elsewhere to get information during a call, or whenever you<br />
wish to complete a call from a different location. Also, if the call received is for<br />
someone else, use it to hold the call until the called party can answer it from another<br />
voice terminal.<br />
Call Pickup Lets you answer a call at your voice terminal for another extension in<br />
your pickup group. Use when you wish to h<strong>and</strong>le a call for a group member who is<br />
absent or unable to answer. Note: You can use this feature only if you <strong>and</strong> the called<br />
party have been assigned to the same pickup group by your system manager.<br />
Conference Allows you to add a third party to a call, so you can conduct a 3-way<br />
conversation. (If you want to conference more than three parties, call your attendant<br />
for assistance.) Use to set up time-saving conferences, or to spontaneously include a<br />
third party important to a conversation.<br />
Drop Disconnects from a call without requiring you to hang up the h<strong>and</strong>set, turn off<br />
the speakerphone, or press the switchhook. Can also be used with the Conference<br />
feature to disconnect the last party added. Use whenever you want to continue using<br />
the h<strong>and</strong>set or speakerphone for another action after ending a call.<br />
Hold Puts a call on hold until you can return to it. While a call is on hold, you can<br />
place another call, activate another feature, answer a waiting call, or leave your<br />
voice terminal to do another task. Use when you have a call you don’t want to drop,<br />
but have to interrupt briefly to do something else.<br />
Intercom (Automatic/Dial) Gives you quick access to specified extensions. With<br />
Automatic Intercom, you can call a predetermined partner by pressing a single<br />
feature button. With Dial Intercom, you can call any member of a predetermined<br />
group of users. (For the Dial Intercom feature, you need to know the group member’s<br />
2- or 3-digit code.) Use to rapidly dial frequently called numbers.<br />
Last Number Dialed Automatically redials the last number you dialed, either an<br />
extension or an outside number. Use to save time in redialing a busy or unanswered<br />
number. Available with <strong>DEFINITY</strong> <strong>Generic</strong> 2 <strong>and</strong> with <strong>System</strong> <strong>85</strong> R2V4 <strong>and</strong> some<br />
R2V3 systems. Check with your system manager to see if the feature is available in<br />
your system. Note: This feature can be accessed either with the softkeys or by<br />
pressing an administered feature button.<br />
Leave Word Calling (LWC) Leaves a message for another extension to call you back.<br />
The called party will be able to dial message center, AUDIX, a covering user, to<br />
retrieve a short, st<strong>and</strong>ard message which gives your name <strong>and</strong> extension, the date<br />
<strong>and</strong> time you called, <strong>and</strong> the number of times you called. Use any time you want to<br />
have someone call you back; it will help cut down on repeated call attempts. This<br />
feature also allows other people in your system to leave a message for you.<br />
Message Lets you know a caller has left a message for you when the message light<br />
goes on. You can then follow your system manager’s local message retrieval<br />
procedures to get your message. See the Message Retrieval procedures under the<br />
Display Features heading.<br />
7
Mute Allows you to turn off the microphone of the built-in speakerphone or the<br />
h<strong>and</strong>set. Use when you want to confer with someone in the room with you, but you<br />
do not want the other person on the call to hear your conversation.<br />
Priority Calling Allows you to call another extension with a distinctive 3-burst ring<br />
to indicate your call requires immediate attention. Use when you have important or<br />
timely information for someone.<br />
Reset Speakerphone On those voice terminals that have the Reset Spkr label<br />
under the Speaker button, you can use this feature to initiate an acoustic test of the<br />
surrounding environment by using a sequence of tones. When the tones stop, your<br />
speakerphone has finished adjusting itself for optimal performance. It is now ready<br />
for use. Use whenever you move your voice terminal to a different location (even in<br />
the same room), or whenever the light next to Speaker is fluttering, or when the<br />
display shows you a message that the speakerphone needs to be reset. You can<br />
access this feature by pressing Shift <strong>and</strong> then Speaker or pressing the softkey<br />
below the word “Begin” on the display. Important: You only need to use this feature<br />
if the Reset Spkr label appears under the Speaker button <strong>and</strong> the voice terminal is<br />
set for the Speakerphone feature.<br />
Select Ring Allows you to choose your own personalized ringing pattern for your<br />
voice terminal from among eight available patterns. Use to help distinguish your<br />
incoming calls from those of other nearby voice terminals. Note: According to the<br />
8434DX voice terminal you are using, this feature is accessed either by pressing<br />
Shift <strong>and</strong> then Hold (if your 8434DX has a Shift button) or by pressing the<br />
Ring button (if your voice terminal has a Ring button).<br />
Send All Calls Temporarily sends all your calls to the extension of a person<br />
designated to answer them when you cannot (perhaps a secretary or receptionist).<br />
Use when you will be away from your desk for awhile, or when you do not want to be<br />
interrupted by telephone calls.<br />
Speaker (Listen-Only) In the listen-only mode, allows you to place calls or access<br />
other voice features without lifting the h<strong>and</strong>set. However, in order to speak to the<br />
other party, you must use the h<strong>and</strong>set. Use with feature activities that require<br />
listening only, such as dialing while the h<strong>and</strong>set is on-hook, monitoring calls on hold,<br />
<strong>and</strong> retrieving messages. Note: Your voice terminal may be administered for either<br />
Speaker (listen-only) or the Speakerphone (list <strong>and</strong> talk) function. Check with the<br />
system manager.<br />
Speakerphone Allows you to place <strong>and</strong> answer calls or access other voice features<br />
without lifting the h<strong>and</strong>set. Use the built-in speakerphone any time you prefer<br />
h<strong>and</strong>s-free communication, both speaking <strong>and</strong> listening, or for group conference<br />
situations. Note: Your voice terminal has either the Speaker (listen-only) or the<br />
Speakerphone (listen <strong>and</strong> speak) feature. Check with your system manager to see<br />
how your voice terminal is administered.<br />
Note: If your 8434DX has a Shift button, you can press Shift <strong>and</strong> then Speaker to<br />
initiate the Reset Speakerphone feature. As the built-in speakerphone performs a<br />
test of the surrounding acoustic environment, you will hear a sequence of tones.<br />
When the tones stop, your speakerphone has finished adjusting itself for optimal<br />
performance. It is now ready for use. (See “Reset Speakerphone.”) Important: You<br />
can use this feature only if the Reset Spkr label appears under the Speaker button.<br />
Test When the voice terminal is initially powered up, the green light next to Test<br />
flashes if the link with the <strong>DEFINITY</strong> switch or with <strong>System</strong> <strong>85</strong> is not (or not yet)<br />
operational. The light changes to steady green when the voice terminal is able to<br />
communicate with the <strong>DEFINITY</strong> switch or with <strong>System</strong> <strong>85</strong>, <strong>and</strong> then goes off after<br />
8
a short period of time. After the voice terminal is powered up, you can press Test<br />
to test the lights <strong>and</strong> the display on your voice terminal.<br />
Transfer Transfers a call from your voice terminal to another extension or outside<br />
number. Use when your caller needs to speak further with someone else.<br />
Display Features <strong>and</strong> Features Used with the Softkeys<br />
Note: Besides the display features listed <strong>and</strong> described below, you can use also up<br />
to 15 additional features accessed with the softkeys <strong>and</strong> display control buttons.<br />
Your system manager can tell you which softkey features are available to you.<br />
Exit Use Exit to leave Display Mode (after using any display or softkey feature)<br />
<strong>and</strong> return to Normal (call-h<strong>and</strong>ling) Mode. Once you are in Normal Mode, you can<br />
use the display to identify current call appearance, calling/called party, <strong>and</strong><br />
calling/called number.<br />
Feature Status Indication Indicates the status of each feature accessed with the<br />
softkeys. If the feature is active, an arrow ( ) appears above the feature<br />
abbreviation; if the arrow does not appear above the feature, the feature is off. If the<br />
feature requires you to dial a telephone number or extension, such as Call<br />
Forwarding, you will temporarily see the digits you are dialing, rather than the<br />
arrow, above the feature name.<br />
Inspect Shows you call-related information for an incoming call when you are<br />
already active on a call. Use to identify <strong>and</strong> screen new calls.<br />
Message Retrieval Allows you to retrieve messages left for you when your Message<br />
light is on. Will also let you retrieve messages for other voice terminals not equipped<br />
with a display (if you are authorized as a systemwide message retriever by your<br />
system manager). Use to quickly <strong>and</strong> conveniently check messages, even when you<br />
are already on a call.<br />
Normal See “Exit.”<br />
Time/Date Shows you the date <strong>and</strong> time. Use as a h<strong>and</strong>y calendar <strong>and</strong> clock.<br />
Timer Allows you to measure elapsed time. Use in order to keep track of time spent<br />
on a call or task.<br />
9
How to Use the Features<br />
The procedures which appear in the sections, Voice Feature Procedures <strong>and</strong><br />
Display Feature Procedures, give short, step-by-step instructions for using each<br />
feature. For your convenience, the features in each section are listed alphabetically.<br />
General Instructions<br />
Use the following special instructions for operating your voice terminal.<br />
• The first time you use these procedures, you will need to customize them for<br />
yourself by obtaining the following information from your system manager:<br />
➤<br />
Your system manager may assign call appearances or features to some of the<br />
34 call appearance/feature buttons on your voice terminal. To the right of each<br />
feature name in this section is a box. For each feature you have on your voice<br />
terminal or feature you can access with the softkeys (see “Note” below), mark<br />
a ✔ in the blank box as a reminder. The Conference, Drop, Hold, Message,<br />
Mute, Select Ring, Test, <strong>and</strong> Transfer voice features <strong>and</strong> the<br />
Normal Mode/Exit feature are already marked for you. You may also be able to<br />
use the Speakerphone (<strong>and</strong> Reset Speakerphone) or the Speaker feature.<br />
Check with your system manager to see what other features you can use with<br />
the <strong>DEFINITY</strong> <strong>Generic</strong> 2 or with <strong>System</strong> <strong>85</strong>.<br />
Note: You may also be able to use up to 15 additional features accessed with<br />
the softkeys <strong>and</strong> display control buttons. Check with your system manager to<br />
➤<br />
see which softkey features are available on your voice terminal <strong>and</strong> then put<br />
a checkmark in the box beside each of those features.<br />
Any feature not appearing on a button or accessed with the display <strong>and</strong><br />
softkeys can be activated or canceled by dialing a 1-, 2-, or 3-digit feature<br />
access code. Ask your system manager for the feature access codes for the<br />
features you need, <strong>and</strong> then write the assigned code number in the provided<br />
blanks in each feature procedure.<br />
• If you receive an intercept tone (high-pitched, alternating high <strong>and</strong> low tone)<br />
while attempting to operate any feature, you have taken too much time to<br />
complete a procedural step or have made a dialing error. Hang up, get dial tone,<br />
<strong>and</strong> begin again at Step 1.<br />
10
Conventions Used in The Following Procedures<br />
Feature <strong>and</strong><br />
Feature xxxxx<br />
Each of these boxes represents a button that has a<br />
feature assigned to it. The button is labeled with the<br />
feature name, sometimes followed by an extension<br />
number (shown as xxxxx) or a person’s name.<br />
LWC CnLWC Cnslt AutCB Timer<br />
This rectangular box, 2 lines by 40 characters,<br />
represents the 8434DX display screen. Like the<br />
example to the left, the second line appearing on the<br />
display will most likely list the features you can access<br />
with the softkeys. For directions on using the display<br />
<strong>and</strong> softkeys, see the section titled Using the Display,<br />
Softkeys, <strong>and</strong><br />
[h<strong>and</strong>set tones]<br />
The tone that appears in brackets after a step, such as<br />
[dial tone], indicates what you should hear from your<br />
h<strong>and</strong>set (or speakerphone) after successfully<br />
performing that step.<br />
For a list of tones <strong>and</strong> their meaning, see the section<br />
titled Tones <strong>and</strong> Their Meanings.<br />
Troubleshooting (Later in This Guide)<br />
Later in this guide you will find a short section on troubleshooting. Use the<br />
procedures listed in that section if you have problems in using your voice terminal.<br />
Quick Reference Lists (At the Back of This Guide)<br />
At the back of this guide is a set of quick reference lists. Use them to record your<br />
feature access codes <strong>and</strong> trunk codes, Abbreviated Dialing personal list items, <strong>and</strong><br />
message <strong>and</strong> attendant extensions. Once you have completed the lists, remove the<br />
page from the guide (tear along the perforation), <strong>and</strong> keep the lists near your voice<br />
terminal.<br />
11
Using the Display, Softkeys <strong>and</strong> Display<br />
Control Buttons<br />
The following information will help you use the display, the softkeys, <strong>and</strong> the display<br />
control buttons on your 8434DX voice terminal.<br />
The softkeys are the five keys labeled with arrows ( ) located directly below the<br />
display. The four display control buttons, labeled Menu , Exit , Prev ,<br />
<strong>and</strong> Next are located under the softkeys. Figure 3 shows the location of the<br />
softkeys in relation to the display above the softkeys <strong>and</strong> the display control<br />
buttons below them.<br />
Display<br />
Softkeys<br />
Menu<br />
Exit<br />
Prev<br />
Next<br />
Display<br />
control<br />
buttons<br />
Figure 3. The Display, Softkeys, <strong>and</strong> Display Control Buttons<br />
Entering Softkey Mode <strong>and</strong> Viewing the Three Feature Option Screens<br />
There are three separate feature option screens. Each of these screens allows you to<br />
select from five different features.<br />
You can enter Softkey Mode by pressing the display option button labeled Menu .<br />
The following is an example of a feature option screen.<br />
LWC CnLWC Cnslt AutCB Timer<br />
The top line of each feature option screen shows you the status of each of the five<br />
features. An arrow appears above the name of a feature if that feature is active. If<br />
there is no arrow above the feature, the feature is not active. In the above example,<br />
the Automatic Callback feature is active because there is an arrow above that<br />
feature name.<br />
Note: If the feature requires you to dial a telephone number or extension, such as<br />
Call Forwarding, you will temporarily see the digits you are dialing, rather than the<br />
arrow, above the feature name.<br />
The second line on each feature option screen shows the features you can access. To<br />
use any of these features, you must press the softkey below the feature name. For<br />
example, on the feature option screen shown on the previous page, you can leave a<br />
message for another extension to call you back by pressing the softkey below LWC<br />
12
(the Leave Word Calling feature). If you want to cancel the message, press the<br />
softkey below CnLWC (the Cancel Leave Word Calling feature).<br />
To see the next set of five features, press the display control button labeled Next ;<br />
to move back a screen, press the display control button labeled Prev . Press<br />
Next or Prev until the feature you want to use appears on the second line.<br />
The following flowchart (Figure 4) shows the features on each of the three feature<br />
option screens.<br />
LWC CnLWC Cnslt AutCB Timer<br />
CFrwd CPark Excl TmDay PCall<br />
Leave<br />
Word<br />
Calling<br />
Cancel<br />
LWC<br />
Consult<br />
Automatic<br />
Callback<br />
Timer<br />
Call<br />
Forwarding<br />
Call<br />
Park<br />
Manual<br />
Exclusion<br />
Time/<br />
Date<br />
Priority<br />
Calling<br />
Prog Pause Spres<br />
AD<br />
Pause<br />
Mark Wait<br />
AD<br />
Mark<br />
Abbreviated<br />
Dialing (AD)<br />
Program<br />
AD<br />
Suppress<br />
AD<br />
Wait<br />
Figure 4. The Three Feature Option Screens<br />
Note: On the <strong>DEFINITY</strong> <strong>Generic</strong> 2 or on <strong>System</strong> <strong>85</strong>, the Call Forwarding feature<br />
accessed with the softkeys is Call Forward — Follow Me.<br />
To use the Call Park feature on the <strong>DEFINITY</strong> <strong>Generic</strong> 2 or on <strong>System</strong> <strong>85</strong>, the Call<br />
Park button must be administered as an Abbreviated Dialing button <strong>and</strong><br />
programmed with the Call Park trunk group access code. The Recall feature must be<br />
administered on one of the feature buttons.<br />
An error tone (one beep) may sound when you have made a mistake in your softkey<br />
entries.<br />
Press Exit at any time to exit Softkey Mode <strong>and</strong> return to Normal (call-h<strong>and</strong>ling)<br />
Mode.<br />
13
Using the Softkeys to Activate a Feature<br />
Your display <strong>and</strong> softkeys allow you to access up to 15 switch-related features. For<br />
example, you may want to use the Priority Calling feature to call another extension<br />
with a distinctive 3-burst ring. You can activate this feature with the softkeys in the<br />
following way:<br />
To access a feature with<br />
the softkeys (Priority<br />
Calling is used in this<br />
example)<br />
1 Press Menu<br />
• The display shows the initial feature option<br />
screen:<br />
LWC CnLWC Cnslt AutCB Timer<br />
2 Press Next<br />
• The display shows:<br />
CFrwd CPark Excl TmDay PCall<br />
3 To use the Priority Calling feature, press the softkey<br />
below PCall <strong>and</strong> then dial the extension.<br />
Note: When the feature is activated, after the<br />
display screen shows you the digits you are dialing,<br />
an arrow appears above the feature, as in the<br />
example below. If there is not an arrow above the<br />
feature, the feature is off.<br />
CFrwd CPark Excl TmDay PCall<br />
When both parties hang up from the call, the arrow<br />
above PCall (showing feature status indication)<br />
disappears.<br />
14
Resetting the Speakerphone with the Softkeys<br />
(When Powering Up the Voice Terminal)<br />
Important: You can use the Reset Speakerphone feature only if the Reset Spkr<br />
label appears under the Speaker button.<br />
When you first power up the voice terminal, the following display appears.<br />
Begin<br />
PLEASE RESET SPKR.<br />
Cancel<br />
When you reset the speakerphone on your voice terminal, you hear a set of tones as<br />
the speakerphone performs an acoustic test of the environment. When the tones<br />
stop, your speakerphone has finished adjusting itself for optimal performance <strong>and</strong> is<br />
ready for use. For more information about the Reset Speakerphone feature, see<br />
“Reset Speakerphone” in the Voice Feature Procedures section later in this guide.<br />
Note: If you are using an 8434DX without the Shift button, the voice terminal<br />
will automatically reset the built-in speakerphone when needed.<br />
To reset the speakerphone<br />
(when the voice terminal<br />
is first powered up)<br />
1 Press the softkey below Begin to reset the<br />
speakerphone<br />
(Press the softkey below Cancel if you do not want to<br />
reset the speakerphone at this time. However, note<br />
that the red light next to Speaker will continue to<br />
flutter.)<br />
• If you press the softkey below Begin, the display<br />
shows the following timed screen:<br />
OPTIMIZING PERFORMANCE<br />
OF THE SPEAKERPHONE.<br />
• You will hear a set of rising tones as the<br />
speakerphone adjusts itself to the surrounding<br />
acoustical environment. These tones are<br />
automatic. No user response is required.<br />
15
Voice Feature Procedures<br />
Note: When placing <strong>and</strong> answering calls or using the voice features, you have the<br />
option of doing so by lifting the h<strong>and</strong>set or by pressing Speaker . If your voice<br />
terminal is set for the Speakerphone feature, pressing Speaker simultaneously<br />
activates the built-in microphone so you can place <strong>and</strong> answer calls without lifting<br />
the h<strong>and</strong>set.<br />
Abbreviated Dialing (AD)<br />
Note: Before you can use this feature, AD buttons must first be assigned by your<br />
system manager. If you hear the intercept tone while programming, start over from<br />
the beginning.<br />
You may also be able to use the following softkey features with Abbreviated Dialing.<br />
(Press Menu <strong>and</strong> then the softkey below the feature abbreviation.)<br />
• Program (labeled Prog) — You can program a telephone number, extension, or<br />
feature access code on an AD button.<br />
• Pause (labeled Pause) — A 1.5-second pause can be placed in an AD number,<br />
such as between an access code <strong>and</strong> the telephone number.<br />
• Mark (labeled Mark) — Numbers included after a Mark on an AD button are<br />
dialed in Touch-Tone signal form.<br />
• Wait (labeled Wait) — Numbers included after a Wait on an AD button are<br />
delayed 5 to 25 seconds until the voice terminal receives dial tone from the switch.<br />
• Suppress (labeled Spres) — Suppressed numbers are dialed but not shown on<br />
the display (an “s” appears instead). Used for passwords or authorization codes.<br />
To program or reprogram<br />
an outside number,<br />
extension, or feature<br />
access code into a<br />
personal list<br />
1 On a separate sheet of paper, write down the outside<br />
numbers, extensions, <strong>and</strong> feature access codes you<br />
want to program as items on your personal list<br />
2 Press Menu <strong>and</strong> then press the softkey below Prog<br />
(while off-hook)<br />
or, Press Program (while off-hook)<br />
or Dial the Abbreviated Dialing Program access<br />
code __________ (while off-hook)<br />
[confirmation tone]<br />
3 Press Personal List<br />
or Dial the Personal List code __________<br />
4 Dial the desired list item number (for example, 0-9,<br />
01-95, <strong>and</strong> so on, depending on list size<br />
[dial tone]<br />
16
5 Dial the outside number, extension, or feature access<br />
code you want to store<br />
Note: You may also be able to use the softkeys to<br />
add special functions such as Pause, Mark,<br />
Suppress, or Wait into the programmed telephone<br />
numbers.<br />
6 Press Personal List<br />
or Press #<br />
[confirmation tone]<br />
• Number is stored<br />
• Repeat Steps 3 through 6 if you want to program<br />
additional items on the same list<br />
7 Hang up or press Drop to end programming<br />
• If you want to continue programming, begin again<br />
at Step 1 to program another personal list<br />
Note: Record your personal list items on the<br />
Abbreviated Dialing list in the back of this guide;<br />
group <strong>and</strong> system lists are available from the<br />
controller of the list or from your system manager.<br />
To place a call using a<br />
personal, group, or<br />
system list<br />
1 While off-hook, press Personal List or Group List or<br />
<strong>System</strong> List<br />
or Dial the appropriate Abbreviated Dialing list code<br />
(while off-hook)<br />
• Personal __________ [dial tone]<br />
• Group __________ [dial tone]<br />
• <strong>System</strong> __________ [dial tone]<br />
2 Dial the desired list item (1, 2, 3..., 01, 02...)<br />
• Stored number is automatically dialed<br />
17
To program an<br />
Abbreviated Dialing (AD)<br />
button<br />
1 While off-hook, press Menu <strong>and</strong> then press the<br />
softkey below Prog<br />
or Press Program (while off-hook)<br />
or Dial the Abbreviated Dialing Program<br />
access code __________ (while off-hook)<br />
[confirmation tone]<br />
2 Press the selected AD xxxxx<br />
3 Dial the outside number, extension, or feature access<br />
code you want to store<br />
Note: You may also be able to use the softkeys to<br />
add special functions such as Pause, Mark, or Wait<br />
into the telephone numbers programmed on the<br />
AD button.<br />
4 Press AD xxxxx again [confirmation tone]<br />
5 Hang up or press Drop to end programming<br />
To see the number stored<br />
on an Abbreviated Dialing<br />
(AD) button<br />
1 While on-hook, press the selected AD xxxxx<br />
• Stored number is shown<br />
2 Press Exit to return to the normal display or repeat<br />
Step 1 to see another number<br />
To place a call using an<br />
Abbreviated Dialing (AD)<br />
button<br />
1 While off-hook, press the selected AD xxxxx<br />
• Call is automatically dialed [ringback tone]<br />
Automatic Callback<br />
To automatically place<br />
another call to an<br />
extension that was<br />
frequently busy<br />
1 Press Menu <strong>and</strong> then press the softkey below<br />
AutCB before or during call attempt<br />
or Press Auto Callback before or during the call<br />
attempt<br />
[dial or confirmation tone].<br />
or Dial the Automatic Callback access code before<br />
the call attempt __________<br />
[dial tone]<br />
2 Hang up (within seven seconds) or press Drop<br />
• You will get a 3-burst priority ring when both your<br />
voice terminal <strong>and</strong> the called extension are idle<br />
18
3 Pick up the h<strong>and</strong>set when you hear priority ring<br />
[ringback tone]<br />
• A call is automatically placed to the called<br />
extension, which receives regular ringing<br />
Note: Only one Automatic Callback call at a time<br />
can be placed, <strong>and</strong> Automatic Callback is canceled<br />
after 20 to 40 minutes if the callback call is<br />
unanswered.<br />
To cancel Automatic<br />
Callback<br />
1 While off-hook, press Menu <strong>and</strong> then press the<br />
softkey below AutCB again<br />
or Press Auto Callback again (while off-hook)<br />
or Dial the Automatic Callback cancel code<br />
__________ (while off-hook) [confirmation tone]<br />
• Green light goes off<br />
Bridging/Manual Exclusion<br />
To answer a bridged call 1 Press the call appearance button of the bridged call<br />
Note: If your terminal has Ringing Appearance<br />
Preference, this step is not necessary; you will<br />
automatically be connected to the call when you<br />
lift the h<strong>and</strong>set.<br />
2 Pick up the h<strong>and</strong>set or press Speaker<br />
To prevent other bridged<br />
voice terminals from<br />
entering a call (on a<br />
per-call basis)<br />
1 While on a call, press Menu <strong>and</strong> then press the<br />
softkey below Excl<br />
or Press Exclusion xxxxx while connected to the call<br />
Note: Pressing the softkey below Excl or pressing<br />
Exclusion xxxxx again reactivates bridging.<br />
19
Call Coverage/Consult<br />
To answer a call for a<br />
coworker for whom you<br />
are a coverage point<br />
1 Press the call appearance button of the incoming call<br />
when ring begins or green light flashes<br />
Note: The call is not at your terminal until the<br />
green light is flashing.<br />
To leave a message telling<br />
a coworker to call the<br />
original caller’s extension<br />
1 Press Coverage CallBack while connected to the call<br />
[confirmation tone]<br />
Note: To leave a message telling a coworker to call<br />
you, press LWC instead.<br />
To use the Consult<br />
feature to talk privately<br />
with a coworker after<br />
answering a redirected<br />
call<br />
1 Press Transfer or Conf<br />
[dial tone]<br />
• Call is temporarily put on hold<br />
2 Press Menu <strong>and</strong> then press the softkey below Cnslt<br />
or Press Consult [priority ring to coworker]<br />
or Dial the coworker’s extension<br />
[single-burst ring to coworker]<br />
Note: You can privately discuss call; if the coworker<br />
is not available, press the call appearance button<br />
next to the fluttering light to reconnect to the call.<br />
If your coworker has activated Send All Calls, you<br />
must use the Consult feature to reach your coworker.<br />
3 Press Transfer again to send the call to the coworker<br />
or Press Conf to make it a 3-party call<br />
20
Call Forwarding — Busy/Don’t Answer<br />
To activate Call<br />
Forwarding —<br />
Busy/Don’t Answer<br />
Note: To find out which<br />
type of Call Forwarding<br />
Call Forward activates,<br />
contact your system<br />
manager.<br />
1 While off-hook, press Call Forward<br />
or, Dial the Call Forwarding — Busy/Don’t Answer<br />
access code __________ (while off-hook) [dial tone]<br />
2 Dial the extension where calls will be sent<br />
[confirmation tone]<br />
Note: If you hear intercept tone, you are attempting<br />
to forward your calls to a restricted telephone, a<br />
telephone with Call Forwarding — Follow Me<br />
activated, or a telephone in another partition or<br />
group (if you are in a tenant services environment).<br />
See your system manager for more information.<br />
3 Hang up or press Drop<br />
To cancel Call<br />
Forwarding —<br />
Busy/Don’t Answer<br />
1 While off-hook, press Call Forward<br />
or Dial the Call Forward cancel code __________<br />
(while off-hook)<br />
[confirmation tone]<br />
2 Hang up<br />
• Your calls will ring at your own voice terminal<br />
again<br />
21
Call Forwarding — Follow Me<br />
To temporarily redirect all<br />
calls to an extension or<br />
outside number of your<br />
choice<br />
Note: To find out which<br />
type of Call Forwarding<br />
Call Forward activates,<br />
contact your system<br />
manager.<br />
1 While off-hook, press Menu <strong>and</strong> then press the<br />
softkey below CFrwd<br />
or Press Call Forward (while off-hook)<br />
or Dial the Call Forwarding — Follow Me access<br />
code __________ (while off-hook) [dial tone]<br />
2 Dial the extension or number where calls will be sent<br />
[confirmation tone]<br />
Note: You may hear a half ring as each call is<br />
forwarded. Also, some voice terminals may have<br />
restrictions on where calls can be forwarded; see<br />
your system manager.<br />
3 Hang up<br />
To cancel Call<br />
Forwarding — Follow Me<br />
1 While off-hook, press Menu <strong>and</strong> then press the<br />
softkey below CFrwd<br />
[dial tone]<br />
or Press Call Forward (while off-hook)<br />
or Dial the Call Forward cancel code __________<br />
(while off-hook)<br />
[confirmation tone]<br />
2 Hang up<br />
• Your calls will ring at your own voice terminal<br />
again<br />
22
Call Park<br />
To park a call (for<br />
retrieval at any<br />
extension)<br />
1 Press Transfer<br />
[dial tone]<br />
• Second party is temporarily put on hold<br />
2 Press Menu <strong>and</strong> then press the softkey below CPark<br />
or Press Call Park<br />
or Dial the Call Park trunk group access code<br />
__________<br />
[dial tone]<br />
3 Dial the Call Park zone number<br />
4 Dial an idle Answer Back channel number<br />
[confirmation tone]<br />
5 Press Recall<br />
6 Press Transfer<br />
[ringback tone]<br />
7 Hang up<br />
• Held party is transferred to the answer-back<br />
channel <strong>and</strong> hears ringback tone (or music) while<br />
waiting<br />
To retrieve a parked call<br />
from any extension<br />
1 Dial the Call Park Answer Back code __________<br />
2 Dial the channel number where call was parked<br />
[confirmation tone]<br />
Note: If you receive intercept tone, parked call has<br />
been disconnected or retrieved by another party.<br />
23
Call Pickup<br />
To answer a call to a<br />
member of your pickup<br />
group when your voice<br />
terminal is idle<br />
1 While off-hook, press Call Pickup<br />
or Dial the Call Pickup access code __________<br />
(while off-hook)<br />
• You are connected to the ringing call<br />
To answer a call to your<br />
pickup group while on<br />
another call<br />
1 Press Hold<br />
• Present call is put on hold<br />
2 Press an idle call appearance [dial tone]<br />
3 Press<br />
Call Pickup<br />
or Dial the Call Pickup access code _______<br />
• Called voice terminal stops ringing<br />
• You are connected to the ringing call<br />
Note: To return to the held call after completing the<br />
present call, press the call appearance button next to<br />
the fluttering light.<br />
Conference<br />
✔<br />
To add a third party to<br />
a call<br />
1 Press Conf<br />
[dial tone]<br />
• Present call is temporarily put on hold, <strong>and</strong> you<br />
are given a new call appearance<br />
2 Dial the number of the new party <strong>and</strong> wait for an<br />
answer<br />
Note: You can privately discuss the call with the<br />
new party at this time; if there is no answer or the<br />
line is busy, press the call appearance button next to<br />
the fluttering light to return to the original party.<br />
3 Press Conf again<br />
• All parties are now connected<br />
To add a call you’ve put<br />
on hold to another call<br />
you’re connected to<br />
1 Press Conf<br />
[dial tone]<br />
2 Press the call appearance button of the first call<br />
3 Press Conf again<br />
• All parties are now connected<br />
24
To drop the last party<br />
added to a conference call<br />
1 Press Drop<br />
• You remain connected to the original party<br />
Drop<br />
✔<br />
To disconnect from a<br />
normal call, or to drop<br />
the last party added to<br />
a conference call<br />
1 Press Drop<br />
[dial tone]<br />
Note: If you press Drop during a conference call, the<br />
last party you added is dropped, but you remain<br />
connected with the original party.<br />
H<strong>and</strong>set Volume<br />
✔<br />
To raise or lower the<br />
receive level volume<br />
of the h<strong>and</strong>set<br />
1 While h<strong>and</strong>set is off-hook, press the Volume control<br />
button<br />
• To raise the volume, press the right half of the<br />
Volume control button labeled ;<br />
to lower the volume, press the left half of the<br />
Volume control button labeled<br />
• The display shows:<br />
HANDSET L > > > > H<br />
(There are eight possible volume settings. On the<br />
display, one arrow is the lowest setting, <strong>and</strong><br />
eight arrows is the highest setting.)<br />
25
Hold<br />
✔<br />
To keep a call waiting<br />
while you answer another<br />
call, make a call, or<br />
perform some other task<br />
1 Press Hold<br />
• Green light next to the held call flutters<br />
Note: If you put a conference call on hold,<br />
the other parties remain connected.<br />
To answer a new call<br />
while active on another<br />
1 Press Hold<br />
• Green light next to the held call flutters<br />
2 Press the call appearance button of the incoming call<br />
• You are connected to the incoming call<br />
To return to the held call 1 Press the call appearance button of the held call<br />
• You are connected to the held call<br />
Note: If you are active on a call <strong>and</strong> you press<br />
the call appearance button of the held call, the active<br />
call will be dropped.<br />
Intercom (Automatic/Dial)<br />
To make a call to your<br />
predetermined Automatic<br />
Intercom partner<br />
1 While off-hook, press<br />
• Intercom ring is sent<br />
Icom Auto xxx<br />
[ringback tone]<br />
26
To dial a call to a member<br />
of your Dial Intercom<br />
group<br />
1 While off-hook, press Icom Dial xxx [dial tone]<br />
2 Dial the group member’s 1- or 2-digit code<br />
[ringback tone]<br />
• Intercom ring is sent<br />
To answer any intercom<br />
call<br />
1 Pick up the h<strong>and</strong>set <strong>and</strong> press Icom<br />
• You are connected to the call<br />
Note: If you are active on another call, first<br />
press Hold , then press the Icom button next to the<br />
flashing light.<br />
Last Number Dialed<br />
To automatically redial<br />
the last number you<br />
dialed (extension, outside<br />
number, or trunk/feature<br />
access code)<br />
1 While on-hook or off-hook, press Last Dialed<br />
or Dial the Last Number Dialed access code<br />
__________ (while off-hook)<br />
• Number is automatically dialed (up to 20 digits)<br />
Note: Available with <strong>DEFINITY</strong> <strong>Generic</strong> 2 <strong>and</strong> with<br />
<strong>System</strong> <strong>85</strong> R2V4 <strong>and</strong> some R2V3 systems. Check<br />
with your system manager to learn if the feature is<br />
available on your system.<br />
Limitations on this feature should be noted. Digits<br />
dialed via Abbreviated Dialing, feature dial codes,<br />
authorization codes, <strong>and</strong> Station Message Detail<br />
Recording (SMDR) account codes are not retained in<br />
memory <strong>and</strong> must be redialed for each call.<br />
To see the number you<br />
last dialed (you must be<br />
on-hook)<br />
1 While on-hook, press Last Dialed<br />
• Last number dialed is shown on the display screen<br />
27
Leave Word Calling (LWC)<br />
To leave a message after<br />
dialing an extension<br />
(when the call is not<br />
answered, or you hear a<br />
coverage or busy tone)<br />
1 Press Menu <strong>and</strong> then press the softkey below LWC<br />
after you complete dialing<br />
or Press LWC any time after you complete dialing<br />
[confirmation tone]<br />
• Message light on the called voice terminal goes on<br />
(if so equipped)<br />
Note: If reorder tone is heard, the message is not<br />
stored; try again.<br />
To leave a message<br />
without ringing an<br />
extension<br />
1 While on-hook or off-hook, press Menu <strong>and</strong> then press<br />
the softkey below LWC<br />
or Press LWC (while off-hook)<br />
or Dial the Leave Word Calling access code<br />
__________ (while off-hook)<br />
[dial tone]<br />
2 Dial the extension [confirmation tone]<br />
• Message light on the called voice terminal goes on<br />
(if so equipped)<br />
3 Hang up or press Drop<br />
28
To cancel a Leave Word<br />
Calling message (you<br />
cannot cancel messages<br />
for an AUDIX subscriber)<br />
1 While off-hook, press Menu <strong>and</strong> then press the<br />
softkey below CnLWC<br />
or Press Cancel LWC (while off-hook)<br />
or the Dial Leave Word Calling cancel code<br />
__________ (while off-hook)<br />
[dial tone]<br />
2 Dial the extension [confirmation tone]<br />
• Message is deleted<br />
Note: If reorder tone is heard, message is not<br />
deleted; try again.<br />
Message<br />
✔<br />
To retrieve a message<br />
when your Message light<br />
is on<br />
1 See the “Message Retrieval” procedures under the<br />
Display Features heading. Otherwise, see your<br />
system manager for instructions regarding local<br />
message retrieval procedures.<br />
Mute<br />
✔<br />
Note: When you are talking on the h<strong>and</strong>set, the Mute feature affects the<br />
microphone associated with the h<strong>and</strong>set rather than the speakerphone.<br />
This feature has no effect on an external speakerphone attached to your voice<br />
terminal.<br />
To prevent the other<br />
party from hearing you<br />
(To mute the h<strong>and</strong>set<br />
or speakerphone<br />
microphone)<br />
1 Press Mute<br />
• Red light next to Mute goes on, <strong>and</strong> the other<br />
party cannot hear you<br />
2 When you are ready to resume conversation with the<br />
other party, press Mute again<br />
• Red light next to Mute goes off, <strong>and</strong> the other<br />
party can hear you again<br />
Note: When the voice terminal is set for the Speaker<br />
(listen-only) feature, the light next to Mute goes on<br />
whenever you are using the speaker.<br />
The Mute feature turns off automatically when you hang<br />
up, or switch from the speakerphone to the h<strong>and</strong>set or<br />
from the h<strong>and</strong>set to the speakerphone.<br />
29
Priority Calling<br />
To place a priority call<br />
(3-burst ring)<br />
1 While off-hook, press Menu <strong>and</strong> then press the softkey<br />
below PCall<br />
or Press Priority (while off-hook)<br />
or the Dial Priority Calling access code __________<br />
(while off-hook)<br />
[dial tone]<br />
2 Dial the extension [ringback tone]<br />
• Wait for the called party to answer<br />
To change a regular call<br />
into a priority call<br />
(3-burst ring) when you<br />
hear a call waiting<br />
ringback tone<br />
1 Press Menu <strong>and</strong> then press the softkey below PCall<br />
or Press Priority<br />
• Called party receives a priority call-waiting tone<br />
(3-burst ring)<br />
2 Wait for the called party to answer<br />
Note: If you still receive a call waiting ringback<br />
tone, wait a few minutes <strong>and</strong> try again.<br />
Reset Speakerphone<br />
Important: You can use this feature only if the Reset Spkr label appears under the<br />
Speaker button <strong>and</strong> the voice terminal is set for the Speakerphone feature.<br />
If your 8434DX is equipped with this feature, you can adjust the speakerphone to<br />
the surrounding room acoustics to provide optimal performance. Use the Reset<br />
Speakerphone feature in the following ways:<br />
• Whenever you move your voice terminal to another place (even in the same room)<br />
• Whenever the red light next to Speaker is fluttering<br />
Note: You may also use this feature when you are on a call in the unlikely event<br />
your speakerphone makes a squealing noise during the call. Your speakerphone<br />
will adjust itself to normal for that call. (No tones will be heard.)<br />
Important: If there has been an interruption in power (such as, the system has<br />
just been powered up again, or you have plugged in the voice terminal at another<br />
location), the light next to Speaker flutters until you reset the built-in<br />
speakerphone.<br />
You can initiate the Reset Speakerphone feature when your h<strong>and</strong>set is on-hook, or<br />
during a call in which you are using the built-in speakerphone. (If a call is in<br />
progress, you will not hear the tones, <strong>and</strong> the new speakerphone adjustment is reset<br />
for only the duration of that call.)<br />
Remember you can use the Reset Speakerphone feature only if your voice terminal is<br />
set for the Speakerphone features (as opposed to the Speaker feature).<br />
30
When you first power up the voice terminal, the following display appears.<br />
Begin<br />
PLEASE RESET SPKR.<br />
Cancel<br />
To reset the speakerphone<br />
(when the voice terminal<br />
is first powered up)<br />
1 Press the softkey below Begin to reset the<br />
speakerphone<br />
(Press the softkey below Cancel if you do not want to<br />
reset the speakerphone at this time. However, note<br />
that the red light next to Speaker will continue to<br />
flutter.)<br />
• If you press the softkey below Begin, the display<br />
shows the following timed screen:<br />
OPTIMIZING PERFORMANCE<br />
OF THE SPEAKERPHONE.<br />
• You will hear a set of rising tones as the<br />
speakerphone adjusts itself to the surrounding<br />
acoustical environment. These tones are<br />
automatic. No user response is required.<br />
To adjust the<br />
speakerphone to the<br />
surrounding room<br />
acoustics<br />
1 While on-hook, press Shift<br />
• Red light next to Shift goes on steadily<br />
2 Press Speaker<br />
• Red light next to Shift goes off<br />
• Red light next to Speaker flutters intermittently<br />
• You hear a series of tones as the speakerphone<br />
performs an acoustic test of the environment.<br />
The display shows:<br />
OPTIMIZING PERFORMANCE<br />
OF THE SPEAKERPHONE.<br />
When the tones stop, your built-in speakerphone<br />
is ready for use.<br />
31
Select Ring (<strong>and</strong> Ringer Volume)<br />
✔<br />
To select a personalized<br />
ringing pattern (for those<br />
8434DX voice terminals<br />
which have a Shift<br />
button)<br />
Note: For procedures on<br />
selecting a personalized<br />
ringing pattern for those<br />
8434DX voice terminals<br />
that have a Ring button,<br />
see the next page.<br />
1 Press Shift<br />
• Red light next to Shift goes on steadily<br />
2 Press Hold<br />
• Red light next to Shift winks<br />
• Current ringing pattern plays <strong>and</strong> repeats every<br />
three seconds. The display shows the ringing<br />
pattern you are hearing:<br />
SELECT RING PATTERN: 1<br />
3 Continue to press (<strong>and</strong> then release) Hold (or press<br />
Next or Prev ) to cycle through all eight ringing<br />
patterns<br />
4 When you hear the desired ringing pattern,<br />
press Shift again<br />
• You hear confirmation tone (two rising tones)<br />
• Your new ringing pattern is set<br />
• Red light next to Shift goes off<br />
Note: If you receive a call, go off-hook, or lose power<br />
during selection, the process is interrupted <strong>and</strong> you<br />
must start again.<br />
32
To select a personalized<br />
ringing pattern (for those<br />
8434DX voice terminals<br />
which have a Ring<br />
button)<br />
1 While on-hook, press Ring<br />
• Red light next to Ring winks<br />
• Current ringing pattern plays <strong>and</strong> repeats every<br />
three seconds.<br />
• The display shows the ringing pattern you are<br />
hearing, such as:<br />
SELECT RING PATTERN: 1<br />
2 Cycle through the ringing patterns by pressing (<strong>and</strong><br />
then releasing) Ring<br />
• Red light next to Ring continues to wink<br />
• The display shows the number of the ringing<br />
pattern you have selected<br />
Note: You can also press Next or Prev ) to<br />
cycle through all eight ringing patterns<br />
3 If you want to save the ringing pattern currently<br />
being played, don’t press Ring anymore. You will hear<br />
the selected ringing pattern two more times, <strong>and</strong> then<br />
it will be automatically saved.<br />
• You hear confirmation tone (two rising tones)<br />
• Red light next to goes Ring off<br />
Note: If you receive a call, go off-hook, or lose power<br />
during selection, the process is interrupted <strong>and</strong> you<br />
must start again.<br />
To adjust ringer volume<br />
if necessary (h<strong>and</strong>set <strong>and</strong><br />
speaker are not active, or<br />
the h<strong>and</strong>set <strong>and</strong> ringer<br />
are both active)<br />
1 To raise the volume, press the right half of the<br />
Volume control button labeled ;<br />
to lower the volume, press the left half of the<br />
Volume control button labeled<br />
33
• The display shows:<br />
RINGER L > > > > H<br />
(There are eight possible volume settings.<br />
On the display, one arrow is the lowest setting, <strong>and</strong><br />
eight arrows is the highest setting.)<br />
One full ring cycle will sound to demonstrate the<br />
new volume.<br />
Send All Calls<br />
To send all incoming calls<br />
(except priority, intercom,<br />
<strong>and</strong> personal central office<br />
calls) immediately to an<br />
assigned extension,<br />
AUDIX, or message<br />
center for coverage<br />
1 While on-hook or off-hook, press Send All Calls<br />
or Pick up the h<strong>and</strong>set <strong>and</strong> dial the Send All Calls<br />
access code __________ [confirmation tone]<br />
Note: You may hear a half ring as each call is sent<br />
to coverage if you have a <strong>DEFINITY</strong> <strong>Generic</strong> 2 or a<br />
<strong>System</strong> <strong>85</strong> R2V4.<br />
To send an assigned<br />
group of extensions<br />
(except priority, intercom,<br />
<strong>and</strong> personal central office<br />
calls) immediately to an<br />
assigned extension,<br />
AUDIX, or message<br />
center for coverage<br />
1 While on-hook or off-hook, press SAC Group<br />
[confirmation tone]<br />
To cancel Send All Calls<br />
or SAC Group<br />
1 While on-hook, press Send All Calls or SAC Group<br />
again<br />
or Pick up the h<strong>and</strong>set <strong>and</strong> dial the Send All Calls<br />
cancel code __________ [confirmation tone]<br />
• Your calls ring at your own voice terminal again<br />
34
Speaker<br />
Note: Your voice terminal is set for either the Speaker (listen-only) or the<br />
Speakerphone (listen <strong>and</strong> talk) function. Check with your system manager to see if<br />
you can use either of these two features.<br />
In order for the other party to hear you, you must speak through the h<strong>and</strong>set.<br />
Use the following procedures if your voice terminal is set for the Speaker<br />
(listen-only) feature.<br />
To place a call without<br />
lifting the h<strong>and</strong>set, or to<br />
use speaker with any<br />
listening-only feature<br />
activity (such as,<br />
monitoring a call on<br />
which you have been put<br />
on hold or for group<br />
listening)<br />
1 Press Speaker<br />
• Red light next to Speaker goes on;<br />
red light next to Mute goes on<br />
2 Place the call or access the selected feature<br />
3 Adjust speaker volume if necessary<br />
• To raise the volume, press the right half of the<br />
Speaker Volume control button labeled ;<br />
to lower the volume, press the left half of the<br />
Speaker Volume control button labeled<br />
• The display shows:<br />
SPEAKER L > > > ><br />
H<br />
(There are eight possible volume settings. On the<br />
display, one arrow is the lowest setting, <strong>and</strong><br />
eight arrows is the highest setting.)<br />
To turn off the speaker<br />
<strong>and</strong> return to the h<strong>and</strong>set<br />
1 Pick up the h<strong>and</strong>set<br />
• Red light next to Speaker <strong>and</strong> the red light next<br />
to Mute go off<br />
• Speaker goes off<br />
35
To mute the microphone<br />
associated with the<br />
h<strong>and</strong>set so the other<br />
party cannot hear you<br />
1 Press Mute<br />
• Red light next to Mute goes on <strong>and</strong> the other<br />
party cannot hear you<br />
2 Press Mute again to resume talking to the other party<br />
through h<strong>and</strong>set<br />
• Red light next to Mute goes off <strong>and</strong> the other<br />
party can hear you again<br />
To activate the speaker<br />
while using the h<strong>and</strong>set<br />
1 Press Speaker<br />
• Red light next to Speaker <strong>and</strong> the red light next<br />
to Mute go on steadily<br />
• The speaker is active, <strong>and</strong> the h<strong>and</strong>set is turned<br />
off<br />
To end a call (while<br />
h<strong>and</strong>set is on-hook<br />
<strong>and</strong> only the speaker is<br />
active)<br />
1 Press Speaker<br />
• Red light next to Speaker <strong>and</strong> the red light next<br />
to Mute go off<br />
Speakerphone<br />
Note: If you are uncertain whether your voice terminal is set for the Speaker<br />
(listen-only) feature or the Speakerphone (listen <strong>and</strong> talk) feature, check with your<br />
system manager.<br />
Use the following procedures if your voice terminal is set for the Speakerphone<br />
(speak <strong>and</strong> listen) feature.<br />
If the Reset Spkr label appears under the Speaker button on your 8434DX voice<br />
terminal, you can use the Reset Speakerphone feature. For directions on using the<br />
Reset Speakerphone feature, see “Reset Speakerphone” in this section.<br />
To place/answer a call<br />
without lifting the<br />
h<strong>and</strong>set, or to use the<br />
speakerphone with<br />
any feature<br />
1 Press Speaker<br />
• Red light next to Speaker goes on steadily<br />
2 Place or answer a call, or access the selected feature<br />
3 Adjust speakerphone volume if necessary<br />
• To raise the volume, press the right half of the<br />
Volume control button labeled ;<br />
to lower the volume, press the left half of the<br />
Volume control button labeled<br />
36
• The display shows:<br />
SPEAKER L > > > ><br />
H<br />
(There are eight possible volume settings. On the<br />
display, one arrow is the lowest setting, <strong>and</strong><br />
eight arrows is the highest setting.)<br />
Note: The Volume control does not affect an external<br />
speakerphone attached to your voice terminal.<br />
To prevent the other<br />
party from<br />
hearing you<br />
Note: If the Speakerphone feature is not active, the<br />
Mute feature turns off the microphone associated with<br />
the h<strong>and</strong>set (not the speakerphone). However, if the<br />
speakerphone is active <strong>and</strong> the h<strong>and</strong>set is not active,<br />
then the Mute feature turns off the microphone<br />
associated with the speakerphone (not the h<strong>and</strong>set).<br />
1 Press Mute<br />
• Red light next to Mute goes on <strong>and</strong> the other party<br />
cannot hear you<br />
2 Press Mute again to resume talking to the other party<br />
• Red light next to Mute goes off <strong>and</strong> the other party<br />
can hear you again<br />
To change from the<br />
speakerphone to the<br />
h<strong>and</strong>set<br />
1 Pick up the h<strong>and</strong>set <strong>and</strong> talk<br />
• Red light goes off next to Speaker<br />
To change from the<br />
h<strong>and</strong>set to the<br />
speakerphone<br />
1 Press Speaker<br />
• Red light goes on next to<br />
2 Hang up the h<strong>and</strong>set<br />
Speaker<br />
To end a call 1 Press Speaker again to hang up<br />
• Red light next to Speaker goes off<br />
37
Test<br />
✔<br />
To test the lights <strong>and</strong> the<br />
display on your voice<br />
terminal<br />
1 While on-hook or off-hook, press <strong>and</strong> hold Test<br />
• Green light next to Test goes on<br />
Note: If the green light next to Test flashes<br />
rather than goes on steadily, it means the voice<br />
terminal is not communicating with the<br />
<strong>DEFINITY</strong> switch or with <strong>System</strong> <strong>85</strong>. In such a<br />
case, see your system manager.<br />
• The button lights go on steadily in four groups,<br />
<strong>and</strong> the display fills in all the segments<br />
2 To end test, release Test<br />
• Lights return to pretest state; green light next to<br />
Test goes off<br />
Note: If the display or the lights do not respond<br />
during test, notify your system manager.<br />
Transfer<br />
✔<br />
To send the present call to<br />
another extension or<br />
outside number<br />
1 Press Transfer<br />
[dial tone]<br />
• Present call is put on hold <strong>and</strong> the green light<br />
next to the held call flutters<br />
• You are given a new call appearance<br />
2 Dial the extension or number to which the call is to be<br />
transferred<br />
[ringback tone]<br />
• Remain on line <strong>and</strong> announce call if desired; if no<br />
answer or number dialed is busy, return to held<br />
call by pressing its call appearance<br />
3 Press Transfer again<br />
• Call is sent to dialed extension or number<br />
Note: Only calls from another extension can be sent<br />
to an outside number; you cannot transfer a call<br />
from an outside number to another outside number.<br />
4 Hang up or press Drop<br />
38
Display Feature Procedures<br />
This section includes the procedures for seven display features you may use with the<br />
8434DX voice terminal. However, note that the display, along with the softkeys <strong>and</strong><br />
display control buttons, can also be used for accessing up to 15 softkey features. For<br />
procedures on using the display <strong>and</strong> softkeys <strong>and</strong> a list of the features that can be<br />
accessed with the softkeys, see “Using the Display, Softkeys, <strong>and</strong> Display Control<br />
Buttons” earlier in this guide.<br />
Call Information<br />
You may have as many as 34 call appearance buttons. The two columns of buttons on<br />
the left (five buttons in each column) are labeled a through e <strong>and</strong> f through j. (The<br />
24 buttons on the right are NOT labeled.) When the display shows a= it<br />
represents call information for the first call appearance button. The next button<br />
down would be shown as b= , <strong>and</strong> so on, continuing through j= if all 10<br />
of the buttons are used for call appearances.<br />
When you dial an extension, that number is shown then replaced by the called<br />
party’s name <strong>and</strong> extension.<br />
When a call is received from another extension, the caller’s name is shown; when a<br />
call is received from outside, “OUTSIDE CALL” or a trunk identifier is shown.<br />
The display remains in Normal Mode until you activate one of the other display or<br />
softkey features. After using any of these features, return to Normal Mode by<br />
pressing Exit .<br />
Exit (Normal)<br />
✔<br />
To return to normal<br />
display after using any<br />
display feature<br />
1 Press Exit<br />
• Display will show call information for the active<br />
call appearance<br />
39
Inspect<br />
To see who’s calling (if you<br />
are already on a call)<br />
1 Press Inspect<br />
• Name <strong>and</strong> number of the caller are shown if from<br />
an extension; “OUTSIDE CALL” or other trunk<br />
source is shown if from outside<br />
2 Press Exit to return to display for the present call<br />
To see who’s on hold while<br />
on a call<br />
1 Press Inspect<br />
2 Press the call appearance button of the held call<br />
• Information is shown on display screen;<br />
you remain connected to the present call<br />
3 To return to the held call, press Exit <strong>and</strong> the call<br />
appearance button of the held call<br />
Message Retrieval<br />
the a<br />
To see your messages<br />
when your Message light<br />
is on (while on-hook,<br />
off-hook, or on a call)<br />
1 Press Message Retrieve<br />
2 Press Next Message to see the first message<br />
(<strong>and</strong> then for each following message)<br />
To return a call to the<br />
message sender<br />
1 Pick up the h<strong>and</strong>set or activate the speakerphone<br />
[dial tone]<br />
2 Press Return Call while any part of the message is<br />
shown<br />
To erase a message Press Delete while any part of the message is shown<br />
40
To see a coworker’s<br />
messages (can be during<br />
call with the coworker)<br />
Note: You must first<br />
be designated as a<br />
systemwide message<br />
retriever by your<br />
system manager.<br />
1 Select an idle call appearance button, or put the<br />
coworker on hold <strong>and</strong> select an idle call appearance<br />
button<br />
[dial tone]<br />
2 Press Covr Msg Retrieve<br />
3 Dial the coworker’s extension<br />
4 Press Next Message to see the first message<br />
(<strong>and</strong> then for each following message)<br />
5 Press the call appearance button of the person on hold<br />
to give them their messages, if appropriate<br />
To return a call for the<br />
coworker to the displayed<br />
extension (while on call<br />
with the coworker)<br />
1 Press Transfer<br />
• Coworker is put on hold<br />
2 Press Call Disp while any part of the message is<br />
shown<br />
3 Press Transfer<br />
• Coworker is connected to the call<br />
Normal (Exit)<br />
✔<br />
To return to the normal<br />
display after using any<br />
display feature<br />
1 Press Exit<br />
• Display will show call information for the active<br />
call appearance<br />
Time/Date<br />
To see the date <strong>and</strong> time 1 Press Menu <strong>and</strong> then press the softkey below<br />
TmDay<br />
or Press Date/Time<br />
• Display returns to Normal Mode after a few<br />
seconds<br />
41
Timer<br />
To see elapsed time<br />
(hours, minutes, seconds)<br />
1 Press Menu <strong>and</strong> then press the softkey below<br />
Timer<br />
or Press Timer<br />
• Elapsed time is shown<br />
2 To stop timer <strong>and</strong> clear display, press Menu <strong>and</strong><br />
then press the softkey below Timer again<br />
or Press Timer again<br />
• Elapsed time is displayed on the screen for about<br />
four seconds <strong>and</strong> then disappears<br />
42
Tones <strong>and</strong> Their Meaning<br />
Ringing tones are produced by an incoming call. Feedback tones are those which<br />
you hear through the h<strong>and</strong>set (receiver) or the speaker.<br />
Ringing Tones<br />
• 1 ring — A call from another extension.<br />
• 2 rings — A call from outside or from the attendant.<br />
• 3 rings — A priority call from another extension, or from an Automatic Callback<br />
call you placed.<br />
• ring-ping (half ring) — A call redirected from your voice terminal to another<br />
because Send All Calls or Call Forwarding All Calls is active.<br />
Feedback Tones<br />
• busy tone — A low-pitched tone repeated 60 times a minute; indicates the<br />
number dialed is in use.<br />
• call waiting — One, two, or three beeps of high-pitched tone, not repeated;<br />
indicates an incoming call is waiting to be answered. Number of beeps designates<br />
the source: one for an internal call, two for an outside or attendant call, three for a<br />
priority call.<br />
• call waiting ringback tone — A ringback tone with a lower-pitched signal at<br />
the end; indicates the extension called is busy, <strong>and</strong> the called party has been given<br />
a call waiting tone.<br />
• confirmation tone — Three short bursts of tone; indicates a feature activation<br />
or cancellation has been accepted. When you have finished selecting a ringing<br />
pattern for your voice terminal, you hear two rising tones.<br />
• coverage tone — One short burst of tone; indicates your call will be sent to<br />
another extension to be answered by a covering user.<br />
• dial tone — A continuous tone; indicates dialing can begin.<br />
• intercept/time-out tone — An alternating high <strong>and</strong> low tone; indicates a dialing<br />
error, a denial of the service requested, or a failure to dial within a preset interval<br />
(usually 10 seconds) after lifting the h<strong>and</strong>set or dialing the previous digit.<br />
• local error tone — A steady low tone; indicates an incorrect button press.<br />
• recall dial tone — Three short bursts of tone followed by a steady dial tone;<br />
indicates the feature request has been accepted <strong>and</strong> dialing can begin.<br />
• recorder tone — A fast busy tone repeated 120 times a minute; indicates all<br />
trunks are busy.<br />
• ringback tone — A low-pitched tone repeated 15 times a minute; indicates the<br />
number dialed is being rung.<br />
• speakerphone reset tones — A rising set of tones; indicates the speakerphone<br />
is adjusting itself to the surrounding room acoustics. Note: Only 8434DX voice<br />
terminals with the Reset Speakerphone feature will play these tones.<br />
43
Troubleshooting<br />
Problem<br />
A feature doesn’t work<br />
as noted in this guide.<br />
There are no feature<br />
access codes written in<br />
the appropriate blanks<br />
in this guide.<br />
Solution<br />
1 Reread the procedure <strong>and</strong> try again.<br />
2 For many features you must lift the h<strong>and</strong>set before<br />
you can use the feature.<br />
3 Check with your system manager to be sure this<br />
feature is administered on your voice terminal.<br />
4 You may have an older version of <strong>System</strong> <strong>85</strong> software<br />
so some features may work differently from the<br />
procedures described in this guide.<br />
See your system manager for a list of feature access<br />
codes for features assigned to your voice terminal.<br />
Then, write the codes in this guide.<br />
Problem<br />
Solution<br />
There’s no dial tone. 1 Check with your system manager to be sure your<br />
voice terminal is administered correctly.<br />
2 Make sure the h<strong>and</strong>set <strong>and</strong> line cords at your voice<br />
terminal are securely connected at both ends.<br />
3 Press Test . If the green light next to Test does not go<br />
on or flashes rather than goes on steadily, the voice<br />
terminal is not communicating with the <strong>DEFINITY</strong><br />
switch or with <strong>System</strong> <strong>85</strong>.<br />
4 Find a working voice terminal of the same type as<br />
your own. Unplug this voice terminal from its modular<br />
wall jack. Plug your voice terminal into that jack <strong>and</strong><br />
check if it gets dial tone.<br />
5 If your voice terminal still does not work, plug the<br />
working voice terminal (of the same type) into your<br />
modular wall jack. If the working voice terminal has<br />
dial tone, your own voice terminal is faulty. See your<br />
system manager.<br />
44
Problem<br />
The telephone doesn’t<br />
ring.<br />
Solution<br />
1 Make sure the ringer is turned on.<br />
2 Set the ringer volume to a higher level.<br />
3 Place a test call from another extension to your<br />
extension.<br />
4 Check the line cord to make certain it is securely<br />
connected at both ends.<br />
5 If there is still a problem, see your system manager.<br />
The lights do not go on<br />
next to the buttons.<br />
1 Press Test to check if the voice terminal lights go on.<br />
2 Check the line cord to make certain it is securely<br />
connected at both ends.<br />
3 If there is still a problem, see your system manager.<br />
45
Key Words to Know<br />
access code See feature access code.<br />
activate To begin or turn on the operation of a feature.<br />
attendant The person who h<strong>and</strong>les incoming <strong>and</strong> outgoing calls at the main console.<br />
AUDIX Audio Information Exchange, an optional voice mail <strong>and</strong> message<br />
service which provides coverage for calls to you by recording callers’ messages <strong>and</strong><br />
reporting Leave Word Calling messages.<br />
call appearance A button used exclusively to place or receive calls. It has an<br />
assigned extension number <strong>and</strong> is equipped with a red light <strong>and</strong> a green status light.<br />
console permission The authorization (from your system manager) to initiate<br />
Call Forwarding All Calls for an extension other than your own.<br />
coverage Automatic redirection of calls from an unanswered voice terminal to<br />
another voice terminal. Redirection could be to the extension of a receptionist,<br />
secretary, coworker, AUDIX, or message center. A person who provides coverage is a<br />
covering user.<br />
<strong>DEFINITY</strong> <strong>Communications</strong> <strong>System</strong> <strong>Generic</strong> 2 The switch to which you may be<br />
connected. (Your voice terminal may be connected to <strong>System</strong> <strong>85</strong> instead.) Both the<br />
<strong>DEFINITY</strong> <strong>Generic</strong> 2 <strong>and</strong> <strong>System</strong> <strong>85</strong> are communications systems which transmit<br />
<strong>and</strong> receive voice <strong>and</strong> data signals for all communications equipment in your<br />
network.<br />
dial pad The 12 pushbuttons you use to dial a number <strong>and</strong> access features.<br />
display <strong>and</strong> softkey features Those features accessed with one of the five arrowed<br />
softkeys ( ) <strong>and</strong> one of the four display control buttons.<br />
display control buttons These buttons are labeled Menu , Exit , Prev ,<br />
<strong>and</strong> Next . Menu is used to access the first feature option screen. Exit allows<br />
you to exit a display feature <strong>and</strong> return to Normal (call-h<strong>and</strong>ling) Mode. Prev<br />
<strong>and</strong> Next are used to help you go back <strong>and</strong> forth through the feature option<br />
screens.<br />
extension A dialing number of one to five digits assigned to each voice terminal<br />
connected to the <strong>DEFINITY</strong> <strong>Generic</strong> 2 or to a <strong>System</strong> <strong>85</strong>.<br />
feature A special function or service, such as Conference, Hold, Send All Calls, etc.<br />
feature access code A dial code of one, two, or three digits, which you use to<br />
activate or cancel the operation of a feature. Check with your system manager for<br />
the feature access codes for your system.<br />
group list One of the four types of Abbreviated Dialing lists; programmable by the<br />
controller of the list or the system manager. Contains telephone numbers useful to<br />
members of a specific group, <strong>and</strong> stores each of those numbers as a 2-digit list item.<br />
h<strong>and</strong>set The h<strong>and</strong>held part of the voice terminal which you pick up, talk into, <strong>and</strong><br />
listen from. Also known as the receiver.<br />
message retriever A person authorized by the system manager to retrieve<br />
messages for other users.<br />
off-hook When the h<strong>and</strong>set is removed from the cradle (for example, when you lift<br />
the h<strong>and</strong>set to place or answer a call) or when the speakerphone is turned on.<br />
46
on-hook When the h<strong>and</strong>set is left on the cradle <strong>and</strong> the speakerphone is turned off.<br />
party A person who places or answers a call.<br />
personal list One of the four types of Abbreviated Dialing lists; programmable by<br />
the system manager or by you, the user. Contains telephone numbers of your choice,<br />
<strong>and</strong> stores each of them as a single-digit list item.<br />
personal list item One of the 10 available slots on an Abbreviated Dialing personal<br />
list. The first nine personal list items are given digits 1 to 9, with 0 for the tenth<br />
item.<br />
pickup group A group of up to 25 voice terminal users who can answer calls for<br />
each other through the Call Pickup feature. Group members are determined by the<br />
system manager <strong>and</strong> are usually located in the same work area or perform similar<br />
job functions.<br />
priority call An important or urgent call which sends a special 3-burst ring.<br />
program/reprogram To use your dial pad to assign a telephone number to a<br />
personal list item or an AD xxxxx for Abbreviated Dialing.<br />
reset the speakerphone Press Shift <strong>and</strong> then Speaker to perform an acoustic test<br />
of the surrounding environment <strong>and</strong> adjust the speakerphone for optimal<br />
performance. Note: You can use the Reset Speakerphone feature only if the<br />
Reset Spkr label appears under the Speaker button.<br />
retrieve To collect telephone messages with the Message or Voice Message Retrieval<br />
features. (Also, with Call Park, to resume a call from an extension other than the one<br />
where the call was first placed or received.)<br />
ringer The device that produces the electronic ringing sound in your voice terminal.<br />
softkey features Those features accessed with the four arrowed softkeys ( ) <strong>and</strong><br />
the four display control buttons. A person using an 8411D (with display) can access<br />
up to 12 softkey features.<br />
softkeys The four buttons below the display labeled with arrows ( ). These<br />
buttons correspond to words on the display screen. Softkeys can be used along with<br />
display control keys to access up to 12 features. (These features are in addition to<br />
those features assigned to the call appearance/feature buttons on your voice<br />
terminal.)<br />
stored number A telephone number which has been programmed <strong>and</strong> stored as a<br />
1-, 2-, or 3-digit list item for use with Abbreviated Dialing. It can be a complete or<br />
partial telephone number, an extension number, or a feature or trunk code. Once<br />
programmed, a number can be accessed by first dialing the list, then the list item<br />
digit(s) under which it is stored. If the number is stored on an AD xxxxx , the number<br />
can be accessed by simply pressing that button, <strong>and</strong> then dialing the appropriate<br />
entry number.<br />
switch The device that makes connections for all voice <strong>and</strong> data calls for a<br />
network, <strong>and</strong> which contains software for features. Also known as a system or<br />
switching system. Your switch is either a <strong>DEFINITY</strong> <strong>Communications</strong> <strong>System</strong><br />
<strong>Generic</strong> 2 or a <strong>System</strong> <strong>85</strong>.<br />
system list One of the four types of Abbreviated Dialing lists; programmable only<br />
by the system manager. Contains telephone numbers helpful to all system users, <strong>and</strong><br />
stores each of those numbers as a 2-digit list item.<br />
system manager The person responsible for specifying <strong>and</strong> managing the operation<br />
of features for all the voice <strong>and</strong> data equipment in your network.<br />
47
<strong>System</strong> <strong>85</strong> The switch to which you may be connected. (Your voice terminal may be<br />
connected to the <strong>DEFINITY</strong> <strong>Communications</strong> <strong>System</strong> <strong>Generic</strong> 2 instead.) Both<br />
<strong>System</strong> <strong>85</strong> <strong>and</strong> <strong>DEFINITY</strong> <strong>Generic</strong> 2 are communications systems which transmit<br />
<strong>and</strong> receive voice <strong>and</strong> data signals for all communications equipment in your<br />
network.<br />
trunk A telecommunications channel between your switch <strong>and</strong> the public network.<br />
Trunks of the same kind connecting to the same end points are assigned to the same<br />
trunk group.<br />
trunk code A dial code of one, two, or three digits which you dial to access a trunk<br />
group to place an outside call.<br />
voice terminal A telephone equipped with an array of specifically designed features<br />
(for example, the Conference or Hold button, Message light, etc.) <strong>and</strong> functional<br />
capabilities that distinguish it from a conventional telephone.<br />
48
Contents<br />
Your 8434DX Voice Terminal. . . . . . . . . . . . . . . . . . . . . . . . . . . . . . . . . . . . . . . . . . . . . . . 1<br />
A Quick Look at the Features . . . . . . . . . . . . . . . . . . . . . . . . . . . . . . . . . . . . . . . . . . . . . . . 6<br />
Voice Features. . . . . . . . . . . . . . . . . . . . . . . . . . . . . . . . . . . . . . . . . . . . . . . . . . . . . . 6<br />
Display Features <strong>and</strong> Features Used with the Softkeys . . . . . . . . . . . . . . . . . . . . . . 9<br />
How to Use the Features . . . . . . . . . . . . . . . . . . . . . . . . . . . . . . . . . . . . . . . . . . . . . . . . .10<br />
General Instructions. . . . . . . . . . . . . . . . . . . . . . . . . . . . . . . . . . . . . . . . . . . . . . . . .10<br />
Conventions Used in The Following Procedures . . . . . . . . . . . . . . . . . . . . . . . . . . 11<br />
Troubleshooting (Later in This Guide) . . . . . . . . . . . . . . . . . . . . . . . . . . . . . . . . . . . 11<br />
Quick Reference Lists (At the Back of This Guide) . . . . . . . . . . . . . . . . . . . . . . . . . 11<br />
Using the Display, Softkeys <strong>and</strong> Display Control Buttons . . . . . . . . . . . . . . . . . . . . . . . .12<br />
Entering Softkey Mode <strong>and</strong> Viewing the Three Feature Option Screens . . . . . . . .12<br />
Using the Softkeys to Activate a Feature. . . . . . . . . . . . . . . . . . . . . . . . . . . . . . . . .14<br />
Resetting the Speakerphone with the Softkeys<br />
(When Powering Up the Voice Terminal) . . . . . . . . . . . . . . . . . . . . . . . . . . . . . . .15<br />
Voice Feature Procedures . . . . . . . . . . . . . . . . . . . . . . . . . . . . . . . . . . . . . . . . . . . . . . . .16<br />
Abbreviated Dialing (AD) . . . . . . . . . . . . . . . . . . . . . . . . . . . . . . . . . . . . . . .16<br />
Automatic Callback . . . . . . . . . . . . . . . . . . . . . . . . . . . . . . . . . . . . . . . . . . . .19<br />
Bridging/Manual Exclusion. . . . . . . . . . . . . . . . . . . . . . . . . . . . . . . . . . . . . .20<br />
Call Coverage/Consult . . . . . . . . . . . . . . . . . . . . . . . . . . . . . . . . . . . . . . . . . .20<br />
Call Forwarding — Busy/Don’t Answer . . . . . . . . . . . . . . . . . . . . . . . . . . . .21<br />
Call Forwarding — Follow Me . . . . . . . . . . . . . . . . . . . . . . . . . . . . . . . . . . .22<br />
Call Park . . . . . . . . . . . . . . . . . . . . . . . . . . . . . . . . . . . . . . . . . . . . . . . . . . . .23<br />
Call Pickup. . . . . . . . . . . . . . . . . . . . . . . . . . . . . . . . . . . . . . . . . . . . . . . . . . .24<br />
Conference . . . . . . . . . . . . . . . . . . . . . . . . . . . . . . . . . . . . . . . . . . . . . . . . . . .25<br />
Drop . . . . . . . . . . . . . . . . . . . . . . . . . . . . . . . . . . . . . . . . . . . . . . . . . . . . . . . .25<br />
H<strong>and</strong>set Volume . . . . . . . . . . . . . . . . . . . . . . . . . . . . . . . . . . . . . . . . . . . . . .26<br />
Hold . . . . . . . . . . . . . . . . . . . . . . . . . . . . . . . . . . . . . . . . . . . . . . . . . . . . . . . .26<br />
Intercom (Automatic/Dial) . . . . . . . . . . . . . . . . . . . . . . . . . . . . . . . . . . . . . .27<br />
Last Number Dialed . . . . . . . . . . . . . . . . . . . . . . . . . . . . . . . . . . . . . . . . . . .28<br />
Leave Word Calling (LWC) . . . . . . . . . . . . . . . . . . . . . . . . . . . . . . . . . . . . . . 28<br />
Message . . . . . . . . . . . . . . . . . . . . . . . . . . . . . . . . . . . . . . . . . . . . . . . . . . . . .30<br />
Mute . . . . . . . . . . . . . . . . . . . . . . . . . . . . . . . . . . . . . . . . . . . . . . . . . . . . . . . .30<br />
Priority Calling . . . . . . . . . . . . . . . . . . . . . . . . . . . . . . . . . . . . . . . . . . . . . . . 31<br />
Reset Speakerphone . . . . . . . . . . . . . . . . . . . . . . . . . . . . . . . . . . . . . . . . . . .31<br />
Select Ring (<strong>and</strong> Ringer Volume) . . . . . . . . . . . . . . . . . . . . . . . . . . . . . . . . .33<br />
Send All Calls. . . . . . . . . . . . . . . . . . . . . . . . . . . . . . . . . . . . . . . . . . . . . . . . .35<br />
Speaker. . . . . . . . . . . . . . . . . . . . . . . . . . . . . . . . . . . . . . . . . . . . . . . . . . . . . .36<br />
Speakerphone. . . . . . . . . . . . . . . . . . . . . . . . . . . . . . . . . . . . . . . . . . . . . . . . .37<br />
Test . . . . . . . . . . . . . . . . . . . . . . . . . . . . . . . . . . . . . . . . . . . . . . . . . . . . . . . . .39<br />
Transfer . . . . . . . . . . . . . . . . . . . . . . . . . . . . . . . . . . . . . . . . . . . . . . . . . . . . .39<br />
i
Display Feature Procedures . . . . . . . . . . . . . . . . . . . . . . . . . . . . . . . . . . . . . . . . . . . . . . .40<br />
Call Information . . . . . . . . . . . . . . . . . . . . . . . . . . . . . . . . . . . . . . . . . . . . . . . . . . . .40<br />
Exit (Normal) . . . . . . . . . . . . . . . . . . . . . . . . . . . . . . . . . . . . . . . . . . . . . . . . .40<br />
Inspect . . . . . . . . . . . . . . . . . . . . . . . . . . . . . . . . . . . . . . . . . . . . . . . . . . . . . .41<br />
Message Retrieval . . . . . . . . . . . . . . . . . . . . . . . . . . . . . . . . . . . . . . . . . . . . .41<br />
Normal (Exit) . . . . . . . . . . . . . . . . . . . . . . . . . . . . . . . . . . . . . . . . . . . . . . . . .43<br />
Time/Date. . . . . . . . . . . . . . . . . . . . . . . . . . . . . . . . . . . . . . . . . . . . . . . . . . . .43<br />
Timer . . . . . . . . . . . . . . . . . . . . . . . . . . . . . . . . . . . . . . . . . . . . . . . . . . . . . . .43<br />
Tones <strong>and</strong> Their Meaning. . . . . . . . . . . . . . . . . . . . . . . . . . . . . . . . . . . . . . . . . . . . . . . . .44<br />
Ringing Tones . . . . . . . . . . . . . . . . . . . . . . . . . . . . . . . . . . . . . . . . . . . . . . . . . . . . .44<br />
Feedback Tones . . . . . . . . . . . . . . . . . . . . . . . . . . . . . . . . . . . . . . . . . . . . . . . . . . .44<br />
Troubleshooting . . . . . . . . . . . . . . . . . . . . . . . . . . . . . . . . . . . . . . . . . . . . . . . . . . . . . . . .45<br />
Key Words to Know . . . . . . . . . . . . . . . . . . . . . . . . . . . . . . . . . . . . . . . . . . . . . . . . . . . . .47<br />
Quick Reference Lists<br />
ii
Blind Perf<br />
Quick Reference Lists<br />
FEATURE ACCESS CODES<br />
Feature<br />
Code<br />
Feature<br />
Code<br />
ABBREVIATED DIALING<br />
Personal<br />
Group<br />
<strong>System</strong><br />
Program<br />
AUTOMATIC CALLBACK<br />
Cancel<br />
CALL FORWARDING —<br />
BUSY DON’T ANSWER<br />
or CALL FORWARDING —<br />
FOLLOW ME<br />
CALL PARK<br />
Answer Back<br />
CALL PICKUP<br />
LAST NUMBER DIALED<br />
LEAVE WORD CALLING<br />
Cancel<br />
PRIORITY CALLING<br />
SEND ALL CALLS<br />
Cancel<br />
Cancel
Item<br />
No.<br />
1<br />
2<br />
3<br />
4<br />
5<br />
6<br />
7<br />
8<br />
9<br />
0<br />
Abbreviated Dialing*<br />
Personal List 1 Personal List 2 Personal List 3<br />
Name Name Name<br />
Miscellaneous<br />
Description Extension<br />
Message<br />
Attendant<br />
AUDIX<br />
Trunk Codes<br />
Description Code<br />
* You may have as many as 3 personal lists, <strong>and</strong> each list can<br />
have either 5 or 10 items; see your system manager.<br />
Blind Perf