Maintenance and Repair Manual - saf-holland
Maintenance and Repair Manual - saf-holland
Maintenance and Repair Manual - saf-holland

You also want an ePaper? Increase the reach of your titles
YUMPU automatically turns print PDFs into web optimized ePapers that Google loves.
E) Installation instructions<br />
Completely release the wheel brake by turning the adjusting screw<br />
on the slack adjuster until the cam rollers of the brake shoes are in<br />
the end position.<br />
Position a wheel mounting carriage <strong>and</strong> push the complete wheel<br />
hub unit with brake drum onto the stub axle.<br />
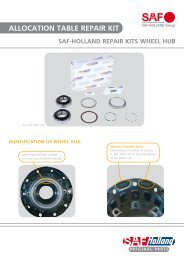
Inspect the O-rings (19) on the axle nut <strong>and</strong> replace, if necessary.<br />
Screw on the axle nut.<br />
Axle nut: W.A.F. 140<br />
On left-h<strong>and</strong> side of vehicle (as seen in direction of forward travel)<br />
– left-h<strong>and</strong> thread<br />
Identification of axle nut with left-h<strong>and</strong> thread: Milled groove on<br />
outside of hexagonal head.<br />
Tighten the axle nut.<br />
Axle nut wrench: SAF Part No. 1 012 0024 00<br />
Tightening torque 900 Nm. Each hub unit must<br />
be rotated smoothly at least twice while tightening the bolts.<br />
Special locking of the axle nut is not necessary.<br />
Completely coat the ABS sensor with copper paste <strong>and</strong> install in the<br />
sensor holder.<br />
Inspect the O-ring (39) on the wheel hub for the snap fastening of<br />
the hub cap; replace, if necessary. Push on the hub cap <strong>and</strong> check<br />
that it is securely seated.<br />
Remove the plug from the hub cap <strong>and</strong> adjust the ABS sensor until<br />
it is just contacting the exciter ring.<br />
Insert the plug into the hub cap again.<br />
Measure the voltage output on the ABS sensor cable using a<br />
voltmeter (approx. 100 mV) whilst turning the brake drum.<br />
Check the sensor, if necessary.<br />
Check that the cover plate of the brake shoes is correctly installed<br />
<strong>and</strong> correct the positioning, if necessary, using a clamp.<br />
25