Maintenance and Repair Manual - saf-holland
Maintenance and Repair Manual - saf-holland
Maintenance and Repair Manual - saf-holland

Create successful ePaper yourself
Turn your PDF publications into a flip-book with our unique Google optimized e-Paper software.
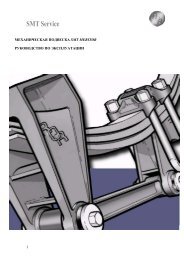
E) Installation instructions<br />
Ensure that the seal ring is installed correctly; the sealing lip must<br />
face outwards.<br />
Replace the complete plastic bearing bush of the camshaft on the<br />
slack adjuster end.<br />
Coat the inner surfaces of the plastic <strong>and</strong> brass bush all round with<br />
lubricating grease.<br />
Suitable greases, see chapter “<strong>Maintenance</strong> instructions”.<br />
Replace the O-rings on the<br />
camshaft.<br />
Coat both bearing points on<br />
the camshaft with lubricating<br />
grease.<br />
Push washer <strong>and</strong> new sealing<br />
sleeve onto the camshaft.<br />
Insert the camshaft into the<br />
bearings <strong>and</strong> secure in position<br />
with the circlip.<br />
Align the plastic bearing bush in the ball mounting plate with the<br />
camshaft, tighten the retaining screws <strong>and</strong> check that the camshaft<br />
turns freely.<br />
If necessary, correct the alignment of the plastic bearing bush with<br />
the camshaft.<br />
Push both sealing sleeves onto the camshaft until they contact the<br />
plastic bearing bush.<br />
Coat the splines of the slack adjuster <strong>and</strong> of the camshaft with<br />
ubricating grease.<br />
19