You also want an ePaper? Increase the reach of your titles
YUMPU automatically turns print PDFs into web optimized ePapers that Google loves.
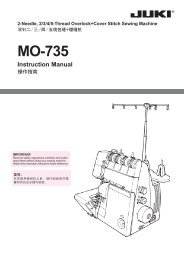
2 - 19 Hooking Fork Position of Needle Threader<br />
Checking:<br />
1. Check and see if #14 needle is used and it is not bent.<br />
2. Set machine for Straight Stitch at center needle<br />
position.<br />
3. Raise the needle to its highest position by rotating<br />
the hand wheel towards you.<br />
4. Lowering needle hole threader lever, check and<br />
see if hook (1) inserts into needle hole.<br />
( 3 )<br />
SECTION 2 - 19<br />
PAGE 1<br />
( 1 )<br />
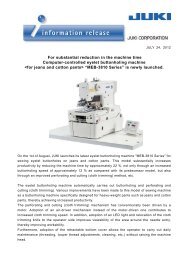
Adjustment when hook (1) is deviated horizontally or bent vertically:<br />
Correct the condition using small screw driver as illustrated.<br />
<br />
<br />
Deviated horizontally<br />
Bent vertically<br />
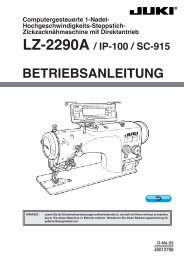
Adjustment when hook (1) is deviated vertically:<br />
1. Remove face cover.<br />
2. Turning hand wheel by hand, bring needle bar to its highest<br />
position.<br />
3. Lower needle hole threader lever (3).<br />
4. Pushing needle hole threader lever (3) away from you,<br />
insert hook (1) into needle hole, and keep it.<br />
5. Loosen stopper screw (4).<br />
6. Holding threader stopper (4) onto stopper pin (8), tighten stopper screw (5).<br />
Make sure to align the screw (5) with the screw (7) on needle bar clamp (6)<br />
Center<br />
( 8 )<br />
( 4 )<br />
( 5 )<br />
( 6 )<br />
( 7 )