Users Manual WP 900 UHF.pdf - Jotron
Users Manual WP 900 UHF.pdf - Jotron
Users Manual WP 900 UHF.pdf - Jotron

Create successful ePaper yourself
Turn your PDF publications into a flip-book with our unique Google optimized e-Paper software.
Installation Guide<br />
PBX Interface T942PX<br />
TD 91012GB<br />
Handook page<br />
51/128<br />
SWO1<br />
J03<br />
SW02<br />
S03<br />
1<br />
6<br />
S09<br />
S10<br />
J01<br />
S06<br />
S01 S02<br />
ICO1<br />
IC16<br />
J04A<br />
J04B<br />
S04<br />
S05<br />
S14<br />
J02<br />
J07 J06<br />
1 2 1 2<br />
S11<br />
ICO5<br />
IC02<br />
S12 S16<br />
S18 S17<br />
S13<br />
S19<br />
S15<br />
S07 S08<br />
LEDO2<br />
LEDO7<br />
3<br />
S20<br />
1<br />
J08<br />
J09<br />
1 J05<br />
12<br />
1<br />
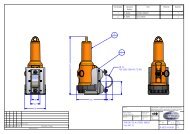
3. Screw Connectors etc. for Installation<br />
J01, J02: Modular bus cabling for connection of<br />
data buses.<br />
J03: Supply voltage. Also used for connection<br />
of A, B, C, or D bus when modular bus<br />
cabling is not used.<br />
J04A, J04B: For T941SM speech module.<br />
J05: For audio lines, E-line, M-line, and if<br />
needed external power.<br />
J06: Power supply for ring signals, if used.<br />
J07: For parallel connected telephone.<br />
J08: For remote pagings.<br />
J09: For voice module T941VM.<br />
S01: Jumper points that must be soldered<br />
together when PBX A345 with circuit<br />
board TPC70 is used.<br />
S02: Jumper points that must be soldered<br />
together when T942PX is to detect<br />
pulses and external 48 V.<br />
S03: Not used.<br />
S04, S05: Jumpers, for selection of A or B bus.<br />
S06: Jumper, used to select trunk or<br />
extension line.<br />
S07, S08: Jumpers, drilled if ring signals are used.<br />
S09, S10: Jumpers for adapting to different supply<br />
voltages.<br />
S11, S12, Jumpers for selection of 2-wire and<br />
S13, S14: 4-wire speech/audio line connections.<br />
S15, S16, S17: Jumpers for decadic pulsing.<br />
S18, S19: Jumpers for impedance matching.<br />
S20: Jumper points that must be soldered<br />
together to enable use of software<br />
program S941PX. See point 12.<br />
LED01: Function indicator.<br />
LED02: Dial tone indicator.<br />
LED03: Indicates that a parallel connected telephone<br />
connected to T942PX, is in use.<br />
LED04: Indicates received ring signal/impulse.<br />
LED05: Indicates that relay for E-signal/decadic<br />
pulsing is actuated.<br />
LED06: Indicates that line relay is actuated.<br />
LED07: Indicates that dial tone is being sent out.<br />
SW01: Address switch.<br />
SW02: Switch, section 1 selects trunk or extension<br />
line. Section 2 must be set to OFF.<br />
IC05: FLASH PROM<br />
1<br />
4. Installation Together With Other <strong>900</strong><br />
Units<br />
1. Remove upper and lower covers. The lower<br />
rectangular pieces are used to fasten units to<br />
each other (1).<br />
2. Fasten the unit with three screws, see the<br />
illustration on page 1.<br />
2 1996 11 06