Users Manual WP 900 UHF.pdf - Jotron
Users Manual WP 900 UHF.pdf - Jotron
Users Manual WP 900 UHF.pdf - Jotron

Create successful ePaper yourself
Turn your PDF publications into a flip-book with our unique Google optimized e-Paper software.
Installation Guide<br />
Alarm Module T941AM8<br />
TD 90858GB<br />
Handook page<br />
45/128<br />
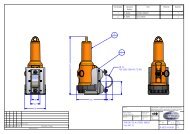
3. Screw Connectors etc. for Installation<br />
SWO1<br />
SW02<br />
LEDO1<br />
LEDO2<br />
J01, J02: Modular bus cabling for connection of<br />
A, B, D, and SP bus.<br />
J03: Supply voltage and connection of A or B bus.<br />
J04: System fault. (Not used in CTS <strong>900</strong>.)<br />
S04<br />
ICO1<br />
J05: External acknowledgement input.<br />
(Not used in CTS <strong>900</strong>.)<br />
S05<br />
ICO2<br />
J06: Connector for speech module 941SM.<br />
(Not used in CTS <strong>900</strong>.)<br />
J07: Alarm inputs 1–4.<br />
S14<br />
S03<br />
J08: Alarm inputs 5–8.<br />
IC03<br />
J09: Supply voltage for alarm inputs and external<br />
acknowledgement input. For galvanic isolation<br />
an external power supply is required<br />
(always used in CTS <strong>900</strong>).<br />
J04<br />
1<br />
6<br />
1 J06 8<br />
LED10<br />
RE01<br />
LED03<br />
S13<br />
S06<br />
J05<br />
4<br />
1<br />
8<br />
S01, S02: Jumpers for selection of A or B bus.<br />
(Not used in CTS <strong>900</strong>.)<br />
S03: Not used.<br />
S04, S05, Jumper points that must be soldered together<br />
S10: to enable use of software program S940AM.<br />
See point 12.<br />
S06-S13:<br />
Jumpers for selecting type of alarm inputs, i.e.<br />
make/break or ring signal, or for external<br />
power supply (e.g. nurse call).<br />
SW01:<br />
Address selector switch.<br />
J01<br />
S01 S02<br />
J02<br />
1<br />
J08<br />
SW02:<br />
Switch, must always be set to OFF.<br />
SW02:1 is used for test<br />
SW02:2 is used to generate test pagings.<br />
1<br />
J03<br />
6<br />
J09<br />
1<br />
2<br />
1 J07 8<br />
LED01<br />
Function indicator for green, red, or orange<br />
indication<br />
LED02:<br />
Sum alarm indicator<br />
PC board<br />
LED03– Indicators for alarm inputs 1–8<br />
LED10:<br />
IC02:<br />
Flash PROM, program memory<br />
1<br />
4. Installation Together With Other <strong>900</strong> Units<br />
1. Remove upper and lower covers. The lower<br />
rectangular pieces are used to fasten units to<br />
each other (1).<br />
1<br />
2. Fasten the unit with three screws, see the<br />
illustration on page 1.<br />
2 1995 08 31