Users Manual WP 900 UHF.pdf - Jotron
Users Manual WP 900 UHF.pdf - Jotron
Users Manual WP 900 UHF.pdf - Jotron

Create successful ePaper yourself
Turn your PDF publications into a flip-book with our unique Google optimized e-Paper software.
Handook page<br />
44/128<br />
Installation Guide<br />
Alarm Module T941AM8<br />
TD 90858GB<br />
Installation Guide - Alarm Module T941AM8<br />
T941AM8 has 8 physical inputs for connection to external alarm devices. Inputs are galvanically isolated, have<br />
transient protection, and can be programmed for making or breaking contacts. There are an additional 56<br />
logical inputs that can only be activated by programmed parameters.<br />
A FLASH PROM in T941AM8 enables remote programming of the program and parameters. T941AM8 is<br />
used in teleCOURIER <strong>900</strong>, telePROTECT <strong>900</strong>, and CTS <strong>900</strong>.<br />
T941AM8 is not intended for connection to public telephone networks.<br />
1. General<br />
As a complement to this installation guide, see also<br />
the “System Installation“ document for the respective<br />
system :<br />
teleCOURIER <strong>900</strong>, doc. no. TD 90227GB,<br />
telePROTECT <strong>900</strong>, doc. no. TD 90678GB, or<br />
CTS <strong>900</strong>, doc. no. TD 90795GB.<br />
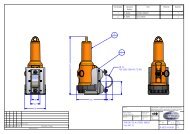
56,5<br />
188,5<br />
Dimensions (H x W x D)<br />
275 x 130 x 60 mm<br />
112<br />
9 9<br />
275<br />
Supply voltage: 12,5 Vdc ± 10%<br />
Current<br />
150 mA max<br />
consumption: + 100 mA max for all inputs.<br />
For selection of input connection<br />
see point 9.<br />
Delivery includes:<br />
• T941AM8<br />
• Modular bus cabling<br />
• If T941AM8 is to be used in a system with speech,<br />
speech module T941SM must be mounted on the<br />
PC board. Installation Guide TD 90648GB for<br />
T941SM should be included in the delivery<br />
Tools etc., required:<br />
• Screw driver<br />
• Screws for installation<br />
• Soldering iron<br />
65<br />
130<br />
Note:<br />
To facilitate service after the unit is installed,<br />
we recommend a free space of about 50 mm<br />
above and 150 mm below the unit.<br />
2<br />
2. Installation<br />
The alarm module should be placed in a dry environment<br />
with a temperature range of 0 to +40ºC.<br />
The alarm module can be connected together with<br />
other units in the <strong>900</strong> system, either via modular<br />
system bus cabling or via twisted-pairs (point 8).<br />
To replace the PC board, see point 14.<br />
The second drawing at left shows dimensions for<br />
installing the alarm module.<br />
1<br />
1<br />
Use a screwdriver or similar to release the cover by<br />
applying a light pressure to the two snap catches (1)<br />
and remove the cover (2).<br />
1995 08 31 1