Create successful ePaper yourself
Turn your PDF publications into a flip-book with our unique Google optimized e-Paper software.
www.jotron.com<br />
4.2 MOUNTING THE FBR-3<br />
Bolt the unit to the vessel using the mounting holes. The Float Free Bracket<br />
FBR-3 must be connected to the fixed installation S-<strong>VDR</strong> installation through<br />
the junction box according to the connection diagram in paragraph 3.1.7.<br />
When the Capsule is mounted in the FBR-3 release mechanism, it operates as<br />
a float free automatic unit.<br />
Therefore it is important that the bracket is mounted in a place where there are<br />
no obstructions that can endanger the automatic release of the beacon.<br />
The location where the bracket is mounted should be as high as possible on the<br />
vessel, protected from environmental conditions such as direct sea spray, chemicals,<br />
oil, exhaust and vibrations. The location must also be easily accessible<br />
for testing and maintenance.<br />
4.3 MOUNTING OF THE <strong>CAPSULE</strong> INTO THE FBR-3<br />
Strain the spring loaded lower arm with the connector at the lower part of the<br />
bracket. Place the higher part of the Capsule into the top grip of the bracket<br />
with the main switch facing out. Then push the Capsule into the bracket and<br />
slowly release the lower arm, checking that the connector pins at the bracket<br />
hits the connector holes at the Capsule. Place the locking bolt into the corresponding<br />
holes in the lower arm, and mount the clamp at the bolt.<br />
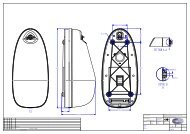
4.4 REPLACEMENT AND MOUNTING OF THE HYDROSTATIC RELEASE<br />
MECHANISM<br />
The Hydrostatic Release Mechanism must be mounted before the Capsule is<br />
placed into the FBR-3 bracket. To replace the Hydrostatic Release Mechanism,<br />
remove the Capsule from the bracket:<br />
1. Remove the clamp on the locking bolt on the spring-loaded lower arm.<br />
2. Remove the locking bolt.<br />
3. Whilst holding the Capsule, strain the spring-loaded lower arm and gently<br />
remove the Capsule from the bracket.<br />
4. Now the H20 unit is accessible. Unscrew the plastic bolt (3) and remove the<br />
unit.<br />
5. Replace the old unit with a new one and tag in expiration date for 2 more<br />
years.<br />
6. Screw the new plastic bolt on. Make sure the distance piece (4,5,6) is in place<br />
on the plastic bolt. Tighten the bolt using hand-force only until rubber<br />
seal (5) starts to compress. Replace the Capsule into the bracket, reversing<br />
paragraph 1, 2 and 3.<br />
82310_UM_S<strong>VDR</strong>_H<br />
29