

Merlin VSR manual
Merlin VSR manual
Merlin VSR manual

You also want an ePaper? Increase the reach of your titles
YUMPU automatically turns print PDFs into web optimized ePapers that Google loves.
SUMMARY:<br />
Thank you for purchasing a <strong>Merlin</strong> M-Power Voltage Sensitive Relay.<br />
Provided it is used and installed properly, it will provide years of dependable<br />
service. Please read this <strong>manual</strong> prior to installation, if in doubt contact<br />
<strong>Merlin</strong> Power Systems on 01202 697979.<br />
We draw your attention to CAUTION and WARNING statements throughout<br />
this <strong>manual</strong>. CAUTION statements relate to practices that could lead<br />
to damage of your electrical system. WARNING statements relate to<br />
practices that could lead to serious injury or death.<br />
CAUTION & WARNING! Read this <strong>manual</strong> before installation. We recommend<br />
that installation is completed by a qualified electrical engineer.<br />
USES:<br />
Your <strong>VSR</strong> can be used in a number of different configurations:<br />
1) As a split charger<br />
2) As a voltage sensitive switch<br />
1) As a Split Charger - The <strong>VSR</strong> is designed to sit between two<br />
batteries. When either is charged (above the Connect Voltage),<br />
the <strong>VSR</strong> will close and allow the other battery to charge. When<br />
charge is removed, voltage will drop to the Disconnect Voltage<br />
and the <strong>VSR</strong> will open. M-Power <strong>VSR</strong>’s are bi-directional - eg<br />
they will connect if either battery is being charged. Any number of<br />
<strong>VSR</strong>’s can be used to provide charging between any number of<br />
battery banks.<br />
2) The <strong>VSR</strong> can be used to switch on an appliance<br />
or load when, and only when the batteries<br />
are being charged. This is useful for items like<br />
onboard radio chargers that you would only<br />
want charged when the engine is running.<br />
LOCATION:<br />
<strong>VSR</strong>’s should be placed conveniently between<br />
battery banks. Keep battery cables as short as<br />
possible and ensure they are appropriately<br />
sized.<br />
<strong>Merlin</strong> Equipment recommends protecting all<br />
battery cables with fuses/circuit breakers.<br />
Your <strong>VSR</strong> can be installed under the hood/bonnet,<br />
engine compartment and on the inside of transoms for RIB’s and other<br />
craft. The <strong>VSR</strong> is designed to be water resistant but should not be fully<br />
or regularly immersed.<br />
BEFORE WORK:<br />
<strong>VSR</strong><br />
Battery<br />
To Load<br />
CAUTION & WARNING: Ensure you observe good electrical practices<br />
of workmanship. Ensure batteries are disconnected before starting work.<br />
Observe battery CAUTION & WARNING notices. Remove all jewellery<br />
and tie long hair back. Ensure that you wear appropriate clothing, personal<br />
safety equipment and use the correct tool for the job in hand.<br />
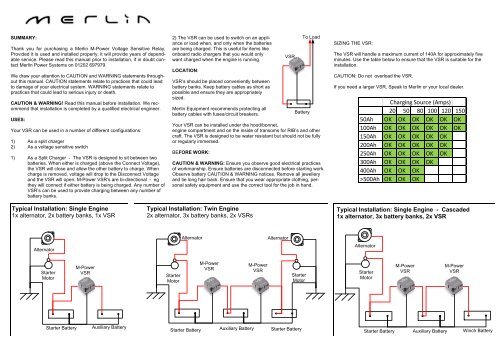
SIZING THE <strong>VSR</strong>:<br />
The <strong>VSR</strong> will handle a maximum current of 140A for approximately five<br />
minutes. Use the table below to ensure that the <strong>VSR</strong> is suitable for the<br />
installation.<br />
CAUTION: Do not overload the <strong>VSR</strong>.<br />
If you need a larger <strong>VSR</strong>, Speak to <strong>Merlin</strong> or your local dealer.<br />
Charging Source (Amps)<br />
20 50 80 100 120 150<br />
50Ah OK OK OK OK OK OK<br />
100Ah OK OK OK OK OK OK<br />
150Ah OK OK OK OK OK<br />
200Ah OK OK OK OK OK<br />
250Ah OK OK OK OK OK<br />
300Ah OK OK OK OK<br />
400Ah OK OK OK<br />
>500Ah OK OK OK<br />
Typical Installation: Single Engine<br />
1x alternator, 2x battery banks, 1x <strong>VSR</strong><br />
Typical Installation: Twin Engine<br />
2x alternator, 3x battery banks, 2x <strong>VSR</strong>s<br />
Typical Installation: Single Engine - Cascaded<br />
1x alternator, 3x battery banks, 2x <strong>VSR</strong><br />
Alternator<br />
Alternator<br />
Alternator<br />
Alternator<br />
Starter<br />
Motor<br />
M-Power<br />
<strong>VSR</strong><br />
Starter<br />
Motor<br />
M-Power<br />
<strong>VSR</strong><br />
M-Power<br />
<strong>VSR</strong><br />
Starter<br />
Motor<br />
Starter<br />
Motor<br />
M-Power<br />
<strong>VSR</strong><br />
M-Power<br />
<strong>VSR</strong><br />
Starter Battery<br />
Auxiliary Battery<br />
Starter Battery Auxiliary Battery Starter Battery<br />
Starter Battery Auxiliary Battery Winch Battery
<strong>VSR</strong> - REAR VIEW<br />
CAUTION: Connect battery connections first. Then connect ground to a<br />
common negative point or either battery negative.<br />
The left hand battery connection is for the battery that receives the Primary<br />
Charge (typically the engine battery). The right hand connection is<br />
for the auxiliary battery.<br />
DO NOT FORGET TO CONNECT THE BLACK GROUND WIRE!<br />
<strong>VSR</strong> - FIRST USE TESTS<br />
Ground Wire<br />
Battery<br />
Connections<br />
LH: Engine<br />
RH: Auxiliary<br />
1. Check the primary (engine) battery voltage using a multi meter.<br />
Note the voltage (typically 12.2-12.8V).<br />
2. Note the second (auxiliary) battery voltage using a multi meter.<br />
Note the voltage (typically 12.2-12.8V)<br />
3. Start the engine (or other charge source). Normally, the engine<br />
battery will replenish very quickly (sometimes in seconds). The<br />
Red “Connected” LED should illuminate on the <strong>VSR</strong>. If the engine<br />
battery is very low, it may take a while for the voltage to reach the<br />
<strong>VSR</strong>’s connect voltage point.<br />
4. Once the red LED is lit, use your multi Meter. Check the voltage<br />
on the second battery. It should be above that noted in Point 2<br />
above.<br />
5. If the <strong>VSR</strong> doesn't connect, check the voltage on the engine battery.<br />
It should be rising above the level you recorded in point 1<br />
above. If it isn't, there is a fault with the alternator/charge source.<br />
If it is above the Connect Voltage of the <strong>VSR</strong> (13.3V), ensure that<br />
the Negative Ground Wire is properly connected.<br />
FREQUENTLY ASKED QUESTIONS:<br />
Q: My <strong>VSR</strong> isn't connecting. What Shall I Check?<br />
A: Verify that the voltage of the charging system is actually rising beyond<br />
the <strong>VSR</strong>’s connect voltage (13.3V). If it is, check that the <strong>VSR</strong>’s<br />
ground cable is properly connected.<br />
Q: The Red Connected LED stays on / The <strong>VSR</strong> isn't disconnecting.<br />
Help!:<br />
A: The <strong>VSR</strong> will disconnect only when the system voltage (the mean<br />
voltage) between the engine and auxiliary battery reach 12.8V. Surface<br />
voltage (also known as phantom voltage) may mean that the voltage the<br />
<strong>VSR</strong> sees is around 13V for up to an hour after charging (prevalent on<br />
brand new and larger batteries). If you place a small load on the auxiliary<br />
battery, the <strong>VSR</strong> should disconnect shortly afterwards. Use a multi<br />
meter to check the voltage (of both batteries) if in doubt.<br />
Q: My <strong>VSR</strong> keeps “clicking”<br />
A: This is a normal function of a <strong>VSR</strong>. When the engine battery starts<br />
charging, voltage will rise. The <strong>VSR</strong> will cut in. If the auxiliary battery is<br />
very low, it will draw the overall system voltage down. The <strong>VSR</strong> will<br />
open again. The engine voltage starts to rise and the <strong>VSR</strong> reconnects<br />
(and continues to cycle on/off). It is quite normal for a few clicks over a 1<br />
-2 minute period (especially if the battery banks are low). If it continues<br />
for a lengthy period either a) the alternator (or other charge source) is<br />
significantly under powered for the battery bank size or b) the auxiliary<br />
battery bank is very large or c) the auxiliary battery is failing. If you are<br />
seeing continual <strong>VSR</strong> cycling (chatter), speak to a <strong>Merlin</strong> Engineer for<br />
help.<br />
Q: My <strong>VSR</strong> gets hot<br />
A: The <strong>VSR</strong> is designed to operate at an elevated temperature of ~50-<br />
60 degrees C. Ensure that the <strong>VSR</strong> has been sized properly according<br />
to the chart overleaf.<br />
For any other questions, please call us, check our website or speak to<br />
your local M-Power dealer.<br />
WARRANTY:<br />
Your <strong>VSR</strong> is warranted for two years from the date of purchase against<br />
defects in workmanship only. Either return your <strong>VSR</strong> to the point of purchase<br />
or log in directly to the <strong>Merlin</strong> Equipment warranty system at<br />
www.merlinequipment.com<br />
Please do not return any item to <strong>Merlin</strong> Equipment with obtaining an RMA<br />
number from our website. No responsibility or liability for goods will be<br />
accepted without an RMA number clearly attached to the returned product.<br />
MERLIN EQUIPMENT LIMITED<br />
UNIT 4, CABOT BUSINESS VILLAGE<br />
HOLYROOD CLOSE<br />
POOLE<br />
DORSET BH17 7BA<br />
T: +44 (0) 1202 697979<br />
F: +44 (0) 1202 691919<br />
www.merlinequipment.com


