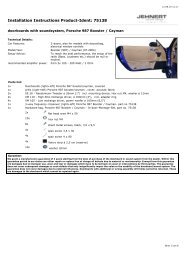
Installation Instructions Product-Ident: 47169 - Jehnert Sound Design
Installation Instructions Product-Ident: 47169 - Jehnert Sound Design
Installation Instructions Product-Ident: 47169 - Jehnert Sound Design

Create successful ePaper yourself
Turn your PDF publications into a flip-book with our unique Google optimized e-Paper software.
30.11.09 09:05<br />
<strong>Installation</strong> <strong>Instructions</strong> <strong>Product</strong>-<strong>Ident</strong>: <strong>47169</strong><br />
11 Insulation of the back side of the door card<br />
In order to avoid vibration noise insulate all cables with insulation tape e.g.<br />
11.1 Insulate the backside of the door card e.g. with self-adhesive vibration suppressing insulation<br />
fleece – see attached installation recommendation.<br />
IMPORTANT:<br />
No insulation material behind loudspeaker, door latch lever and<br />
fastening points of the door card!<br />
Example<br />
12 <strong>Installation</strong> of the door card onto the car doors<br />
12.1 Check up length of the screws and bolts:<br />
In order to prevent damages of mechanic parts of the car doors, please check once again the length of all bolts and screws on the<br />
back side of the door card! No touch with any mechanic parts of the car doors!<br />
(please shorten if necessary)<br />
12.2 Put the door card into the upper sealing of the car door.<br />
12.3 Fit the door card in contrary order of succession.<br />
Final inspection after installation of the door card:<br />
Please check all functions of the operating elements such as seat adjustment, opening of the glove box, window winder<br />
etc.<br />
13 <strong>Installation</strong> of the doorboard grills<br />
13.1 Carefully press grill with Velcro fasteners onto the doorboards:<br />
IMPORTANT: The Velcro fasteners stick very strongly!<br />
Therefore only press the grills to the doorboard at the end of the installation of the doorboard and the soundsystem!<br />
13.2 Further tips see attached installation recommendation.<br />
Seite 10 von 10