

Directions for: Sport Jr., Sport 1 and Sport 3 Car Top Carriers - Jegs
Directions for: Sport Jr., Sport 1 and Sport 3 Car Top Carriers - Jegs
Directions for: Sport Jr., Sport 1 and Sport 3 Car Top Carriers - Jegs

You also want an ePaper? Increase the reach of your titles
YUMPU automatically turns print PDFs into web optimized ePapers that Google loves.
<strong>Directions</strong> <strong>for</strong>: <strong>Sport</strong> <strong>Jr</strong>., <strong>Sport</strong> 1 <strong>and</strong> <strong>Sport</strong> 3 <strong>Car</strong> <strong>Top</strong><br />
<strong>Car</strong>riers<br />
The correct attachment of this product is critical <strong>and</strong><br />
beyond the control of Rightline Gear. The safe use<br />
<strong>and</strong> long life of this product depends entirely on<br />
your good judgment <strong>and</strong> following these directions.<br />
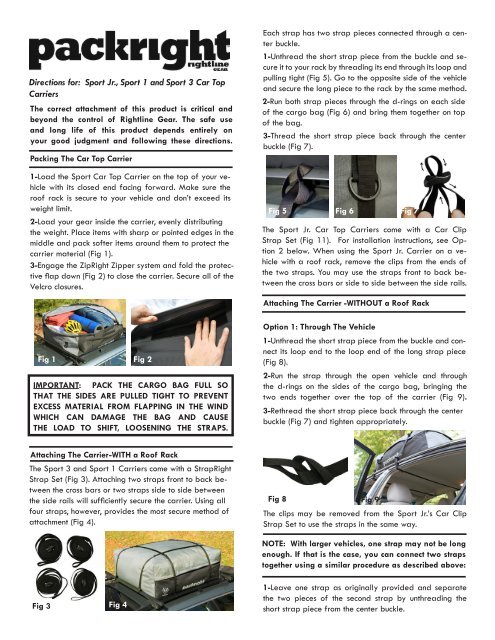
Packing The <strong>Car</strong> <strong>Top</strong> <strong>Car</strong>rier<br />
1-Load the <strong>Sport</strong> <strong>Car</strong> <strong>Top</strong> <strong>Car</strong>rier on the top of your vehicle<br />
with its closed end facing <strong>for</strong>ward. Make sure the<br />
roof rack is secure to your vehicle <strong>and</strong> don’t exceed its<br />
weight limit.<br />
2-Load your gear inside the carrier, evenly distributing<br />
the weight. Place items with sharp or pointed edges in the<br />
middle <strong>and</strong> pack softer items around them to protect the<br />
carrier material (Fig 1).<br />
3-Engage the ZipRight Zipper system <strong>and</strong> fold the protective<br />
flap down (Fig 2) to close the carrier. Secure all of the<br />
Velcro closures.<br />
Fig 1<br />
Fig 2<br />
IMPORTANT: PACK THE CARGO BAG FULL SO<br />
THAT THE SIDES ARE PULLED TIGHT TO PREVENT<br />
EXCESS MATERIAL FROM FLAPPING IN THE WIND<br />
WHICH CAN DAMAGE THE BAG AND CAUSE<br />
THE LOAD TO SHIFT, LOOSENING THE STRAPS.<br />
Each strap has two strap pieces connected through a center<br />
buckle.<br />
1-Unthread the short strap piece from the buckle <strong>and</strong> secure<br />
it to your rack by threading its end through its loop <strong>and</strong><br />
pulling tight (Fig 5). Go to the opposite side of the vehicle<br />
<strong>and</strong> secure the long piece to the rack by the same method.<br />
2-Run both strap pieces through the d-rings on each side<br />
of the cargo bag (Fig 6) <strong>and</strong> bring them together on top<br />
of the bag.<br />
3-Thread the short strap piece back through the center<br />
buckle (Fig 7).<br />
Fig 5 Fig 6<br />
The <strong>Sport</strong> <strong>Jr</strong>. <strong>Car</strong> <strong>Top</strong> <strong>Car</strong>riers come with a <strong>Car</strong> Clip<br />
Strap Set (Fig 11). For installation instructions, see Option<br />
2 below. When using the <strong>Sport</strong> <strong>Jr</strong>. <strong>Car</strong>rier on a vehicle<br />
with a roof rack, remove the clips from the ends of<br />
the two straps. You may use the straps front to back between<br />
the cross bars or side to side between the side rails.<br />
Attaching The <strong>Car</strong>rier -WITHOUT a Roof Rack<br />
Option 1: Through The Vehicle<br />
Fig 7<br />
1-Unthread the short strap piece from the buckle <strong>and</strong> connect<br />
its loop end to the loop end of the long strap piece<br />
(Fig 8).<br />
2-Run the strap through the open vehicle <strong>and</strong> through<br />
the d-rings on the sides of the cargo bag, bringing the<br />
two ends together over the top of the carrier (Fig 9).<br />
3-Rethread the short strap piece back through the center<br />
buckle (Fig 7) <strong>and</strong> tighten appropriately.<br />
Attaching The <strong>Car</strong>rier-WITH a Roof Rack<br />
The <strong>Sport</strong> 3 <strong>and</strong> <strong>Sport</strong> 1 <strong>Car</strong>riers come with a StrapRight<br />
Strap Set (Fig 3). Attaching two straps front to back between<br />
the cross bars or two straps side to side between<br />
the side rails will sufficiently secure the carrier. Using all<br />
four straps, however, provides the most secure method of<br />
attachment (Fig 4).<br />
Fig 8<br />
Fig 9<br />
The clips may be removed from the <strong>Sport</strong> <strong>Jr</strong>.’s <strong>Car</strong> Clip<br />
Strap Set to use the straps in the same way.<br />
Fig 3<br />
Fig 4<br />
NOTE: With larger vehicles, one strap may not be long<br />
enough. If that is the case, you can connect two straps<br />
together using a similar procedure as described above:<br />
1-Leave one strap as originally provided <strong>and</strong> separate<br />
the two pieces of the second strap by unthreading the<br />
short strap piece from the center buckle.
2-Connect the loop end of each of those pieces to each<br />
loop end of the first strap.<br />
3-Run this one double long strap through the vehicle,<br />
through the d-rings <strong>and</strong> over the top of the carrier.<br />
4-Rethread the short strap piece back through the center<br />
buckle (Fig 14)<strong>and</strong> tighten.<br />
Buckle<br />
Double Long Strap<br />
Fig 10<br />
Loop Ends<br />
Fig 11<br />
Tri-glides<br />
Fig 14 Fig 15<br />
Buckle<br />
Option 2: Using The <strong>Car</strong> Clip Strap Set<br />
The <strong>Car</strong> Clip Strap Set (Fig 10) (included with the <strong>Sport</strong> <strong>Jr</strong>.<br />
<strong>Car</strong>rier <strong>and</strong> can be purchased separately) is used to attach<br />
the cargo bag to the vehicle’s door frame. Each <strong>Car</strong><br />
Clip Strap requires a sturdy ledge inside of the car door<br />
opening <strong>for</strong> connection. On most vehicles, the best ledge<br />
can be found under the weather molding around the door<br />
frame (Fig 11 & Fig 12), however, you can use a metal<br />
ledge, a rain gutter, or the outside of the weather molding.<br />
Each strap has two strap pieces connected through a center<br />
buckle.<br />
1-Unthread the short strap piece from the buckle <strong>and</strong><br />
thread both the short <strong>and</strong> long strap pieces through the<br />
d-rings on each side of the cargo bag, bringing the<br />
two ends together over the top of the carrier (Fig 13).<br />
2-Rethread the short strap piece back through the center<br />
buckle (Fig 14).<br />
3-Clip the ends in the open door frame <strong>and</strong> tighten the<br />
strap at the buckle.<br />
4-Shut the door of the vehicle over the clips/straps, securing<br />
them in place (Fig 15).<br />
Fig 13<br />
Fig 12<br />
IMPORTANT: DO NOT ATTACH STRAPS TO THE D-<br />
RINGS AS THEY WILL CAUSE THEM DAMAGE. The<br />
strap tension from one side of the vehicle to the other<br />
over the top of the cargo bag secures the load.<br />
Final Adjustments For All Straps<br />
Fig 16 Fig 17<br />
1-Secure the extra length of each strap in the plastic triglide<br />
so that it doesn’t flap in the wind. (Fig 16)<br />
2-Always check straps be<strong>for</strong>e driving <strong>and</strong> tie off any excess<br />
length (Fig 17). If the straps are too long, cut off the<br />
extra length <strong>and</strong> melt the cut end to prevent fraying.<br />
3-Position the straps at least 20” apart on each side of<br />
the vehicle (Fig 18).<br />
Visit: www.rightlinegear.com<br />
LIMITED WARRANTY<br />
Fig 18<br />
Rightline Gear warrants that <strong>for</strong> one (1) year, from the<br />
date of purchase that all PackRight <strong>and</strong> CampRight<br />
products will be free of material defect <strong>and</strong> Rightline<br />
Gear will repair or replace any defective or damaged<br />
product free of charge if it is returned in original condition<br />
by the consumer to Rightline Gear or the place<br />
of purchase. Claims of defective material <strong>and</strong>/or<br />
workmanship must be made in a timely manner. Safe<br />
<strong>and</strong> maintenance-free use of this product depends<br />
upon the consumer’s or user’s proper installation of the<br />
product <strong>and</strong> good judgment in its use. Rightline Gear<br />
is not responsible <strong>for</strong> the consumer’s or user’s use or<br />
misuse of this product. Damage to Purchaser’s vehicle<br />
or any other vehicle caused by Purchaser’s improper<br />
use of this product may cause serious injury or death.<br />
The Purchaser acknowledges that Rightline Gear has<br />
no control over the attachment of its products to vehicles<br />
or the attachment of items to the Rightline Gear<br />
products. Accordingly, Rightline Gear cannot assume<br />
responsibility <strong>for</strong> any damage to any property arising<br />
out of the improper attachment or use of its products.<br />
RIGHTLINE GEAR SPECIFICALLY DISCLAIMS ANY AND<br />
ALL OTHER WARRANTIES WHETHER EXPRESS OR IM-<br />
PLIED, INCLUDING BUT NOT LIMITED TO WARRANTY<br />
OF MERCHANTABILITY AND WARRANTY OF FITNESS<br />
FOR A PARTICULAR PURPOSE. RIGHTLINE GEAR FUR-<br />
THER DISCLAIMS ANY WARRANTY OR OTHER PROM-<br />
ISE THAT GIVES RISE TO ANY SORT OF CONSE-<br />
QUENTIAL, EXTRAORDINARY, PUNITIVE, EXEMPLARY,<br />
SUBSEQUENT, OR NONECONOMIC DAMAGES OR<br />
ATTORNEY FEES. THE CONSUMER OR USER’S SOLE<br />
REMEDY AGAINST RIGHTLINE GEAR FOR ANY DEFECT<br />
IN THIS PRODUCT IS LIMITED TO FULL RETURN OF THE<br />
PURCHASE PRICE.<br />
RIGHTLINE GEAR SPECIFICALLY ENCOURAGES<br />
COMPLIANCE WITH ALL MOTOR VEHICLE LAWS,<br />
AND EXPRESSLY DISCLAIMS ANY AND ALL LIABIL-<br />
ITY FOR FAILURE TO COMPLY WITH SAME.


