JCPS Computerized Personal Accountant Training Manual and ...
JCPS Computerized Personal Accountant Training Manual and ...
JCPS Computerized Personal Accountant Training Manual and ...

You also want an ePaper? Increase the reach of your titles
YUMPU automatically turns print PDFs into web optimized ePapers that Google loves.
<strong>Computerized</strong> <strong>Personal</strong> <strong>Accountant</strong><br />
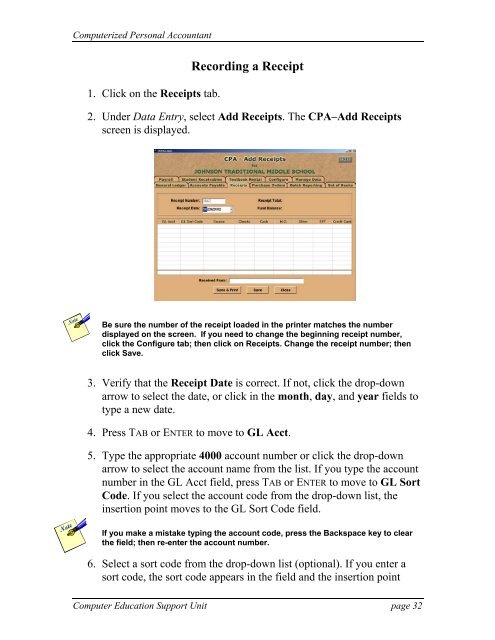
1. Click on the Receipts tab.<br />
Recording a Receipt<br />
2. Under Data Entry, select Add Receipts. The CPA–Add Receipts<br />
screen is displayed.<br />
Be sure the number of the receipt loaded in the printer matches the number<br />
displayed on the screen. If you need to change the beginning receipt number,<br />
click the Configure tab; then click on Receipts. Change the receipt number; then<br />
click Save.<br />
3. Verify that the Receipt Date is correct. If not, click the drop-down<br />
arrow to select the date, or click in the month, day, <strong>and</strong> year fields to<br />
type a new date.<br />
4. Press TAB or ENTER to move to GL Acct.<br />
5. Type the appropriate 4000 account number or click the drop-down<br />
arrow to select the account name from the list. If you type the account<br />
number in the GL Acct field, press TAB or ENTER to move to GL Sort<br />
Code. If you select the account code from the drop-down list, the<br />
insertion point moves to the GL Sort Code field.<br />
If you make a mistake typing the account code, press the Backspace key to clear<br />
the field; then re-enter the account number.<br />
6. Select a sort code from the drop-down list (optional). If you enter a<br />
sort code, the sort code appears in the field <strong>and</strong> the insertion point<br />
Computer Education Support Unit page 32