IntelliCorder Camera System User's Guide - Jasco Products
IntelliCorder Camera System User's Guide - Jasco Products
IntelliCorder Camera System User's Guide - Jasco Products

Create successful ePaper yourself
Turn your PDF publications into a flip-book with our unique Google optimized e-Paper software.
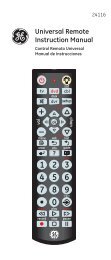
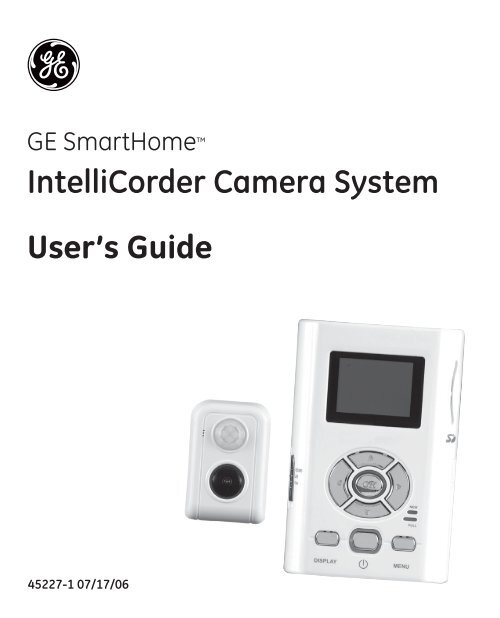
GE SmartHome <br />
<strong>IntelliCorder</strong> <strong>Camera</strong> <strong>System</strong><br />
User’s <strong>Guide</strong><br />
45227-1 07/17/06
Before attempting to connect or operate this product,<br />
please read these instructions carefully and save this<br />
manual for future reference.<br />
Congratulations<br />
With the GE branded <strong>IntelliCorder</strong>, you can monitor the entrance<br />
of any home or business and safely answer your door before<br />
opening. The internal Digital Video Recorder (DVR), can capture<br />
the video/audio of any visitor even when you are not present.<br />
The <strong>IntelliCorder</strong> is a high-quality, battery-operated security<br />
monitoring device. It uses a passive infrared (PIR) motion sensor<br />
to detect guests/intruders at your front or back door and projects<br />
an on-screen image onto the internal monitor screen. If set into<br />
record mode, it will activate a video recording, storing it in the<br />
internal memory or onto a SD memory card.<br />
This instruction manual explains in simple steps how to install,<br />
use and care for your new <strong>IntelliCorder</strong> in your<br />
home, office or business.
Parts Checklist<br />
Identify all parts before proceeding with installation<br />
Adjustment<br />
Tool<br />
<strong>IntelliCorder</strong><br />
Battery Charger<br />
Rechargeable<br />
Battery<br />
Clock Battery<br />
(installed in<br />
<strong>IntelliCorder</strong>)<br />
T-Shaped<br />
Lock-Screw<br />
Mounting Bracket<br />
<strong>Camera</strong> with PIR sensor and<br />
double-side tape<br />
<br />
Support<br />
tubes (2 sizes)
Things You Should Know<br />
FCC Warning<br />
Any unauthorized changes or modifications to the equipment<br />
would void the users authority to operate. This <strong>IntelliCorder</strong><br />
complies with part 15 of the FCC rules. Operation is subject<br />
to the following two conditions:<br />
1. The <strong>IntelliCorder</strong> may not cause harmful interference<br />
2. The <strong>IntelliCorder</strong> may accept any interference received,<br />
including interference that may cause undesired operation.<br />
Important Safeguards<br />
1. Cleaning – Turn off this video unit before cleaning. Do not<br />
use strong or abrasive detergents. Use a dry cloth to clean the<br />
camera body when dirty. In case the dirt is hard to remove, use a<br />
damp (not wet) cloth for cleaning.<br />
2. Water and Moisture – Do not use any component<br />
of this system in an exposed outdoor area, unless the instructions<br />
clearly state that it is safe. Do not operate this system in the<br />
presence of explosive or flammable fumes.<br />
Precautions<br />
1. Do not attempt to disassemble the camera. There are no<br />
user-serviceable parts inside.<br />
2. Handle the <strong>IntelliCorder</strong> with care – Avoid striking or shaking.<br />
Improper use or storage could damage the <strong>IntelliCorder</strong>.<br />
Modifying or tampering with the device or its internal components<br />
can cause a malfunction and void the <strong>IntelliCorder</strong>’s warranty. If
you feel the <strong>IntelliCorder</strong> may not be performing correctly, contact<br />
customer service for assistance.<br />
3. Motion Detection – The PIR motion sensor will NOT detect<br />
motion through glass storm doors, screen doors or metal gates.<br />
4. <strong>Camera</strong> faceplate care – Do not clean the lens with strong or<br />
abrasive detergents. Use lens tissue or a cotton tipped applicator<br />
and ethanol alcohol.<br />
5. Light Source – The <strong>Camera</strong>s viewing area must be illuminated<br />
with a suitable light source during evening and nighttime hours.<br />
6. Door Mounting – The product should be mounted to a door,<br />
only as recommended by the instructions. Contact customer<br />
service for any questions.<br />
7. Stand-by MODE - When not using your <strong>IntelliCorder</strong> set mode<br />
switch to Play and Press Power. This will power off <strong>IntelliCorder</strong>.<br />
8. Do not touch the LCD screen with a sharp-pointed object.<br />
9. If your <strong>IntelliCorder</strong> is used in a cold environment, a residual<br />
image may appear on the LCD screen. This is not a malfunction.<br />
Contact customer service for any questions. Call 1-800-654-8483
Features<br />
Monitor and Sensor Front<br />
1. LCD Screen - 1.5” LTPS LCD<br />
2. Speaker - play back the audio<br />
sound of recorded file in PLAY mode<br />
3. SD Card Insert Slot<br />
4. Battery Cover<br />
5. Microphone<br />
6. Motion-activated Sensor – detects<br />
motion up to 6.5 feet (2 meters)<br />
away and from a horizontal angle of<br />
up to 125 degrees (Motion cannot be<br />
detected through glass storm doors,<br />
screen doors or metal gates).<br />
7. Lens<br />
Control Panel<br />
1. OK – confirm setting<br />
2. CURSOR –<br />
3. MENU – enter Menu screen<br />
4. DISPLAY – press this button to toggle<br />
between Full Display On, Text Off and<br />
Display Off<br />
5. MODE switch – go to RECORD, LIVE,<br />
or PLAY<br />
6. POWER – activates and deactivates<br />
the device in play mode<br />
7. RESET – use a pointer or alike to press<br />
this button to reset the unit<br />
Monitor and Sensor Back<br />
1. Terminal<br />
2. Clock Battery Cover
Operation Indicators<br />
1. New Message Light Indicator<br />
(Green)<br />
2. Full Memory Light Indicator (Red)<br />
3. Key Light <strong>Guide</strong> (Blue) – illuminates<br />
when user presses any button<br />
4. Low Battery Light Indicator (Red)<br />
Preparation<br />
Charging CAMERA Battery<br />
Charge Battery fully before use<br />
1. Plug in Charger.<br />
2. Insert Battery onto the Charger, observing<br />
proper +/- polarities as indicated. The red light<br />
will turn on.<br />
3. When charging is complete, the light<br />
changes to Green.<br />
4. Remove Battery from the Charger.<br />
4<br />
3<br />
2<br />
1<br />
Notes:<br />
• Charging takes approximately 2 hours.<br />
• An amber light will indicate abnormal use or defective battery.<br />
• Prevent metallic objects from coming into contact with the metal parts<br />
of the Charger’s terminal. This may cause a short circuit, damaging<br />
the Charger.<br />
• Keep the battery dry.<br />
• Battery life gradually decreases after repeated use and recharging
The rechargeable battery can last<br />
up to two years. If operation time<br />
becomes very short even after a<br />
sufficient charge, discard Battery<br />
properly and contact Customer<br />
Service to purchase a replacement<br />
battery.<br />
• If the battery will not be used<br />
for a long period of time, it will<br />
need to be fully charged, then fully<br />
discharged for storage.<br />
Install Battery<br />
1. Press and slide the battery<br />
cover downward. The cover is<br />
spring-loaded and will open up<br />
horizontally.<br />
2. Install a fully charged Battery<br />
into the battery compartment,<br />
observing proper +/- polarities<br />
as indicated. Press battery into<br />
compartment until lower tab locks<br />
battery into position.<br />
3. Once the battery is locked, press<br />
the cover down and slide up to<br />
lock the battery cover.
To Remove Battery<br />
1. Press and slide the battery<br />
cover downward. The cover is<br />
spring-loaded and will open up<br />
horizontally.<br />
2. Press Orange BATTERY RELEASE<br />
tab down to unlock battery. The<br />
battery is spring-loaded and will<br />
eject out.<br />
3. Once the battery has been<br />
removed, press the cover down<br />
and slide up to lock the battery<br />
cover.<br />
Battery Care<br />
Caution:<br />
• Charge only with specified<br />
charger and AC adapter<br />
• Battery can be charged within a<br />
temperature range of 10C (50F)<br />
and 35C (95F)<br />
• Battery is normally warm after<br />
charging or just after use.<br />
• Do not use an insufficiently<br />
charged or worn-out Battery<br />
Safety precautions:<br />
• Do not place Battery near, or<br />
dispose of in fire<br />
• Do not directly connect (short<br />
circuit) the positive (+) and<br />
negative (-) terminals<br />
• Never attempt to disassemble or<br />
reassemble Battery
To avoid Battery damage:<br />
• Do not drop or jar Battery<br />
• Use Battery with the <strong>IntelliCorder</strong> only<br />
• If Battery is used in extremely high<br />
temperatures, an internal safety<br />
circuit will automatically stop the<br />
<strong>IntelliCorder</strong>’s operation to prolong<br />
Battery life.<br />
• While not in use, remove Battery from<br />
the <strong>IntelliCorder</strong> and Charger, and store<br />
in a cool, dark, dry place.<br />
• Keep Battery terminals clean<br />
Charger Caution:<br />
• The battery charging unit operates<br />
on AC 100-240 V 50/60Hz.<br />
• Power-Cord Protection – The Power<br />
supply cord should be routed so that<br />
it will not be stepped on, pinched or<br />
punctured by items placed upon or<br />
against it.<br />
• Overloading – Do not overload wall<br />
outlets and extension cords as this can<br />
result in a risk of fire or electric shock.<br />
• During charging operation, the<br />
battery should be kept away from<br />
high temperature, high pressure and<br />
heat sources. Also it should be kept<br />
away from children. Do not charge the<br />
battery for over 24 hours.<br />
CLOCK Battery Installation<br />
The <strong>IntelliCorder</strong>’s internal clock<br />
operates on a CR2032 lithium flat cell<br />
battery (included). To replace battery<br />
when expired:<br />
1. Remove the cover on the back of<br />
the unit by rotating tabs into unlock<br />
position.<br />
2. Install a new CR2032 battery into the<br />
clock battery compartment, observing<br />
proper + / - polarities as indicated.<br />
3. Replace the battery cover, rotate<br />
tabs into lock position.<br />
Warning:<br />
• Dispose of old battery promptly and<br />
properly.<br />
Do not burn or bury.<br />
• Replace battery with CR2032 only.<br />
Use of another battery may present a<br />
risk of damage to the <strong>IntelliCorder</strong>.<br />
• Keep away from children. Do not<br />
recharge, disassemble or dispose of<br />
in fire.<br />
Note:<br />
• Keep battery out of children’s reach.<br />
Swallowing it may be harmful.<br />
• Battery life is approximately two years.<br />
10
Installation<br />
Choose a Mounting Location<br />
The <strong>IntelliCorder</strong> is designed to mount<br />
on a smooth, flat door surface. Select<br />
a door/entrance you wish to monitor.<br />
The recommended mounting height is<br />
approximately 5 - 6 feet. At this height,<br />
the PIR sensor detects motion up to 6.5<br />
feet (2 meters) away, with a viewing<br />
angle up to 125 degrees.<br />
To help avoid false activation, mount your camera:<br />
• Away from direct sunlight<br />
• Away from heat sources, such as space heaters, radiators, and exposed light bulbs<br />
• Away from strong drafts, like those caused by central heating vents<br />
1. Prepare the mounting space by first removing the original door peep hole<br />
viewer. If there is no peep hole, then you will need to drill a hole of at least 9/16”<br />
(14mm) diameter at desired location.<br />
2. Clean the surface where the PIR camera sensor is to be mounted.<br />
3. Carefully pull out the ribbon cable from the camera tube.<br />
4. Remove the backing of the double sided adhesive tape on the back of the PIR.<br />
Carefully feed the ribbon cable and tube through the peep hole, to the other side<br />
of the door; Be careful not to stick the camera to the door. Once you have the<br />
camera aligned properly, press the camera to the door allowing the adhesive tape<br />
to hold the camera in place. As illustrated below, keep the PIR sensor on the top.<br />
11<br />
PIR sensor<br />
<strong>Camera</strong> lens
3. Feed the ribbon cable through the mounting hole of the mounting bracket.<br />
Position the Mounting Bracket over the peep hole opening on the inside of<br />
your door.<br />
4. Feed the ribbon cable through the support tube. Place the Support tube through<br />
the Mounting Bracket into the peep hole and screw onto the PIR tube . Use the<br />
Adjustment Tool to turn the Support tube clockwise until the mounting plate is<br />
secured to the door. Take care not to overtighten the Support Tube.<br />
5. Connect the ribbon cable plug to the INPUT Connector by matching the arrow<br />
symbols on the plug and the terminal.<br />
Caution<br />
Do not rotate the camera or<br />
recorder without disconnecting<br />
the ribbon cable first. Damage to<br />
the ribbon cable will occur and<br />
void the warranty.<br />
12
6. To activate clock battery, pull the insulator tab from the back side of Monitor.<br />
7. Position the slot located at the top edge of the <strong>IntelliCorder</strong> onto the top tab<br />
of the Mounting Bracket. Next, fit the slot located at the bottom edge of the<br />
<strong>IntelliCorder</strong> onto the lower tab of the mounting bracket. Press the <strong>IntelliCorder</strong><br />
firmly into position.<br />
8. Insert the T-shaped lock-screw into hole located at bottom of the <strong>IntelliCorder</strong><br />
and turn it clockwise until it locks into position. Take care not to over tighten.<br />
9. If using an SD memory card (not supplied) insert into the slot at the right side of Monitor.<br />
10. Insert the Battery into the compartment, as indicated by polarity symbols<br />
(+ and -) marked inside. See Battery Installation (Page 8).<br />
Operation<br />
For First Use, set MODE switch to RECORD. The camera will undergo selfcalibration<br />
within several seconds. <strong>IntelliCorder</strong> has different languages available.<br />
Select your desired language (see page 27) Set the Time / Date (see page 26).<br />
To save battery power, the <strong>IntelliCorder</strong> will enter into sleep mode at a selectable<br />
time (5 or 10 seconds) when not in use or no motion is detected<br />
(see page 22 for setting).<br />
13
SD Card (not included)<br />
For increased recording time, data (Video files) can be stored onto standard<br />
SD memory cards. Data from the <strong>IntelliCorder</strong>’s internal memory can also be<br />
downloaded to an SD card. The <strong>IntelliCorder</strong> accepts SD memory cards up to 1GB.<br />
SD Card Insertion/Removal<br />
1. Insert SD card with the logo facing outward toward the LCD screen. Press the<br />
SD memory card inward until it ‘clicks’ into position.<br />
2. To remove the SD memory card, press in on it to release.<br />
It will click and eject out.<br />
Record/Playback Time<br />
Use one of the following SD card sizes in the chart below.<br />
The resolution setting determines the recording length.<br />
Resolution 128MB 256MB 512MB 1GB<br />
Fine 15 min 30 min 60 min 120 min<br />
SP (Standard Play) 30 min 60 min 120 min 240 min<br />
LP (Long Play)* 40 min 80 min 160 min 320 min<br />
* LP playback may contain more picture noise<br />
14
Operating Modes<br />
The system can be set to operate in<br />
one of three modes: RECORD, LIVE or<br />
PLAY. The desired operating mode can<br />
be selected using the MODE switch on<br />
the left side of the <strong>IntelliCorder</strong>.<br />
Motion-Activation in RECORD Mode<br />
In this mode setting, the <strong>IntelliCorder</strong><br />
can record high-resolution video with<br />
sound of visitors/intruders at your front<br />
or back door, even when you are not<br />
home.<br />
Before you begin<br />
• Check the Battery Indicator<br />
• If using an SD memory card, Ensure<br />
SD memory card is properly installed.<br />
Your <strong>IntelliCorder</strong> will automatically<br />
record to the SD memory card when<br />
activated.<br />
1. Set MODE to RECORD.<br />
2. A camera icon indicates that<br />
the camera is on.<br />
3. When motion is detected, the<br />
<strong>IntelliCorder</strong> begins recording<br />
shortly after the PIR detects motion. It<br />
continues recording until motion has<br />
ceased for 5 or 10 seconds (selectable,<br />
see Page 20)<br />
4. The <strong>IntelliCorder</strong> is equipped with<br />
internal memory for immediate<br />
recording storage. Video files are<br />
stored as standard AVI computer files<br />
in MPEG4 format. If no SD memory<br />
card is detected, files will be stored to<br />
internal memory. Internal memory can<br />
store up to four minutes of Video in LP<br />
mode. For longer recording time you<br />
can use SD memory cards up to 1GB<br />
(see page 26). If a SD memory card is<br />
detected, video files will store to the<br />
memory card. When the memory is<br />
full, (either internal or on SD memory<br />
card) recording will stop and the Full<br />
(Red) indicator light will turn on. This<br />
indicates you should replace the<br />
memory card or clear the memory. The<br />
<strong>IntelliCorder</strong> can also be set to autoerase,<br />
In this setting it will erase the<br />
three oldest files each time.<br />
(See page 22)<br />
5. Use the DISPLAY button to switch<br />
between LCD ON/TEXT OFF/LCD OFF.<br />
LCD ON allows you to view a scene<br />
while in live or record mode. TEXT OFF<br />
allows you to view scene in live or<br />
revord mode without text appearing<br />
on the screen. LCD OFF allows a scene<br />
to be recorded without viewing. You<br />
can use this position to conserve<br />
battery power, but still record a scene<br />
for viewing at a later time. Date, time,<br />
length of recording, and file number<br />
are always recorded and will be<br />
displayed on the screen<br />
during playback.<br />
A FINE<br />
1:20<br />
15<br />
01/01/2 005 12:00
PIR Sensor activation may not occur when:<br />
• Motion is very slow or very fast.<br />
• Moving object is very small.<br />
• Motion occurs only in 1 corner of viewing area.<br />
Note: The PIR sensor will not detect motion through a glass storm door, screen<br />
door or metal gate.<br />
Sensor Trigger Capture<br />
+ -<br />
Auto Delete Enable<br />
A<br />
White Balance<br />
Auto<br />
Sunny<br />
Fluorescent<br />
Tungsten<br />
Cloudy<br />
Battery Status<br />
Full Power Level<br />
66% Power Level<br />
33% Power Level<br />
Empty<br />
FINE<br />
SP<br />
LP<br />
Video Quality<br />
640x480 @ 15fps<br />
320x240 @ 30fps<br />
320x240 @ 15fps<br />
SD card Status<br />
Present and Valid<br />
Present but Locked<br />
Record Status<br />
Capturing Triggered<br />
by PIR sensor<br />
01/01/2005<br />
12:00 AM<br />
Clock Info/Stamp Mode<br />
+ -<br />
EV Enabled<br />
1:20<br />
Clock Record Elapsed Time/<br />
Remain Time/ Stamp Mode<br />
Set Clock<br />
The clock time is lost<br />
in last power off<br />
Motion-Activation in LIVE mode setting<br />
In this mode setting, the <strong>IntelliCorder</strong> can monitor video and audio of visitors/<br />
intruders at your front or back door.<br />
16
1. Set MODE switch to LIVE.<br />
2. A sensor capture icon will appear.<br />
3. When activated, the PIR system<br />
will monitor the surrounding area in<br />
front of the door for motion. It will go<br />
to standby mode when no motion is<br />
detected or motion has ceased for 5 or<br />
10 seconds (selectable, see Page 22)<br />
4. You can view outside scene on the<br />
LCD (Liquid Crystal Display) monitor.<br />
Use DISPLAY button to switch between<br />
LCD ON/TEXTS OFF/LCD OFF. LCD ON<br />
allows you to view a scene while in<br />
live or record mode. TEXT OFF allows<br />
you to view scene in live or record<br />
mode without text appearing on the<br />
screen. LCD OFF allows a scene to be<br />
recorded without viewing. You can use<br />
this position to conserve battery power,<br />
but still record a scene for viewing<br />
at a later time. Date, time, length of<br />
recording, and file number are always<br />
recorded and will be displayed on the<br />
screen during playback.<br />
5. When in live mode, press to<br />
change the Movie Quality (Fine/SP/LP).<br />
6. Press OK to manually start<br />
recording. Press OK again to stop<br />
recording. Video files are stored as<br />
standard AVI computer files in MPEG4<br />
format. If no SD card is detected, files<br />
will be stored to internal memory.<br />
If an SD card is detected, video files<br />
will store to the memory card . When<br />
the memory is full, recording will stop<br />
and the Full indicator (Red) light will<br />
17<br />
blink on/off. This indicates you should<br />
replace the memory card or clear the<br />
memory. The <strong>IntelliCorder</strong> can also be<br />
set to auto-erase. In this setting the<br />
oldest three files will be erased each<br />
time. (See page 22)<br />
PLAY Back Video Files using Monitor<br />
A flashing Green light indicates new<br />
files have been recorded. You can<br />
monitor the playback picture on the<br />
LCD screen using the <strong>IntelliCorder</strong>’s<br />
DVR features.<br />
1. Set MODE switch to Play and<br />
press Thumbnail file(s) will appear<br />
on the screen.<br />
3. Use to select the desired<br />
file to preview.<br />
4. Press OK to open it.<br />
5. Uses OK to play/pause/replay the<br />
video.<br />
6. Use DISPLAY button to change<br />
between LCD ON/TEXTS OFF/LCD OFF.<br />
After 1 minute the <strong>IntelliCorder</strong> will go<br />
into sleep mode.<br />
When a video is playing:<br />
- To Fast Forward or Rewind,<br />
Press to or <br />
- To Zoom in or out, Press to zoom in<br />
or to zoom out.<br />
Note: Zoom is performed digitally; as<br />
the zoom is increased, more video<br />
noise (static) will appear in the picture.
• To Pan (in Zoom mode only) Hold <br />
to pan to desired position<br />
When the video is paused/stopped<br />
20 05/01 /01<br />
12 :00:00<br />
20 05/01 /03<br />
12 :00:00<br />
20 05/01 /06<br />
12 :00:00<br />
• Press to skip to previous/next<br />
video<br />
• Press to increase volume or to<br />
decrease it<br />
Notes:<br />
• The <strong>IntelliCorder</strong> saves video files<br />
with date and time information In<br />
Thumbnail mode<br />
20 05/01 /09<br />
12 :00:00<br />
20 05/01 /10<br />
12 :00:00<br />
20 05/01 /01<br />
12 :00:00<br />
• New message light will turn off when<br />
the video is played<br />
• Recordings will stop when starting<br />
the Play Back Mode (Video)<br />
• The file Order depends on DCF Index:<br />
CLIP00001 to CLIP09999<br />
18
Video File<br />
Auto Delete Enable<br />
Playback status<br />
Video stop<br />
Video Playing<br />
Video Pause<br />
Battery Status<br />
Full Power Level<br />
66% Power Level<br />
33% Power Level<br />
Empty<br />
21/28<br />
Current File / Total File<br />
SD card Status<br />
Present and Valid<br />
Present but Locked<br />
2005/01/01<br />
12:00:00<br />
Movie Date and Time<br />
x1<br />
Playback Zoom Ratio<br />
Zoom position<br />
White region – Whole<br />
Green region - Zoomed<br />
Set Clock<br />
The clock time is lost in<br />
last power off<br />
Using Menu Mode<br />
1. Press MENU button for Menu mode. The Menu screen with thumbnail<br />
selections will appear.<br />
2. Press to highlight the desired item<br />
3. Press OK to select an option.<br />
4. When finished, press MENU button to exit<br />
Note:<br />
• The menu mode will cancel if a selection is not made within 1 minute.<br />
The <strong>IntelliCorder</strong> will enter into stand-by mode.<br />
19
RECORD/ LIVE Mode Menu Screen<br />
Select Movie (Resolution) Quality<br />
Select White balance<br />
EV Set Up - Select Exposure Compensation<br />
Choose Auto Off in 5 seconds or 10 seconds<br />
Enable/Disable Auto Delete Function<br />
Enter Setup Mode<br />
Movie Quality<br />
You can select the Movie quality mode in video recording.<br />
The default setting is Standard Play.<br />
Fine (640x480 15fps)<br />
Standard Play (320x240 30fps)<br />
Long Play (320x240 15fps)<br />
1. Set MODE switch to LIVE.<br />
2. Press MENU button to enter Menu mode<br />
3. Use to select your desired Movie Quality<br />
4. Press OK to enter the setting mode<br />
5. Press OK to confirm the selected quality and go back to the previous menu.<br />
Press menu to return to live mode.<br />
6. Note: You can press the MENU button anytime during setting to cancel the<br />
selection and go back to the previous menu<br />
20
Adjust White Balance<br />
White balance adjustment can make subjects look washed out or it can allow<br />
more natural color balance for video recording. Normally, white balance is<br />
automatically adjusted. You can obtain different results by adjusting the white<br />
balance manually to fit your actual living environment.<br />
Auto<br />
Sunlight<br />
Cloudy<br />
Fluorescent<br />
Tungsten<br />
1. Set MODE switch to LIVE while the LCD is on.<br />
2. Press MENU button to enter Menu mode<br />
3. Use to move to White Balance (AWB)<br />
4. Press OK to enter the setting mode<br />
5. Use to move to your desired effect (Auto, Sunlight, Cloudy,<br />
Fluorescent or Tungsten)<br />
6. Press OK to confirm the selected quality and go back to the previous menu.<br />
Press menu to return to live mode.<br />
7. Note: You can press the MENU button anytime during setting to cancel the<br />
selection and go back to the previous menu<br />
Exposure Valve Setup<br />
>0 Brighter/ Exposure longer<br />
=0 Standard/ Exposure normal<br />
6. Press OK to confirm the selected quality and go back to the previous menu.<br />
Press menu to return to live mode.<br />
7. Note: You can press the MENU button anytime during setting to cancel the<br />
selection and go back to the previous menu<br />
Choose Auto Off<br />
5 seconds<br />
10 seconds<br />
To conserve power, the <strong>IntelliCorder</strong> will<br />
automatically go to stand-by mode<br />
whenever it detects no motion in RECORD or LIVE<br />
mode, or remains idle in PLAY mode.<br />
1. Set MODE switch to LIVE while the LCD is ON<br />
2. Press MENU button to enter Menu mode<br />
3. Use to move to Setup<br />
4. Press OK to enter the setting mode<br />
5. Use to select 5 seconds or 10 seconds<br />
6. Press OK to confirm the selected quality and go back to the previous menu.<br />
Press menu to return to live mode.<br />
7. Note: You can press the MENU button anytime during setting to cancel the<br />
selection and go back to the previous menu<br />
Enable/Disable Auto Delete<br />
Auto Delete means that the three oldest index files are deleted when memory is full<br />
Enable Auto Delete<br />
Disable Auto Delete<br />
22
PLAY Mode Menu Screen<br />
Erase a Single Video File.<br />
E ra se T hi s<br />
Erase This<br />
Erase All Video Files<br />
Adjust Volume Level<br />
Enter Setup Mode<br />
Go back to Thumbnail Mode<br />
1. Set MODE switch to PLAY and ensure the LCD is on<br />
2. Use to select to the desired file<br />
to erase in thumbnail mode<br />
DELET E S ING LE<br />
AR E Y OU SUR E ?<br />
3. Press MENU button to enter Menu mode<br />
4. Press OK to enter the setting mode<br />
C a ncel<br />
5. Use to select “Cancel” or “OK”.<br />
Ok<br />
Press OK to confirm the selected command.<br />
6. Press OK to confirm the selected quality and g<br />
o back to the previous menu. Press menu to return to live mode.<br />
7. Note: You can press the MENU button anytime during setting to cancel the<br />
selection and go back to the previous menu<br />
Erase All<br />
DELE T E ALL<br />
ARE YOU SURE ?<br />
C a ncel<br />
1. Set MODE switch to PLAY and ensure the LCD is on<br />
O k<br />
2. Press MENU button to enter Menu mode<br />
3. Use to move to Erase All<br />
4. Press OK to enter the setting mode<br />
5. Use to select “Cancel” or “OK”. Press OK to confirm your selection.<br />
6. Press OK to confirm the selected quality and go back to the previous menu.<br />
Press menu to return to live mode.<br />
7. Note: You can press the MENU button anytime during setting to cancel the<br />
selection and go back to the previous menu<br />
23
Adjust Volume<br />
1. Set MODE switch to PLAY and ensure the<br />
LCD is on<br />
Volume<br />
2. Press MENU button to enter Menu mode<br />
3. Use to move to Volume setting<br />
7<br />
4. Press OK to enter the setting mode<br />
5. Use to adjust your desired<br />
sound level<br />
6. Press OK to confirm the selected quality<br />
and go back to the previous menu. Press<br />
menu to return to live mode.<br />
7. Note: You can press the MENU button anytime during setting to cancel the<br />
selection and go back to the previous menu<br />
SETUP Screen<br />
Choose LCD Brightness<br />
Choose Flicker Option (depending<br />
on lighting - See page 25)<br />
Go to Format Menu<br />
LCD<br />
Brightness<br />
Go to Copy All to SD Card<br />
Go to Date/Time Menu<br />
Choose Language Option<br />
LCD<br />
Brightness<br />
Default<br />
Setup<br />
Go to Reset All Settings Menu<br />
Go to Firmware Version Info. Menu<br />
Choose LCD Brightness<br />
1. Press MENU to enter Menu mode<br />
2. Use to move to Setup<br />
3. Press OK to enter the setting mode<br />
24
4. Use to move to LCD Brightness.<br />
Press OK to enter<br />
5. Use to reduce the brightness value<br />
or to increase it<br />
6. Press OK to confirm the selected quality<br />
and go back to the previous menu. Press<br />
menu to return to live mode.<br />
7. Note: You can press the MENU button<br />
anytime during setting to cancel the selection<br />
and go back to the previous menu<br />
Choose Flicker Option<br />
This setting is for 50Hz/60Hz lighting.<br />
E.g. US: 60Hz<br />
EU: 50Hz<br />
HK: 50Hz<br />
Adjust LCD<br />
Brightness<br />
50Hz Flicker<br />
60Hz Flicker<br />
1. Press MENU buttons to enter Menu mode<br />
2. Use to move to Setup<br />
3. Press OK to enter the setting mode<br />
4. Use to move to Flicker option.<br />
Press OK to enter<br />
5. Use to select 50Hz or 60Hz depending on your country standards - see above.<br />
6. Press OK to proceed the selection and go back to previous menu<br />
7. Press MENU during setting to cancel the selection and go back to the last menu<br />
Format Memory Card<br />
1. Press MENU to enter Menu mode<br />
2. Use to move to Setup<br />
3. Press OK to enter the setting mode<br />
4. Use to move to Format. Press OK to enter<br />
5. Use to select Cancel or OK. Press OK<br />
to confirm the selected command<br />
6. Press OK to confirm the selected quality and go<br />
back to the previous menu. Press menu to return to<br />
live mode.<br />
25<br />
0.0<br />
-2.0 0 2.0<br />
.<br />
50H z Light<br />
Flic k er<br />
F or m a t will era se<br />
A ll da ta<br />
C a ncel<br />
O k
7. Note: You can press the MENU button anytime during setting to cancel the<br />
selection and go back to the previous menu<br />
Copy Files to SD Card<br />
The Copy Files function can be used to copy<br />
all video files at once from internal memory<br />
to SD card.<br />
Note: <strong>IntelliCorder</strong> will automatically detect an<br />
SD memory card after insertion. Record, Play<br />
and other file management tasks will be routed<br />
from internal memory to SD card.<br />
St ar t C opy ing Files<br />
f ro m inte r na l M em ory<br />
to SD C ar d?<br />
C a ncel<br />
1. Press MENU switch to enter Menu mode<br />
2. Use to move to Setup<br />
3. Press OK to enter the setting mode<br />
4. Use to move to Copy File to SD. Press OK to enter<br />
5. Use to select Cancel or OK<br />
6. Press OK to start copying.<br />
7. Press MENU during setting to cancel the selection<br />
and go back to the last menu<br />
Note:<br />
• Files copied from the internal memory<br />
will be stored in a new folder \DCIM\xxxFLASH\. xxx<br />
• The original files in the internal memory will not be erased - They must be erased manually.<br />
O k<br />
Set Date / Time<br />
1. Date<br />
2. Time<br />
3. Date Format<br />
YYYY-MM-DD<br />
MM-DD-YYYY<br />
DD-MM-YYYY<br />
4. Time Format<br />
12 - HOUR<br />
24 - HOUR<br />
Date / Time<br />
2005 – 05 – 13<br />
00 : 00 A M<br />
YYYY -M M -DD<br />
12 -HOUR<br />
26
1. Press MENU switch to enter Menu mode<br />
2. Use to move to Setup<br />
3. Press OK to enter the setting mode<br />
4. Use to move to Date/Time. Press OK to enter<br />
5. Use to move to desired item. The selected item is always blinking<br />
6. Press to increase the current item’s value or to decrease it<br />
7. After setting, press OK to save changes and go back to previous menu<br />
8. During setting, press MENU button to cancel selection and go back to previous menu<br />
Choose Language<br />
L a ngu a ge<br />
1. Press MENU button to enter Menu mode<br />
2. Use to move to Setup<br />
3. Press OK to enter the setting mode<br />
4. Use to move to Language. Press OK<br />
to enter<br />
5. Use to select your desired language.<br />
The flag of the country will change according to the selection<br />
6. Press OK to proceed the selection and go back<br />
to previous menu<br />
English<br />
Default Setup<br />
Should it become necessary, you have the<br />
option of setting the <strong>IntelliCorder</strong> back to the<br />
original factory default settings.<br />
RES T ORE<br />
DEF A UL T<br />
A RE YOU SURE?<br />
C a ncel<br />
1. Press MENU button to enter Menu mode<br />
2. Use to move to Setup<br />
3. Press OK to enter the setting mode<br />
4. Use to move to Default Setup. Press OK to enter<br />
5. Use to select “Cancel” or “OK”. Press OK to confirm the selected command<br />
6. If “OK” is selected, the default settings will be restored and return to the screen<br />
at RECORD/LIVE mode, or go to thumbnail at PLAY mode; Select “Cancel” to go<br />
back to previous menu<br />
7. Press MENU button during setting to cancel the selection and go back to the<br />
previous menu<br />
27<br />
O k
Firmware Version<br />
Occasionally, software updates/improvements may become available. The<br />
<strong>IntelliCorder</strong> has the ability to load new software. Check the website periodically<br />
to find out if new software versions are available. Instructions to download from<br />
the web site and upload to the <strong>IntelliCorder</strong> can also be found on the web site. You<br />
can also contact Customer Service for any questions at 1-800- 654-8483<br />
1. Press MENU button to enter Menu mode<br />
2. Use to move to Setup<br />
3. Press OK to enter the setting mode<br />
4. Use to move to Version. Press<br />
OK to enter<br />
5. Press OK or MENU button to go back to<br />
previous menu<br />
Use “SD Memory Card”<br />
v601010<br />
You can record and play back videos on the SD memory<br />
card (purchase separately). Exchange video data with other equipment such as<br />
a personal computer etc., using the Memory Card Reader/Writer or a PC card<br />
adaptor (not supplied).<br />
Note:<br />
• We recommend backing up important data<br />
• <strong>IntelliCorder</strong> supports up to 1 GHz SD card.<br />
• Video data may be damaged in the following cases:<br />
- If you remove the SD memory card before you turn off power<br />
- If you remove battery while reading or recording data to the SD memory card<br />
- If the SD memory card is placed near magnetic or static electricity fields<br />
• Do not bend, drop or apply strong shock to a SD card.<br />
• Do not disassemble or modify a SD card.<br />
• Do not let the SD card get wet<br />
• Do not use or keep a SD card in locations that are:<br />
- Extremely hot<br />
- Under direct sunlight<br />
- Very humid or subject to corrosive gases<br />
V er si on<br />
• When you carry or store a SD card, put it in its case.<br />
• A SD memory card formatted by the Windows OS or Macintosh computer does not have a<br />
guaranteed compatibility with this <strong>IntelliCorder</strong>.<br />
28
Download Video<br />
To download video images directly from a SD memory card to your PC, a<br />
Multimedia or SD card reader compatible with your computer is required. Your<br />
<strong>IntelliCorder</strong> compresses video data into AVI format.<br />
Typical video data file name<br />
Root: folder CLIP0001~2,3,…. : As displayed on your PC<br />
screen<br />
Software Requirements<br />
An XviD code is required to view recorded movies on your computer’s media<br />
viewer. A free XviD code is available for download from http://www.koepi.org/xvid.<br />
shtml and you can download the current stable binary XviD-1.0.3-20122004.exe.<br />
Once you install the software, you may need to reboot your computer.<br />
Alternatively, DivX code software is available at the DivX website: www.divx.com.<br />
Trouble Shooting<br />
If you are having trouble in operating this product, please consult the guide as<br />
below:<br />
SYMPTOM<br />
REMEDIES<br />
No picture in LCD monitor<br />
Set MODE to RECORD or LIVE<br />
• Use fully charged Battery<br />
• Firmly connect all needed cables<br />
LCD displays “SENSOR ERROR” Ensure the plug of the ribbon cable is<br />
properly attached into the terminal<br />
(see page 13).<br />
• Make sure monitor is switched ON.<br />
• Make sure camera is not covered<br />
Audio problems<br />
Ensure the volume is turned up sufficiently<br />
on the monitor<br />
29
Trouble Shooting Cont.<br />
SYMPTOM<br />
The power goes off<br />
The AUTO RECORD function<br />
does not work<br />
The battery remaining indicator<br />
does not indicate the correct time<br />
Cannot record files to SD<br />
memory card<br />
NO SD memory card<br />
SD card cannot be inserted<br />
REMEDIES<br />
The Battery is dead or nearly dead<br />
• Recharge battery<br />
There is no AUTO RECORD in the<br />
LIVE, PLAY or menu settings.<br />
• Set MODE to RECORD<br />
You have used the Battery in an extremely<br />
hot or cold environment for a long time.<br />
The Battery is completely dead, and can not<br />
be recharged<br />
• Replace with a new Battery<br />
The SD memory card has already been<br />
recorded to its full capacity<br />
• Erase unnecessary videos and record again<br />
SD card is formatted incorrectly.<br />
• Format the SD card or use another<br />
SD memory card<br />
• Check Battery Indicator<br />
No SD card or unreadable SD card is inserted<br />
• The SD card is broken or the file format<br />
is incorrect. Eject the SD card, check it for<br />
damage and insert it again. If the same<br />
indicator appears, use another SD card.<br />
Insert SD card, label side facing out<br />
LCD displays<br />
Set the time and date<br />
Replace with a new CR2032 battery for clock<br />
30
Specifications<br />
Input Power:<br />
Charger 100-240V AC, 50/60Hz<br />
Battery Rechargeable Lithium Polymer Type DC 3.7V<br />
Video Recording <strong>Camera</strong><br />
1/5” CMOS, Approx. 300,000 pixels<br />
LCD: 1.5 inch Color S/D LPTS (557 x 324)<br />
File Type:<br />
AVI<br />
Video Format: MPEG 4<br />
Operating Temperature:<br />
32F ~ 122F (0C ~ 50C)<br />
Operating Humidity: 10% ~ 85 %<br />
Weight:<br />
<strong>IntelliCorder</strong> 231g (including batteries)<br />
Charger 74 g<br />
Dimensions:<br />
<strong>IntelliCorder</strong> - Color 110 x 72 x 24mm<br />
(excluding Mounting Bracket)<br />
<strong>IntelliCorder</strong> - Sensor 60 x 40 x 13mm<br />
(excluding Supporter)<br />
Charger 22 x 49 x 93mm<br />
(excluding adaptor)<br />
Weight and dimensions as shown above are approximation only. Design<br />
and specifications are subject to change without prior notice.<br />
31
1 YEAR LIMITED WARRANTY: <strong>Jasco</strong> <strong>Products</strong> Company warrants this product to be free from manufacturing<br />
defects for a period of 1 year from the original date of consumer purchase. This warranty is limited to the<br />
repair or replacement of this product only and does not extend to consequential or incidental damage to other<br />
products that may be used with this unit. This warranty is in lieu of all other warranties express or implied.<br />
Some states do not allow limitations on how long an implied warranty lasts or permit the exclusion or limitation<br />
of incidental or consequential damages, so the above limitations may not apply to you. This warranty gives<br />
you specific rights, and you may also have other rights which vary from state to state. If unit should prove<br />
defective within the warranty period, return prepaid with dated proof of purchase to:<br />
<strong>Jasco</strong> <strong>Products</strong> Company<br />
311 N.W. 122nd<br />
Oklahoma City, OK. 73114<br />
1-800-654-8483<br />
is a trademark of<br />
General Electric Company<br />
and is used under license to<br />
<strong>Jasco</strong> <strong>Products</strong> Company LLC,<br />
311 N.W. 122nd Street,<br />
Oklahoma City, OK 73114<br />
Or visit us at<br />
www.jascoproducts.com<br />
All brand names shown are trademarks of their respective owners.