worksheets - Indian Institute of Technology, Bombay
worksheets - Indian Institute of Technology, Bombay
worksheets - Indian Institute of Technology, Bombay

Create successful ePaper yourself
Turn your PDF publications into a flip-book with our unique Google optimized e-Paper software.
First Edition 2 08<br />
BOOK-II<br />
Computer<br />
Second Edition<br />
Level IV<br />
Computer<br />
Created at:<br />
Department <strong>of</strong> Computer Science & Engineering<br />
<strong>Indian</strong> <strong>Institute</strong> <strong>of</strong> <strong>Technology</strong> <strong>Bombay</strong><br />
Mumbai, India.<br />
www.cse.iitb.ac.in<br />
Editors<br />
Sridhar Iyer<br />
Malati Baru<br />
Authors<br />
Farida Khan<br />
Usha Viswanathan<br />
Vijayalakshmi Chitta<br />
Powered by:<br />
InOpen Technologies<br />
Design<br />
Sameer Sahasrabudhe<br />
Swati Revandkar<br />
Illustrations<br />
Kaumudi Sahasrabudhe
About This Book<br />
This book has evolved out <strong>of</strong> contributions from many authors, bringing together a variety <strong>of</strong> creative<br />
ideas. The salient features <strong>of</strong> this book are:<br />
• The book is based on a detailed computer science syllabus that has been reviewed by many<br />
experts. This syllabus is available for download from www.computermasti.com<br />
• The lessons and activities are based on free and open source s<strong>of</strong>tware. The Computer Masti<br />
Toolkit (in the DVD) is easy to install on commonly used operating systems.<br />
• The lesson contents are woven around interactions between an imaginary teacher and two<br />
students. The teacher mostly asks questions that guide the students to discover and learn topics<br />
on their own.<br />
• Each lesson focusses on specific concepts and associated skills. These concepts are selected such<br />
that: (i) They lay a strong foundation for learning computer science, (ii) They contribute towards<br />
general intellectual development, and (iii) They are age appropriate.<br />
• The Worksheets and Activities are designed in such a way that they supplement topics being<br />
covered in other subjects, to the extent possible. Group activities are included in each lesson to<br />
encourage collaborative learning. Projects are also suggested to reinforce the learning <strong>of</strong> topics<br />
across multiple lessons.<br />
• Some <strong>of</strong> the authors used a preliminary version <strong>of</strong> this book for teaching at Sri Sri Ravishankar<br />
Vidya Mandir (SSRVM) Mulund, Mumbai. As a result <strong>of</strong> the insights gained, various sections in<br />
this book have been revised appropriately.<br />
• Each Lesson has a Teacher’s Corner section, which gives a lesson plan outline, some dos and<br />
don’ts, and other tips, learnt from the above experience.<br />
• The online (e-book) version is available freely for individual use, under the conditions described<br />
earlier in the Copyright Statement. You may download it from: www.computermasti.com<br />
• Comments on the book and suggestions may be sent to Sridhar Iyer (sri@iitb.ac.in).<br />
Acknowledgements:<br />
This second edition is a result <strong>of</strong> incorporating several suggestions by Sahana Murthy and Farida<br />
Khan. We are thankful to Aruna Prabhala, Srinath Perur and Neela Srinivasan, for their contribution<br />
to the preliminary content, prior to the first edition. We are also thankful to Vaijayanthi Sarma for her<br />
meticulous review during the first edition. We acknowledge the support provided by Rekha Kale,<br />
Pravin Ingle, Vinod Bhalerao, Bhairavnath Lahotkar and Seeja Sadanandan.<br />
We are grateful to IIT <strong>Bombay</strong> for support during the creation <strong>of</strong> this book. We are also grateful to the<br />
SSRVM Trust, especially the staff <strong>of</strong> SSRVM Mulund, for support during the pilot implementation.<br />
Last but not the least, the teachings <strong>of</strong> Sri Sri Ravishankar have been a major source <strong>of</strong> inspiration for<br />
this book.
How To Use This Book<br />
This book is meant to be used for teaching computers to children in a way that is mostly fun (as<br />
indicated by the “Masti” in the title). The teacher’s role is primarily that <strong>of</strong> a facilitator encouraging<br />
active learning. Specific guidelines for each lesson can be found in the Teacher’s Corner <strong>of</strong> each<br />
lesson. Ensure that the conceptual understanding is mastered before proceeding to the skills. Allow<br />
students to play educational computer games included in each lesson in order to reinforce learning<br />
<strong>of</strong> the concepts/skills covered in the lesson. In the computer lab, if they are doing activities in groups,<br />
ensure that they switch “drivers” frequently, so that each student gets to do a fair amount <strong>of</strong> the<br />
computer based activities. The Worksheets include exercises to inculcate higher order thinking skills.<br />
Use the Group Activities and Projects to stimulate creativity and knowledge sharing. The book is<br />
designed so that it can be covered comfortably in one year, with one class (30 to 45 minutes) per<br />
week. See the table below for an overview <strong>of</strong> the concepts, skills and values covered in each lesson<br />
along with a week wise schedule.
Computer<br />
First Edition<br />
Level IV<br />
Contents<br />
Sr. No Name <strong>of</strong> the lesson<br />
Page Number<br />
0. Three Years Ago...<br />
1. Revision <strong>of</strong> Level III<br />
2. Logical Thinking<br />
1<br />
2<br />
26<br />
3. Programming Multiple Sprites in Scratch<br />
4. Dos and Don’ts - Balancing Asanas<br />
5. More Activities using Scratch<br />
6. Naming and Organising Files<br />
7. Projects<br />
50<br />
72<br />
84<br />
94<br />
110
Three years ago...<br />
Tejas and Jyoti met Moz in the school computer<br />
room. Moz <strong>of</strong>fered to teach them computer and thus<br />
their ‘masti’ with computers started. They learnt<br />
how to write programs using Scratch, and format<br />
text in Word Processor. They also learnt how to keep<br />
themselves fit and healthy.<br />
Moz: Both <strong>of</strong> you look fresh and healthy.<br />
What is the secret?<br />
Tejas: We both had been to Timbaktu<br />
and spent some time sharing our<br />
computer knowledge with friends.<br />
Jyoti: We learnt many things about trees, animals<br />
and insects in their natural surroundings, from<br />
our friends.<br />
Tejas: Yes. We also learnt some interesting<br />
games, songs and the Kolatam dance from them.<br />
Moz: That is good.<br />
Tejas: We brought some saplings and seeds to be sown in the<br />
school.<br />
Jyoti: Moz, We are just waiting to learn and explore more about<br />
Scratch and the other activities.<br />
Moz: Sure, Let us start from tomorrow.<br />
1
Lesson1<br />
Revision <strong>of</strong> Level III<br />
Aim<br />
In this lesson you will:<br />
Revise the topics from level III.<br />
Schools have reopened and it is time for students to plan<br />
an event for their class. This year Tejas and Jyoti have<br />
been given the responsibility to plan for the class day. The<br />
children are discussing about the event with Moz.<br />
Tejas: Moz, We have to plan a four hour event. We planned four main<br />
activities. These are,<br />
1. Tree planting – Vanamahotsav.<br />
2. Fun with Scratch.<br />
3. Exercises and Asanas.<br />
4. Fun with text processing.<br />
Moz: Wow, tree planting! Why did you think <strong>of</strong> tree planting?<br />
Jyoti: We need to plant more and more trees to fight pollution.<br />
Tejas: Trees give us oxygen, shade, fruits, flowers, wood and many more things.<br />
Moz: What does Vanamahotsav mean?<br />
Tejas: Vanamahotsav is a festival <strong>of</strong> tree planting and nurturing the trees.<br />
During Vanamahotsav<br />
Awareness is created in people about the importance <strong>of</strong> trees in<br />
our lives.<br />
Every year, during Vanamahotsav, new saplings <strong>of</strong> trees are planted<br />
in areas that do not have trees.<br />
Trees native to the region are planted. These can adapt easily to<br />
local regions and have a high survival rate. They can support the<br />
birds, insects and animals <strong>of</strong> the local eco-system.<br />
Info<br />
2
Jyoti: Now is the right time to plant trees as the rains have<br />
just begun.<br />
Moz: Correct. So what should we do next?<br />
1. Step-wise thinking<br />
Tejas: Now we have to plan for each activity and list the main steps for<br />
each activity.<br />
Moz: Good. What are the main steps for “Tree planting activity”?<br />
Tejas: First, we get some saplings. Then we go to a place where we can plant<br />
the saplings.<br />
Jyoti: Then, plant the saplings and water them regularly. If it starts raining<br />
regularly, we need not water them.<br />
Moz: Good. So you have three main steps. What are they?<br />
Activity 1: Tree planting- Vanamahotsav<br />
Step 1: Plan for planting <strong>of</strong> saplings.<br />
Step 2: Plant the saplings.<br />
Step 3: Take care <strong>of</strong> the saplings.<br />
Moz: What next?<br />
Tejas: We have to list the detailed steps.<br />
Moz: Good. Do you know where you can plant the saplings?<br />
Jyoti: The hill near the school is barren. We plan to plant the saplings there.<br />
Jyoti: Our teacher has obtained the permission for us to plant the saplings.<br />
Moz: How many saplings will be planted?<br />
Tejas: There are 40 students, 2 teachers and a principal.<br />
Jyoti: We need a total <strong>of</strong> 43 saplings.<br />
Moz: Did you decide the type <strong>of</strong> saplings that you are going to plant?<br />
Tejas: Some medicinal plants like Amla and Neem. My grandmother says<br />
that the air from the neem tree is very good for health.<br />
Laxmi Taru<br />
Moz: I know <strong>of</strong> one tree called Laxmi Taru or Sirouba.<br />
This tree consumes high amount <strong>of</strong> Carbon dioxide and<br />
purifies the environment. It can grow on barren land and<br />
reduces the soil erosion. It requires very little water<br />
to grow.<br />
Jyoti: We can also plant trees that give shade like Banyan, as well as fruit<br />
bearing trees like Mango, Tamarind and Chikoo.<br />
Banyan<br />
3<br />
Chikoo
Tejas: After deciding the saplings that we want, we have to give the list to<br />
the gardener. The gardener will bring the saplings.<br />
Moz: Good.<br />
Moz: How do you plant the saplings?<br />
Jyoti: We need to dig the soil and then plant the saplings.<br />
Tejas: Our teacher said that the ground will be prepared by our gardeners.<br />
Detailed steps are:<br />
Main Step 1: Plan for planting <strong>of</strong> saplings.<br />
Step 1.1: Decide the location to plant the saplings.<br />
Step 1.2: Obtain permission to plant the saplings.<br />
Permission to plant<br />
Step 1.3: Calculate the number <strong>of</strong> saplings that will<br />
be required.<br />
43<br />
Step 1.4: List the types <strong>of</strong> saplings that are required.<br />
10<br />
10<br />
10<br />
13<br />
Step 1.5: Inform the gardener about the number <strong>of</strong><br />
saplings and type <strong>of</strong> saplings that will<br />
be planted.<br />
Step 1.6: Request the school gardeners to prepare<br />
the ground to plant the saplings.<br />
4
Moz: Now, how do you plant the saplings?<br />
Tejas: Let us work in groups <strong>of</strong> two students each.<br />
Moz: Why?<br />
Tejas: It is fun and we can help each other while planting.<br />
Moz: That is a good idea.<br />
Jyoti: Next, each student plants a sapling.<br />
Moz: Correct. You have to detail out this step too.<br />
Jyoti: Oh! Yes. We put the roots <strong>of</strong> the plant in the hole made by the gardener.<br />
Then cover it with mud.<br />
Moz: So do you need something for this step?<br />
Jyoti: Yes. We need a shovel or a spade.<br />
Moz: Good thinking.<br />
Detailed steps are:<br />
Main Step 2: Plant the saplings.<br />
Step 2.1: Make groups <strong>of</strong> two students each.<br />
Step 2.2: Collect the tools to be used for planting.<br />
Step 2.3: Plant the saplings.<br />
Moz: After the saplings are planted what do you do?<br />
Tejas: We need to water them. So we need to get a few water cans.<br />
Moz: Very good. You have made a very detailed plan.<br />
Tejas: The last step and important one is to water them regularly. The<br />
teacher said that the gardener will take care <strong>of</strong> it, till we get regular rains.<br />
Main Step 3: Take care <strong>of</strong> the plants.<br />
Step 3.1: Arrange for water.<br />
Step 3.2: Water the plants regularly.<br />
5
2. Scratch – Introduction and Simple animation<br />
Moz: Can you demonstrate the tree planting activity using Scratch?<br />
Tejas: Yes. We can.<br />
Tejas and Jyoti first plan the program and then convert it into instructions<br />
in Scratch.<br />
Information:<br />
There are two students.<br />
Two saplings to plant.<br />
A hill to plant the saplings.<br />
Main steps for Scratch program “Two students planting saplings”.<br />
Step 1: Prepare for planting.<br />
Step 2: Plant the saplings.<br />
Step 3: Take care <strong>of</strong> the saplings.<br />
Tejas: We need two Sprites, one for each student. We also need different<br />
Costumes like sitting to plant, digging etc. for the two Sprites.<br />
Jyoti: Let us do Warli drawings for each action using Paint.<br />
Tejas: Oh! Yes. That will be a good idea.<br />
Jyoti: Will you please draw the Background? You are good at<br />
drawing scenery.<br />
Tejas: Thanks. I will paint the Background. We will need three<br />
Backgrounds:<br />
1. To show the place where the saplings are to be planted.<br />
2. To show the place dug out and mud strewn around.<br />
3. Another one with the planted sapling.<br />
Warli art is an ancient <strong>Indian</strong> folk art tradition <strong>of</strong> painting. It has<br />
derived its name from a tribe in Maharashtra by the same name. This<br />
art mainly uses geometric figures like circle, triangle and square. The<br />
use <strong>of</strong> colour is usually white against earthen colors.<br />
Info<br />
6
Moz: Very good. Both <strong>of</strong> you have planned the activity very well.<br />
Tejas and Jyoti then plan the program on paper.<br />
Tejas: We first have to import the Background, Sprites and Costumes.<br />
Import Backgrounds.<br />
Import the Sprites and the Costumes.<br />
Position StudentSprite1 and StudentSprite2 on the hill.<br />
Jyoti: Now let us first write the detailed steps for StudentSprite1,<br />
StudentSprite2 and Background.<br />
Tejas: I will be student 1 and you are student 2. Let us act out the sequence<br />
and write the detailed steps.<br />
Wait Tejas.<br />
Let me hand you the tools.<br />
Tejas (with a smile says): That means<br />
we have to insert “wait __ secs”<br />
wherever necessary.<br />
Moz: Correct. Coordination between<br />
Sprites is important.<br />
Jyoti and Tejas write the detailed steps for each action:<br />
Detailed steps for - Step 1: Prepare for planting<br />
StudentSprite1<br />
Start the program.<br />
Change to Costume standing.<br />
Say “Let us start”, for 1 second.<br />
StudentSprite2<br />
Start the program.<br />
Change to Costume standing.<br />
Wait for 1 second.<br />
Wait for 1 second.<br />
Say “I will give you the<br />
saplings and the tools” for 1<br />
second.<br />
Change Costume to sitting<br />
position.<br />
Say “`Please give me the tools”<br />
for 1 second.<br />
Wait for 0.5 second.<br />
Wait for 1 second.<br />
Change Costume to giving tools.<br />
Wait for 0.5 second.<br />
Change Costume to digging.<br />
7
Detailed steps for - Step 1: Prepare for planting<br />
StudentSprite1<br />
Say “Thanks” for 1 second.<br />
StudentSprite2<br />
Change Costume to standing.<br />
Wait for 1 second.<br />
Say “There are earth worms<br />
in the soil!”, for 1 second.<br />
Wait for 1 second.<br />
Wait for 1 second.<br />
Say “They are good for the<br />
plants. They keep the soil<br />
loose.”<br />
Background<br />
Start the program.<br />
Switch to background showing the place where the saplings are to<br />
be planted.<br />
Wait for 4.5 seconds.<br />
Change to background with the place dug out and mud strewn<br />
around.<br />
Scratch block for StudentSprite1<br />
8
Scratch block for StudentSprite2<br />
Scratch block for Background<br />
background1<br />
background3<br />
Detailed steps for - Step 2: Plant the saplings<br />
StudentSprite1<br />
Change Costume to<br />
stretching the hand.<br />
Say “Please give me the<br />
Neem sapling”, for 1 second.<br />
StudentSprite2<br />
Change Costume standing.<br />
Wait for 1 second.<br />
Wait for 1 second.<br />
Change Costume to<br />
planting the sapling.<br />
Change Costume to<br />
giving the plant.<br />
Say “Here is the Neem<br />
sapling”, for 1 second.<br />
Change Costume standing.<br />
Background<br />
Change Background with the place dug out and mud strewn<br />
around.<br />
Wait for 3 seconds.<br />
Change Costume to background with the planted sapling.<br />
9
Scratch block for StudentSprite1<br />
Scratch block for StudentSprite2<br />
Scratch block for Background<br />
10
Detailed steps for - Step 3: Take care <strong>of</strong> the saplings<br />
StudentSprite1<br />
Change Costume to standing.<br />
Say “Planting done! Have<br />
to water the plant.”, for 1<br />
second.<br />
Wait for 1 second.<br />
StudentSprite2<br />
Change Costume to standing.<br />
Wait for 1 second.<br />
Change Costume to watering<br />
the plant.<br />
Say “I will water the plant”,<br />
for 1 sec.<br />
Change Costume to standing.<br />
Background<br />
Change Costume to Background with planted sapling.<br />
Scratch block for StudentSprite1<br />
Scratch block for StudentSprite2<br />
11
Scratch block for Background<br />
Jyoti: When it is the second student’s turn to plant, we<br />
can repeat the above blocks for StudentSprite1 and<br />
StudentSprite2, just by reversing the roles.<br />
Moz: Correct. Are there any steps where you can change the<br />
sequence?<br />
Tejas: Either <strong>of</strong> the two students can start planting the sapling.<br />
Jyoti: Both <strong>of</strong> them can also sit together, keep the tools in between<br />
and plant the saplings at the same time.<br />
Moz: Correct. For some activities the sequence does not matter, while for<br />
others the sequence matters. Now, enter the programs in Scratch and<br />
execute the animation.<br />
Jyoti: For the next “Fun with Scratch” activity, let us ask the students to<br />
make the Sprite draw an elephant, a joker, a butterfly or a dragon, step by<br />
step.<br />
Moz: That will be interesting. Are you giving any hints to help them complete<br />
the activity?<br />
Tejas: Yes. We will give hints.<br />
“Fun with Scratch” activity prepared by Tejas and Jyoti can be found on<br />
page number 23, as group activity (b).<br />
12
3. Dos and Don’ts: Asanas<br />
Tejas: Let us take a break and do some exercises.<br />
Samakonasana<br />
Manibandha chakra<br />
Skandha Chakra<br />
Akarna dhanurasana<br />
Hasta Utthanasana<br />
Rotational viewing<br />
Moz: Can you list some <strong>of</strong> the important precautions while using a computer.<br />
Tejas and Jyoti: Yes. We can.<br />
Do not work for more than half an hour at a time.<br />
If we are not using the mouse or keyboard then keep the hands<br />
relaxed.<br />
Keep your wrists straight while you are typing. Do not bend your<br />
wrists up, down or to the sides.<br />
Maintain a good posture to avoid pains and aches in the body.<br />
Do some stretching exercises and asanas for shoulders, wrists,<br />
legs and back.<br />
Exercise regularly to keep fit.<br />
Guidelines<br />
13
Moz: Are you blinking regularly?<br />
Tejas: Yes. And we also take breaks while using computers.<br />
Palming<br />
1 2<br />
Be a cat<br />
Minimize eye strain<br />
Blinking and looking away from the monitor need to be<br />
done frequently.<br />
Take eye-breaks every 10 minutes, by looking away from<br />
the screen and into the distance.<br />
Remember to clean your screen. If you wear glasses,<br />
clean them also.<br />
If you cannot read the text on the screen easily,<br />
increase the font size <strong>of</strong> your text, instead <strong>of</strong> going<br />
closer to the monitor.<br />
Do the eye exercises regularly to avoid strain on the<br />
eyes and to have good eyesight.<br />
Guidelines<br />
Moz: Now, What is your plan for “Exercises and Asanas” activity?<br />
Jyoti: Let us divide the class into groups and ask each group to demonstrate<br />
one asana.<br />
“Exercises and Asanas“ activity prepared by Tejas and Jyoti can be found on<br />
page number 23, as group activity (c).<br />
4. Fun with Text processing<br />
Moz: Good. Now you have one more activity that needs to be detailed.<br />
Tejas: Let us write about the history <strong>of</strong> computers in the Word Processor.<br />
Jyoti: The students can then format the document.<br />
Moz: What are the guidelines for formatting?<br />
Tejas: We will list them down so that we can give these guidelines to the<br />
students.<br />
14
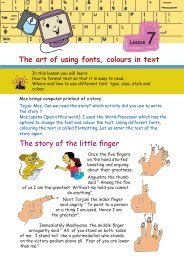
Formatting text<br />
Font type:<br />
Choose a font which is clear and easy to read.<br />
If you mix different types <strong>of</strong> fonts in a sentence, it will be<br />
difficult to read the sentence.<br />
Font size:<br />
Larger fonts are used for text which is important and to<br />
capture the attention <strong>of</strong> the reader.<br />
Font Style:<br />
Whenever you want to highlight or emphasize a word or<br />
sentence:<br />
Use either bold or italics style <strong>of</strong> the font.<br />
Use bold and italics together only if necessary.<br />
A different colour can be used for a word or sentence.<br />
Underline can also be used to draw attention.<br />
Remember not to use too much <strong>of</strong> bold, italics or colour in<br />
your story, essay or any document that you are preparing.<br />
Guidelines<br />
Moz: That is right. Can you use a number <strong>of</strong> fonts in a sentence?<br />
Jyoti: If there are too many font changes, then it is not easy to read.<br />
Moz: Correct.<br />
Jyoti and Tejas prepare an activity for “Fun with Text Processing” which is<br />
given as a worksheet on page number 20.<br />
Moz: Excellent. You have learned to do things systematically. Did you observe<br />
that you have planned the event step by step.<br />
Jyoti: Yes. We decided the main activities first. Then we detailed<br />
each activity.<br />
Tejas: Thanks Moz for helping us to plan the event. We would like to explore<br />
more <strong>of</strong> Scratch.<br />
Moz: Sure, we will start tomorrow. In the next lesson we will discuss problem<br />
solving with logical thinking. This will help you in writing programs for games,<br />
interactive greeting cards, etc., in Scratch.<br />
Chin Chinaki...<br />
Learning Outcome<br />
After you have studied this lesson,<br />
you will be able to:<br />
Recall and applay what was learnt in<br />
Level III, such as step-wise thinking,<br />
programming with Scratch, Asanas and<br />
text formatting.<br />
15
Level IV Lesson 1<br />
WORKSHEETS<br />
1. Various steps in digestion <strong>of</strong> food are given below. Write numbers from<br />
1 to 7 next to the sentences, as per the steps in digestion process.<br />
Oesophagus<br />
Liver<br />
Stomach<br />
Large Intestine<br />
Small Intestine<br />
Appendix<br />
Rectum<br />
Step 1<br />
You take a bite <strong>of</strong> food.<br />
_ _ _ _ _ _ _ _ _<br />
_ _ _ _ _ _ _ _ _<br />
Water is removed from the remaining food in<br />
this large intestine.<br />
Your teeth tear, chop and grind the food.<br />
_ _ _ _ _ _ _ _ _<br />
Food reaches the stomach. It is mixed with digestive<br />
juices and churned.<br />
_ _ _ _ _ _ _ _ _<br />
The waste food is thrown out through the rectum.<br />
_ _ _ _ _ _ _ _ _<br />
_ _ _ _ _ _ _ _ _<br />
The food is mixed with more digestive juices<br />
in this long, narrow intestine. The food breaks<br />
down further.<br />
The crushed food travels through the oesophagus.<br />
16
Level IV Lesson 1<br />
WORKSHEETS<br />
2. Circle True, if the statement is correct and False, if the statement<br />
is not correct.<br />
i. Increasing the text size on the computer screen<br />
will strain your eyes.<br />
True/False<br />
ii. You can work on a computer without breaks.<br />
True/False<br />
iii. If you are not typing or using the mouse, relax<br />
your hands in your lap.<br />
True/False<br />
iv. Zeba and Zubin are sharing the computer and<br />
sharing is a good habit.<br />
True/False<br />
v. Shishir is sitting in a low chair to work on the<br />
computer and this is the correct posture.<br />
True/False<br />
3. Bittu wants to do exercises for his eyes. Which <strong>of</strong> the following two<br />
exercises should he do?<br />
a) Palming<br />
b) Manibandha Chakra<br />
c) Blinking<br />
d) Samakonasana<br />
17
Level IV Lesson 1<br />
WORKSHEETS<br />
4. Following pictures show how rice (or paddy) is grown in Timbaktu. The<br />
pictures are given in a jumbled order. The three main steps are listed<br />
below. List out the detailed sequence <strong>of</strong> each main step in the blanks<br />
given below.<br />
Levelling Ploughing Sowing seeds in the nursery plot<br />
Seedlings grow<br />
Removing<br />
seedlings from<br />
nursery plot<br />
Transplanting<br />
seedling into<br />
fields<br />
Weeding<br />
Applying organic<br />
pesticide<br />
Flowering<br />
Main Step 1: Preparing the field.<br />
Detailed Steps: 1.1. Levelling<br />
Drying out in<br />
drained field<br />
1.2. Ploughing<br />
Cutting the crop<br />
Threshing<br />
Main Step 2: Preparing the rice plants.<br />
Detailed Steps: 2.1. 2.2. 2.3<br />
Main Step 3: Harvesting.<br />
Detailed Steps:<br />
18
Level IV Lesson 1<br />
WORKSHEETS<br />
5. State whether True or False.<br />
a. Dividing a task into smaller steps makes the task difficult to do.<br />
True/ False<br />
b. Take eye-breaks every 10 minutes by looking away from the screen<br />
into the distance.<br />
True/ False<br />
c. command can be used to stop a program in Scratch.<br />
True/ False<br />
d. To highlight or emphasize a word or sentence we can use bold style<br />
<strong>of</strong> the font.<br />
True/ False<br />
e. A computer can only work using step by step instructions from us.<br />
True/False<br />
6. Just like you draw step by step, you can also colour step by step.<br />
An example is shown below.<br />
1 2 3 4<br />
Now paint the following figure step by step.<br />
1 2 3 4<br />
7. Write a program in Scratch to show the step by step colouring in the<br />
above question.<br />
8. Help Tejas find the two exercises that are good for his shoulders.<br />
i. Hasta Utthanasana<br />
ii. Skandha Chakra<br />
iii. Manibandha Chakra<br />
19
Level IV Lesson 1<br />
WORKSHEETS<br />
9. Format the following document choosing a font type and colour. One<br />
<strong>of</strong> the paragraphs is done for you.<br />
History <strong>of</strong> Computers<br />
Since stone age people needed to count<br />
and calculate. Stone age men used stones for<br />
simple counting and calculations. The abacus<br />
was invented as an early aid for mathematical<br />
calculations. It was made <strong>of</strong> strings and<br />
beads. Using these beads people performed calculations. Many<br />
mechanical devices were later invented to help us in calculations. In a present<br />
times, computers are used to perform complex calculations.<br />
The history <strong>of</strong> modern computers dates back to 1945. The present day<br />
computer has crossed more than 3 generations. The classification <strong>of</strong> generations<br />
has been done based on technology, speed, storage, reliability and cost.<br />
The first generation computers used vacuum tubes. They were<br />
named ‘Eniac’, ‘Edvac’, and ‘Univac’. They were enormous (taking up<br />
entire rooms), very expensive to operate and used a great deal <strong>of</strong><br />
electricity, generated a lot <strong>of</strong> heat, which was <strong>of</strong>ten the cause <strong>of</strong><br />
malfunctions.<br />
In the second generation <strong>of</strong> computers, transistors<br />
replaced the vacuum tubes. The transistor was far superior<br />
to the vacuum tube. Computers became smaller, faster,<br />
cheaper, more energy-efficient and reliable. But still it<br />
generated a lot <strong>of</strong> heat which <strong>of</strong>ten damaged the computer.<br />
The invention <strong>of</strong> integrated circuits ushered in the next generation <strong>of</strong><br />
computers. With the developments in the integrated circuits, large number<br />
components could be fit into a small chip. A microprocessor is a single integrated<br />
circuit which incorporates most or all <strong>of</strong> the functions <strong>of</strong> a central processing unit<br />
(CPU). These developments reduced the size and<br />
price <strong>of</strong> the computers at the same time increasing<br />
power, efficiency and reliability. The computers in<br />
the latest generation are the Desktop, Notebook<br />
or Laptop, Palmtop, Server, Mainframe and Super<br />
Computer.<br />
20
Level IV Lesson 1<br />
Open Educational suite GCompris and play the following games:<br />
1. Invisible Maze: Help Tux get out <strong>of</strong> this maze. Use the keyboard arrows to move Tux<br />
up to the door. You can switch between invisible and visible modes using the spacebar.<br />
Visible mode just gives you an indication <strong>of</strong> your position, like a map. You cannot move<br />
Tux in visible mode.<br />
Invisible mode<br />
Visible mode<br />
2. Memory game Flash cards: You can see only one side <strong>of</strong> the cards. Each card is hiding<br />
an operation, or the answer to it. You are playing against Tux, the penguin. You need<br />
to find the two parts <strong>of</strong> the operation, and bring them together again. Click on a card<br />
to see what number it is hiding, and then try to find the other card that goes with it,<br />
to make a whole operation.<br />
You are doing the job <strong>of</strong> the equals sign, and the numbers need you to put them<br />
together and make a proper equality. When you do that, both those cards disappear!<br />
When you have made them all disappear, you have won the game!<br />
21
Level IV Lesson 1<br />
3. gbrainy: This is a brain teaser game and allows you to play games related to memory,<br />
calculation and logic. To play this game, follow these steps:<br />
Applications ---> Games ---> gbrainy<br />
Group Activity:<br />
a. Famous Five on a Vacation:<br />
Form groups <strong>of</strong> Five children. Imagine that you are on a vacation with your friends (the<br />
group members). Example: Taj Mahal, Munnar hills, Goa beaches, or Timbaktu. When<br />
you are in such a place what would you talk about? Act out the conversation. Write<br />
down the conversation. Write a Scratch program with the place as the background and<br />
your conversation to the Sprite. Remember to first write the detailed steps for each<br />
Sprite and the background. Then convert it into a Scratch program.<br />
Hint: Each member <strong>of</strong> the group is represented by a Sprite. Have fun using animals,<br />
birds, insects as Sprites. Use Looks, Control, Motion and Sound blocks.<br />
22
Level IV Lesson 1<br />
b. Anything is easy to draw!<br />
Draw step by step:<br />
Form groups <strong>of</strong> three children each. Each group selects one <strong>of</strong> the following drawings<br />
which can be drawn using step by step:<br />
1. An elephant 3. A dragon<br />
2. A butterfly 4. A joker<br />
Write a program in Scratch to demonstrate step by step drawing <strong>of</strong> the selected<br />
drawing.<br />
Hint: Draw a Costume for each step using Paint. Use instructions from Looks, Control<br />
and Sound blocks. Some instructions that can be used are:<br />
Example: Costumes to draw a<br />
joker step by step.<br />
c. Choose and Demo:<br />
Divide the class into eight equal groups. On small sheets <strong>of</strong> paper write the names <strong>of</strong><br />
the exercises and asanas. Fold these papers and put them in a bowl. A member <strong>of</strong> the<br />
group picks up one <strong>of</strong> the folded papers from the bowl. The group then demonstrates<br />
the exercise or asana that is written on the paper.<br />
1. Kehuni Naman.<br />
2. Manibandha Chakra.<br />
3. Greeva Sanchalana.<br />
4. Akarna Dhanurasana.<br />
5. Samakonasana.<br />
6. Be a cat.<br />
7. Rotational viewing.<br />
8. Palming.<br />
Explore!<br />
1. Find out about Carpal Tunnel Syndrome. What are<br />
its causes and how can it be avoided?<br />
2. Find out how you can use your own pictures as a<br />
Sprite in Scratch.<br />
23
Teacher’s<br />
Corner<br />
Level IV<br />
Lesson 1<br />
The first lesson <strong>of</strong> Level IV is a revision chapter. It is important that students have a clear<br />
understanding <strong>of</strong> the concepts covered in Book III before they start learning new topics. You<br />
can begin the class by asking the students how they spent their vacation. Some students<br />
would mention that they visited their relatives or travelled to a new place.<br />
You can ask them how they planned the trip and list the different steps involved in the<br />
activity. Summarize the main and detailed steps. Draw attention <strong>of</strong> the students to the<br />
reasoning involved in taking decision for each step. Mention that they will learn more<br />
thinking skills this year.<br />
You can make the students enact the vanmahotsav activity in the lesson.<br />
You can ask the students to write a short paragraph on activities during the vacation,<br />
using the text editor. Encourage them to use the different formatting options to make the<br />
paragraph easy to read.<br />
Revise the various exercises they learnt to keep fit while using computers. Ask the students<br />
to demonstrate these in the class. You can play a game where each row in the classroom<br />
represents one group. Ask one group to mention the name <strong>of</strong> the asana and the second<br />
group demonstrates it. You can also reverse the format, wherein one group shows the<br />
exercise and other group mentions its name. Make the game more challenging by asking a<br />
few random questions open to all the groups such as demonstrate the correct posture while<br />
using the computer. End the session by listing the different asanas for neck, back, eyes and<br />
shoulders.<br />
Ask the students to mention the various activities they did with computers. Students would<br />
mention about Scratch and the different projects they had written. Let one student start<br />
this application and run a short program such as drawing a square. Another student can<br />
show how to control the given project by using the different control commands. Revise the<br />
different commands <strong>of</strong> Scratch covered in Level III. Tell the students that they will learn<br />
new commands this year that will allow them to write interesting projects using Scratch.<br />
Ask the students to read the detailed steps for writing a script for the vanmahotsav project<br />
explained in the lesson.<br />
End the class by summarizing the different topics covered in Level III. Allow the students<br />
to have adequate hands-on practice by giving them appropriate exercises, especially in<br />
Scratch.<br />
Further Reading:<br />
http://school.discoveryeducation.com/brainboosters/<br />
24
Notes:<br />
25
Lesson<br />
2<br />
Logical Thinking<br />
Aim<br />
In this lesson you will learn:<br />
Step by step approach and reasoning to solve problems.<br />
How to use what you already know to solve problems.<br />
How to tackle a task when you do not know anything about it.<br />
Tejas: Fruits! I like fruits. They are good<br />
for health.<br />
Moz: Correct. You can have them.<br />
But first you have to solve this puzzle.<br />
There are four types <strong>of</strong> fruits:<br />
Apples, Oranges, Bananas and Grapes.<br />
Each one <strong>of</strong> you must pick two types <strong>of</strong> fruits.<br />
Note the following conditions:<br />
If you pick apple you cannot pick orange.<br />
If you pick orange you cannot pick banana.<br />
If you pick grapes you cannot pick apple.<br />
Tejas: I want an apple. With apple I cannot pick an orange or grapes. So I<br />
pick apple and banana.<br />
We know: There are four types <strong>of</strong> fruitsapples,<br />
oranges, bananas and grapes.<br />
Goal: Tejas has to pick two fruits. He likes apples.<br />
What other fruit can he take?<br />
Answer: Banana<br />
26
Jyoti: I like oranges. With orange I cannot pick banana or<br />
apple. Hence I pick orange and grapes.<br />
Moz: Very good logical thinking. Can I pick banana and grapes?<br />
Tejas and Jyoti: Yes, you can!<br />
Main steps in logical thinking<br />
I. Task: Read the problem carefully.<br />
Example problem: What comes next in the sequence below?<br />
II. Identify: As you are reading make a note <strong>of</strong> the following:<br />
1. Goal- What is the goal?<br />
To find the fourth shape in the sequence.<br />
2. Information- What is the information available?<br />
A sequence <strong>of</strong> geometrical shapes is given.<br />
In the sequence, the first shape has 3 sides, the second<br />
has 4 sides, and the third has 5 sides.<br />
CONCEPTS<br />
3. Conditions- What are the conditions?<br />
In the given sequence, from one shape to the next, the<br />
number <strong>of</strong> sides is increasing by 1 .<br />
III. Solve: Achieve the goal by using the given information and<br />
following the conditions.<br />
1. Reasoning- The fourth shape should have 5+1 = 6 sides.<br />
2. Solution- Work out the solution in a step-wise manner.<br />
The problem is solved!<br />
Moz: Let us look at another example. You are walking towards a play ground.<br />
But the playground is on the other side <strong>of</strong> the road. So what do you do?<br />
27
Jyoti: We know that we have to first reach a crossing where there are traffic<br />
lights.<br />
Tejas: Next, we check that the vehicles on both sides <strong>of</strong> the road have<br />
stopped before crossing. Then we can cross.<br />
1 3<br />
2<br />
Jyoti: The condition is that we should follow traffic light rules.<br />
Moz: Good. It is very important to learn about the traffic rules and follow<br />
them.<br />
I. Task: To cross the road.<br />
II. Identify:<br />
1. Goal- Cross the road.<br />
2. Information available-<br />
There are vehicles on the road.<br />
There is a zebra crossing with a traffic signal.<br />
3. Conditions-<br />
Wait for the green signal before crossing the road.<br />
No vehicles should be moving while we cross.<br />
III. Solve:<br />
1. Reasoning- We should wait till the crossing signal is green<br />
and the vehicles have stopped moving.<br />
2. Solution- Steps: 1) Come to a zebra crossing.<br />
2) Wait for green signal.<br />
3) Ensure vehicles have stopped.<br />
4) Cross the road.<br />
28
Moz: If you do not know the rules then what do you do?<br />
Tejas: Ask parents, teachers, other elders whom you know.<br />
Jyoti: Observe others who are performing the task.<br />
ex: Observe, how people wait till the green signal to cross is on, and all<br />
the vehicles in both the directions stop.<br />
Moz: Why do you follow the traffic rules?<br />
Jyoti: To be safe.<br />
Tejas: If we do not follow traffic rules, we can get hit by a vehicle and<br />
get hurt.<br />
CONCEPTS<br />
We use logical thinking to solve problems. This involve 3 steps :<br />
1. First identify the goal.<br />
2. Understand the given information, the rules and conditions.<br />
3. Work out the solution in a step-wise manner.<br />
“What”, “When” and “Why”, are questions that can help in thinking<br />
logically, to find out “How” to reach the goal.<br />
Moz: Did you know that you already use logical reasoning to solve puzzles,<br />
math’s problems, science experiments and other subjects?<br />
Moz brings out four pieces <strong>of</strong> a chain and gives<br />
Tejas and Jyoti the following problem:<br />
You are given four pieces <strong>of</strong> a chain.<br />
Each piece has three links in it.<br />
The links can be opened and closed.<br />
Join all 12 links <strong>of</strong> the chain into a single<br />
circle, as shown below.<br />
At the beginning <strong>of</strong> the problem all the links<br />
are closed.<br />
Each <strong>of</strong> the actions “opening a link” and “closing a link”<br />
is counted as one action.<br />
Total number <strong>of</strong> actions to form the single circular chain should not<br />
exceed 6.<br />
A<br />
1 2 3<br />
B<br />
C<br />
D<br />
29
Tejas and Jyoti make a note <strong>of</strong> the information available and the conditions<br />
<strong>of</strong> the problem as follows:<br />
I. Task: To make a circular chain.<br />
II. Identify:<br />
1. Goal- Join all the 12 links into a single circle.<br />
2. Information available-<br />
Four pieces <strong>of</strong> chain.<br />
Each chain has three closed links inter-connected.<br />
The links can be closed and opened.<br />
3. Conditions-<br />
Opening a link or closing a link is counted as one action.<br />
Number <strong>of</strong> actions to complete the task should not be<br />
more than six.<br />
III. Solve:<br />
(See the next box.)<br />
A<br />
B<br />
C<br />
D<br />
Tejas: Let us open link at the end <strong>of</strong> chain ‘A’ and<br />
connect it to the beginning link <strong>of</strong> chain ‘B’.<br />
Jyoti: Then we will open the end link <strong>of</strong> ‘B’ and<br />
connect it to the beginning link <strong>of</strong> the chain ‘C’.<br />
Moz: The number <strong>of</strong> actions are now 4. You have<br />
two more actions to complete the circular chain.<br />
Tejas: Oh! We cannot complete in two more actions<br />
as we still have to connect the ‘D’ chain and then<br />
close the circle. What should we do?<br />
1 2 3<br />
A<br />
Tejas and Jyoti start thinking <strong>of</strong> other<br />
options and they keep playing with one<br />
chain. Tejas accidentally opens all the links<br />
<strong>of</strong> chain A.<br />
B<br />
C<br />
Tejas (exclaims): Look! The three links <strong>of</strong> chain A<br />
D<br />
are open. Let us try connecting other chains B, C and<br />
D with these links.<br />
Jyoti: We have already used three actions for opening the three links <strong>of</strong><br />
chain A. We have to achieve the goal with three more actions!<br />
30
Jyoti: With link 1 <strong>of</strong> chain A let us connect chains B and C. We have seven<br />
links interconnected. Total number <strong>of</strong> actions is 4.<br />
Tejas: Now connect the chain D to these 7 links using the link 2 <strong>of</strong> chain A.<br />
We have a long chain <strong>of</strong> 11 links. Total number <strong>of</strong> actions is 5.<br />
Jyoti: Complete the circle using link 3 <strong>of</strong> chain A!<br />
Problem solved using 6 actions.<br />
Moz: Very good.<br />
III. Solve: (Continued from previous box.)<br />
1. Reasoning- Try various options for the solution. Find one<br />
option that leads to the goal without breaking the conditions<br />
given.<br />
Example: Circular chain problem:<br />
Option 1:<br />
Open a link from each chain to make the circular chain.<br />
Option 1 does not satisfy the conditions.<br />
Option 2:<br />
Open all the three links <strong>of</strong> one <strong>of</strong> the chains.<br />
Option 2 satisfies the conditions.<br />
2. Solution- Achieve the goal by choosing the option that<br />
satisfies the conditions. Work out the detailed steps<br />
required to reach the goal.<br />
Moz: You have been able to solve the problem very easily. You already know<br />
how to think logically. Would you like to solve a different type <strong>of</strong> puzzle?<br />
Tejas: Oh! yes.<br />
Moz: Here is the problem <strong>of</strong> a farmer I met yesterday.<br />
Farmer’s problem:<br />
Kishan, the farmer has to take a fox, a chicken, and a bag <strong>of</strong> corn safely<br />
across a river in a boat. He can take only one thing at a time in the boat.<br />
He cannot leave the fox and the chicken<br />
together on either side <strong>of</strong> the river, since<br />
the fox will eat the chicken. Likewise, he<br />
cannot leave the chicken along with the<br />
bag <strong>of</strong> corn, since the chicken will<br />
eat the corn. How can the farmer<br />
get everything across the river<br />
without anything being eaten?<br />
31
Tejas and Jyoti discuss the problem and first list out the information, goal<br />
and conditions.<br />
I. Task: The farmer, fox, chicken, and corn have to cross the river.<br />
II. Identify:<br />
1. Goal- Farmer has to take the chicken, fox and the corn to the<br />
other side <strong>of</strong> the river in the boat.<br />
2. Information available-<br />
A river that can be crossed by boat.<br />
A farmer who owns a boat.<br />
The farmer has with him a fox, chicken and some corn.<br />
3. Conditions-<br />
The farmer can take only one item at a time in his boat<br />
(either the fox or the chicken or corn).<br />
On either side <strong>of</strong> the river the farmer cannot leave:<br />
Fox and chicken together.<br />
Chicken and corn together.<br />
III. Solve:<br />
(See the next box.)<br />
Tejas: Suppose the farmer takes the chicken first and leaves it on the<br />
other side.<br />
Moz: Why did you choose chicken first?<br />
Tejas: If we take the fox then chicken and corn will be left together. The<br />
chicken will eat the corn.<br />
Jyoti: The farmer cannot leave the fox and chicken together because the<br />
fox will eat the chicken.<br />
Moz: Good reasoning.<br />
fox and chicken together<br />
Chicken and corn together<br />
But he can leave fox and<br />
corn together<br />
32
III. Solve: (Continued from previous box.)<br />
1. Reasoning- For the first step<br />
Option 1:<br />
First take fox in the boat.<br />
Then chicken and corn will be together.<br />
Chicken will eat the corn.<br />
Option 1 does not satisfy the conditions.<br />
Option 2:<br />
First take corn in the boat.<br />
Then fox and chicken will be together.<br />
Fox will eat the chicken.<br />
Option 2 does not satisfy the conditions.<br />
Option 3:<br />
First take chicken in the boat.<br />
Then fox and corn will be together.<br />
Fox does not eat the corn.<br />
Option 3 satisfies the conditions.<br />
2. Solution- Choose option 3 and proceed.<br />
Detailed steps are shown below.<br />
1<br />
Step 1: Farmer takes the chicken<br />
in the boat and leaves it on the<br />
other side <strong>of</strong> the river and comes<br />
back alone.<br />
Jyoti: Next the farmer takes the corn.<br />
Tejas: But he cannot leave the corn and chicken together on the other side <strong>of</strong><br />
the river. So the farmer should leave the corn and bring back the chicken.<br />
2<br />
Step 2: The farmer takes the<br />
corn to the other side <strong>of</strong> the<br />
river. He leaves the corn and<br />
brings back the chicken.<br />
33
Tejas: Next the farmer takes the fox and leaves it on the other side.<br />
3<br />
Step 3: The farmer takes<br />
the fox and leaves it on the<br />
other side and comes back.<br />
Moz: Good. So the fox and corn on the other side can be left together.<br />
Jyoti: Yes. He comes back and then takes the chicken.<br />
4<br />
Step 4: The farmer takes the<br />
chicken to the other side <strong>of</strong><br />
the river.<br />
Jyoti: Farmer’s problem solved! That was fun to solve.<br />
CONCEPTS<br />
Logical thinking<br />
1. Identify - the goal, the information given, and the conditions<br />
<strong>of</strong> a problem.<br />
2. Solve the problem in a step-wise manner to achieve the goal.<br />
CONCEPTS<br />
Step-wise thinking<br />
1. Identify the main steps.<br />
2. List the detailed steps for each main step to achieve the goal.<br />
Moz: Now consider the second step again. Can the farmer take the fox instead<br />
<strong>of</strong> the corn?<br />
Tejas: Oh! Yes. Either fox or corn can be taken in the boat to the other<br />
side.<br />
Jyoti: But he has to bring back the chicken.<br />
Moz: Correct. Now what will be the next step?<br />
Tejas: The farmer takes the corn to the other side and comes<br />
back.<br />
Jyoti: Then he takes the chicken in the last step.<br />
34
Farmers problem solved<br />
Step 1: Farmer takes the chicken in the boat, leaves it on the other<br />
side <strong>of</strong> the river and come backs empty.<br />
Step 2: The farmer takes the fox and brings back the chicken.<br />
Step 3: The farmer takes the corn to the other side and comes back<br />
empty.<br />
Step 4: The farmer then takes the chicken.<br />
Moz: See how easy it is to solve a problem by first understanding<br />
the given information, the conditions and the goal.<br />
Tejas: And then solve it step by step!<br />
Jyoti: We have also found out that there can be many ways in<br />
which we can solve a problem.<br />
CONCEPTS<br />
A problem can have more than one correct solution.<br />
The sequence <strong>of</strong> steps may be fixed in some cases (only one<br />
solution) or interchangeable in others (more than one solution).<br />
Moz: Correct. Now apply step by step thinking and logical<br />
reasoning while you solve problems in other subjects.<br />
Tomorrow we can use what you learned and build some<br />
interesting games using Scratch.<br />
Chin Chinaki...<br />
Learning Outcome<br />
After you have studied this lesson,<br />
you will be able to:<br />
Identify the goal, the information<br />
given and conditions <strong>of</strong> a problem.<br />
Solve the problem step by step using<br />
logical reasoning.<br />
35
Level IV Lesson 2<br />
WORKSHEETS<br />
1. Solve anagrams and match the columns.<br />
In anagrams, alphabets in a word are presented in jumbled order.<br />
You have to set them in correct order to form the word. For instance, ‘D<br />
R E’ is an anagram <strong>of</strong> ‘RED’.<br />
a. Following are some things you carry to the school everyday. Solve the<br />
anagrams and match the columns.<br />
S. No. Anagram Word Object<br />
1 K B O O<br />
2 F I T F I N<br />
3 G A B<br />
4 C I P E N L<br />
5 X O B<br />
BOX<br />
36
Level IV Lesson 2<br />
WORKSHEETS<br />
b. Following are names <strong>of</strong> some vehicles that are used for transportation.<br />
Solve the anagrams and match the columns.<br />
S. No Anagram Word Object<br />
1 R N T I A<br />
2 P S I H<br />
3 L C Y E C<br />
4 S B U<br />
BUS<br />
5 R A C<br />
37
Level IV Lesson 2<br />
WORKSHEETS<br />
2. Chiku, the rabbit has to hop his way to find the carrots on the island.<br />
With each hop, he crosses five tiles. How many times will he have to<br />
hop to reach the carrots.<br />
I. Task: Rabbit has to find the carrots on the island.<br />
II. Identify:<br />
1. Goal: Reach carrots on tile _______.<br />
2. Information: There are _______ tiles.<br />
1 2 3 4 5<br />
6<br />
7<br />
8<br />
3. Conditions: hops <strong>of</strong>_______ tiles.<br />
III. Solution: Hop on tile numbers 5, 10, __ , __ , 25.<br />
So the number <strong>of</strong> hops =____.<br />
9<br />
10<br />
11<br />
12<br />
13<br />
14<br />
15 16 17 18 19<br />
25<br />
24<br />
23<br />
22<br />
21<br />
20<br />
Another way <strong>of</strong> solving:<br />
25 5 = _______ hops.<br />
3. Munmun, the squirrel has to eat the groundnut. Help her reach it.<br />
38
Level IV Lesson 2<br />
WORKSHEETS<br />
4. Complete the following sequences by writing the steps as shown in the<br />
first problem below:<br />
a. 9, 10, 12, 15, ?<br />
1. Goal:<br />
Find the 5 th number in the sequence.<br />
2. Information:<br />
4 numbers <strong>of</strong> a sequence in ascending order.<br />
3. Condition: We observe that<br />
9 + 1 = 10, 10 + 2 =12, 12 + 3 =15<br />
4. Reasoning:<br />
We added 1 to first number and got second number. 9+1=10<br />
We added 2 to second number and got third number. 10+2=12<br />
We added 3 to third number and got fourth number. 12+3=15<br />
We should add 4 to fourth number to get the fifth number.<br />
5. Solution: 15+4=19<br />
b. 1, 2, 4, 7, ?<br />
A) 10 B) 11<br />
c. 10, 9, 7, 4, ?<br />
A) 8<br />
B) 1 C) 2<br />
C) 5 D) 12<br />
D) 0<br />
d. 12, 8, 5, 3, ?<br />
A) 2<br />
B) 10<br />
C) 1<br />
D) 7<br />
5. Can you help Jyoti to solve the following puzzles.<br />
a. Some figures are given below. Observe them.<br />
Now match the shapes with their colour.<br />
YELLOW RED BLUE GREEN<br />
39
Level IV Lesson 2<br />
WORKSHEETS<br />
b. Observe the following figures.<br />
Fill in the blanks and colour the triangles in the grid below. The Red<br />
triangle should be between yellow and blue triangles. The first triangle<br />
is the Yellow one.<br />
1. Goal: Colour the grid.<br />
2. Information: First triangle is _______.<br />
3. Condition: Red triangle should be between _______ and _______<br />
triangles.<br />
4. Reasoning:<br />
So the third triangle is _______.<br />
The second triangle is _______.<br />
The fourth triangle is _______.<br />
c. Study the following figures.<br />
The Red square comes in between the brown and yellow squares. Blue<br />
square is the first square in the grid. Black square is directly above the<br />
yellow square.<br />
Fill in the blanks and colour the squares in the grid that follows:<br />
1. Goal: Colour the squares in the grid.<br />
2. Information: _______ square is the first square in the grid.<br />
40
Level IV Lesson 2<br />
WORKSHEETS<br />
3. Condition:<br />
Red square comes in between the _______ and yellow<br />
squares.<br />
_______ square is directly above the yellow square.<br />
4. Reasoning and solution:<br />
The squares in the second row are brown, _______ , yellow.<br />
The remaining square next to blue is _______ square.<br />
6. Minu will go hiking with her friend in 2 weeks. Today is January 3rd.<br />
What is the date on which Minu will go hiking?<br />
1. Information:<br />
Today is _______.<br />
Minu will go hiking in _______ weeks.<br />
2. Reasoning:<br />
Two weeks means _______ days.<br />
3. Solution:<br />
3+ _______ = _______.<br />
Minu will go hiking on January_______.<br />
7. Can you tell what comes next? Circle the correct option from a,b,c<br />
given below.<br />
i.<br />
?<br />
a. b. c.<br />
41
Level IV Lesson 2<br />
WORKSHEETS<br />
ii.<br />
?<br />
a. b. c.<br />
iii.<br />
?<br />
a. b. c.<br />
iv.<br />
?<br />
a. b. c.<br />
42
Level IV Lesson 2<br />
WORKSHEETS<br />
8. Solve the following puzzles:<br />
a. Kartar, Seema and Rahul collect different items. One collects stamps, one<br />
collects insect pictures and one collects toy car pictures. Rahul exchanged<br />
his car pictures for insect pictures. Seema doesn’t like cars but likes<br />
getting letters. Kartar thinks insects are too small to worry about. What<br />
do Kartar, Seema and Rahul collect?<br />
Kartar Seema Rahul<br />
Information:<br />
_______, _______, and _______ are collectors.<br />
Conditions:<br />
i. _______ swapped his car pictures for _______ pictures.<br />
ii. Seema doesn’t like cars but likes getting _______ .<br />
iii. Kartar thinks _______ are too small to worry about.<br />
Reasoning and solution:<br />
1. By condition (i), Rahul collects _______ pictures.<br />
2. By condition (ii), Since Seema likes getting letters. Letters have<br />
_______ stuck on them, so Seema collects _______.<br />
3. By condition (iii) and (i), Kartar collects _______ pictures.<br />
43
Level IV Lesson 2<br />
WORKSHEETS<br />
b. Amina, Manish, and Jeet each ate something different for breakfast. One<br />
had toast, one had chapati, and one had an apple for breakfast.<br />
i. Amina likes to eat either an apple or toast for breakfast.<br />
ii. Only Manish and Jeet like chapati for breakfast.<br />
iii. Jeet did not have chapati or toast for breakfast.<br />
What did each person have for breakfast?<br />
Amina Manish Jeet<br />
Goal:<br />
Find who ate what for breakfast.<br />
Information:<br />
i. There are 3 items for breakfast- apple, chapati and toast.<br />
ii. There are 3 children- Amina, Manish, Jeet.<br />
iii. Jeet did not have chapati or toast.<br />
Condition:<br />
i. _______ likes to eat either an _______ or toast for breakfast.<br />
ii. _______ and Jeet like chapati for _______.<br />
Reasoning:<br />
1. From information, Jeet ate _______.<br />
2. Since Jeet ate _______, by condition (i). Amina ate _______.<br />
3. From 1 and 2 above, we find that _______ is left. Hence, Manish<br />
ate _______.<br />
Solution:<br />
Jeet ate _______.<br />
Amina ate _______.<br />
Manish ate _______.<br />
44
Level IV Lesson 2<br />
1. Sudoku: Select Applications ---> Games ---> Sudoku<br />
The rules <strong>of</strong> Sudoku are quite simple. In order to complete the puzzle, you must fill<br />
each square with a number between 1 to 5. Each row and each column contains the<br />
digits from 1 to 5 only once. That means, you must fill each square such that no number<br />
appears twice in the same row or column. Ask questions like:<br />
“How can I fit all the numbers in this box?”<br />
“What numbers can fit in a square satisfying the given conditions?”<br />
Think logically and solve the puzzle.<br />
As the level <strong>of</strong> the game increases, the difficulty level and the number <strong>of</strong> grids also<br />
increases.<br />
45
Level IV Lesson 2<br />
2. Chess: Select Applications ---> Games ---> Chess<br />
Goal: The object <strong>of</strong> the game is to checkmate the opponent’s king. This occurs when<br />
the king is under immediate attack (in check) and there is no way to remove it from<br />
attack on the next move. Learn to play by trial and error.<br />
Information: Chess is a two-player board game. You can play this game with the<br />
computer (as a second player). Chess is played on a square chessboard, consisting <strong>of</strong><br />
64 squares <strong>of</strong> alternating colour. Each player begins the game with sixteen pieces: one<br />
king, one queen, two rooks, two knights, two bishops, and eight pawns.<br />
Rules: One player controls the white pieces and the other player controls the black<br />
pieces; the player that controls white is the first to move. The players take turns<br />
moving pieces; certain moves involve a “capturing” <strong>of</strong> an opponent’s piece, removing<br />
it from the chessboard. Movement <strong>of</strong> each type <strong>of</strong> piece has a rule. Find these rules<br />
using “help”. Discover more rules on your own by playing with the computer.<br />
46
Level IV Lesson 2<br />
3. Tux math: Select Applications ---> Games ---> Tux math<br />
Your mission is to save the penguins’ igloo from the falling comets. Stop a comet by<br />
typing the correct answer to the math problem and pressing the space bar or enter.<br />
If an igloo gets hit by a comet, it melts. But do not worry, the penguin is ok! Type the<br />
correct answer on the comet before it hits the igloo.<br />
(Note: You can select what kind <strong>of</strong> operations you want to solve and change the<br />
difficulty level.)<br />
Group Activity:<br />
1. Enact the following story in the class.<br />
2. Answer the questions given at the end <strong>of</strong> the story.<br />
Unity is Strength<br />
Once upon a time, there was a flock <strong>of</strong> doves that flew in search <strong>of</strong> food led by<br />
their king. One day, they had flown a long distance and were very tired. The dove king<br />
encouraged them to fly a little further. The smallest dove picked up speed and found<br />
some rice scattered beneath a banyan tree. So all the doves landed and began to eat.<br />
Suddenly a net fell over them and they were all trapped. They saw a hunter<br />
approaching carrying a huge club. The doves desperately fluttered their wings trying to<br />
get out, but to no avail.<br />
The king had an idea. He advised all the doves to fly up together carrying the net<br />
with them. He said that there was strength in unity.<br />
47
Level IV Lesson 2<br />
Each dove picked up a portion <strong>of</strong> the net and together they<br />
flew <strong>of</strong>f carrying the net with them. The hunter looked up in<br />
astonishment. He tried to follow them, but they were flying high<br />
over hills and valleys. They flew to a hill near a city <strong>of</strong> temples,<br />
where lived a mouse who could help them. He was a faithful friend<br />
<strong>of</strong> the dove king.<br />
When the mouse heard the loud noise <strong>of</strong> their approach, he went into hiding. The<br />
dove king gently called out to him and then the mouse was happy to see him. The dove<br />
king explained that they had been caught in a trap and needed<br />
the mouse’s help. He asked the move to gnaw at the net with his<br />
teeth and set them free.<br />
The mouse agreed saying that he would set the king free<br />
first. The king insisted that his subjects be freed first and the<br />
king last. The mouse understood the king’s feelings and complied<br />
with his wishes. He began to cut the net and one by one all the<br />
doves were freed, including the dove king.<br />
They all thanked the mouse and flew away together, united in their strength.<br />
Questions to be answered:<br />
i. How were the doves saved?<br />
ii. What would have happened if all the doves did not listen to their king?<br />
iii. Why is it important to be united?<br />
iv. Finally, list out the information, conditions, reasoning and the solution.<br />
Project<br />
Do project 1 given in lesson 7.<br />
Explore!<br />
1. A shoe can be used for several activities besides<br />
covering your feet. Suggest twenty different uses<br />
<strong>of</strong> a shoe.<br />
2. What are the conditions in constructing a building?<br />
Can you put beams before columns?<br />
48
Teacher’s<br />
Corner<br />
Level IV<br />
Lesson 2<br />
Start the class by revising the step-wise thinking lesson. Now bring out the importance <strong>of</strong><br />
thinking capabilities. Ask students what they do to keep physically fit. They may say, ‘We<br />
exercise our body to remain physically fit’. Tell them, that exercise <strong>of</strong> mind is important<br />
for mental fitness. Mention that solving puzzles, mental sums, stories and computer games<br />
can be an effective mechanism for exercise <strong>of</strong> the mind.<br />
The purpose <strong>of</strong> this lesson is to build clarity <strong>of</strong> thought in students. A foundation for the<br />
same is provided by step-wise thinking and it is further reinforced in this lesson.<br />
To teach logical thinking, discuss examples where children use logical thinking in every day<br />
life. For instance, you may ask the students, why they do not cross the road when vehicles<br />
are moving. You can elaborate that while crossing the road, they reason out that: (i) they<br />
should not cross the road when the vehicles are passing, and (ii) they may be hit if they are<br />
not careful. They wait for the walk signal to be green, so that the vehicles stop and they cross<br />
the road safely.<br />
Ask several ‘WHY’ questions. For example:<br />
i. Why are vegetables washed before cooking?<br />
ii. Why do you not put your finger in the flame <strong>of</strong> a burning candle?<br />
iii. Why should we learn good manners?<br />
iv. Why should we help others?<br />
v. Why should we speak truth?<br />
Explain that step wise thinking is about identifying the steps <strong>of</strong> a solution. The sequence<br />
<strong>of</strong> steps may be fixed sometimes or interchangeable. For logical reasoning, they have to<br />
understand the rules and conditions. You can give the example <strong>of</strong> cooking a vegetable.<br />
First ask them about the steps to follow. Tell them that this is an example <strong>of</strong> making a<br />
vegetable. Now question them on why to follow the steps in that order. In many a situation,<br />
questioning leads to logical reasoning and finding a solution. Encourage students to ask<br />
questions while solving a problem.<br />
Narrate a story to the students that highlights logical thinking. Ask them questions that<br />
require logical reasoning after you have told them the story. For example, you can refer<br />
stories <strong>of</strong> Akbar and Birbal, Tenali Raman.<br />
Explain the concepts covered in the lesson and make the students solve the examples in<br />
the class. You can make the students enact the puzzles in the class and help them solve it.<br />
Tell the students that many a times they have to make a choice. For this, logical thinking is<br />
required. Pose the puzzle <strong>of</strong> choosing fruits in the lesson to illustrate this.<br />
Summarise the lesson emphasizing the importance <strong>of</strong> thinking. Give them puzzles to solve<br />
where they have to detail the steps and understand the conditions to arrive at the answer.<br />
Further Reading:<br />
http://www.kidsdomain.com/kids/links/Puzzles.html<br />
http://www.indiaparenting.com/stories/panchatantra/panch010.shtml<br />
http://www.aimsedu.org/Puzzle/fencingNum/fence1.html<br />
http://www.det.wa.edu.au/education/gifttal/activities/ideas.htm<br />
49
Lesson<br />
3<br />
Programming Multiple Sprites in Scratch<br />
Aim<br />
In this lesson you will learn:<br />
To demonstrate actions like games, in Scratch.<br />
To program coordination between various Sprites.<br />
Tejas: We want to animate two Sprites playing throw ball.<br />
Moz: How is this game played?<br />
Tejas: I throw the ball and Jyoti catches<br />
it. Next Jyoti throws and I have to<br />
catch it. Many players can also play this<br />
game together.<br />
Moz: Good! Now, plan the Scratch<br />
project for the game.<br />
Jyoti: Let us start with two players. So<br />
we need two Sprites.<br />
Tejas: We need one more Sprite- the<br />
ball.<br />
Jyoti: Let us have a playground as the Background.<br />
Moz: Ok. Now list out what you need. Are you painting or importing the<br />
Sprites?<br />
Tejas: We can import the ball and paint the two players.<br />
Jyoti: Let us import the ‘playground’ for the Background.<br />
What we need?<br />
3 Sprites (two players, one ball).<br />
One Background.<br />
50
Moz: How does the game start?<br />
Tejas: We have to make them stand opposite to each other at the start <strong>of</strong><br />
the game.<br />
Jyoti: Yes. And both have to stand at some distance apart.<br />
Tejas: How can we make the Sprite stand in one position at the start <strong>of</strong><br />
the game?<br />
Moz (points to the Current Sprite Info window): Look at this. What is the<br />
number next to x and y?<br />
Jyoti: x: 0 and y: 0.<br />
Current Sprite Info<br />
Moz: Where is the Sprite on the stage?<br />
Jyoti: At the centre <strong>of</strong> the stage.<br />
51
Moz: Now move the Sprite to the bottom-left corner <strong>of</strong> the stage. Check<br />
x and y again.<br />
Tejas: Oh! Look, now it is x: -159 and y: -82.<br />
Current Sprite Info<br />
Current Sprite Info shows a Sprite’s name, x-y position and direction.<br />
You can also type in a new name for the Sprite.<br />
Direction indicates how the Sprite will turn when it executes a move<br />
instruction.<br />
Direction: 0 = up<br />
Direction: 90 = right<br />
Direction: 180 = down<br />
Direction: -90 = left<br />
Info<br />
Jyoti: Why is x -159? What does it mean?<br />
Moz: Look at this figure. Consider this as<br />
Scratch Stage. What do you observe?<br />
Jyoti: The stage is divided into four squares by a horizontal line<br />
and a vertical line.<br />
Tejas: They are also numbered.<br />
Moz: Good observation. The four squares are called four quadrants.<br />
CONCEPTS<br />
The horizontal line is labeled the x-axis and the vertical line is<br />
labeled the y-axis.These two axes divide the Stage into four<br />
quadrants.<br />
The point at which the two axes meet is the center <strong>of</strong> the Stage<br />
and is called the origin. The origin has x:0 and y:0.<br />
Moz: Now move the mouse pointer to each<br />
corner <strong>of</strong> the stage and note x and y values.<br />
Tejas: The top right corner has x:240 and<br />
y:180 but the top left corner has x -240 and<br />
y:180.<br />
52
Moz: Correct. What else do you observe about x and y values?<br />
Jyoti: As we move to the right from the origin, the x-value<br />
increases from 0 to 240. As we move left from the origin, the<br />
x-value changes from 0 to -240.<br />
Tejas: Similarly, as we move up from the origin, the y-value<br />
increases from 0 to 180. As we move down from the origin,<br />
the y-value changes from 0 to -180.<br />
Moz: Very good.<br />
CONCEPTS<br />
Each point on the stage is represented by two numbers. In<br />
Scratch, these numbers are called x and y values.<br />
Moz: Let us look at an example <strong>of</strong> this in real life. Jyoti, you stay in a four<br />
stored building. Isn’t it?<br />
Jyoti: Yes. I stay on 4C. On each floor we have four houses. The horizontal<br />
line x, which represents houses on each floor, has values A, B, C,<br />
D. The vertical line y, which represents the floors, has values 1,<br />
2, 3, 4.<br />
Tejas: Then the address <strong>of</strong> the 3rd house in the second<br />
floor is 2C.<br />
4<br />
Jyoti’s House<br />
3<br />
2<br />
1<br />
A B C D<br />
Moz: Good. Now, get back to the Scratch instructions.<br />
Tejas: We have to move the Sprite to a particular position on the stage at<br />
the start <strong>of</strong> the game.<br />
Moz: In which block will you find the movement instructions?<br />
Jyoti: Motion block.<br />
53
Jyoti (points to the instruction) : Let us try out this instruction.<br />
Tejas and Jyoti use the go to x:_ _ , y: _ _ instruction<br />
to position the first Sprite on Stage.<br />
Jyoti: Now we have to import the second Sprite into the project.<br />
Steps to import a new Sprite:<br />
Step 1: Click on the<br />
buttons to Import a<br />
new Sprite.<br />
Step 2: The available<br />
list <strong>of</strong> folders are<br />
displayed. Select a<br />
folder to choose a<br />
new Sprite.<br />
54
Step 3: Sprite inside<br />
the selected folder<br />
are displayed. Select<br />
the required Sprite.<br />
The selected Sprite is added<br />
to the existing Sprite list.<br />
Jyoti: The Script area is blank. What happened to the Script that we wrote.<br />
Moz: Click on Sprite1.<br />
Jyoti: Oh! It is back.<br />
Moz: Yes. But observe that this is the Script for Sprite1. You have to write<br />
a separate script for Sprite2.<br />
Jyoti: Ok. At the start we want both the Sprites to be positioned on the<br />
stage. The starting instruction has to be same.<br />
Moz: Correct.<br />
Jyoti: The Sprite2 has to face Sprite1. How do we change the direction<br />
<strong>of</strong> the Sprite? This is again a movement <strong>of</strong> the Sprite. Let us check in the<br />
Motion block.<br />
55
Tejas (points to the instruction block): We can use this.<br />
Tejas and Jyoti enter the following instructions to position the second Sprite<br />
on the stage.<br />
Tejas: Now we have to import the ball Sprite (Sprite3).<br />
Jyoti: Next let us place the ball in the hand <strong>of</strong> Sprite1.<br />
Tejas uses the mouse and moves the ball Sprite into the hands <strong>of</strong> Sprite1.<br />
Then he points to the x and y position <strong>of</strong> the ball Sprite displayed in the<br />
Current Sprite Info window.<br />
Tejas: The x and y position <strong>of</strong><br />
the Sprite is displayed here,<br />
x: -134 and y:-106.<br />
Jyoti: When Sprite1 throws the ball then the ball has to be in the hands <strong>of</strong><br />
Sprite2.<br />
Tejas (moves the ball Sprite into the hands <strong>of</strong> Sprite2): The x and y position<br />
<strong>of</strong> the Sprite displayed here is x: 161 and y:-113.<br />
Jyoti: To repeat the actions we have to use instructions from Control block.<br />
Moz: Good. Now, write the Scripts for the ball Sprite.<br />
56
Tejas and Jyoti enter the following instructions for the ball Sprite to animate<br />
the game <strong>of</strong> throw ball.<br />
Tejas and Jyoti click on<br />
throw ball on stage.<br />
and are happy to see the two Sprites playing<br />
Jyoti: We will give it a title “Catch me and play”. Let us glide this ball over<br />
the title. Then make it jump into the hands <strong>of</strong> Sprite1.<br />
Tejas: That is a good idea. We have to add one more Sprite for the title.<br />
I think we have to use Paint in Scratch to create the title.<br />
Jyoti and Tejas create the title Sprite and place it on stage. The ball Sprite<br />
instruction block is modified.<br />
Stage <strong>of</strong> “Catch me and play” animation<br />
57
The modified instructions <strong>of</strong> ball Sprite.<br />
Moz: Let us take a break and play throw ball outside.<br />
Tejas: When we were playing outside the ball<br />
sometimes goes to the left <strong>of</strong> right <strong>of</strong> the<br />
player. But still we catch it. Can we make the<br />
Sprites do the same in the animation?<br />
Moz: Yes. You can. Suppose I am throwing<br />
the ball. How do you know that you have to<br />
move to the right or left to catch the ball?<br />
Tejas: When I look at the way the ball is<br />
coming, I know if I have to move to the right or left.<br />
Moz: Correct. We need to provide this signal in the program by sending a<br />
message all the Sprites. See the instruction in Control block.<br />
Tejas: What does Broadcast do?<br />
Moz: Broadcast sends out a signal to all the Sprites through a message and<br />
then waits for some action from other Sprites.<br />
Jyoti: It is just like we get a signal when the ball is thrown to the left or<br />
right.<br />
Tejas: Ok. Then let us make ball Sprite broadcast “left”.<br />
58
A signal is sent to other Sprites<br />
through the message “left”.<br />
In Scratch a signal is sent to other Sprites through a message<br />
using the instruction Broadcast.<br />
SKILLS<br />
Jyoti: Then Sprite2 has to receive the message and take action.<br />
The signal is received<br />
by Sprite2.<br />
The actions <strong>of</strong> Sprite2 after<br />
receiving the signal.<br />
Tejas: We can also use similar instructions to control the movement <strong>of</strong> Sprites<br />
to other positions.<br />
Jyoti: I see that these instructions help us to coordinate actions <strong>of</strong> multiple<br />
Sprites.<br />
In Scratch, the instructions Broadcast and When I receive<br />
enable us to coordinate the actions <strong>of</strong> multiple Sprites.<br />
SKILLS<br />
59
Final scripts <strong>of</strong> “Catch me and play”.<br />
Scripts for Sprite1 along with the Stage.<br />
Scripts for Sprite2 along with the Stage.<br />
Title Sprite<br />
60
Scripts for the Ball Sprite along with the Stage.<br />
Tejas: Wow! The two Sprites are playing throw ball.<br />
Jyoti: We will write more programs like this.<br />
Moz: Yes. You can do some more interesting programs in Scratch next time.<br />
Chin Chinaki...<br />
Learning Outcome<br />
After you have studied this lesson,<br />
you will be able to:<br />
Write a program with multiple Sprites.<br />
Coordinate the actions <strong>of</strong> the various<br />
Sprites.<br />
Use Control bolcks appropriately.<br />
Write a program for animation.<br />
61
Level IV Lesson 3<br />
WORKSHEETS<br />
1. Shilpa is at Powai. She has to go via L.B.S Road to Mulund. The x-value<br />
and y-value shows positions <strong>of</strong> Powai, L.B.S Road, Mulund are given below.<br />
Write a program in Scratch for Shilpa to go from Powai to Mulund via<br />
L.B.S Road.<br />
Hint: The starting instructions are given below. Complete the program and<br />
run it in Scratch.<br />
2. Vishal is programming an animation for his sister Jyotsna. He wants<br />
to show her jumping on the trampoline. Help him do the following three<br />
activities.<br />
62
Level IV Lesson 3<br />
WORKSHEETS<br />
a. Arrange the following instructions on the right hand side to make<br />
Sprite Jyotsna, jump on the trampoline.<br />
b. Vishal knows that following instructions are required to make Jyotsna<br />
do a somersault. Match the command with the correct action.<br />
Moves Sprite smoothly to a specified<br />
position over specified length <strong>of</strong> time.<br />
Changes Sprite’s appearance by<br />
switching to different Costume.<br />
Runs the blocks inside over and over.<br />
Runs Script below when green flag is<br />
clicked.<br />
63
Level IV Lesson 3<br />
WORKSHEETS<br />
c. The following instructions make Jyotsna do a full somersault from the<br />
right when right arrow key is pressed, and a full somersault from the<br />
left when left arrow key is pressed. Put the instructions together to<br />
make Jyotsna do somersault.<br />
Hint:<br />
Runs instructions below it when<br />
the specified key is pressed.<br />
64
Level IV Lesson 3<br />
WORKSHEETS<br />
3. Match the following instructions with their blocks:<br />
Looks<br />
Motion<br />
Control<br />
Pen<br />
Sound<br />
65
Level IV Lesson 3<br />
WORKSHEETS<br />
4. Meetu monkey again! Complete the sequence <strong>of</strong> actions and instructions<br />
given in a), b) and c) to help Martha monkey jump on the stones and<br />
reach the bananas. You are given the following:<br />
Sprites – Bananas and Martha monkey.<br />
Background – A stream with the stones and the banana<br />
tree on the other side <strong>of</strong> the stream.<br />
x, y positions <strong>of</strong> bananas and stones.<br />
a. Fill in the blanks for Step 1 and Step 2:<br />
Step 1: ______ the background into the project.<br />
Step 2: Program the _____ Sprite to place it on the banana plant.<br />
When flag clicked<br />
go to x: ___ y: ____<br />
b. Program the Sprite Martha monkey to jump on the stones: Write the<br />
program block for Step 3 using the x-value and y-value given in the following<br />
picture.<br />
Hint: The first three instructions are given to you. Complete the block.<br />
When flag clicked<br />
go to x: -115 y: -126<br />
wait 1 secs<br />
go to x: ___ y: ___<br />
wait __ secs<br />
go to x: ___ y: ___<br />
wait __ secs<br />
go to x: ___ y: ___<br />
wait __ secs<br />
go to x: ___ y: ___<br />
wait __ secs<br />
go to x: ___ y: ___<br />
wait __ secs<br />
go to x: ___ y: ___<br />
wait __ secs<br />
66
Level IV Lesson 3<br />
WORKSHEETS<br />
(O,O)<br />
c. Add the instructions to Banana Sprite to make the bananas move to the<br />
hands <strong>of</strong> the monkey.<br />
Hint: Find the correct x-value and y-value <strong>of</strong> Meetu and write these<br />
instructions.<br />
67
Level IV Lesson 3<br />
Open the following Scratch projects and do the activities.<br />
1. Kaleidoscope: Use the arrow keys to move around and draw a symmetrical pattern.<br />
Follow these steps to start this project:<br />
Scratch ---> Projects ---> Games ---> Kaleidoscope<br />
Activities to do:<br />
Edit the Costumes <strong>of</strong> the Sprites to draw using different shapes.<br />
Change the x and y position.<br />
Use the ‘change colour effect’ block to make different colours.<br />
Add more key controls.<br />
68
Level IV Lesson 3<br />
2. Monkey Dressup: Click the clothes to adorn the monkey.<br />
Follow these steps to start this project:<br />
Scratch ---> Projects ---> Interactive Art ---> Monkey DressUp<br />
Activities to do:<br />
Change the x and y position.<br />
Use the broadcast option.<br />
Add key controls.<br />
3. Expression Creator: Click on different parts <strong>of</strong> the face to change them.<br />
Follow these steps to start this project:<br />
Scratch ---> Projects ---> Interactive Art ---> Expression Creator<br />
Activities to do:<br />
Make changes to the Costume <strong>of</strong> each Sprite.<br />
Make the eyes glide to particular x and y position.<br />
69
Level IV Lesson 3<br />
4. Write a project in Scratch that shows the game <strong>of</strong> badminton.<br />
Hint:<br />
This is similar to the ball game described in the lesson.<br />
1. You will need Sprites for the two players, play items.<br />
2. Use the following commands under motion block:<br />
Group Activity<br />
Divide the class into groups <strong>of</strong> five each. Create or import two Sprites for the two students<br />
and write a script for them to do an activity <strong>of</strong> your choice. Use your imagination to make<br />
them do actions under motion and control blocks.<br />
While acting as Sprites, you can draw different shapes, for example:<br />
Project<br />
Do project 2 given in lesson 7.<br />
Explore!<br />
1. Open Scratch and click on the tab ‘want help?’<br />
[You will find it in the top row]. Now click on help<br />
screens and read to know the function <strong>of</strong> different<br />
instruction blocks.<br />
2. How will you draw a flower, a heart, circle, etc, using<br />
Scratch?<br />
70
Teacher’s<br />
Corner<br />
Level IV<br />
Lesson 3<br />
The purpose <strong>of</strong> this lesson is to teach students how to plan and write a program in Scratch.<br />
It will enable students to think logically and plan an activity. Besides, they become<br />
confident in controlling the technology, by writing programs they can make the computer<br />
do something.<br />
Start the class by revising the Scratch concepts taught in Level 3 <strong>of</strong> Computer Masti. Revise<br />
the different blocks and instructions. You can ask the students to write a small project to<br />
refresh their memory <strong>of</strong> what they already know about Scratch.<br />
Tell the students that they will now learn more interesting activities using Scratch. You can<br />
say that they will learn to do animations to arouse their curiosity.<br />
Start Scratch and click on the motion block so that students can look at all the instructions<br />
under it. Ask them to read it. Students are already familiar with move, turn and point<br />
instructions. As they go through the list, draw their attention on the instruction:<br />
Use this opportunity to explain what are x and y axis, origin and the concept <strong>of</strong> quadrants.<br />
Refer page numbers 52 and 53 <strong>of</strong> the lesson for this. Explain that the stage in Scratch is<br />
divided into four quadrants. The horizontal line represents x-axis and the vertical line y-axis.<br />
The x-value varies from -240 to 240 and y-value varies from -180 to 180. Ask them to note<br />
the x and y values for the Sprite. Drag the Sprite and ask them to note the change in x and y<br />
values. Now demonstrate how to make the Sprite move by changing the x and y values.<br />
Get two Sprites and write scripts for the two so that the program runs with coordination.<br />
You can use various control blocks such as, , ,<br />
.<br />
Write the Script for the activity described in the lesson and demonstrate the use <strong>of</strong> the<br />
different instruction blocks covered in the lesson.<br />
Emphasise that it is important to plan the program on paper before going to the computer.<br />
Ask the students to write the script for the Scratch project in their notebook. Ensure that<br />
they think through the entire activity before they start writing the project on the computer.<br />
Of course, they can go back and forth on this and make changes, but this exercise will help<br />
them to plan the project appropriately.<br />
Summarise the lesson and give the students activities to practice.<br />
Further Reading:<br />
http://info.scratch.mit.edu/Support<br />
71
Lesson<br />
4<br />
Dos and Don’ts- Balancing Asanas<br />
Aim<br />
In this lesson you will learn:<br />
Eye and breathing exercises.<br />
Exercises for strengthening leg, ankle and foot muscles.<br />
Moz: Shadow <strong>of</strong> a swan! Interesting.<br />
Tejas: These are called hand shadows. We are practicing<br />
these to show in the class.<br />
Moz: Good. These also provide exercise to your wrists and<br />
hand. How do you make these hand shadows?<br />
Jyoti: We need a white screen to be used as the background<br />
and a torch. Position the torch such that the light falls on<br />
the hands. Stand to one side <strong>of</strong> the screen so that your<br />
body does not get in the way. Remember that all other<br />
lights should be <strong>of</strong>f.<br />
Moz: Can we make shadows with any other source <strong>of</strong> light?<br />
Tejas: The Sun. When we walk in the Sun our shadows can be seen on the<br />
ground.<br />
Jyoti: We can also see shadows in moon light.<br />
Moz: Let us go out and try making<br />
shadows using sunlight.<br />
Tejas, Moz and Jyoti go out and make<br />
shadows in the sun light.<br />
Tejas: I am tired.<br />
Moz: Let us go inside and do pranayam.<br />
Jyoti: What is pranayam? Does pranayam help to remove tiredness?<br />
Moz: Pranayam is a breathing exercise. It calms the mind, improves attention<br />
and refreshes us.<br />
72
Pranayama:<br />
1<br />
Sit comfortably. Close your eyes.<br />
2<br />
3<br />
4<br />
Close the right nostril with the right thumb.<br />
Inhale slowly through the left nostril and fill your<br />
lungs with air.<br />
Close your left nostril with the ring and middle<br />
fingers <strong>of</strong> the right hand and open the right<br />
nostril.<br />
Exhale slowly and completely with the right<br />
nostril.<br />
Again inhale through the right nostril and fill your<br />
lungs.<br />
Close the right nostril by pressing it with the<br />
right thumb. Open the left nostril, breathe out<br />
slowly. This process is one round <strong>of</strong> Anulom Vilom<br />
Pranayam.<br />
Continue for 15 minutes. You may take a minutes rest after every five minutes<br />
<strong>of</strong> exercise.<br />
CONCEPTS<br />
Breathing exercises have many benefits, such as calming the mind<br />
and improving concentration.<br />
Tejas: I feel fresh after the breathing exercise.<br />
Jyoti: Let us show the balancing asanas that we learnt during holidays.<br />
Moz: What are the benefits <strong>of</strong> these asanas?<br />
Tejas: These asanas help to strengthen leg, ankle and foot muscles.<br />
Jyoti: They also help in balancing the body and increasing concentration.<br />
Tejas: I fall down and get hurt very <strong>of</strong>ten. After practicing the balancing<br />
asanas regularly I do not fall <strong>of</strong>ten.<br />
Moz: That means they are helping you to control your movements and maintain<br />
balance.<br />
73
Tejas: Ekapada Pranamasana strengthens muscles <strong>of</strong> the ankle and foot.<br />
It also develops nervous balance.<br />
Eka Pada Pranamasana (One legged prayer pose):<br />
1<br />
Stand upright with the feet together and<br />
the arms at the sides. Focus your gaze on a<br />
fixed point in front <strong>of</strong> the body at eye level.<br />
2<br />
Bend the right leg, grasp the ankle and place<br />
the sole <strong>of</strong> the foot on the inside <strong>of</strong> the<br />
left thigh. The heel should be close to the<br />
perineum and the right knee should point out<br />
to the side.<br />
3<br />
Hold the ankle until the body is balanced.<br />
Place the hands in the prayer position in<br />
front on the chest for the final position.<br />
4<br />
Release the pose completely and change<br />
sides.<br />
Breathe normally throughout the practice.<br />
Practise upto 3 rounds on each leg, holding<br />
the final position for up to 2 minutes.<br />
74
Jyoti: Natarajasana balances the body and develops mental concentration.<br />
Natarajasana (Dance form pose):<br />
1<br />
2<br />
Stand upright with the feet slightly apart.<br />
Bend and raise the left knee so the thigh is<br />
horizontal, the foot pointing away from the<br />
body and slightly to the right <strong>of</strong> the right<br />
leg.<br />
Bend the right knee slightly.<br />
3<br />
Place the left arm across<br />
the body in line with the<br />
left thigh, with the palm<br />
and fingers facing down.<br />
4<br />
Bend the right elbow so that<br />
the right palm faces forward<br />
and the forearm is vertical.<br />
5<br />
The right elbow should be just behind the<br />
left wrist.<br />
Fold the index finger <strong>of</strong> the right hand<br />
so that it touches the inside root <strong>of</strong> the<br />
thumb. Straighten the other three fingers<br />
<strong>of</strong> the hand so that they are relaxed and<br />
slightly apart. This is called gyana mudra.<br />
6<br />
Release the pose and change sides.<br />
Look in the front.<br />
Breathe normally throughout the practice.<br />
Practise up to 3 times on each side, holding<br />
each time for as long as possible.<br />
75
Jyoti: Eka padasana asana strengthens arms, wrists, hips and leg muscles.<br />
Eka Padasana (One foot pose):<br />
1<br />
Relax the body in the standing position<br />
with the feet together.<br />
2<br />
3<br />
Raise the arms directly above the head<br />
and interlock the fingers with the palms<br />
downward. Inhale while raising the<br />
arms.<br />
Bend forward slowly from the hips, keeping<br />
the trunk, head and arms in a straight line.<br />
Simultaneously raise the left leg straight<br />
back, keeping it in line with the trunk.<br />
In the final position the left leg, trunk, head<br />
and arms are all in one straight, horizontal<br />
line. The right leg is straight and vertical.<br />
Focus your gaze on the hands. Exhale while<br />
bending to assume the final position.<br />
4<br />
Hold the final position for as long as possible<br />
then slowly return to the starting position.<br />
Inhale while returning to the upright<br />
position. Exhale while lowering your arm.<br />
Repeat the movement, raising the right leg<br />
back.<br />
76
Tejas: Natavarasana helps develop concentration.<br />
Natavarasana (Flute playing pose):<br />
1<br />
Stand with the feet together and focus on<br />
a fixed point at eye level.<br />
2<br />
Place the right foot to the outside <strong>of</strong> the<br />
left calf with the toes above the floor and<br />
the sole <strong>of</strong> the foot almost vertical.<br />
Rest the side <strong>of</strong> the right calf against the<br />
left shin.<br />
3<br />
Raise both the hands to the right as if<br />
playing a flute, the right palm should face<br />
forward and the left palm backward. The<br />
index and little fingers <strong>of</strong> the hands are<br />
straight and the middle fingers bent.<br />
4<br />
Turn the head slightly to the left and focus<br />
the eyes at a point on the floor.<br />
Hold the final position for as long as is<br />
comfortable.<br />
Breathe normally throughout the practice.<br />
Practise up to 3 rounds on each leg, holding<br />
the final position for up to 2 minutes.<br />
77
CONCEPTS<br />
Balancing asanas<br />
They strengthen leg, ankle, and foot muscles. These asanas also<br />
help in balancing the body and helps develop concentration.<br />
Moz: Very good. Now do some exercises for the eyes.<br />
Tejas and Jyoti do palming, pencil exercise and the exercise using the ball.<br />
Tejas: We would like to explore more instructions in Scratch and build some<br />
games.<br />
Moz: Sure. Get ready with an interesting game and you can write a program<br />
in Scratch tomorrow. Chin Chinaki...<br />
Learning Outcome<br />
After you have studied this lesson,<br />
you will be able to:<br />
Perform breathing exercises.<br />
Practise balancing exercises for<br />
physical and mental fitness.<br />
78
Level IV Lesson 4<br />
WORKSHEETS<br />
1. Match the following.<br />
Eka Pada Pranamasana<br />
Hasta Utthanasana<br />
Natavarasana<br />
Eka Padasana<br />
Natarajasana<br />
79
Level IV Lesson 4<br />
WORKSHEETS<br />
2. Complete the sequence.<br />
1<br />
2<br />
3<br />
1<br />
2<br />
3<br />
4<br />
1<br />
2<br />
3<br />
4<br />
3. Name five musical instruments which are played with fingers.<br />
1 2 3<br />
_ _ _ _ _ _ _ _ _ _ _ _ _ _ _ _ _ _ _ _ _ _ _ _ _ _ _ _ _ _ _ _ _ _ _ _ _ _ _ _ _ _<br />
4 5<br />
_ _ _ _ _ _ _ _ _ _ _ _ _ _<br />
_ _ _ _ _ _ _ _ _ _ _ _ _ _<br />
80
Level IV Lesson 4<br />
Group Activity<br />
Make hand shadow pictures and tell a story.<br />
Divide the class into groups <strong>of</strong> five each. Let them discuss and decide upon a story. The<br />
students have to perform the story. Use hand shadows for the characters <strong>of</strong> the story.<br />
For making hand shadows you need:<br />
1. A screen <strong>of</strong> white cloth, about 1 meter square, fastened to the wall and pulled tight so<br />
that there are no creases. A large sheet <strong>of</strong> white paper will also work.<br />
2. A torch for casting shadows.<br />
Ask your partner to keep the torch on a level with hands making the shadow. Stand to one<br />
side <strong>of</strong> the screen so that your body does not get in the audience’s way. Remember that<br />
all other lights should be <strong>of</strong>f.<br />
Project<br />
Do project 3 given in lesson 7.<br />
Explore!<br />
1. Find more asanas for improving balance.<br />
2. What is shadow puppetry?<br />
3. Find out about various pranayamas and their benefits.<br />
81
Teacher’s<br />
Corner<br />
Level IV<br />
Lesson 4<br />
The purpose <strong>of</strong> this lesson is to ensure that children learn ways to prevent strain caused due<br />
to extended computer use, especially on the wrist.<br />
Start the class by playing a game which requires some physical activity. Let the students play<br />
for 15 mins or so and then ask the students how they feel. Some <strong>of</strong> the expected responses<br />
are: ‘we feel fresh’, ‘we want to play more’. Ask them to show some <strong>of</strong> the exercises/ asanas<br />
they know. Use this opportunity to revise the asanas taught in earlier levels. You can ask<br />
them to demonstrate exercises/asanas that help to relieve strain in neck, hands, wrist and<br />
eyes. To make it challenging, divide the class into two or three groups, ask one <strong>of</strong> them to<br />
name the asana and the other group demonstrates it. Allocate points to each group and<br />
reward students <strong>of</strong> that group (e.g. they get preference in the next computer lab session or<br />
get extra computer time).<br />
Teach the students asanas covered in the chapter that provide exercises to balance and<br />
develop attention. Ask the students to read the description <strong>of</strong> different asanas and look<br />
at the pictures in the book. You can tell them a story that highlights the importance <strong>of</strong><br />
attention in every activity they do. Use this opportunity to reach out to students who<br />
have an attention problem and teach them asanas such as Pranayam that can help them in<br />
relaxing and improving concentration. Make the students do Pranayam as explained on<br />
page number 73.<br />
Summarise the lesson and emphasize the importance <strong>of</strong> exercise and asanas to avoid strain<br />
due to computer use.<br />
Further Reading:<br />
ftp://opensource.nchc.org.tw/gutenberg/1/2/9/6/12962/12962-h/12962-h.htm<br />
[Project Gutenberg’s Hand Shadows To Be Thrown Upon The Wall, by Henry Bursill<br />
This e-Book is for the use <strong>of</strong> anyone anywhere at no cost.]<br />
http://www.kidsexercise.co.uk/on-your-marks-exercise-game.html<br />
Asana Pranayama Mudra Bandha written by: Swami Satyananda Saraswati<br />
82
Notes:<br />
83
Lesson<br />
5<br />
More Activities using Scratch<br />
Aim<br />
In this lesson you will learn:<br />
To use various blocks <strong>of</strong> Scratch.<br />
Explore a variety <strong>of</strong> programs that you can build, like animations, teach<br />
what you know, toy demos, making interactive cards, narrating a story.<br />
1. Make the robots exercise:<br />
Create atleast two robot Sprites, using shapes. Paint various Costumes<br />
for each <strong>of</strong> the robots. Write a program in Scratch to make the robots<br />
demonstrate atleast two <strong>of</strong> the asanas you have learned.<br />
2. Each one teach one:<br />
Teach one <strong>of</strong> the following to class I students using Scratch program:<br />
Uses <strong>of</strong> computers.<br />
Dos and Don’ts <strong>of</strong> computers.<br />
Parts <strong>of</strong> computers.<br />
Example:<br />
Parts <strong>of</strong> Computers: Brainy the CPU, is introducing the parts <strong>of</strong> a computer.<br />
CPU, monitor, keyboard, mouse, printer, and speakers are all Sprites.<br />
84
Program plan:<br />
1. Brainy introduces itself.<br />
2. Parts <strong>of</strong> the computer appear one by one and introduce themselves.<br />
3. Starting with CPU each part explains its functionality.<br />
A few screens and Scratch Scripts are given below:<br />
BRAINY’S TEAM<br />
I am the brain <strong>of</strong> the<br />
computer<br />
Monitor<br />
Now we will tell<br />
you how we work<br />
as a team!<br />
85
3. Interactive cards:<br />
Divide the class into groups <strong>of</strong> five students each. Each group picks one <strong>of</strong><br />
the following celebrations and write two projects.<br />
Project A: An interactive invitation to the celebration.<br />
Project B: An interactive greeting card for the celebration.<br />
Happy Holi!<br />
Birthday<br />
Diwali<br />
New Year<br />
Christmas<br />
Ramzan Eid<br />
Holi<br />
Hint:<br />
Use Sound block, Looks block, Pen block, Control block. You can record a<br />
song and use it in the greeting. Use looks to say something. Make the Sprite<br />
dance!<br />
4. Evolution <strong>of</strong> a butterfly:<br />
Students in Class II are interested to see an animation <strong>of</strong> the evolution<br />
<strong>of</strong> a butterfly. Write an animation project in Scratch to demonstrate how<br />
a caterpillar changes to a butterfly. At the end <strong>of</strong> the demo make many<br />
butterflies fly around the stage and drink honey from some flowers.<br />
1 2 3 4<br />
86
5 6 7 8<br />
Hint:<br />
Use Costumes and instructions from Costume block. For explanation <strong>of</strong> each<br />
stage <strong>of</strong> the evolution, create a text Sprite and place it on the stage. Use<br />
Motion block to make the butterfly fly around the Stage and drink honey<br />
from flowers. You can also make the butterfly fly from one Background “into”<br />
another.<br />
5. Tell me a story:<br />
Write a story using the animal Sprites, available in Scratch.<br />
Write a program in Scratch to tell the story.<br />
Example:<br />
This is a story <strong>of</strong> how Annie the monkey saved Smiley the fish. Annie is a<br />
magician. One day Annie went to the beach. Annie saw a big shark chasing<br />
Smiley. Annie wanted to save Smiley. Suddenly the shark turned back and<br />
went away. What happened?<br />
The following Scripts show how Smiley was saved.<br />
Smiley scripts<br />
Annie saves Smiley<br />
Annie<br />
87
Annie scripts<br />
Shark scripts<br />
What is this??<br />
Run for your life!<br />
88
6. Gaming with Scratch: Build your own computer game.<br />
Example:<br />
Play “Conquer the Maze!” with your friends. Manoeuvre Roller ( ) through<br />
a maze using arrow keys. If Roller touches the wall <strong>of</strong> the maze then the<br />
player is out. Record the time each player takes to move Roller to the exit<br />
<strong>of</strong> the maze.<br />
Hint:<br />
Use Motion block, Control block, Sensing.<br />
Roller script<br />
Maze script<br />
89
Group Activity:<br />
7. Jumping frog:<br />
Divide the class into groups <strong>of</strong> five each. Each student can make a frog<br />
in different colour. Jumping Frog is an amazing paper toy. It needs a<br />
special size <strong>of</strong> rectangular paper where the length is double the width.<br />
The frog has a special spring folded from the paper itself. When you<br />
press the spring it makes the frog leap and jump. Instructions for making<br />
the toy are given below. Devise games with the frogs and have fun.<br />
1<br />
2<br />
3<br />
4<br />
5<br />
90
6<br />
7<br />
8<br />
9<br />
10<br />
11<br />
91
8. Demonstrate a toy:<br />
Take a picture <strong>of</strong> any animal and make its head disappear and appear. You<br />
can try these out with vehicles. Use your imagination. Here is an example<br />
<strong>of</strong> how a Giraffe’s neck and head disappears and appears using a Match<br />
box. Write a program in Scratch to demonstrate the toy.<br />
Hint:<br />
Pressing Up arrow key reveals the neck and head <strong>of</strong> giraffe.<br />
Pressing Down arrow key makes it disappear.<br />
Repeat this activity using a match box.<br />
Project<br />
Do project 4 given in lesson 7.<br />
Explore!<br />
1. Write a Scratch program to show our Solar system.<br />
2. Explore the instructions that you have not used till now<br />
from control, looks, sound, motion, pen using help. Start<br />
using these instructions and have fun with Scratch.<br />
92
Teacher’s<br />
Corner<br />
Level IV<br />
Lesson 5<br />
The purpose <strong>of</strong> this lesson is to provide a wide set <strong>of</strong> activities that students can do in<br />
Scratch.<br />
Students have been using Scratch and are familiar with various instruction blocks. Start the<br />
class by asking students questions about what they have liked the most about Scratch, a<br />
particular project that they enjoyed doing and so on. Tell them that with Scratch they will<br />
be able to do animation and show movements as they see in cartoons. Mention that they<br />
can also make their own computer games using Scratch. They will be thrilled with this and<br />
eager to learn more.<br />
Revise the different instructions in Scratch that students have already used. You can use the<br />
Scratch cards and ask them to write projects (http://info.scratch.mit.edu/Support/Scratch_<br />
Cards). Use this opportunity to assist students who are less confident <strong>of</strong> using Scratch.<br />
Bring Book 3 to the class and allow the students to read the Scratch chapters. Ask students<br />
to open an existing project, make changes to it and observe its effect.<br />
You can also ask the students to read the help screens (click on tab – want help?) to revise<br />
the function <strong>of</strong> the different blocks.<br />
Ask students to open one <strong>of</strong> the projects and add the different sensing options in the control<br />
blocks. Ask them to note the edges <strong>of</strong> different sensing blocks to find out which blocks<br />
can fit into the control blocks. Let them explore and test the effect <strong>of</strong> adding the different<br />
sensing blocks to the existing project. Explain the function <strong>of</strong> different sensing blocks and<br />
demonstrate this to them.*<br />
In order to give appropriate practice <strong>of</strong> the different instruction blocks, allow the students<br />
to do the different activities listed in the lesson. Tell them that they can use Scratch to do<br />
projects <strong>of</strong> other subjects, such as showing life cycle, solar system and so on. Besides, these<br />
projects can be shown as a slide show. Steps to convert Scratch projects into presentations is<br />
available at http://scratch.mit.edu/forums/viewtopic.php?id=10122<br />
* Note: Depending on what version <strong>of</strong> Scratch you have installed, there might be slight<br />
changes in the menu and instruction blocks.<br />
Further Reading:<br />
http://info.scratch.mit.edu/Support<br />
www.arvindguptatoys.com<br />
93
Lesson6<br />
Naming and Organising Files<br />
Aim<br />
In this lesson you will learn:<br />
How to organise files and folders.<br />
Naming <strong>of</strong> files and folders.<br />
Tejas: Moz, today at home we helped my mother to store the things that she<br />
brought from the shop.<br />
Moz: What did your mother bring and where did you store them?<br />
Tejas: We put the sugar, c<strong>of</strong>fee, grains, and rice on<br />
the kitchen shelves.<br />
Jyoti: Aunty brought some story books.<br />
We put them in the story book shelf <strong>of</strong><br />
Tejas’s cupboard.<br />
Tejas: The bed sheets were placed in the<br />
bedroom cupboard.<br />
Moz: Good. Why do you keep sugar, rice etc.,<br />
in the kitchen?<br />
Jyoti: These items are used for cooking. Whenever we need these items we<br />
can find them easily.<br />
Tejas: It is like storing my files in<br />
a folder named Tejas-files on the<br />
computer. Jyoti saves her files in the<br />
folder named Jyoti-files. So each one <strong>of</strong><br />
us can find our files easily.<br />
Moz: What are the names <strong>of</strong> the files that<br />
you saved?<br />
Tejas: painting-house, story-fingers, song-jana-gana.<br />
Jyoti: painting-sun, story-tenaliraman, music-vande-mataram.<br />
Moz: Why is it important to choose suitable names for the files and folders?<br />
Tejas: The name tells us what the file or folder contains.<br />
94
Jyoti: Yesterday, I was going home with<br />
my friends. Then we were reading the<br />
names <strong>of</strong> shops and schools. Imagine what<br />
would happen if our school is given the name<br />
food bazaar and the shop that sells vegetables<br />
is called the Zephyr school!<br />
Moz: Yes. Names are very important. Names allow you to identify places,<br />
persons and things. Similarly giving appropriate names to files and folders is<br />
very important.<br />
CONCEPTS<br />
Any content created using a computer, such as a picture or text<br />
is saved as a File.<br />
Choose a File name that tells us something about the contents <strong>of</strong><br />
the File, without having to open it.<br />
Tejas: Why is .png added to the name <strong>of</strong> my painting?<br />
Moz: This is called an extension. Which activity did you use to create the<br />
painting?<br />
Tejas: Tux paint.<br />
Moz: So files created with a painting activity have been given the extension<br />
.png.<br />
Tejas: Ok, I see. I can name my painting just sun instead <strong>of</strong> painting-sun. I<br />
can identify that it is a painting when I look at the name sun.png.<br />
Moz: Yes. Let us look at other extensions.<br />
Jyoti: The file that has Tenali Raman’s story has the extension .txt.<br />
Moz: Good observation! Text files created using text editor have the extension<br />
.txt.<br />
Jyoti: I used Open Office activity to enter the chocolate story. The file was<br />
saved with extension .odt. Chocolate .odt is also a text file.<br />
Moz: You are right. Both the files with .txt and .odt are text files.<br />
File names have extensions. The extension is added to the name<br />
<strong>of</strong> the file by the activity with which you create the file. We can<br />
identify the type <strong>of</strong> content in a file by the file extensions.<br />
Example: Types <strong>of</strong> files and their extensions<br />
.png or .jpg - paintings, photographs or any image.<br />
.avi or .mp3 – music<br />
.txt or .doc or .odt – text files<br />
Info<br />
95
Moz: Now, how will you organize these files into folders? In one folder or<br />
different folders?<br />
Jyoti: Different folders. I store music files in one folder, paintings and<br />
photos in another and my stories in another folder.<br />
CONCEPTS<br />
Folders help us by:<br />
allowing us to organise related documents or files together.<br />
making it easy to locate important files quickly.<br />
Moz: Very good. Now look at this desktop. These photos are <strong>of</strong> students in<br />
class IV.<br />
Tejas: The desktop looks so untidy. Let us create a folder for each student.<br />
Then move the photos <strong>of</strong> the students into his or her folder.<br />
Moz: How do you move files into a folder?<br />
Tejas: By using drag and drop. We learnt this in Book II.<br />
96
Jyoti: The desktop still looks cluttered! Can we create one folder for each<br />
class?<br />
Moz: Yes, you can. Move the students folders into their class folder.<br />
Jyoti: That means we can move folders into other folders!<br />
Moz: Yes. For example folder Class4B contains student folders Jyoti, Prachi,<br />
Suman and Tejas. Class4B is called the parent folder and the student folders<br />
are called the sub-folders.<br />
Parent folder<br />
Sub-folder<br />
CONCEPTS<br />
A folder located within another folder is called a sub-folder.<br />
The main folder is called the parent folder.<br />
Folders and sub-folders help us to keep our files neatly.<br />
97
Open<br />
Jyoti: Can we have a school folder to contain all the different class folders?<br />
Moz: Yes. you can.<br />
Tejas: Let us see how we can do this.<br />
Create a folder with the name <strong>of</strong> the school. This folder will contain<br />
information <strong>of</strong> the students <strong>of</strong> that particular school.<br />
Within the school folder, create folders for each class in that school,<br />
for example, std1, std2, and so on. These are sub-folders <strong>of</strong> the school<br />
folder.<br />
Similarly we can create further sub-folders within each class for different<br />
sections, for example, std4A, std4B, and so on, and store files containing<br />
information about the students in these sections within these<br />
sub-folders.<br />
CONCEPTS<br />
Arranging folders one inside another is useful to group files<br />
systematically. Arrangement <strong>of</strong> folders into parent and sub-folders<br />
is called a directory structure.<br />
Open<br />
Open<br />
4<br />
4<br />
4<br />
4A<br />
4B<br />
4B<br />
4B<br />
98
Moz: Now let us see how to save a file in its correct folder.<br />
Tejas: I will save the story that I entered in text editor.<br />
Tejas does the following to save the file in Tejas-stories folder.<br />
Step 1: Click on Save in<br />
the text editor menu bar.<br />
Step 2: Enter a name<br />
for the file here.<br />
Step 3: Click on Browse<br />
for other folders.<br />
Step 4: Double click on<br />
std4B, then Tejas, next<br />
Tejas-stories.<br />
Step 5: Click on Save.<br />
SKILLS<br />
Moz: Let us look at another situation. This is the first time that your friend<br />
Neeta is saving her files on this computer. What should she do?<br />
Jyoti: Neeta is in class 4A. She should create a sub-folder under Class-4A<br />
folder and name the sub-folder neeta.<br />
Moz: Correct. Observe that in many places like a classroom, library, shops<br />
and home, things are organized logically. Similarly, we organise files and<br />
folders in a computer, logically.<br />
Mumbai Delhi Kolkata<br />
Jyoti: I have seen that the postman sorts<br />
letters for each city separately in a post<br />
<strong>of</strong>fice.<br />
99<br />
Mumbai
Tejas: My mother does beautiful embroidery. Her<br />
embroidery box is neatly arranged. The coloured<br />
threads are all kept in one partition, the beads are in<br />
another partition, various sizes <strong>of</strong> needles are kept in<br />
a small box. She says that, when things are arranged in<br />
their place, we can find them easily. When we work<br />
systematically, we can enjoy our work.<br />
Moz: You have given very good examples. Now, give<br />
me a few examples on the computer.<br />
Jyoti: From Applications menu, when we choose games<br />
then we find a list <strong>of</strong> all the games that we can play.<br />
Tejas: In Scratch, the costumes for the Sprites are<br />
organized in folders according to the categories that they belong to. For<br />
example, all animal costumes can be found in animals folder.<br />
We organize things in our home, school and <strong>of</strong>fice systematically so<br />
that we can find them easily. This also saves time.<br />
CONCEPTS<br />
Similarly suitable naming and organizing <strong>of</strong> files and folders on a<br />
computer is important. This helps us to find the information that<br />
we want easily.<br />
Tejas and Jyoti: Thanks, Moz for teaching us so much about the computers.<br />
Moz: I too enjoyed your company. I have learned the exercises, yoga asanas.<br />
I have to now go to Anandavan. Do all the projects that I have prepared and<br />
have fun using the computers. See you next year. Chin Chinaki...<br />
Learning Outcome<br />
After you have studied this lesson,<br />
you will be able to:<br />
Select appropriate names for files<br />
and folders.<br />
Organise data using files, folders<br />
and sub-folders.<br />
100
Level IV Lesson 6<br />
WORKSHEETS<br />
1. See the list <strong>of</strong> items given below and group them appropriately.<br />
Group all the items appropriately. Two boxes are given below, one is<br />
labelled as Things we eat, and another as Things we wear. Arrange the<br />
items under these two groups.<br />
Things we eat<br />
Fruits<br />
Sweets<br />
1. 1. 1.<br />
2.<br />
3.<br />
2.<br />
2.<br />
Things we wear<br />
Clothes<br />
1.<br />
2.<br />
3.<br />
101
Level IV Lesson 6<br />
WORKSHEETS<br />
2. Identify what does not belong here. Circle the word that does not<br />
belong and explain why.<br />
a. Car Truck Horse Bus Train<br />
A horse is an animal, the others are vehicles.<br />
b. Camel Goat Doll Cow Lamb<br />
c. Fan Fridge Mixer Oven Pen<br />
d. Cake Bread Apple Muffin Biscuit<br />
e. Pencil Table Chair S<strong>of</strong>a Recliner<br />
f. Cow Lion Camel Goat Sheep<br />
3. Help Tejas list three things that:<br />
a. You take to school Pencil, Tiffin box, School bag<br />
b. Are round in shape<br />
c. Smell good<br />
d. Are green in colour<br />
e. Conduct electricity<br />
f. Are sweet in taste<br />
g. Cause pollution<br />
102
Level IV Lesson 6<br />
WORKSHEETS<br />
4. A list <strong>of</strong> countries, capitals <strong>of</strong> these countries, rivers, mountains, and<br />
some interesting places to visit in the country is given below. Classify<br />
the information and create a tree structure for each country. Add<br />
more rivers, mountains and interesting places that you know.<br />
Countries: India, United States <strong>of</strong> America, United Kingdom, France<br />
Capitals:, Washington, London, Paris, New Delhi<br />
Rivers: Thames, Mississipi, Ganges, Seine, Missouri, Krishna<br />
Mountains: Marilyns, Vindhyas, Hewitts, Himalayas, Rocky mountains,<br />
Alps, Colorado, Mount Rushmore.<br />
Places: Eiffel Tower, London Eye, Taj Mahal, Notre Dame Cathedral,<br />
Statue <strong>of</strong> Liberty, Empire State Building, Big Ben, Kutub Minar.<br />
An example is given below.<br />
India<br />
Rivers<br />
Mountains<br />
Monuments<br />
Capital<br />
Places<br />
Ganges<br />
Krishna<br />
United States <strong>of</strong> America<br />
Rivers<br />
Mountains<br />
Monuments<br />
Capital<br />
Places<br />
United Kingdom<br />
Rivers<br />
Mountains<br />
Monuments<br />
Capital<br />
Places<br />
France<br />
Rivers<br />
Mountains<br />
Monuments<br />
Capital<br />
Places<br />
103
Level IV Lesson 6<br />
WORKSHEETS<br />
5. Following is a set <strong>of</strong> pictures <strong>of</strong> some things you see in your home.<br />
How will you organise them? The following outline will help you in it.<br />
THINGS SEEN AT HOME<br />
furniture --------------<br />
Fridge<br />
1. Which is the root parent folder?<br />
2. Name the sub-folders?<br />
3. Name the different files.<br />
104
6.<br />
Level IV Lesson 6<br />
a.<br />
WORKSHEETS<br />
Circle the picture that is exactly same as the one given above.<br />
1<br />
2<br />
3<br />
4<br />
b. Four pictures are given below. Circle the two pictures which are<br />
exactly same.<br />
105
Level IV Lesson 6<br />
1. Pack your school bag according to the timetable:<br />
All the textbooks, class work and home work notebooks, rough book and school calendar<br />
are mixed together in one pile. You have to pick up the books <strong>of</strong> a particular subject<br />
and put them together. Now pack your school bag according to the time table for the<br />
next day.<br />
2. Tetravex: Select Applications ---> Games ---> Tetravex<br />
Tetravex is a simple puzzle where pieces must be positioned so that the same numbers<br />
are touching each other. The tiles are divided into four parts. You must position them<br />
so that only identical numbers are next to each other. The game will not let you position<br />
the tiles so that different numbers are next to each other. You position the pieces<br />
by dragging them from their current position to their new position. These moves are<br />
not permanent and can be readily reversed. The game is completed when you have<br />
positioned all the squares in the right positions.<br />
Group Activity<br />
Part A<br />
Write names <strong>of</strong> flowers, fruits, vegetables, sweets on chits <strong>of</strong> paper. Now<br />
mix them all and ask each student to pick one chit. Let students sitting in one<br />
row form one group. The teacher asks two students to find out names <strong>of</strong> all<br />
the sweets that are written on chits. Similarly, two students find names <strong>of</strong><br />
flowers. Note that you will have to go to each group if you want to know the<br />
names <strong>of</strong> all the sweets.<br />
106
Level IV Lesson 6<br />
Part B<br />
Now, the teacher calls for each group one by one. First, fruits is called out.<br />
Notice that students from different groups who have the names <strong>of</strong> fruits<br />
will form the new group. Similarly, flowers, vegetables and sweets are divided<br />
into respective groups. Now you can go directly to a particular group and<br />
find out names <strong>of</strong> all sweets! Note that the new groups are formed because<br />
they share a common theme. Similarly, folders help us to keep related files<br />
together.<br />
Fruits<br />
Project<br />
Do project 5 given in lesson 7.<br />
Explore!<br />
1. Start grouping and classifying what you learn and<br />
discover how easy it is to remember. For example,<br />
try to group the different types <strong>of</strong> vehicles.<br />
2. Associate what you learn with an appropriate name<br />
to help you recall the information.<br />
107
Teacher’s<br />
Corner<br />
Level IV<br />
Lesson 6<br />
The purpose <strong>of</strong> this lesson is to ensure that children learn organization skills. Students<br />
already know about files and folders. You can revise these concepts and explain the<br />
importance <strong>of</strong> using folders. Emphasize the importance <strong>of</strong> selecting appropriate file<br />
names.<br />
Explain that files can be organised in different ways. Example: You are storing details <strong>of</strong><br />
your family members in different files. You can have one folder that has all the photos,<br />
another folder that has voice recordings or text on each family member. The other way<br />
<strong>of</strong> organising these files is to have different folders for each family member. All the files<br />
related to this member – photos, voice recording and text are put in this folder. There is no<br />
single correct way <strong>of</strong> organizing, irrespective <strong>of</strong> which method you use to organise, there<br />
needs to be some order that has to be followed. This is for your convenience as you will be<br />
able to find the files easily later.<br />
Play a memory game with the students. Bring in a variety <strong>of</strong> things, jumble them up and<br />
spread it on the table. For example, you can get chalk, duster, books, key, lock, bangle,<br />
bottle, tiffin, apple, banana, orange, etc. Now remove the cover for a minute and ask the<br />
students to look at these items. Cover it again and ask students to recall all the items they<br />
had seen. Take a count <strong>of</strong> how many items were correctly recalled and note it on the board.<br />
Now, segregate these items according to their category, e.g. put all fruits on one desk.<br />
Repeat the game. Take a count <strong>of</strong> how many items were correctly recalled and note it on<br />
the board. This is likely to be higher than the first case. Explain that when the items are<br />
organised, it is more convenient to locate them.<br />
Explain the function <strong>of</strong> sub-folders. You can use the analogy that every page is a file, the<br />
notebook are sub-folders and the school bag the main (root/ parent) folder. For example, if<br />
you want to refer Lesson 3 from EVS, you will open the bag, pick up the EVS book and go<br />
to page <strong>of</strong> lesson 3. Ask questions such as: If they did not have notebook and only stacks<br />
<strong>of</strong> paper all piled together, how will they find the lesson 3 <strong>of</strong> EVS? Just as notebooks keep<br />
related pages together, the sub-folders keep related files together. Similarly, just as all<br />
the notebooks are put in your school bag, similarly all related sub-folders are kept in the<br />
main folder. Ask questions to encourage discussion and thinking amongst students. For<br />
example, what happens if your notebook goes in your friend’s bag? Why do you need<br />
separate notebooks for different subjects?<br />
Illustrate how sub-folders are created. To do this, create a folder called Bag. Create subfolders<br />
with names Mathematics and English. Now create files that has names <strong>of</strong> lessons<br />
from Mathematics and English. Select a file with the name <strong>of</strong> a English lesson, drag and<br />
drop it in the sub-folder named English. Similarly place all the files in their respective<br />
sub-folders.<br />
Summarise the lesson and emphasize the importance <strong>of</strong> organising.<br />
Further Reading:<br />
www.myffgames.com<br />
108
Notes:<br />
109
Lesson7<br />
Projects<br />
Project 1 (Lesson 2 - Logical Thinking)<br />
1. A story with four puzzles is given in this project. Divide the class into four<br />
groups. Each group solves one puzzle and invents another puzzle similar<br />
to what they have solved. The puzzles thus created are solved by other<br />
groups. While solving the puzzle, the group should list out the information,<br />
conditions, the goal and the solution steps. Of course, you also get a new<br />
story in this project with the new puzzles created by you. Share the new<br />
story created by your class with your friends and family.<br />
The lost rabbit and the four puzzles<br />
Jyoti, Tejas and their friends were searching for their rabbit<br />
that was lost. As they were searching, they met a monkey who<br />
was sitting and seriously counting again and again.<br />
Children: Did you see a small rabbit walking this way?<br />
Monkey: I saw the rabbit. The rabbit went in the direction<br />
where you can find papayas.<br />
Tejas: But where can we find papayas?<br />
Monkey: I am going that way. I will show you. But first you<br />
have to answer my question. I have called twenty friends<br />
for dinner. Four want bananas, six want nuts, five want<br />
coconuts. The rest want papayas. How many papayas<br />
should I get?<br />
Children: You have to get _____ number <strong>of</strong> papayas.<br />
110
The children then walked with the monkey to the place where papayas are<br />
found. They met a boy named Mihir, who was standing at a gate and seemed<br />
to be solving some puzzles displayed on a board.<br />
Children: Did you see a rabbit go through this gate?<br />
Mihir: Yes. It went through the gate. We have to solve the puzzle on the<br />
board for the gate to open.<br />
Fill in the numbers that ran away in the following crossword puzzle:<br />
The children filled in the correct numbers and the gate opened.<br />
The children saw a beautiful garden and many people walking here and there.<br />
The children searched everywhere in the garden and asked many people<br />
about the rabbit. No one seemed to have seen the rabbit. Finally they met a<br />
magician. They asked the magician if he saw the rabbit.<br />
Magician: Yes. I saw your rabbit and it followed one group <strong>of</strong> my<br />
magicians. I have eight magicians, one group <strong>of</strong> my magicians<br />
went on the road which is on the right side and the other group on<br />
the road which is on the left side.<br />
The group <strong>of</strong> magicians that went to the right<br />
Were carrying carrots and cabbages.<br />
The age <strong>of</strong> each member in this group is less than 15 years.<br />
The group <strong>of</strong> magicians that went to the left.<br />
Were carrying fruits.<br />
The age <strong>of</strong> each member in this group is more than or equal to 15 years.<br />
111
The rabbit went with the larger group <strong>of</strong> my magicians. You can find the<br />
larger group <strong>of</strong> magicians by solving the following puzzle.<br />
On the following eight cards,<br />
One side gives the magicians age.<br />
The other side gives what they are carrying.<br />
The magician showed the children only one side <strong>of</strong> each card. The children<br />
now have to figure out which way each magician went.<br />
30<br />
7<br />
12<br />
15<br />
5<br />
The children figured out that they have to take the road on the<br />
_______ side to find the rabbit.<br />
The children started walking on the road and reached a river. They met a<br />
farmer there who was sitting and thinking.<br />
Children: Did you see a rabbit go this way?<br />
Farmer: Yes, the rabbit crossed the river with some magicians. You can find<br />
it on the other side <strong>of</strong> the river.<br />
Tejas: Please help us cross the river.<br />
Farmer: I will. But first I have to take the lion, the goat and the hay to the<br />
other side <strong>of</strong> the river.<br />
Jyoti: Then take them across and later take us also.<br />
Farmer: I can take only one person or animal, or a thing at a time in my boat.<br />
If I leave the goat and the hay together, then the goat will eat up the hay.<br />
If I leave the lion and the goat together, then the lion will eat up the goat.<br />
So what should I do?<br />
112
Fill in the answers to understand the farmer’s problem:<br />
1. What is the information? _____________________________<br />
_________________________________________________<br />
2. What are the conditions? _____________________________<br />
_________________________________________________<br />
_________________________________________________<br />
3. What is the goal? __________________________________<br />
_________________________________________________<br />
Fill in the blanks to give the farmer a solution:<br />
i. Take the __________ to the other side <strong>of</strong> the river.<br />
ii. Come back.<br />
iii. Take ________ to the other side <strong>of</strong> the river.<br />
iv. While coming back bring ______ with you.<br />
v. Take _________ to the other side <strong>of</strong> the river.<br />
vi. Come back.<br />
vii. Take ______ to the other side <strong>of</strong> the river.<br />
After the farmer safely takes the lion, goat and the hay to the other side<br />
<strong>of</strong> the river, he comes back and takes the children to the other side <strong>of</strong> the<br />
river. They find the rabbit at last with the magicians and take it back home.<br />
They thanked all the people who helped them find the rabbit.<br />
113
Project 2 (Lesson 3 - Programming Multiple Sprites in Scratch)<br />
a. Balancing acts:<br />
There are many balancing acts that you see. For example in circus, in<br />
dance programs, sports etc., Choose any one <strong>of</strong> these activities. Decide<br />
the number <strong>of</strong> sprites required to show the activity. Write the sequence<br />
<strong>of</strong> steps for each sprite to demo the activity.<br />
Convert the steps into a Scratch program. Demonstrate the program to<br />
your class.<br />
b. Be a magician!<br />
Recall a magic act that you have seen or create one <strong>of</strong> your own using<br />
Scratch.<br />
Example: A girl disappears from the crowd and appears near the magician.<br />
Magician asks the girl to lie on a table. The magician keeps raising his<br />
magic wand and the girl follows rising up without any support. By moving<br />
the wand downward the girl is brought down slowly back onto the table.<br />
The girl gets up and stands next to the magician. The crowd says “Hurray”<br />
“Once more” “Unbelievable” and so on.<br />
114
c. Demonstrate a food chain:<br />
Show the food chain in nature using a Scratch program.<br />
Example: (a) butterflies (insects) eaten by<br />
(b) frogs who in turn are eaten by<br />
(c) snakes, who form the food for<br />
(d) eagles (birds).<br />
Hint: Use different Sprites to show the sequence.<br />
115
Project 3 (Lesson 4 - Do’s and Don’ts- Balancing Asanas)<br />
a. Who touched my nose?<br />
“Rose, Rose, Give a pose, come<br />
and touch my friend’s nose”.<br />
Divide the class into two groups A and B.<br />
Each group selects a leader.<br />
The groups sit separately and decide an alternate name for each student<br />
in their group and write it down on a paper and gives it to the teacher.<br />
The leader <strong>of</strong> group A goes to group B and closes the eyes <strong>of</strong> one <strong>of</strong> the<br />
students in group B.<br />
The leader <strong>of</strong> group A then calls a student from group A with the alternate<br />
name using an interesting sentence.<br />
Example: Suppose the alternate name <strong>of</strong> a student is Rose. Then the<br />
leader can create an interesting phrase or a sentence to call<br />
the student.<br />
“Rose, Rose, Give a pose, come and touch my friend’s nose”.<br />
The student who has the alternate name comes and touches the nose <strong>of</strong><br />
the student in group B whose eyes are closed.<br />
The student from group B whose eyes are closed, has to recognise the<br />
student who touched the nose.<br />
If the student is recognized then the student from A joins group B.<br />
If the student is not recognized then the student whose eyes have been<br />
closed joins group A.<br />
The group with most number <strong>of</strong> students wins.<br />
116
. Langdi – Balance on a foot and catch me.<br />
Divide the class into two groups. The game is played in a limited space. A line<br />
is drawn around the area where this game is played.<br />
At the start <strong>of</strong> the game a coin is tossed. The group that wins the toss<br />
goes into the game area.<br />
The second group sits or stands outside the area in a group. One member<br />
(ex: Shruti) from the second group comes to the boundary <strong>of</strong> the area.<br />
When the teacher blows the whistle, Shruti bends one <strong>of</strong> her legs up<br />
and starts hopping in the area with one leg to catch the members <strong>of</strong> the<br />
second group.<br />
The members <strong>of</strong> second group keep running around. When Shruti touches<br />
a member <strong>of</strong> the second group that member is out and goes out <strong>of</strong> the<br />
circle.<br />
Shruti can continue catching members <strong>of</strong> second group if she is not<br />
tired.<br />
Shruti cannot put both legs down. She has to balance herself. If she<br />
puts both legs down then her turn is over. Shruti can go out on her own<br />
if she is tired. She goes out <strong>of</strong> the circle and the next member from the<br />
team repeats the action.<br />
The group which catches all the members <strong>of</strong> other group wins. If both<br />
groups catch all the members <strong>of</strong> other group then you can decide the<br />
other parameters on which the winner is decided.<br />
Have fun devising games which need balancing and sensing to be used, and<br />
play with your friends.<br />
117
Project 4 (Lesson 5 - More Activities using Scratch)<br />
Animate an activity:<br />
There are many activities you do or watch during the course <strong>of</strong> a day like<br />
playing with your friends, crossing the busy road, a train waiting for the<br />
signal, people waiting at a railway crossing, etc. Write a program in Scratch<br />
to animate these activities.<br />
Example: People waiting at a railway<br />
crossing:<br />
We need the following:<br />
Sprites- One person on a cycle, a<br />
boy and a girl waiting to<br />
cross, a train and a signal.<br />
Background - A railway crossing.<br />
STOP<br />
RAILWAY<br />
Hint:<br />
To co ordinate the actions <strong>of</strong> these Sprites, use the commands Broadcast<br />
_ _ _ _ and when I receive _ _ _ _.<br />
Project 5 (Lesson 6 - Naming and Organizing Files)<br />
Where is my place?<br />
Divide the class into two groups.<br />
One group <strong>of</strong> students draws pictures <strong>of</strong> the following items.<br />
Clothes (T-shirt, shorts,<br />
pyjamas, frocks, skirts, etc.).<br />
Pencil, colour pencils,<br />
pen, eraser, paints, ruler.<br />
Shoes, socks and slippers.<br />
Story books.<br />
Take two printouts <strong>of</strong> each picture and create a chart as shown below.<br />
118<br />
School books.<br />
Bed sheets,<br />
pillow covers.<br />
Basket ball, base ball,<br />
foot ball, cricket ball<br />
and bat.<br />
The second group draws pictures <strong>of</strong> containers for the above items.<br />
Clothes cupboard which has a<br />
A study table.<br />
few drawers.<br />
Pencil holder.<br />
Bed with the drawers below<br />
Shoe rack.<br />
the bed open.<br />
A cardboard box.<br />
A book shelf with at least two<br />
Coat hangers.<br />
shelves, some drawers.
1<br />
8<br />
5<br />
3<br />
9<br />
4<br />
6<br />
2 7<br />
1<br />
Hint:<br />
Arrange the different items in their respective places. One example is<br />
shown in the above picture.<br />
119
Notes:<br />
120
Notes:<br />
121
Other books in<br />
Computer<br />
series<br />
Computer<br />
Second Edition<br />
DVD<br />
Inside<br />
DVD<br />
Inside<br />
LEVEL<br />
I<br />
Computer<br />
Second edition<br />
DVD<br />
Inside<br />
DVD<br />
Inside<br />
LEVEL<br />
II<br />
Computer<br />
Second Edition<br />
DVD<br />
Inside<br />
DVD<br />
Inside<br />
LEVEL<br />
III<br />
eMailing Browsing Internet s formation organizinge<br />
Internet applications Search ting Projects<br />
eMailing Browsing Internet i inge<br />
Internet applications Search<br />
eMailing Browsing Internet safet<br />
Internet applications Searching<br />
eMailing Browsing Internet s<br />
Internet applications Search<br />
eMailing Browsing Inter<br />
Internet applications Se<br />
eMailing Browsing Inte<br />
Internet applications S<br />
eMailing Browsing Interne<br />
Internet applications Sear<br />
eMailing Browsing Int<br />
Internet applications S<br />
eMailing Browsin<br />
Internet applicati<br />
eMailing Browsi<br />
Internet applicat<br />
eMailing Bro<br />
Internet app<br />
eMailing Bro<br />
Internet ap<br />
eMailing Browsin<br />
Internet applicat<br />
eMailing Bro<br />
Internet app<br />
eMailing<br />
Internet<br />
eMailin<br />
Interne<br />
eMailing B<br />
Internet a<br />
eMaili<br />
Internet app<br />
Computer<br />
First edition 2010<br />
DVD<br />
Inside<br />
DVD<br />
Inside<br />
eMailing Browsing<br />
Internet applications Search<br />
eMailing Browsing Internet safety In<br />
Internet applications Searching SCRA g<br />
eMailing Browsing Internet safety Information organizing<br />
Internet applications Searching SCRATCH Sorting Projects<br />
eMailing Browsing Internet safety Information organizing<br />
et applications Searching SCRATCH Sorting Projects<br />
ternet safety Information organizing<br />
g SCRATCH Sorting Projects<br />
formation organizing<br />
ATCH Sorting Projects<br />
P r<br />
BOOK<br />
V<br />
o j e c t<br />
y Information organizing<br />
SCRATCH Sorting Projects<br />
ty Information organizing<br />
SCRATCH Sorting Projects<br />
nformation organizing<br />
CRATCH Sorting Projects<br />
fety Information organizing<br />
g SCRATCH Sorting Projects<br />
et safety Information organizing<br />
ching SCRATCH Sorting Projects<br />
et safety Information organizing<br />
rching SCRATCH Sorting Projects<br />
ternet safety Information organizing<br />
Searching SCRATCH Sorting Projects<br />
nternet safety Information organizing<br />
s Searching SCRATCH Sorting Projects<br />
et safety Information organizing<br />
rching SCRATCH Sorting Projects<br />
ternet safety Information o rganizing<br />
Searching SCRATCH Sorting Projects<br />
ng Internet safety Information organizing<br />
ions Searching SCRATCH Sorting Projects<br />
ng Internet safety Information organizing<br />
tions Searching SCRATCH Sorting Projects<br />
ternet safety Information organizing<br />
ns Searching SCRATCH Sorting Projects<br />
ing Internet safety Information organizing<br />
tions Searching SCRATCH Sorting Projects<br />
owsing Internet safety Information organizing<br />
pplications Searching SCRATCH Sorting Projects<br />
Browsing Internet safety Information organizing<br />
applications Searching SCRATCH Sorting Projects
Computer Masti (CM) is a research based product, created and developed at IIT <strong>Bombay</strong>,<br />
in collaboration with InOpen Technologies, for effectively teaching computers in schools.<br />
It is designed as a series <strong>of</strong> text books, based on a curriculum suitable for the primary and<br />
secondary school students. The book is accompanied by a DVD which contains several<br />
interactive educational s<strong>of</strong>tware, and games. CM books have been translated into eight<br />
<strong>Indian</strong> languages and more translation efforts are ongoing. The e-book downloads have been<br />
increasing almost on a daily basis.<br />
Educational<br />
Computer<br />
Games<br />
Programming<br />
Collaborative<br />
Learning<br />
Salient<br />
Features<br />
Logic<br />
Thinking Skills<br />
Projects<br />
Ergonomics<br />
FREE<br />
Online Version<br />
Open Source<br />
Spiral<br />
Curriculum<br />
Constructivist<br />
Approch<br />
DVD<br />
Inside<br />
Contains<br />
• Computer Masti Toolkit which can be installed on any operating<br />
system.<br />
• Free and OpenSource applications referred in the book, such as:<br />
1. Open <strong>of</strong>fice: A multiplatform and multilingual <strong>of</strong>fice suite,<br />
compatible with all other major <strong>of</strong>fice suites.<br />
2. Scratch: A programming language developed at MIT, for<br />
everyone to create interactive projects.<br />
3. TuxMath: Educational games for math practise.<br />
4. Gcompris: A high quality educational s<strong>of</strong>tware suite comprising<br />
<strong>of</strong> numerous activities.<br />
Download e-book and DVD contents from: www.computermasti.com