

D-Series Syringe Pumps - Isco
D-Series Syringe Pumps - Isco
D-Series Syringe Pumps - Isco

You also want an ePaper? Increase the reach of your titles
YUMPU automatically turns print PDFs into web optimized ePapers that Google loves.
D-<strong>Series</strong> <strong>Pumps</strong><br />
Installation and Operation Guide<br />
Part #69-1243-867 of Assembly #60-1243-766<br />
Copyright © 2001. All rights reserved, Teledyne <strong>Isco</strong><br />
Revision X: February 27, 2012
Foreword<br />
This instruction manual is designed to help you gain a thorough understanding of the<br />
operation of the equipment. Teledyne <strong>Isco</strong> recommends that you read this manual<br />
completely before placing the equipment in service.<br />
Although Teledyne <strong>Isco</strong> designs reliability into all equipment, there is always the possibility<br />
of a malfunction. This manual may help in diagnosing and repairing the malfunction.<br />
If the problem persists, call or e-mail the Teledyne <strong>Isco</strong> Technical Service Department<br />
for assistance. Simple difficulties can often be diagnosed over the phone.<br />
If it is necessary to return the equipment to the factory for service, please follow the<br />
shipping instructions provided by the Customer Service Department, including the<br />
use of the Return Authorization Number specified. Be sure to include a note<br />
describing the malfunction. This will aid in the prompt repair and return of the<br />
equipment.<br />
Teledyne <strong>Isco</strong> welcomes suggestions that would improve the information presented in<br />
this manual or enhance the operation of the equipment itself.<br />
Teledyne <strong>Isco</strong> is continually improving its products and reserves the right to<br />
change product specifications, replacement parts, schematics, and instructions<br />
without notice.<br />
Contact Information<br />
Customer Service<br />
Phone: (800) 228-4373 (USA, Canada, Mexico)<br />
(402) 464-0231 (Outside North America)<br />
Fax: (402) 465-3022<br />
Email:<br />
<strong>Isco</strong>CSR@teledyne.com<br />
Technical Support<br />
Phone: (800) 775-2965 (Analytical)<br />
(866) 298-6174 (Samplers and Flow Meters)<br />
Email:<br />
<strong>Isco</strong>Service@teledyne.com<br />
Return equipment to: 4700 Superior Street, Lincoln, NE 68504-1398<br />
Other Correspondence<br />
Mail to: P.O. Box 82531, Lincoln, NE 68501-2531<br />
Email:<br />
Web site:<br />
<strong>Isco</strong>Info@teledyne.com<br />
www.isco.com<br />
Revised March 17, 2009
D <strong>Series</strong> <strong>Syringe</strong> <strong>Pumps</strong><br />
Warnings, Cautions, and Notices<br />
Warnings and Cautions<br />
The lightning flash and arrowhead within the triangle is a warning<br />
sign alerting you to “dangerous voltage” inside the product.<br />
The exclamation point within the triangle is a warning sign alerting<br />
you to important instructions in this manual.<br />
Symboles de Sécurité<br />
Ce symbole signale la présence d’un danger d’électrocution.<br />
Ce symbole signale l’existence d’instructions importantes<br />
relatives au produit dans ce manuel.<br />
i
D <strong>Series</strong> <strong>Syringe</strong> <strong>Pumps</strong><br />
Warnings, Cautions, and Notices<br />
Warnungen und Vorsichtshinweise<br />
Der gepfeilte Blitz im Dreieck ist ein Warnzeichen, das Sie vor<br />
„gefährlichen Spannungen“ im Inneren des Produkts warnt.<br />
Das Ausrufezeichen in Dreieck ist ein Warnzeichen, das Sie<br />
darauf aufmerksam macht, daß wichtige Anleitungen zu diesem<br />
Handbuch gehören.<br />
Advertencias y Precauciones<br />
Esta señal alerta sobre la presencia de alto voltaje en el interior<br />
del producto.<br />
Esta señal le advierte sobre la importancia de las instrucciones<br />
del manual que acompañan a este producto.<br />
ii
D <strong>Series</strong> <strong>Syringe</strong> <strong>Pumps</strong><br />
Warnings, Cautions, and Notices<br />
“To prevent damaging the instrument or injuring yourself, it is<br />
absolutely necessary that you understand everything in English, above<br />
all, technical terms, before operating the instrument. Otherwise, it is<br />
necessary for you to receive complete instruction from someone<br />
qualified who understands both the instrument and English very well.”<br />
“Um eine Beschädigung des Gerätes oder eine Gefährdung des<br />
Anwenders zu vermeiden ist es notwendig, daß dieser vollstandig die<br />
englische Sprache und die technischen Bezeichnungen beherrscht.<br />
Oder der Anwender muß von einer Person eingeübt werden, die bereits<br />
vorher dieses Gerät bedienst hat.”<br />
“Pour empêcher dommage à l’instrument ou blesser vous-même, il faut<br />
absolument que vous compreniez tout en anglais, surtout les termes<br />
techniques, avant d’actionner l’instrument. Autrement, il faut que vous<br />
receviez l’instruction parfaite d’une personne très compétente qui<br />
comprend bien les deux l’instrument et anglais.”<br />
“Para prevenir cualquier daño en el instrumento o en el operador, es<br />
necesario que el usuario comprenda perfectamente el lenguaje inglés y<br />
las términos técnicos intrínsecos, o bien ser formado por una persona<br />
que haya trabajado ya previamente con este instrumento.”<br />
“For a forhindre skade på instrumentet eller operatøren er det<br />
nødvendig at brukeren har full forståelse for det engelske sprak og<br />
tekniske uttrykk Ellers må brukeren få opplæring av en person, som<br />
kan engelsk, for instrumentet tas i bruk.”<br />
“För att förhindra skade på instrumentet eller operatören, år det<br />
nötvändigt att användaren har fullständiga kunskaper i det engelska<br />
språket och dess tekniska termer, eller utbildas av en person, som<br />
tidigare brukat instrumentet.”<br />
“For at undgå skade på produktet eller på brugeren er det nødvendigt<br />
at brugeren til fulde forstår det engelske sprog for at forstå den<br />
tekniske formulering i den engelske manual. I modsat fald skal<br />
brugeren modtage træning, inden apparatet tages I drift.”<br />
iii
D <strong>Series</strong> <strong>Syringe</strong> <strong>Pumps</strong><br />
Warnings, Cautions, and Notices<br />
Laitteelle tai käyttäjälle aiheutuvien vahinkojen välttämiseksi on<br />
tärkeää, että käyttäjä hallitsee englannin kielen ja englantilaiset<br />
tekniset termit tai on saanut käyttöopastuksen englantia osaavalta<br />
henkilöltä.<br />
“Per evitare danni allo struménto od incidenti all’operatore, é<br />
necessario che l’utilizzatore abbia una completa conoscensza della<br />
lingua inglese oppure che venga istruita da una persona che abbia<br />
utilizzato precedentemente questo strumento.”<br />
“Para impedir qualquer dano no aparelho ou ferimentos parao<br />
operador, é necessario que o utilizador tenha um conhecimento<br />
completo da lingua inglesa e dos respectivos termos técnicos, ou seja,<br />
treinado por uma pessoa que tenha esse conhecimento, antes de<br />
operar com este aparelho.”<br />
“‘<br />
<br />
<br />
”<br />
С цел да избегне повреда на апаратурата или нараняване на<br />
оператора е необходимо клиента добре да владее английски език и<br />
техчническата терминолгия, която е използувана в описанието<br />
или да бъде обучен от лице, което е вече работило с такъв апарат.<br />
Figyelmeztetés! A készülék meghibásodásának valamint a kezelö<br />
sérülésének megelözése érdekében a felhasználónak feltétlenül értenie<br />
kell az angol nyelvet, ezen belül a müszaki kifejezéseket, vagy pedig a<br />
használatba vételt megelözöen a készülék kezelésében már gyakarlott<br />
személy által történö betanitás szükséges!<br />
iv
D <strong>Series</strong> <strong>Syringe</strong> <strong>Pumps</strong><br />
Warnings, Cautions, and Notices<br />
- EXPLOSION WARNING -<br />
WARNING<br />
Teledyne <strong>Isco</strong> D <strong>Series</strong> <strong>Pumps</strong>, SFX 2-10 and<br />
SFX 220 Extractors are NOT EXPLOSION PROOF.<br />
Teledyne <strong>Isco</strong> SFX System and D <strong>Series</strong> <strong>Syringe</strong><br />
Pump Safety Note when using a flammable fluid<br />
The Teledyne <strong>Isco</strong> SFX system and syringe pumps must be placed within a properly<br />
operating vent hood (fume cupboard), when using ethane or any other flammable<br />
gas. Ensure that all SFE tubing connections are completely free of any gas<br />
leaks by performing the leak test using CO 2 (detailed in Section 2 of the D <strong>Series</strong><br />
pump manual, Section 5 of the SFX 2-10 manual and Section 6 of the SFX 2-10,<br />
220, and SFX 3560 manual). There must absolutely be NO gas leaks present before<br />
introducing the flammable gas. In a temperature-stable, leak-free system, the flow<br />
rate, as registered by the pump, should settle to a value below 0.01 ml/min after 15,<br />
minutes during a static extraction.<br />
Important: When using a Teledyne <strong>Isco</strong> extractor (either SFX 2-10, SFX<br />
220, SFX 3560) be absolutely sure the built-in venting fan (a brushless<br />
motor) is operating properly.<br />
The Teledyne <strong>Isco</strong> D <strong>Series</strong> <strong>Syringe</strong> <strong>Pumps</strong> and the SFX units, use brush-type drive<br />
motors. Minor modifications to the pumps may render them safer, especially in the<br />
rare event of catastrophic piston seal failure. However, these modifications<br />
will not make these pumps explosion proof.<br />
•Remove the front and back cylinder covers located on the ball screw tower.<br />
This will allow any escaped gas to quickly dissipate away from the pump cylinder<br />
area and to reduce the amount entering the motor compartment.<br />
•Seal the syringe pump motor compartment with tape and purge it with a continuous<br />
flow of nitrogen (N 2 ) gas. This will also reduce the possibility of accumulating<br />
an explosive mixture around the motor and relays.<br />
•For further information, telephone Teledyne <strong>Isco</strong> at (800)775-2965, or fax<br />
(402)465-3085 to consult the Teledyne <strong>Isco</strong> Service Department.<br />
USE THE Teledyne <strong>Isco</strong> SFE SYSTEM AND SYRINGE PUMPS IN THESE<br />
POTENTIALLY HAZARDOUS APPLICATIONS AT YOUR OWN RISK!<br />
5-97<br />
v
D <strong>Series</strong> <strong>Syringe</strong> <strong>Pumps</strong><br />
Warnings, Cautions, and Notices<br />
- AVERTISSEMENT D’EXPLOSION -<br />
AVERTISSEMENT<br />
Les pompes de Série ‘D’ Teledyne <strong>Isco</strong> et l’extracteur SFX 2-10,<br />
SFX 220, et SFX 3560 ne sont pas à l’épreuve d’explosion!<br />
Remarque de sûreté concernant l’usage d’un fluide inflammable avec les<br />
pompes à seringue d’<strong>Isco</strong> Série ‘D’ et le système SFX.<br />
Le système SFX et pompes à seringue Teledyne <strong>Isco</strong> doivent être placées à l'intérieur d’une hotte<br />
chimique fonctionnelle, quand vous utilisez éthane C 2 H 6 , ou tout autre gaz inflammable.<br />
Assurez-vous que toute la tuyauterie SFE est complètement scellée avec aucune fuite de gaz en exécutant<br />
une épreuve de fuite en utilisant du CO 2 . (Cette méthode est détaillée à la partie 2 du manuel<br />
de la pompe Série ‘D’et à la partie 2 du manuel SFX 2-10, SFX 220, et 3560.) Il faut absolument<br />
qu'il n'y ait aucune fuite de gaz avant d'introduire le gaz inflammable au système. À partir d’un système<br />
à température stable et sans aucune fuite de gaz, la valeur du flot qui est indiqué par la<br />
pompe, devrait se stabiliser à une valeur moins de 0,01 ml/min après 15 minutes, pendant une<br />
extraction statique.<br />
Important: Quand vous utilisez un extracteur Teledyne <strong>Isco</strong> SFX 2-10, SFX 220, et 3560,<br />
soyez absolument certain que le ventilateur (du moteur sans brosses) fonctionne<br />
correctement. Quand vous installez l'extracteur, assurez-vous qu'il y a un espace vide de<br />
15 centimètres au moins entre le mur et l'arrière de l'extracteur pour assurer ventilation<br />
adéquate.<br />
Le système SFE et les pompes de série 'D' utilisent les moteurs de courant continu. Ils possédent<br />
des collecteurs et brosses qui produisent des décharges électriques (étincelles) entre eux quand les<br />
moteurs fonctionnent normalement. Ces décharges, aussi bien que celles qui sont produites aux<br />
contacts des relais pourraient faire exploser un mixture d'air et de gaz inflammable. De petites<br />
modifications aux pompes peuvent les rendre moins dangereuses, surtout dans le cas rare d’une<br />
panne catastrophique du joint d’étanchéité du piston. Cependant, il n’y a aucune modification<br />
qui fera ces pompes à l’épreuve d’explosion!<br />
• Enlevez les couvercles de devant et d'arrière du cylindre qui sont situés sur la tour de la<br />
pompe. Cela permettra au gaz qui s'échappe de dissiper plus rapidement loin de la pompe et<br />
réduira aussi la quantité de gaz qui entre dans le compartiment du moteur.<br />
• Scellez le compartiment du moteur de la pompe avec un ruban adhésif et circulez un flot continu<br />
d'azote (N 2 ) à l’intérieur du compartiment. Cela réduira aussi la possibilité d'accumuler<br />
une mixture explosive autour du moteur et relais, où se trouvent la première possibilité des<br />
étincelles électriques.<br />
• Pour l'information supplémentaire, téléphonez gratuitement (800) 775-2965, ou télécopiez<br />
(402) 465-3085 pour consulter le département de service technique.<br />
UTILISEZ LE SYSTÈME SFE ET LES POMPES À SERINGUE TELEDYNE ISCO DANS TELLES<br />
APPLICATIONS POTENTIELLEMENT HASARDEUSES Á VOS RISQUES ET PÉRILS!<br />
vi
D <strong>Series</strong> <strong>Syringe</strong> <strong>Pumps</strong><br />
Warnings, Cautions, and Notices<br />
WARNING:<br />
PLEASE READ<br />
At the request of our Supercritical Fluid Extraction laboratory staff, we want our customers<br />
to be aware of the potential hazards involved with supercritical fluid extraction. Oxidizing<br />
gases, such as nitrous oxide, in contact with organic matrices or flammable modifiers, can<br />
detonate under certain conditions. Likewise, flammable fluids, such as methane, under high<br />
pressure conditions can present a hazard.<br />
With concern for the safety of our customers, we have designed our extractors to be as safe as<br />
possible. However, we do not recommend the use of our instrument with potentially explosive<br />
reactions.<br />
The letter below, which appeared in the July 22, 1991 edition of Chemical and Engineering<br />
News, is reprinted with permission from Professor Robert E. Sievers and his colleagues at<br />
the University of Colorado at Boulder. Even though they were not performing supercritical<br />
fluid extraction, it details the problems their lab experienced using nitrous oxide under similar<br />
conditions. We add our support for their suggestion to use only carbon dioxide or other<br />
less hazardous fluids for supercritical fluid extraction.<br />
vii
D <strong>Series</strong> <strong>Syringe</strong> <strong>Pumps</strong><br />
Warnings, Cautions, and Notices<br />
CAUTION:<br />
Avoid spills! Liquids associated with this instrument may be classified<br />
as carcinogenic, biohazardous, flammable, or radioactive. Should<br />
these liquids be used, it is highly recommended that this application be<br />
accomplished in an isolated environment designed for these types of<br />
materials in accordance with federal state and local regulatory laws<br />
and in compliance with your organization’s chemical/hygiene plan in<br />
the event of a spill.<br />
In all cases, when using Teledyne <strong>Isco</strong> instrumentation, prudence and<br />
common sense must be used.<br />
WARNING:<br />
Pinch point. This symbol warns you that your fingers or hands will<br />
sustain serious injury if you place them between the moving parts of<br />
the mechanism near this symbol.<br />
WARNING:<br />
Avoid hazardous practices! If you use this instrument in any way not<br />
specified in this manual, the protection provided by the instrument may<br />
be impaired; this will increase your risk of injury.<br />
CAUTION:<br />
Liquids associated with this instrument may be classified as<br />
carcinogenic, biohazardous, flammable, or radioactive. Should these<br />
liquids be used, it is highly recommended that this application be<br />
accomplished in an isolated environment designed for these types of<br />
materials, in accordance with federal, state, and local regulatory laws,<br />
and in compliance with your company’s chemical/hygiene plan in the<br />
event of a spill.<br />
In all cases, when using Teledyne <strong>Isco</strong> instrumentation, prudence and<br />
common sense must be used.<br />
viii
D <strong>Series</strong> <strong>Syringe</strong> <strong>Pumps</strong><br />
Warnings, Cautions, and Notices<br />
AVIS: Éviter de répandre! Les liquides qui sont pompés dans cet<br />
instrument peuvent être cancérigènes, hasards biologiques,<br />
inflammables, ou radioactifs. Si vous devez utiliser ces liquides<br />
hasardeux, il est très recommandé que vous le faites à l'intérieur<br />
d'un environnement isolé conçu pour tels liquides. Cet<br />
environnement isolé devrait être construit selon les règlements<br />
fédéraux, provinciaux, et locaux, aussi que le plan de votre<br />
organisation qui concerne l'évènement d'un accident avec les<br />
matières hasardeuses. En tout cas, utilisez toujours<br />
l'instrumentation d'<strong>Isco</strong> avec prudence et sens commun.<br />
ATTENTION:<br />
Risque de pincement. Ce symbole vous avertit que les mains ou les<br />
doigts recevront une blessure sérieuse si vous les mettez entre les<br />
éléments en mouvement du mécanisme près de ce symbole.<br />
ATTENTION:<br />
Éviter les usages hasardeux! Si vous utilisez cet instrument d’une<br />
manière autre que celles qui sont specifiées dans ce manuel, la<br />
protection fournie par l’instrument peut être affaiblie; cela augmentera<br />
votre risque de blessure.<br />
AVIS:<br />
Les liquides qui sont analysés dans cet instrument peuvent être<br />
cancérigènes, hasards biologiques, inflammables, ou radioactifs.<br />
Si vous devez utiliser ces liquides hasardeux, il est très recommandé<br />
que vous le faites à l'intérieur d'un environnement isolé conçu pour tels<br />
liquides.<br />
Cet environnement isolé devrait être construit selon les règlements<br />
fédéraux, provinciaux, et locaux, aussi que le plan de votre<br />
organisation qui concerne l'évènement d'un accident avec les matières<br />
hasardeuses.<br />
En tout cas, utilisez toujours l'instrumentation d'<strong>Isco</strong> avec prudence et<br />
sens commun.<br />
ix
D <strong>Series</strong> <strong>Syringe</strong> <strong>Pumps</strong><br />
Warnings, Cautions, and Notices<br />
Commonly Ordered Replacement Parts for the<br />
D <strong>Series</strong> <strong>Syringe</strong> <strong>Pumps</strong><br />
Description<br />
Part Number<br />
Cylinder Seals General:<br />
65D 0-1379 bar 202-9096-08<br />
65DM 0-689.5 bar 202-9096-08<br />
100DX/DM 0-689.5 bar 202-9090-75<br />
260D 0-517.1 bar 202-9091-06<br />
500D 0-258.6 bar 202-9091-56<br />
1000D 0-137.8 bar upper seal 202-9990-25<br />
1000D 0-137.8 bar lower seal 202-9990-23<br />
(For more information on seals, refer to Table 2A-6)<br />
65D<br />
Inlet/Outlet fittings:<br />
1 4" F250C Gland 209-0164-02<br />
1 4" F250C Collar 209-0164-03<br />
1 4" F250C Plug 209-0164-05<br />
65DM<br />
Inlet/Outlet fittings:<br />
Valco - 1 8" Nut 209-0169-27<br />
1 8" Ferrule 209-0169-41<br />
1 8" Plug 209-0166-80<br />
1 8 – 1 16" Tubing Reducer 209-0169-42<br />
100DX/DM and 260D<br />
Inlet/Outlet fittings:<br />
Valco - 1 8" Nut 209-0169-27<br />
1 8" Ferrule 209-0094-07<br />
1 8" Plug 209-0166-80<br />
1 8 – 1 16" Tubing Reducer 209-0169-42<br />
500D<br />
Inlet/Outlet fittings:<br />
1 8" Tubing Connector to 1 8" NPT 209-0161-01<br />
1 8" NPT Plug 209-0168-00<br />
1 8 – 1 16" Tubing Reducer 209-0162-00<br />
1000D<br />
Inlet/Outlet fittings:<br />
1 4" NPT Plug 209-0168-09<br />
1 4" NPT Connector to 1 4" tubing 202-1063-36<br />
Stainless Steel Tubing:<br />
1 16" OD 0.009" ID 004-7462-51<br />
1 16" OD 0.020" ID 004-7300-21<br />
1 8" OD 0.069" ID 004-7302-22<br />
x
D <strong>Series</strong> <strong>Syringe</strong> <strong>Pumps</strong><br />
Table of Contents<br />
Section 1 Introduction<br />
1.1 Introduction . . . . . . . . . . . . . . . . . . . . . . . . . . . . . . . . . . . . . . . . . . . . . . . . . . . . . . . . 1-1<br />
1.1.1 Specifications . . . . . . . . . . . . . . . . . . . . . . . . . . . . . . . . . . . . . . . . . . . . . . . . . 1-1<br />
1.2 Controls and Indicators . . . . . . . . . . . . . . . . . . . . . . . . . . . . . . . . . . . . . . . . . . . . . 1-12<br />
1.3 Unpacking . . . . . . . . . . . . . . . . . . . . . . . . . . . . . . . . . . . . . . . . . . . . . . . . . . . . . . . . 1-16<br />
1.4 Electrical Connections . . . . . . . . . . . . . . . . . . . . . . . . . . . . . . . . . . . . . . . . . . . . . . 1-16<br />
1.5 Preliminary Checkout . . . . . . . . . . . . . . . . . . . . . . . . . . . . . . . . . . . . . . . . . . . . . . . 1-17<br />
Section 2A 65DM, 100DM, 100DX, and 260D Liquid System Connections<br />
& Accessories<br />
2A.1 Introduction . . . . . . . . . . . . . . . . . . . . . . . . . . . . . . . . . . . . . . . . . . . . . . . . . . . . . 2A-1<br />
2A.2 Liquid System Connections . . . . . . . . . . . . . . . . . . . . . . . . . . . . . . . . . . . . . . . . . 2A-2<br />
2A.2.1 Ports . . . . . . . . . . . . . . . . . . . . . . . . . . . . . . . . . . . . . . . . . . . . . . . . . . . . . . 2A-2<br />
2A.2.2 Installation Tips . . . . . . . . . . . . . . . . . . . . . . . . . . . . . . . . . . . . . . . . . . . . 2A-3<br />
2A.2.3 Tubing Cutting . . . . . . . . . . . . . . . . . . . . . . . . . . . . . . . . . . . . . . . . . . . . . 2A-3<br />
2A.2.4 Accessory Package . . . . . . . . . . . . . . . . . . . . . . . . . . . . . . . . . . . . . . . . . . . 2A-4<br />
2A.2.5 Drain Tube . . . . . . . . . . . . . . . . . . . . . . . . . . . . . . . . . . . . . . . . . . . . . . . . . 2A-4<br />
2A.3 Fluid Connection Accessories. . . . . . . . . . . . . . . . . . . . . . . . . . . . . . . . . . . . . . . . 2A-5<br />
2A.3.1 Manual Refill Kit . . . . . . . . . . . . . . . . . . . . . . . . . . . . . . . . . . . . . . . . . . . 2A-5<br />
2A.3.2 CO 2 Cylinder Connection Package . . . . . . . . . . . . . . . . . . . . . . . . . . . . . . 2A-7<br />
2A.3.3 Manual Outlet Valve Package . . . . . . . . . . . . . . . . . . . . . . . . . . . . . . . . . 2A-7<br />
2A.3.4 In-Line Filter Package . . . . . . . . . . . . . . . . . . . . . . . . . . . . . . . . . . . . . . . 2A-8<br />
2A.4 Temperature and Pressure Controls . . . . . . . . . . . . . . . . . . . . . . . . . . . . . . . . . 2A-10<br />
2A.4.1 Cylinder Insulating Cover . . . . . . . . . . . . . . . . . . . . . . . . . . . . . . . . . . . 2A-10<br />
2A.4.2 Cooling/Heating Jacket . . . . . . . . . . . . . . . . . . . . . . . . . . . . . . . . . . . . . . 2A-11<br />
2A.4.3 Back Pressure Regulation . . . . . . . . . . . . . . . . . . . . . . . . . . . . . . . . . . . . 2A-13<br />
2A.5 Nitrogen Purge . . . . . . . . . . . . . . . . . . . . . . . . . . . . . . . . . . . . . . . . . . . . . . . . . . 2A-14<br />
2A.6 Optional Kits and Instrumentation. . . . . . . . . . . . . . . . . . . . . . . . . . . . . . . . . . 2A-15<br />
2A.6.1 LabView Pump Controller . . . . . . . . . . . . . . . . . . . . . . . . . . . . . . . . . . 2A-15<br />
2A.7 Optional Seals. . . . . . . . . . . . . . . . . . . . . . . . . . . . . . . . . . . . . . . . . . . . . . . . . . . 2A-16<br />
2A.8 Optional Accessories. . . . . . . . . . . . . . . . . . . . . . . . . . . . . . . . . . . . . . . . . . . . . . 2A-17<br />
Section 2B 500D Liquid System Connection & Accessories<br />
2B.1 Introduction . . . . . . . . . . . . . . . . . . . . . . . . . . . . . . . . . . . . . . . . . . . . . . . . . . . . . 2B-1<br />
2B.2 Liquid System Connections . . . . . . . . . . . . . . . . . . . . . . . . . . . . . . . . . . . . . . . . . 2B-2<br />
2B.2.1 Ports . . . . . . . . . . . . . . . . . . . . . . . . . . . . . . . . . . . . . . . . . . . . . . . . . . . . . . 2B-2<br />
2B.2.2 500D Installation Tips . . . . . . . . . . . . . . . . . . . . . . . . . . . . . . . . . . . . . . . 2B-2<br />
2B.2.3 Tubing Cutting . . . . . . . . . . . . . . . . . . . . . . . . . . . . . . . . . . . . . . . . . . . . . 2B-2<br />
2B.2.4 Accessory Package . . . . . . . . . . . . . . . . . . . . . . . . . . . . . . . . . . . . . . . . . . . 2B-3<br />
2B.2.5 Drain Tube . . . . . . . . . . . . . . . . . . . . . . . . . . . . . . . . . . . . . . . . . . . . . . . . . 2B-3<br />
2B.3 Fluid Connection Accessories. . . . . . . . . . . . . . . . . . . . . . . . . . . . . . . . . . . . . . . . 2B-4<br />
2B.3.1 Manual Refill Kit . . . . . . . . . . . . . . . . . . . . . . . . . . . . . . . . . . . . . . . . . . . 2B-4<br />
2B.3.2 Manual Outlet Valve Package . . . . . . . . . . . . . . . . . . . . . . . . . . . . . . . . . 2B-6<br />
2B.4 Temperature and Pressure Controls . . . . . . . . . . . . . . . . . . . . . . . . . . . . . . . . . . 2B-7<br />
2B.4.1 Cylinder Insulating Cover . . . . . . . . . . . . . . . . . . . . . . . . . . . . . . . . . . . . 2B-7<br />
2B.4.2 Cooling/Heating Jacket . . . . . . . . . . . . . . . . . . . . . . . . . . . . . . . . . . . . . . . 2B-8<br />
xi
D <strong>Series</strong> <strong>Syringe</strong> <strong>Pumps</strong><br />
Table of Contents<br />
2B.5 Nitrogen Purge . . . . . . . . . . . . . . . . . . . . . . . . . . . . . . . . . . . . . . . . . . . . . . . . . . . 2B-8<br />
2B.6 500D Optional Accessories . . . . . . . . . . . . . . . . . . . . . . . . . . . . . . . . . . . . . . . . . 2B-10<br />
Section 2C 1000D Liquid System Connection & Accessories<br />
2C.1 Introduction . . . . . . . . . . . . . . . . . . . . . . . . . . . . . . . . . . . . . . . . . . . . . . . . . . . . . 2C-1<br />
2C.2 Liquid System Connections . . . . . . . . . . . . . . . . . . . . . . . . . . . . . . . . . . . . . . . . . 2C-1<br />
2C.2.1 Ports . . . . . . . . . . . . . . . . . . . . . . . . . . . . . . . . . . . . . . . . . . . . . . . . . . . . . . 2C-1<br />
2C.2.2 1000D Installation Tips . . . . . . . . . . . . . . . . . . . . . . . . . . . . . . . . . . . . . . 2C-2<br />
2C.2.3 Tubing Cutting . . . . . . . . . . . . . . . . . . . . . . . . . . . . . . . . . . . . . . . . . . . . . 2C-2<br />
2C.2.4 Drain Tube . . . . . . . . . . . . . . . . . . . . . . . . . . . . . . . . . . . . . . . . . . . . . . . . . 2C-4<br />
2C.3 Cylinder Washing and Purging . . . . . . . . . . . . . . . . . . . . . . . . . . . . . . . . . . . . . . 2C-4<br />
Section 2D 65D Liquid System Connections & Accessories<br />
2D.1 Introduction . . . . . . . . . . . . . . . . . . . . . . . . . . . . . . . . . . . . . . . . . . . . . . . . . . . . . 2D-1<br />
2D.2 Fluid Connections. . . . . . . . . . . . . . . . . . . . . . . . . . . . . . . . . . . . . . . . . . . . . . . . . 2D-1<br />
2D.2.1 Pump Inlet and Outlet . . . . . . . . . . . . . . . . . . . . . . . . . . . . . . . . . . . . . . . 2D-1<br />
2D.2.2 Drain Tube . . . . . . . . . . . . . . . . . . . . . . . . . . . . . . . . . . . . . . . . . . . . . . . . 2D-2<br />
2D.3 Temperature and Pressure Controls . . . . . . . . . . . . . . . . . . . . . . . . . . . . . . . . . . 2D-3<br />
2D.3.1 Cylinder Insulating Cover . . . . . . . . . . . . . . . . . . . . . . . . . . . . . . . . . . . . 2D-3<br />
2D.3.2 Cooling/Heating Jacket . . . . . . . . . . . . . . . . . . . . . . . . . . . . . . . . . . . . . . . 2D-4<br />
2D.4 Nitrogen Purge . . . . . . . . . . . . . . . . . . . . . . . . . . . . . . . . . . . . . . . . . . . . . . . . . . . 2D-6<br />
2D.5 Flushing the Pump. . . . . . . . . . . . . . . . . . . . . . . . . . . . . . . . . . . . . . . . . . . . . . . . 2D-7<br />
Section 3 Single & Multiple Independent Pump Operation<br />
3.1 Introduction . . . . . . . . . . . . . . . . . . . . . . . . . . . . . . . . . . . . . . . . . . . . . . . . . . . . . . . . 3-1<br />
3.2 General Controller Information . . . . . . . . . . . . . . . . . . . . . . . . . . . . . . . . . . . . . . . . 3-1<br />
3.2.1 Display . . . . . . . . . . . . . . . . . . . . . . . . . . . . . . . . . . . . . . . . . . . . . . . . . . . . . . 3-2<br />
3.2.2 Selecting Operating Parameters . . . . . . . . . . . . . . . . . . . . . . . . . . . . . . . . . . 3-3<br />
3.3 Main Menu Features. . . . . . . . . . . . . . . . . . . . . . . . . . . . . . . . . . . . . . . . . . . . . . . . . 3-3<br />
3.3.1 Setting Flow and/or Pressure Units . . . . . . . . . . . . . . . . . . . . . . . . . . . . . . . 3-4<br />
3.3.2 Refill . . . . . . . . . . . . . . . . . . . . . . . . . . . . . . . . . . . . . . . . . . . . . . . . . . . . . . . . 3-5<br />
3.3.3 Power Failure [STOP] . . . . . . . . . . . . . . . . . . . . . . . . . . . . . . . . . . . . . . . . . . 3-5<br />
3.3.4 Resetting the System . . . . . . . . . . . . . . . . . . . . . . . . . . . . . . . . . . . . . . . . . . . 3-6<br />
3.3.5 Display Contrast . . . . . . . . . . . . . . . . . . . . . . . . . . . . . . . . . . . . . . . . . . . . . . 3-7<br />
3.3.6 Serial Option . . . . . . . . . . . . . . . . . . . . . . . . . . . . . . . . . . . . . . . . . . . . . . . . . 3-7<br />
3.3.7 Pump Status . . . . . . . . . . . . . . . . . . . . . . . . . . . . . . . . . . . . . . . . . . . . . . . . . . 3-7<br />
3.3.8 External Analog Control . . . . . . . . . . . . . . . . . . . . . . . . . . . . . . . . . . . . . . . . 3-8<br />
3.3.9 Multi-Pump . . . . . . . . . . . . . . . . . . . . . . . . . . . . . . . . . . . . . . . . . . . . . . . . . . 3-9<br />
3.3.10 Total Volume Reset . . . . . . . . . . . . . . . . . . . . . . . . . . . . . . . . . . . . . . . . . . 3-11<br />
3.3.11 Valve . . . . . . . . . . . . . . . . . . . . . . . . . . . . . . . . . . . . . . . . . . . . . . . . . . . . . . 3-11<br />
3.4 Second Menu . . . . . . . . . . . . . . . . . . . . . . . . . . . . . . . . . . . . . . . . . . . . . . . . . . . . . . 3-12<br />
3.4.1 Second Menu Menu Options . . . . . . . . . . . . . . . . . . . . . . . . . . . . . . . . . . . . 3-12<br />
3.5 Front Panel Keys. . . . . . . . . . . . . . . . . . . . . . . . . . . . . . . . . . . . . . . . . . . . . . . . . . . 3-13<br />
3.5.1 HOLD . . . . . . . . . . . . . . . . . . . . . . . . . . . . . . . . . . . . . . . . . . . . . . . . . . . . . . 3-13<br />
3.5.2 RECALL . . . . . . . . . . . . . . . . . . . . . . . . . . . . . . . . . . . . . . . . . . . . . . . . . . . . 3-13<br />
3.5.3 STORE . . . . . . . . . . . . . . . . . . . . . . . . . . . . . . . . . . . . . . . . . . . . . . . . . . . . . 3-14<br />
3.5.4 LIMITS . . . . . . . . . . . . . . . . . . . . . . . . . . . . . . . . . . . . . . . . . . . . . . . . . . . . . 3-14<br />
3.5.5 RAPID PRESS . . . . . . . . . . . . . . . . . . . . . . . . . . . . . . . . . . . . . . . . . . . . . . . 3-16<br />
3.5.6 HELP . . . . . . . . . . . . . . . . . . . . . . . . . . . . . . . . . . . . . . . . . . . . . . . . . . . . . . 3-16<br />
3.5.7 ACC CTRL . . . . . . . . . . . . . . . . . . . . . . . . . . . . . . . . . . . . . . . . . . . . . . . . . . 3-16<br />
3.5.8 ZERO PRESS . . . . . . . . . . . . . . . . . . . . . . . . . . . . . . . . . . . . . . . . . . . . . . . . 3-17<br />
3.6 Operating Modes . . . . . . . . . . . . . . . . . . . . . . . . . . . . . . . . . . . . . . . . . . . . . . . . . . . 3-17<br />
3.6.1 Constant Flow . . . . . . . . . . . . . . . . . . . . . . . . . . . . . . . . . . . . . . . . . . . . . . . 3-18<br />
3.6.2 Constant Pressure . . . . . . . . . . . . . . . . . . . . . . . . . . . . . . . . . . . . . . . . . . . . 3-18<br />
3.7 External Control . . . . . . . . . . . . . . . . . . . . . . . . . . . . . . . . . . . . . . . . . . . . . . . . . . . 3-19<br />
xii
D <strong>Series</strong> <strong>Syringe</strong> <strong>Pumps</strong><br />
Table of Contents<br />
3.8 Remote RUN/STOP. . . . . . . . . . . . . . . . . . . . . . . . . . . . . . . . . . . . . . . . . . . . . . . . . 3-19<br />
3.8.1 Wire Connections . . . . . . . . . . . . . . . . . . . . . . . . . . . . . . . . . . . . . . . . . . . . . 3-19<br />
3.9 Analog Flow Rate and Volume Output Option . . . . . . . . . . . . . . . . . . . . . . . . . . . 3-19<br />
3.9.1 Compatibility . . . . . . . . . . . . . . . . . . . . . . . . . . . . . . . . . . . . . . . . . . . . . . . . 3-20<br />
3.9.2 Hardware . . . . . . . . . . . . . . . . . . . . . . . . . . . . . . . . . . . . . . . . . . . . . . . . . . . 3-20<br />
3.9.3 Current Loop Output . . . . . . . . . . . . . . . . . . . . . . . . . . . . . . . . . . . . . . . . . . 3-20<br />
Section 4 Theory of Operation<br />
4.1 Introduction . . . . . . . . . . . . . . . . . . . . . . . . . . . . . . . . . . . . . . . . . . . . . . . . . . . . . . . . 4-1<br />
4.2 Pump Controller . . . . . . . . . . . . . . . . . . . . . . . . . . . . . . . . . . . . . . . . . . . . . . . . . . . . 4-1<br />
4.2.1 Electric Valve Interface . . . . . . . . . . . . . . . . . . . . . . . . . . . . . . . . . . . . . . . . . 4-6<br />
4.3 Pump Power Supply and Motor Drive Power amplifier . . . . . . . . . . . . . . . . . . . . . 4-7<br />
4.4 Pressure Transducer and Amplifier. . . . . . . . . . . . . . . . . . . . . . . . . . . . . . . . . . . . 4-10<br />
4.5 Automatic Pump Type Indication . . . . . . . . . . . . . . . . . . . . . . . . . . . . . . . . . . . . . 4-11<br />
4.6 Optical Indicators Piston Travel Limit Sensors . . . . . . . . . . . . . . . . . . . . . . . . . . 4-11<br />
Section 5 Pump Maintenance & Repair<br />
5.1 Introduction . . . . . . . . . . . . . . . . . . . . . . . . . . . . . . . . . . . . . . . . . . . . . . . . . . . . . . . . 5-1<br />
5.1.1 Service Department . . . . . . . . . . . . . . . . . . . . . . . . . . . . . . . . . . . . . . . . . . . . 5-2<br />
5.1.2 How to Ship Returns . . . . . . . . . . . . . . . . . . . . . . . . . . . . . . . . . . . . . . . . . . . 5-2<br />
5.1.3 Removing the Case Top . . . . . . . . . . . . . . . . . . . . . . . . . . . . . . . . . . . . . . . . . 5-3<br />
5.2 Lubrication . . . . . . . . . . . . . . . . . . . . . . . . . . . . . . . . . . . . . . . . . . . . . . . . . . . . . . . . 5-3<br />
5.2.1 Ball Nut . . . . . . . . . . . . . . . . . . . . . . . . . . . . . . . . . . . . . . . . . . . . . . . . . . . . . 5-4<br />
5.3 Seal Cleaning and Replacement. . . . . . . . . . . . . . . . . . . . . . . . . . . . . . . . . . . . . . . . 5-5<br />
5.3.1 The Piston Seal . . . . . . . . . . . . . . . . . . . . . . . . . . . . . . . . . . . . . . . . . . . . . . . 5-5<br />
5.3.2 Piston Seal Break-In (Aqueous seals only) . . . . . . . . . . . . . . . . . . . . . . . . . . 5-6<br />
5.3.3 All other piston seals . . . . . . . . . . . . . . . . . . . . . . . . . . . . . . . . . . . . . . . . . . . 5-7<br />
5.3.4 The Wiper Seal . . . . . . . . . . . . . . . . . . . . . . . . . . . . . . . . . . . . . . . . . . . . . . . . 5-7<br />
5.3.5 To reinstall the wiper . . . . . . . . . . . . . . . . . . . . . . . . . . . . . . . . . . . . . . . . . . 5-7<br />
5.4 Wear Ring Cleaning and Replacement . . . . . . . . . . . . . . . . . . . . . . . . . . . . . . . . . . 5-7<br />
5.5 Flushing the Cylinder . . . . . . . . . . . . . . . . . . . . . . . . . . . . . . . . . . . . . . . . . . . . . . . . 5-8<br />
5.5.1 Gas Solvent Changeover . . . . . . . . . . . . . . . . . . . . . . . . . . . . . . . . . . . . . . . . 5-8<br />
5.5.2 Liquid Solvent Changeover and Flushing . . . . . . . . . . . . . . . . . . . . . . . . . . 5-8<br />
5.6 General Cleaning. . . . . . . . . . . . . . . . . . . . . . . . . . . . . . . . . . . . . . . . . . . . . . . . . . . . 5-9<br />
5.7 Torque Limiter . . . . . . . . . . . . . . . . . . . . . . . . . . . . . . . . . . . . . . . . . . . . . . . . . . . . . 5-9<br />
5.8 Shear Key Replacement . . . . . . . . . . . . . . . . . . . . . . . . . . . . . . . . . . . . . . . . . . . . . 5-10<br />
5.8.1 Replacement Using Installation Tool . . . . . . . . . . . . . . . . . . . . . . . . . . . . . 5-11<br />
5.8.2 Replacement Without Installation Tool . . . . . . . . . . . . . . . . . . . . . . . . . . . 5-11<br />
5.8.3 Pump Bearings<br />
(65DM Only) . . . . . . . . . . . . . . . . . . . . . . . . . . . . . . . . . . . . . . . . . . . . . . . . 5-12<br />
5.8.4 Completion of Shear Key Replacement . . . . . . . . . . . . . . . . . . . . . . . . . . . 5-13<br />
5.9 Motor Brush Replacement . . . . . . . . . . . . . . . . . . . . . . . . . . . . . . . . . . . . . . . . . . . 5-14<br />
5.10 Troubleshooting. . . . . . . . . . . . . . . . . . . . . . . . . . . . . . . . . . . . . . . . . . . . . . . . . . . 5-16<br />
5.10.1 Power Supply (A1) . . . . . . . . . . . . . . . . . . . . . . . . . . . . . . . . . . . . . . . . . . . 5-16<br />
5.10.2 Controller . . . . . . . . . . . . . . . . . . . . . . . . . . . . . . . . . . . . . . . . . . . . . . . . . . 5-16<br />
5.11 Calibration. . . . . . . . . . . . . . . . . . . . . . . . . . . . . . . . . . . . . . . . . . . . . . . . . . . . . . . 5-17<br />
5.11.1 +5 Volts Adjustment . . . . . . . . . . . . . . . . . . . . . . . . . . . . . . . . . . . . . . . . . 5-17<br />
5.11.2 Pressure Transducer Calibration for 65DM, 100D, 260D, 500D, and 1000D<br />
5-17<br />
5.11.3 Pressure Transducer Calibration for 65D . . . . . . . . . . . . . . . . . . . . . . . . 5-17<br />
5.11.4 Reset Circuit . . . . . . . . . . . . . . . . . . . . . . . . . . . . . . . . . . . . . . . . . . . . . . . 5-19<br />
5.11.5 A/D Circuit Adjustment . . . . . . . . . . . . . . . . . . . . . . . . . . . . . . . . . . . . . . . 5-19<br />
5.11.6 Limit Sensor Adjustment . . . . . . . . . . . . . . . . . . . . . . . . . . . . . . . . . . . . . 5-19<br />
5.11.7 Limit Sensor Calibration . . . . . . . . . . . . . . . . . . . . . . . . . . . . . . . . . . . . . . 5-22<br />
xiii
D <strong>Series</strong> <strong>Syringe</strong> <strong>Pumps</strong><br />
Table of Contents<br />
Section 6 Serial Interface<br />
6.1 Introduction . . . . . . . . . . . . . . . . . . . . . . . . . . . . . . . . . . . . . . . . . . . . . . . . . . . . . . . . 6-1<br />
6.2 Network Control and Communication . . . . . . . . . . . . . . . . . . . . . . . . . . . . . . . . . . . 6-1<br />
6.3 User-written Software . . . . . . . . . . . . . . . . . . . . . . . . . . . . . . . . . . . . . . . . . . . . . . . 6-3<br />
6.3.1 DASNET . . . . . . . . . . . . . . . . . . . . . . . . . . . . . . . . . . . . . . . . . . . . . . . . . . . . . 6-3<br />
6.4 Cabling for Serial Control. . . . . . . . . . . . . . . . . . . . . . . . . . . . . . . . . . . . . . . . . . . . 6-11<br />
6.5 Serial Commands for the D <strong>Series</strong> Pump . . . . . . . . . . . . . . . . . . . . . . . . . . . . . . . 6-12<br />
6.5.1 Get Status Command . . . . . . . . . . . . . . . . . . . . . . . . . . . . . . . . . . . . . . . . . 6-16<br />
6.5.2 Gradient Download Command . . . . . . . . . . . . . . . . . . . . . . . . . . . . . . . . . . 6-18<br />
6.5.3 Gradient Upload Commands . . . . . . . . . . . . . . . . . . . . . . . . . . . . . . . . . . . . 6-18<br />
6.5.4 Range Command . . . . . . . . . . . . . . . . . . . . . . . . . . . . . . . . . . . . . . . . . . . . . 6-22<br />
6.5.5 Error Messages . . . . . . . . . . . . . . . . . . . . . . . . . . . . . . . . . . . . . . . . . . . . . . 6-23<br />
6.6 Serial Control Set-up . . . . . . . . . . . . . . . . . . . . . . . . . . . . . . . . . . . . . . . . . . . . . . . 6-23<br />
Section 7 Gradient Pumping for Pressure, Flow, and Concentration<br />
Modes<br />
7.1 Introduction . . . . . . . . . . . . . . . . . . . . . . . . . . . . . . . . . . . . . . . . . . . . . . . . . . . . . . . . 7-1<br />
7.2 Connecting the System . . . . . . . . . . . . . . . . . . . . . . . . . . . . . . . . . . . . . . . . . . . . . . . 7-2<br />
7.2.1 Inlet Connections . . . . . . . . . . . . . . . . . . . . . . . . . . . . . . . . . . . . . . . . . . . . . . 7-4<br />
7.2.2 Outlet Connections . . . . . . . . . . . . . . . . . . . . . . . . . . . . . . . . . . . . . . . . . . . . 7-5<br />
7.2.3 Dual System Gradient Connections . . . . . . . . . . . . . . . . . . . . . . . . . . . . . . . 7-6<br />
7.3 Single-Pump Gradient Programming . . . . . . . . . . . . . . . . . . . . . . . . . . . . . . . . . . . 7-8<br />
7.4 Dual Pump Concentration Gradient Programming . . . . . . . . . . . . . . . . . . . . . . . 7-10<br />
7.5 Review, Revise, & Hold Options. . . . . . . . . . . . . . . . . . . . . . . . . . . . . . . . . . . . . . . 7-12<br />
7.6 Program Conclusion . . . . . . . . . . . . . . . . . . . . . . . . . . . . . . . . . . . . . . . . . . . . . . . . 7-12<br />
Section 8 Continuous Flow Introduction, Installation, & Operation<br />
8.1 Introduction . . . . . . . . . . . . . . . . . . . . . . . . . . . . . . . . . . . . . . . . . . . . . . . . . . . . . . . . 8-1<br />
8.2 Continuous Flow Check Valves . . . . . . . . . . . . . . . . . . . . . . . . . . . . . . . . . . . . . . . . 8-2<br />
8.2.1 Check Valve Technical Specifications . . . . . . . . . . . . . . . . . . . . . . . . . . . . . . 8-2<br />
8.2.2 Dual Check Valve Installation . . . . . . . . . . . . . . . . . . . . . . . . . . . . . . . . . . . 8-3<br />
8.2.3 Inlet Tubing . . . . . . . . . . . . . . . . . . . . . . . . . . . . . . . . . . . . . . . . . . . . . . . . . . 8-4<br />
8.3 Continuous Flow Air Valves . . . . . . . . . . . . . . . . . . . . . . . . . . . . . . . . . . . . . . . . . . . 8-8<br />
8.3.1 Dual Air Valve Installation . . . . . . . . . . . . . . . . . . . . . . . . . . . . . . . . . . . . . . 8-8<br />
8.4 Continuous Flow Electric Valves . . . . . . . . . . . . . . . . . . . . . . . . . . . . . . . . . . . . . . 8-13<br />
8.4.1 Technical Specifications . . . . . . . . . . . . . . . . . . . . . . . . . . . . . . . . . . . . . . . 8-13<br />
8.4.2 Dual Electric Valve Installation . . . . . . . . . . . . . . . . . . . . . . . . . . . . . . . . . 8-14<br />
8.5 User Supplied Valves . . . . . . . . . . . . . . . . . . . . . . . . . . . . . . . . . . . . . . . . . . . . . . . 8-16<br />
8.6 Operation . . . . . . . . . . . . . . . . . . . . . . . . . . . . . . . . . . . . . . . . . . . . . . . . . . . . . . . . . 8-17<br />
8.6.1 Continuous Flow Setup . . . . . . . . . . . . . . . . . . . . . . . . . . . . . . . . . . . . . . . . 8-17<br />
8.6.2 Continuous Flow Features . . . . . . . . . . . . . . . . . . . . . . . . . . . . . . . . . . . . . 8-18<br />
8.7 Operating Tips and Guidelines . . . . . . . . . . . . . . . . . . . . . . . . . . . . . . . . . . . . . . . 8-18<br />
8.8 Special Features . . . . . . . . . . . . . . . . . . . . . . . . . . . . . . . . . . . . . . . . . . . . . . . . . . . 8-19<br />
8.8.1 Remote Start/Stop . . . . . . . . . . . . . . . . . . . . . . . . . . . . . . . . . . . . . . . . . . . . 8-19<br />
8.8.2 External Analog Control . . . . . . . . . . . . . . . . . . . . . . . . . . . . . . . . . . . . . . . 8-19<br />
8.8.3 Serial Control and Monitoring . . . . . . . . . . . . . . . . . . . . . . . . . . . . . . . . . . 8-19<br />
8.9 Accessories. . . . . . . . . . . . . . . . . . . . . . . . . . . . . . . . . . . . . . . . . . . . . . . . . . . . . . . . 8-20<br />
Section 9 Modifier Addition<br />
9.1 Introduction . . . . . . . . . . . . . . . . . . . . . . . . . . . . . . . . . . . . . . . . . . . . . . . . . . . . . . . . 9-1<br />
9.2 Plumbing Kit for Modifier Addition . . . . . . . . . . . . . . . . . . . . . . . . . . . . . . . . . . . . . 9-2<br />
9.3 Initial Preparation for Modifier Addition . . . . . . . . . . . . . . . . . . . . . . . . . . . . . . . . 9-5<br />
9.4 Modifier Addition . . . . . . . . . . . . . . . . . . . . . . . . . . . . . . . . . . . . . . . . . . . . . . . . . . . 9-7<br />
9.5 Refilling . . . . . . . . . . . . . . . . . . . . . . . . . . . . . . . . . . . . . . . . . . . . . . . . . . . . . . . . . . . 9-8<br />
xiv
D <strong>Series</strong> <strong>Syringe</strong> <strong>Pumps</strong><br />
Table of Contents<br />
9.5.1 Remote Start/Stop . . . . . . . . . . . . . . . . . . . . . . . . . . . . . . . . . . . . . . . . . . . . 9-10<br />
9.5.2 External Analog Control . . . . . . . . . . . . . . . . . . . . . . . . . . . . . . . . . . . . . . . 9-10<br />
9.5.3 Serial Control . . . . . . . . . . . . . . . . . . . . . . . . . . . . . . . . . . . . . . . . . . . . . . . . 9-10<br />
Appendix A Replacement Parts<br />
Index<br />
A.1 Replacement Parts . . . . . . . . . . . . . . . . . . . . . . . . . . . . . . . . . . . . . . . . . . . . . . . . . . A-1<br />
A.1.1 D <strong>Series</strong> Controller . . . . . . . . . . . . . . . . . . . . . . . . . . . . . . . . . . . . . . . . . . . . A-2<br />
A.1.2 1000D Pump . . . . . . . . . . . . . . . . . . . . . . . . . . . . . . . . . . . . . . . . . . . . . . . . . A-4<br />
A.1.3 500D/DX Pump . . . . . . . . . . . . . . . . . . . . . . . . . . . . . . . . . . . . . . . . . . . . . . . A-8<br />
A.1.4 100DM/DX and 260D <strong>Pumps</strong> . . . . . . . . . . . . . . . . . . . . . . . . . . . . . . . . . . . A-12<br />
A.1.5 65D Pump . . . . . . . . . . . . . . . . . . . . . . . . . . . . . . . . . . . . . . . . . . . . . . . . . . A-16<br />
A.1.6 65DM . . . . . . . . . . . . . . . . . . . . . . . . . . . . . . . . . . . . . . . . . . . . . . . . . . . . . . A-28<br />
A.1.7 Power Circuit Board . . . . . . . . . . . . . . . . . . . . . . . . . . . . . . . . . . . . . . . . . . A-42<br />
A.1.8 Controller Circuit Board . . . . . . . . . . . . . . . . . . . . . . . . . . . . . . . . . . . . . . . A-46<br />
A.1.9 Analog Output Circuit Board . . . . . . . . . . . . . . . . . . . . . . . . . . . . . . . . . . . A-50<br />
A.1.10 Interface Circuit Board . . . . . . . . . . . . . . . . . . . . . . . . . . . . . . . . . . . . . . . A-52<br />
A.1.11 Dual Electric Valve Package . . . . . . . . . . . . . . . . . . . . . . . . . . . . . . . . . . A-54<br />
A.1.12 Single Electric Valve Package . . . . . . . . . . . . . . . . . . . . . . . . . . . . . . . . . A-56<br />
A.1.13 SST Dual Air Valve Package for 100/260D/500D . . . . . . . . . . . . . . . . . . A-58<br />
A.1.14 SST Dual Air Valve Package for 1000D . . . . . . . . . . . . . . . . . . . . . . . . . . A-60<br />
A.1.15 Single Air Valve Package . . . . . . . . . . . . . . . . . . . . . . . . . . . . . . . . . . . . . A-62<br />
A.1.16 Dual Check Valve Package for 100/260/500D . . . . . . . . . . . . . . . . . . . . . A-64<br />
A.1.17 Dual Check Valve Package for 1000D . . . . . . . . . . . . . . . . . . . . . . . . . . . A-66<br />
A.1.18 Single Check Valve Package . . . . . . . . . . . . . . . . . . . . . . . . . . . . . . . . . . . A-68<br />
List of Figures<br />
1-1 D <strong>Series</strong> <strong>Syringe</strong> Pump (500D shown) . . . . . . . . . . . . . . . . . . . . . . . . . . . . . . . . . . 1-1<br />
1-2 260D flow rate range . . . . . . . . . . . . . . . . . . . . . . . . . . . . . . . . . . . . . . . . . . . . . . . . 1-9<br />
1-3 500D flow rate range . . . . . . . . . . . . . . . . . . . . . . . . . . . . . . . . . . . . . . . . . . . . . . . . 1-9<br />
1-4 1000D flow rate range . . . . . . . . . . . . . . . . . . . . . . . . . . . . . . . . . . . . . . . . . . . . . . 1-10<br />
1-5 Pump controller key functions . . . . . . . . . . . . . . . . . . . . . . . . . . . . . . . . . . . . . . . . 1-12<br />
1-6 Pump controller rear panel connectors . . . . . . . . . . . . . . . . . . . . . . . . . . . . . . . . . 1-13<br />
1-7 Pump rear panel connectors . . . . . . . . . . . . . . . . . . . . . . . . . . . . . . . . . . . . . . . . . 1-14<br />
1-8 Pump front panel controls . . . . . . . . . . . . . . . . . . . . . . . . . . . . . . . . . . . . . . . . . . . 1-15<br />
1-9 Status Screen . . . . . . . . . . . . . . . . . . . . . . . . . . . . . . . . . . . . . . . . . . . . . . . . . . . . . 1-17<br />
2A-1 Liquid system plumbing connections . . . . . . . . . . . . . . . . . . . . . . . . . . . . . . . . . 2A-2<br />
2A-2 Accessory package installation . . . . . . . . . . . . . . . . . . . . . . . . . . . . . . . . . . . . . . 2A-4<br />
2A-3 Drain tube installation . . . . . . . . . . . . . . . . . . . . . . . . . . . . . . . . . . . . . . . . . . . . 2A-5<br />
2A-4 Refill kit installation . . . . . . . . . . . . . . . . . . . . . . . . . . . . . . . . . . . . . . . . . . . . . . 2A-6<br />
2A-5 CO 2 package installation . . . . . . . . . . . . . . . . . . . . . . . . . . . . . . . . . . . . . . . . . . . 2A-7<br />
2A-6 Outlet valve package connection . . . . . . . . . . . . . . . . . . . . . . . . . . . . . . . . . . . . . 2A-8<br />
2A-7 In-line filter package . . . . . . . . . . . . . . . . . . . . . . . . . . . . . . . . . . . . . . . . . . . . . . 2A-9<br />
2A-8 Cylinder insulation cover . . . . . . . . . . . . . . . . . . . . . . . . . . . . . . . . . . . . . . . . . 2A-10<br />
2A-9 Cooling/Heating jacket installed . . . . . . . . . . . . . . . . . . . . . . . . . . . . . . . . . . . . 2A-12<br />
2A-10 Back pressure regulator . . . . . . . . . . . . . . . . . . . . . . . . . . . . . . . . . . . . . . . . . 2A-14<br />
2A-11 Purge connector installation . . . . . . . . . . . . . . . . . . . . . . . . . . . . . . . . . . . . . . 2A-15<br />
2B-1 Liquid system plumbing connections for the 500D pump . . . . . . . . . . . . . . . . . 2B-2<br />
2B-2 Drain tube installation . . . . . . . . . . . . . . . . . . . . . . . . . . . . . . . . . . . . . . . . . . . . 2B-4<br />
2B-3 Refill kit installation on the 500D pump . . . . . . . . . . . . . . . . . . . . . . . . . . . . . . 2B-5<br />
2B-4 500D pump outlet valve package installation . . . . . . . . . . . . . . . . . . . . . . . . . . 2B-7<br />
2B-5 500D cylinder insulation cover . . . . . . . . . . . . . . . . . . . . . . . . . . . . . . . . . . . . . . 2B-8<br />
2B-6 Purge connector installation . . . . . . . . . . . . . . . . . . . . . . . . . . . . . . . . . . . . . . . . 2B-9<br />
xv
D <strong>Series</strong> <strong>Syringe</strong> <strong>Pumps</strong><br />
Table of Contents<br />
2C-1 Liquid system plumbing connections for the 1000D pump . . . . . . . . . . . . . . . . 2C-2<br />
2C-2 Drain tube installation . . . . . . . . . . . . . . . . . . . . . . . . . . . . . . . . . . . . . . . . . . . . 2C-4<br />
2C-3 1000D wash fluid connections . . . . . . . . . . . . . . . . . . . . . . . . . . . . . . . . . . . . . . . 2C-5<br />
2D-1 Liquid system plumbing connections . . . . . . . . . . . . . . . . . . . . . . . . . . . . . . . . . 2D-2<br />
2D-2 Drain tube installation . . . . . . . . . . . . . . . . . . . . . . . . . . . . . . . . . . . . . . . . . . . . 2D-2<br />
2D-3 Cylinder insulation cover . . . . . . . . . . . . . . . . . . . . . . . . . . . . . . . . . . . . . . . . . . 2D-3<br />
2D-4 Cooling/Heating jacket installed . . . . . . . . . . . . . . . . . . . . . . . . . . . . . . . . . . . . . 2D-5<br />
2D-5 Purge connector installation . . . . . . . . . . . . . . . . . . . . . . . . . . . . . . . . . . . . . . . . 2D-7<br />
3-1 Main menu . . . . . . . . . . . . . . . . . . . . . . . . . . . . . . . . . . . . . . . . . . . . . . . . . . . . . . . . 3-3<br />
3-2 Units menu . . . . . . . . . . . . . . . . . . . . . . . . . . . . . . . . . . . . . . . . . . . . . . . . . . . . . . . . 3-4<br />
3-3 Refill menu . . . . . . . . . . . . . . . . . . . . . . . . . . . . . . . . . . . . . . . . . . . . . . . . . . . . . . . . 3-5<br />
3-4 Display contrast menu . . . . . . . . . . . . . . . . . . . . . . . . . . . . . . . . . . . . . . . . . . . . . . . 3-7<br />
3-5 Serial option menu . . . . . . . . . . . . . . . . . . . . . . . . . . . . . . . . . . . . . . . . . . . . . . . . . . 3-7<br />
3-6 Second Menu . . . . . . . . . . . . . . . . . . . . . . . . . . . . . . . . . . . . . . . . . . . . . . . . . . . . . . 3-12<br />
3-7 Limits menu . . . . . . . . . . . . . . . . . . . . . . . . . . . . . . . . . . . . . . . . . . . . . . . . . . . . . . 3-14<br />
3-8 Limits setpoint (Max Press) menu . . . . . . . . . . . . . . . . . . . . . . . . . . . . . . . . . . . . 3-14<br />
3-9 Output range selection jumpers . . . . . . . . . . . . . . . . . . . . . . . . . . . . . . . . . . . . . . 3-20<br />
5-1 Gear train lubrication and motor drive service . . . . . . . . . . . . . . . . . . . . . . . . . . . 5-4<br />
5-2 Break-in procedure for aqueous seals . . . . . . . . . . . . . . . . . . . . . . . . . . . . . . . . . . . 5-6<br />
5-3 Accessing the shear key . . . . . . . . . . . . . . . . . . . . . . . . . . . . . . . . . . . . . . . . . . . . . 5-10<br />
5-4 Shear key replacement . . . . . . . . . . . . . . . . . . . . . . . . . . . . . . . . . . . . . . . . . . . . . . 5-11<br />
5-5 65DM Bearing set . . . . . . . . . . . . . . . . . . . . . . . . . . . . . . . . . . . . . . . . . . . . . . . . . . 5-12<br />
5-6 65DM Shear key replacement . . . . . . . . . . . . . . . . . . . . . . . . . . . . . . . . . . . . . . . . 5-13<br />
5-7 D <strong>Series</strong> motor brush replacement . . . . . . . . . . . . . . . . . . . . . . . . . . . . . . . . . . . . 5-15<br />
5-8 65D PreAmp CBA . . . . . . . . . . . . . . . . . . . . . . . . . . . . . . . . . . . . . . . . . . . . . . . . . . 5-18<br />
5-9 Pressure output jacks, pump rear panel . . . . . . . . . . . . . . . . . . . . . . . . . . . . . . . . 5-18<br />
5-10 Limit sensor replacement . . . . . . . . . . . . . . . . . . . . . . . . . . . . . . . . . . . . . . . . . . 5-20<br />
5-11 Installing the plastic mounts . . . . . . . . . . . . . . . . . . . . . . . . . . . . . . . . . . . . . . . . 5-21<br />
6-1 Single serial network connection example (rear view) . . . . . . . . . . . . . . . . . . . . . . 6-1<br />
6-2 Serial network connection example . . . . . . . . . . . . . . . . . . . . . . . . . . . . . . . . . . . . 6-11<br />
6-3 Get Status String . . . . . . . . . . . . . . . . . . . . . . . . . . . . . . . . . . . . . . . . . . . . . . . . . . 6-16<br />
6-4 Get All Status String . . . . . . . . . . . . . . . . . . . . . . . . . . . . . . . . . . . . . . . . . . . . . . . 6-17<br />
6-5 Gradient Download Commands - Single pump flow gradient . . . . . . . . . . . . . . . 6-18<br />
6-6 Gradient Download Commands - Two pump flow gradient . . . . . . . . . . . . . . . . . 6-19<br />
6-7 Gradient Upload Commands - Single pump flow gradient . . . . . . . . . . . . . . . . . 6-20<br />
6-8 Gradient Upload Commands - Two pump flow gradient . . . . . . . . . . . . . . . . . . . 6-21<br />
6-9 Upload Commands - Single pump pressure programming . . . . . . . . . . . . . . . . . 6-22<br />
6-10 Range Serial Commands . . . . . . . . . . . . . . . . . . . . . . . . . . . . . . . . . . . . . . . . . . . 6-22<br />
7-1 Pump inlet connections . . . . . . . . . . . . . . . . . . . . . . . . . . . . . . . . . . . . . . . . . . . . . . 7-4<br />
7-2 Pump outlet connections . . . . . . . . . . . . . . . . . . . . . . . . . . . . . . . . . . . . . . . . . . . . . 7-5<br />
7-3 Dual gradient system connections<br />
(Inlet valves (A & C) are from refill valve kits) . . . . . . . . . . . . . . . . . . . . . . . . . . . 7-7<br />
7-4 Dual gradient connections: Detail . . . . . . . . . . . . . . . . . . . . . . . . . . . . . . . . . . . . . . 7-7<br />
8-1 Check valve package installation:<br />
65DM/100D/265D/500D pumps . . . . . . . . . . . . . . . . . . . . . . . . . . . . . . . . . . . . . . . . 8-5<br />
8-2 Check valve package installation: 1000D pump . . . . . . . . . . . . . . . . . . . . . . . . . . . 8-7<br />
8-3 Air valve installation for 65DM, 100DM/DX, 260D, and 500D pumps . . . . . . . . 8-10<br />
8-4 Air valve installation for 1000D pump . . . . . . . . . . . . . . . . . . . . . . . . . . . . . . . . . 8-11<br />
8-5 Air valve installation for 65D pump . . . . . . . . . . . . . . . . . . . . . . . . . . . . . . . . . . . 8-12<br />
8-6 Electric valve installation . . . . . . . . . . . . . . . . . . . . . . . . . . . . . . . . . . . . . . . . . . . 8-15<br />
9-1 Modifier addition kit installation . . . . . . . . . . . . . . . . . . . . . . . . . . . . . . . . . . . . . . 9-4<br />
9-2 Two pump modifier system . . . . . . . . . . . . . . . . . . . . . . . . . . . . . . . . . . . . . . . . . . . 9-6<br />
List of Tables<br />
1-1 65D Technical Specifications . . . . . . . . . . . . . . . . . . . . . . . . . . . . . . . . . . . . . . . . . . 1-2<br />
1-2 65DM Technical Specifications . . . . . . . . . . . . . . . . . . . . . . . . . . . . . . . . . . . . . . . . 1-3<br />
xvi
D <strong>Series</strong> <strong>Syringe</strong> <strong>Pumps</strong><br />
Table of Contents<br />
1-3 100DM Technical Specifications . . . . . . . . . . . . . . . . . . . . . . . . . . . . . . . . . . . . . . . 1-4<br />
1-4 100DX Technical Specifications . . . . . . . . . . . . . . . . . . . . . . . . . . . . . . . . . . . . . . . . 1-5<br />
1-5 260D Technical Specifications . . . . . . . . . . . . . . . . . . . . . . . . . . . . . . . . . . . . . . . . . 1-6<br />
1-6 500D Technical Specifications . . . . . . . . . . . . . . . . . . . . . . . . . . . . . . . . . . . . . . . . . 1-7<br />
1-7 1000D Technical Specifications . . . . . . . . . . . . . . . . . . . . . . . . . . . . . . . . . . . . . . . . 1-8<br />
1-8 Pump Controller Key Functions . . . . . . . . . . . . . . . . . . . . . . . . . . . . . . . . . . . . . . 1-11<br />
1-9 Pump Controller Front Panel Label . . . . . . . . . . . . . . . . . . . . . . . . . . . . . . . . . . . 1-12<br />
1-10 Pump Controller Rear Panel Connectors . . . . . . . . . . . . . . . . . . . . . . . . . . . . . . 1-13<br />
1-11 Pump Rear Panel Connectors . . . . . . . . . . . . . . . . . . . . . . . . . . . . . . . . . . . . . . . 1-14<br />
1-12 Pump Front Panel . . . . . . . . . . . . . . . . . . . . . . . . . . . . . . . . . . . . . . . . . . . . . . . . 1-15<br />
2A-1 Manual Refill Kit Package . . . . . . . . . . . . . . . . . . . . . . . . . . . . . . . . . . . . . . . . . 2A-5<br />
2A-2 CO 2 Cylinder Connection Package . . . . . . . . . . . . . . . . . . . . . . . . . . . . . . . . . . . 2A-7<br />
2A-3 Manual Outlet Valve Package . . . . . . . . . . . . . . . . . . . . . . . . . . . . . . . . . . . . . . 2A-7<br />
2A-4 Optional in-line Filter Package . . . . . . . . . . . . . . . . . . . . . . . . . . . . . . . . . . . . . . 2A-9<br />
2A-5 Packages and Parts . . . . . . . . . . . . . . . . . . . . . . . . . . . . . . . . . . . . . . . . . . . . . . 2A-12<br />
2A-6 Seal Selection Chart . . . . . . . . . . . . . . . . . . . . . . . . . . . . . . . . . . . . . . . . . . . . . 2A-16<br />
2A-7 Optional Accessories . . . . . . . . . . . . . . . . . . . . . . . . . . . . . . . . . . . . . . . . . . . . . 2A-17<br />
2B-1 500D Accessory Package . . . . . . . . . . . . . . . . . . . . . . . . . . . . . . . . . . . . . . . . . . . 2B-3<br />
2B-2 Refill Kit Package . . . . . . . . . . . . . . . . . . . . . . . . . . . . . . . . . . . . . . . . . . . . . . . . 2B-5<br />
2B-3 500D Optional Accessories . . . . . . . . . . . . . . . . . . . . . . . . . . . . . . . . . . . . . . . . 2B-10<br />
2D-1 Cooling/Heating Jacket Package . . . . . . . . . . . . . . . . . . . . . . . . . . . . . . . . . . . . 2D-5<br />
3-1 Key functions in the Multi-pump Mode . . . . . . . . . . . . . . . . . . . . . . . . . . . . . . . . 3-10<br />
3-2 Analog Output Options (connections to female 25 pin Sub-D) . . . . . . . . . . . . . . 3-21<br />
5-1 Replacement Shear Keys . . . . . . . . . . . . . . . . . . . . . . . . . . . . . . . . . . . . . . . . . . . . 5-10<br />
6-1 External control connector<br />
serial pin connections . . . . . . . . . . . . . . . . . . . . . . . . . . . . . . . . . . . . . . . . . . . . . . . 6-2<br />
6-2 Example of BASIC program to demonstrate<br />
conversion of pump commands to DASNET frames . . . . . . . . . . . . . . . . . . . . . . . 6-4<br />
6-3 Example of C program to demonstrate<br />
conversion of pump commands to DASNET frames . . . . . . . . . . . . . . . . . . . . . . . 6-5<br />
6-4 Serial Commands . . . . . . . . . . . . . . . . . . . . . . . . . . . . . . . . . . . . . . . . . . . . . . . . . . 6-12<br />
6-5 Error Messages . . . . . . . . . . . . . . . . . . . . . . . . . . . . . . . . . . . . . . . . . . . . . . . . . . . . 6-23<br />
7-1 Manual Refill Valve Kits . . . . . . . . . . . . . . . . . . . . . . . . . . . . . . . . . . . . . . . . . . . . . 7-1<br />
7-2 Manual Outlet Valve Kits . . . . . . . . . . . . . . . . . . . . . . . . . . . . . . . . . . . . . . . . . . . . 7-2<br />
7-3 Swaging Detail . . . . . . . . . . . . . . . . . . . . . . . . . . . . . . . . . . . . . . . . . . . . . . . . . . . . . 7-2<br />
8-1 Continuous Flow Technical Specifications-Check Valves: . . . . . . . . . . . . . . . . . . . 8-2<br />
8-2 Continuous Flow Check Valve Package for 100D/260D /500D, part #68-1247-059 8-<br />
6<br />
8-3 Continuous Flow Check Valve Package for 1000D, part #68-1247-128 . . . . . . . . 8-7<br />
8-4 Continuous Flow Technical Specifications-Air Valves: . . . . . . . . . . . . . . . . . . . . . 8-8<br />
8-5 Continuous Flow Technical Specifications-Electric Valves: . . . . . . . . . . . . . . . . 8-13<br />
8-6 Accessory Control Digital Outputs . . . . . . . . . . . . . . . . . . . . . . . . . . . . . . . . . . . . 8-16<br />
9-1 Modifier Addition Kit . . . . . . . . . . . . . . . . . . . . . . . . . . . . . . . . . . . . . . . . . . . . . . . . 9-2<br />
xvii
D <strong>Series</strong> <strong>Syringe</strong> <strong>Pumps</strong><br />
Table of Contents<br />
xviii
D <strong>Series</strong> <strong>Syringe</strong> <strong>Pumps</strong><br />
Section 1 Introduction<br />
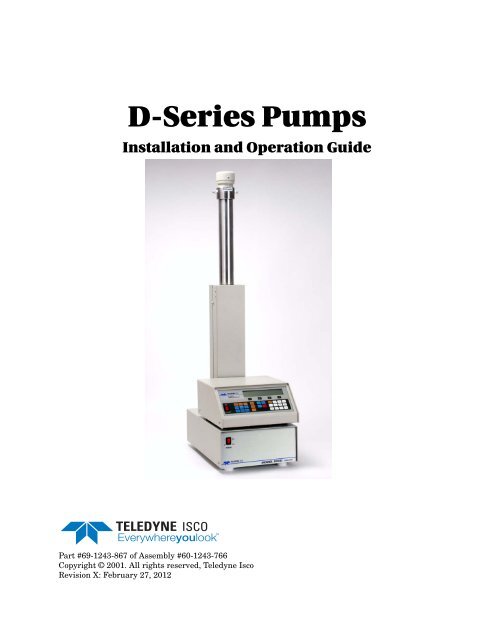
1.1 Introduction This manual is intended to help you get your pumps set up and<br />
running as quickly and easily as possible.<br />
1.1.1 Specifications The technical specifications for the D <strong>Series</strong> <strong>Syringe</strong> <strong>Pumps</strong> are<br />
detailed in Tables 1-1 through 1-7.<br />
Note<br />
Underwriters Laboratories (UL) has certified all <strong>Series</strong> D<br />
<strong>Pumps</strong> with the exception of the 100 Vac versions.<br />
Figure 1-1 D <strong>Series</strong> <strong>Syringe</strong> Pump (500D shown)<br />
1-1
D <strong>Series</strong> <strong>Syringe</strong> <strong>Pumps</strong><br />
Section 1 Introduction<br />
POWER REQUIREMENTS a<br />
(Mains voltage line cord is a<br />
“Disconnect Device”)<br />
LINE FREQUENCY<br />
Table 1-1 65D Technical Specifications<br />
100 ± 10 Vac, 1.5 A maximum<br />
117 ± 12 Vac, 1.5 A maximum<br />
234 ± 23 Vac, 0.75 A maximum<br />
50 or 60 Hz<br />
}<br />
Factory Set<br />
LINE VOLTAGE NOISE TOLERANCE<br />
1.7 nominal rms line voltage, 10 µsecond pulses, any phase<br />
angle, random or repetitive<br />
DIMENSIONS PUMP CONTROLLER<br />
Width: 27.18 cm 27.18 cm<br />
Depth: 46.74 cm 30.48 cm<br />
Height: 101.09 cm 13.59 cm<br />
WEIGHT PUMP CONTROLLER<br />
32.8 kg 2.96 kg<br />
FLOW RATE RANGE<br />
FLOW RATE ACCURACY b<br />
FLOW RATE DISPLAY RESOLUTION<br />
ANALOG OUTPUT ACCURACY c<br />
DISPLACEMENT RESOLUTION<br />
REFILL TIME<br />
REFILL OR DEPRESSURIZATION RATE<br />
PRESSURE RANGE<br />
PRESSURE ACCURACY<br />
PRESSURE REPEATABILITY d<br />
ZERO PRESSURE DRIFT<br />
PRESSURE DISPLAY RESOLUTION<br />
0.01 µl/min to 25 ml/min (for any pressure up to 1379 bar)<br />
± 0.3% (maximum 0.25 µl/min seal leakage)<br />
0.01 µl/min (1.0 µl/min in Constant Pressure Mode)<br />
± 1% of selected range<br />
2.55 nl<br />
1.7 minutes<br />
0.01 µl/min to 40 ml/min at any pressure from 0 to 1379 bar<br />
0.6895 to 1379 bar<br />
± 0.5% of full scale at constant temperature<br />
± 0.5% of full scale within 48 hours at constant temperature<br />
± 0.25% of full scale within 48 hours at constant temperature<br />
6.895 kPa<br />
AMBIENT TEMPERATURE RANGE 5 to 40°C<br />
TEMPERATURE DRIFT<br />
HUMIDITY<br />
CYLINDER CAPACITY<br />
DEAD (HEADSPACE) VOLUME e<br />
± 0.015% of full scale/°C<br />
95% maximum<br />
67.97 ml<br />
1.30 ± 0.020 ml<br />
POLLUTION DEGREE 2<br />
INSTALLATION CATEGORY<br />
MAXIMUM ALTITUDE<br />
II<br />
2000 m<br />
a. Underwriters Laboratories (UL) has certified all D <strong>Series</strong> <strong>Pumps</strong> with the exception of the 100 Vac versions.<br />
b. Using water at 137.9 bar and a temperature controlled environment at 30°C.<br />
c. The analog output is an optional accessory.<br />
d. Pressure repeatability specification is based upon re-zeroing pressure transducer every 48 hours. Refer to sub-section<br />
ZERO PRESS in Section 3 of the manual for re-zeroing procedure.<br />
e. Volume in and above the piston seal, head clearance at automatic shutoff, and inlet and outlet ports to the fittings.<br />
1-2
D <strong>Series</strong> <strong>Syringe</strong> <strong>Pumps</strong><br />
Section 1 Introduction<br />
POWER REQUIREMENTS a<br />
(Mains voltage line cord is a<br />
“Disconnect Device”)<br />
LINE FREQUENCY<br />
Table 1-2 65DM Technical Specifications<br />
100 ± 10 Vac, 1.5 A maximum<br />
117 ± 12 Vac, 1.5 A maximum<br />
234 ± 23 Vac, 0.75 A maximum<br />
50 or 60 Hz<br />
}<br />
Factory Set<br />
LINE VOLTAGE NOISE TOLERANCE<br />
1.7 nominal rms line voltage, 10 µsecond pulses, any phase<br />
angle, random or repetitive<br />
DIMENSIONS PUMP CONTROLLER<br />
Width: 27.18 cm 27.18 cm<br />
Depth: 45.0 cm 30.48 cm<br />
Height: 103.0 cm 13.59 cm<br />
WEIGHT PUMP CONTROLLER<br />
33.2 kg 2.96 kg<br />
FLOW RATE RANGE<br />
FLOW RATE ACCURACY b<br />
FLOW RATE DISPLAY RESOLUTION<br />
ANALOG OUTPUT ACCURACY c<br />
DISPLACEMENT RESOLUTION<br />
REFILL TIME<br />
REFILL OR DEPRESSURIZATION RATE<br />
PRESSURE RANGE<br />
PRESSURE ACCURACY<br />
PRESSURE REPEATABILITY d<br />
ZERO PRESSURE DRIFT<br />
PRESSURE DISPLAY RESOLUTION<br />
0.01 µl/min to 30 ml/min (for any pressure up to 689 bar)<br />
± 0.3% of setpoint, (maximum 0.25 µl/min seal leakage)<br />
0.01 µl/min (1.0 µl/min in Constant Pressure Mode)<br />
± 1% of selected range<br />
2.55 nl /step<br />
1.7 minutes<br />
0.01 µl/min to 40 ml/min at any pressure from 0 to 689 bar<br />
0.6895 to 689 bar<br />
± 0.5% of full scale at constant temperature<br />
(± 0.1% FS optional)<br />
± 0.5% of full scale within 48 hours at constant temperature<br />
± 0.25% of full scale within 48 hours at constant temperature<br />
6.895 kPa<br />
AMBIENT TEMPERATURE RANGE 5 to 40°C<br />
TEMPERATURE DRIFT<br />
HUMIDITY<br />
CYLINDER CAPACITY<br />
DEAD (HEADSPACE) VOLUME e<br />
± 0.12% of full scale/°C<br />
95% maximum<br />
67.97 ml<br />
1.30 ± 0.020 ml<br />
POLLUTION DEGREE 2<br />
INSTALLATION CATEGORY<br />
MAXIMUM ALTITUDE<br />
II<br />
2000 m<br />
a. Underwriters Laboratories (UL) has certified all D <strong>Series</strong> <strong>Pumps</strong> with the exception of the 100 Vac versions.<br />
b. Using water at 137.9 bar and a temperature controlled environment at 30°C.<br />
c. The analog output is an optional accessory.<br />
d. Pressure repeatability specification is based upon re-zeroing pressure transducer every 48 hours. Refer to sub-section<br />
ZERO PRESS in Section 3 of the manual for re-zeroing procedure.<br />
e. Volume in and above the piston seal, head clearance at automatic shutoff, and inlet and outlet ports to the fittings.<br />
1-3
D <strong>Series</strong> <strong>Syringe</strong> <strong>Pumps</strong><br />
Section 1 Introduction<br />
POWER REQUIREMENTS a<br />
(Mains voltage line cord is a<br />
“Disconnect Device”)<br />
Table 1-3 100DM Technical Specifications<br />
100 ± 10 Vac, 1.5 A maximum<br />
117 ± 12 Vac, 1.5 A maximum<br />
234 ± 23 Vac, 0.75 A maximum<br />
}<br />
Factory Set<br />
LINE FREQUENCY<br />
LINE VOLTAGE NOISE TOLERANCE<br />
50 or 60 Hz<br />
1.7 nominal rms line voltage, 10 µsecond pulses, any phase<br />
angle, random or repetitive<br />
DIMENSIONS PUMP CONTROLLER<br />
Width: 27.18 cm 27.18 cm<br />
Depth: 46.74 cm 30.48 cm<br />
Height: 101.09 cm 13.59 cm<br />
WEIGHT PUMP CONTROLLER<br />
32.8 kg 2.96 kg<br />
FLOW RATE RANGE<br />
FLOW RATE ACCURACY b<br />
FLOW RATE DISPLAY RESOLUTION<br />
ANALOG OUTPUT ACCURACY c<br />
DISPLACEMENT RESOLUTION<br />
REFILL TIME<br />
REFILL OR DEPRESSURIZATION RATE<br />
PRESSURE RANGE<br />
PRESSURE ACCURACY<br />
PRESSURE REPEATABILITY d<br />
ZERO PRESSURE DRIFT<br />
PRESSURE DISPLAY RESOLUTION<br />
0.01 µl/min to 25 ml/min (for any pressure up to 689.5 bar)<br />
± 0.3% (maximum 0.25 µl/min seal leakage)<br />
0.01 µl/min (1.0 µl/min in Constant Pressure Mode)<br />
± 1% of selected range<br />
4.825 nl<br />
3.5 minutes<br />
0.01 µl/min to 30 ml/min at any pressure from 0 to 689.5 bar<br />
0.6895 to 689.5 bar<br />
± 0.5% of full scale at constant temperature<br />
± 0.5% of full scale within 48 hours at constant temperature<br />
± 0.25% of full scale within 48 hours at constant temperature<br />
6.895 kPa<br />
AMBIENT TEMPERATURE RANGE 5 to 40°C<br />
TEMPERATURE DRIFT<br />
HUMIDITY<br />
CYLINDER CAPACITY<br />
DEAD (HEADSPACE) VOLUME e<br />
± 0.0.12% of full scale/°C<br />
95% maximum<br />
102.93 ml<br />
1.30 ± 0.020 ml<br />
POLLUTION DEGREE 2<br />
INSTALLATION CATEGORY<br />
MAXIMUM ALTITUDE<br />
II<br />
2000 m<br />
NOTES:<br />
a. Underwriters Laboratories (UL) has certified all D <strong>Series</strong> <strong>Pumps</strong> with the exception of the 100 Vac versions.<br />
b. Using water at 137.9 bar and a temperature controlled environment at 30°C.<br />
c. The analog output is an optional accessory.<br />
d. Pressure repeatability specification is based upon re-zeroing pressure transducer every 48 hours. Refer to sub-section<br />
ZERO PRESS in Section 3 of the manual for re-zeroing procedure.<br />
e. Volume in and above the piston seal, head clearance at automatic shutoff, and inlet and outlet ports to the fittings.<br />
1-4
D <strong>Series</strong> <strong>Syringe</strong> <strong>Pumps</strong><br />
Section 1 Introduction<br />
POWER REQUIREMENTS a<br />
(Mains voltage line cord is a<br />
“Disconnect Device”)<br />
LINE FREQUENCY<br />
Table 1-4 100DX Technical Specifications<br />
100 ± 10 Vac, 1.5 A maximum<br />
117 ± 12 Vac, 1.5 A maximum<br />
234 ± 23 Vac, 0.75 A maximum<br />
50 or 60 Hz<br />
}<br />
Factory Set<br />
LINE VOLTAGE NOISE TOLERANCE<br />
1.7 nominal rms line voltage, 10 µsecond pulses, any phase<br />
angle, random or repetitive<br />
DIMENSION PUMP CONTROLLER<br />
Width: 27.18 cm 27.18 cm<br />
Depth: 46.74 cm 30.48 cm<br />
Height: 101.09 cm 13.59 cm<br />
WEIGHT PUMP CONTROLLER<br />
32.8 kg 2.96 kg<br />
FLOW RATE RANGE<br />
FLOW RATE ACCURACY b<br />
FLOW RATE DISPLAY RESOLUTION<br />
ANALOG OUTPUT ACCURACY c<br />
DISPLACEMENT RESOLUTION<br />
REFILL TIME<br />
REFILL OR DEPRESSURIZATION RATE<br />
PRESSURE RANGE<br />
PRESSURE ACCURACY<br />
PRESSURE REPEATABILITY d<br />
ZERO PRESSURE DRIFT<br />
PRESSURE DISPLAY RESOLUTION<br />
0.01 µl/min to 50 ml/min (for any pressure up to 689.5 bar)<br />
± 0.3% (maximum 0.25 µl/min seal leakage)<br />
0.01 µl/min (1.0 µl/min in Constant Pressure Mode)<br />
± 1% of selected range<br />
9.65 nl<br />
1.72 minutes<br />
0.01 µl/min to 60 ml/min at any pressure from 0 to 689.5 bar<br />
0.6895 to 689.5 bar<br />
± 0.5% of full scale at constant temperature<br />
± 0.5% of full scale within 48 hours at constant temperature<br />
± 0.25% of full scale within 48 hours at constant temperature<br />
6.895 kPa<br />
AMBIENT TEMPERATURE RANGE 5 to 40°C<br />
TEMPERATURE DRIFT<br />
HUMIDITY<br />
CYLINDER CAPACITY<br />
DEAD (HEADSPACE) VOLUME e<br />
± 0.0.12% of full scale/°C<br />
95% maximum<br />
102.93 ml<br />
1.30 ± 0.020 ml<br />
POLLUTION DEGREE 2<br />
INSTALLATION CATEGORY<br />
MAXIMUM ALTITUDE<br />
II<br />
2000 m<br />
a. Underwriters Laboratories (UL) has certified all D <strong>Series</strong> <strong>Pumps</strong> with the exception of the 100 Vac versions.<br />
b. Using water at 137.9 bar and a temperature controlled environment at 30°C.<br />
c. The analog output is an optional accessory.<br />
d. Pressure repeatability specification is based upon re-zeroing pressure transducer every 48 hours. Refer to sub-section<br />
ZERO PRESS in Section 3 of the manual for re-zeroing procedure.<br />
e. Volume in and above the piston seal, head clearance at automatic shutoff, and inlet and outlet ports to the fittings.<br />
1-5
D <strong>Series</strong> <strong>Syringe</strong> <strong>Pumps</strong><br />
Section 1 Introduction<br />
POWER REQUIREMENTS a<br />
(Mains voltage line cord is a<br />
“Disconnect Device”)<br />
LINE FREQUENCY<br />
Table 1-5 260D Technical Specifications<br />
100 ± 10 Vac, 1.5 A maximum<br />
117 ± 12 Vac, 1.5 A maximum<br />
234 ± 23 Vac, 0.75 A maximum<br />
50 or 60 Hz<br />
}<br />
Factory Set<br />
LINE VOLTAGE NOISE TOLERANCE<br />
1.7 nominal rms line voltage, 10 µsecond pulses, any phase<br />
angle, random or repetitive<br />
DIMENSIONS PUMP CONTROLLER<br />
Width: 27.18 cm 27.18 cm<br />
Depth: 46.74 cm 30.48 cm<br />
Height: 101.09 cm 13.59 cm<br />
WEIGHT PUMP CONTROLLER<br />
32.8 kg 2.96 kg<br />
FLOW RATE RANGE See Figure 1-2.<br />
FLOW RATE ACCURACY b<br />
FLOW RATE DISPLAY RESOLUTION<br />
ANALOG OUTPUT ACCURACY c<br />
DISPLACEMENT RESOLUTION<br />
REFILL TIME<br />
REFILL OR DEPRESSURIZATION RATE<br />
PRESSURE RANGE<br />
PRESSURE ACCURACY<br />
PRESSURE REPEATABILITY d<br />
ZERO PRESSURE DRIFT<br />
PRESSURE DISPLAY RESOLUTION<br />
± 0.5% (maximum 0.50 µl/min seal leakage)<br />
1.0 µl/min<br />
± 1% of selected range<br />
16.63 nl<br />
2.5 minutes<br />
1.0 µl/min to 107 ml/min at any pressure from 0 to 517.1 bar<br />
0.6895 to 517.1 bar<br />
± 0.5% of full scale at constant temperature<br />
± 0.5% of full scale within 48 hours at constant temperature<br />
± 0.25% of full scale within 48 hours at constant temperature<br />
6.895 kPa<br />
AMBIENT TEMPERATURE RANGE 5 to 40°C<br />
TEMPERATURE DRIFT<br />
HUMIDITY<br />
CYLINDER CAPACITY<br />
DEAD (HEADSPACE) VOLUME e<br />
± 0.15% of full scale/°C<br />
95% maximum<br />
266.05 ml<br />
2.10 ± 0.020 ml<br />
POLLUTION DEGREE 2<br />
INSTALLATION CATEGORY<br />
MAXIMUM ALTITUDE<br />
II<br />
2000 m<br />
a. Underwriters Laboratories (UL) has certified all D <strong>Series</strong> <strong>Pumps</strong> with the exception of the 100 Vac versions.<br />
b. Using water at 137.9 bar and a temperature controlled environment at 30°C.<br />
c. The analog output is an optional accessory.<br />
d. Pressure repeatability specification is based upon re-zeroing pressure transducer every 48 hours. Refer to sub-section<br />
ZERO PRESS in Section 3 of the manual for re-zeroing procedure.<br />
e. Volume in and above the piston seal, head clearance at automatic shutoff, and inlet and outlet ports to the fittings.<br />
1-6
D <strong>Series</strong> <strong>Syringe</strong> <strong>Pumps</strong><br />
Section 1 Introduction<br />
POWER REQUIREMENTS a<br />
(Mains voltage line cord is a<br />
“Disconnect Device”)<br />
LINE FREQUENCY<br />
Table 1-6 500D Technical Specifications<br />
100 ± 10 Vac, 1.5 A maximum<br />
117 ± 12 Vac, 1.5 A maximum<br />
234 ± 23 Vac, 0.75 A maximum<br />
50 or 60 Hz<br />
}<br />
Factory Set<br />
LINE VOLTAGE NOISE TOLERANCE<br />
1.7 nominal rms line voltage, 10 µsecond pulses, any phase<br />
angle, random or repetitive<br />
DIMENSIONS PUMP CONTROLLER<br />
Width: 27.18 cm 27.18 cm<br />
Depth: 46.74 cm 30.48 cm<br />
Height: 102.36 cm 13.59 cm<br />
WEIGHT PUMP CONTROLLER<br />
33.25 kg 2.96 kg<br />
FLOW RATE RANGE See Figure 1-3.<br />
FLOW RATE ACCURACY b<br />
FLOW RATE DISPLAY RESOLUTION<br />
ANALOG OUTPUT ACCURACY c<br />
DISPLACEMENT RESOLUTION<br />
REFILL TIME<br />
REFILL OR DEPRESSURIZATION RATE<br />
PRESSURE RANGE<br />
PRESSURE ACCURACY<br />
PRESSURE REPEATABILITY d<br />
ZERO PRESSURE DRIFT<br />
PRESSURE DISPLAY RESOLUTION<br />
± 0.5% (maximum 1.0 µl/min seal leakage)<br />
1.0 µl/min<br />
± 1% of selected range<br />
31.71 nl<br />
2.5 minutes<br />
1.0 µl/min to 204 ml/min at any pressure from 0 to 258.6 bar<br />
0.6895 to 258.6 bar<br />
± 0.5% of full scale at constant temperature<br />
± 0.5% of full scale within 48 hours at constant temperature<br />
± 0.25% of full scale within 48 hours at constant temperature<br />
6.895 kPa<br />
AMBIENT TEMPERATURE RANGE 5 to 40°C<br />
TEMPERATURE DRIFT<br />
HUMIDITY<br />
CYLINDER CAPACITY<br />
DEAD (HEADSPACE) VOLUME e<br />
± 0.15% of full scale/°C<br />
95% maximum<br />
507.38 ml<br />
4.00 ± 0.020 ml<br />
POLLUTION DEGREE 2<br />
INSTALLATION CATEGORY<br />
MAXIMUM ALTITUDE<br />
II<br />
2000 m<br />
a. Underwriters Laboratories (UL) has certified all D <strong>Series</strong> <strong>Pumps</strong> with the exception of the 100 Vac versions.<br />
b. Using water at 137.9 bar and a temperature controlled environment at 30°C.<br />
c. The analog output is an optional accessory.<br />
d. Pressure repeatability specification is based upon re-zeroing pressure transducer every 48 hours. Refer to sub-section<br />
ZERO PRESS in Section 3 of the manual for re-zeroing procedure.<br />
e. Volume in and above the piston seal, head clearance at automatic shutoff, and inlet and outlet ports to the fittings.<br />
1-7
D <strong>Series</strong> <strong>Syringe</strong> <strong>Pumps</strong><br />
Section 1 Introduction<br />
POWER REQUIREMENTS a<br />
(Mains voltage line cord is a<br />
“Disconnect Device”)<br />
LINE FREQUENCY<br />
Table 1-7 1000D Technical Specifications<br />
100 ± 10 Vac, 1.5 A maximum<br />
117 ± 12 Vac, 1.5 A maximum<br />
234 ± 23 Vac, 0.75 A maximum<br />
50 or 60 Hz<br />
}<br />
Factory Set<br />
LINE VOLTAGE NOISE TOLERANCE<br />
1.7 nominal rms line voltage, 10 µsecond pulses, any phase<br />
angle, random or repetitive<br />
DIMENSIONS PUMP CONTROLLER<br />
Width: 27.18 cm 27.18 cm<br />
Depth: 46.74 cm 30.48 cm<br />
Height: 102.36 cm 13.59 cm<br />
WEIGHT PUMP CONTROLLER<br />
38.5 kg 2.96 kg<br />
FLOW RATE RANGE See Figure 1-4.<br />
FLOW RATE ACCURACY b<br />
FLOW RATE DISPLAY RESOLUTION<br />
ANALOG OUTPUT ACCURACY c<br />
DISPLACEMENT RESOLUTION<br />
REFILL TIME<br />
REFILL OR DEPRESSURIZATION RATE<br />
PRESSURE RANGE<br />
PRESSURE ACCURACY<br />
PRESSURE REPEATABILITY d<br />
ZERO PRESSURE DRIFT<br />
PRESSURE DISPLAY RESOLUTION<br />
± 0.5% (maximum 1.5 µl/min seal leakage)<br />
1.0 µl/min<br />
± 1% of selected range<br />
25.38 nl<br />
2.5 minutes<br />
1.0 µl/min to 408 ml/min at any pressure from 0 to 137.9 bar<br />
0.6895 to 137.9 bar<br />
± 0.5% of full scale at constant temperature<br />
± 0.5% of full scale within 48 hours at constant temperature<br />
± 0.25% of full scale within 48 hours at constant temperature<br />
6.895 kPa<br />
AMBIENT TEMPERATURE RANGE 5 to 40°C<br />
TEMPERATURE DRIFT<br />
HUMIDITY<br />
CYLINDER CAPACITY<br />
DEAD (HEADSPACE) VOLUME e<br />
± 0.12% of full scale/°C<br />
95% maximum<br />
1015.0 ml<br />
11.0 ± 0.7 ml<br />
POLLUTION DEGREE 2<br />
INSTALLATION CATEGORY<br />
MAXIMUM ALTITUDE<br />
II<br />
2000 m<br />
a. Underwriters Laboratories (UL) has certified all D <strong>Series</strong> <strong>Pumps</strong> with the exception of the 100 Vac versions.<br />
b. Using water at 137.9 bar and a temperature controlled environment at 30°C.<br />
c. The analog output is an optional accessory.<br />
d. Pressure repeatability specification is based upon re-zeroing pressure transducer every 48 hours. Refer to sub-section<br />
ZERO PRESS in Section 3 of the manual for re-zeroing procedure.<br />
e. Volume in and above the piston seal, head clearance at automatic shutoff, and inlet and outlet ports to the fittings.<br />
1-8
D <strong>Series</strong> <strong>Syringe</strong> <strong>Pumps</strong><br />
Section 1 Introduction<br />
260D Flow Rate Range<br />
107 110 100<br />
90<br />
0 25 50 75 100 125 150 175 200 225 250 275 300 325 350 375 400 425 450 475 500<br />
Flow Rate (ml/min)<br />
80<br />
70<br />
60<br />
50<br />
40<br />
30<br />
20<br />
10<br />
0<br />
Pressure (bar)<br />
525<br />
517.1<br />
Flow Rate (ml/min) Max. Pressure (bar)<br />
0 to 90 517.1<br />
90 to 107 (107.23 ml/min – flow rate) 30<br />
Figure 1-2 260D flow rate range<br />
500D Flow Rate Range<br />
204<br />
170<br />
Flow Rate (ml/min)<br />
200<br />
180<br />
160<br />
140<br />
120<br />
100<br />
80<br />
60<br />
40<br />
20<br />
0<br />
0 20 40 60 80 100 120 140 160 180 200 220 240<br />
Pressure (bar)<br />
258.6<br />
Flow Rate (ml/min) Max. Pressure (bar)<br />
0 to 170 258.6<br />
170 to 204 (204.9 ml/min – flow rate) 7.4<br />
Figure 1-3 500D flow rate range<br />
1-9
D <strong>Series</strong> <strong>Syringe</strong> <strong>Pumps</strong><br />
Section 1 Introduction<br />
1000D Flow Rate Range<br />
408<br />
340<br />
Flow Rate (ml/min)<br />
425<br />
400<br />
375<br />
350<br />
325<br />
300<br />
275<br />
250<br />
225<br />
200<br />
175<br />
150<br />
125<br />
100<br />
75<br />
50<br />
25<br />
0<br />
0 10 20 30 40 50 60 70 80 90 100 110 120 130 140 150<br />
Pressure (bar)<br />
137.9<br />
Flow Rate (ml/min)<br />
Max. Pressure (bar)<br />
0 to 340 137.9<br />
340 to 408 (409.8 ml/min – flow rate) 1.9756<br />
Figure 1-4 1000D flow rate range<br />
1-10
D <strong>Series</strong> <strong>Syringe</strong> <strong>Pumps</strong><br />
Section 1 Introduction<br />
Key<br />
ON/STANDBY<br />
Table 1-8 Pump Controller Key Functions<br />
Description<br />
Two-position toggle switch turns controller on and activates drive motor<br />
to maintain position. Standby disables the drive motor and halts the<br />
controlling processor.<br />
A, B, C, D Softkeys; used to select displayed options.<br />
PRGM GRAD<br />
CONST PRESS<br />
CONST FLOW<br />
STORE<br />
LIMITS<br />
RAPID PRESS<br />
RECALL<br />
ACC CTRL<br />
ZERO PRESS<br />
CLEAR ENTRY<br />
MENU<br />
HELP<br />
HOLD<br />
REFILL<br />
RUN<br />
STOP<br />
ENTER<br />
NUMBER KEYS<br />
Program gradient: Puts pump in gradient mode and accesses the softkey<br />
driven gradient programming.<br />
Constant pressure: Puts pump in constant pressure mode.<br />
Constant flow: Puts pump in constant flow rate mode.<br />
Stores the current program in nonvolatile memory and exits programming<br />
mode.<br />
Displays and allows changes to the maximum and minimum pressure<br />
and flow rate limits.<br />
Rapid pressure: Allows rapid pressurization to the stable pressure point<br />
and then switches automatically to constant flow. (Available in constant<br />
flow mode only.) NOTE: This feature is automatic, i.e. RAPID PRESS is<br />
pressed only once and the user does not enter a pressure; although,<br />
entering a target pressure may speed equilibration.<br />
Replaces the current program with one recalled from nonvolatile<br />
memory.<br />
Accessory control: Manually operates accessories such as valves.<br />
Zero pressure: Sets pressure display to zero. Active only from -750 to<br />
+750 psi.<br />
Clear the last digit entered from the numeric key.<br />
Accesses software to set operational modes, units, and other optional<br />
parameters.<br />
Provides information.<br />
Freezes the program clock. The unit will continue at the current gradient<br />
parameters.<br />
Turns on pump drive motor to move piston downward at a rate<br />
previously programmed.<br />
Turns on pump drive motor to move piston upward in a previously programmed<br />
mode, such as “CONSTANT FLOW” or “CONSTANT<br />
PRESSURE.”<br />
Stops the drive motor.<br />
Enters selected values to memory.<br />
These keys are used to make menu selections and enter values when<br />
setting parameters.<br />
1-11
D <strong>Series</strong> <strong>Syringe</strong> <strong>Pumps</strong><br />
Section 1 Introduction<br />
1.2 Controls and<br />
Indicators<br />
The pump controller, which is designed to conveniently sit on top<br />
of the pump base, regulates all pumping functions. Controller<br />
input is made through the keypad on the controller front panel.<br />
The controller front panel is shown in Figure 1-5 and detailed in<br />
Table 1-9. Table 1-8 details the key functions.<br />
The rear panel of the pump controller contains several input and<br />
output connectors, detailed in Table 1-10, and shown in Figure<br />
1-6.<br />
The only operational control on the pump itself is the mains<br />
power switch, shown in Figure 1-8. The rear panel contains<br />
several connectors, detailed in Table 1-11, and shown in Figure<br />
1-7.<br />
4<br />
3<br />
1<br />
2<br />
Figure 1-5 Pump controller key functions<br />
Table 1-9 Pump Controller Front Panel Label<br />
Item No. on<br />
Figure 1-5<br />
Connector<br />
Description<br />
1 On/Standby switch Turns instrument off and on.<br />
(Does not disconnect power.)<br />
2 Programming keypad Used to program controller.<br />
3 Softkeys Labeled A, B, C, or D; used to select menu items<br />
displayed on the liquid crystal display.<br />
4 Liquid crystal display 40 Characters 4 line.<br />
1-12
D <strong>Series</strong> <strong>Syringe</strong> <strong>Pumps</strong><br />
Section 1 Introduction<br />
Figure 1-6 Pump controller rear panel connectors<br />
Table 1-10 Pump Controller Rear Panel Connectors<br />
Item No. on<br />
Figure 1-6<br />
Connector<br />
Description<br />
1 AUXILIARY Provides connection for pump external controls and to future accessories.<br />
2 RS-232 This serial port connector may be used with an RS-232 cable to place the<br />
pump under computer control.<br />
3 PUMP A This plug connects the control cable from the pump rear panel. This connection<br />
should be secured with the thumbscrews.<br />
IMPORTANT: The pump A connector is the only input power connector on<br />
the rear panel of the controller. During single pump operation, the pump<br />
must be attached to this connector to supply power to the controller.<br />
WARNING<br />
Do not connect or disconnect the control cable when the pump is connected<br />
to the mains voltage.<br />
4 PUMP B This connector is only used during multiple pump operation. The control<br />
cable from the rear panel of the second pump is attached to this connector.<br />
5 PUMP C This connector is only used during multiple pump operation. The control<br />
cable from the rear panel of the third pump is attached to this connector.<br />
6 ACCESSORY These terminals allow connection of input and output signals (such as analog<br />
controls and external RUN/STOP).<br />
7 SERIAL TAG This tag indicates the serial number of the instrument.<br />
8 CHASSIS GROUND Ground point for high static or remote controller installations.<br />
9 ANALOG OUTPUT Optional circuit provides flow rate and volume outputs. See section 3.9.<br />
10 SFX220/VALVES Optional circuit provides motor drive for valve operation.<br />
1-13
D <strong>Series</strong> <strong>Syringe</strong> <strong>Pumps</strong><br />
Section 1 Introduction<br />
60-1242-306<br />
Figure 1-7 Pump rear panel connectors<br />
Table 1-11 Pump Rear Panel Connectors<br />
Item No. on<br />
Figure 1-7<br />
Connector<br />
Description<br />
1 Pressure outputs Two red binding post/banana jacks providing pressure output voltages.<br />
Pump Left Jack Right Jack<br />
VDC/psi VDC/psi<br />
65D 1.0 V/2000 psi 0.1 V/2000 psi<br />
All others 1.0 V/1000 psi 0.1 V/1000 psi<br />
2 Ground A black binding post/banana jack providing a connection to circuit<br />
common.<br />
3 Pressure transducer The pressure transducer cable must be plugged in for the pump<br />
to operate.<br />
4 Control cable This cable connects the pump to the controller.<br />
5 Mains IEC power connector with EMI filter.<br />
6 Fuses * Limits pump current drawn from main power supply.<br />
Replace with same type: (“T” time delay fuses)<br />
1 - 2.0 Amp for 100/117 volt operation<br />
2 - 1.0 Amp for 234 volt operation<br />
To remove, rotate cap counterclockwise.<br />
7 Chassis ground Ground point for high static installations.<br />
* Fuses not replaceable<br />
by the operator<br />
F101 4.0 Amp “T”<br />
F102, F104 1.5 Amp “T”<br />
F103 0.75 Amp “T”<br />
1-14
D <strong>Series</strong> <strong>Syringe</strong> <strong>Pumps</strong><br />
Section 1 Introduction<br />
Figure 1-8 Pump front panel controls<br />
Table 1-12 Pump Front Panel<br />
Item No. on<br />
Figure 1-8<br />
Connector<br />
Description<br />
1 Mains power switch Disconnects power from the pump circuits for setup changes, such as<br />
connecting the controller.<br />
“1” = mains power is applied to the pump circuitry.<br />
“0” = mains power is removed from the pump circuitry.<br />
1-15
D <strong>Series</strong> <strong>Syringe</strong> <strong>Pumps</strong><br />
Section 1 Introduction<br />
1.3 Unpacking After removing the pump, controller, and accessories from the<br />
shipping carton, examine them for signs of shipping damage. Be<br />
sure no internal parts have shaken loose in transit. If there is<br />
any shipping damage, file a claim with the delivering carrier<br />
immediately.<br />
Compare the contents of the boxes with the enclosed packing<br />
slip. If there are shortages, contact Teledyne <strong>Isco</strong> immediately.<br />
1.4 Electrical Connections The pump controller may be placed on top of the pump, as shown<br />
in Figure 1-1. Power is supplied to the pump controller through<br />
the control cable.<br />
CAUTION<br />
All connections between the pump and controller should be<br />
made BEFORE the pump is connected to mains power.<br />
1. Connect the pressure transducer cable (which originates<br />
from the top of the pump cylinder) to the nine pin sub-D<br />
PRESSURE TRANSDUCER connector on the pump rear<br />
panel (Figure 1-7). Be sure to tighten the thumbscrews.<br />
2. Connect the control cable (which originates from the pump<br />
rear panel) to the PUMP A connector on the rear panel of<br />
the controller (Figure 1-6), and tighten the thumbscrews.<br />
This cable must be plugged into the PUMP A connector.<br />
Important<br />
There are three PUMP connectors on the rear of the controller.<br />
Only the PUMP A connector is wired to supply power to the<br />
controller; therefore, one pump must be attached to this connector.<br />
3. Check the serial number tag to make sure the voltage rating<br />
of the pump is correct.<br />
4. Connect the line cord to the MAINS connector on the back<br />
of the pump.<br />
1-16
D <strong>Series</strong> <strong>Syringe</strong> <strong>Pumps</strong><br />
Section 1 Introduction<br />
1.5 Preliminary Checkout After the electrical connections have been completed, follow this<br />
brief test of the pump’s operation:<br />
Note<br />
Preliminary checkout of the pump is performed without fluid in<br />
the pump.<br />
Note<br />
If adding a new pump to the controller, a hard and soft reset<br />
need to be completed.<br />
1. Before connecting the line cord, make sure the voltage rating<br />
on the serial tag matches your outlet’s voltage. Plug in<br />
the line cord. Set the pump mains power switch to ON. Set<br />
the controller ON/STANDBY switch to ON.<br />
2. The display will briefly show the software revision on the<br />
first line; and the pump model(s) connected to the controller<br />
on the following lines, Figure 1-9.<br />
PUMP CONTROLLER ISCO, INC. REV ______<br />
<br />
Figure 1-9 Status Screen<br />
3. Check the upper left corner of the controller screen. The<br />
current pump mode will be presented in a two-letter abbreviation,<br />
e.g. CF for constant flow. This will be followed by a<br />
lowercase letter indicating the current pump, e.g. lowercase<br />
“a” indicates that pump A is the current pump. The<br />
current pump is the one for which parameters are being<br />
set.<br />
a. If a pump other than pump A is currently selected:<br />
On the lower right corner of the screen, directly over<br />
softkey D, are the words “SELECT PUMP.”<br />
Press softkey D and then softkey A to select pump A.<br />
The display will automatically switch to the run screen,<br />
and “a” will be displayed in the upper left corner.<br />
4. Press the orange MENU key on the controller front panel.<br />
5. Press number 6 to set the display contrast. Use softkeys B<br />
and C to set the optimum contrast for your viewing conditions.<br />
Press softkey D, PREVIOUS, to return to the menu<br />
screen.<br />
6. Press number 1 to select UNITS.<br />
7. Press number 3 to select PSI for the pressure units.<br />
8. Press number 5 to select ML/MIN for the flow units. The<br />
first line of the display will show the selected units.<br />
1-17
D <strong>Series</strong> <strong>Syringe</strong> <strong>Pumps</strong><br />
Section 1 Introduction<br />
9. Press softkey D, PREVIOUS, to return to the main menu.<br />
10. Press softkey D, RETURN, to exit the main menu.<br />
11. Push the blue CONST FLOW key to set the pump mode to<br />
constant flow. CFa will be displayed in the upper left corner<br />
of the screen.<br />
12. Press softkey A, FLOW RATE. The words “ENTER FLOW<br />
RATE” should flash on the display. Use the numeric keys<br />
to enter “1”, “0”, a flow rate of 10 ml/min. Press the ENTER<br />
key to load this setpoint.<br />
Note<br />
If you make an error, press the orange CLEAR ENTRY key to<br />
delete it.<br />
13. Press the blue RUN key. Observe the flow rate displayed<br />
on the first line. After a few moments, the setpoint and<br />
flow rate display should match.<br />
14. Once the setpoint and flow rate match, press the STOP<br />
key.<br />
If more than one pump is connected to the controller, you<br />
will be prompted to press softkey A to stop pump A, B to<br />
stop pump B, etc.<br />
Press softkey A to stop pump A or softkey D to stop all<br />
pumps.<br />
If you encountered any problems during the preliminary<br />
checkout, please contact the Teledyne <strong>Isco</strong> Service<br />
Department. The number is (800) 775-2965 or (402)<br />
464-0231.<br />
1-18
D <strong>Series</strong> <strong>Syringe</strong> <strong>Pumps</strong>:<br />
Models 65DM, 100DM, 100DX, 260D<br />
Section 2A 65DM, 100DM, 100DX, and 260D<br />
Liquid System Connections & Accessories<br />
About This Section:<br />
The following section is divided into four parts, 2A through 2D. Section 2A covers the liquid<br />
system connections and accessories for the Teledyne <strong>Isco</strong> 65DM, 100DM, 100DX, and 260D<br />
syringe pumps. Sections 2B, 2C, and 2D cover the same topics for the 500D, 1000D, and 65D<br />
syringe pumps, respectively.<br />
The installation procedures for the D <strong>Series</strong> pumps have been divided in this way for your convenience.<br />
The 65DM, 100DM, 100DX, and 260D pumps all come with 1 8" standard Valco ports. The<br />
500D and 1000D ports are 1 8" pipe thread fittings. The 65D uses AE F250C high pressure fittings.<br />
Because of this difference, the packages, tubing, and options have different part numbers. Additionally,<br />
these pumps are typically used for different applications; therefore, the optional kits and<br />
accessories differ.<br />
Table 2A-6 is a seal selection chart applicable to all D <strong>Series</strong> pumps except the 65D.<br />
If you are setting up flow gradient, continuous flow, air valve, or modifier addition systems, there<br />
are sections for these systems located at the rear of this manual, which contains plumbing suggestions<br />
and outlines basic operation.<br />
DANGER<br />
RISK OF INJURY. THE PRESSURE PRODUCED<br />
COULD BE 700 BAR. PLEASE UTILIZE<br />
APPROPRIATE TUBING AND CONNECTIONS<br />
NOTED IN THE MANUAL.<br />
2A.1 Introduction This section discusses liquid system connections in general, and<br />
details the accessory package installation. It also covers the<br />
installation of fluid connection accessories, temperature and<br />
pressure control accessories, optional kits and attachments, and<br />
software options.<br />
If you are familiar with syringe pumps, you may wish to skip<br />
over the general information and helpful tips presented in<br />
section 2A.2, liquid system connections, and proceed directly to<br />
your package installation instructions. Use the following references<br />
to locate the desired section.<br />
2A-1
D <strong>Series</strong> <strong>Syringe</strong> <strong>Pumps</strong>: Models 65DM, 100DM, 100DX, 260D<br />
Section 2A 65DM, 100DM, 100DX, and 260D Liquid System Connections & Accessories<br />
Note<br />
When operating at flow rates at or below 100 µl/min, it is<br />
strongly suggested that an insulating cover or cooling jacket be<br />
installed. See Temperature Controls in the following list.<br />
Fluid Connection Accessories (section 2A.3):<br />
Pump refill kit, 2A.3.1<br />
CO 2 cylinder connection package, 2A.3.2<br />
Outlet valve package, 2A.3.3<br />
In-line filter package, 2A.3.4<br />
Temperature and Pressure Controls (section 2A.4):<br />
Cylinder insulating cover, 2A.4.1<br />
Cooling jacket package, 2A.4.2<br />
Back pressure regulators, 2A.4.3<br />
Nitrogen Purge (section 2A.5)<br />
Optional Kits and Instrumentation (section 2A.6)<br />
Optional Seal Selection (section 2A.7)<br />
Optional Accessories (section 2A.8)<br />
2A.2 Liquid System<br />
Connections<br />
The following section provides general information concerning<br />
syringe pumps, some tips about liquid connections, and information<br />
about tubing and tubing cutting procedures. The<br />
accessory package is also discussed.<br />
2A.2.1 Ports There are two ports in the pump cylinder cap. Either port can<br />
serve as the inlet or outlet. As shown in Figure 2A-1, you may<br />
plug one port and use a single port as both the inlet and outlet.<br />
DANGER<br />
RISK OF INJURY. THE PRES-<br />
SURE PRODUCED COULD BE<br />
700 BAR. PLEASE UTILIZE<br />
APPROPRIATE TUBING AND<br />
CONNECTIONS NOTED IN THE<br />
MANUAL.<br />
Pressure<br />
transducer cap<br />
Nut &<br />
Ferrule<br />
Port<br />
Plug<br />
Port<br />
Tubing<br />
to valve<br />
Figure 2A-1 Liquid system plumbing connections<br />
2A-2
D <strong>Series</strong> <strong>Syringe</strong> <strong>Pumps</strong>: Models 65DM, 100DM, 100DX, 260D<br />
Section 2A 65DM, 100DM, 100DX, and 260D Liquid System Connections & Accessories<br />
2A.2.2 Installation Tips • Be sure to keep the tubing as straight as possible at the<br />
end, as this will make it easier to install the ferrules.<br />
• Be sure to cut the ends of the tubing squarely.<br />
• Don’t leave burrs on the ends of the tubing.<br />
• When installing ferrules on the tubing, be sure the<br />
tubing extends beyond the ferrule to allow for proper<br />
crimping.<br />
• If the connection is leaking, retighten fittings.<br />
• Push the tubing completely into the port before tightening<br />
the nut.<br />
• When connections are made to the cylinder cap, the<br />
pressure reading may be affected. If the pressure no<br />
longer reads zero, press ZERO PRESSURE on the front<br />
panel of the controller to readjust.<br />
2A.2.3 Tubing Cutting To prevent possible problems, it is important to squarely cut the<br />
tubing. Square ends will be easier to insert through the ferrule<br />
and will lower the dead volume.<br />
It is recommended that electrochemically machined steel tubing<br />
be used throughout the plumbing system. Electrochemically<br />
machined tubing has flat, burr-free ends for minimum dead<br />
volumes and is free of cutting residues. Pre-cut, electrochemically<br />
machined tubing is available through many chromatographic<br />
supply distributors in assorted lengths.<br />
A somewhat less desirable alternative is to purchase a tubing<br />
cutter designed to handle steel tubing.<br />
For quick fixes, the tubing may also be cut by hand with the following<br />
procedure. A jewelers file, goggles, and two pairs of pliers<br />
are necessary for this operation.<br />
To cut the tubing by hand<br />
1. Wear goggles. Using a fine jewelers file, score the tubing<br />
around its entire circumference.<br />
2. Secure the tubing with pliers on each side of the score line<br />
leaving approximately 1.5 mm between each set of pliers<br />
and the score line. Care must be taken not to squeeze the<br />
tubing too tightly as that will flatten or deform the exterior<br />
of the tubing.<br />
3. With the pliers, bend the tubing back and forth to cause<br />
cracking at the score line. The bending should be done in<br />
two places to reduce the chance of squashing the tubing.<br />
4. It may be necessary to deburr the outside of the tubing<br />
ends with the file. Make sure the tubing ends are clean and<br />
the inner bore is clear before installing the cut tube.<br />
Note<br />
It is often impossible to remove a burr that blocks the inner<br />
bore.<br />
2A-3
D <strong>Series</strong> <strong>Syringe</strong> <strong>Pumps</strong>: Models 65DM, 100DM, 100DX, 260D<br />
Section 2A 65DM, 100DM, 100DX, and 260D Liquid System Connections & Accessories<br />
2A.2.4 Accessory Package The accessory packages for all pumps (#60-1249-012 for 260D,<br />
#60-1249-028 for 65DM, or #60-1249-015 for 100DM/DX) contain<br />
Valco fittings for 1 8" tubing, which allow you to attach tubing to<br />
the pump, a reducing adapter for use with 1 16" tubing, and the<br />
appropriately sized cylinder seals.<br />
To install the 1 8" fittings<br />
(Figure 2A-2)<br />
1. Slide first the 1 8" nut and then the ferrule over the tubing.<br />
2. Push the tubing all the way into the port.<br />
3. Then hold the tubing in place and tighten the nut.<br />
DANGER<br />
RISK OF INJURY. THE PRES-<br />
SURE PRODUCED COULD BE<br />
700 BAR. PLEASE UTILIZE<br />
APPROPRIATE TUBING AND<br />
CONNECTIONS NOTED IN THE<br />
MANUAL.<br />
209-0166-80<br />
Figure 2A-2 Accessory package installation<br />
To install the 1 16" fittings<br />
1. The reducing adapter must be used. Loosen the 1 16" nut<br />
until it is held by a few threads.<br />
2. Insert the adapter into the port and finger tighten the fittings.<br />
3. Retighten the 1 16" nut until it is also finger tight.<br />
4. Tighten the 1 8" nut with a wrench to crimp the ferrule.<br />
5. Insert the 1 16" tubing through the 1 16" nut until it stops.<br />
6. Tighten the 1 16" nut.<br />
Note<br />
It is recommended that after tightening, the fittings be removed<br />
and examined.<br />
2A.2.5 Drain Tube The overflow outlet on the pump cylinder provides a means of<br />
draining fluid from seal leakage. Use the 1 4" ID flexible tubing<br />
included with the accessory package, to divert the leakage away<br />
from the pump. To install the drain tube, simply place one end of<br />
the tubing over the end of the drip pan outlet, shown in Figure<br />
2A-3.<br />
2A-4
D <strong>Series</strong> <strong>Syringe</strong> <strong>Pumps</strong>: Models 65DM, 100DM, 100DX, 260D<br />
Section 2A 65DM, 100DM, 100DX, and 260D Liquid System Connections & Accessories<br />
Figure 2A-3 Drain tube installation<br />
2A.3 Fluid Connection<br />
Accessories<br />
The optional accessories discussed in this section are used to<br />
make fluid connections from the pump(s) to another apparatus.<br />
These include devices such as a CO 2 tank, fluid reservoirs, etc.<br />
2A.3.1 Manual Refill Kit The optional manual refill kit is detailed in Table 2A-1. This kit<br />
provides a high pressure, 2-way valve which connects to the<br />
pump inlet and allows for filling from a fluid reservoir.<br />
Table 2A-1 Manual Refill Kit Package<br />
Qty. Part Number Description<br />
1 60-1243-659 Valve spacer<br />
1 209-0098-05 2-way straight valve, 1 8" OD, bracket mounted<br />
1 023-0504-02 1.5 m - 0.065 ID PTFE tubing<br />
1 60-1243-658 Stainless steel tubing, 1 8" OD 0.069 ID<br />
1 209-0161-66 Gland nut 1 8" OD tubing<br />
1 209-0161-67 Ferrule 1 8" OD tubing<br />
1 209-0169-27 Column nut, 1 8", zero volume<br />
1 209-0169-41 Ferrule, 1 8", zero voume<br />
1 209-9012-10 10 micron filter<br />
1 60-1243-391 1.5 m coiled, stainless steel tubing, 1 8" OD 0.069 ID<br />
Appropriate screws and washers also included<br />
(P/N 68-1247-077)<br />
2A-5
D <strong>Series</strong> <strong>Syringe</strong> <strong>Pumps</strong>: Models 65DM, 100DM, 100DX, 260D<br />
Section 2A 65DM, 100DM, 100DX, and 260D Liquid System Connections & Accessories<br />
The package also contains all the tubing and hardware necessary<br />
for valve installation.<br />
1. To attach the 2-way valve to the pump housing, use the<br />
valve (see Figure 2A-4): spacer block and screws provided.<br />
2. Then connect the pre-bent 1 8" stainless steel tubing from<br />
the valve to the pump inlet. Use the 1 8" nut and ferrule to<br />
connect the tubing at the inlet and the valve fittings to connect<br />
the tubing at the valve.<br />
3. Then connect the 1.5 m PTFE refill tubing (with the filter)<br />
to the port of the 2-way valve, using the valve fittings.<br />
or,<br />
When connecting to pressurized sources in SFC<br />
applications, use the 1 8" 1.5 m stainless steel tubing (P/N<br />
60-1243-391) without a filter. An in-line filter is contained<br />
in the CO 2 connection package.<br />
DANGER<br />
RISK OF INJURY. THE PRES-<br />
SURE PRODUCED COULD BE<br />
700 BAR. PLEASE UTILIZE<br />
APPROPRIATE TUBING AND<br />
CONNECTIONS NOTED IN THE<br />
MANUAL.<br />
Figure 2A-4 Refill kit installation<br />
2A-6
D <strong>Series</strong> <strong>Syringe</strong> <strong>Pumps</strong>: Models 65DM, 100DM, 100DX, 260D<br />
Section 2A 65DM, 100DM, 100DX, and 260D Liquid System Connections & Accessories<br />
2A.3.2<br />
CO 2 Cylinder<br />
Connection Package<br />
The optional CO 2 connection package is part number<br />
68-1247-043, Table 2A-2.<br />
Table 2A-2 CO 2 Cylinder Connection Package<br />
Qty. Part Number Description<br />
1 209-0161-63 Reducing connector 1 8" to 1 4"<br />
1 209-0161-16<br />
1 4" 2 1 2" nipple<br />
1 209-0161-15 0.830-14 nut<br />
1 209-0161-17 PTFE washer<br />
1 209-0161-64 In-line filter assembly<br />
(P/N 68-1247-043)<br />
Figure 2A-5 CO 2 package installation<br />
2A.3.3<br />
Manual Outlet Valve<br />
Package<br />
The optional manual outlet valve package is part number<br />
68-1247-078, Table 2A-3.<br />
Table 2A-3 Manual Outlet Valve Package<br />
(P/N 68-1247-078)<br />
Qty. Part Number Description<br />
1 60-1243-659 Valve spacer<br />
1 60-1243-322 5.1 cm - 0.069 ID stainless steel tubing<br />
1 209-0169-27<br />
1 8" nut, zero volume<br />
1 209-0169-41 Ferrule, 1 8" zero volume<br />
1 209-0162-00<br />
1 8" - 1 16" union<br />
1 209-0098-05 2-way straight valve<br />
1 60-1243-658<br />
1 8" OD - 0.069 ID stainless steel tubing<br />
1 60-1243-320<br />
1 16" OD - 0.02 ID 0.9 m stainless steel tubing<br />
Appropriate screws and washers also included.<br />
To install the outlet<br />
valve package<br />
(Figure 2A-6)<br />
1. Attach the 2-way valve using the spacer block and panhead<br />
screws provided in the refill kit.<br />
2. Connect the pre-bent 1 8" OD length of stainless steel tubing<br />
to the outlet port on the pump using the 1 8" nut and 1 8"<br />
2A-7
D <strong>Series</strong> <strong>Syringe</strong> <strong>Pumps</strong>: Models 65DM, 100DM, 100DX, 260D<br />
Section 2A 65DM, 100DM, 100DX, and 260D Liquid System Connections & Accessories<br />
ferrule. Connect the other end to the top port on the valve<br />
using the valve fitting.<br />
Note<br />
When nuts are torqued to the cylinder cap ports, the pressure<br />
reading may be affected. If the pressure no longer reads zero,<br />
push pressure zero key on the front panel of the controller to<br />
readjust.<br />
3. Then use the valve fittings to attach the 5.1 cm length of<br />
1 8" OD stainless steel tubing to the port of the 2-way valve.<br />
4. Connect the reducing union, (P/N 209-0162-00) to this 5.1<br />
cm tubing.<br />
5. Connect the 0.9 m length of 1 16" tubing between the reducing<br />
union and your apparatus. Cut to the desired length.<br />
DANGER<br />
RISK OF INJURY. THE PRES-<br />
SURE PRODUCED COULD BE<br />
700 BAR. PLEASE UTILIZE<br />
APPROPRIATE TUBING AND<br />
CONNECTIONS NOTED IN THE<br />
MANUAL.<br />
Figure 2A-6 Outlet valve package connection<br />
2A.3.4 In-Line Filter Package The optional in-line filter package (P/N 68-1247-011) should be<br />
used when it is important to filter flow exiting the pump. This<br />
package (Table 2A-4) contains a 0.5 µm filter and 1 16" tubing.<br />
2A-8
D <strong>Series</strong> <strong>Syringe</strong> <strong>Pumps</strong>: Models 65DM, 100DM, 100DX, 260D<br />
Section 2A 65DM, 100DM, 100DX, and 260D Liquid System Connections & Accessories<br />
Table 2A-4 Optional in-line Filter Package<br />
Qty. Part Number Description<br />
(P/N 68-1247-011)<br />
1 60-1243-231 1.5 m stainless steel tubing, 1 16" OD 0.020" ID<br />
1 60-1243-232 0.3 m stainless steel tubing, 1 16" OD 0.020" ID<br />
1 209-9012-17 In-line solvent filter with replacement frit, 0.5<br />
micron filter<br />
5 209-0094-07 Zero volume, 1 16" valve nut<br />
5 209-0094-08 Zero volume, 1 16" valve ferrule<br />
To install the in-line<br />
filter package<br />
(Figure 2A-7)<br />
1. Attach the reducing adapter, included with your pump<br />
accessory package to the pump outlet using the nut and<br />
ferrule provided. Or, connect to the reducing union of the<br />
outlet valve package.<br />
2. Attach the 1 16" - 1.5 m length of tubing to the reducing<br />
adapter. Cut to the desired length.<br />
3. Then attach the in-line filter to the end of the tubing. The<br />
flow direction is indicated on the filter body.<br />
4. Connect the remaining 0.3 m length of tubing between the<br />
in-line filter and the receiving device. Cut to the desired<br />
length.<br />
1.5 m Tubing Length In-line Filter 0.3 m Tubing Length<br />
Figure 2A-7 In-line filter package<br />
2A-9
D <strong>Series</strong> <strong>Syringe</strong> <strong>Pumps</strong>: Models 65DM, 100DM, 100DX, 260D<br />
Section 2A 65DM, 100DM, 100DX, and 260D Liquid System Connections & Accessories<br />
2A.4 Temperature and<br />
Pressure Controls<br />
2A.4.1<br />
Cylinder Insulating<br />
Cover<br />
An optional insulation cover (P/N 68-1247-081 for<br />
260D/100DM/DX; 68-1247-085 for 500D) is available to reduce<br />
noise (due to temperature fluctuations) and also improve pump<br />
performance at flow rates under 500 µl/min.<br />
The cover consists of two pieces which fit over the cylinder, as<br />
shown in Figure 2A-8.<br />
Notches for<br />
tubing<br />
Side Latches<br />
Notch for cable<br />
Figure 2A-8 Cylinder insulation cover<br />
Notches in the cover provide openings for the inlet and outlet<br />
tubing and for the cable to the pressure transducer.<br />
To install the cylinder<br />
insulating cover<br />
(Figure 2A-8)<br />
1. Install the back cover.<br />
2. Route the cable around tubing through the appropriate<br />
tabs.<br />
3. Install the front cover and secure the side latches.<br />
2A-10
D <strong>Series</strong> <strong>Syringe</strong> <strong>Pumps</strong>: Models 65DM, 100DM, 100DX, 260D<br />
Section 2A 65DM, 100DM, 100DX, and 260D Liquid System Connections & Accessories<br />
2A.4.2 Cooling/Heating Jacket An optional cylinder temperature jacket (68-1247-047) is<br />
available for use in maintaining cylinder temperatures (–30 to<br />
100°C) by circulating liquids, such as water or water/ethylene<br />
glycol solution through the 1 4" upper and lower hose connectors.<br />
To install the<br />
cooling/heating jacket<br />
(Figure 2A-9)<br />
Removing the pump cylinder<br />
The jacket is very useful for SFC applications where cylinder<br />
cooling facilitates pump filling with fluids, such as liquid CO 2 .<br />
The jacket can also be used with a circulating temperature-controlled<br />
bath to keep the fluid inside the pump at a constant temperature.<br />
This may be necessary when operating at very low flow<br />
rates (below 100 µl/min), where temperature fluctuation can<br />
cause flow variations.<br />
1. Empty the cylinder.<br />
Note<br />
Be sure the piston is left fully extended.<br />
2. Turn the pump’s mains power switch OFF or disconnect<br />
the power cord.<br />
3. Remove the pump front cover by loosening the four cover<br />
screws (two, located on each side of the pump).<br />
4. Loosen the cylinder lock screw (a 1 4"-20 set screw) in the<br />
front side of the cylinder housing.<br />
5. Disconnect the pump pressure transducer cable from the<br />
pump and remove the inlet and outlet tubing.<br />
6. Unscrew the cylinder from the cylinder housing.<br />
Note<br />
It may be necessary to use a tubing strap wrench or Teledyne<br />
<strong>Isco</strong> wrenches package P/N 68-1247-067 to unscrew the cylinder<br />
without marring its outer surface.<br />
7. Lift the cylinder up and off the piston and push rod.<br />
2A-11
D <strong>Series</strong> <strong>Syringe</strong> <strong>Pumps</strong>: Models 65DM, 100DM, 100DX, 260D<br />
Section 2A 65DM, 100DM, 100DX, and 260D Liquid System Connections & Accessories<br />
Figure 2A-9 Cooling/Heating jacket installed<br />
Table 2A-5 Packages and Parts<br />
Item Description<br />
Temperature control jacket packages for:<br />
65D, 65DM,100DM,<br />
100DX, 260D<br />
500D<br />
500SP<br />
1000D<br />
Temperature control jacket assembly:<br />
65DM, 100DM, 100DX,<br />
260D<br />
500D<br />
1000D<br />
Part Number<br />
68-1247-047<br />
68-1247-057<br />
68-1247-115<br />
60-5364-199<br />
60-1248-053<br />
60-1248-099<br />
60-1248-183<br />
Key 3 32" socket 490-0031-54<br />
Inlet/outlet connector (2) 209-0161-00<br />
Installation procedure 60-1242-183<br />
O-ring (2):<br />
100DM, 100DX, 260D 202-2062-23<br />
500D<br />
202-2062-11<br />
1000D<br />
202-2062-35<br />
2A-12
D <strong>Series</strong> <strong>Syringe</strong> <strong>Pumps</strong>: Models 65DM, 100DM, 100DX, 260D<br />
Section 2A 65DM, 100DM, 100DX, and 260D Liquid System Connections & Accessories<br />
To install the cooling jacket<br />
1. Install the O-rings in the grooves of the cooling jacket.<br />
2. Lubricate the O-rings with soapy water or a light oil to<br />
ease assembly of the cooling jacket onto the cylinder.<br />
3. Slide the cooling jacket onto the cylinder using a twisting<br />
motion.<br />
Note<br />
It is important that the cooling jacket be installed with the locking<br />
set screw away from the cylinder cap.<br />
CAUTION<br />
Be careful not to damage the O-rings when pushing them over<br />
the threads of the cylinder.<br />
Reassembling the pump<br />
1. Place the cylinder/cooling jacket assembly over the piston<br />
and push rod assembly.<br />
2. Screw the assembly into the cylinder housing until the cylinder<br />
no longer turns. This indicates that it is snug against<br />
the piston.<br />
3. Unscrew the cylinder a minimum of 1 2 turn.<br />
4. Line the inlet and outlet cylinder cap ports up as you had<br />
them before. Turn the cooling jacket ports to the desired<br />
location and lock the cooling jacket to the cylinder by tightening<br />
the cooling jacket lock set screw.<br />
5. Lock the cylinder by tightening the cylinder locking screw.<br />
6. Replace the front cover and adjust both covers so they are<br />
flush with the cylinder housing.<br />
7. Reinstall tubing.<br />
8. Reconnect the pump pressure transducer cable.<br />
Note<br />
Anytime you adjust fittings on the cylinder cap you should<br />
re-zero your pump’s pressure transducer. See section 3.5.8.<br />
The pump’s pressure transducer is a very sensitive strain gage<br />
which can be offset as much as 17.2 bar by tightening fittings.<br />
2A.4.3<br />
Back Pressure<br />
Regulation<br />
DANGER<br />
RISK OF INJURY. THE PRESSURE PRODUCED<br />
COULD BE 700 BAR. PLEASE UTILIZE THE<br />
APPROPRIATE TUBING AND CONNECTIONS<br />
NOTED IN THE MANUAL.<br />
2A-13
D <strong>Series</strong> <strong>Syringe</strong> <strong>Pumps</strong>: Models 65DM, 100DM, 100DX, 260D<br />
Section 2A 65DM, 100DM, 100DX, and 260D Liquid System Connections & Accessories<br />
Two back pressure regulators are available from Teledyne <strong>Isco</strong>: a<br />
7 bar (P/N 209-9012-22) or a 5 bar back pressure regulator (P/N<br />
209-9012-21). Both regulators reduce flow noise and improve<br />
pump performance at pressures less than 3.5 bar. Fittings to<br />
connect the tubing to the regulators are supplied.<br />
To install the back pressure<br />
regulator<br />
1. Note the arrow on the regulator indicating the fluid<br />
direction.<br />
2. Connect your tubing (not supplied) between the pump outlet<br />
and the regulator using the supplied fittings, see Figure<br />
2A-10.<br />
Figure 2A-10 Back pressure regulator<br />
2A.5 Nitrogen Purge A thin film of liquid will wet the inside of the cylinder each time<br />
the piston travels up the cylinder. Corrosive liquids drying in the<br />
air can cause the cylinder to corrode. This corrosion occurs at<br />
varying rates based on the liquids and pumping conditions being<br />
employed. The lowest flow rate engenders the most corrosive<br />
pumping environment, as the deposited film has the longest time<br />
to corrode the inside of the cylinder wall.<br />
The 100D or 260D pump is equipped with a purge connector<br />
(Figure 2A-11). The purge connector enables the pump cylinder<br />
beneath the piston to be purged with nitrogen which inhibits cylinder<br />
corrosion and may increase the useful cylinder life. Figure<br />
2A-11 shows a typical purge connection to the purge tube on the<br />
back of the pump.<br />
2A-14
D <strong>Series</strong> <strong>Syringe</strong> <strong>Pumps</strong>: Models 65DM, 100DM, 100DX, 260D<br />
Section 2A 65DM, 100DM, 100DX, and 260D Liquid System Connections & Accessories<br />
To install the nitrogen<br />
(Figure 2A-11)<br />
1. Attach gas supply by slipping the plastic tube over the<br />
purge connector, see Figure 2A-11.<br />
2. Regulate the nitrogen supply to slightly above atmospheric<br />
pressure.<br />
Figure 2A-11 Purge connector installation<br />
2A.6 Optional Kits and<br />
Instrumentation<br />
The kits and instrumentation described in this section may be<br />
used to enhance the D <strong>Series</strong> pump operation.<br />
2A.6.1<br />
LabView Pump<br />
Controller<br />
Teledyne <strong>Isco</strong> provides a software package which can be used in<br />
conjunction with the D <strong>Series</strong> pump line.<br />
2A-15
D <strong>Series</strong> <strong>Syringe</strong> <strong>Pumps</strong>: Models 65DM, 100DM, 100DX, 260D<br />
Section 2A 65DM, 100DM, 100DX, and 260D Liquid System Connections & Accessories<br />
2A.7 Optional Seals Typically, the general seal provided with your pump will satisfy<br />
your application’s requirements, including SFE or other applications<br />
which use carbon dioxide. However, certain solvents and/or<br />
conditions require the cylinder seal be changed to facilitate the<br />
application. Table 2A-6 is provided to help you select the correct<br />
seal for your pump and application requirements.<br />
Seal Type<br />
GENERAL/SFE<br />
CARBON<br />
DIOXIDE<br />
HIGH<br />
TEMPERATURE<br />
Maximum<br />
Pressure Rating<br />
for Seal (bar)<br />
Table 2A-6 Seal Selection Chart<br />
0-689.5 bar Black, PTFE<br />
graphite filled<br />
Seal Description 100DX/DM 260D 500D 1000D<br />
202-9090-75 202-9091-06 202-9091-56 upper seal<br />
202-9990-25<br />
lower seal<br />
202-9990-23<br />
This is our standard seal. It is good for most applications, particularly those using organic solvents,<br />
such as: LC, SFC, and SFE.<br />
0-689.5 bar Black, PTFE<br />
graphite fiber<br />
reinforced high<br />
temperature<br />
compound<br />
202-9090-76 202-9091-09 202-9093-56 upper seal<br />
202-9990-28<br />
lower seal<br />
202-9990-27<br />
This seal is best suited for applications which require temperatures between 50°C and 100°C. Its<br />
chemical compatibility is similar to that of the general seal.<br />
LOW PRESSURE 0-137.9 bar Black, PTFE<br />
graphite filled<br />
single point<br />
contact<br />
202-9092-75 202-9092-06 202-9092-56 N/A<br />
This seal may provide better sealing at lower pressure. Its chemical compatibility is similar to that<br />
of the general seal.<br />
AQUEOUS 0-689.5 bar White-translucent,<br />
ultra-high<br />
molecular weight<br />
polyethylene<br />
AMMONIA (NH3)<br />
NITRIC ACID<br />
202-9090-77 202-9094-06 202-9094-56 N/A<br />
This seal has better wetting properties, which makes it a good choice for aqueous solutions. It is<br />
also the best choice for electrochemical detection.<br />
Note: This seal requires a special break-in procedure before installation. See Section 5.3.2.<br />
0-275.8 bar White, virgin<br />
PTFE<br />
This is the only seal which is recommended for ammonia.<br />
Note: Call the factory for seal availability for the 65D pump.<br />
202-9090-78 202-9091-07 202-9091-57 upper seal<br />
202-9990-26<br />
lower seal<br />
202-9990-24<br />
2A-16
D <strong>Series</strong> <strong>Syringe</strong> <strong>Pumps</strong>: Models 65DM, 100DM, 100DX, 260D<br />
Section 2A 65DM, 100DM, 100DX, and 260D Liquid System Connections & Accessories<br />
2A.8 Optional Accessories Table 2A-7 presents the optional accessories available for use<br />
with the 100DX/DM and 260D pumps.<br />
Table 2A-7 Optional Accessories<br />
Software<br />
Part Number Description<br />
Call Teledyne <strong>Isco</strong> LabView Virtual Instrument Drivers – interfaces D <strong>Series</strong> <strong>Pumps</strong> with LabView Software<br />
Tubing<br />
004-7300-21 Stainless steel 304 tubing, 1 16" OD 0.020" ID<br />
004-7302-22 Stainless steel 304 tubing, 1 8" OD 0.069" ID<br />
004-7300-23 Stainless steel 304 tubing, 1 16" OD 0.007" ID<br />
004-7601-00 Stainless steel 316 tubing, 1 16" OD 0.031" ID<br />
004-7462-51 Stainless steel 316 tubing, 1 16" OD 0.009" ID<br />
Extension Cables<br />
68-1020-210 Pump/Controller extension cable, 3 m.<br />
68-1020-214 Pump/Controller extension cable, 15 m.<br />
Inlet/Outlet Fittings<br />
209-0166-80<br />
1 8" SST plug<br />
209-0162-00<br />
1 8" - 1 16" tubing reducing union<br />
In-Line Filter Package (P/N 68-1247-011)<br />
Qty. Part Number Description<br />
1 60-1243-231 1.5 m - Stainless steel tubing, 1 16" OD 0.020" ID<br />
1 60-1243-232 0.3 m- Stainless steel tubing, 1 16" OD 0.020" ID<br />
1 209-9012-17 In-line solvent filter with replacement frit, 0.5 micron filter<br />
5 209-0094-07 Zero volume, 1 16" nut<br />
5 209-0094-08 Zero volume, 1 16" ferrule<br />
Other Accessories<br />
209-9012-21 5 bar back pressure regulator<br />
209-9012-22 7 bar back pressure regulator<br />
68-1247-093 260D High accuracy transducer. Contact factory for specifications.<br />
2A-17
D <strong>Series</strong> <strong>Syringe</strong> <strong>Pumps</strong>: Models 65DM, 100DM, 100DX, 260D<br />
Section 2A 65DM, 100DM, 100DX, and 260D Liquid System Connections & Accessories<br />
Table 2A-7 Optional Accessories (Continued)<br />
CO 2 Cylinder Connection Package (P/N 68-1247-043)<br />
Qty. Part Number Description<br />
1 209-0161-63 Swagelok connector, 1 4" male pipe to 1 8" OD fractional tube<br />
1 209-0161-16 6.35 cm - Nipple, 1 4" pipe thread<br />
1 209-0161-15 Nut<br />
1 209-0161-17 Flat PTFE washer<br />
1 209-0161-64 In-line filter assembly<br />
Manual Outlet Valve Package (P/N 68-1247-078)<br />
1 209-0098-05 2-way thru valve, 1 8" OD, bracket mounted<br />
1 209-9012-10 10 Micron filter<br />
Appropriate Stainless steel tubing, tube fittings, and unions also included.<br />
Cylinder Insulating Cover (P/N 68-1247-081)<br />
Cooling/Heating Jacket Package (P/N 68-1247-047)<br />
1 60-1248-053 Cooling/heating jacket assembly<br />
1 490-0031-54<br />
3 32" socket screw key<br />
1 60-1242-183 Installation procedure<br />
2 202-2062-23 O-ring, 1.609" ID<br />
SFE Modifier Addition Kit (P/N 68-1247-079)<br />
2 209-0098-05 2-way thru valve - 1 8" OD<br />
1 60-2253-209 Standard check valve housing<br />
1 60-3864-010 Check valve cartridge<br />
1 60-1243-516 Single check valve housing<br />
Appropriate nuts, ferrules, tubing, and tube fittings also included.<br />
Manual Pump Refill Kit (P/N 68-1247-077)<br />
1 60-1243-659 Valve spacer<br />
1 209-0098-05 2-way thru valve, 1 8" OD, bracket mounted<br />
1 023-0504-02 1.5 m - 0.065" ID PTFE tubing<br />
1 60-1243-658 Inlet valve tubing, 1 8" OD<br />
1 209-0161-66 Nut 1 8"<br />
1 209-0161-67 Ferrule 1 8" tubing<br />
1 209-9012-10 10 micron filter<br />
1 60-1243-391 1.5 m coiled - Stainless steel tubing, 0.125" OD 0.069" ID<br />
Appropriate screws and washers also included.<br />
2A-18
D <strong>Series</strong> <strong>Syringe</strong> <strong>Pumps</strong>: Models 65DM, 100DM, 100DX, 260D<br />
Section 2A 65DM, 100DM, 100DX, and 260D Liquid System Connections & Accessories<br />
Table 2A-7 Optional Accessories (Continued)<br />
Gradient Mixer Package (P/N 68-1247-080)<br />
Qty. Part Number Description<br />
2 209-0098-05 2-way thru valve 1 8" OD<br />
2 60-1243-516 Single check valve housing<br />
2 60-3864-010 Check valve cartridge<br />
1 60-1244-245 Check valve stand assembly<br />
1 209-0166-09 3.1 µl static mixer with fittings<br />
Appropriate nuts, ferrules, tubing, and tube fittings also included.<br />
Continuous Flow Check Valve Package (P/N 68-1247-059)<br />
4 60-2253-240 Check valve housing, analytical standard inlet<br />
4 60-3864-010 Check valve cartridge<br />
2 60-1243-517 Double check valve housing<br />
Appropriate nuts, ferrules, tubing, tube reducers, and filters also included.<br />
Continuous Flow Air Driven Valve Package (P/N 68-1247-061)<br />
2 69-1243-572 3-way valve<br />
1 69-1243-574 Air actuator<br />
Appropriate nuts, ferrules, tubing, tube reducers, and filters also included.<br />
Analog Output Package (P/N 68-1247-070)<br />
1 60-1244-262 Analog output circuit board assembly<br />
1 60-1242-277 Assembly instruction procedure<br />
1 232-1140-00 6-32 Stainless steel hex nut<br />
1 149-9004-05 Jack socket assembly<br />
2A-19
D <strong>Series</strong> <strong>Syringe</strong> <strong>Pumps</strong>: Models 65DM, 100DM, 100DX, 260D<br />
Section 2A 65DM, 100DM, 100DX, and 260D Liquid System Connections & Accessories<br />
2A-20
D <strong>Series</strong> <strong>Syringe</strong> <strong>Pumps</strong>:<br />
Model 500D<br />
Section 2B 500D Liquid System Connection &<br />
Accessories<br />
2B.1 Introduction<br />
DANGER<br />
RISK OF INJURY. THE PRESSURE PRODUCED<br />
COULD BE 260 BAR. PLEASE UTILIZE<br />
APPROPRIATE TUBING AND CONNECTIONS<br />
NOTED IN THE MANUAL.<br />
This section discusses 500D liquid system connections, in<br />
general, and details the accessory package installation. It also<br />
covers the installation of fluid connection accessories, temperature<br />
and pressure control accessories, optional kits and attachments,<br />
and software options.<br />
If you are familiar with syringe pumps, you may wish to skip<br />
over the general information and helpful tips presented in<br />
section 2B.2, Liquid System Connections, and proceed directly to<br />
your 500D package installation instructions. Use the following<br />
reference chart to locate the desired section.<br />
Note<br />
When operating the pump at flow rates at or below 100 µl/min,<br />
it is strongly suggested that a cylinder insulating cover be<br />
installed. See section 2B.4.1.<br />
Fluid Connection Accessories (section 2B.3):<br />
Refill kit, 2B.3.1<br />
Temperature and Pressure Controls (section 2B.4):<br />
Cylinder insulating cover, 2B.4.1<br />
Cooling/heating jacket, 2B.4.2<br />
Nitrogen Purge (section 2B.5)<br />
Optional Accessories (section 2B.6):<br />
2B-1
D <strong>Series</strong> <strong>Syringe</strong> <strong>Pumps</strong>: Model 500D<br />
Section 2B 500D Liquid System Connection & Accessories<br />
2B.2 Liquid System<br />
Connections<br />
The following section provides general information concerning<br />
the 500D syringe pump, some tips about liquid connections and<br />
information about tubing and tubing cutting procedures. The<br />
accessory package is also discussed.<br />
2B.2.1 Ports There are two ports in the cylinder cap. The 500D ports come<br />
standard with 1 8" pipe thread fittings.<br />
Either port can serve as the inlet or outlet. As shown in Figure<br />
2B-1, you may plug one port and use a single port as both the<br />
inlet and outlet.<br />
DANGER<br />
RISK OF INJURY. THE PRES-<br />
SURE PRODUCED COULD BE<br />
260 BAR. PLEASE UTILIZE<br />
APPROPRIATE TUBING AND<br />
CONNECTIONS NOTED IN THE<br />
MANUAL.<br />
Figure 2B-1 Liquid system plumbing connections for the<br />
500D pump<br />
2B.2.2 500D Installation Tips • Be sure to keep the tubing as straight as possible at the<br />
end, as this will make it easier to install the ferrules.<br />
• Be sure to cut the ends of the tubing squarely.<br />
• Don’t leave burrs on the ends of the tubing.<br />
• When installing ferrules on the tubing, be sure the<br />
tubing extends beyond the ferrule to allow for proper<br />
crimping.<br />
• If the connection is leaking, retighten fittings.<br />
• Push the tubing completely into the port before tightening<br />
the nut.<br />
• When connections are made to the cylinder cap, the<br />
pressure reading may be affected. If the pressure no<br />
longer reads zero, push the pressure zero key on the<br />
controller front panel.<br />
2B.2.3 Tubing Cutting To prevent possible problems, it is important to squarely cut the<br />
tubing. Square ends will be easier to insert through the ferrule<br />
and will lower the dead volume.<br />
2B-2
D <strong>Series</strong> <strong>Syringe</strong> <strong>Pumps</strong>: Model 500D<br />
Section 2B 500D Liquid System Connection & Accessories<br />
It is recommended that electrochemically machined steel tubing<br />
be used throughout the plumbing system. Electrochemically<br />
machined tubing has flat, burr-free ends for minimum dead<br />
volumes and is free of cutting residues. Pre-cut, electrochemically<br />
machined tubing is available through many chromatographic<br />
supply distributors in assorted lengths.<br />
A somewhat less desirable alternative is to purchase a tubing<br />
cutter designed to handle steel tubing. For quick fixes, the tubing<br />
may also be cut by hand with the following procedure. A jeweler’s<br />
file, goggles, and two pairs of pliers are necessary for this operation.<br />
To cut the tubing by hand<br />
1. Wear goggles. Using a fine jewelers file, score the tubing<br />
around its entire circumference.<br />
2. Secure the tubing with pliers on each side of the score line,<br />
leaving approximately 1 16" between each set of pliers and<br />
the score line. Care must be taken not to squeeze the tubing<br />
too tightly, as that will flatten or deform the exterior of<br />
the tubing.<br />
3. With the pliers, bend the tubing back and forth to cause<br />
cracking at the score line. The bending should be done in<br />
two places to reduce the chance of squashing the tubing.<br />
4. It may be necessary to deburr the outside of the tubing<br />
ends with the file. Make sure the tubing ends are clean and<br />
the inner bore is clear before installing the cut tube.<br />
Note<br />
It is often impossible to remove a burr that blocks the inner<br />
bore.<br />
2B.2.4 Accessory Package The 500D accessory package (P/N 60-1249-016) contains the<br />
items listed in Table 2B-1. These are included for your convenience,<br />
to aid in operation of your pump.<br />
Table 2B-1 500D Accessory Package<br />
(P/N 60-1249-016)<br />
Qty. Part Number Description<br />
1 202-9091-56 Heavy duty graphite filled seal<br />
1 60-1244-271 Lubrication kit<br />
1 490-0031-25<br />
1 8" short arm, socket screw key<br />
1 029-0712-02 0.9 m - 1 4" ID Tygon R-1000 tubing<br />
2B.2.5 Drain Tube The overflow outlet on the pump cylinder provides a means of<br />
draining fluid from seal leakage. Use the 1 4" ID flexible tubing<br />
included with the accessory package, to divert the leakage away<br />
from the pump. To install the drain tube simply place one end of<br />
the tubing over the end of drip pan outlet, shown in Figure 2B-2.<br />
2B-3
D <strong>Series</strong> <strong>Syringe</strong> <strong>Pumps</strong>: Model 500D<br />
Section 2B 500D Liquid System Connection & Accessories<br />
Note<br />
The drain tube shown in this photo may appear slightly different<br />
than that on your pump.<br />
Figure 2B-2 Drain tube installation<br />
2B.3 Fluid Connection<br />
Accessories<br />
The optional accessories discussed in this section are used to make<br />
fluid connections from the 500D pump to another apparatus.<br />
When making fluid connections, be sure to use the ferrules provided<br />
in the connectors. Then push the tubing completely into<br />
the connector and finger tighten. Then tighten with a wrench to<br />
clamp the ferrules on the tubing.<br />
2B.3.1 Manual Refill Kit The manual refill valve package is rated to 689.5 bar. It includes<br />
those items necessary to connect to pressurized or non-pressurized<br />
refill sources. Table 2B-2 lists the contents of the<br />
package. Figure 2B-3 illustrates the installation of the package.<br />
To install the refill kit<br />
1. Attach the valve to the pump tower using the valve spacer<br />
and screws provided.<br />
2. Screw the male adapter (P/N 209-0161-01) into the inlet<br />
port of the pump.<br />
3. Connect the pre-bent tubing from the valve to the male<br />
adapter, using the nuts and ferrules supplied.<br />
2B-4
D <strong>Series</strong> <strong>Syringe</strong> <strong>Pumps</strong>: Model 500D<br />
Section 2B 500D Liquid System Connection & Accessories<br />
Table 2B-2 Refill Kit Package<br />
(P/N 68-1247-083)<br />
Qty. Part Number Description<br />
1 209-0098-05 2-way valve<br />
1 60-1243-689 Stainless steel tubing 1 8" OD, 0.069" ID<br />
1 023-0504-02 1.5 m - 0.125" OD 0.065" ID PTFE tubing<br />
1 209-9012-10 10 micron filter<br />
1 209-0161-01 Male connector NPT to 1 8" tubing<br />
1 60-1243-659 Valve spacer<br />
1 60-1243-391 1.5 m - 0.125" OD 0.069" ID stainless steel tubing<br />
1 209-0161-66<br />
1 8" nut<br />
1 209-0161-67<br />
1 8" ferrule<br />
Appropriate screws and washers also included.<br />
DANGER<br />
RISK OF INJURY. THE PRES-<br />
SURE PRODUCED COULD BE<br />
260 BAR. PLEASE UTILIZE<br />
APPROPRIATE TUBING AND<br />
CONNECTIONS NOTED IN THE<br />
MANUAL.<br />
Figure 2B-3 Refill kit installation on the 500D pump<br />
2B-5
D <strong>Series</strong> <strong>Syringe</strong> <strong>Pumps</strong>: Model 500D<br />
Section 2B 500D Liquid System Connection & Accessories<br />
4. Then connect the PTFE tubing (with the filter) to the bottom<br />
port of the valve, using the valve fittings,<br />
or,<br />
When connecting to pressurized sources, use the stainless<br />
steel tubing without a filter. Due to the wide variety of<br />
pressure sources, fittings to connect to the pressurized<br />
source are not provided.<br />
2B.3.2<br />
Manual Outlet Valve<br />
Package<br />
The manual outlet valve package is rated to 689.5 bar. It includes<br />
those items necessary to connect a shut-off valve between the<br />
pump and your system process. Table 2B-3 lists the contents of<br />
the package. Figure 2B-4 illustrates the installation.<br />
To install outlet valve<br />
package<br />
1. Attach the valve to the pump tower, using the valve spacer<br />
and screws provided.<br />
2. Screw the male adapter (P/N 209-0161-01) into the pump<br />
outlet.<br />
DANGER<br />
RISK OF INJURY. THE PRESSURE PRODUCED<br />
COULD BE 260 BAR. PLEASE UTILIZE THE<br />
APPROPRIATE TUBING AND CONNECTIONS<br />
NOTED IN THE MANUAL.<br />
3. Connect the pre-bent tubing from the male adapter to the<br />
valve, using the nuts and ferrules provided.<br />
4. Connect the 1.5 m piece of stainless steel tubing to the bottom<br />
port of the valve, using the fittings provided. This<br />
piece of tubing should be cut to the proper length for connection<br />
to your process system. Due to the wide variety of<br />
applications this pump is used for, fittings to connect this<br />
tubing to your system are not provided.<br />
2B-6
D <strong>Series</strong> <strong>Syringe</strong> <strong>Pumps</strong>: Model 500D<br />
Section 2B 500D Liquid System Connection & Accessories<br />
DANGER<br />
RISK OF INJURY. THE PRES-<br />
SURE PRODUCED COULD BE<br />
260 BAR. PLEASE UTILIZE<br />
APPROPRIATE TUBING AND<br />
CONNECTIONS NOTED IN THE<br />
MANUAL.<br />
Figure 2B-4 500D pump outlet valve package installation<br />
2B.4 Temperature and<br />
Pressure Controls<br />
2B.4.1<br />
Cylinder Insulating<br />
Cover<br />
An optional insulation cover (P/N 68-1247-085) is available to<br />
reduce flow noise due to temperature fluctuations and also<br />
improve pump performance at flow rates under 500 µl/min.<br />
The cover consists of two pieces which fit over the cylinder, as<br />
shown in Figure 2B-5.<br />
Notches in the cover provide openings for the inlet and outlet<br />
tubing and for the cable to the pressure transducer.<br />
To install the cylinder<br />
insulating cover<br />
1. Install the back cover.<br />
2. Route the cable around the tubing through the appropriate<br />
tabs.<br />
3. Install the front cover and secure the side latches.<br />
2B-7
D <strong>Series</strong> <strong>Syringe</strong> <strong>Pumps</strong>: Model 500D<br />
Section 2B 500D Liquid System Connection & Accessories<br />
Notches for<br />
tubing<br />
Side Latches<br />
Notch for cable<br />
Figure 2B-5 500D cylinder insulation cover<br />
2B.4.2 Cooling/Heating Jacket An optional cylinder temperature jacket (P/N 68-1247-057) is<br />
available for use in maintaining cylinder temperatures (30 to<br />
100°C) by circulating liquids, such as water or water/ethylene<br />
glycol solution, through the hose connectors.<br />
See section 2A.4.2 for installation instructions.<br />
2B.5 Nitrogen Purge A thin film of liquid will wet the inside of the cylinder each time<br />
the piston travels up the cylinder. Corrosive liquids drying in the<br />
air can cause the cylinder to corrode. This corrosion occurs at<br />
varying rates, based on the liquids and pumping conditions being<br />
employed. The lowest flow rate engenders the most corrosive<br />
pumping environment, as the deposited film has the longest time<br />
to corrode the inside of the cylinder wall.<br />
The 500D pump is equipped with a purge connector (Figure<br />
2B-6). The purge connector enables the pump cylinder beneath<br />
the piston to be purged with nitrogen, which inhibits cylinder<br />
corrosion and may increase the useful cylinder life. Figure 2B-6<br />
shows a typical purge connection to the purge tube on the back of<br />
the pump.<br />
To install the nitrogen purge<br />
1. Attach gas supply by slipping the plastic tube over the<br />
purge connector, see Figure 2B-6.<br />
2B-8
D <strong>Series</strong> <strong>Syringe</strong> <strong>Pumps</strong>: Model 500D<br />
Section 2B 500D Liquid System Connection & Accessories<br />
Figure 2B-6 Purge connector installation<br />
2B-9
D <strong>Series</strong> <strong>Syringe</strong> <strong>Pumps</strong>: Model 500D<br />
Section 2B 500D Liquid System Connection & Accessories<br />
2B.6 500D Optional<br />
Accessories<br />
The following list (P/N 60-1242-176) presents the optional accessories<br />
available for use with the 500D pump.<br />
Note<br />
See Table 2A-6 for a list of optional seals.<br />
Table 2B-3 500D Optional Accessories<br />
Outlet Valve Package (P/N 68-1247-082)<br />
Qty. Part Number Description<br />
1 60-1243-659 Valve spacer<br />
1 209-0098-05 2-way valve<br />
1 60-1243-689 Stainless steel tubing 1 8" OD, 0.069" ID<br />
1 209-0161-01 Male connector, NPT to 1 8"<br />
1 60-1243-391 Stainless steel tubing 1 8" OD, 0.069" ID, 1.5 m<br />
Appropriate screws and washers also included.<br />
Auto-Refill Valve Package (P/N 68-1247-062)<br />
Cylinder Insulating Cover (P/N 68-1247-085)<br />
Heating/Cooling Jacket (P/N 68-1247-057)<br />
Extension Cables<br />
1 68-1020-210 3 m<br />
1 68-1020-214 15 m<br />
Continuous Flow Air Driven Valve Package (P/N 68-1247-061)<br />
2 69-1243-572 3-way valve<br />
1 69-1243-574 Air actuator<br />
Appropriate nuts, ferrules, tubing, and tube unions also included.<br />
Analog Output Package (P/N 68-1247-070)<br />
1 60-1244-262 Analog output circuit board assembly<br />
1 60-1242-277 Assembly instruction procedure<br />
1 232-1140-00 6-32 Stainless steel hex nut<br />
1 149-9004-05 Jacket socket assembly<br />
1 SM-1 High accuracy transducer. Contact factory for specifications.<br />
2B-10
D <strong>Series</strong> <strong>Syringe</strong> <strong>Pumps</strong>:<br />
Model 1000D<br />
Section 2C 1000D Liquid System Connection &<br />
Accessories<br />
2C.1 Introduction<br />
DANGER<br />
RISK OF INJURY. THE PRESSURE PRODUCED<br />
COULD BE 138 BAR. PLEASE UTILIZE<br />
APPROPRIATE TUBING AND CONNECTIONS<br />
NOTED IN THE MANUAL.<br />
This section discusses 1000D liquid system connections, in<br />
general. If you are familiar with syringe pumps, you may wish to<br />
skip over the general information and helpful tips presented in<br />
section 2C.2, Liquid System Connections, and proceed directly to<br />
your 1000D package installation instructions. Use the following<br />
reference chart to locate the desired section.<br />
2C.2 Liquid System<br />
Connections<br />
The following section provides general information concerning<br />
1000D syringe pump, some tips about liquid connections and<br />
information about tubing and tubing cutting procedures.<br />
2C.2.1 Ports There are two ports in the cylinder cap. The 1000D ports come<br />
standard with 1 4" pipe thread fittings.<br />
Either port can serve as the inlet or outlet. As shown in Figure<br />
2C-1, you may plug one port and use a single port as both the<br />
inlet and outlet.<br />
2C-1
D <strong>Series</strong> <strong>Syringe</strong> <strong>Pumps</strong>: Model 1000D<br />
Section 2C 1000D Liquid System Connection & Accessories<br />
DANGER<br />
RISK OF INJURY. THE PRES-<br />
SURE PRODUCED COULD BE<br />
138 BAR. PLEASE UTILIZE<br />
APPROPRIATE TUBING AND<br />
CONNECTIONS NOTED IN THE<br />
MANUAL.<br />
Figure 2C-1 Liquid system plumbing connections for the 1000D pump<br />
2C.2.2 1000D Installation Tips • Be sure to keep the tubing as straight as possible at the<br />
end, as this will make it easier to install the ferrules.<br />
• Be sure to cut the ends of the tubing squarely.<br />
• Don’t leave burrs on the ends of the tubing.<br />
• When installing ferrules on the tubing, be sure the<br />
tubing extends beyond the ferrule to allow for proper<br />
crimping.<br />
• If the connection is leaking, retighten fittings.<br />
• Push the tubing completely into the port before tightening<br />
the nut.<br />
• When connections are made to the cylinder cap, the<br />
pressure reading may be affected. If the pressure no<br />
longer reads zero, push the pressure zero key on the<br />
controller front panel.<br />
2C.2.3 Tubing Cutting To prevent possible problems, it is important to squarely cut the<br />
tubing. Square ends will be easier to insert through the ferrule<br />
and will lower the dead volume.<br />
It is recommended that electrochemically machined steel tubing<br />
be used throughout the plumbing system. Electrochemically<br />
machined tubing has flat, burr-free ends for minimum dead<br />
volumes and is free of cutting residues. Pre-cut, electrochemically<br />
machined tubing is available through many chromatographic<br />
supply distributors in assorted lengths.<br />
A somewhat less desirable alternative is to purchase a tubing<br />
cutter designed to handle steel tubing. For quick fixes, the tubing<br />
may also be cut by hand with the following procedure. A jewelers<br />
file, goggles, and two pairs of pliers are necessary for this operation.<br />
To cut the tubing by hand<br />
1. Wear goggles. Using a fine jewelers file, score the tubing<br />
around its entire circumference.<br />
2C-2
D <strong>Series</strong> <strong>Syringe</strong> <strong>Pumps</strong>: Model 1000D<br />
Section 2C 1000D Liquid System Connection & Accessories<br />
2. Secure the tubing with pliers on each side of the score line,<br />
leaving approximately 1 16" between each set of pliers and<br />
the score line. Care must be taken not to squeeze the tubing<br />
too tightly, as that will flatten or deform the exterior of<br />
the tubing.<br />
3. With the pliers, bend the tubing back and forth to cause<br />
cracking at the score line. The bending should be done in<br />
two places to reduce the chance of squashing the tubing.<br />
4. It may be necessary to deburr the outside of the tubing<br />
ends with the file. Make sure the tubing ends are clean and<br />
the inner bore is clear before installing the cut tube.<br />
Note<br />
It is often impossible to remove a burr that blocks the inner<br />
bore.<br />
2C-3
D <strong>Series</strong> <strong>Syringe</strong> <strong>Pumps</strong>: Model 1000D<br />
Section 2C 1000D Liquid System Connection & Accessories<br />
2C.2.4 Drain Tube The overflow outlet on the pump cylinder provides a means of<br />
draining fluid from seal leakage. Use two pieces of 1 4" ID flexible<br />
tubing to divert the leakage away from the pump. To install the<br />
drain tubes, attach one end of each piece of tubing over the ends<br />
of the drip tray outlet and the splash pan outlet, shown in Figure<br />
2C-2. You may also drain the fluid away from the pump by connecting<br />
to the two 1 8" tubes protruding from the back of the<br />
pump.<br />
Note<br />
The drain tubes shown in Figure 2C-2 may appear slightly different<br />
than that on your pump.<br />
Figure 2C-2 Drain tube installation<br />
2C.3 Cylinder Washing and<br />
Purging<br />
A thin film of liquid will wet the inside of the cylinder each time<br />
the piston travels up the cylinder. Corrosive liquids drying in the<br />
air can cause the cylinder to corrode. This corrosion occurs at<br />
varying rates, based on the liquids and pumping conditions being<br />
employed. The lowest flow rate engenders the most corrosive<br />
pumping environment, as the deposited film has the longest time<br />
to corrode the inside of the cylinder wall.<br />
The 1000D pump is equipped for cylinder washing. The two 1 8"<br />
tubes located on the back of the pump feed the wash gland.<br />
2C-4
D <strong>Series</strong> <strong>Syringe</strong> <strong>Pumps</strong>: Model 1000D<br />
Section 2C 1000D Liquid System Connection & Accessories<br />
CAUTION<br />
The pressure in the wash gland and line should NEVER<br />
exceed the system pressure. A wash pressure greater than the<br />
system pressure may force wash liquid past the pump’s main<br />
seals and contaminate the delivery fluid.<br />
Typically, a small pump delivers the wash fluid to one of the two<br />
1 8" tubes. The second tube would then be used as an outlet to<br />
drain the wash fluid (refer to Figure 2C-3). Select a wash fluid<br />
that will best flush the cylinder of any residue left by the pumped<br />
fluid, yet will not damage the seals. If the wash pump is configured<br />
to recirculate the wash fluid, ensure that you change the<br />
wash fluid at regular intervals.<br />
CAUTION<br />
If the primary pump seal fails, the pressure of the delivery fluid will<br />
be exerted on the secondary (wash gland) seal.<br />
Note<br />
See Page 2A-16 for a list of optional seals.<br />
1/8” Wash Tubes<br />
1/8” Tubing*<br />
Pump*<br />
Outlet Fluid*<br />
Inlet Fluid*<br />
* User-supplied<br />
Figure 2C-3 1000D wash fluid connections<br />
2C-5
D <strong>Series</strong> <strong>Syringe</strong> <strong>Pumps</strong>: Model 1000D<br />
Section 2C 1000D Liquid System Connection & Accessories<br />
2C-6
D <strong>Series</strong> <strong>Syringe</strong> <strong>Pumps</strong>:<br />
Model 65D<br />
Section 2D 65D Liquid System Connections &<br />
Accessories<br />
DANGER<br />
RISK OF INJURY. THE PRESSURE PRODUCED<br />
COULD BE 1379 BAR. PLEASE UTILIZE<br />
APPROPRIATE TUBING AND CONNECTIONS<br />
NOTED IN THE MANUAL.<br />
2D.1 Introduction This section discusses liquid system connections in general, and<br />
details the accessory package installation. It also covers the<br />
installation of fluid connection accessories, temperature and<br />
pressure control accessories, optional kits and attachments, and<br />
software options.<br />
2D.2 Fluid Connections<br />
If you are not familiar with syringe pumps, you may wish to refer<br />
to the general information and helpful tips presented in section<br />
2A.2, Liquid System Connections. To proceed directly to your<br />
package installation instructions, use the following references to<br />
locate the desired section.<br />
Fluid Connection Accessories (section 2D.2):<br />
Pump inlet and outlet, 2D.2.1<br />
Drain tube, 2D.2.2<br />
Temperature and Pressure Controls (section 2D.3):<br />
Cylinder insulating cover, 2D.3.1<br />
Cooling jacket package, 2D.3.2<br />
Nitrogen Purge (section 2D.4)<br />
2D.2.1 Pump Inlet and Outlet There are two F250C ports in the pump cylinder cap. The F250C<br />
fittings are designed for use with high-pressure 1 4"–40 tubing.<br />
Either port can serve as the inlet or outlet. As shown in Figure<br />
2D-1, you may plug one port and use a single port as both the<br />
inlet and outlet.<br />
2D-1
D <strong>Series</strong> <strong>Syringe</strong> <strong>Pumps</strong>: Model 65D<br />
Section 2D 65D Liquid System Connections & Accessories<br />
DANGER<br />
RISK OF INJURY. THE PRES-<br />
SURE PRODUCED COULD BE<br />
1379 BAR. PLEASE UTILIZE<br />
APPROPRIATE TUBING AND<br />
CONNECTIONS NOTED IN THE<br />
MANUAL.<br />
Pressure<br />
transducer cap<br />
Nut &<br />
Ferrule<br />
Port<br />
Plug<br />
Port<br />
Tubing<br />
to valve<br />
Figure 2D-1 Liquid system plumbing connections<br />
2D.2.2 Drain Tube The overflow outlet on the pump cylinder provides a means of<br />
draining fluid from seal leakage. Use the 1 4" ID flexible tubing<br />
included with the accessory package (60-1249-024), to divert the<br />
leakage away from the pump. To install the drain tube, simply<br />
place one end of the tubing over the end of the drip pan outlet,<br />
shown in Figure 2D-2.<br />
Figure 2D-2 Drain tube installation<br />
2D-2
D <strong>Series</strong> <strong>Syringe</strong> <strong>Pumps</strong>: Model 65D<br />
Section 2D 65D Liquid System Connections & Accessories<br />
2D.3 Temperature and<br />
Pressure Controls<br />
2D.3.1<br />
Cylinder Insulating<br />
Cover<br />
An optional insulation cover (P/N 68-1247-081) is available to<br />
reduce noise (due to temperature fluctuations) and also improve<br />
pump performance at flow rates under 500 µl/min.<br />
The cover consists of two pieces which fit over the cylinder, as<br />
shown in Figure 2D-3.<br />
Notches for<br />
tubing<br />
Side Latches<br />
Notch for cable<br />
Figure 2D-3 Cylinder insulation cover<br />
Notches in the cover provide openings for the inlet and outlet<br />
tubing and for the cable to the pressure transducer.<br />
To install the cylinder<br />
insulating cover<br />
(Figure 2D-3)<br />
1. Install the back cover.<br />
2. Route the cable around tubing through the appropriate<br />
tabs.<br />
3. Install the front cover and secure the side latches.<br />
2D-3
D <strong>Series</strong> <strong>Syringe</strong> <strong>Pumps</strong>: Model 65D<br />
Section 2D 65D Liquid System Connections & Accessories<br />
2D.3.2 Cooling/Heating Jacket An optional cylinder temperature jacket (68-1247-047) is<br />
available for use in maintaining cylinder temperatures (–30 to<br />
100°C) by circulating liquids, such as water or water/ethylene<br />
glycol solution through the 1 4" upper and lower hose connectors.<br />
To install the<br />
cooling/heating jacket<br />
(Figure 2D-4)<br />
Removing the pump cylinder<br />
The jacket is very useful for SFC applications where cylinder<br />
cooling facilitates pump filling with fluids, such as liquid CO 2 .<br />
The jacket can also be used with a circulating temperature-controlled<br />
bath to keep the fluid inside the pump at a constant temperature.<br />
This may be necessary when operating at very low flow<br />
rates (below 100 µl/min), where temperature fluctuation can<br />
cause flow variations.<br />
1. Empty the cylinder.<br />
Note<br />
Be sure the piston is left fully extended.<br />
2. Turn the pump’s mains power switch OFF or disconnect<br />
the power cord.<br />
3. Remove the pump front cover by loosening the four cover<br />
screws (two, located on each side of the pump).<br />
4. Loosen the cylinder lock screw (a 1 4"-20 set screw) in the<br />
front side of the cylinder housing.<br />
5. Disconnect the pump pressure transducer cable from the<br />
pump and remove the inlet and outlet tubing.<br />
6. Unscrew the cylinder from the cylinder housing.<br />
Note<br />
It may be necessary to use a tubing strap wrench or Teledyne<br />
<strong>Isco</strong> wrenches package P/N 68-1247-067 to unscrew the cylinder<br />
without marring its outer surface.<br />
7. Lift the cylinder up and off the piston and push rod.<br />
2D-4
D <strong>Series</strong> <strong>Syringe</strong> <strong>Pumps</strong>: Model 65D<br />
Section 2D 65D Liquid System Connections & Accessories<br />
Figure 2D-4 Cooling/Heating jacket installed<br />
Table 2D-1 Cooling/Heating Jacket Package<br />
(P/N 68-1247-047)<br />
Qty. Part Number Description<br />
1 60-1248-053 Cooling/heating jacket assembly<br />
1 490-0031-54 Key 3 32" socket<br />
1 60-1242-183 Installation procedure<br />
2 202-2062-23 O-ring<br />
To install the cooling jacket<br />
1. Install the O-rings in the grooves of the cooling jacket.<br />
2. Lubricate the O-rings with soapy water or a light oil to<br />
ease assembly of the cooling jacket onto the cylinder.<br />
3. Slide the cooling jacket onto the cylinder using a twisting<br />
motion.<br />
Note<br />
It is important that the cooling jacket be installed with the locking<br />
set screw away from the cylinder cap.<br />
4. Be careful not to damage the O-rings when pushing them<br />
over the threads of the cylinder.<br />
2D-5
D <strong>Series</strong> <strong>Syringe</strong> <strong>Pumps</strong>: Model 65D<br />
Section 2D 65D Liquid System Connections & Accessories<br />
Reassembling the pump<br />
1. Place the cylinder/cooling jacket assembly over the piston<br />
and push rod assembly.<br />
2. Screw the assembly into the cylinder housing until the cylinder<br />
no longer turns. This indicates that it is snug against<br />
the piston.<br />
3. Unscrew the cylinder a minimum of 1 2 turn.<br />
4. Line the inlet and outlet cylinder cap ports up as you had<br />
them before. Turn the cooling jacket ports to the desired<br />
location and lock the cooling jacket to the cylinder by tightening<br />
the cooling jacket lock set screw.<br />
5. Lock the cylinder by tightening the cylinder locking screw.<br />
6. Replace the front cover and adjust both covers so they are<br />
flush with the cylinder housing.<br />
7. Reinstall tubing.<br />
8. Reconnect the pump pressure transducer cable.<br />
2D.4 Nitrogen Purge A thin film of liquid will wet the inside of the cylinder each time<br />
the piston travels up the cylinder. Corrosive liquids drying in the<br />
air can cause the cylinder to corrode. This corrosion occurs at<br />
varying rates based on the liquids and pumping conditions being<br />
employed. The lowest flow rate engenders the most corrosive<br />
pumping environment, as the deposited film has the longest time<br />
to corrode the inside of the cylinder wall.<br />
The 65D pump is equipped with a purge connector (Figure 2D-5).<br />
The purge connector enables the pump cylinder beneath the<br />
piston to be purged with nitrogen which inhibits cylinder corrosion<br />
and may increase the useful cylinder life. Figure 2D-5<br />
shows a typical purge connection to the purge tube on the back of<br />
the pump.<br />
To install the nitrogen<br />
(Figure 2D-5)<br />
Attach gas supply by slipping the plastic tube over the<br />
purge connector, see Figure 2D-5.<br />
2D-6
D <strong>Series</strong> <strong>Syringe</strong> <strong>Pumps</strong>: Model 65D<br />
Section 2D 65D Liquid System Connections & Accessories<br />
Figure 2D-5 Purge connector installation<br />
2D.5 Flushing the Pump When changing pumped liquids, flush the pump to prevent<br />
cross-contamination or difficulties with incompatible fluids.<br />
In comparison to other D-<strong>Series</strong> pumps, the 65D has a greater<br />
dead volume space due to transducer and tubing differences.<br />
This dead volume space increases the possibility of residual<br />
liquid being held in the pump.<br />
To flush the pump:<br />
1. Remove the transducer and its tubing from the top of the<br />
pump.<br />
CAUTION<br />
Liquids expelled by compressed gasses may cause injury.<br />
Wear eye protection. Liquids also may require other personal<br />
protective equipment. Refer to the applicable Material Safety<br />
Data Sheet (MSDS) for more information.<br />
2. Using nitrogen, blow out any liquid that remains in the<br />
transducer port and tubing.<br />
2D-7
D <strong>Series</strong> <strong>Syringe</strong> <strong>Pumps</strong>: Model 65D<br />
Section 2D 65D Liquid System Connections & Accessories<br />
2D-8
D <strong>Series</strong> <strong>Syringe</strong> <strong>Pumps</strong><br />
Section 3 Single & Multiple Independent Pump<br />
Operation<br />
3.1 Introduction This section will familiarize you with the D <strong>Series</strong> pump controller<br />
and describe operating the pump under each of the<br />
various modes: constant flow, constant pressure, and refill.<br />
Pump setup and operation is regulated by the D <strong>Series</strong> controller.<br />
Operating parameters are entered via the keypad on the front<br />
panel of the controller. Operating selections are displayed as<br />
menu items on the controller screen or are associated with a dedicated<br />
key on the controller keypad. Operating modes such as<br />
CONST FLOW, CONST PRESS, and REFILL all have such dedicated<br />
keys.<br />
WARNING<br />
UL (Underwriter Laboratories) has certified the D <strong>Series</strong><br />
Controller and <strong>Pumps</strong> on the basis that explosive<br />
chemicals or chemicals that could become explosive under<br />
pressure are NOT used. The instruments are not explosion<br />
proof. Use extreme caution when pumping hazardous<br />
fluids.<br />
3.2 General Controller<br />
Information<br />
Terminology<br />
The following information is intended to familiarize you with<br />
controller operation. Once you have become familiar with the<br />
keypad and the main menu, you will find it easy to direct the<br />
pumping operations required for your applications.<br />
Mode – The pump mode refers to the type of operation the pump<br />
is performing, e.g. constant flow, constant pressure, or gradient.<br />
Screen – The liquid crystal display is referred to in this manual<br />
as the LCD, the display, and the screen.<br />
100DX/DM – An abbreviation used when referring to the 100DX<br />
and 100DM pumps.<br />
Rates, Units, and Limits<br />
To allow pump operation to be tailored to your application,<br />
both the pressure and flow rate units may be set by the<br />
user, refer to section 3.3.1, UNITS.<br />
The pump also allows user programmed refill, as well as<br />
pumping rates, refer to section 3.3.2, REFILL.<br />
The system protection limits may also be set by the user,<br />
refer to section 3.5.4, LIMITS.<br />
3-1
D <strong>Series</strong> <strong>Syringe</strong> <strong>Pumps</strong><br />
Section 3 Single & Multiple Independent Pump Operation<br />
Note<br />
Mistakes – If you make an incorrect entry, press the CLEAR<br />
ENTRY key to delete your last keystroke. If you have entered a<br />
programming mode but do not wish to make any changes,<br />
press the ENTER key to retain the current setting. If you find<br />
yourself locked in a menu, press softkey D under RETURN or<br />
EXIT to return to the previous screen.<br />
3.2.1 Display There are two types of screen displayed: programming screens<br />
and run screens.<br />
Programming screens<br />
Run screens<br />
The programming screens are divided into separate menus.<br />
These menus are accessed when different features are being programmed.<br />
The run screen appears once a program has been loaded and the<br />
pump is running.<br />
The run screen, which varies depending on the mode you have<br />
set, displays current information about your pumping operation.<br />
There is a great deal of information displayed in a small amount<br />
of space. The following paragraphs describe the display line by<br />
line.<br />
Line One – No matter what mode you are in, the first line of the<br />
run screen is always the same.<br />
Active<br />
Pump<br />
Actual Pressure<br />
Volume Remaining<br />
PGa<br />
.000 mL/MIN<br />
PSI<br />
XXX.XX ml<br />
Current Mode<br />
Actual Flow Rate<br />
Line Two – The second line varies slightly depending on the<br />
operating mode. A file or step will only be displayed when operating<br />
in the gradient mode.<br />
Elapsed Time<br />
STOPPED<br />
FILE/STEP<br />
000:00:00<br />
Status<br />
Step of program running or<br />
loaded file number<br />
3-2
D <strong>Series</strong> <strong>Syringe</strong> <strong>Pumps</strong><br />
Section 3 Single & Multiple Independent Pump Operation<br />
Line Three – Line three varies depending on the mode; the rate<br />
and units are set by the user, so these will vary depending on<br />
your programming requirements. The ending time will always be<br />
displayed on this line.<br />
Current Pressure<br />
Ending Time<br />
PS/MIN<br />
FINAL:<br />
PSI<br />
00:00:00<br />
Final Pressure<br />
Rate<br />
Line Four – Line four varies depending on the mode. The<br />
options presented on this line are softkey selectable, i.e. you use<br />
the softkeys (A - D) located under the screen to choose the option.<br />
3.2.2 Selecting Operating<br />
Parameters<br />
There are three ways operating parameters are set from a menu<br />
screen, using a softkey or pressing a programming option key on<br />
the controller keypad.<br />
Menu Selection – The number keys are used to make menu selections.<br />
The menu options will be numbered and demarcated by a<br />
period, such as “1. UNITS.” Pressing the number 1 will select the<br />
UNITS option and cause the units menu to be displayed.<br />
Softkey Selection – The softkey selectable programming options<br />
are displayed on the fourth line of the LCD. To select an option,<br />
press the softkey, A-D, directly under the option. The parameter<br />
will either toggle or be selected when the softkey is pressed.<br />
Keypad Selection – The programming keys are located on the<br />
left side of the controller keypad. The pump mode, limits, and<br />
refill are all options that may be selected from the keypad.<br />
Value Selection – The number keys are used to enter all<br />
numeric values required for pump operation. When a numeric<br />
value is required, the controller will usually display a blinking<br />
message, prompting you to enter an appropriate value.<br />
3.3 Main Menu Features The main menu (Figure 3-1) is accessed by pressing the orange<br />
MENU key on the pump controller keypad.<br />
Once it is displayed use the number keys to select a menu option.<br />
Selecting an option from the main menu displays the programming<br />
parameters for that option. These will be presented in<br />
menu form. When the main menu is displayed, press softkey A,<br />
MORE, to view additional programming options. To return to the<br />
run screen press softkey D, RETURN.<br />
1. UNITS<br />
2. SELECT PUMP<br />
3. REFILL<br />
MORE<br />
4. POWER FAILURE [__]<br />
5. SYSTEM RESET<br />
6. DISPLAY CONTRAST<br />
RETURN<br />
A B C D<br />
Figure 3-1 Main menu<br />
3-3
D <strong>Series</strong> <strong>Syringe</strong> <strong>Pumps</strong><br />
Section 3 Single & Multiple Independent Pump Operation<br />
The following options are available via the main menu, Figure<br />
3-1. Each option is discussed in the separate subsection indicated.<br />
• Units: Section 3.3.1.<br />
• Refill: Section 3.3.2.<br />
• Power failure: Section 3.3.3.<br />
• System reset: Section 3.3.4.<br />
• Display contrast: Section 3.3.5.<br />
• Serial options: Section 3.3.6.<br />
• Status Section: 3.3.7.<br />
• External analog control: Section 3.3.8.<br />
• Multi-pump mode: Section 3.3.9.<br />
• Total volume reset: Section 3.3.10.<br />
• Valve: Section 3.3.11.<br />
3.3.1 Setting Flow and/or<br />
Pressure Units<br />
For your convenience, the controller allows the user to set the<br />
displayed units on the pump. See Figure 3-2.<br />
PRESSURE UNITS=___________FLOW UNITS=__________<br />
1. ATM<br />
3. PSI<br />
5. mL/MIN 7. µL/MIN<br />
2. BAR<br />
4. kPA<br />
6. mL/HR 8. µL/HR<br />
PREVIOUS<br />
A B C D<br />
Figure 3-2 Units menu<br />
Setting the units<br />
1. Press the orange MENU key.<br />
2. Press number 1, UNITS.<br />
3. The units menu, Figure 3-2, will be displayed.<br />
4. Use numbers 1-4 to select the pressure units (ATM, BAR,<br />
PSI, kPa). Pressing the number associated with the unit<br />
will cause it to be displayed on the first line of the screen<br />
after PRESSURE UNITS=.<br />
5. Use numbers 5-8 (mL/MIN, mL/HR, µL/MIN, µL/HR) to set<br />
the flow rate units. Pressing the number associated with<br />
the unit will cause it to be displayed on the first line of the<br />
screen after FLOW UNITS=.<br />
6. To exit the UNITS menu, press softkey D, PREVIOUS.<br />
This will return you to the main menu screen. Your settings<br />
will be saved automatically for all pumps.<br />
3-4
D <strong>Series</strong> <strong>Syringe</strong> <strong>Pumps</strong><br />
Section 3 Single & Multiple Independent Pump Operation<br />
3.3.2 Refill The refill option allows you to set the refill rate or have the pump<br />
automatically refill when a certain volume is reached.<br />
To set auto refill volume<br />
1. Press the orange MENU key.<br />
2. Press number 3, REFILL. The auto refill menu, Figure 3-3<br />
will be displayed.<br />
1. REFILL MARK<br />
2. AUTO REFILL<br />
3. REFILL RATE<br />
PUMP A<br />
VOLUME A:<br />
PUMP A:<br />
PUMP A:<br />
000.00mL<br />
OFF<br />
000.00mL/MIN<br />
PREVIOUS<br />
A B C D<br />
Figure 3-3 Refill menu<br />
Note<br />
If more than one pump is connected to the controller, pump B<br />
and pump C will be displayed on the fourth line. To select a<br />
pump, press the softkey under the pump designation.<br />
3. Press the number 1 key to set the volume for pump A.<br />
4. The units to the right of the symbol will blink, indicating<br />
that you should enter a volume. Use the number keys to<br />
enter an appropriate value and then press the ENTER key.<br />
Disable/Enable Auto Refill<br />
To set refill rate<br />
To exit<br />
The second line will display “OFF” or “ON”, indicating whether<br />
or not this feature is enabled for pump A (or the currently<br />
selected pump). Press the number 2 key to toggle this feature off<br />
and on for each pump, as desired.<br />
If auto refill is ON, then the pump will automatically switch to<br />
refill mode when the volume reaches the auto refill mark. After<br />
refilling, pumping will resume in the programmed mode. The<br />
ACCESSORY outputs, which drive powered valves, will switch in<br />
sequence.<br />
1. Press the number 3 key to set the refill rate for the designated<br />
pump. The refill rate can also be changed from the<br />
main screen while the pump is refilling.<br />
2. A message will blink on the screen prompting you to enter<br />
the selected refill rate.<br />
3. Enter the desired rate using the number keys.<br />
4. Press the ENTER key to save the value.<br />
1. To exit the refill menu, press softkey D, PREVIOUS. You<br />
will be returned to the main menu; and your selections will<br />
be saved.<br />
3.3.3 Power Failure [STOP] This feature allows you to dictate the activity of the pump in the<br />
event of a power failure. Use the number 4 key to toggle this<br />
feature to [STOP] or [CONT] to automatically resume pumping<br />
after power is restored.<br />
3-5
D <strong>Series</strong> <strong>Syringe</strong> <strong>Pumps</strong><br />
Section 3 Single & Multiple Independent Pump Operation<br />
Note<br />
This option covers all pumps connected to the controller. You<br />
cannot dictate the action of an individual pump.<br />
3.3.4 Resetting the System This option allows you to completely clear user programmed settings.<br />
It will erase all programs and return units and limits to<br />
factory settings. If the ZERO PRESS key has been used, the corrected<br />
offsets will be lost.<br />
Note<br />
This option covers all pumps connected to the controller. You<br />
cannot dictate the action of an individual pump.<br />
Press softkey D, DO_NOT, to return to the main menu without<br />
resetting your system.<br />
CAUTION<br />
Once a system reset has taken place, all programs will be<br />
erased. These cannot be recovered. All user-set limits and<br />
units will be returned to the factory default settings.<br />
System reset<br />
Hard reset<br />
1. Press the orange MENU key.<br />
2. Select number 5. SYSTEM RESET.<br />
3. Press softkey A, CONTINUE.<br />
A hard reset should only be performed when changing EPROMs<br />
for a software upgrade or at the suggestion of the <strong>Isco</strong> Service<br />
Department. Like the system reset, all user programmed settings<br />
will be cleared.<br />
Note<br />
A hard reset will erase all programs and user defined parameters.<br />
These cannot be recovered.<br />
1. Turn the pump controller to STANDBY.<br />
2. Press and hold the CLEAR ENTRY key on the front panel<br />
keypad.<br />
3. While holding the CLEAR ENTRY key, flip the on/standby<br />
switch to ON. Keep the CLEAR ENTRY key pressed for 1<br />
second.<br />
4. Release the key and turn the unit back to STANDBY.<br />
5. Then turn the instrument back ON and execute a system<br />
reset (described above).<br />
3-6
D <strong>Series</strong> <strong>Syringe</strong> <strong>Pumps</strong><br />
Section 3 Single & Multiple Independent Pump Operation<br />
3.3.5 Display Contrast The pump conveniently allows you to adjust the screen contrast<br />
for your light conditions and viewing angle.<br />
To change the display<br />
contrast<br />
1. Press the orange MENU key.<br />
2. Press number 6, DISPLAY CONTRAST. The display contrast<br />
menu, Figure 3-4, will be displayed.<br />
ADJUST THE DISPLAY CONTRAST:<br />
DEFAULT DOWN UP<br />
PREVIOUS<br />
Figure 3-4 Display contrast menu<br />
A B C D<br />
3. Use softkeys B, DOWN, or C, UP to change the contrast.<br />
Raising the contrast [UP] darkens the blue of the writing.<br />
Note<br />
Due to differences in manufacture, some displays will not show<br />
an obvious variation when the contrast is adjusted. This is normal<br />
and should not be considered a malfunction.<br />
3.3.6 Serial Option The serial option menu allows you to set the baud rate and the<br />
unit identification number.<br />
To change the serial options<br />
1. Press the orange MENU key.<br />
2. Press softkey A, MORE.<br />
3. Press number 1, SERIAL OPTION. The serial option<br />
menu, Figure 3-5, will be displayed.<br />
BAUD RATE = 1200<br />
UNIT # ID = 6<br />
NEXT BAUD<br />
NEXT ID#<br />
PREVIOUS<br />
Figure 3-5 Serial option menu<br />
A B C D<br />
4. Use softkey A, NEXT BAUD, to scroll through the available<br />
baud rates. These are: 300, 1200, 2400, 4800, 9600,<br />
and 19.2K, 38.4K, 57.6K.<br />
5. Use the softkey B, NEXT ID#, to scroll through the available<br />
ID numbers. These are 1-7. Six is the default, as this<br />
is the unit identifier for the Teledyne <strong>Isco</strong> LabView software.<br />
For a complete discussion of serial control, refer to Section 6 in<br />
this manual.<br />
3.3.7 Pump Status This option simply presents the revision of software used by the<br />
pump controller and indicates the type of pumps connected to the<br />
controller.<br />
3-7
D <strong>Series</strong> <strong>Syringe</strong> <strong>Pumps</strong><br />
Section 3 Single & Multiple Independent Pump Operation<br />
Note<br />
This screen is momentarily displayed automatically each time<br />
the pump controller is turned from STANDBY to ON.<br />
To display the status<br />
3.3.8 External Analog<br />
Control<br />
Setting up external control<br />
1. Press the MENU key and then press softkey A, MORE.<br />
2. Press 2 to display the pump status.<br />
3. The first line displays the revision of the software.<br />
4. Lines 2, 3, and 4 display the type of pump connected to the<br />
A, B, and C pump connectors, respectively.<br />
The D <strong>Series</strong> syringe pump can be controlled externally by<br />
analog voltage in either constant flow or constant pressure mode.<br />
The input range is 0 – 11.5 volts (for all pumps), with a resolution<br />
of 5000 increments per volt.<br />
1. Select the desired operating mode (CONST FLOW or<br />
CONST control: PRESS) by pressing the appropriate key<br />
on the controller front panel.<br />
The mode you have selected, along with the current pump<br />
will be displayed in the upper left-hand corner of the<br />
screen. For example, if you have selected CONST PRESS,<br />
CP will be displayed, followed by a lowercase a, b, or c<br />
depending on the selected pump.<br />
To set parameters for a different pump, press softkey D,<br />
SELECT PUMP, and choose A for pump A, B for pump B,<br />
etc. Once you have changed pumps, the display will change<br />
back to the run screen, automatically.<br />
If you do not wish to select a different pump, press softkey<br />
D to return to the run screen.<br />
2. Press MENU, then softkey A for MORE options.<br />
3. Press number key 3 to select EXTERNAL control.<br />
4. Softkey B will toggle the EXTERNAL mode ON or OFF.<br />
5. If you wish to change the full-scale input voltage, press softkey<br />
A to SET RANGE. Then enter the new voltage range<br />
between 1.000 V and 11.500 V, and press ENTER to store<br />
the value. This voltage will correspond to the maximum<br />
flow rate or pressure value programmed by the LIMITS key.<br />
DV FS<br />
ML = input<br />
where:<br />
DV = desired value of pressure or flow rate.<br />
FS = full-scale input range.<br />
ML = max limit of pressure or flow rate<br />
input = external input voltage.<br />
3-8
D <strong>Series</strong> <strong>Syringe</strong> <strong>Pumps</strong><br />
Section 3 Single & Multiple Independent Pump Operation<br />
Pressure Example<br />
The maximum pressure desired is 510.2 ATM, (maximum<br />
allowed by the MODEL 260D) with a scale factor of 2.0 volts per<br />
100 ATM. The full-scale input voltage would be:<br />
510.2 ATM <br />
2.00 V<br />
= 10.204 volts<br />
100 ATM<br />
and MAX PRESS should be set to 510.2 ATM.<br />
Maximum Flow Rate<br />
Example<br />
The maximum flow rate desired is 25.0 ml/min with a scale factor<br />
of 5.0 volts per 20.0 ml/min. The full scale input voltage would be:<br />
5.0 V<br />
25.0 ml/min <br />
= 6.250 volts<br />
20.0 ml/min<br />
and MAX FLOW should be set to 25.0 ml/min.<br />
Wire Connections<br />
Two wires are required for analog control. The analog common or<br />
ground wire should be connected to the GND terminal under<br />
ANALOG INPUT of the ACCESSORY connector on the controller<br />
rear panel. The analog control or input wire should be connected<br />
to terminal 1 under ANALOG INPUT.<br />
If two pumps are used with the controller, the second analog<br />
control or input wire should be connected to terminal 2 under<br />
ANALOG INPUT. If three pumps are used with the controller,<br />
the third analog control or input wire should be connected to terminal<br />
3 under ANALOG INPUT or to auxiliary (P11) pin 15.<br />
When using one of the multi-pump operation modes, only the<br />
ANALOG INPUT terminal 1 needs to be connected.<br />
3.3.9 Multi-Pump When using multiple pumps, there are four multi-pump operating<br />
modes of delivery and an independent mode, including:<br />
• Continuous flow in constant flow mode.<br />
• Continuous flow in constant pressure mode.<br />
• Modifier addition in constant pressure mode.<br />
• Modifier addition in continuous flow, constant pressure<br />
mode.<br />
• Independent mode.<br />
Continuous Flow (constant<br />
flow mode)<br />
A D <strong>Series</strong> continuous flow pumping system in constant flow<br />
mode, will consist of two syringe pumps and a valve accessory<br />
package, all regulated by one controller.<br />
To connect two D <strong>Series</strong> pumps for a continuous flow pumping<br />
system, you will need a continuous flow check valve package (P/N<br />
68-1247-059) or a continuous flow air driven valve package (P/N<br />
68-1247-129 for 65D, 68-1247-058 for 100D/260D, 68-1247-061<br />
for 500D, or 68-1247-104 for 1000D). Installation and operating<br />
instructions for this system are located in Section 8.<br />
In this mode the softkeys toggle between the options described in<br />
Table 3-1.<br />
3-9
D <strong>Series</strong> <strong>Syringe</strong> <strong>Pumps</strong><br />
Section 3 Single & Multiple Independent Pump Operation<br />
Table 3-1 Key functions in the Multi-pump Mode<br />
Key Display Option Description<br />
A NORMAL Uses a finer (slower) pressure<br />
match control when<br />
switching from one pump to<br />
the other.<br />
FAST<br />
Uses a coarser (faster)<br />
pressure match control<br />
when switching from one<br />
pump to the other.<br />
B NORMAL PRESS Uses pressure matching<br />
when switching from one<br />
pump to the other<br />
LOW PRESS<br />
Uses no pressure matching<br />
when switching from one<br />
pump to the other.<br />
C DELIVER Sets the pump into the<br />
delivery mode of operation.<br />
RECEIVE<br />
Sets the pump into the<br />
receive mode of operation.<br />
6 MIN/MAX POINTS Sets the fill and refill marks<br />
that are used with both continuous<br />
flow modes.<br />
Continuous Flow (constant<br />
pressure mode)<br />
Modifier (constant pressure<br />
mode)<br />
Independent Control of up to<br />
Three <strong>Pumps</strong><br />
A D <strong>Series</strong> continuous flow pumping system in constant pressure<br />
mode, will consist of two D <strong>Series</strong> syringe pumps, and a valve<br />
accessory package, all regulated by one controller. To connect two<br />
D <strong>Series</strong> pumps you will need to use a continuous flow check<br />
valve package (P/N 68-1247-059) or a continuous flow air driven<br />
valve package (P/N 68-1247-058 for 100D/260D, 68-1247-061 for<br />
500D, or 68-1247-104 for 1000D). Consult with the factory when<br />
configuring 65D pumps for continuous flow. Installation and<br />
operating instructions for this system are located in Section 8.<br />
In this mode the softkeys toggle between the options described in<br />
Table 3-1.<br />
A pump modifier system includes two D <strong>Series</strong> syringe pumps,<br />
regulated by one controller and outlet check valves to prevent<br />
system back flow into the pump. To connect the 100D/260D<br />
pumps, you will need a modifier addition kit (P/N 68-1247-079).<br />
Consult with the factory when configuring 65D pumps as a modifier<br />
system. Installation and operating instructions for modifier<br />
systems are located in Section 9.<br />
In this mode the softkeys toggle between the options described in<br />
Table 3-1.<br />
A D <strong>Series</strong> syringe pump controller can run three syringe pumps<br />
independently of each other in either constant pressure or constant<br />
flow mode or any combination of the two. To set up this<br />
option use the procedure detailed below.<br />
3-10
D <strong>Series</strong> <strong>Syringe</strong> <strong>Pumps</strong><br />
Section 3 Single & Multiple Independent Pump Operation<br />
To designate independent<br />
control of multiple pumps<br />
1. Press the orange MENU key.<br />
2. Press softkey A, MORE.<br />
3. Press number 4, MULTI PUMP. The multi-pump menu<br />
will then be displayed.<br />
4. Press number 4, INDEPENDENT. The controller will set<br />
the pumps to Independent mode. Number 4 will blink,<br />
indicating that INDEPENDENT mode is selected.<br />
5. Select the HOLD PRESS or NORMAL mode of operation.<br />
Press softkey A to toggle between the two modes.<br />
HOLD PRESS: After the pump is empty in constant<br />
pressure mode, if the outlet pressure rises past the set<br />
point the pump will restart and run the system to the set<br />
point pressure.<br />
NORMAL: This feature shuts the pump off if the pumps<br />
runs empty in constant pressure mode.<br />
Once the pumps have been set to this mode, they will<br />
operate independently from one another. Each pump will<br />
operate at its defined limit and rate. One pump may be<br />
operating in constant flow, the other in constant pressure.<br />
Independent mode is the default setting for the pump.<br />
When a command such as stop or refill is pressed, a menu<br />
will appear asking you to designate the pump to stop or<br />
refill. Only the designated pump will stop, the other pumps<br />
will continue in the pumping application you have them set<br />
for.<br />
6. Return to the run screen by pressing softkey D three times.<br />
Then press softkey D (select pump) to display the select<br />
pump screen. This screen will show each pump’s pertinent<br />
information and allow you to select any pump for programming<br />
changes.<br />
7. To select B pump from the select pump screen, press softkey<br />
B. This will display the B pump run screen. From here,<br />
you can start pump B or change the operating parameters.<br />
3.3.10 Total Volume Reset This feature will reset the total volume display used in the continuous<br />
flow, or modifier option to zero.<br />
To reset total volume to zero<br />
1. Press the orange MENU key.<br />
2. Press softkey A, MORE.<br />
3. Press number 5, TOTAL VOL RESET.<br />
The volume will then be reset to zero.<br />
3.3.11 Valve This feature will designate the type of valves (passive, active or<br />
electric) being used for the flow operation. (If “active value” or<br />
“electric” is selected, the controller will match the pressure more<br />
closely before switching delivery pumps.)<br />
To select valve type<br />
1. Press the orange MENU key.<br />
2. Press softkey A, MORE.<br />
3-11
D <strong>Series</strong> <strong>Syringe</strong> <strong>Pumps</strong><br />
Section 3 Single & Multiple Independent Pump Operation<br />
3. Press number 6, VALVE. The number for the selected valve<br />
type will be blinking.<br />
4. Press the number 1, 2 or 3 key to select a desired option<br />
and the number 1, 2, 3 will blink indicating which valve<br />
type is selected.<br />
5. To exit this menu, press the softkey D, PREVIOUS, to<br />
return to the main menu.<br />
3.4 Second Menu The Second Menu gives you access to various functions. Access<br />
the Second Menu by pressing softkey A, MORE, two times.<br />
1. POOR FILL<br />
2. DIAGNOSTIC MENU<br />
3. PRESS. CALIBRATION<br />
4. DIFF. MODES<br />
5. PRESS. INTEGRAL<br />
Figure 3-6 Second Menu<br />
A B C D<br />
3.4.1 Second Menu Menu<br />
Options<br />
POOR FILL – In the constant pressure mode, this feature<br />
allows you to set a fill point as a percentage of pump volume. If<br />
this volume percentage is not reached after a refill and re-pressurization,<br />
the system sounds an alarm and stops the pump.<br />
DIAGNOSTIC MENU – Displays an additional menu containing<br />
testing options<br />
LCD TEST<br />
This feature will cycle the display. Press any key to<br />
stop test.<br />
ANALOG INPUT<br />
This feature will display all the analog input signals on<br />
the display.<br />
MEMORY TEST – This feature will test the memory<br />
for errors.<br />
KEYPAD TEST – This feature will test the keypad.<br />
Press “EXIT” to exit.<br />
MOTOR CONTROL/LIMITS – This feature will test the<br />
digital position control system. Press 1, 2, 3 for the<br />
pump wanted for test. Press “UP 100” to move the<br />
pump’s cylinder up 100 counts. Press “DOWN 100” to<br />
move the pump’s cylinder down 100 counts. Press<br />
“EXIT” to exit this function.<br />
SERIAL TEST – This feature will test the serial<br />
channel. Once this feature is active the software will<br />
serial send “*******SERIAL TEST XXXX*********”<br />
through the serial port. The “REC.” message will show<br />
any serial input characters on the display.<br />
PRESS. CALIBRATION – This feature is used for calibration<br />
only. If an incorrect number is entered with this feature, the<br />
pumps will NOT display/run at the correct pressure. Press<br />
“CalA” (“Cal”, “CalC”) and enter the calibration number for the<br />
needed pump. Press “Prev” to exit this feature.<br />
3-12
D <strong>Series</strong> <strong>Syringe</strong> <strong>Pumps</strong><br />
Section 3 Single & Multiple Independent Pump Operation<br />
DIFF. MODES – The standard pressure transducer MUST be<br />
connected to pump for correct operation. This feature allows the<br />
use of other analog inputs for pressure input to the pump.<br />
Press 1, OFF, to turn off this feature.<br />
Press 2, 0 to 50 ANLG1, to use a 5 volt 50 psi<br />
transducer on analog input ANLG1.<br />
Press 3, Custom ANLG1, to use 5 volt custom pressure<br />
transducer on analog input ANLG1.<br />
Press 4, 500 ANLG2, to use a 5 volt 500 psi pressure<br />
transducer on analog input ANLG2.<br />
Press 5, 5000 ANLG3, to use a 5 volt 5000 psi<br />
transducer on analog input ANLG3.<br />
PRESS. INTEGRAL – This feature lets the user turn on/off the<br />
integral function for the pump control.<br />
3.5 Front Panel Keys In addition to the menu options, certain features are conveniently<br />
located on the front panel keyboard. These include:<br />
• HOLD, 3.5.1<br />
• RECALL, 3.5.2<br />
• STORE, 3.5.3<br />
• LIMITS, 3.5.4<br />
• RAPID PRESS (Rapid Pressure), 3.5.5<br />
• HELP, 3.5.6<br />
• ACCESS CTRL (Accessories Control), 3.5.7<br />
• ZERO PRESS (Zero Pressure), 3.5.8<br />
HOLD, RECALL, and STORE are all used when in program gradient<br />
mode.<br />
3.5.1 HOLD The HOLD key is used while a gradient is running. When the<br />
HOLD key is pressed, this will freeze the program clock and<br />
maintain present gradient parameters.<br />
To continue the gradient, press the HOLD or RUN key.<br />
3.5.2 RECALL The RECALL key is used to recall a previously programmed gradient.<br />
When you select this option, the controller automatically<br />
loads the gradient and switches the pump to program gradient<br />
mode. The RECALL key can be used when the pump(s) are<br />
stopped or when in the HOLD mode.<br />
1. Press the RECALL key and use the number keys to enter<br />
the number name of the gradient you wish to recall. Press<br />
the Enter key.<br />
2. If you enter a number of a gradient which does not exist,<br />
the controller briefly displays the message “FILE NUM-<br />
BER DOES NOT EXIST.” It then assumes you will be creating<br />
a new gradient under that number and displays the<br />
program gradient run screen.<br />
3-13
D <strong>Series</strong> <strong>Syringe</strong> <strong>Pumps</strong><br />
Section 3 Single & Multiple Independent Pump Operation<br />
3.5.3 STORE The store key is operational when in the programmed gradient<br />
mode. It is used to save the program gradient parameters and<br />
exit the programming (parameter entry) mode.<br />
3.5.4 LIMITS The controller allows the user to set the minimum and maximum<br />
flow rate limits, the minimum and maximum pressure limits,<br />
and the maximum rate the pump will run while controlling the<br />
pressure in constant pressure mode.<br />
• When using a single controller to operate multiple<br />
pumps, you need to select the appropriate pump before<br />
setting any pump parameters. The available pumps will<br />
be displayed above the softkeys. These selections correspond<br />
with the connector that the pump control cable is<br />
plugged into on the rear panel of the pump controller. To<br />
select a pump, press the softkey under the pump designation.<br />
The top line of the screen will indicate the pump<br />
which is currently selected.<br />
• The high and low limits you set cannot exceed the pump<br />
specifications.<br />
To set the limits<br />
1. Press the LIMITS key on the keypad. To display the Limits<br />
menu, Figure 3-7, enter the number of the limit you wish<br />
to program using the number keys. This will cause one of<br />
five limit setpoint menus to appear, MAX PRESS, MIN<br />
PRESS, MAX FLOW, MIN FLOW, or FLOW LIMIT. The<br />
MAX PRESS limit setpoint menu is shown in Figure 3-8.<br />
Figure 3-7 Limits menu<br />
LIMITS:<br />
CURRENT PUMP<br />
1. MAX PRESS _____<br />
2. MIN PRESS______<br />
PUMP A<br />
3. MAX FLOW____<br />
4. MIN FLOW_____<br />
5. FLOW LIMIT_____<br />
PREVIOUS<br />
A B C D<br />
MAX PRESS_____PSI<br />
1. SET PRESS VALUE<br />
Figure 3-8 Limits setpoint (Max Press) menu<br />
ON ON OFF<br />
DISPLAY* ALARM* SHUTDOWN* PREVIOUS*<br />
A B C D<br />
Note<br />
These features are discussed later in this section under Limits<br />
Programming Options.<br />
2. Press the number 1 key to set the value. A message will<br />
blink on the right side of the screen, prompting you to<br />
enter the selected limit.<br />
3. Enter the desired limit setpoint, using the number keys.<br />
4. Press the ENTER key to save the value.<br />
3-14
D <strong>Series</strong> <strong>Syringe</strong> <strong>Pumps</strong><br />
Section 3 Single & Multiple Independent Pump Operation<br />
Note<br />
The pump can be set to shut off or not at this limit condition by<br />
pressing softkey C under shutdown. This will toggle this option<br />
to ON.<br />
5. To exit the limit setpoint menu, press the softkey D, PRE-<br />
VIOUS.<br />
6. Once all the limits have been set, press softkey D, PREVI-<br />
OUS, to return to the main menu.<br />
Limits programming<br />
options<br />
In addition to setting the upper and lower limits, the pump also<br />
allows the user to specify whether they want:<br />
• the alarm message displayed<br />
• an alarm to sound when the limit is reached<br />
• the pump to shut down when the limit is reached<br />
These features are set using the softkeys, A-C. Pressing these<br />
softkeys toggle the feature on and off. (If you press the softkey<br />
once the feature is activated, pressing the softkey again turns<br />
the feature off).<br />
Note<br />
The Max Press (maximum pressure) display on and alarm on<br />
options cannot be disabled.<br />
Display<br />
When this feature is on and a limit has been exceeded, the pump<br />
will automatically flash an over or under limit message on the<br />
screen. If you do not wish it to do so, press softkey A once to<br />
toggle this to:<br />
OFF<br />
DISPLAY<br />
Alarm<br />
When this feature is on, the pump will automatically beep a<br />
warning when a limit has been exceeded. If you wish to disable<br />
the beep, press softkey B once. The display should change to:<br />
OFF<br />
ALARM<br />
Shutdown<br />
The pump will, if you wish, shut down [pump stop] when a limit<br />
has been exceeded. If you wish to enable this feature, press<br />
softkey C once. The display should change to:<br />
ON<br />
SHUTDOWN<br />
Flow rate limit for pressure<br />
control<br />
When the pump is controlling pressure (CONSTANT<br />
PRESSURE MODE), the flow rate is not set by the operator, and<br />
may range up to the maximum flow the pump is capable of. In<br />
some cases, it is desired to limit the rate of pumping during<br />
3-15
D <strong>Series</strong> <strong>Syringe</strong> <strong>Pumps</strong><br />
Section 3 Single & Multiple Independent Pump Operation<br />
system pressurization. This can be done by selecting limit 5,<br />
FLOW LIMIT. The FLOW LIMIT value is used as the upper<br />
range of flow rate during pressure control. This limit is not the<br />
same as the MAX FLOW limit which is a threshold above when<br />
the pump is stopped, or an alarm is activated as selected by the<br />
operator.<br />
To exit<br />
1. To exit the limits menu, press softkey D, PREVIOUS. You<br />
will be returned to the main menu; and your changes will<br />
be saved.<br />
3.5.5 RAPID PRESS This option is available when operating in the constant flow<br />
mode and in the two-pump concentration gradient mode. It<br />
allows rapid pressurization to a stable pressure point and then<br />
switches automatically to the constant flow setpoint. This is<br />
helpful when you are operating at a low flow rate but wish to<br />
rapidly pressurize a solvent.<br />
1. Press the CONST FLOW key, to put the pump in constant<br />
flow mode or enter a two-pump concentration gradient.<br />
2. Press the RAPID PRESS key to start rapid pressurization.<br />
3. The controller will display maximum flow rate and target<br />
pressure setting. If these values are correct, press the softkey<br />
D to continue rapid pressurization.<br />
4. If you know approximately what the pressure will be when<br />
the system is stable, enter this value as a target pressure.<br />
Press the softkey A and enter the desired pressure value.<br />
This should shorten the time required to stabilize the system<br />
pressure.<br />
5. If you would like to limit the maximum flow rate during<br />
the rapid pressurization phase, press softkey B and enter<br />
the desired flow rate limit.<br />
6. Press the softkey D to continue rapid pressurization.<br />
Note<br />
This feature is automatic, i.e. the user does not enter a pressure<br />
and the RAPID PRESS key is pressed only once.<br />
3.5.6 HELP When the HELP key is pressed, information regarding the<br />
current operation of the pump will be displayed. If you are<br />
setting parameters, a short description about the parameters<br />
being prompted will be displayed, along with other helpful information.<br />
Because most pump programming is self-documented,<br />
the HELP messages are limited.<br />
3.5.7 ACC CTRL The ACC CONTROL key will allow you to manually operate<br />
accessories, such as valves, via the Digital Output terminals on<br />
the back of the controller.<br />
To set the digital output<br />
1. Press the blue ACC CTRL key. The accessory control menu<br />
will be displayed.<br />
3-16
D <strong>Series</strong> <strong>Syringe</strong> <strong>Pumps</strong><br />
Section 3 Single & Multiple Independent Pump Operation<br />
2. Use the number keys, 1-4, (1-A INLET, 2-A OUTLET, 3-B<br />
INLET, 4-B OUTLET) to toggle the desired valve to either<br />
open or closed. (Numbers 1-4 represent digital output terminals<br />
1-4, respectively).<br />
3. Use the number keys, 5-8, to toggle the digital output to<br />
either high or low. (Numbers 5-8 represent digital output<br />
terminals 5-8, respectively).<br />
4. To exit the accessory control menu, press softkey D, PRE-<br />
VIOUS.<br />
3.5.8 ZERO PRESS The ZERO PRESSURE key will correct pressure sensor drift.<br />
Before pressing the ZERO PRESS key, the pump should be set up<br />
and depressurized.<br />
1. Be sure the pump is depressurized with port fittings<br />
installed.<br />
2. Press the ZERO PRESS key. A message will ask if you<br />
want to zero the pressure; and the current pressure will be<br />
displayed on the third line of the display.<br />
3. Press softkey A, pump A, or softkey B, pump B, or softkey<br />
C, pump C, to zero the selected pump’s pressure.<br />
or,<br />
If the pump is not depressurized, press softkey D, DO<br />
NOT, to exit the zero pressure operation.<br />
3.6 Operating Modes The pump has three delivery modes and one refill mode<br />
including:<br />
Note<br />
When using a single controller to operate multiple pumps independently,<br />
you need to select the appropriate pump run screen<br />
before selecting an operation mode. To select the appropriate<br />
operating pump, press the SELECT PUMP (softkey D) and an<br />
intermediate screen will be shown. Then press the softkey<br />
under the pump you would like to select, and this will take you<br />
to the run screen of the appropriate pump.<br />
CONSTANT FLOW RATE, Refer to Section 3.6.1<br />
This mode is used when the flow rate must remain constant<br />
during the pumping operation.<br />
CONSTANT PRESSURE, Refer to Section 3.6.2<br />
The constant pressure mode is used when the application of fixed<br />
pressure throughout the pumping operation is required. The<br />
pump will maintain the desired pressure by positive or negative<br />
displacement of the piston.<br />
Programmed Gradient – Refer to Section 7.<br />
In the programmed gradient mode, the pump can provide the following<br />
types of gradient:<br />
• Two-pump concentration gradient<br />
3-17
D <strong>Series</strong> <strong>Syringe</strong> <strong>Pumps</strong><br />
Section 3 Single & Multiple Independent Pump Operation<br />
• Single-pump linear pressure gradients<br />
• Single-pump flow programs<br />
Refill – Refer to Section 3.3.2.<br />
The user may set the refill rate and change it when in the refill<br />
mode.<br />
3.6.1 Constant Flow To set constant flow operation, use the following procedure:<br />
1. Press the CONST FLOW key on the keypad. “CFa” will be<br />
displayed in the upper left corner of the screen. This<br />
denotes that you will be defining constant flow parameters<br />
for pump A. If you wish to define parameters for pump B or<br />
C, press softkey D, select pump, and then press softkey A,<br />
B, or C to select pump A, B, or C, respectively.<br />
Note<br />
If the main menu is displayed, you must press softkey D under<br />
CONST FLOW key.<br />
2. Press the A softkey to change the flow rate. The words<br />
“ENTER FLOW RATE” will flash on the screen.<br />
3. Use the number keys to enter the desired flow rate.<br />
Note<br />
If you make an error, press the CLEAR ENTRY key to delete<br />
your last keystroke. Each time you depress the CLEAR ENTRY<br />
key, you will delete one character.<br />
4. Press the ENTER key once the desired flow rate is displayed.<br />
5. Press the RUN key to begin pump operation.<br />
3.6.2 Constant Pressure Programming a constant pressure operation only requires a few<br />
keystrokes. Use the following procedure:<br />
1. Press the CONST PRESS key on the keyboard, CPa will be<br />
displayed in the upper left corner of the screen. This<br />
denotes that you will be defining constant pressure parameters<br />
for pump A. If you wish to define parameters for<br />
pump B or C, press softkey D, select pump, and then press<br />
softkey A, B, or C to select pump A, B, or C, respectively.<br />
Note<br />
If the main menu is displayed, you must press softkey D under<br />
RETURN before pressing the CONST PRESS key.<br />
2. Press the A softkey to indicate to the program that you<br />
wish to enter the pressure. The words “ENTER PRES-<br />
SURE” will flash on the screen.<br />
3. Use the number keys to enter the desired pressure.<br />
3-18
D <strong>Series</strong> <strong>Syringe</strong> <strong>Pumps</strong><br />
Section 3 Single & Multiple Independent Pump Operation<br />
Note<br />
If you make an error, press the CLEAR ENTRY key to delete<br />
your last keystroke. Each time you depress the CLEAR ENTRY<br />
key, you will delete back a character.<br />
4. Press the ENTER key once the desired pressure is displayed.<br />
5. Press the RUN key to initiate pump operation.<br />
3.7 External Control The pump can be externally controlled for pressure or flow rate<br />
operation with an analog voltage or through the serial interface.<br />
Controlling the pump with an analog voltage is discussed in<br />
section 3.3.8.<br />
The serial interface allows you to control the pump operation<br />
from an IBM-PC or compatible computer which has an RS-232-C<br />
serial output. The serial interface accepts English command<br />
words from the computer, like constant pressure, refill, etc. For<br />
more information see Section 6, Serial Interface.<br />
3.8 Remote RUN/STOP The D series syringe pump RUN/STOP function can be externally<br />
controlled by a switch contact closure or TTL input. The<br />
input voltage is 5 volts and is internally pulled high (RUN). The<br />
input is level sensitive (must remain high for RUN or low for<br />
STOP) and must be high for normal operation of serial (RS-232)<br />
control.<br />
To use the remote RUN/STOP feature, first press RUN or force<br />
the RUN/STOP pin low to enable the pump. Thereafter the<br />
RUN/STOP pin will control operation. Pressing STOP on the<br />
front panel will override the RUN/STOP pin.<br />
3.8.1 Wire Connections Two wires are required for external RUN/STOP control. The<br />
digital common or ground wire should be connected to one of the<br />
four DIGITAL GROUND terminals of the ACCESSORY connector<br />
on the controller rear panel. The control wire should be<br />
connected to terminal 1, under DIGITAL INPUT. If an electrically<br />
isolated relay is used, one relay terminal should be connected<br />
to digital ground and the other to terminal 1, under<br />
DIGITAL INPUT.<br />
If two pumps are used with the controller, the second control wire<br />
should be connected to terminal 2, under DIGITAL INPUT.<br />
If three pumps are used with the controller, the third control wire<br />
should be connected to terminal 3, under DIGITAL INPUT or to<br />
auxiliary (P11) pin 17.<br />
3.9 Analog Flow Rate and<br />
Volume Output Option<br />
The purpose of the analog output option (P/N 68-1247-070) is to<br />
provide for analog monitoring of the syringe pump flow rate. If<br />
two or less pump modules are connected to the controller, pump<br />
volume delivered can also be monitored via the analog output.<br />
These outputs are often used with analog based plant or process<br />
monitoring equipment.<br />
3-19
D <strong>Series</strong> <strong>Syringe</strong> <strong>Pumps</strong><br />
Section 3 Single & Multiple Independent Pump Operation<br />
3.9.1 Compatibility The hardware for this option includes a rear panel mounted<br />
circuit board which is compatible with the D <strong>Series</strong> 68-1240-026<br />
controller only.<br />
3.9.2 Hardware Three 12-bit digital-to-analog outputs represent the pump flow<br />
rates scaled to the maximum flow rate limits similar to the analog<br />
inputs. The three jumper selectable output ranges are 0 to 5V, 0 to<br />
10V, and 5V to 5V. These jumpers are accessed by removing the<br />
controller case top. Four outputs are provided on the circuit board<br />
and each output can be set to a different range, see Figure 3-9.<br />
The controller is shipped with all jumpers set for the 0 to 10V<br />
range. If less than three pumps are connected to the controller,<br />
pump volume delivered is provided by the extra outputs. The<br />
combinations are shown in Table 3-2.<br />
The MAX FLOW setting accessed via the LIMITS key, sets the<br />
fullscale flow rate. (See Section 3.5.4). For example, if the voltage<br />
output range is 5 volts and the desired output scale is 1 Volt per<br />
10 ml/min, the MAX FLOW limit should be set to 50 ml/min. The<br />
MAX FLOW setting may not exceed the pump specification.<br />
The volume analog outputs are not adjustable. The full-scale<br />
range represents one pump stroke. These outputs represent<br />
volume delivered, with the maximum output at cylinder empty.<br />
3.9.3 Current Loop Output The pump controller can be configured to provide a 4–20 mA<br />
current loop output. Contact the factory for more information on<br />
this option.<br />
Figure 3-9 Output range selection jumpers<br />
3-20
D <strong>Series</strong> <strong>Syringe</strong> <strong>Pumps</strong><br />
Section 3 Single & Multiple Independent Pump Operation<br />
Table 3-2 Analog Output Options (connections to<br />
female 25 pin Sub-D)<br />
Pin No. Description One or Two<br />
Pump Function<br />
Three Pump<br />
Function<br />
1 Chassis (earth) — —<br />
2 Analog common — —<br />
3 Analog common — —<br />
4 Analog common — —<br />
5 Analog common — —<br />
14 Output #1 Flow Rate A Flow Rate A<br />
15 Output #2 Flow Rate B Flow Rate B<br />
16 Output #3 Volume A Flow Rate C<br />
17 Output #4 Volume B Volume B<br />
3-21
D <strong>Series</strong> <strong>Syringe</strong> <strong>Pumps</strong><br />
Section 3 Single & Multiple Independent Pump Operation<br />
3-22
D <strong>Series</strong> <strong>Syringe</strong> <strong>Pumps</strong><br />
Section 4 Theory of Operation<br />
DANGER<br />
RISK OF ELECTRIC SHOCK -<br />
DISCONNECT THE ELECTRIC POWER BEFORE<br />
SERVICING. ONLY TRAINED SERVICE<br />
PERSONNEL MAY REMOVE THE CASE TOP.<br />
DANGER<br />
RISQUE DE CHOC ÉLECTRIQUE.<br />
COUPER L´ALIMENTATION AVANT LA<br />
RÉPARATION. L´USAGER NE DOIT PAS<br />
DÉMONTER L´INSTRUMENT OU DÉRANGER LE<br />
MÉCANISME DEDANS. ADRESSER LA<br />
REPARATION SEULEMENT AUX TECHNICIENS<br />
COMPÉTENTS.<br />
4.1 Introduction The following sections describe the electrical theory of operation<br />
for the D <strong>Series</strong> syringe pumps and controller. These descriptions<br />
are included to aid you in troubleshooting your instrumentation.<br />
To view the schematic drawings referred to in this section, first<br />
find the serial number for your unit. Then go to our Web site at<br />
www.isco.com. In the left column, click Service & Support. In<br />
the center of the page, click Fast, thorough factory repair<br />
service. Find the blue heading Circuit Schematics and click<br />
the indicated link. After you enter your serial number in the field<br />
provided, you will be able to view the schematics online. If you<br />
need assistance, or don’t see the correct schematic for your specific<br />
unit, contact our service department.<br />
4.2 Pump Controller The pump controller is a microprocessor-based user interface and<br />
motor control system. The user interface consists of a keypad<br />
label; a four-line, 40 character display; and various digital and<br />
analog interface connectors, located on the rear panel of the<br />
instrument. Up to three syringe pump modules of various capacities<br />
can be operated independently or in several coordinated<br />
configurations.<br />
Power Supplies<br />
The pump controller, hereinafter referred to as the controller,<br />
does not contain a power supply. Each pump connected to the<br />
controller contains a power supply but the controller is powered<br />
4-1
D <strong>Series</strong> <strong>Syringe</strong> <strong>Pumps</strong><br />
Section 4 Theory of Operation<br />
only by the pump connected to the PUMP A connector on the rear<br />
panel. For this reason, care should be taken to remove mains<br />
power before connecting or disconnecting the pumps from the<br />
rear panel of the controller.<br />
The supplies required are +5 volts for the digital circuitry and<br />
±15 volts for the analog interface circuitry. Other supplies<br />
derived from these, using zener diode circuits are ±11 volt supplies<br />
for the RS-232 serial interface driver, U107, ±5.2 volt supplies<br />
for the analog to digital (A/D) converter, U129, +12 volts for<br />
the analog input interface and multiplexer U130, and -3 volts for<br />
the analog input interface circuit.<br />
The A/D converter voltage reference VREF, is generated from the<br />
+15 volt supply by U133, with R135 as the adjustment. See<br />
section 5.11.5 for the adjustment procedure. Battery BT101<br />
maintains the static RAM memory for one month without power<br />
to the pump if fully charged. The battery charging circuit uses<br />
diodes CR101 and CR102 to direct power to the memory chips<br />
U105 and U106 for memory retention and for normal operation<br />
(charging). The unregulated supply to the +5 volt regulator in the<br />
pump is brought to the controller for the purpose of monitoring<br />
the transformer secondary. This voltage labeled +10 volts at<br />
TP112, is divided by R120 and R121 and monitored by the<br />
internal microprocessor A/D converter. When the supply begins<br />
to drop (as in a power failure), the microprocessor detects the<br />
drop with enough time to save operating conditions and execute a<br />
graceful shutdown.<br />
Microprocessor and Memory<br />
Microprocessor Reset Circuit<br />
The heart of the controller is the INTEL 80C196 embedded<br />
microprocessor U104. The operating code (or firmware) is contained<br />
as 16-bit wide information split into two 8-bit EPROMs<br />
U102 (low byte) and U103 (high byte). Some static RAM (SRAM)<br />
is built into the microprocessor but the bulk is provided by<br />
battery backed SRAMs U105 (low byte) and U106 (high byte)<br />
also as split 16 bit wide information. The microprocessor bus<br />
functions as a zero wait state 16 bit wide bus or as a slower 3<br />
wait state 8- bit wide bus. The selection is under the control of<br />
the chip select or address decoding circuit. The wait state generation<br />
is internal to the processor. All peripheral chips other than<br />
the RAM and ROM, are operated on the slower 8-bit bus, which<br />
is buffered through U108, a bi-directional buffer. The microprocessor<br />
is designed to address a 64-Kilobyte space. To access more<br />
code memory, this system utilizes a paged memory method which<br />
allows access to 512 K bytes of code memory (with 27C020s<br />
installed), in addition to the 16 K of SRAM. The additional<br />
address bits are output through U112, a programmable logic<br />
device.<br />
The microprocessor reset signal is generated by voltage monitor<br />
circuit U101. The microprocessor has an internal pull-up on the<br />
active low reset signal. The open drain output at pin 7 pulls the<br />
reset signal low when the +5 volt supply drops below about 4.75<br />
volts. Refer to section 5.11.1 for calibration instructions. R108<br />
4-2
D <strong>Series</strong> <strong>Syringe</strong> <strong>Pumps</strong><br />
Section 4 Theory of Operation<br />
provides hysteresis to insure the reset signal switches without<br />
bouncing. The calibrated switching point is the low to high transition<br />
which occurs when the +5 volt supply exceeds 4.875 volts.<br />
The front panel ON/STANDBY switch also exerts control over<br />
the reset circuit. In normal operation with the reset signal high,<br />
transistor Q101 is turned on. When the front panel switch is<br />
changed to STANDBY, it is designed to switch the reset signal<br />
low, halting the microprocessor after a delay, sufficient enough to<br />
allow saving microprocessor RAM information in the external<br />
non-volatile RAM. When pin 3 of P105 switches high, an<br />
interrupt routine is activated by pin 15 of U104 which initiates<br />
the transfer. With pin 3 of P105 at 5 volts and Q101 turned on, 5<br />
volts is placed across R101. This creates in effect a hardware<br />
“request to reset.” When pin 3 of U101 goes high, pin 7 will be<br />
pulled low activating the reset and turning off Q101. Anything<br />
which pulls the reset signal low will release the Q101 “latch” and<br />
accomplish this. The microprocessor has the ability to internally<br />
pull the reset signal low which is done after all necessary variables<br />
have been transferred to the external SRAM and the<br />
display has been cleared. The reset signal will then remain low<br />
until the front panel switch is set to ON and the +5 volt supply is<br />
greater than 4.875 volts. The active low reset signal is inverted<br />
by U127 to provide an active high reset signal for U129, U123,<br />
and U128.<br />
Keypad Scan Circuit<br />
Display<br />
The front panel keypad is scanned by the microprocessor at a<br />
rate of one row per millisecond. Each row of the keypad driver<br />
outputs of U128 is sequentially set high, followed by a read of the<br />
columns which are normally pulled low by R104. The keypad is<br />
debounced by software time delay.<br />
The four line LCD display is connected to the 8-bit wide bus to<br />
allow the microprocessor to output display information and read<br />
back display status information. Additional control signals are<br />
needed for the interface and are provided by U128. The display<br />
read/write (D-R/W) signal is active high for a read cycle and low<br />
for a write to the display. The display register select (D-RS) controls<br />
data flow in the display controller. A read or write is signaled<br />
by a momentary low to high pulse on one of the two display<br />
enable signals (DISP EN1 and DISP EN2), which control the<br />
upper and lower half of the display, respectively. The upper half<br />
of the display is decoded in address space as chip select 10 (CS10)<br />
and the lower two lines by chip select 11 (CS11).<br />
The display viewing angle adjustment is under software control<br />
and may be selected by pressing the MENU key. The adjustment<br />
is made by varying the voltage at pin 6 of P104. The HSO.1 pin of<br />
the microprocessor outputs a pulse width modulated signal<br />
which drives the gate of MOSFET Q103. The resulting pulse<br />
signal is filtered by R122 and C139 to drive the display. R123<br />
provides a minimal current to prevent the display from being<br />
turned completely off.<br />
4-3
D <strong>Series</strong> <strong>Syringe</strong> <strong>Pumps</strong><br />
Section 4 Theory of Operation<br />
Analog-to-Digital Converter<br />
Circuit<br />
Motor Control<br />
A 16-bit analog-to-digital converter U129 reads eight multiplexed<br />
analog inputs, which include pump pressure signals and<br />
general analog interface signals used for external control. The 16<br />
bits of information from U129 is transferred to the CPU in two<br />
successive reads. Pin 33 of U129 selects the 8-bit bus mode. The<br />
4051 CMOS multiplexer (U130) input is selected under microprocessor<br />
control by setting the three output pins P1.4, P1.5, and<br />
P1.6. The 5 volt signal is level translated to 12 volts by U131, a<br />
4504. CR117 protects the circuit from excessive swings and<br />
floating inputs. R126 with C144 and C169-C175 filter the inputs<br />
to prevent aliasing. The selected input is buffered by operational<br />
amplifier U132A. U132B inverts, level shifts, and scales the<br />
input signal to match the bipolar input range of A/D circuit U129<br />
determined by voltage reference circuit U133. A circuit composed<br />
of diodes and zener diodes prevents this signal from exceeding<br />
the analog supplies of U129. The three pump pressure signals<br />
are scanned at a rate of 500 HZ, and all other signals at a rate of<br />
100 HZ. These signals are then filtered by software. A conversion<br />
is initiated by a low pulse on the HOLD signal (pin 1) of U129,<br />
and the end of conversion signal at pin 38 activates an interrupt<br />
routine to read the value. These signals should pulse at a frequency<br />
of 2.0 kHz.<br />
The syringe pump motor speed control is entirely a digital<br />
control system. Both the pressure and flow rate controls are<br />
software implemented via the controller module. Feedback and<br />
control elements are duplicated for three pump control, so only<br />
the pump A controls will be described.<br />
The syringe pump module includes a power amplifier to interface<br />
the digital controls to the direct current, brush type electric<br />
motor. The pump full and pump empty positions are detected by<br />
optoelectronic sensors in the pump module, and the signals<br />
connect to P110 of the controller through the pump control cable.<br />
These signals are labeled ULA (upper limit pump A) and LLA<br />
(lower limit pump A) for cylinder empty and full, respectively.<br />
The piston travel limit signals are connected to port 0 of the<br />
microprocessor, U104. For more information see section 4.6,<br />
Piston Travel Limit Sensors.<br />
The motor drives an optoelectronic quadrature position sensor<br />
which encodes the angular position of the motor, see section 4.6,<br />
Quadrature Motor Angular Position Sensors. The two<br />
quadrature position feedback signals (TACHAA AND TACHAB)<br />
connect to P110 via the pump control cable. These signals feed<br />
the count inputs of U121, an LS7166 quadrature decoder<br />
up/down counter. The value of this counter represents the<br />
angular position of the motor. The microprocessor reads U121 via<br />
the 8-bit bus and compares this feedback to the desired motor<br />
position. A motor drive, pulse-width modulated (PWM) signal<br />
and a motor drive, direction signal are then generated by the<br />
microprocessor to drive the motor to the correct position.<br />
D <strong>Series</strong> <strong>Syringe</strong> <strong>Pumps</strong><br />
Section 4 Theory of Operation<br />
4-4
D <strong>Series</strong> <strong>Syringe</strong> <strong>Pumps</strong><br />
Section 4 Theory of Operation<br />
The direction signals are output through port 1 of the microprocessor<br />
(P1.0 for pump A). The pump A PWM signal is output on<br />
pin 39 of the microprocessor. The PWM signals for pumps B and<br />
C are generated by sections of an 82C54 counter (U113 for pump<br />
B and U114 for pump C). The pump control signals are inverted<br />
by a 74AC04 which drives the optical isolator LEDs located in<br />
the pump module (see section 4.3, Pump Power Supply and<br />
Motor Drive Power Amplifier).<br />
Sections of the 82C54 also determine the rate of motor<br />
movement. The rate signals return to the microprocessor on pins<br />
24 (pump A), 25 (pump B), and 26 (pump C). If the motor control<br />
appears to be functioning properly (holds position) but the motor<br />
will not turn, the 82C540s (or their connection to the microprocessor)<br />
should be checked.<br />
The motor drive supply voltage is switched between two levels by<br />
output pins 18, 19, and 20 of U128 for pumps A, B, and C, respectively.<br />
Sections of a 2803 (U126) invert the signals and drive the<br />
voltage switching relays. For more information, (See section 4.3)<br />
Pump Power Supply and Motor Drive Power Amplifier.<br />
Front Panel Standby Switch<br />
Serial Port Interface<br />
Accessory Interface<br />
In addition to controlling the microprocessor reset function<br />
described under Microprocessor Reset Circuit, one half of the<br />
front panel ON/STANDBY DPDT switch is wired in series with<br />
the motor enable signal. This signal controls the relay which connects<br />
the motor to the motor drive power amplifier.<br />
When the switch is set to the STANDBY position, the motor<br />
drive is disabled and the electromechanical brake is applied. The<br />
microprocessor can also disable the motor drives of all pumps by<br />
turning off transistor Q102 (which is wired in series with the<br />
standby switch). Q102 is turned off if a failure of the motor<br />
control circuits is detected or if the pump pressure exceeds the<br />
pump specification by 103.4 bar. Such failures are indicated on<br />
the display by the messages FAILURE POSITION or FAILURE<br />
PRESSURE. The front panel switch must be set to STANDBY<br />
and then to ON to reset the system. If the condition was transient,<br />
the pump may then operate correctly. If there is a permanent<br />
failure, the message will repeat.<br />
The hardware interface for the RS-232 serial interface consists of<br />
line driver IC U107, a 14C88; and line receiver IC U110, a<br />
14C89.<br />
A non-serial digital and analog external interface is implemented<br />
on the rear panel ACCESSORY connector. The terminals of this<br />
connector are used for various purposes.<br />
Analog Output The analog output option is described in Section 3.9.<br />
4-5
D <strong>Series</strong> <strong>Syringe</strong> <strong>Pumps</strong><br />
Section 4 Theory of Operation<br />
4.2.1 Electric Valve Interface Incorporated into the <strong>Series</strong> D Controller is a bus interfaced<br />
circuit board for the Electric Valve Package.<br />
Valve Motor Control<br />
The valve is operated by a direct current, permanent-magnetic-field<br />
gear motor. The motor provides rotary motion to open<br />
and close the valve.<br />
Note<br />
Electric valves are not available for the 65D pump. Please consult<br />
the factory for options.<br />
The valve is closed to a preset torque determined by controlling<br />
the motor current during the closing cycle. In this type of motor,<br />
the output torque is proportional to motor current. Therefore,<br />
current control provides satisfactory torque control.<br />
When the valve is opened, the motor rotates a fixed angular<br />
amount from the closed position. The motor is operated at a constant<br />
speed for the fixed time required to rotate the desired<br />
amount.<br />
Circuit Description<br />
Microprocessor Interface<br />
Relays<br />
Motor Drive Control<br />
(Refer to the Interface Schematic and the Depressurization Valve<br />
Schematic.)<br />
The valve control and sensing signals interface to the controlling<br />
microprocessor through U206, an 82C55A integrated circuit.<br />
Ports A and C are configured as outputs. Port B is configured as<br />
eight inputs. Each output is buffered through a section of a 2803<br />
Darlington transistor driver chip. The outputs of port A select a<br />
motor to be operated, select the direction of operation, and switch<br />
the power circuitry on or off.<br />
The motor selection and direction functions are implemented by<br />
relays. Six DPDT relays are configured to select the desired<br />
motor and an associated current limit setpoint potentiometer.<br />
The current setpoint potentiometer is located on the back of the<br />
valve motor so that controllers can be exchanged without disturbing<br />
the valve torque calibration. A seventh DPDT relay,<br />
K204, switches the motor drive polarity, to select the motor drive<br />
direction.<br />
A reference voltage circuit provides the setpoint for the current<br />
control circuit. Voltage reference U203 is adjusted to 2.50 volts<br />
by R212 and is buffered by U202B. The reference voltage is<br />
divided to provide the current setpoint signal. R210 and the<br />
potentiometer (which is R101 for Depressurization 1 valve) set<br />
the maximum current the drive circuit will provide.<br />
Motor current is switched and regulated by FET Q01. Q01 is<br />
mounted on the controller rear panel for the purpose of heat dissipation.<br />
The motor current also flows through R204, which is in<br />
series with Q01. R204 generated the current feedback signal<br />
which is a voltage proportional to the motor current.<br />
4-6
D <strong>Series</strong> <strong>Syringe</strong> <strong>Pumps</strong><br />
Section 4 Theory of Operation<br />
The current control circuit includes U202A and the associated<br />
resistors. They form a linear differential amplifier which is the<br />
controlling element in the current control circuit. The circuit subtracts<br />
the current feedback signal from the current setpoint<br />
signal and amplifies the resulting error signal. The current error<br />
signal at pin 1 of U202 drives the gate of Q01 through R207. This<br />
prevents the motor current from exceeding the amount set by the<br />
current setpoint potentiometer. When the current setpoint is<br />
exceeded, the voltage on the drain of Q01 rises. This signals the<br />
CPU (via chip U206) to turn off the motor. R205 with C203 connected<br />
to the gate of Q01 provide high frequency stability.<br />
To ensure valve opening, the maximum drive current is<br />
increased when the valve open direction is selected. The opening<br />
current maximum is about 1.5 times the closing current<br />
maximum. Q202 is turned on when valve open direction is<br />
selected. This places R206 in series with R209. The resulting<br />
voltage divider reduces the current feedback signal to 68% of the<br />
voltage at R204. The current required to match the feedback<br />
signal to the setpoint will be about 1.5 times greater than with<br />
Q202 off.<br />
Standby<br />
Circuit Failure Detection<br />
4.3 Pump Power Supply<br />
and Motor Drive<br />
Power amplifier<br />
One section of the 2803 is used to insure that the motor drive is<br />
turned off when the microprocessor is not operating. The<br />
STANDBY signal from the front panel switch turns the open collector<br />
2803 off when the switch is set to RUN. When the switch is<br />
set to STANDBY, R214 turns the 2803 on. The output pulls the<br />
gate of Q1 low, which turns the motor drive off, regardless of the<br />
state of the 82C55 output.<br />
U202C functions as a comparator to monitor the motor drive<br />
current. The threshold is set at 1.14 amps. This current value<br />
should never be exceeded in normal operation. If a failure occurs<br />
in the current control circuit, which results in excess current, the<br />
output (pin 8) of U202C will go high. This signal will be read by<br />
the microprocessor and the user will be notified of the failure.<br />
The motor drive circuit, located in the pump module on the pump<br />
power circuit board, consists of an input signal isolation circuit, a<br />
current limiting control circuit, and a power amplifier circuit. An<br />
LC filter, which converts the pulse-width modulated (PWM)<br />
power signal to a DC motor drive voltage, is located near the<br />
motor off the circuit board.<br />
The PWM signal and the direction signal from the controller are<br />
buffered by U102, a high speed optocoupler circuit. The outputs<br />
at pins 6 and 7 are active high when the respective inputs are<br />
flowing current (controller outputs low).<br />
The two control signals then pass through the current limiting<br />
and direction steering circuit. The PWM signal (labeled PULSE)<br />
is gated by U102C to turn off when the motor drive current<br />
exceeds 5 amps. R104 with R105 divide the +12 volt supply to<br />
provide a 0.5 volt reference. Comparators U101A and U101B<br />
compare the reference to the voltage across 0.1 ohm current<br />
sense resistors R112 and R116 respectively. R116 senses the<br />
4-7
D <strong>Series</strong> <strong>Syringe</strong> <strong>Pumps</strong><br />
Section 4 Theory of Operation<br />
current when power is applied to the motor in the forward (piston<br />
up) direction. R112 senses current with power applied in the<br />
reverse (piston down) direction. U103B and U103C are connected<br />
to form an RS flip flop which is set at the beginning of a PWM<br />
cycle and is cleared if the motor current exceeds the 5 amp limit.<br />
When the PULSE signal goes high, current will flow through the<br />
motor and increase with time. If the current exceeds 5 amps<br />
before the end of the PWM cycle, the comparator will reset the<br />
flip flop. U104C gates the PULSE signal through, according to<br />
the state of the RS flip flop, which disables the signal when a<br />
current limit has been reached. The PULSE signal is then<br />
steered to the correct drive transistor, according to the<br />
DIRECTION signal.<br />
Transistors Q106, Q107, Q108, and Q109 form an H bridge<br />
power amplifier. N channel power FETs, Q106 and Q108, form<br />
the lower half of the bridge; P channel power FETs, Q107 and<br />
Q109, form the top half. In addition to the pulse-by-pulse current<br />
limiting for the N channel drivers, the P channel FETs are protected<br />
by a current limiting circuit. Considering Q107 as an<br />
example, the gate voltage is supplied by level shifting transistor<br />
Q102. Q102 is connected so that it places a constant voltage<br />
(about 10 volts) across R109 when turned on, resulting in a constant<br />
current through the collector. This current, which also<br />
flows through R111 and regulating diode CR103, applies 12 volts<br />
to the gate of Q107, which turns it on. Filter C127 prevents<br />
switching noise from turning on Q107.<br />
Current sense resistor R113 applies a voltage to current limiting<br />
transistor Q103. If the voltage reaches the base-emitter band gap<br />
voltage of about 0.6 volts, Q103 will turn on, reducing the gate<br />
voltage of Q107 and regulating the current through Q107 at<br />
about 6 amps. This usually occurs only in a motor braking situation<br />
where the braking current would circulate through the top<br />
half of the bridge, unaffected by the pulse-by-pulse current limiting.<br />
The P-channel transistors are not pulsed when the lower<br />
half transistors are switched by the PWM signal, but remain<br />
turned on when the associated N-channel transistor is being<br />
modulated.<br />
Q107 (up supply) is turned on when Q108 (up gnd) is being<br />
pulsed to drive the piston up. Q109 (down supply) and Q106 are<br />
used in the same way to drive the piston down. The direction of<br />
drive is not necessarily the direction of piston travel. For<br />
example, if the piston is traveling up (delivering fluid) and the<br />
STOP key is pressed, the motor will be braked by reversing the<br />
direction of drive. This bi-directional control, which allows for<br />
quick reversal of piston travel, is necessary for pressure control.<br />
In addition to the direction control logic located on the pump<br />
power circuit board, some logic is implemented via the software.<br />
If the motor is reversed while turning at high speed, the back<br />
EMF will be high enough to cause a current to circulate through<br />
the top half of the H-bridge, sufficient to activate the 6 amp<br />
current limit. If this occurs and is allowed to continue, the<br />
voltage across the P-channel transistor will increase to a level<br />
4-8
D <strong>Series</strong> <strong>Syringe</strong> <strong>Pumps</strong><br />
Section 4 Theory of Operation<br />
high enough for the power dissipated by the transistor to destroy<br />
the device. To protect the high side drivers in this braking condition,<br />
control software pulses the direction signal. This allows<br />
the current to alternately build up to a safe level and decay<br />
between pulses, limiting the power dissipation of the device.<br />
Below approximately 800 RPM of the motor, the direction signal<br />
functions without this pulsing effect and correctly indicates the<br />
desired direction of motor drive.<br />
Pump Type<br />
1000D<br />
500D<br />
260D<br />
100DM<br />
100DX<br />
65D/DM<br />
Flow Rate at 800 rpm<br />
40.582 ml/min<br />
20.295 ml/min<br />
10.642 ml/min<br />
3.0888 ml/min<br />
6.1776 ml/min<br />
2.7176 ml/min<br />
Referring to the components connected to the gate of Q106, two<br />
additional circuit functions are present. Negative feedback compensation<br />
is provided by R137 in series with C130. They limit the<br />
switching speed of Q106 and prevent oscillation. A current-limiting<br />
circuit, consisting of Q111, R112, and R139, limits the<br />
current through Q106 to about 6 amps by reducing the gate drive<br />
voltage in the same manner described previously for Q107, R113,<br />
and Q103. In normal operation, when Q106 or Q108 are switched<br />
off, energy stored by the motor inductance and filter inductors<br />
(L1 and L2) may maintain current flow until the next drive<br />
pulse. If current is circulating in this manner through diode<br />
CR105 when Q106 is switched on, there will be a short delay<br />
after current reversal before CR105 turns off.<br />
Q111 limits the current from the supply (+VM) through CR105<br />
and Q106 while CR105 is in the low impedance state.<br />
Inductors L1 and L2 with capacitor C1, form a low pass LC filter<br />
between the power amplifier and the motor. Capacitors C2, C3,<br />
and C4 attenuate motor brush electrical noise. Relay K101 is<br />
switched by the controller and serves to connect the motor to the<br />
power amplifier when energized. When released, it connects<br />
R115 across the motor terminals to dissipate energy and brake<br />
the motor. An electromechanical brake (shown electrically as L3)<br />
is wired in parallel with K101 to allow the pump to hold pressure<br />
without motor rotation when the power amplifier is disconnected<br />
or the instrument is without power.<br />
To activate the relay and release the brake, the motor enable<br />
signal must be pulled low by the controller. This signal is<br />
series-wired through the controller front panel ON/STANDBY<br />
switch and a transistor switch under control of the microprocessor.<br />
This allows both the operator and the microprocessor to<br />
disable the motor if either detects a problem.<br />
4-9
D <strong>Series</strong> <strong>Syringe</strong> <strong>Pumps</strong><br />
Section 4 Theory of Operation<br />
The motor supply voltage +VM is switchable between two levels<br />
under control of the microprocessor. To allow a greater motor<br />
speed dynamic range, the motor supply voltage is switched to<br />
better match the motor operating speed. Motor voltage select<br />
relay K102 switches the power rectifier between a half bridge<br />
and full-bridge configuration to provide two voltage selections<br />
which differ by a factor of two. The relay is switched to the full<br />
bridge configuration above 3000 RPM. In constant pressure<br />
mode, K102 is left in the full-bridge (high voltage) setting at all<br />
speeds. The motor drive circuit is somewhat electrically isolated<br />
from the rest of the instrument, except for R123, a 47k ohm<br />
resistor between motor common and earth ground. The +12-volt<br />
supply for the power amplifier logic is referenced to the motor<br />
common rather than instrument common. This supply is generated<br />
by a voltage regulator circuit drawing its supply from the<br />
motor supply voltage. Zener diode CR102 with diode CR101 and<br />
R114 provide the reference base drive voltage for Q101 which is<br />
configured in the emitter-follower configuration. Q101 thus acts<br />
as a current amplifier at 12-volts fixed output.<br />
The remaining transformer windings supply power for + and -<br />
15-volt, 5% regulators and an adjustable 5-volt supply. Since the<br />
5-volt supply is used as a reference by the microprocessor A/D<br />
converter, it is adjusted to a tighter tolerance than the 15-volt<br />
supplies.<br />
4.4 Pressure Transducer<br />
and Amplifier<br />
To sense cylinder pressure there is a strain gauge built into the<br />
cylinder cap. The strain gauge is a 120 ohm bridge with a sensitivity<br />
that relates to the pressure. The table below lists the<br />
approximate sensitivity of each pump model. The strain gauge is<br />
connected to a -5.00 volt reference supply (CR51 and U51B), a<br />
preamplifier (U52), and a final amplifier (U51A), all located on a<br />
circuit board enclosed at the top of the cylinder.<br />
Pump Model<br />
1000D<br />
500D<br />
65DM, 100DM/DX, 260D<br />
65D<br />
Approximate Sensitivity<br />
100mV/137.89 bar<br />
100mV/344.8 bar<br />
100mV/689.5 bar<br />
100mV/1379 bar<br />
The pressure amplifier gain is adjusted by R53 to provide a<br />
signal of 2-volts per 68.95 bar for the 500D, or 1-volt per 68.95<br />
bar for the 65DM, 100DM/DX, and 260D, and 0.5 volt per 68.95<br />
bar for the 65D. This pressure signal is used for the pressure<br />
display, pressure limiting, and as feedback for constant pressure<br />
regulation. Analog pressure output jacks are located on the rear<br />
panel of the pump module. The two outputs are scaled for ranges<br />
of 1.0-volts per 68.95 bar and 0.10-volts per 68.95 bar. These<br />
outputs are not adjusted by the automatic pressure zero software<br />
which affects the pressure display and control at the controller.<br />
For this reason, these outputs will disagree with the controller<br />
display by the amount of the offset.<br />
4-10
D <strong>Series</strong> <strong>Syringe</strong> <strong>Pumps</strong><br />
Section 4 Theory of Operation<br />
4.5 Automatic Pump Type<br />
Indication<br />
4.6 Optical Indicators<br />
Piston Travel Limit<br />
Sensors<br />
Quadrature Motor Angular<br />
Position Sensors<br />
U108 automatically indicates to the microprocessor which pump<br />
type is connected to a given port. In addition, when the pressure<br />
transducer is connected, the signal labeled PC-1 (pump code 1) is<br />
grounded at the pressure amplifier circuit board. This indicates<br />
its presence to the controller. The pump will not operate without<br />
the pressure transducer connected.<br />
An optically coupled interruptible sensor is mounted at each<br />
limit of piston travel. A mechanical flag blocks the light path of a<br />
sensor when the piston is at the cylinder full or cylinder empty<br />
position. The optotransistors are connected to pull the limit<br />
signals high when the light path is open (transistor on). When<br />
the light is blocked, resistors R125 or R126 pull the signal low.<br />
Additional pull down resistors are located in parallel on the<br />
control circuit board. With this connection, the most common<br />
failures of the optodevice (such as a failed LED or a nonconducting<br />
transistor) will stop the pump with an indication of cylinder<br />
full or empty. The LEDs are wired in series so that an open<br />
circuit of either will stop the pump.<br />
The limit sensors also disable the motor drive through opto-couplers<br />
U105 and U106 when a limit is reached. The circuit<br />
remains enabled, to drive the piston away from the limit.<br />
Motor position feedback to the microprocessor is generated by<br />
two optically interrupted sensors which span a rotating etched<br />
metal disk. This sensor is an enclosed sensor: HEDS-5500 II A06<br />
(500 line) for the 1000D and 65D; HEDS-5500 II E06 (200 line)<br />
for all other pump types. Two rows of slots in the disk are<br />
arranged in quadrature (or 90 electrical degrees out of phase)<br />
with respect to each other. When the motor is rotating in the<br />
direction which moves the piston up, the TACHA signal leads the<br />
TACHB signal. The order reverses in the opposite direction of<br />
rotation. The light sensors are integrated circuits which use a<br />
photodiode, followed by amplification circuitry which drives the<br />
output high when light from the LED passes through the disk<br />
slots, and low when the light is interrupted.<br />
The +5-volt power supply for all optical sensors originates at the<br />
pump, but is first passed to the controller and back to the pump<br />
to insure that the sensors do not apply input signals to the controller<br />
logic without the logic +5-volt supply present. This is necessary<br />
because when multiple pump modules are connected to<br />
the same controller; the B and C pumps (which do not power the<br />
controller) may be connected to mains power without the A pump<br />
powered. Therefore, all optical sensors in a multiple pump<br />
system are powered from the pump A power supply.<br />
4-11
D <strong>Series</strong> <strong>Syringe</strong> <strong>Pumps</strong><br />
Section 4 Theory of Operation<br />
4-12
D <strong>Series</strong> <strong>Syringe</strong> <strong>Pumps</strong><br />
Section 5 Pump Maintenance & Repair<br />
DANGER<br />
RISK OF ELECTRIC SHOCK - DISCONNECT THE<br />
ELECTRIC POWER BEFORE SERVICING. ONLY<br />
TRAINED SERVICE PERSONNEL MAY REMOVE<br />
THE CASE TOP.<br />
DANGER<br />
RISQUE DE CHOC ÉLECTRIQUE. COUPER<br />
L´ALIMENTATION AVANT LA RÉPARATION.<br />
L´USAGER NE DOIT PAS DÉMONTER<br />
L´INSTRUMENT OU DÉRANGER LE MÉCANISME<br />
DEDANS. ADRESSER LA REPARATION<br />
SEULEMENT AUX TECHNICIENS COMPÉTENTS.<br />
WARNING<br />
Earth ground bonding conductor. Do not remove or<br />
disconnect.<br />
Mise à la terre. Ne pas enlever ni déconnecter.<br />
WARNING<br />
Line voltage is present inside this unit at all times,<br />
regardless of switch settings. If internal adjustments or<br />
repairs are necessary, the line cords must be disconnected<br />
to remove possible shock hazard before opening the case.<br />
5.1 Introduction The following sections contain maintenance and repair procedures<br />
which you can do yourself or have done by a technician at<br />
your site.<br />
To view the schematic drawings referred to in this section, first<br />
find the serial number for your unit. Then go to our Web site at<br />
www.isco.com. In the left column, click Service & Support. In<br />
the center of the page, click Fast, thorough factory repair<br />
service. Find the blue heading Circuit Schematics and click<br />
the indicated link. After you enter your serial number in the field<br />
5-1
D <strong>Series</strong> <strong>Syringe</strong> <strong>Pumps</strong><br />
Section 5 Pump Maintenance & Repair<br />
provided, you will be able to view the schematics online. If you<br />
need assistance, or don’t see the correct schematic for your specific<br />
unit, contact our service department.<br />
5.1.1 Service Department If you have a question about a procedure, need parts information,<br />
or need some help, call the Teledyne <strong>Isco</strong> Service department. If<br />
you write, be sure to include all the details about your<br />
instrument and the nature of the error. Address your letter to:<br />
Teledyne <strong>Isco</strong><br />
Service Department<br />
P.O. Box 82531<br />
Lincoln, NE 68501 USA<br />
<strong>Isco</strong>Service@teledyne.com<br />
We suggest you call the Service Department first, before deciding<br />
to return the unit for factory repair. Often a problem can be<br />
solved in the field with just a little extra help. Our telephone<br />
number is:<br />
Toll free: (800) 775-2965<br />
Outside USA, Canada, and Mexico: (402) 464-0231<br />
5.1.2 How to Ship Returns In the rare event that an instrument must be returned for maintenance,<br />
be sure all parts and hardware are back in place before<br />
packing. The pump should not be shipped unless the piston and<br />
cylinder have been rinsed with methanol or isopropanol (to<br />
prevent freezing). Wrap the unit in heavy paper or put it in a<br />
plastic bag. If the original box is not available, put the wrapped<br />
unit in a strong cardboard box at least six inches longer in each<br />
basic dimension than the unit. Fill the box equally around the<br />
unit with resilient packing material (shredded paper, bubble<br />
pack, expanded foam chunks, etc.). Seal it with strapping tape or<br />
gummed cloth tape and ship it to the address listed on the warranty.<br />
The warranty at the end of the manual also describes the<br />
conditions under which Teledyne <strong>Isco</strong> will pay surface shipping<br />
costs.<br />
NOTICE<br />
If the pump has been used for pumping a<br />
hazardous or potentially lethal material:<br />
· Do not return the pump without contacting the<br />
Teledyne <strong>Isco</strong> Service Department.<br />
· Do not return the pump without first providing<br />
written guarantee that it has been decontaminated<br />
of hazardous or potentially lethal materials.<br />
· Teledyne <strong>Isco</strong> reserves the right to refuse<br />
shipment if no decontamination assurance has<br />
been provided prior to shipment. Failure to<br />
decontaminate a pump may result in legal action.<br />
5-2
D <strong>Series</strong> <strong>Syringe</strong> <strong>Pumps</strong><br />
Section 5 Pump Maintenance & Repair<br />
Note<br />
It is very important that the shipment be well-packed and fully<br />
insured. Damage claims must be settled between you and the<br />
carrier. This can delay repair and return of the unit to you.<br />
5.1.3 Removing the Case Top For some maintenance procedures the case top of the pump component<br />
may need to be removed. Use the following procedures:<br />
DANGER<br />
RISK OF ELECTRIC SHOCK - DISCONNECT THE<br />
ELECTRIC POWER BEFORE SERVICING. ONLY<br />
TRAINED SERVICE PERSONNEL MAY REMOVE<br />
THE CASE TOP.<br />
DANGER<br />
RISQUE DE CHOC ÉLECTRIQUE. COUPER<br />
L´ALIMENTATION AVANT LA RÉPARATION.<br />
L´USAGER NE DOIT PAS DÉMONTER<br />
L´INSTRUMENT OU DÉRANGER LE MÉCANISME<br />
DEDANS. ADRESSER LA REPARATION<br />
SEULEMENT AUX TECHNICIENS COMPÉTENTS.<br />
1. Locate and remove the four case top screws on the sides of<br />
the instrument, two on each side of the cabinet.<br />
2. Pull the cover straight up and off.<br />
5.2 Lubrication<br />
Note<br />
The pump is a precision engineered instrument which must be<br />
lubricated after two years or every 6,000 strokes (whichever<br />
comes first) to assure proper service life.<br />
The pump has an easy-to-access lube wheel that keeps the main<br />
gears lubricated during operation. See Figure 5-1, configuration<br />
1 or 2, depending on your pump motor type. For your convenience,<br />
a lubrication kit (containing Never-seez and ALMASOL<br />
609 lubricants) is included in your pump accessory package.<br />
5-3
D <strong>Series</strong> <strong>Syringe</strong> <strong>Pumps</strong><br />
Section 5 Pump Maintenance & Repair<br />
Ball<br />
Screw<br />
(worm gear<br />
unseen)<br />
Worm<br />
Gear<br />
Configuration 1 Lube<br />
Configuration 2<br />
Wheel<br />
Figure 5-1 Gear train lubrication and motor drive service<br />
Worm/Worm Gear<br />
The worm and worm gear are lubricated by a lubrication wheel.<br />
Apply ALMASOL 609 directly to the wheel until it is saturated.<br />
The wheel may also be directly lubricated by trickling oil into the<br />
wheel while the pump is running.<br />
Note<br />
Use only ALMASOL 609 lubrication on the worm and worm<br />
gear. Do not substitute.<br />
5.2.1 Ball Nut The ball screw, which drives the ball nut, must be kept lubricated<br />
with Never-seez.<br />
To lube the worm gear and<br />
ball nut<br />
(Figure 5-1)<br />
Precision Thrust Bearing<br />
1. Remove the case top, as detailed in section 5.1.3, and front<br />
cover to gain access to all parts requiring lubrication.<br />
2. To lubricate the ball nut, run the pump until the ball nut<br />
reaches its maximum height.<br />
3. Apply two beads of lubricant, on opposite sides of the ball<br />
screw, down its entire length.<br />
The precision thrust bearing on which the ball screw rides is<br />
factory lubricated and should not need re-greasing.<br />
5-4
D <strong>Series</strong> <strong>Syringe</strong> <strong>Pumps</strong><br />
Section 5 Pump Maintenance & Repair<br />
5.3 Seal Cleaning and<br />
Replacement<br />
Before cleaning or replacing the piston or wiper seals, the cylinder<br />
must first be emptied. To access the cylinder:<br />
1. Run the pump at maximum flow rate until it’s empty.<br />
2. Disconnect the power cord.<br />
3. Disconnect the pump pressure transducer cable from the<br />
controller and remove the tubing from the inlet and outlet<br />
ports.<br />
4. Remove the front cover of the pump.<br />
5. Loosen the four cover screws.<br />
6. Then loosen the cylinder lock screw which is a 1 4-20 setscrew<br />
located in the front side of the cylinder mounting<br />
block.<br />
7. You may now unscrew the cylinder. If you need to use a<br />
wrench, we recommend using a strap wrench or the<br />
wrenches in the Teledyne <strong>Isco</strong> wrench package<br />
(60-1247-067 for 65DM, 100DM, 100DX, and 260D;<br />
68-1247-068 for 500D;<br />
60-1247-093 for 1000D), which will not mar the cylinder’s<br />
outer surface.<br />
8. Once the cylinder has been unscrewed, lift it up and off the<br />
piston and the push tube.<br />
5.3.1 The Piston Seal Sometimes dirt or other solids on the seal can cause leakage.<br />
Removing and cleaning the seal may stop the leak and a new seal<br />
may not have to be used. However, if you remove and inspect the<br />
seal and it does not have any obvious crease or you did not find<br />
any foreign material on the seal, then the seal must be replaced.<br />
Check the wear ring. See Section 5.4.<br />
Note<br />
DO NOT use abrasives while cleaning the piston and piston<br />
seal area. Scratches caused by the use of such abrasives will<br />
cause leaking. If either the cylinder or seal has been<br />
scratched, it must be replaced to maintain flow rate specifications.<br />
Note<br />
If your pump uses polyethylene piston seals, be sure to follow<br />
the special instruction below for this type of seal.<br />
Accessing the Piston Seal<br />
1. Unscrew the piston seal retainer (Figure 5-2) from the piston<br />
and remove the seal from it. Notice that the spring<br />
imbedded in the seal is facing up or is on the top side of the<br />
seal.<br />
2. Clean both the piston seal retainer and the cylinder thoroughly.<br />
Make sure all parts that come into contact with the<br />
seal are free of dirt and other solids.<br />
5-5
D <strong>Series</strong> <strong>Syringe</strong> <strong>Pumps</strong><br />
Section 5 Pump Maintenance & Repair<br />
3. Once the seal and cylinder surfaces have been cleaned,<br />
rinse both parts with isopropyl alcohol.<br />
5.3.2 Piston Seal Break-In<br />
(Aqueous seals only)<br />
The break-in procedure is intended only for the UHMWP<br />
(aqueous) piston seal, to prevent the spring from bowing out its<br />
shape.<br />
1. Assemble the piston assembly per Figure 5-2A. Be sure to<br />
install the top seal on the piston with the spring facing<br />
down.<br />
2. Slide the cylinder over the piston assembly, per<br />
Figure 5-2B, and allow it to sit for 15 minutes. This “breaks<br />
in” the seal for the steps that follow.<br />
3. Remove the cylinder.<br />
4. Reassemble the top seal with the spring facing up, per<br />
Figure 5-2C.<br />
5. Install the cylinder over the piston assembly, again, and<br />
screw onto the mounting block.<br />
6. Leak test the pump.<br />
Model 1000D - Refer to Replacement Parts Listing 60-1242-347<br />
Figure 5-2 Break-in procedure for aqueous seals<br />
5-6
D <strong>Series</strong> <strong>Syringe</strong> <strong>Pumps</strong><br />
Section 5 Pump Maintenance & Repair<br />
5.3.3 All other piston seals 1. Access the piston seal as previously described.<br />
2. Orient a new seal so that the spring in the seal is facing up.<br />
3. Slide the seal onto the piston.<br />
4. Replace the piston seal retainer.<br />
5.3.4 The Wiper Seal Although the wiper seal does not normally have to be changed,<br />
periodic cleaning is advisable.<br />
1. Access the cylinder as described previously.<br />
2. Locate the piston (Figure 5-2).<br />
3. Insert a round, 1 8" diameter steel bar or tool of some sort<br />
into the round hole on the side of the piston.<br />
4. Use the tool to twist the piston loose, then unscrew it by<br />
hand.<br />
5. Remove the retaining ring and wiper retainer, then lift off<br />
the wiper seal. Being careful not to scratch any sealing surfaces,<br />
gently break free any solids from the seal and piston.<br />
Rinse all the solids away with distilled water.<br />
5.3.5 To reinstall the wiper 1. Install the piston seal onto the retainer with the spring oriented<br />
towards the retainer.<br />
2. Install the wiper seal onto the piston base with the spring<br />
oriented towards the push tube.<br />
3. Place the piston base onto the push tube.<br />
4. Install the piston seal retainer onto the piston base.<br />
5. Replace the cylinder over the piston and push tube assembly<br />
and screw it into the cylinder mounting block. The cylinder<br />
should be screwed into the cylinder mounting block<br />
until the cylinder snugly bottoms against the piston (the<br />
cylinder will no longer turn).<br />
6. Unscrew the cylinder until the inlet and outlet ports are<br />
lined up as you had them before.<br />
7. Lock the cylinder by tightening the locking screw. Reinstall<br />
covers.<br />
5.4 Wear Ring Cleaning<br />
and Replacement<br />
To replace the wear ring<br />
Although the wear ring does not routinely need to be replaced,<br />
occasionally it becomes worn or damaged, depending on how the<br />
pump has been used. Teledyne <strong>Isco</strong> recommends that when<br />
replacing the seal or cleaning the piston, check the wear ring for<br />
any signs of deterioration.<br />
1. Follow the instructions in section 5.3, Seal Cleaning and<br />
Replacement, to access the cylinder.<br />
2. Remove the piston seal retainer and slide off the seal. The<br />
wear ring should then slide easily up and off the piston.<br />
The wear ring prevents the piston from direct metal-to-metal<br />
contact with the cylinder wall, and should, therefore, extend at<br />
least 0.010" beyond the circumference of the piston lip. Check the<br />
bottom of the wear ring, which rests on the piston lip, for<br />
extrusion or any unevenness. If there is an indentation (of<br />
5-7
D <strong>Series</strong> <strong>Syringe</strong> <strong>Pumps</strong><br />
Section 5 Pump Maintenance & Repair<br />
0.0010" or more) marking the outline of the piston lip, then you<br />
should replace the wear ring. However, if the surface is smooth,<br />
the wear ring does not need replacing.<br />
5.5 Flushing the Cylinder After cylinder/seal maintenance or during modifier (liquid<br />
solvent) change, the pump cylinder should be flushed to remove<br />
possible residue.<br />
The way in which the cylinder is flushed will depend on your<br />
pumping system and whether you are pumping a liquefied gas<br />
such as CO 2 (see Section 5.5.1) or a liquid modifier such as<br />
methanol (see Section 5.5.2).<br />
5.5.1 Gas Solvent<br />
Changeover<br />
To switch gas solvents<br />
5.5.2 Liquid Solvent<br />
Changeover and<br />
Flushing<br />
This procedure is used when changing from one gaseous solvent<br />
to another.<br />
1. Close the valve on the fluid supply tank so that no solvent<br />
is supplied to the system.<br />
2. Turn the controller ON.<br />
3. Open the pump outlet valve. If there was any pressure in<br />
the system, wait until all the pressure bleeds off.<br />
4. Change the solvent tank.<br />
5. Close the pump outlet valve.<br />
6. Open the valve on the tank to repressurize the system.<br />
7. Refill the pump, if necessary.<br />
This procedure is typically used for modifier systems when<br />
changing from one liquid solvent to another.<br />
Note<br />
If high ionic strength aqueous reagent solutions are allowed to<br />
remain in the pump, solid residues may be formed, which will<br />
scratch the seals and the polished inner surface of the cylinder<br />
of the pump. These scratches allow leakage, which decreases<br />
flow rate.<br />
To clean the cylinder<br />
1. Press the CONST FLOW key on the front panel of the controller.<br />
2. Press the RUN key. You will be asked to designate which<br />
pump if more than one is present.<br />
3. Press a softkey to run the desired pump.<br />
4. Run the pump until the message “CYLINDER EMPTY” is<br />
displayed.<br />
5. Place the pump inlet line in a flask containing a compatible<br />
solvent or a detergent solution.<br />
6. Press the blue REFILL key.<br />
5-8
D <strong>Series</strong> <strong>Syringe</strong> <strong>Pumps</strong><br />
Section 5 Pump Maintenance & Repair<br />
7. You will be asked to designate the pump to refill if more<br />
than one is present. Press a softkey to refill the pump.<br />
8. Fill the pump and repeat this procedure several times.<br />
9. Then place the pump inlet line in a flask containing distilled<br />
water or appropriate solvent. Fill the pump once<br />
more and then run it until empty. You are now ready to fill<br />
the pump with your new liquid solvent.<br />
Note<br />
Do not leave buffer solutions which contain dissolved salts or<br />
are corrosive in the cylinder, overnight or for long periods of<br />
time. The pump should be stored with methanol or isopropanol<br />
(at least partially fill the cylinder with either solvent and then<br />
run the piston all of the way up) when it is not being used.<br />
5.6 General Cleaning For general cleaning of the instrument’s front panel or enclosure,<br />
use a mild detergent in water or isopropyl alcohol on a sponge<br />
which is mostly squeezed out.<br />
5.7 Torque Limiter There are two torque limiting devices on the pump. An indirect<br />
torque limiter is controlled by the operator of the pump. The<br />
operator can set the maximum pressure limit on the pump controller.<br />
(When the pressure exceeds the maximum pressure<br />
setting, the pump is stopped electronically).<br />
The second torque limiting device is a shear key in the worm<br />
gear assembly of the pump. Should the maximum pressure<br />
circuit fail and excessive pressures (pressures that exceed<br />
maximum pressure limits) persist in the operation of this pump,<br />
the torque limiting shear key may become damaged. The shear<br />
key will yield at pressures slightly above maximum pressure,<br />
and it will break around 1.5 times the pressure rating.<br />
In the event of a shear key failure, the pump will sound as<br />
though it is turning, but the piston will not be advancing up the<br />
cylinder. Damage to the pressure transducer and push tube could<br />
be possible if the key failed due to extreme overpressure.<br />
5-9
D <strong>Series</strong> <strong>Syringe</strong> <strong>Pumps</strong><br />
Section 5 Pump Maintenance & Repair<br />
5.8 Shear Key<br />
Replacement<br />
Table 5-1 below provides part numbers for each pump model<br />
replacement shear key.<br />
Table 5-1 Replacement Shear Keys<br />
Pump Model<br />
Part Number<br />
1000D, 500HP, 260D, 65D 60-1243-607<br />
500D 60-1243-654<br />
100DM/DX 60-1243-608<br />
65DM 60-1243-949<br />
1. Place the pump on its side and remove the four panhead<br />
screws, that attach the access plate to the case bottom, as<br />
shown in Figure 5-3.<br />
2. Remove the cotter pin that passes through the castle nut<br />
and ball screw.<br />
3. Use a 3 4" wrench to remove the castle nut, shown below.<br />
4. Remove the spacer.<br />
5. The two broken halves of the shear key should be protruding<br />
from the brass worm gear and the ball screw.<br />
Note<br />
The 65DM pump has a bearing set not included in the other<br />
pumps. In addition to following the other steps in this section,<br />
when performing shear key replacement on a 65DM pump,<br />
ensure that the bearing set is properly reinstalled, as<br />
described in Section 5.8.3.<br />
Access Plate<br />
Spacer<br />
Ball Screw<br />
Cotter Pin<br />
Castle Nut<br />
Figure 5-3 Accessing the shear key<br />
5-10
D <strong>Series</strong> <strong>Syringe</strong> <strong>Pumps</strong><br />
Section 5 Pump Maintenance & Repair<br />
gap<br />
gap<br />
Shear Key<br />
shear key for<br />
65DM<br />
shear key for all<br />
other models<br />
Locking Pin<br />
Figure 5-4 Shear key replacement<br />
5.8.1 Replacement Using<br />
Installation Tool<br />
5.8.2 Replacement Without<br />
Installation Tool<br />
A shear key installation tool (part #60-1248-135) is available<br />
from Teledyne <strong>Isco</strong>.<br />
1. Insert tool into ball screw so that the slot on ball screw and<br />
tool are lined up, then lock with locking pin.<br />
2. Rotate the ball screw until the broken halves of shear key<br />
are realigned (Figure 5-4, above).<br />
3. Remove the broken shear key halves by gripping them<br />
with pliers or vise grips and pulling them out.<br />
4. Insert the new shear key into the slot with the gap facing<br />
away from the shaft, as shown above. Push the shear key<br />
about 1/2-way into the worm gear. Do not push it all the<br />
way in.<br />
5. Remove the tool and proceed to the final steps in<br />
Section 5.8.4.<br />
1. Follow steps 1 through 5 in section 5.8.<br />
2. Insert the cotter pin into the ball screw, and screw the castle<br />
nut onto ball screw, with the slot on castle nut outward,<br />
as shown in Figure 5-4.<br />
3. Use a 3 4" wrench on the castle nut and rotate the ball<br />
screw clockwise until the broken halves of the shear key<br />
are realigned (Figure 5-4, above).<br />
CAUTION<br />
Never use tools on the ball screw. Doing so will render it inoperable<br />
and beyond repair.<br />
4. Remove the castle nut and cotter pin.<br />
5-11
D <strong>Series</strong> <strong>Syringe</strong> <strong>Pumps</strong><br />
Section 5 Pump Maintenance & Repair<br />
5. Remove the broken shear key halves by gripping them<br />
with pliers or vise grips and pulling them out.<br />
6. Insert the new shear key into the slot with the gap facing<br />
away from the shaft, as shown in Figure 5-4. Push the<br />
shear key about 1/2-way into the worm gear. Do not push it<br />
all the way in.<br />
7. For 65DM pumps, proceed to the next section. For all other<br />
pump models, proceed to the final steps in Section 5.8.4.<br />
5.8.3 Pump Bearings<br />
(65DM Only)<br />
Follow the step by step instructions in Section 5.8.1 Replacement<br />
Using Installation Tool, or in Section 5.8.2 Replacement Without<br />
Installation Tool. Then proceed with the instructions below.<br />
The 65DM pump has an outer bearing set not included in the<br />
other pumps. The set includes two thrust washers and one thrust<br />
bearing (see Figure 5-5 below).<br />
1 2 3<br />
Figure 5-5 65DM Bearing set<br />
Note that the 65DM spacer is shaped differently from that of<br />
other pump models, and must be properly oriented during reinstallation,<br />
Figure 5-6.<br />
When performing shear key replacement on the 65DM pump, use<br />
care to keep the bearings in position, with the bearing between<br />
the two washers, while installing the spacer.<br />
5-12
D <strong>Series</strong> <strong>Syringe</strong> <strong>Pumps</strong><br />
Section 5 Pump Maintenance & Repair<br />
Ball screw<br />
Inner bearing<br />
set (not accessed)<br />
Worm<br />
gear<br />
Shear<br />
key<br />
Outer bearing<br />
set<br />
Spacer<br />
Figure 5-6 65DM Shear key replacement<br />
Proceed to the final steps in Section 5.8.4.<br />
5.8.4 Completion of Shear<br />
Key Replacement<br />
1. Slide the spacer onto the ball screw. The spacer will push<br />
the shear key into proper position. Install the castle nut on<br />
the ball screw. If the shear key isn’t completely in the slot,<br />
the spacer will position it properly as the castle nut is<br />
tightened.<br />
2. Tighten the castle nut.<br />
a. For the 65DM, torque to 200 in-lbs (23 N-m). Do not<br />
exceed this limit, or damage to the bearings will occur.<br />
b. For all other models, torque to 250 in-lbs (28 N-m).<br />
3. Loosen the nut until it can be turned by hand. Tighten the<br />
nut finger tight.<br />
4. Insert the cotter pin through the castle nut and ball screw.<br />
If the holes do not line up, tighten the castle nut until any<br />
set of holes allow the cotter pin to be inserted.<br />
CAUTION<br />
Do not tighten the nut more than 30° beyond finger-tight to<br />
align the holes.<br />
5. Reinstall the access cover.<br />
5-13
D <strong>Series</strong> <strong>Syringe</strong> <strong>Pumps</strong><br />
Section 5 Pump Maintenance & Repair<br />
5.9 Motor Brush<br />
Replacement<br />
The motor brushes will require inspection approximately every<br />
two years of operation or 6,000 strokes (whichever comes first).<br />
The normal length of a new brush is 1.1 cm. The brushes should<br />
be replaced before they reach 0.4 cm. Only one brush needs to be<br />
checked. The other brush will wear at about the same rate. We<br />
recommend checking the top brush, as it is much easier to<br />
remove and replace.<br />
The upper brush may be removed with the unit in the upright<br />
position. The lower brush, which is difficult to remove, is<br />
accessed through a hole on the case bottom. While not a preferred<br />
method, the lower brush can also be removed by first<br />
removing the gear train from the case bottom.<br />
DANGER<br />
RISK OF ELECTRIC SHOCK -<br />
DISCONNECT THE ELECTRIC POWER BEFORE<br />
SERVICING. ONLY TRAINED SERVICE<br />
PERSONNEL MAY REMOVE THE CASE TOP.<br />
DANGER<br />
RISQUE DE CHOC ÉLECTRIQUE.<br />
COUPER L´ALIMENTATION AVANT LA<br />
RÉPARATION. L´USAGER NE DOIT PAS<br />
DÉMONTER L´INSTRUMENT OU DÉRANGER LE<br />
MÉCANISME DEDANS. ADRESSER LA<br />
REPARATION SEULEMENT AUX TECHNICIENS<br />
COMPÉTENTS.<br />
To remove the top brush 1. Remove the pump case top as detailed in Section 5.1.3.<br />
2. Locate the upper brush, Figure 5-7 (Configuration 1 or 2,<br />
depending on your pump motor type).<br />
3. Remove the wire lead by pulling on the quick disconnect.<br />
4. Unscrew the brush retainer from the motor using a<br />
straight edge screwdriver.<br />
5. Once the wire has been removed, pull the brush out.<br />
To replace the top brush<br />
To remove the bottom brush<br />
1. Guide the new brush into the slot.<br />
2. Push the spring down and the replace the brush retainer.<br />
3. Tighten the brush retainer with a straight-edge screwdriver.<br />
1. If you have not already done so, remove the pump case top.<br />
2. Lay the pump on its back so that you can access the hole in<br />
the case bottom. Remove two screws which secure a cover<br />
plate over the access hole.<br />
3. Remove the wire lead by pulling on the quick disconnect.<br />
5-14
D <strong>Series</strong> <strong>Syringe</strong> <strong>Pumps</strong><br />
Section 5 Pump Maintenance & Repair<br />
4. Insert a straight-edge screwdriver through the hole and<br />
unscrew the brush retainer. It’s quite easy to drop the<br />
retainer into the case if you aren’t careful. Using a larger<br />
screwdriver or putting a dab of adhesive on the end of the<br />
screwdriver will prevent this from occurring.<br />
5. Once the retainer has been removed, the brush can be<br />
pulled out. You can use needle-nose pliers or your first two<br />
fingers to tug on the brush.<br />
To replace the bottom brush<br />
1. Connect the new brush to the wire lead.<br />
2. Look through the hole on the case bottom and use your fingers<br />
to push the wire lead so that the brush moves near the<br />
slot.<br />
3. When you have the brush aligned with the slot, use a<br />
straight-edge screwdriver to push the brush into the slot.<br />
4. Once the brush has been pushed into the slot, hold it in<br />
place with the screwdriver. Then, holding the brush<br />
retainer between your first two fingers, reach your hand<br />
inside the pump case (between the circuit board and the<br />
motor) and align the retainer over the slot.<br />
5. Move the screwdriver as you put the retainer in place.<br />
6. Then, tighten the brush retainer with a straight-edge<br />
screwdriver.<br />
Quick Disconnect /<br />
Motor Brush Retainer (one of two)<br />
Figure 5-7 D <strong>Series</strong> motor brush replacement<br />
5-15
D <strong>Series</strong> <strong>Syringe</strong> <strong>Pumps</strong><br />
Section 5 Pump Maintenance & Repair<br />
Note<br />
Parts for Configuration 1 and Configuration 2 are not interchangeable.<br />
5.10 Troubleshooting The following sections contain tables listing the most commonly<br />
used test points and their voltages. Refer to the controller schematic<br />
and the pump schematic (available online on our Web site).<br />
DANGER<br />
RISK OF ELECTRIC SHOCK -<br />
DISCONNECT THE ELECTRIC POWER BEFORE<br />
SERVICING. ONLY TRAINED SERVICE<br />
PERSONNEL MAY REMOVE THE CASE TOP.<br />
DANGER<br />
RISQUE DE CHOC ÉLECTRIQUE.<br />
COUPER L´ALIMENTATION AVANT LA<br />
RÉPARATION. L´USAGER NE DOIT PAS<br />
DÉMONTER L´INSTRUMENT OU DÉRANGER LE<br />
MÉCANISME DEDANS. ADRESSER LA<br />
REPARATION SEULEMENT AUX TECHNICIENS<br />
COMPÉTENTS.<br />
5.10.1 Power Supply (A1) Output voltages of the power supply can be verified. The voltages<br />
in the pump unit, between circuit common (TP106) and the fuses<br />
or at the test points should be:<br />
F104 22 VDC to 31 VDC<br />
F103 8.1 VDC to 13 VDC<br />
F102 22 VDC to 31 VDC<br />
TP111 15 VDC 0.6 VDC<br />
TP110 15 VDC 0.6 VDC<br />
TP109 5 VDC 0.3 VDC<br />
The voltage between motor common (TP101) and +VM (TP105)<br />
should be + 30 V to + 45 V (low speed) or +60 to +90 V (high<br />
speed). See section 4.<br />
5.10.2 Controller The voltages in the controller unit between circuit common<br />
(TP134) and the test points should be:<br />
TP106 5 VDC 0.002 VDC<br />
TP112 8.1 VDC to +13 VDC<br />
TP131 15 VDC 0.6 VDC<br />
TP135 15 VDC 0.6 VDC<br />
TP136 10 VDC to +12 VDC<br />
TP137 10 VDC to -12 VDC<br />
5-16
D <strong>Series</strong> <strong>Syringe</strong> <strong>Pumps</strong><br />
Section 5 Pump Maintenance & Repair<br />
5.11 Calibration It should not be necessary to readjust the instrument unless<br />
repairs have been made on the electronic circuitry or the controller<br />
cable length has been changed.<br />
Only pump A must be adjusted.<br />
5.11.1 +5 Volts Adjustment<br />
(on A1 board)<br />
The 5-volt adjustment is done in the pump unit, with the voltage<br />
measured at the controller.<br />
1. Connect a voltmeter to TP106 and to common TP134 (both<br />
of which are located on the controller board).<br />
2. Adjust R133 on the pump CBA until the voltage at TP106<br />
reads 5.0 volts, ±0.002 V.<br />
5.11.2 Pressure Transducer<br />
Calibration for 65DM,<br />
100D, 260D, 500D, and<br />
1000D<br />
5.11.3 Pressure Transducer<br />
Calibration for 65D<br />
This adjustment is done on the pressure preamp board on top of<br />
the cylinder. The A0 portion of the schematic details this board.<br />
To access this board, remove the amplifier cover at the top of the<br />
pump. Connect a valve with inlet tubing and a 10 micron filter to<br />
one port of the pump. Connect a pressure gauge with a precision<br />
of 0.25% accuracy to the second pump port. Both the valve and<br />
the gauge must be rated above the maximum pressure of the<br />
pump.<br />
Then, do the following:<br />
1. Fill the pump with fluid.<br />
2. With the fittings in both ports tight and the valve open,<br />
adjust R61 (offset) on the pressure preamp board for 0.000,<br />
±0.050 V at TP52, with respect to TP51.<br />
3. Press ZERO PRESS and close the inlet valve.<br />
4. Put the pump in constant pressure mode. Enter a pressure<br />
setpoint of 69 bar, then press the RUN key.<br />
5. When the pressure is stable, adjust R53 (gain) so that the<br />
pressure gauge reads 69, ±3 bar.<br />
6. Enter the maximum pressure.<br />
7. When the pressure is stable, adjust R53 to match the pressure<br />
gauge reading to the pressure setpoint, to within 1.7<br />
bar.<br />
The 65D pump requires a different calibration procedure than<br />
that of the other models. This procedure requires a #2 Phillips<br />
screwdriver, a small, flat screwdriver, and a voltmeter.<br />
1. Connect an external pressure gauge to the system.<br />
2. Perform a system reset and hard reset on the controller<br />
(refer to Section 3.3.4 Resetting the System) to clear any<br />
zero offsets.<br />
CAUTION<br />
Once a system reset has taken place, all programs will be<br />
erased. These cannot be recovered. All user-set limits and<br />
units will be returned to the factory default settings.<br />
5-17
D <strong>Series</strong> <strong>Syringe</strong> <strong>Pumps</strong><br />
Section 5 Pump Maintenance & Repair<br />
3. Remove the four screws holding the pump base cover in<br />
place, and remove the cover to expose the PreAmp CBA<br />
(Figure 5-8, below).<br />
R6<br />
R27<br />
Figure 5-8 65D PreAmp CBA<br />
4. Connect the voltmeter to J14 (left red banana plug on the<br />
pump rear panel, Figure 5-9), and J16 (black center<br />
banana plug).<br />
J16<br />
J14<br />
Figure 5-9 Pressure output jacks, pump rear panel<br />
5. On the PreAmp CBA, adjust R6 to 0 VDC ±.010 at J14<br />
with reference to J16.<br />
6. On the controller, press ZERO PRESS, and zero the pressure<br />
for the appropriate pump.<br />
7. Enter a set pressure (such as 5,000 psi) and run the pump<br />
to that pressure. On the PreAmp CBA, adjust R27 until<br />
the pressure gauge reads the set pressure.<br />
8. Run the pump up to 10,000 psi, checking the pressure<br />
gauge for accuracy. If the reading is not within ±25 psi,<br />
readjust R27 to match the set pressure.<br />
5-18
D <strong>Series</strong> <strong>Syringe</strong> <strong>Pumps</strong><br />
Section 5 Pump Maintenance & Repair<br />
9. Run the pump up to 20,000 psi, checking the pressure<br />
gauge for accuracy. If the reading is not within ±25 psi,<br />
readjust R27 to match the set pressure.<br />
5.11.4 Reset Circuit This adjustment is required if U101, and the ICL 7665, is<br />
replaced. It is done on the circuit board in the controller unit.<br />
1. Connect the common of the voltmeter to TP134.<br />
2. Turn the standby switch to the on position.<br />
3. Adjust R133 of the power supply circuit board in the pump<br />
unit to obtain a voltage of 4.875 ±0.001 volts at TP106 in<br />
the controller unit.<br />
4. Adjust R113 in the controller unit slowly clockwise until<br />
the voltage at TP105 switches high (approximately +5<br />
volts).<br />
5. Adjust R133 of the power supply board in the pump unit to<br />
regain a voltage of 5.000, ±0.002 volts at TP106 in the controller<br />
unit.<br />
5.11.5 A/D Circuit<br />
Adjustment<br />
5.11.6 Limit Sensor<br />
Adjustment<br />
This adjustment is done in the controller unit.<br />
1. Connect the common of the voltmeter to TP138.<br />
2. Turn the standby switch to the on position.<br />
3. Adjust R135 to obtain a voltage of 4.587 volts at TP124.<br />
4. Place a jumper between TP133 and TP139.<br />
5. Adjust R138 to obtain a voltage of 2.081 volts at TP139.<br />
6. Remove the jumper.<br />
7. Place a jumper between TP133 and TP138.<br />
8. Adjust R139 to obtain a voltage of 3.537 volts at TP139.<br />
9. Remove the jumper.<br />
In the event that the limit sensors must be replaced on the pump,<br />
use the following procedure:<br />
1. Disconnect the instrument from mains power.<br />
2. Disconnect the pressure transducer cable from the pump,<br />
and remove the tubing from the inlet and outlet ports.<br />
3. Loosen the four cover screws and remove the front and<br />
rear covers of the pump.<br />
4. The cylinder must be unscrewed several turns to avoid<br />
accidentally bottoming the piston out during calibration of<br />
the limit sensor. Therefore, loosen the cylinder lock screw.<br />
The lock screw is located in the front side of the cylinder<br />
mounting block and is a 1 4-20 setscrew.<br />
5. The limit sensor assembly includes two limit sensors, the<br />
wire harness and connector, and a conduit which protects<br />
the wires running between the sensors, Figure 5-10.<br />
Depending upon when your pump was manufactured, the<br />
protective conduit may be directly fastened to the pump or<br />
retained with mounting tabs and cable ties.<br />
5-19
D <strong>Series</strong> <strong>Syringe</strong> <strong>Pumps</strong><br />
Section 5 Pump Maintenance & Repair<br />
If the conduit is fastened directly to the case, then it must<br />
be removed and the plastic mounting tabs included with<br />
the limit sensor assembly package should be installed<br />
using the existing screws and screw holes.<br />
To install the mounting tabs<br />
a. Remove the screws and the conduit.<br />
b. Then use the same screws and holes to install the<br />
mounts. Be sure the tab portion of the mount is facing<br />
away from the sensors, as shown in Figure 5-11, (the<br />
screw aperture is closest to the sensors).<br />
If your pump already has the plastic tabs installed, cut and<br />
discard the plastic cable ties which run through the tabs<br />
and hold the conduit.<br />
6. Remove the four screws holding the limit sensors, and<br />
unplug the cable from the power circuit board. (The<br />
replacement limit sensor assembly includes both the upper<br />
and lower sensor and the plug.)<br />
7. Install the new limit sensor harness; and secure the protective<br />
conduit by running the cable ties through the mounts<br />
and tightening. Then cut the excess cable tie and discard.<br />
Note<br />
Be sure the circuit board connector is mated pin-for-pin with<br />
the jack.<br />
Figure 5-10 Limit sensor replacement<br />
5-20
D <strong>Series</strong> <strong>Syringe</strong> <strong>Pumps</strong><br />
Section 5 Pump Maintenance & Repair<br />
Figure 5-11 Installing the plastic mounts<br />
8. Be sure that the cylinder is unscrewed several turns. If you<br />
need to use a wrench, we recommend a strap wrench or<br />
wrenches in the Teledyne <strong>Isco</strong> wrench package (P/N<br />
68-1247-067 for 65DM, 100DM, 100DX, 260D, and 65D;<br />
P/N 68-1247-068 for 500D; P/N 60-1247-093 for 1000D)<br />
which will not mar the cylinder’s outer surface.<br />
9. Center the pump bottom limit sensor with respect to the<br />
mounting screws and tighten them.<br />
10. Raise the top limit sensor to the extent of the slots and<br />
tighten the upper screw.<br />
Now the new limit sensors MUST be calibrated, as explained in<br />
the following section.<br />
5-21
D <strong>Series</strong> <strong>Syringe</strong> <strong>Pumps</strong><br />
Section 5 Pump Maintenance & Repair<br />
5.11.7 Limit Sensor<br />
Calibration<br />
Once the new limit sensor assembly is installed, the sensors<br />
must be calibrated. Before calibrating the limit sensors, be sure<br />
the cylinder is unscrewed several turns. Follow steps 8-10 in the<br />
previous section (5.11.6). Use the following procedure to calibrate<br />
the limit sensors:<br />
1. Connect the pressure cable and power cord and turn the<br />
controller ON.<br />
2. Press REFILL and enter the maximum rate.<br />
3. Press STOP when the interrupter flag is approximately 1 4"<br />
from the full (lower) sensor.<br />
4. Press ‘A’ (FLOW RATE), and use the number key to set 10<br />
(ml/min). Press the ENTER key.<br />
5. Press REFILL.<br />
After the lower limit sensor is interrupted, the motor will<br />
stop.<br />
6. Press CONST FLOW.<br />
7. Press ‘A’ (FLOW RATE) and select MAX.<br />
8. Press RUN.<br />
9. Press STOP when the volume counter in the upper<br />
right-hand corner of the LCD reads 005.00 ml or less.<br />
10. Press ‘A’ (FLOW RATE) and enter 5 ml/min.<br />
11. Press RUN .<br />
12. Press STOP when the counter reads 0.30 or less.<br />
13. Press ‘A’ (FLOW RATE) and enter 1 ml/min.<br />
14. Press RUN.<br />
15. When the counter counts from 000.01 to 000.00 press<br />
STOP.<br />
16. Lower the upper limit sensor to the point where the flag<br />
just interrupts the sensor. (“CYLINDER EMPTY” will<br />
flash on the screen.)<br />
17. Tighten the top upper limit mounting screw.<br />
18. Turn the controller to STANDBY and disconnect the pressure<br />
cable.<br />
19. Screw the cylinder into the cylinder mounting block until<br />
the cylinder snugly bottoms against the piston (the cylinder<br />
will no longer turn).<br />
20. Unscrew the cylinder a minimum of 1 2 turn, then line up<br />
the inlet and outlet ports as you had them before.<br />
21. Lock the cylinder by tightening the locking screw.<br />
22. Connect the pressure cable and power cord and turn the<br />
controller ON.<br />
23. Press the REFILL key. Wait until you have access to the<br />
second upper limit sensor mounting screw and tighten it.<br />
24. Install the covers.<br />
5-22
D <strong>Series</strong> <strong>Syringe</strong> <strong>Pumps</strong><br />
Section 6 Serial Interface<br />
6.1 Introduction The Teledyne <strong>Isco</strong> D <strong>Series</strong> pump can be remotely controlled by a<br />
computer through a built-in RS-232-C serial interface. Up to<br />
three D <strong>Series</strong> pump modules can be serially controlled from<br />
each D <strong>Series</strong> controller. This function is supported in two ways:<br />
Teledyne <strong>Isco</strong> LabView software or by user written software.<br />
To write software for the D <strong>Series</strong> pumps, you must be familiar<br />
with the Teledyne <strong>Isco</strong> DASNET communications protocol and<br />
the serial commands recognized by the pumps.<br />
• Section describes the DASNET protocol<br />
• Section 6.4 describes the proper cabling connections for<br />
serial control<br />
• Section 6.5 details the serial commands<br />
• Section 6.6 details the procedure for placing your<br />
controller(s) in serial control mode.<br />
6.2 Network Control and<br />
Communication<br />
Network communications are always initiated by the network<br />
controller, which is typically a computer. Messages from the<br />
instruments are in response to messages from the network controller.<br />
All information on the network is transmitted as groups<br />
of ASCII characters called frames. The message frames contain<br />
the origin of the message, the destination of the message, and a<br />
checksum to verify the validity of the message.<br />
Figure 6-1 Single serial network connection example (rear view)<br />
6-1
D <strong>Series</strong> <strong>Syringe</strong> <strong>Pumps</strong><br />
Section 6 Serial Interface<br />
Each instrument is provided with a method of selecting unit<br />
identification numbers and a baud rate. For proper operation,<br />
each instrument must be set to a unique unit identification<br />
number (see Section 6.6). It is also important that each unit’s<br />
baud rate is set to the same speed. Possible baud rates are 1200<br />
and 19200. Other baud rates of 300, 1200, 2400, 4800, 9600,<br />
19200, 38400, 57600, and 115200 are supported by the D <strong>Series</strong><br />
pumps but are not part of the Teledyne <strong>Isco</strong> defined communications<br />
standard.<br />
Electrical standards are RS-232-C; connector pin usage is outlined<br />
in Table 6-1. Characters consist of 1 start bit, 8 data bits<br />
(low order first with 8 th bit always set to zero), and 1 stop bit.<br />
There is no parity bit used. All characters will be printable ASCII<br />
characters. Control characters (0-1FH) are ignored except for carriage<br />
return (0DH).<br />
The serial unit number and baud rate can be changed from the<br />
default values through the MENU key. Select SERIAL under the<br />
menu; and adjust the values using the softkeys (see section 6.6).<br />
Table 6-1 External control connector<br />
serial pin connections<br />
Pin No. Name Use<br />
1 CHASSIS GROUND Used to connect to the shield of the<br />
interconnect cable.<br />
2 RECEIVE Serial interface data input. Standard<br />
RS-232-C signal levels.<br />
3 TRANSMIT Serial interface data output.<br />
Standard RS-232-C signal levels.<br />
4 REQUEST TO SEND RTS chain - RS-232-C input is buffered<br />
and connected to pin 21.<br />
5 CLEAR TO SEND CTS buffered RS-232-C output of<br />
pine 25 input.<br />
6 +11 VDC DATA SET READY is held on.<br />
7 COMMON Signal common for all signals.<br />
8 +11 VDC DATA CARRIER DETECT is held on.<br />
9 +5 VDC Test Voltage.<br />
10 -11 VDC Negative test voltage.<br />
14 TRANSMIT CHAIN Serial data from next unit.<br />
16 RECEIVE CHAIN Serial data to next unit.<br />
21 RTS CHAIN RTS buffered RS-232-C output of pin<br />
4 input.<br />
25 CTS CHAIN CTS chain -RS-232-C input is<br />
buffered and connected to pin 5.<br />
NOTE: Only pins 2, 3, and 7 are required for serial interface to one<br />
controller.<br />
6-2
D <strong>Series</strong> <strong>Syringe</strong> <strong>Pumps</strong><br />
Section 6 Serial Interface<br />
6.3 User-written Software When designing software to control the D <strong>Series</strong> pumps, you<br />
must follow the DASNET communications protocol. This protocol<br />
allows a number of instruments to be controlled from a single<br />
RS-232-C serial port. Up to nine D <strong>Series</strong> controllers may share a<br />
single serial data channel, with each controller only accepting<br />
commands that are meant for it. Each pump controller can then<br />
control up to three pumps each. Figure 6-1 shows a simple<br />
system where the PC is connected to the serial port on the rear<br />
panel of the pump controller (shown sitting on top of the pump<br />
module). The pump control cable is attached to the pump A connector<br />
on the rear panel of the controller.<br />
6.3.1 DASNET DASNET converts your direct serial commands into a form recognizable<br />
to our instruments. Using a computer language such<br />
as C or BASIC, serial commands can be entered, converted, and<br />
then sent to your instrument.<br />
Table 6-2 is an example BASIC language program which performs<br />
the required portion of the DASNET serial protocol.<br />
Table 6-3 is an example of a C language program which does the<br />
same. Both of these programs, including a DASNET serial driver<br />
written in Visual C++, are available on CD-ROM (P/N<br />
60-1245-096) in the sleeve at the back of the printed manual.<br />
6-3
D <strong>Series</strong> <strong>Syringe</strong> <strong>Pumps</strong><br />
Section 6 Serial Interface<br />
Table 6-2 Example of BASIC program to demonstrate<br />
conversion of pump commands to DASNET frames<br />
1 CLS : Z$ = "": PRINT "INPUT ALL ENTRIES IN CAPITAL LETTERS"<br />
5 INPUT "INPUT UNIT ID >> ", UNITNUM’GET UNIT NUMBER<br />
30 REM OPEN COM PORT SET FOR COM2 EDIT TO COM1 IF NEED<br />
40 OPEN "COM2:1200,N,8,1,ASC" FOR RANDOM AS #2<br />
50 PRINT : INPUT "ENTER STRING (HIT Q TO EXIT) >> ", I$’GET OUTPUT STRING FROM USER<br />
65 IF I$ = "" THEN GOTO 50 ’IF BLANK INPUT THEN GO BACK<br />
70 IF I$ = "Q" THEN GOTO 200 ’IF "Q" INPUT THEN QUIT<br />
80 GOSUB 10000 ’CONVERT STRING TO DASNET FORMAT<br />
90 GOSUB 20000 ’OUT DASNET STRING TO COM 2<br />
120 PRINT "DASNET FORMATTED CMD >> "; O$ ’OUTPUT FORMATTED CMD TO USER<br />
124 PRINT : PRINT ">>>> PRESS CTRL-C IF NO RESPONSE FROM PUMP
D <strong>Series</strong> <strong>Syringe</strong> <strong>Pumps</strong><br />
Section 6 Serial Interface<br />
Table 6-3 Example of C program to demonstrate<br />
conversion of pump commands to DASNET frames<br />
#include<br />
#include<br />
#include "b:comm.c" /* edit to path needed */<br />
/* a ’C’ example of DASNET serial control */<br />
int conv_das();<br />
unsigned char in[256],out[256],buf[256];<br />
char unitnum;<br />
main()<br />
{<br />
unsigned port;<br />
int speed;<br />
cputs("ENTER UNIT ID="); /* get parms */<br />
scanf("%d",&unitnum);<br />
cputs("ENTER COM PORT=");<br />
scanf("%d",&port);<br />
cputs("ENTER BAUD RATE=");<br />
scanf("%d",&speed);<br />
comm_open(port,speed); /* open comm port */<br />
in[0]=50;<br />
cputs("ALL ENTRIES IN CAPS\n\r");<br />
while(1)<br />
cputs("\n\rENTER STRING(Q TO QUIT) >>>");<br />
cgets(in);<br />
if(in[2]==’Q’) break;<br />
conv_das(&in[2],out); /* convert string */<br />
cputs("\nDASNET FORMATTED OUTPUT >>>");<br />
puts(out); /* output converted string */<br />
comm_putc(0x0d); /* send "CR" to serial port */<br />
dput(out); /* output converted string to serial port */<br />
comm_putc(0x0d); /* end with a "CR" */<br />
dgets(buf); /* get response */<br />
cputs("\nDASNET RESPONSE >>>");<br />
puts(buf); /* output response */<br />
comm_flush(); /* flush serial buffer to start again */<br />
}<br />
comm_close();<br />
}<br />
/* dasnet conversion utility */<br />
conv_das(char *in, char *out)<br />
{<br />
unsigned sum;<br />
char *c_ptr;<br />
c_ptr=out; /* point to output */<br />
*out++=unitnum+0x30; /* put id first */<br />
*out++=’R’; /* add "R" to output */<br />
if (!strcmp(in,"R")) /* if just "R" add space to string */<br />
{<br />
*out++=’ ’;<br />
*out++=0x00;<br />
}<br />
else /* add # char to string */<br />
sprintf(out,"%3.3X%s",strlen(in),in);<br />
for (sum=0 ; *c_ptr; c_ptr++) /* add all chars together */<br />
sum+=*c_ptr;<br />
sum=(0x100 - sum) & 0x0FF; /* get check sum */<br />
sprintf(c_ptr,"%2.2X",sum); /* insert into string */<br />
}<br />
Note: Polling is part of the DASNET definition but is not required and is not shown in this example. This code was<br />
written in TC, version 4.5.<br />
6-5
D <strong>Series</strong> <strong>Syringe</strong> <strong>Pumps</strong><br />
Section 6 Serial Interface<br />
There are three types of operation within the network: network<br />
controller, master, and slave. A computer typically serves as the<br />
network controller. It supervises all data flow on the network. It<br />
also polls each unit which initiates data transfer and commands.<br />
Note<br />
The network controller (typically a PC) should not be confused<br />
with the pump controller. The network controller is used in<br />
addition to the pump controller.<br />
The slave unit simply responds to commands accordingly. The D<br />
<strong>Series</strong> pump functions as a slave unit. These functions may be<br />
combined in one unit; i.e., a computer can function as both a<br />
network controller and a master.<br />
All data transfers are in a frame format. When the network controller<br />
polls an instrument, it will start to respond within 200 ms.<br />
If it does not reply, it will be polled again. If after three attempts<br />
at polling it does not reply, it will be dropped from the polling<br />
rotation. When the instrument does respond, the polling rotation<br />
does not advance until an error-free transfer has occurred.<br />
The frame format for data transfers from the network controller<br />
is as follows:<br />
destination\acknowledgement\message source<br />
\length\message\checksum\[CR]<br />
• The destination is the 1-digit unit identification<br />
number of the instrument to receive the message.<br />
• Acknowledgment is one character to indicate the<br />
success of the previous transmission. There are three<br />
possibilities: (1) E means error, resend the message<br />
immediately (E is sent by the network controller only.<br />
Other units signify errors by not replying; causing the<br />
controller to resend the message). (2) B means busy,<br />
resend message at next poll. (3) R signifies previous<br />
message was received.<br />
• Message source is the unit ID of the unit that originated<br />
the message. If there is no message, this location<br />
is a space (20H).<br />
• Length is the length of the message in 2 digit,<br />
hexadecimal format. Maximum length is 256, with 256<br />
being represented by a 00. This field is eliminated if<br />
there are no messages.<br />
• Message field is the area where the actual information<br />
is located. The maximum length is 256 characters long.<br />
• Checksum is also a 2 digit hexadecimal number. This<br />
number, when added to all the previous characters in<br />
the message (excluding control characters), will result in<br />
a sum. If there are no errors, the result of modulo 256<br />
division of this sum should be 0.<br />
6-6
D <strong>Series</strong> <strong>Syringe</strong> <strong>Pumps</strong><br />
Section 6 Serial Interface<br />
Examples<br />
Frame is R304STOPD1[CR] =<br />
(R) (3) (0) (4) (S) (T) (O) (P)<br />
52H + 33H + 30H + 34H + 53H + 54H + 4FH + 50H + D1H = 300H<br />
300H MODULO 256 = 00<br />
It is important to note that all characters are converted to<br />
the ASCII equivalent and added, except for the checksum.<br />
The two characters of the checksum are converted to<br />
hexadecimal numbers and concatenated to form a single<br />
two-digit number. This number is then converted to its<br />
ASCII equivalent and added to the end of the message.<br />
Hexadecimal Format Using<br />
MODULO<br />
Step 1:<br />
Step 2:<br />
22FH = 52H + 33H + 30H + 34H + 53H + 54H +4FH + 50H<br />
2FH = 22FH ··<br />
2R2FH<br />
100H<br />
100H 22FH<br />
Modulo<br />
200H<br />
2FH<br />
Step 3:<br />
D1H = 100H 2FH<br />
Step 4: Convert D1H to ASCII (Hex) and put at end of message.<br />
Step 5: Put a “CR” (0DH) at the end of message for end of frame.<br />
Decimal Format Using<br />
MODULO<br />
Step 1:<br />
Step 2:<br />
559 = 82 + 51 + 48 + 52 + 83 + 84 + 79 + 80<br />
47 = 559 ··<br />
2R47<br />
256<br />
256 559<br />
Modulo<br />
512<br />
47<br />
Step 3:<br />
209 = 256 47<br />
Step 4: Convert 209 to ASCII (Hex) and put at end of message.<br />
Step 5: Put a “CR” (13) at the end of message for end of frame.<br />
6-7
D <strong>Series</strong> <strong>Syringe</strong> <strong>Pumps</strong><br />
Section 6 Serial Interface<br />
Hexadecimal Format Using<br />
NO MODULO<br />
Step 1:<br />
Step 2:<br />
22FH = 52H + 33H + 30H + 34H + 53H + 54H + 4FH + 50H<br />
FED1H = 100H 22FH<br />
Step 3:<br />
D1H = FED1H & offH<br />
Step 4: Convert D1H = to ASCII (Hex) and put at end of<br />
message.<br />
Step 5: Put a “CR” (0DH) at the end of message for end of frame.<br />
Decimal Format Using NO<br />
MODULO<br />
Step 1:<br />
Step 2:<br />
559 = 82 + 51 + 48 + 52 + 83 + 84 + 79 + 80<br />
303 = 256 559<br />
Step 3:<br />
209 = 303 & 255<br />
Step 4: Convert 209 into ASCII (Hex) and put at end of<br />
message.<br />
Step 5: Put a “CR” (13) at the end of message for end of frame.<br />
The carriage return “CR” signifies end of frame.<br />
The format for frames sent from the unit to the network controller<br />
is as follows:<br />
acknowledgement\message destination<br />
\length\message\checksum\[CR]<br />
All the parameters are as previously described except message<br />
destination. Message destination is the 1-digit identification<br />
number of the unit that the message is sent to.<br />
An example of a typical data exchange is summarized below. For<br />
illustration, we will assume the network consists of a computer<br />
serving as a combination network controller and master. There<br />
will be one slave unit; a Model 260D pump. Details on the pump<br />
message format are in section 6.5. The computer will be unit #0,<br />
and the pump will be unit #6.<br />
Network Controller and Master Unit #0<br />
[CR]1R 5D[CR]<br />
Note<br />
A [CR] must start the network. The controller is checking for<br />
the presence of unit #1 but will get no response in 200 ms<br />
because there is no unit 1.<br />
6-8
D <strong>Series</strong> <strong>Syringe</strong> <strong>Pumps</strong><br />
Section 6 Serial Interface<br />
Network Controller and Master Unit #0<br />
1R 5D[CR]<br />
Still no response.<br />
Network Controller and Master Unit #0<br />
1R 5D[CR]<br />
Still no response, so unit 1 will be dropped from the poll.<br />
Network Controller and Master Unit #0<br />
2R 5C[CR]<br />
Checks for unit 2 but will get no response in 200 ms<br />
because there is no unit 2.<br />
Network Controller and Master Unit #0<br />
2R 5C[CR]<br />
Still no response.<br />
Network Controller and Master Unit #0<br />
2R 5C[CR]<br />
Still no response, so unit 2 will be dropped from the poll.<br />
In this way units 3-5 will be checked and dropped from the poll.<br />
Network Controller and Master Unit #0<br />
6R 58[CR]<br />
Check for presence of unit 6.<br />
Unit 6<br />
R 8E[CR]<br />
Unit 6 responds.<br />
Network Controller and Master Unit #0<br />
7R 57[CR]<br />
Since unit 7 does not exist, it will be dropped from the<br />
polling scheme.<br />
Network Controller and Master Unit #0<br />
6R008IDENTIFY84[CR]<br />
The master verifies the fact that unit 6 is a Model ___D. In<br />
this example, the master and the network controller are a<br />
single unit. If they were separate units, the master would<br />
send the inquiry to the network controller; then the<br />
network controller would send the message to the slave<br />
unit the next time it is polled. The slave would respond<br />
with the message to the network controller. The next time<br />
the master is polled, the message would be relayed. The<br />
same sequence would occur with all messages. Since the<br />
master and the network controller are combined in this<br />
example, the relaying of messages is not necessary.<br />
6-9
D <strong>Series</strong> <strong>Syringe</strong> <strong>Pumps</strong><br />
Section 6 Serial Interface<br />
Unit 6<br />
R027SERIES=1240-02__, Model ___D PUMP, REV __XX[CR]<br />
The pump responds with identity and software revision<br />
letter. (In this example 02__ would be 021; Model ___D<br />
would be 260D; REV __ signifies the software revision, XX<br />
would be replaced by the correct checksum, which is B4.)<br />
Network Controller and Master Unit #1<br />
6R006REMOTE16[CR]<br />
This places the pump in the remote mode.<br />
Unit 6<br />
R 8E[CR]<br />
The pump acknowledges that it accepted the command.<br />
Network Controller and Master Unit #1<br />
6R00ACONST FLOWF8[CR]<br />
This puts the pump into constant flow rate mode.<br />
Unit 6<br />
R 8E[CR]<br />
The pump verifies that it received the message.<br />
Network Controller and Master Unit #1<br />
6R009FLOW=1.00AB[CR]<br />
This sets the pump’s flow rate to 1.00 ml per minute.<br />
Unit 6<br />
R 8E[CR]<br />
The pump verifies that it received the message.<br />
Network Controller and Master Unit #1<br />
6R 58[CR]<br />
Polls the pump.<br />
Unit 1<br />
R 8E[CR]<br />
Pump responds.<br />
Network Controller and Master Unit #1<br />
6R003RUNF0[CR]<br />
The pump is started.<br />
Unit 1<br />
R 8E[CR]<br />
The pump responds.<br />
The system is now running and the network controller continues<br />
the polling scheme. If the controller gives an improper command,<br />
the units will respond with a problem message indicating the<br />
type of error.<br />
The format of the message is given in section 6.5 of this manual<br />
and specifies the commands used for this instrument. It is<br />
important to follow this format. Spaces are ignored anywhere<br />
within the message field. Commands must be in uppercase<br />
letters. The network definition allows multiple commands in a<br />
6-10
D <strong>Series</strong> <strong>Syringe</strong> <strong>Pumps</strong><br />
Section 6 Serial Interface<br />
message field when delimited by semicolons, but the D <strong>Series</strong><br />
controller is limited to single commands. It will respond with a<br />
PROBLEM=INVALID COMMAND message.<br />
6.4 Cabling for Serial<br />
Control<br />
Cable Connections<br />
The cabling scheme for your system will depend on the number of<br />
instruments you need to control. The computer is always connected<br />
from the serial port to the serial port(s) of the D <strong>Series</strong><br />
controller(s) it is controlling. Each controller is connected to its<br />
pumps in the normal fashion, i.e. the pump control cables are<br />
attached to the pump A, B, and C connectors on the rear panel of<br />
the pump controller. The cable you select to connect your network<br />
will depend on the type of serial port your computer has and the<br />
number of controllers you wish to connect.<br />
One or two controllers: – To connect one controller, use cable<br />
480-7996-00. If only two controller are being connected in the<br />
network, then a single cable, 68-1020-198, is all that is required.<br />
It is connected between the 9-pin serial output connector of the<br />
computer and the RS-232-C connector on the rear of up to two<br />
controllers, as shown in Figure 6-2.<br />
Note<br />
In order for the network to operate properly, all instruments<br />
connected to the network must be turned on even if they are<br />
not being used.<br />
Three or more controllers: – If additional instruments are to<br />
be connected in series, a special daisy chain cable, P/N<br />
68-1020-180, will be required. The 1020-180 cable is attached to<br />
the last connector on the 1020-198 cable shown, in Figure 6-2,<br />
and then plugged into the RS-232-C connectors on the back of the<br />
additional controllers.<br />
Figure 6-2 Serial network connection example<br />
6-11
D <strong>Series</strong> <strong>Syringe</strong> <strong>Pumps</strong><br />
Section 6 Serial Interface<br />
6.5 Serial Commands for<br />
the D <strong>Series</strong> Pump<br />
Table 6-4 is a list of the serial commands recognized by the<br />
pump. These commands are the message part of the DASNET<br />
protocol. The operand always follows the equals sign. The<br />
REMOTE command must be sent once, before any command that<br />
changes the operation of the pump will be accepted.<br />
Note<br />
When setting a value, the serial command will always be followed<br />
by an equal sign.<br />
Command<br />
%B=#<br />
Table 6-4 Serial Commands<br />
Description<br />
Enter # for percentage of modifier.<br />
ALOG1 Status of the analog voltage input on pin 21, P114. See NOTE 1.<br />
ALOG2<br />
ALOG3<br />
ALOG4<br />
ALOG5<br />
CLEAR<br />
CONTIN CONST FLOW<br />
CONTIN CONST PRESS<br />
CONST FLOW<br />
CONST FLOWB<br />
CONST FLOWC<br />
CONST PRESS<br />
CONST PRESSB<br />
CONST PRESSC<br />
DIGITAL<br />
DIGITAL = xxxxxxxx<br />
1 8<br />
Status of the analog voltage input on pin 15, P107 auxiliary DB25 connector and on<br />
analog input 3 of the accessory connector. See NOTE 1.<br />
Status of the analog voltage input on analog input 2 of the accessory connector.<br />
See NOTE 1.<br />
Status of the analog voltage on analog input 1 of the accessory connector.<br />
See NOTE 1.<br />
Status of the analog voltage input on pin 2, P107 auxiliary DB25 connector.<br />
See NOTE 1.<br />
Stops all motors, sets flow rate and pressure setpoints to zero.<br />
Puts pump in continuous flow under constant flow mode.<br />
Puts pump in continuous flow under constant pressure mode.<br />
Put pump in constant flow mode.<br />
Put pump in constant pressure mode.<br />
Returns the status (High or Low) of the digital outputs. Format is digital = xxxxxxxx,<br />
where “x” is either “H” or “L”. The status order returned corresponds with the outputs<br />
1—8.<br />
Sets the digital output either High or Low, where “x” is either “H” or “L”. The order corresponds<br />
with the outputs 1—8.<br />
DIG CONTROL<br />
DIG CONTROL = xxxxxxxx<br />
1 8<br />
FLOW<br />
Returns the status of the digital output control bits as either REMOTE (R) or INTER-<br />
NAL (I). The return message format is DIG CONTROL=xxxxxx, where “x” is either<br />
“R” or “I”. “R” indicates the corresponding bit is controlled remotely; and “I” indicates<br />
the corresponding bit is controlled internally by pump software. The status order<br />
returned corresponds with the outputs 1—8.<br />
Sets the digital output control bits to either internal or remote, where “x” is either “R”<br />
for REMOTE or “I” for INTERNAL CONTROL. “R” indicates the corresponding bit will<br />
be controlled remotely (through the serial port). “I” indicates the corresponding bit<br />
will be controlled internally by pump software. The order corresponds with the outputs<br />
1—8.<br />
Returns the delivering pump’s flow rate in continuous pumping mode and modifier<br />
addition mode. In INDEPENDENT mode it returns the pump A flow rate.<br />
6-12
D <strong>Series</strong> <strong>Syringe</strong> <strong>Pumps</strong><br />
Section 6 Serial Interface<br />
Command<br />
FLOWA<br />
FLOWB<br />
FLOWC<br />
FLOW=#<br />
FLOWB=#<br />
FLOWC=#<br />
G<br />
G&<br />
IDENTIFY<br />
INDEPENDENT<br />
IPUMPA=1, IPUMPA=0<br />
IPUMPB=1, IPUMPB=0<br />
IPUMPC=1, IPUMPC=0<br />
LGGO<br />
LGSL,F:xx<br />
LGDL,F:xx,S:xx<br />
LGUL,F:xx,S:xx<br />
LIMITS<br />
LIMITSB<br />
LIMITSC<br />
LOCAL<br />
MAXFLOWA=#<br />
MAXFLOWB=#<br />
MAXFLOWC=#<br />
MAXFLOWA<br />
MAXFLOWB<br />
MAXFLOWC<br />
Table 6-4 Serial Commands (Continued)<br />
Description<br />
Returns the actual flow rate of the pump.<br />
Returns the actual flow rate of the pump Enter # for a flow rate setpoint (constant<br />
flow mode). Format is XXX.XXXXXXX ml/min. Only 5 figures are significant. Leading<br />
and trailing zeros are not required.<br />
Gets pump information. “G” returns a text string that contains current pressure, analog<br />
input, and digital input information. “G&” is the Get All command. This returns the<br />
same information as “G,” plus flow rates, units, operation status, and more. Refer to<br />
6.5.1 for a complete description of this serial command.<br />
Pump responds “SERIES=1240-0___, MODEL ____D PUMP; REV__.” For each<br />
pump, REV__ is the internal pump program software revision. (For example, if the<br />
controller was attached to two 100DMs, the message would read<br />
“SERIES=1240-024, MODEL 100DM PUMP; SERIES=1240-024, MODEL 100DM;<br />
REV__.”) The series number is the original catalog number for the pump type. It may<br />
not match the production series number on the pump serial label.<br />
SERIES=1240-024, MODEL 100DM PUMP<br />
SERIES=1240-027, MODEL 100DX PUMP<br />
SERIES=1240-021, MODEL 260D PUMP<br />
SERIES=1240-025, MODEL 500D PUMP<br />
SERIES=1240-052, MODEL 1000D PUMP<br />
SERIES=1240-063, MODEL 65D PUMP<br />
Put pumps in Independent mode.<br />
Turns the pressure integral control On and Off for the pump indicated.<br />
1 = ON<br />
0 = OFF<br />
Start Gradient Command. This starts a gradient program (same as the “RUN” key).<br />
This command will check to see if there is a gradient running and respond with<br />
“RUNNING” if there is.<br />
Select Gradient File Command. This selects a gradient file to be run. This command<br />
will reset the controller to the saved file gradient type. If the selected gradient file<br />
does not exist, the controller will respond with “PROBLEM=INVALID OPERAND.”<br />
Gradient Step Download command. This downloads a step from the pump to the<br />
PC. This command will respond with “PROBLEM=INVALID OPERAND” if the file or<br />
step does not exist. The controller will respond with step information if the command<br />
is valid. Refer to 6.5.2 for complete information on Gradient step download commands.<br />
Gradient Step Upload command. This transfers a step from the PC to the controller.<br />
Refer to 6.5.3 for complete information on Gradient step download commands.<br />
Returns the pressure and flow rate limits.<br />
Returns the instrument to local control. Front panel control is enabled and all motors<br />
are stopped (if control was previously remote).<br />
Enter # to designate the maximum flow rate setpoint.<br />
Returns the maximum flow rate setpoint.<br />
6-13
D <strong>Series</strong> <strong>Syringe</strong> <strong>Pumps</strong><br />
Section 6 Serial Interface<br />
Command<br />
MAXPRESSA=#<br />
MAXPRESSB=#<br />
MAXPRESSC=#<br />
MAXPRESSA<br />
MAXPRESSB<br />
MAXPRESSC<br />
MFLOWA=#<br />
MFLOWB=#<br />
MFLOWC=#<br />
MFLOWA<br />
MFLOWB<br />
MFLOWC<br />
MINFLOWA=#<br />
MINFLOWB=#<br />
MINFLOWC=#<br />
MINFLOWA<br />
MINFLOWB<br />
MINFLOWC<br />
MINPRESSA=#<br />
MINPRESSB=#<br />
MINPRESSC=#<br />
MINPRESSA<br />
MINPRESSB<br />
MINPRESSC<br />
MODIFIER<br />
PRESS=#<br />
PRESSB=#<br />
PRESSC=#<br />
PRESS<br />
PRESSA<br />
PRESSB<br />
PRESSC<br />
PRESSCNTRLDIFF1<br />
PRESSCNTRLDIFF1=XXXXX<br />
PRESSCNTRLDIFF2<br />
PRESSCNTRLDIFF3<br />
PRESSCNTRLNORM<br />
PRESSDIFF=XXXXX<br />
PRESSDIFF<br />
Table 6-4 Serial Commands (Continued)<br />
Description<br />
Enter # to designate the maximum pressure setpoint.<br />
Returns the maximum pressure setpoint.<br />
Enter # to designate the maximum flow limit in constant pressure mode.<br />
Returns the maximum flow limit setpoint.<br />
Enter # to designate the minimum flow rate setpoint.<br />
Returns the minimum flow rate setpoint.<br />
Returns the minimum flow rate setpoint.<br />
Returns the minimum pressure setpoint.<br />
Put pumps in modifier addition mode.<br />
Enter # to designate pressure setpoint (constant pressure mode).<br />
Returns the delivering pump pressure in continuous pumping mode and modifier<br />
addition mode. In INDEPENDENT mode it returns the pump A pressure.<br />
Returns the actual pressure of the pump.<br />
Sets the pressure control input to Analog input 1, with a pressure range of 50 psi.<br />
Sets the pressure control input to Analog input 1 and sets the pressure range. The<br />
range is 1 to 5000. the units are psi, with a value of 5000 representing 5000 psi at 5<br />
volts.<br />
Sets the pressure control input to Analog input 2, with a pressure range of 500 psi at<br />
5 volts.<br />
Sets the pressure control input to Analog input 2, with a pressure range of 5000 psi<br />
at 5 volts.<br />
Sets the pressure control input to the standard input.<br />
Differential pressure setpoint. (PSI*10) 0 to 50,000 maximum (0 to 5000 psi)<br />
Reads the differential pressure value. (PSI*10) The transducer can also be read via<br />
the “ANGLx” serial commands.<br />
6-14
D <strong>Series</strong> <strong>Syringe</strong> <strong>Pumps</strong><br />
Section 6 Serial Interface<br />
Command<br />
RANGEA<br />
RANGEB<br />
RANGEC<br />
RAPIDA<br />
RAPIDB<br />
RAPIDC<br />
REFILL<br />
REFILLB<br />
REFILLC<br />
REFILL=#<br />
REFILLB=#<br />
REFILLC=#<br />
REMOTE<br />
RLIMITA<br />
RLIMITB<br />
RLIMITC<br />
RSVP<br />
RSVPB<br />
RSVPC<br />
RUN<br />
RUNB<br />
RUNC<br />
SETFLOWA<br />
SETFLOWB<br />
SETFLOWC<br />
SETPRESSA<br />
SETPRESSB<br />
SETPRESSC<br />
STATUSA<br />
STATUSB<br />
STATUSC<br />
STOP<br />
STOPB<br />
STOPC<br />
UNITSA=<br />
VOLA<br />
VOLB<br />
VOLC<br />
VOLTOT<br />
VOL RESET<br />
Table 6-4 Serial Commands (Continued)<br />
Description<br />
Provides scaling information for the system parameters. See 6.5.4 for more information<br />
about this serial command.<br />
Activates the automatic rapid pressurization cycle (constant flow mode only).<br />
Move cylinder to bottom at preset refill rate.<br />
Enter # to designate refill rate.<br />
Disables controller front panel control and enables all serial commands. Stops all<br />
motors (if control was previously local).<br />
Returns the refill flow rate limit.<br />
Pump responds with “READY” message.<br />
Same as front panel. Initiates pumping.<br />
Returns the flow rate setpoint.<br />
Returns the pressure setpoint.<br />
Returns with status of pump. May be any combination of responses listed below.<br />
STATUS= STOP PROBLEM= OVER PRESSURE<br />
RUN<br />
UNDER PRESSURE<br />
REFILL<br />
CYLINDER FULL<br />
HOLD<br />
CYLINDER EMPTY<br />
EQUIL.<br />
MOTOR FAILURE<br />
LOCAL<br />
REMOTE<br />
EXTERNAL<br />
Same as front panel, except that pump remains under remote serial control.<br />
Enter the desired flow or pressure units after the equal sign. Acceptable values are:<br />
ATM, BAR, KPA, PSI, ML/MIN, ML/HR, UL/MIN, UL/HR. (Sets all pumps.)<br />
Return the volume remaining in cylinder in ml. Format is “XXX.XXXX” ml.<br />
Returns the total volume delivered when using continuous flow or modifier.<br />
Will reset the volume total to zero.<br />
6-15
D <strong>Series</strong> <strong>Syringe</strong> <strong>Pumps</strong><br />
Section 6 Serial Interface<br />
Command<br />
ZEROA<br />
ZEROB<br />
ZEROC<br />
ZERODIFF1<br />
ZERODIFF2<br />
ZERODIFF3<br />
Table 6-4 Serial Commands (Continued)<br />
Description<br />
“Zeros” the pressure sensor offset for analog input 1.<br />
“Zeros” the pressure sensor offset for the respective analog input.<br />
NOTE 1: The analog input range is -1.5 to 11.6 volts. There is NO conversion of the returned number. The number<br />
returned (0 to 65535 decimal) will have an offset of 7500 added to the number (7500 = 0 volts) and a scale of 5000 for<br />
every 1 volt, for example:<br />
number 7500<br />
= volts<br />
5000<br />
(32500 7500)<br />
5000<br />
= 5 volts<br />
NOTE 2: The only pump B commands accepted in continuous pumping mode or modifier addition mode are: %B,<br />
FLOWB, LIMITSB, PRESSB, REFILLB, REFILLB=, STATUSB, VOLB.<br />
6.5.1 Get Status Command The “G” and “G&” serial commands retrieve information from the<br />
pump controller. Each command returns a text string which can<br />
be read as shown in Figures 6-3 and 6-4.<br />
R046=37510,-00128, 01017, 06981, 05743, 00421, 00442, 00449,11111000,CS<br />
Pressure Pump A<br />
Pressure Pump B<br />
Pressure Pump C<br />
Units = (psi*5)<br />
Resolution = 0.2 psi<br />
Digital Inputs 1—8<br />
1 = High<br />
0 = Low<br />
Analog Inputs 1—5<br />
Units = (volts * 5000)<br />
Resolution = 0.2 millivolt<br />
Range = 7500 to 58035<br />
(1.5000V to 11.6070V)<br />
Figure 6-3 Get Status String<br />
6-16
D <strong>Series</strong> <strong>Syringe</strong> <strong>Pumps</strong><br />
Section 6 Serial Interface<br />
Get All Status<br />
Flow Rate Pump A<br />
Units = (Liters/minute)*10E10<br />
Resolution = 0.1 nanoliter/minute<br />
Volume Pump A<br />
Units = (Liters*10 E9)<br />
Resolution = 1 nanoliter<br />
Operation Status Pump A<br />
S = Pump stopped<br />
R = Running<br />
F = Refilling<br />
H = Hold (clock stopped)<br />
E = Equilibrating<br />
(displays Pump A for other modes)<br />
Units = (Liters/minute)*10E10<br />
Resolution = 0.1 nanoliter/minute<br />
System flow rate, multi-pump<br />
Control Status Pump A<br />
L = Local control<br />
R = Remote control<br />
E = External control<br />
= No problem<br />
E = Empty cylinder<br />
B = Cylinder at bottom<br />
O = Over pressure<br />
U = Under pressure<br />
M = Motor failure<br />
(displays Pump A for other modes)<br />
Units = (psi*5)<br />
Resolution = 0.2 psi<br />
System pressure, multi-pump<br />
Problem Status Pump A<br />
Volume total<br />
Continuous flow<br />
or modifier mode<br />
Units = (Liters*10E6)<br />
Pump B Pump C Checksum<br />
R0B5=37510,-00128, 01017, 06981, 05743, 00421, 00442, 00449,11111000,<br />
-0000005921,0010696698,R,R,-, 0027500000,0057744222,R,R,-, 0052500000,0016778750,R,R,-,-0000005921, 37500,00000000,24<br />
Same as Figure 6-3<br />
Figure 6-4 Get All Status String<br />
6-17
D <strong>Series</strong> <strong>Syringe</strong> <strong>Pumps</strong><br />
Section 6 Serial Interface<br />
6.5.2 Gradient Download<br />
Command<br />
6.5.3 Gradient Upload<br />
Commands<br />
This command downloads a step from the D series pump to the<br />
PC. This command will respond with “PROBLEM=INVALID<br />
COMMAND” if the file or step does not exist. If the file and step<br />
is valid, the controller will respond as shown in Figures 6-5 and<br />
6-6.<br />
These commands upload a step from the PC to the D series<br />
pump. This command will respond with “PROBLEM=INVALID<br />
COMMAND” if the file or step does not exist. If the file and step<br />
is valid, the controller will respond as shown in Figures 6-7 and<br />
6-8. Figure 6-9 shows an example of a pressure programming<br />
upload command.<br />
Note<br />
Gradient upload commands must follow the format shown in<br />
the figures below. Where necessary, leading and trailing zeros<br />
must be included so that the numerical values are represented<br />
properly. Also note that the single-pump gradient commands<br />
include spaces in the command string.<br />
Step Number 01:<br />
LGDL,F:xx,S:01,FL:xxx.xxxx,I %:xx.xx,F %:xx.xx,D:xxxx.x,<br />
Step Numbers 02 through 99:<br />
Gradient Total Flow Rate<br />
Units = milliliters/minute<br />
Range = (000.0000 – Maximum Flow Rate)<br />
Step Number 01<br />
File (01 – 99)<br />
Step Number (02 – 99)<br />
File (01 – 99)<br />
Figure 6-5 Gradient Download Commands - Single pump<br />
flow gradient<br />
Initial Gradient Percentage<br />
Range = (00.00 – 100.0)<br />
LGDL,F:xx,S:xx,I %:xx.xx,F %:xx.xx,D:xxxx.x,<br />
Initial Gradient Percentage<br />
Range = (00.00 – 100.0)<br />
Gradient Duration<br />
Range = (0000.1 – 9999.0 minutes)<br />
Final Gradient Percentage<br />
Range = (00.00 – 100.0)<br />
Gradient Duration<br />
Range = (0000.1 – 9999.0 minutes)<br />
Final Gradient Percentage<br />
Range = (00.00 – 100.0)<br />
6-18
D <strong>Series</strong> <strong>Syringe</strong> <strong>Pumps</strong><br />
Section 6 Serial Interface<br />
Step Number 01<br />
LGUL,F:xx,S:01,FL:xxx.xxxx,IB%:xx.xx,FB%:xx.xx,D:xxxx.x,<br />
Gradient Duration<br />
Range = (0000.1 – 9999.0 minutes)<br />
Final %B<br />
Range = (00.00 – 100.0)<br />
Initial %B<br />
Range = (00.00 – 100.0)<br />
Gradient Total Flow Rate<br />
Units = milliliters/minute<br />
Range = (000.0000 – Maximum Flow Rate)<br />
Step Number 01<br />
File (01 – 99)<br />
Step Numbers 02 through 99<br />
LGUL,F:xx,S:xx,IB%:xx.xx,FB%:xx.xx,D:xxxx.x,<br />
Step Number (02 – 99)<br />
File (01 – 99)<br />
Initial %B<br />
Range = (00.00 – 100.0)<br />
Figure 6-6 Gradient Download Commands - Two pump<br />
flow gradient<br />
Gradient Duration<br />
Range = (0000.1 – 9999.0 minutes)<br />
Final %B<br />
Range = (00.00 – 100.0)<br />
6-19
D <strong>Series</strong> <strong>Syringe</strong> <strong>Pumps</strong><br />
Section 6 Serial Interface<br />
Step Number 01:<br />
LGUL,F:xx,S:01,FL:xxx.xxxx,I %:xx.xx,F %:xx.xx,D:xxxx.x,<br />
Gradient Duration<br />
Range = (0000.1 – 9999.0 minutes)<br />
Final Gradient Percentage<br />
Range = (00.00 – 100.0)<br />
Initial Gradient Percentage<br />
Range = (00.00 – 100.0)<br />
Gradient Total Flow Rate<br />
Units = milliliters/minute<br />
Range = (000.0000 – Maximum Flow Rate)<br />
Step Number 01<br />
File (01 – 99)<br />
Step Numbers 02 through 99:<br />
LGUL,F:xx,S:xx,I %:xx.xx,F %:xx.xx,D:xxxx.x,<br />
Step Number (02 – 99)<br />
File (01 – 99)<br />
Figure 6-7 Gradient Upload Commands - Single pump<br />
flow gradient<br />
Gradient Duration<br />
Range = (0000.1 – 9999.0 minutes)<br />
Final Gradient Percentage<br />
Range = (00.00 – 100.0)<br />
Initial Gradient Percentage<br />
Range = (00.00 – 100.0)<br />
6-20
D <strong>Series</strong> <strong>Syringe</strong> <strong>Pumps</strong><br />
Section 6 Serial Interface<br />
Step Number 01<br />
LGUL,F:xx,S:01,FL:xxx.xxxx,IB%:xx.xx,FB%:xx.xx,D:xxxx.x,<br />
Step Number 01<br />
File (01 – 99)<br />
Gradient Duration<br />
Range = (0000.1 – 9999.0 minutes)<br />
Final %B<br />
Range = (00.00 – 100.0)<br />
Initial %B<br />
Range = (00.00 – 100.0)<br />
Gradient Total Flow Rate<br />
Units = milliliters/minute<br />
Range = (000.0000 – Maximum Flow Rate)<br />
Step Numbers 02 through 99<br />
LGUL,F:xx,S:xx,IB%:xx.xx,FB%:xx.xx,D:xxxx.x,<br />
Step Number (02 – 99)<br />
File (01 – 99)<br />
Figure 6-8 Gradient Upload Commands - Two pump flow<br />
gradient<br />
Gradient Duration<br />
Range = (0000.1 – 9999.0 minutes)<br />
Final %B<br />
Range = (00.00 – 100.0)<br />
Initial %B<br />
Range = (00.00 – 100.0)<br />
6-21
D <strong>Series</strong> <strong>Syringe</strong> <strong>Pumps</strong><br />
Section 6 Serial Interface<br />
LGUL,F:xx,S:xx,I:xxxxx,F:xxxxx,D:xxxx.x,<br />
Step Number (01 – 99)<br />
File (01 – 99)<br />
Initial Pressure<br />
Range = 00010 – Maximum<br />
Units = psi<br />
Pressure Duration<br />
Range = 0000.1 – 9999.0 minutes<br />
Final Pressure<br />
Range = 00010 – Maximum<br />
Units = psi<br />
Figure 6-9 Upload Commands - Single pump pressure<br />
programming<br />
6.5.4 Range Command The RANGE command provides scaling information for the<br />
system parameters. For example,<br />
6R006RANGEA34<br />
may return a string similar to the one shown in Figure 6-10.<br />
R02CP= 10000,F=2500000,R=30.00000,V=102.9600,40<br />
Checksum<br />
Max Volume = 102.96<br />
Units = milliliters<br />
Max Refill Rate = 30.0 milliliters/minute<br />
Max Flow Rate = 25 milliliters/minute<br />
Maximum Pressure = 10,000 psi<br />
Figure 6-10 Range Serial Commands<br />
6-22
D <strong>Series</strong> <strong>Syringe</strong> <strong>Pumps</strong><br />
Section 6 Serial Interface<br />
6.5.5 Error Messages If an error occurs in a message, one of the following responses<br />
will be sent. The format of an error message is<br />
“PROBLEM=_____.” Refer to Table 6-5.<br />
Error<br />
PROBLEM=LOCAL MODE<br />
PROBLEM=INVALID COMMAND<br />
PROBLEM=INVALID OPERAND<br />
PROBLEM=PUMP RUNNING<br />
PROBLEM=OVERPRESSURE<br />
PROBLEM=UNDERPRESSURE<br />
PROBLEM=CYLINDER EMPTY<br />
PROBLEM=CYLINDER FULL<br />
PROBLEM=NO PUMP<br />
Table 6-5 Error Messages<br />
Description<br />
The pump was sent a command<br />
before being placed in remote mode.<br />
See Section 6.5.<br />
The command sent was not recognized<br />
by the pump.<br />
The operand (character(s) following<br />
the = sign) is missing or is incorrect;<br />
e.g., the number was too large.<br />
The command sent is only valid when<br />
the pump is stopped.<br />
Sent in response to a high or low<br />
pressure limit condition.<br />
Sent when the pump cylinder is<br />
empty.<br />
Sent when the pump cylinder is full.<br />
Sent when the pump is not present<br />
PROBLEM=WRONG PUMP MODE Sent when the pump is in the incorrect<br />
mode for the command.<br />
6.6 Serial Control Set-up Once you have your pumps properly cabled and have your<br />
software designed, use the following procedure to put your controller(s)<br />
in serial control mode.<br />
To set up for serial control<br />
1. Press MENU > MORE and select the SERIAL option.<br />
2. Set the unit identification number. Each unit on the network<br />
must be set to a unique unit identification number.<br />
This pump may be set to be unit number 1 to 7.<br />
3. Set the baud rate for the pump.<br />
Note<br />
All units in the network must be set to the SAME baud rate.<br />
If several units are being configured, it is a good idea to place a<br />
sticker on the rear of the instrument with the unit number and<br />
baud rate listed. This will help identify the unit in the future and<br />
prevent assigning the same unit number to two controllers or<br />
designating an incorrect baud rate.<br />
6-23
D <strong>Series</strong> <strong>Syringe</strong> <strong>Pumps</strong><br />
Section 6 Serial Interface<br />
6-24
D <strong>Series</strong> <strong>Syringe</strong> <strong>Pumps</strong><br />
Section 7 Gradient Pumping for Pressure, Flow,<br />
and Concentration Modes<br />
7.1 Introduction Gradient pumping is used in applications requiring time-controlled<br />
or rate-controlled delivery of a specific volume at a set<br />
flow rate or pressure, or a two-pump flow concentration.<br />
All Teledyne <strong>Isco</strong> syringe pump models can be used in gradient<br />
mode. The model 65D requires special hardware for this. Call the<br />
factory for complete information.<br />
You can program the controller to increase or decrease pressure<br />
or flow during different steps within a single program by<br />
entering a specific value at the beginning and end of each step.<br />
DANGER<br />
RISK OF INJURY. THE PRESSURE PRODUCED<br />
COULD BE 700 BAR. PLEASE UTILIZE<br />
APPROPRIATE TUBING AND CONNECTIONS<br />
NOTED IN THE MANUAL.<br />
Tools and Parts for Single Pump System<br />
Open-end wrenches: 1 /4", 5 /16", 7 /16", 3 /8"<br />
Manual Refill Valve Kit - see Table 7-1<br />
Manual Outlet Valve Kit - see Table 7-2<br />
Tools and Parts for Dual Pump System<br />
Open-end wrenches: 1 /4", 5 /16", 7 /16", 3 /8"<br />
Manual Refill Valve Kit -<br />
see Table 7-1 (two kits required)<br />
Gradient Mixer Package - part #68-1247-080<br />
Table 7-1 Manual Refill Valve Kits<br />
Pump Model<br />
Part Number<br />
1000D 68-1247-117<br />
500D 68-1247-083<br />
65DM, 100DM/DX, 260D 68-1247-077<br />
65D 68-1247-127<br />
7-1
D <strong>Series</strong> <strong>Syringe</strong> <strong>Pumps</strong><br />
Section 7 Gradient Pumping for Pressure, Flow, and Concentration Modes<br />
Table 7-2 Manual Outlet Valve Kits<br />
Pump Model<br />
Part Number<br />
1000D 68-1247-118<br />
500D 68-1247-082<br />
65DM, 100DM/DX, 260D 68-1247-078<br />
65D 68-1247-126<br />
7.2 Connecting the<br />
System<br />
The syringe pump has two ports at the top of the cylinder. One<br />
port is used as the inlet for filling the pump, and the other as the<br />
outlet (either port may be used as inlet or outlet). Inlet and outlet<br />
connections to each pump must be made identically. Standard<br />
plumbing connections vary between pump models. See Table 7-3<br />
for standard port information.<br />
When making fluid connections that use ferrules, be sure to use<br />
the ferrules supplied for that pump by Teledyne <strong>Isco</strong>. Push the<br />
tubing completely into the connector and finger-tighten. Then<br />
tighten with a wrench to clamp the ferrules onto the tubing.<br />
Table 7-3 Swaging Detail<br />
65DM,<br />
100DM/D<br />
X, 260D<br />
1 /8" Valco<br />
FERRULE<br />
NUT 5-16 - 24<br />
1/2 TURN PAST<br />
FINGER-TIGHT<br />
500D<br />
1 /8" NPT<br />
FRONT FERRULE<br />
BACK FERRULE<br />
NUT 5-16 - 24<br />
3/4 TURN PAST<br />
FINGER-TIGHT<br />
1000D<br />
1 /4" NPT<br />
FRONT FERRULE<br />
BACK FERRULE<br />
NUT 7-16 - 20<br />
1-1/4 TURN PAST<br />
FINGER-TIGHT<br />
65D<br />
1 /4" F250C Call Teledyne <strong>Isco</strong>.<br />
Note<br />
Pump models 260D, 100DM/DX, and 65DM have a direct connection,<br />
as shown in Figures 7-1 and 7-2 on the following<br />
page. Valve kits for other models include male adapter fittings.<br />
7-2
D <strong>Series</strong> <strong>Syringe</strong> <strong>Pumps</strong><br />
Section 7 Gradient Pumping for Pressure, Flow, and Concentration Modes<br />
A gradient pumping system includes<br />
high-pressure, two-way valves that connect the<br />
pump inlets to fluid reservoirs, and the pump<br />
outlets to the gradient mixer (dual pump<br />
system) or other apparatus (single pump<br />
system). Each refill kit and outlet valve<br />
package contains one two-way valve; the gradient<br />
package contains two. The kits contain<br />
all tubing and hardware necessary for valve<br />
installation.<br />
Two-Way<br />
Valve part<br />
#209-0098-05<br />
Following installation, the tubing connections must be tested for<br />
leaks before any program is run. If a leak is found, tighten the<br />
connection slightly. If the leak persists, swage the connection<br />
again with a new ferrule. Refer to Technical Bulletin TB05 Field<br />
Verification Procedures at<br />
http://www.isco.com/sp_applications/#techbulletins for leak test<br />
procedures.<br />
7-3
D <strong>Series</strong> <strong>Syringe</strong> <strong>Pumps</strong><br />
Section 7 Gradient Pumping for Pressure, Flow, and Concentration Modes<br />
7.2.1 Inlet Connections Kit components and connections are shown in Figure 7-1.<br />
1. Mount the inlet valve on the pump housing with the spacer<br />
block and screws provided.<br />
2. Connect the pre-bent SST tubing from one port of the valve<br />
to the pump inlet. Use the nut and ferrule to connect the<br />
tubing at the inlet and the valve fittings to connect the tubing<br />
at the valve.<br />
3. Connect the PTFE refill tubing (with the filter) to the other<br />
port of the valve, using the nuts and ferrules supplied.<br />
Note<br />
When connecting to pressurized sources in supercritical fluid<br />
applications, use the stainless steel tubing without a filter. An<br />
in-line filter is contained in the CO 2 connection package (refer<br />
to technical bulletin TB08 CO 2 Applications and Technical<br />
Notes at http://www.isco.com/sp_applications/#techbulletins).<br />
nut, ferrule<br />
pre-bent<br />
SST tubing<br />
to<br />
system<br />
spacer block<br />
PTFE tubing<br />
or<br />
stainless steel tubing<br />
filter<br />
valve<br />
Figure 7-1 Pump inlet connections<br />
7-4
D <strong>Series</strong> <strong>Syringe</strong> <strong>Pumps</strong><br />
Section 7 Gradient Pumping for Pressure, Flow, and Concentration Modes<br />
7.2.2 Outlet Connections Kit components and connections are shown in Figure 7-2.<br />
1. Mount the two-way outlet valve on the side of the pump<br />
housing opposite the refill valve, with the spacer block and<br />
screws provided.<br />
2. Connect the pre-bent SST tubing between one port of the<br />
valve and the pump outlet. Use the nut and ferrule to connect<br />
the tubing at the outlet and the valve fittings to connect<br />
the tubing at the valve.<br />
3. Connect the 5.1 cm length of 1 8" tubing to the other port of<br />
the valve, using the valve fittings.<br />
4. Connect the 1 8" side of the reducing union to the tubing.<br />
5. Connect the 1 16" side of the reducing union to the 1.5 m<br />
length of 1 16" tubing. (This tubing may be cut to an appropriate<br />
length.)<br />
FROM REFILL<br />
KIT ASSEMBLY<br />
pre-bent<br />
SST tubing<br />
spacer block<br />
SST tubing<br />
2-way<br />
valve<br />
TO<br />
APPARATUS<br />
Figure 7-2 Pump outlet connections<br />
7-5
D <strong>Series</strong> <strong>Syringe</strong> <strong>Pumps</strong><br />
Section 7 Gradient Pumping for Pressure, Flow, and Concentration Modes<br />
7.2.3 Dual System Gradient<br />
Connections<br />
Connection of the dual gradient system requires two refill valve<br />
kits and the gradient mixer package, as discussed in the introduction<br />
on Page 7-1.<br />
The static mixer has an internal volume of 3.1 µl and pressure<br />
rating of 413.7 bar, and is supplied with PEEK Fingertight III<br />
fittings for connection to the 1 /16" tubing in the kit.<br />
Note<br />
The static mixer can be replaced by a user-supplied dynamic<br />
mixer.<br />
Solvents are fed from each pump through the in-line filters and<br />
check valves, and into the static mixer, where they are mixed and<br />
fed into your system apparatus.<br />
Kit components and connections are shown in<br />
Figures 7-3 and 7-4.<br />
1. Connect the 10 cm length of 1 16" stainless steel tubing to<br />
the center port (outlet) of the mixer using the PEEK fittings<br />
provided.<br />
2. Connect the other end of the tubing to the Valco valve at<br />
the port marked “P” (pump), using a Valco 1 16" nut and ferrule.<br />
3. Connect the two in-line filters, oriented with flow toward<br />
the check valves (indicated by the arrow on the housing),<br />
one filter to each piece of 1 16" stainless steel tubing outlet<br />
from each pump.<br />
4. Using the PEEK fittings, connect the 45.7 cm lengths of<br />
1 16" stainless steel tubing to each inlet port on the mixer.<br />
Connect the other ends to the outlet fittings of the check<br />
valve assemblies.<br />
5. Connect the two check valve inlets to the outlets of the<br />
in-line filters with the 12.7 cm lengths of tubing.<br />
6. Press the check valves into the clips on the stand, as shown<br />
below, oriented with flow in the upward direction (indicated<br />
by the arrow on the housing).<br />
7-6
D <strong>Series</strong> <strong>Syringe</strong> <strong>Pumps</strong><br />
Section 7 Gradient Pumping for Pressure, Flow, and Concentration Modes<br />
1/8” OD X 0.069”ID<br />
SST TUBING<br />
INLET<br />
OUTLET<br />
OUTLET<br />
D<br />
INLET<br />
B<br />
C<br />
(from<br />
refill kit)<br />
VALVE A<br />
(from refill kit)<br />
1/8” OD X 0.085”ID<br />
PTFE TUBING<br />
1/8” TO<br />
1/16”<br />
REDUCER<br />
flow<br />
FILL RESERVOIR<br />
10µ FILTER<br />
flow<br />
INLINE<br />
FILTER<br />
(to<br />
apparatus)<br />
MIXER<br />
CHECK VALVES<br />
1/16” OD X 0.020”ID<br />
SST TUBING<br />
VALVE STAND<br />
Figure 7-3 Dual gradient system connections<br />
(Inlet valves (A & C) are from refill valve kits)<br />
Close-up of<br />
valve stand<br />
Close-up of mixer assembly<br />
Close-up of<br />
in-line filter<br />
flow<br />
flow<br />
Figure 7-4 Dual gradient connections: Detail<br />
7-7
D <strong>Series</strong> <strong>Syringe</strong> <strong>Pumps</strong><br />
Section 7 Gradient Pumping for Pressure, Flow, and Concentration Modes<br />
7.3 Single-Pump Gradient<br />
Programming<br />
A single-pump gradient program is based on either pressure or<br />
flow, and controlled by either time duration (in minutes) or rate<br />
of change (units per minute).<br />
The controller’s memory can contain a total of up to 200 steps.<br />
One program can contain from 1 to 200 steps.<br />
When operating in gradient mode, any connected pumps not used<br />
for gradient are inoperable.<br />
1. To access the gradient programming menus, press<br />
PRGM GRAD, select PRESSURE (2) or FLOW (3), and<br />
CONTINUE (C).<br />
The home screen will appear, with either PG (Pressure<br />
Gradient) or FG (Flow Gradient) in the upper left corner.<br />
PGa<br />
0.000mL/MIN 2PSI 013.28mL<br />
STOPPED<br />
FILE:1 00:00:00<br />
/MIN FINAL: PSI<br />
PROGRAM EDIT REVIEW OPTION<br />
2. Press PROGRAM (A).<br />
3. At the prompt, enter a file number between 1 and 99. This<br />
is the file name of your program, and can be the name of a<br />
new program you are creating, or a stored program you<br />
want to edit or run. Press ENTER.<br />
Note<br />
If a selected stored program is in a different mode than that of<br />
the controller selected in Step 1, a brief notification will appear,<br />
displaying the controller’s mode and the file’s mode. If you<br />
attempt to run the program without changing the mode of<br />
either it or the controller, the program will not run, and the<br />
same message will be displayed.<br />
4. To enter the flow rate for this program, either press<br />
FLOWRATE (A) and use the number keys and Enter, or for<br />
maximum possible flow, simply press MAX (C).<br />
ENTER FLOWRATE<br />
0.00000 XX.00000<br />
FLOWRATE<br />
PREVIOUS<br />
MAX<br />
5. To proceed to the programming screen, press<br />
STEP FWD (B).<br />
The programming screen will appear, with the file number<br />
and step number at the top of the screen.<br />
7-8
D <strong>Series</strong> <strong>Syringe</strong> <strong>Pumps</strong><br />
Section 7 Gradient Pumping for Pressure, Flow, and Concentration Modes<br />
PGa<br />
1. INIT = 0PSI 3. RATE = 0:00PSI/MIN<br />
2. FINAL = 0PSI 4. DURATION = 1.0MIN<br />
INSERT DELETE<br />
FGa<br />
FILE# 1 STEP# 1 STORE TO EXIT<br />
1. INIT% = 3. RATE = 0.00%/MIN<br />
2. FIN% =<br />
or<br />
FILE# 1 STEP# 1 STORE TO EXIT<br />
4. DURATION = 1.0MIN<br />
INSERT DELETE<br />
6. To set the initial pressure or flow for this step, press<br />
INIT (1) to activate this parameter. Use the number keys<br />
to enter the desired value, then press ENTER to save it.<br />
7. To set the final pressure or flow for this step, press<br />
FINAL (2) to activate this parameter. User the number<br />
keys to enter the desired value, then press ENTER to save<br />
it.<br />
8. Set either the desired RATE (3) of change or<br />
DURATION (4) in minutes. Once one value has been set<br />
and saved, the other will automatically appear.<br />
Note<br />
DURATION in minutes can have a resolution of 0.1, with a<br />
maximum of 9,999 minutes per step.<br />
9. If you want to add another step to the file program, press<br />
INSERT (C).<br />
10. The step number will increase by one, and the default initial<br />
value will be the final value entered for the previous<br />
step. Edit as desired.<br />
11. When programming is complete, press the STORE key to<br />
save the file and return to the home screen.<br />
12. To start the program, press RUN two times.<br />
Note<br />
When a gradient run is started, digital output 8 of the controller<br />
ACCESSORY connector will toggle from high to low (open to<br />
closed) for one second.<br />
Note that an entire gradient program can be removed only by<br />
deleting each of its steps one at a time, as discussed in<br />
Section 7.5 Review, Revise, & Hold Options. When the last<br />
remaining step is deleted, the entire file is removed.<br />
7-9
D <strong>Series</strong> <strong>Syringe</strong> <strong>Pumps</strong><br />
Section 7 Gradient Pumping for Pressure, Flow, and Concentration Modes<br />
7.4 Dual Pump<br />
Concentration<br />
Gradient<br />
Programming<br />
Two-pump concentration gradients enable proportionate use of<br />
two different fluids that combine at the mixer (refer to<br />
Figures 7-3 and 7-4).<br />
This type of pumping uses flow mode (FG) only. A single-pump<br />
gradient program is based on either pressure or flow, and controlled<br />
by either time duration (in minutes) or rate of change<br />
(units per minute).<br />
The controller’s memory can contain a total of up to 200 steps.<br />
One program can contain from 1 to 200 steps.<br />
When operating in gradient mode, any connected pumps not used<br />
for gradient are inoperable.<br />
1. To access the gradient programming menus, press<br />
PRGM GRAD, then DUAL SYSTEM GRADIENT (1) and<br />
CONTINUE (C).<br />
The home screen will appear, with FG (Flow Gradient) in<br />
the upper left corner.<br />
FGa<br />
STOPPED<br />
PROGRAM<br />
0.000mL/MIN 2PSI 013.28mL<br />
FILE:1 00:00:00<br />
FINAL: %B<br />
EDIT REVIEW OPTION<br />
2. Press PROGRAM (A).<br />
3. At the prompt, enter a file number between 1 and 99. This<br />
is the file name of your program, and can be the name of a<br />
new program you are creating, or a stored program you<br />
want to edit or run. Press ENTER.<br />
Note<br />
If a selected stored program is in a different mode than that of<br />
the controller selected in Step 1, a brief notification will appear,<br />
displaying the controller’s mode and the file’s mode. If you<br />
attempt to run the program without changing the mode of<br />
either it or the controller, the program will not run, and the<br />
same message will be displayed.<br />
4. To enter the flow rate for this program, either press<br />
FLOWRATE (A) and use the number keys and Enter, or for<br />
maximum possible flow, simply press MAX (C).<br />
ENTER FLOWRATE<br />
0.00000 XX.00000<br />
FLOWRATE<br />
PREVIOUS<br />
MAX<br />
7-10
D <strong>Series</strong> <strong>Syringe</strong> <strong>Pumps</strong><br />
Section 7 Gradient Pumping for Pressure, Flow, and Concentration Modes<br />
5. To proceed to the programming screen, press<br />
STEP FWD (B).<br />
The programming screen will appear, with the file number<br />
and step number at the top of the screen.<br />
FGa<br />
1. INIT% = 3. RATE = 0.00%/MIN<br />
2. FIN% =<br />
FILE# 1 STEP# 1 STORE TO EXIT<br />
4. DURATION = 1.0MIN<br />
INSERT DELETE<br />
6. To set the initial pressure or flow for this step, press<br />
INIT (1) to activate this parameter. Use the number keys<br />
to enter the desired value, then press ENTER to save it.<br />
7. To set the final pressure or flow for this step, press<br />
FINAL (2) to activate this parameter. User the number<br />
keys to enter the desired value, then press ENTER to save<br />
it.<br />
8. Set either the desired RATE (3) of change or<br />
DURATION (4) in minutes. Once one value has been set<br />
and saved, the other will automatically appear.<br />
Note<br />
DURATION in minutes can have a resolution of 0.1, with a<br />
maximum of 9,999 minutes per step.<br />
9. If you want to add another step to the file program, press<br />
INSERT (C).<br />
10. The step number will increase by one, and the default initial<br />
value will be the final value entered for the previous<br />
step. Edit as desired.<br />
11. When programming is complete, press the STORE key to<br />
save the file and return to the home screen.<br />
12. To start the program, press RUN two times.<br />
Note<br />
When a gradient run is started, digital output 8 of the controller<br />
ACCESSORY connector will toggle from high to low (open to<br />
closed) for one second.<br />
The flow rates and ramp rate for Pump A in each step will be in<br />
direct opposite proportion to the values set for Pump B (INIT%B,<br />
FIN%B, and RATE).<br />
Note that an entire gradient program can be removed only by<br />
deleting each of its steps one at a time, as discussed in the next<br />
section, 7.5 Review, Revise, & Hold Options. When the last<br />
remaining step is deleted, the entire file is removed.<br />
7-11
D <strong>Series</strong> <strong>Syringe</strong> <strong>Pumps</strong><br />
Section 7 Gradient Pumping for Pressure, Flow, and Concentration Modes<br />
7.5 Review, Revise, & Hold<br />
Options<br />
While in the programming menu, you can also:<br />
Delete – To delete the current step, press DELETE (D). A<br />
deleted step cannot be recovered. Used repeatedly, this command<br />
can be used to delete an entire file.<br />
Review – To review existing program steps, press<br />
STEP BACK (A) or STEP FWD (B).<br />
Add New – To add a new step between two existing steps, navigate<br />
through the program to the step just before your addition.<br />
Press INSERT (C) and program the new step.<br />
Note that the initial value of the next step will default to the<br />
final value of the new step, and may need to be edited if a different<br />
initial value is needed.<br />
While Running – A gradient program can be reviewed or edited<br />
while it is running. Simply press EDIT (B) or REVIEW (C) to<br />
begin. If a new step duration is shorter than the elapsed time for<br />
that step, the program will proceed to the next step. If the total<br />
flow rate is changed, the program will immediately start using<br />
the new rate.<br />
To return to the run screen, press RETURN (D).<br />
Hold – You can hold a running gradient in its current state while<br />
retrieving a different program file to run in its place. Press Hold<br />
and then Recall to access the new program.<br />
This feature is used mainly in applications where it is necessary<br />
to keep the system pressurized during method changes.<br />
External Start – When a gradient program is in Hold mode, a<br />
momentary low on digital input 2 of the controller ACCESSORY<br />
connector will start the program.<br />
7.6 Program Conclusion When a gradient program reaches the end, there are four<br />
selectable actions the system can then perform:<br />
• Hold the final value (example below)<br />
• Stop after the final step<br />
• Return to the initial value and hold it<br />
• Return to the initial value and repeat the program<br />
While the system is in gradient mode, these options can be edited<br />
at any point before or after gradient programming, and while a<br />
gradient is running.<br />
To access the options menu, from the home screen, press<br />
OPTIONS (D).<br />
GRADIENT ACTION=HOLD FINAL VALUE<br />
NEXT_ACTION<br />
PREVIOUS<br />
To scroll through the four options, press NEXT_ACTION (A).<br />
When you have reached the desired option, press PREVIOUS (D)<br />
to save and exit.<br />
7-12
D <strong>Series</strong> <strong>Syringe</strong> <strong>Pumps</strong><br />
Section 8 Continuous Flow Introduction,<br />
Installation, & Operation<br />
8.1 Introduction A D <strong>Series</strong> continuous flow pumping system consists of two<br />
syringe pumps and a valve accessory package regulated by one<br />
controller. This system allows you to continuously deliver your<br />
liquefied gas or liquid under constant flow or constant pressure<br />
mode.<br />
Continuous flow can be used in either of two modes: continuous<br />
constant pressure or continuous constant flow. Both of these<br />
modes assume positive displacement of the piston, with the<br />
exception of continuous Receive Mode (for detailed information<br />
about Receive Mode, refer to Technical Bulletin TB02, available<br />
on the Teledyne <strong>Isco</strong> web site).<br />
In any syringe pump continuous flow system there is a flow<br />
irregularity which occurs at the time of switchover from one<br />
pump module to the other. This flow irregularity can be measured<br />
as a pressure fluctuation. Teledyne <strong>Isco</strong> pressure fluctuation<br />
at switchover is ~0.35 bar (at system backpressures from<br />
6.9 bar to the single pump maximum).<br />
Before programming continuous flow, appropriate valves must be<br />
connected, the pumps must contain fluid, and there must be<br />
backpressure for operation.<br />
The following sections provide part numbers,<br />
specifications, and installation steps for:<br />
Continuous Flow Check Valves, on page 8-2<br />
Continuous Flow Air Valves, on page 8-8<br />
Continuous Flow Electric Valves, on page 8-13<br />
User Supplied Valves, on page 8-16<br />
Following these sections in the manual is information<br />
about:<br />
Operation, on page 8-17<br />
Operating Tips and Guidelines, on page 8-18<br />
Special Features, on page 8-19<br />
Accessories, on page 8-20<br />
8-1
D <strong>Series</strong> <strong>Syringe</strong> <strong>Pumps</strong><br />
Section 8 Continuous Flow Introduction, Installation, & Operation<br />
8.2 Continuous Flow<br />
Check Valves<br />
The following section describes the installation procedure for<br />
continuous flow check valves.<br />
Note<br />
Due to the higher operating pressure and special fittings, the<br />
model 65D pump requires hardware that is not listed in this<br />
section. Call the factory for details to configure a 65D pump for<br />
this type of operation.<br />
The check valve package connects two D-<strong>Series</strong> syringe pumps,<br />
allowing continuous flow operation. The tees, check valves, and<br />
connecting tubing come assembled so that you can quickly and<br />
easily install this package in your system. For additional convenience,<br />
the two lengths of pump connection tubing come with the<br />
fittings already attached. The only connections you have to make<br />
are between the pump tubing and the double check valve<br />
housings and between the outlet and inlet tubing and the tees.<br />
8.2.1 Check Valve Technical<br />
Specifications<br />
Dual system maximum flow rates under optimal conditions are<br />
approximately 65% of the max flow rate for each pump model.<br />
Table 8-1 Continuous Flow Technical Specifications-Check Valves:<br />
Pressure fluctuation at switchover<br />
Minimum<br />
Maximum system backpressure<br />
Maximum flow rate (ml/min)<br />
Liquids: 65% of the single pump<br />
maximum rate.<br />
Liquefied gases<br />
0.35 bar, at system backpressures from 6.9 bar to the single<br />
pump maximum. Higher fluctuation occurs at pressures below<br />
6.9 bar.<br />
3.5 bar<br />
Temperature range 0 to 40°C<br />
Wetted materials in valve packages:<br />
Check valves<br />
Tubing and fittings<br />
The single pump maximum. Valves rated to 689.5 bar<br />
C1000 265.2<br />
C500 132.6<br />
C260 69.55<br />
C100X 32.50<br />
C100M 16.25<br />
C65DM 19.50<br />
45% of the single pump maximum rate. Cylinder cooling jackets<br />
should be used to obtain this rate.<br />
SS316, sapphire, ruby, PEEK, PTFE<br />
SS316, gold<br />
8-2
D <strong>Series</strong> <strong>Syringe</strong> <strong>Pumps</strong><br />
Section 8 Continuous Flow Introduction, Installation, & Operation<br />
8.2.2 Dual Check Valve<br />
Installation<br />
Check valve installation<br />
(refer to Figure 8-1 or 8-2, depending on your pump model):<br />
Note<br />
Tighten fittings just enough to hold tubing in place. Final tightening<br />
will be done after all the tubing and fittings are in place.<br />
1. Move the pumps so that the pump bases are about 1.3 cm<br />
apart.<br />
2. Use the plugs to stopper the ports which will not be connected<br />
to the continuous flow package.<br />
DANGER<br />
RISK OF INJURY. THE PRESSURE PRODUCED<br />
COULD BE 700 BAR. PLEASE UTILIZE<br />
APPROPRIATE TUBING AND CONNECTIONS<br />
NOTED IN THE MANUAL.<br />
3. Attach the connectors appropriate to your pump to the 6.4<br />
cm unbent stainless steel tubing lengths and use the 1 8"<br />
nuts and ferrules to attach to the double check valve housings.<br />
4. Attach the inlet tubing assembly. The tubing you use<br />
depends upon whether or not your source is pressurized.<br />
a. Pressurized Reservoir:<br />
Connect the 1 8" 1.5 m stainless steel tubing to the<br />
bottom of the inlet tee, using high pressure valve fittings.<br />
Note<br />
The filter and PTFE tubing are not used.<br />
b. Nonpressurized Reservoir:<br />
Connect the 1 8" 1.5 m PTFE tubing to the bottom of<br />
each inlet check valve using the ferrule and nut with<br />
support spring provided in the package. Attach the tubing<br />
to the filter connector and then connect the filter.<br />
Note<br />
The stainless steel tubing is not used.<br />
5. Once the contents of the continuous flow package are<br />
totally assembled, attach the connectors appropriate for<br />
your pump on one side of the assembly to a port. Then, supporting<br />
the tee/valve assembly attach the other connector<br />
to the port of the second pump.<br />
6. Attach the outlet fittings to the top of the upper tee. Fittings<br />
for 1 8" tubing, as well as an optional reducing fitting<br />
8-3
D <strong>Series</strong> <strong>Syringe</strong> <strong>Pumps</strong><br />
Section 8 Continuous Flow Introduction, Installation, & Operation<br />
for 1 16" tubing, are provided. Use the fittings appropriate<br />
for your tubing size.<br />
7. Tighten all fittings.<br />
8.2.3 Inlet Tubing There are two types of inlet tubing provided with this kit. The<br />
stainless steel tubing is to be used for a pressurized inlet source,<br />
the PTFE tubing may be used if the source is not pressurized.<br />
DANGER<br />
RISK OF INJURY. THE PRESSURE PRODUCED<br />
COULD BE 700 BAR. PLEASE UTILIZE<br />
APPROPRIATE TUBING AND CONNECTIONS<br />
NOTED IN THE MANUAL.<br />
Note<br />
The fittings for connection to pressurized source are not provided.<br />
A CO 2 cylinder connection package (P/N 68-1247-043)<br />
is available. Refer to section 2A.3.2 of the Instruction Manual.<br />
8-4
D <strong>Series</strong> <strong>Syringe</strong> <strong>Pumps</strong><br />
Section 8 Continuous Flow Introduction, Installation, & Operation<br />
Figure 8-1 Check valve package installation:<br />
65DM/100D/265D/500D pumps<br />
8-5
D <strong>Series</strong> <strong>Syringe</strong> <strong>Pumps</strong><br />
Section 8 Continuous Flow Introduction, Installation, & Operation<br />
Table 8-2 Continuous Flow Check Valve Package for<br />
100D/260D /500D, part #68-1247-059<br />
Qty. Part Number Description<br />
3 loose 209-0169-41<br />
3 loose 209-0169-27<br />
2 209-0168-05<br />
2 209-0166-80<br />
1 8" ferrule<br />
1 8" nut<br />
1 8" pipe plug<br />
1 8" plug assembly<br />
4 60-2253-240 Check valve housing, analytical standard inlet<br />
4 60-3864-010 Check valve cartridge<br />
4 60-1243-519 6.4 cm 2.5" tubing<br />
2 60-1243-518 6.4 cm tubing<br />
1 60-1243-391 1.5 m - 0.125" tubing<br />
2 60-1243-557 1.5 m - 0.085 ID PTFE tubing<br />
2 60-1243-517 Double check valve housing<br />
2 209-0161-01 0.12" male connector<br />
2 209-0161-36 Tee union for 1 8" OD tubing<br />
1 209-0169-42 Reducing tubing connector 1 8" to 1 16"<br />
1 60-2258-019 Nut assembly<br />
1 209-0169-81 Male nut for 1 8" tubing<br />
2 209-0169-80 10 µ replacement filter<br />
8-6
D <strong>Series</strong> <strong>Syringe</strong> <strong>Pumps</strong><br />
Section 8 Continuous Flow Introduction, Installation, & Operation<br />
Outlet Tee<br />
1/4” 1000D<br />
Connector (2)<br />
Plug<br />
Check Valve,<br />
1/4 " Conn (4)<br />
Inlet Tee<br />
Plug<br />
Figure 8-2 Check valve package installation: 1000D pump<br />
Table 8-3 Continuous Flow Check Valve Package for 1000D,<br />
part #68-1247-128<br />
Qty. Part Number Description<br />
24" 004-7302-251 SST tubing .250 x .035<br />
6 60-1243-893 Valve-to-pump tubing<br />
2 209-0163-36 Male connector, 1/4" tube OD to 1/4" NPT<br />
4 209-0164-06 Check Valve w/ 1/4" tube connections<br />
4 209-0168-15 Tee union, 1/4" tube OD<br />
4 60-1243-936 2" x 2" SST tubing elbow<br />
8-7
D <strong>Series</strong> <strong>Syringe</strong> <strong>Pumps</strong><br />
Section 8 Continuous Flow Introduction, Installation, & Operation<br />
8.3 Continuous Flow Air<br />
Valves<br />
Air Valve Package<br />
Numbers<br />
Air valves generally open and close faster and are less prone to<br />
error and component wear, making them suitable for industrial<br />
use and other applications where the system will be constantly<br />
running; however, they require a user-supplied pressurized air<br />
source of 80 to 115 psi (5.5 to 7.9 bar).<br />
A1000 68-1247-104<br />
A500 68-1247-061<br />
A65DM, A260, A100M, A100X 68-1247-058<br />
A65 68-1247-129<br />
Table 8-4 Continuous Flow Technical Specifications-Air Valves:<br />
Pressure fluctuation at switchover<br />
Minimum<br />
Maximum system backpressure<br />
Air supply source pressure<br />
Maximum flow rate (ml/min)<br />
Liquids: 65% of the single pump<br />
maximum rate.<br />
Liquefied gases<br />
5 psi (0.35 bar), at system backpressures from 100 psi<br />
(6.9 bar) to the single pump maximum. Higher fluctuation<br />
occurs at pressures below 100 psi.<br />
50.76 psi (3.5 bar)<br />
Temperature range 0 to 40°C<br />
Wetted materials in valve packages:<br />
Air valves<br />
Check valves<br />
Tubing and fittings<br />
The single pump maximum. Valves rated to 10,000 psi<br />
(689.5 bar)<br />
80 to 115 psi (5.5 to 7.9 bar)<br />
A1000 265.2<br />
A500 132.6<br />
A260 69.55<br />
A100X 32.50<br />
A100M 16.25<br />
A65DM 19.50<br />
A65 16.25<br />
45% of the single pump maximum rate. Cylinder cooling jackets<br />
should be used to obtain this rate.<br />
Hastelloy, PEEK, and PTFE<br />
SS316, sapphire, ruby, PEEK, PTFE<br />
SS316, gold<br />
8.3.1 Dual Air Valve<br />
Installation<br />
To install the air valve package (refer to Figure 8-3, 8-4, or 8-5,<br />
depending on your pump model):<br />
1. Position the valve bases 1.3 cm apart.<br />
2. Use the plugs to stopper the ports which will not be connected.<br />
DANGER<br />
RISK OF INJURY. THE PRESSURE PRODUCED<br />
COULD BE 700 BAR. PLEASE UTILIZE<br />
8-8
D <strong>Series</strong> <strong>Syringe</strong> <strong>Pumps</strong><br />
Section 8 Continuous Flow Introduction, Installation, & Operation<br />
APPROPRIATE TUBING AND CONNECTIONS<br />
NOTED IN THE MANUAL.<br />
3. Loosely attach the tubing lengths from the valve assembly<br />
to the pumps.<br />
4. Allow the bracket to hang vertically; place the straps<br />
around the pressure transducer caps. Tighten the wingnuts.<br />
5. Install the four panhead screws on bottom of the bracket.<br />
Plumbing connections<br />
6. Tighten the tubing nuts.<br />
7. Connect the inlet tube to the supply reservoir. Connect the<br />
outlet tee to your apparatus.<br />
8-9
D <strong>Series</strong> <strong>Syringe</strong> <strong>Pumps</strong><br />
Section 8 Continuous Flow Introduction, Installation, & Operation<br />
Figure 8-3 Air valve installation for 65DM, 100DM/DX, 260D, and 500D pumps<br />
8-10
D <strong>Series</strong> <strong>Syringe</strong> <strong>Pumps</strong><br />
Section 8 Continuous Flow Introduction, Installation, & Operation<br />
Outlet<br />
Mounting plate<br />
Pressure<br />
transducer cap<br />
Cylinder head<br />
TOP VIEW<br />
Valve (2)<br />
Tee fitting (2)<br />
Air tubing to<br />
valve (8)<br />
Check<br />
valve<br />
Actuator<br />
To Controller<br />
(Red = +15V)<br />
Inlet from<br />
reservoir<br />
Air Supply<br />
Figure 8-4 Air valve installation for 1000D pump<br />
8-11
D <strong>Series</strong> <strong>Syringe</strong> <strong>Pumps</strong><br />
Section 8 Continuous Flow Introduction, Installation, & Operation<br />
Outlet<br />
Pressure<br />
transducer (2)<br />
TOP VIEW<br />
Cylinder<br />
head (2)<br />
Valve (2)<br />
Tee<br />
fitting (2)<br />
To Controller<br />
(Red = +15)<br />
Air tubing<br />
to valve (8)<br />
Actuator<br />
Check valve<br />
Inlet from<br />
reservoir<br />
Figure 8-5 Air valve installation for 65D pump<br />
8-12
D <strong>Series</strong> <strong>Syringe</strong> <strong>Pumps</strong><br />
Section 8 Continuous Flow Introduction, Installation, & Operation<br />
8.4 Continuous Flow<br />
Electric Valves<br />
Electric valves, which provide the best positive valve closure, are<br />
most commonly used in liquefied gas applications. Electric valves<br />
require the pump controller to be equipped with the valve driver<br />
board.<br />
Note<br />
The max flow rate for the E1000 dual system will tend to have<br />
a lower percentage flow rate due to port size restrictions, with<br />
a maximum flow rate equal to that of the E500 system<br />
(see Table 8-5).<br />
Electric Valve Package<br />
Numbers<br />
E1000 68-1247-109<br />
E500 68-1247-091<br />
E260, E100M, E100X 68-1247-090<br />
Note<br />
Electric valves are not available for the 65D pump. Please consult<br />
the factory for options.<br />
8.4.1 Technical<br />
Specifications<br />
Dual system maximum flow rates under optimal conditions are<br />
approximately 65% of the max flow rate for each pump model.<br />
Table 8-5 Continuous Flow Technical Specifications-Electric Valves:<br />
Pressure fluctuation at switchover<br />
Minimum<br />
Maximum system backpressure<br />
Maximum flow rate (ml/min)<br />
Liquids: 65% of the single pump<br />
maximum rate<br />
(excluding E1000 systems).<br />
Liquefied gases<br />
0.35 bar, at system backpressures from 6.9 bar to the single<br />
pump maximum. Higher fluctuation occurs at pressures below<br />
6.9 bar.<br />
3.5 bar<br />
Temperature range 0 to 40°C<br />
Wetted materials in valve packages:<br />
Check valves<br />
Tubing and fittings<br />
The single pump maximum. Valves rated to 689.5 bar<br />
E1000 132.6<br />
E500 132.6<br />
E260 69.55<br />
E100X 32.50<br />
E100M 16.25<br />
E65DM 19.50<br />
45% of the single pump maximum rate. Cylinder cooling jackets<br />
should be used to obtain this rate.<br />
SS316, sapphire, ruby, PEEK, PTFE<br />
SS316, gold<br />
8-13
D <strong>Series</strong> <strong>Syringe</strong> <strong>Pumps</strong><br />
Section 8 Continuous Flow Introduction, Installation, & Operation<br />
8.4.2 Dual Electric Valve<br />
Installation<br />
To install the electric valve package (refer to Figure 8-6):<br />
1. Position the valve bases 1.3 cm apart.<br />
2. Use the plugs to stopper the ports that will not be connected.<br />
DANGER<br />
RISK OF INJURY. THE PRESSURE PRODUCED<br />
COULD BE 700 BAR. PLEASE UTILIZE<br />
APPROPRIATE TUBING AND CONNECTIONS<br />
NOTED IN THE MANUAL.<br />
3. Loosely attach the tubing lengths from the valve assembly<br />
to the pumps.<br />
4. Allow the bracket to hang vertically and place the straps<br />
around the pressure transducer caps. Tighten the wingnuts.<br />
5. Install the four bracket panhead screws on the bottom of<br />
the bracket.<br />
Plumbing connections<br />
Electrical connections<br />
6. Tighten the tubing nuts.<br />
7. Connect the inlet tube to the supply reservoir. Connect the<br />
outlet tee to your apparatus.<br />
8. Connect the DB-25 cable to the controller rear panel “SFX<br />
220/VALVES” connector (Figure 8-6).<br />
8-14
D <strong>Series</strong> <strong>Syringe</strong> <strong>Pumps</strong><br />
Section 8 Continuous Flow Introduction, Installation, & Operation<br />
Figure 8-6 Electric valve installation<br />
8-15
D <strong>Series</strong> <strong>Syringe</strong> <strong>Pumps</strong><br />
Section 8 Continuous Flow Introduction, Installation, & Operation<br />
8.5 User Supplied Valves Users may also choose to supply their own valves. The following<br />
information is necessary to choose the appropriate valves to work<br />
with Teledyne <strong>Isco</strong> Continuous Flow software.<br />
• Check valves<br />
Do not use spring loaded check valves if refilling at<br />
atmospheric pressure; the pump seals are not designed to<br />
draw against a vacuum. The balls in Teledyne <strong>Isco</strong> check<br />
valves are closed by gravity.<br />
• Powered valves<br />
These are electrically triggered from the pump controller<br />
and could be air or electrically actuated. Digital outputs<br />
1-4 provide signals for control of four two-way valves. One<br />
wire for each valve is connected to its specific connector on<br />
the rear of the controller. A second wire for each valve<br />
connects to ground. The signal provided is an open collector<br />
which functions as a switch open for closure of the fluid<br />
path. A switch closure (low) signals opening of the fluid<br />
path.<br />
Table 8-6 presents the relationship between the digital output,<br />
pump valve location and the fluid path status for the “ACCESS<br />
CTRL” connections. Refer to the accessory control connections on<br />
the rear panel of the pump controller.<br />
Table 8-6 Accessory Control Digital Outputs<br />
Digital<br />
Output<br />
Pump Valve<br />
Location<br />
Fluid Path Status<br />
1 A Inlet (open or closed)<br />
2 A Outlet (open or closed)<br />
3 B Inlet (open or closed)<br />
4 B Outlet (open or closed)<br />
Alternate connections can be made to drive low power 12-15 V<br />
relays or electric valves. Assume two wires per relay or valve.<br />
The first wire is connected to the appropriate digital output on<br />
the back of the pump controller. The second wire can be connected<br />
to the +15 V connector, to supply a maximum of 200 mA<br />
for switching of relays or valves. Observe correct polarity if the<br />
valve or relay is polarized.<br />
8-16
D <strong>Series</strong> <strong>Syringe</strong> <strong>Pumps</strong><br />
Section 8 Continuous Flow Introduction, Installation, & Operation<br />
8.6 Operation Once your valve package has been properly installed and you<br />
have insured that fluid connections are leak free, you are ready<br />
to begin operating your system.<br />
Note<br />
Teledyne <strong>Isco</strong> convention is to name the pumps “pump A” and<br />
“pump B,” reading from left to right.<br />
Before running in continuous flow mode, become familiar with<br />
independent mode, which allows the controller to operate two<br />
pumps independently and simultaneously. You must operate the<br />
two pumps manually for initial setup, i.e. refill and purging of<br />
air. If the Teledyne <strong>Isco</strong> air valve package is used, the air valves<br />
are switched through the “ACCESS CTRL” key. Lights on the air<br />
switches indicate which valves are open.<br />
8.6.1 Continuous Flow Setup Continuous flow mode is found under the multi-pump options on<br />
the second page of the main menu (MORE). Once you have<br />
accessed the multi-pump options you may select continuous flow<br />
- constant flow mode or constant pressure mode.<br />
To set up continuous<br />
constant flow<br />
To set up continuous<br />
constant pressure<br />
1. Press the orange MENU key on the controller front panel.<br />
2. Press softkey A, MORE, to access the second page of the<br />
main menu.<br />
3. Press the 4 key on the numeric keypad to select number 4.<br />
MULTI-PUMP. The multi-pump menu will then be displayed.<br />
4. Press the 1 key on the numeric keypad to select 1. CON-<br />
TIN CONST FLOW. The 1. will blink, indicating that the<br />
controller is set to this mode.<br />
5. Press softkey D, PREVIOUS, three times to return to the<br />
run screen.<br />
The controller has now automatically set the pump to continuous<br />
constant flow mode.<br />
1. Press the orange MENU key on the controller front panel.<br />
2. Press softkey A, MORE, to access the second page of the<br />
main menu.<br />
3. Press the 4 key on the numeric keypad to select number 4.<br />
MULTI-PUMP. The multi-pump menu will then be displayed.<br />
4. Press the 2 key on the numeric keypad to select 2. CON-<br />
TIN CONST PRESS. The 2. will blink indicating that the<br />
controller is set to this mode.<br />
5. Press softkey D, PREVIOUS, three times to return to the<br />
run menu.<br />
The controller is now set to continuous constant pressure mode.<br />
8-17
D <strong>Series</strong> <strong>Syringe</strong> <strong>Pumps</strong><br />
Section 8 Continuous Flow Introduction, Installation, & Operation<br />
8.6.2 Continuous Flow<br />
Features<br />
Volume Totalizer<br />
To reset the volume totalizer<br />
to zero<br />
Valve Specification<br />
The following features are used to define your continuous flow<br />
operation.<br />
The total volume delivered (in liters) is given on the display at<br />
the right top corner.<br />
1. Press the orange MENU key on the controller front panel.<br />
2. Press softkey A, MORE, to access the second page of the<br />
main menu.<br />
3. Press 5 on the numeric keypad to select 5. TOTAL VOL-<br />
UME RESET.<br />
4. Press softkey D, PREVIOUS, twice to return to the run<br />
screen. The displayed volume will be zero.<br />
It is important to specify in the menu the type of valve package<br />
being used for continuous flow. This will assure minimum<br />
pressure fluctuation at switchover.<br />
To specify valves installed<br />
8.7 Operating Tips and<br />
Guidelines<br />
Operational Overview –<br />
When using liquids<br />
1. Press the orange MENU key on the controller front panel.<br />
2. Press softkey A, MORE, to access the second page of the<br />
main menu.<br />
3. Press 6 on the numeric keypad to select 6. VALVE.<br />
4. Press 1 or 2 on the numeric keypad to specify Active (air<br />
actuator) or Passive (check valves) installed.<br />
5. Press softkey D, PREVIOUS, three times to return to the<br />
run screen.<br />
The following tips and guidelines are provided by our research<br />
laboratory. Please familiarize yourself with them before operating<br />
your continuous flow system.<br />
• Temperature changes can cause pressure fluctuations,<br />
especially if a restrictor is being used for backpressure.<br />
• Pressure limits for continuous constant flow mode are<br />
set by the limits of pump A.<br />
• For correct overpressure response, overpressure<br />
shutdown must be set to shutdown “ON” under pump<br />
limit options.<br />
• Always check the flow rate before pressing the RUN key,<br />
especially after using the pump in a mode other than<br />
continuous flow. For example, a flow rate can be carried<br />
over from independent mode control of pump A.<br />
• Refill rates: As a rule of thumb, the refill rate should be<br />
at least twice the flow rate setpoint (in continuous<br />
constant flow) to allow time for refill and repressurization<br />
before the next switchover. The same refill rate<br />
should be entered separately for pumps A and B.<br />
1. Degas liquids if appropriate.<br />
2. Fill both pumps completely.<br />
8-18
D <strong>Series</strong> <strong>Syringe</strong> <strong>Pumps</strong><br />
Section 8 Continuous Flow Introduction, Installation, & Operation<br />
3. Zero pressure in each pump (requires valves open to atmosphere).<br />
4. Purge air.<br />
5. Perform the total volume reset operation, as previously<br />
described.<br />
6. Be sure “ON CONT FLOW” is displayed on the screen.<br />
7. When the pumps start delivering, the system will go<br />
through an equilibration phase. To properly equilibrate the<br />
pumps, they must be full and delivering fluid during equilibration<br />
phase.<br />
8. Press RUN.<br />
Operational Overview –<br />
When using liquefied gases<br />
1. Zero pressure in each pump if empty (valves must be open<br />
to atmosphere).<br />
2. Fill both pumps completely.<br />
3. Pressurize both pumps.<br />
4. Perform the total volume reset operation.<br />
5. Be sure “ON CONT FLOW” is displayed on the screen.<br />
6. Press the RUN key.<br />
8.8 Special Features The following special features may be useful for your continuous<br />
flow applications.<br />
8.8.1 Remote Start/Stop The D <strong>Series</strong> syringe pump can be externally started or stopped<br />
by switch contact closure or TTL input. The TTL input voltage is<br />
5 volts and is internally pulled high (RUN). The input is level<br />
sensitive and must remain High for RUN and Low for STOP.<br />
The control wire should be connected to terminal 1, and the<br />
common wire should be connected to digital ground. To use the<br />
remote RUN/STOP feature, first press RUN or force the<br />
Run/Stop pin low and then high to start the pumps. Thereafter,<br />
the Run/Stop pin will control operation. Pressing STOP on the<br />
front panel will override the Run/Stop pin.<br />
8.8.2 External Analog<br />
Control<br />
8.8.3 Serial Control and<br />
Monitoring<br />
Flow or pressure setpoints can be externally controlled by analog<br />
voltage. Two wires are required for analog control. The analog<br />
common or ground wire should be connected to the GND terminal<br />
under ANALOG INPUT, and the analog control signal (or<br />
input) should be connected to terminal 1 under ANALOG INPUT.<br />
For more information, see section 3.7 of this instruction manual.<br />
The pumps can be externally controlled with a computer which<br />
has an RS-232-C serial output. The serial interface accepts<br />
English command words from the computer, like constant<br />
pressure, refill, etc. For more information, see Section 6, Serial<br />
Interface.<br />
8-19
D <strong>Series</strong> <strong>Syringe</strong> <strong>Pumps</strong><br />
Section 8 Continuous Flow Introduction, Installation, & Operation<br />
8.9 Accessories Teledyne <strong>Isco</strong> offers a temperature control jacket (68-1247-057)<br />
for the all pumps. Temperature control jackets are compatible<br />
with continuous flow valve packages and may be needed, for<br />
example, for barrel cooling when pumping a liquefied gas.<br />
Teledyne <strong>Isco</strong> Continuous Flow systems do not include temperature<br />
control jackets.<br />
Temperature control jacket<br />
part numbers<br />
1000D 68-1247-115<br />
500D 68-1247-057<br />
65D, 100DM/DX, 260D 68-1247-047<br />
Insulation covers are not compatible with continuous flow valve<br />
packages and should not be needed with the flow rates used in<br />
continuous flow.<br />
For information on other accessories please contact Teledyne <strong>Isco</strong><br />
at:<br />
(800) 228-4373 or (402) 464-0231<br />
or<br />
<strong>Isco</strong>Info@teledyne.com<br />
8-20
D <strong>Series</strong> <strong>Syringe</strong> <strong>Pumps</strong><br />
Section 9 Modifier Addition<br />
9.1 Introduction The Teledyne <strong>Isco</strong> modifier addition systems utilize two D <strong>Series</strong><br />
syringe pumps regulated by one controller to deliver a mixture of<br />
supercritical fluid and modifier to one or more Model SFX 2-10,<br />
SFX 220, or SFX 3560 extractors.<br />
Note<br />
The configurations described in this section apply to 65DM,<br />
100DM, 100DX, 260D, 500D, and 1000D pumps that use Valco<br />
or SSI fittings.<br />
The 65D pump can be configured and operated in a similar<br />
manner. However, due to the higher operating pressure and<br />
the AE F250C fittings, the 65D requires hardware that is not<br />
listed in this section. Call the factory for details to configure a<br />
65D pump for this type of operation.<br />
Pump A delivers supercritical fluid while pump B meters modifier.<br />
Both fluids pass through one-way check valves before they<br />
meet and are blended together in a mixing tee. Modifier concentrations<br />
of up to 100 percent (v/v) are programmable via the controller.<br />
If higher concentrations are needed, put the modifier in<br />
pump A to be delivered as the primary fluid.<br />
Both pumps operate in constant pressure mode and will flow up<br />
to their maximum rate to maintain the set pressure. When modifier<br />
addition mode is selected and the RUN key is pressed, pump<br />
A pressure is ramped at its maximum flow rate to the set<br />
pressure while pump B waits at a lower pressure (3.5 bar).<br />
The user can increase the pump B minimum pressure if the modifier<br />
boils at room temperature and 3.5 bar. See Section 9.4, Modifier<br />
Addition.<br />
Once pump A has reached the set pressure, the controller will<br />
enter a hold mode and wait for a pressure drop, with opening the<br />
extractor inlet to signal the start of “EQUILIBRATION,” or the<br />
user can press the “RUN” key to start equilibration.<br />
Note<br />
Flow must then be started through the system by opening all<br />
valves! The modifier pump will not equilibrate properly without<br />
flow.<br />
Then pump B pressure is slowly ramped upward until its check<br />
valve is detected to open. At this point, the controller exits<br />
“EQUILIBRATION” mode and displays the message<br />
“RUNNING” on the front panel display.<br />
9-1
D <strong>Series</strong> <strong>Syringe</strong> <strong>Pumps</strong><br />
Section 9 Modifier Addition<br />
When “RUNNING” is displayed, the controller monitors pump A<br />
piston movement and calculates the pump B piston movement<br />
required to deliver the correct ratio of modifier. If pump A cannot<br />
maintain the set pressure, as when the extraction cartridges are<br />
initially filling or pump A is refilling, the controller reverts to<br />
‘EQUILIBRATION” and pump B pressure is dropped below that<br />
of pump A to avoid delivery of incorrect modifier concentrations.<br />
Once the pump A set pressure is reestablished, the system will<br />
re-equilibrate.<br />
When pump B needs refilling, it must first be placed under independent<br />
control as you must run it to return 5-10 ml of modifier<br />
back through the valve to be sure that the cylinder is free of air.<br />
Note<br />
To properly equilibrate the pumps, they must be delivering<br />
fluid.<br />
9.2 Plumbing Kit for<br />
Modifier Addition<br />
The modifier addition kit (P/N 68-1247-079) is detailed in<br />
Table 9-1. This package is used to connect the outlets of two<br />
pumps together, using a Valco 1 16” tee as a mixer.<br />
Table 9-1 Modifier Addition Kit<br />
Part Number Description<br />
209-0169-47 Tee union fitting<br />
60-1243-540<br />
1 16” OD 12 cm tubing<br />
209-0169-34<br />
1 16” Ferrule<br />
209-0169-35<br />
1 16” Gland nut<br />
60-2253-209 Standard check valve housing<br />
60-3864-010 Check valve cartridge<br />
60-1243-516 Single check valve housing<br />
209-0169-41<br />
1 8” Ferrule, zero vol<br />
209-0169-27<br />
1 8” nut<br />
60-1243-539<br />
1 16” OD 1.5 m tubing<br />
60-1243-659 Valve spacer<br />
209-0098-05 2-way valve - 1 8” OD<br />
60-1243-658 Tubing, valve inlet<br />
60-1243-644 Tubing, check valve<br />
209-0162-10 Reduction union<br />
60-1243-570 Tubing<br />
209-0161-80 Check valve cartridge<br />
60-1243-691 Check valve/mixer tubing<br />
Appropriate screws and washers also included.<br />
(P/N 68-1247-079)<br />
9-2
D <strong>Series</strong> <strong>Syringe</strong> <strong>Pumps</strong><br />
Section 9 Modifier Addition<br />
The mixing tee union fitting, check valves, and pre-bent SST<br />
tubing comes assembled so that you can quickly and easily<br />
install it in your system, refer to Figure 9-1.<br />
For additional convenience, this package is pre-assembled. The<br />
only connections you have to make are to the pump outlet ports<br />
and the outlet tubing from the tee (not provided).<br />
The PTFE tubing (P/N 023-0504-02) and filter (P/N 209-9012-10)<br />
from refill kit should be connected to the inlet valve of pump B.<br />
To install the modifier<br />
addition kit<br />
DANGER<br />
RISK OF INJURY. THE PRESSURE PRODUCED<br />
COULD BE 700 BAR. PLEASE UTILIZE<br />
APPROPRIATE TUBING AND CONNECTIONS<br />
NOTED IN THE MANUAL.<br />
1. Attach a 2-way valve to each pump housing, using the<br />
spacer block and screws.<br />
Note<br />
Tighten fittings just enough to hold tubing in place. Final tightening<br />
will be done after all tubing and fittings are connected.<br />
2. Attach the pump outlet tubing/2-way valve assembly to<br />
each pump outlet.<br />
3. Attach the 10.2 cm pre-bent SST tubing from the check<br />
valve inlet to the 2-way valve outlet.<br />
4. Connect your tubing from the tee outlet to your equipment.<br />
Note<br />
Tubing for connection to user equipment is not provided.<br />
Optional 1 16" and 1 8" OD stainless steel tubing may be ordered<br />
through Teledyne <strong>Isco</strong>, see optional accessories sections 2A.8<br />
and 2B.6.<br />
All fittings may now be retightened.<br />
9-3
D <strong>Series</strong> <strong>Syringe</strong> <strong>Pumps</strong><br />
Section 9 Modifier Addition<br />
DANGER<br />
RISK OF INJURY. THE PRESSURE PRODUCED<br />
COULD BE 700 BAR. PLEASE UTILIZE APPRO-<br />
PRIATE TUBING AND CONNECTIONS NOTED IN<br />
THE MANUAL.<br />
Figure 9-1 Modifier addition kit installation<br />
Note<br />
Figure 9-1 shows the two pumps with the refill kits installed.<br />
The instructions for this are provided in sections 2A.3.1 and<br />
2B.3.1 (Figure 2A-4). When preparing your system for modifier<br />
operation, if you are connecting pump A to a CO 2 tank, you will<br />
need to use the stainless steel tubing (P/N 60-1243-391) and<br />
appropriate CO 2 connecting fittings. If you do not have these<br />
fittings, a CO 2 cylinder connection package (P/N 68-1247-043)<br />
may be ordered from Teledyne <strong>Isco</strong>.<br />
9-4
D <strong>Series</strong> <strong>Syringe</strong> <strong>Pumps</strong><br />
Section 9 Modifier Addition<br />
9.3 Initial Preparation for<br />
Modifier Addition<br />
When first setting up the D <strong>Series</strong> pump system under modifier<br />
mode, the pumps should be zeroed and filled. To accomplish this,<br />
the pumps should first be placed under independent control -<br />
constant pressure mode.<br />
Note<br />
Once the modifier system is operating, the system does not<br />
need to be zeroed before refilling.<br />
To designate independent<br />
control (constant pressure<br />
mode)<br />
To designate constant<br />
pressure<br />
To zero the pumps<br />
To fill pump B with modifier<br />
1. If the pumps are running, press the STOP key once.<br />
2. Press the MENU key.<br />
3. Press softkey A - MORE.<br />
4. Press 4 - MULTI-PUMP, to display the multi-pump menu.<br />
5. Press 4 - INDEPENDENT to designate that the pumps be<br />
operated under independent control. The number 4 will<br />
blink, indicating that independent has been selected.<br />
6. Press softkey D - PREVIOUS, twice to return to the main<br />
menu.<br />
1. Press the blue CONST PRESS key on the front panel keypad.<br />
1. Place the pumps in independent control - constant pressure<br />
mode, as detailed above.<br />
2. Be sure the pumps are stopped.<br />
3. Disconnect the inlet tubing from the inlet valve of pump A.<br />
4. Select 2 pump independent control/constant pressure<br />
mode.<br />
5. Open the inlet valves of each pump.<br />
6. Run both pumps to their empty positions.<br />
7. Zero the pressure on each pump.<br />
8. Reconnect the pump A inlet tubing to the inlet valve.<br />
1. Place the pumps in independent control - constant pressure<br />
mode, as detailed above.<br />
2. Be sure the pumps are stopped.<br />
3. Close the pump B outlet valve and open the pump B inlet<br />
valve.<br />
4. Press the REFILL key on the front panel keypad. Press<br />
softkey B to designate that pump B is the active pump (the<br />
pump being refilled). Pump B will fill with modifier.<br />
5. After pump B has filled, press run and deliver 5-10 ml of<br />
modifier back through the inlet valve, to ensure all air is<br />
purged from the pump, before pressing stop.<br />
6. Close the inlet valve.<br />
9-5
D <strong>Series</strong> <strong>Syringe</strong> <strong>Pumps</strong><br />
Section 9 Modifier Addition<br />
Figure 9-2 Two pump modifier system<br />
Note<br />
Make sure you purchase a “dip-tube” CO 2 tank.<br />
To fill pump A with<br />
supercritical fluid (helium<br />
head-space tank)<br />
1. Place the pumps in independent control - constant pressure<br />
mode, as detailed above.<br />
2. Be sure the pumps are stopped.<br />
3. Close the pump A outlet valve before opening the tank supply<br />
valve and pump A inlet valve.<br />
4. Press the REFILL key on the front panel keypad. Press<br />
softkey A to designate that pump A is the active pump (the<br />
pump being refilled). Pump A will fill with pressurized<br />
fluid.<br />
9-6
D <strong>Series</strong> <strong>Syringe</strong> <strong>Pumps</strong><br />
Section 9 Modifier Addition<br />
5. After pump A has refilled, wait 15 seconds before closing<br />
the tank supply valve and pump A inlet valve.<br />
9.4 Modifier Addition Once the pressure has been zeroed and both pumps are filled,<br />
you are ready to set up your modifier addition parameters. You<br />
will need to place the pumps in modifier mode, set the pressure<br />
limits (under the limits option on the main menu) and designate<br />
the percent of modifier (found under % pump on the run screen)<br />
to be added. If your modifier boils at 3.5 bar at room temperature,<br />
you may want to increase the minimum pressure for pump<br />
B to prevent vapor (the default minimum pressure is 3.5 bar).<br />
To select modifier mode<br />
To change the minimum<br />
modifier pressure<br />
To select the limits<br />
1. Press the orange MENU key and press softkey A - MORE.<br />
2. Select 4, MULTI-PUMP, to access the multi-pump menu.<br />
3. Then select MODIFIER by pressing the 3 on the numeric<br />
keypad. The 3 will begin to blink, indicating that modifier<br />
mode has been selected.<br />
4. Press softkey D, PREVIOUS, three times to return to the<br />
main menu.<br />
1. Press the orange MENU key and press softkey A - MORE.<br />
2. Select 4, MULTI-PUMP, to access the multi-pump menu.<br />
3. Then select MIN MOD PRESS by pressing the softkey B.<br />
4. To change the minimum modifier pressure, press the softkey<br />
B and enter the desired minimum pressure using the<br />
numeric keypad and press the ENTER key to store the<br />
value.<br />
5. Then press softkey D, again, to return to the multi-pump<br />
menu.<br />
1. Once modifier mode has been selected, the desired pressure<br />
limits must be set. Select number 2, LIMITS, from the<br />
main menu.<br />
2. The pump for which the limits are being set will be shown<br />
on the top left of the display, LIMITS: PUMP A. If it is any<br />
pump other than pump A, press softkey A. LIMITS: PUMP<br />
A will then be displayed.<br />
3. Press number 1 to select limits and then 1 again to set the<br />
MAX pressure limits. Enter the desired maximum pressure<br />
using the numeric keypad and press the ENTER key<br />
to store the value. Then press softkey D, PREVIOUS, to<br />
return to the limits menu.<br />
4. If you need to change the minimum pressure limit, press 2<br />
- MIN. Enter the desired minimum pressure using the<br />
numeric keypad and press the ENTER key to store the<br />
value.<br />
5. Press softkey D, PREVIOUS, to return to the limits menu.<br />
6. Then press softkey D, again, to return to the main menu,<br />
and D, again, to return to the run screen.<br />
9-7
D <strong>Series</strong> <strong>Syringe</strong> <strong>Pumps</strong><br />
Section 9 Modifier Addition<br />
7. MODIFIER ON will be displayed above softkey B, and %<br />
PUMP will be displayed above softkey C. To designate the<br />
desired modifier concentration, press softkey C. Then use<br />
the numeric keys to enter the desired percentage of modifier.<br />
Press the enter key to save the desired value.<br />
8. Open the outlet valves of both pumps if they are not open.<br />
9. Press the RUN key on the controller front panel keypad.<br />
10. When A pressure is established, the message “HOLD:<br />
PRESS RUN” will be displayed.<br />
11. Open the extractor inlet valves.<br />
12. The message “EQUILIBRATE” will be displayed on the<br />
controller screen. If the controller does not display<br />
“EQUILIBRATE,” press the RUN key. While this message<br />
is displayed, no modifier will be delivered.<br />
13. Immediately open the extractant outlet valve(s).<br />
Note<br />
Flow MUST be established through the system at or before the<br />
time “EQUILIBRATE” is displayed. To properly equilibrate the<br />
pumps, they must be delivering fluid.<br />
14. Once the message “Running” is displayed, modifier will be<br />
delivered at the selected rate.<br />
9.5 Refilling Once your modifier addition system is running, you will occasionally<br />
need to refill the pumps. The system must be stopped<br />
while the pumps are refilling. Pump A, the “CO 2 ” pump, may be<br />
refilled simply by designating the pump to be refilled and then<br />
pressing the REFILL key on the front panel (refer to instructions<br />
below). Pump B, “the modifier pump”, may also be refilled in this<br />
manner. However, if you wish to ensure that air is purged from<br />
pump B, it must be placed under independent control before<br />
refilling. Once under independent control, the pump will run<br />
until 5-10 ml of modifier are delivered back to the source (see<br />
refilling pump B below).<br />
To refill pump A (the CO 2<br />
pump)<br />
1. Press the STOP key.<br />
2. Close the outlet valves of both pumps.<br />
3. Press the REFILL key, and press softkey A to designate<br />
pump A.<br />
4. As soon as the pump pressure drops below the known tank<br />
pressure, open the tank supply valve and the pump A inlet<br />
valve.<br />
5. After pump A has refilled, the message “cylinder full” will<br />
be displayed on the controller front panel. Wait 15 seconds<br />
before closing the tank supply valve and the pump A inlet<br />
valve.<br />
6. Open the outlet valves of both pumps if they are not open.<br />
7. Press the RUN key on the controller front panel keypad.<br />
9-8
D <strong>Series</strong> <strong>Syringe</strong> <strong>Pumps</strong><br />
Section 9 Modifier Addition<br />
8. When A pressure is established, the message “HOLD:<br />
PRESS RUN” will be displayed.<br />
9. Open the extractor inlet valves.<br />
10. The message “EQUILIBRATE” will be displayed on the<br />
controller screen. If the controller does not display<br />
“EQUILIBRATE,” press the RUN key. While this message<br />
is displayed, no modifier will be delivered.<br />
11. Immediately open the extractant outlet valve(s).<br />
Note<br />
Flow MUST be established through the system at or before the<br />
time “EQUILIBRATE” is displayed. To properly equilibrate the<br />
pumps, they must be delivering fluid.<br />
12. Once the message “Running” is displayed, modifier will be<br />
delivered at the selected rate.<br />
To refill pump B (the<br />
modifier pump)<br />
1. Press the STOP key.<br />
2. Close the outlet valves of both pumps.<br />
3. Take the pumps out of modifier mode by pressing softkey B<br />
under the words “MODIFIER”. The word ON will change<br />
to OFF above the modifier.<br />
4. Open the inlet valve of pump B.<br />
5. Press the REFILL key, and press softkey B to designate<br />
Pump B.<br />
6. After pump B has filled, press the CONST FLOW key and<br />
set the desired purging flow rate. Press the RUN key and<br />
deliver 5-10 ml of modifier back through the inlet valve.<br />
This ensures that all air is purged from the pump.<br />
7. Press the red STOP key on the controller front panel keypad.<br />
Then press softkey B.<br />
To start modifier 1. Return to constant pressure mode by pressing softkey D,<br />
“SELECT PUMP,” and then softkey A.<br />
2. Place the pump in modifier mode by pressing softkey B<br />
under the words “MODIFIER.” The word OFF will change<br />
to ON above “MODIFIER.”<br />
3. Open the outlet valves of both pumps if they are not open.<br />
4. Press the RUN key on the controller front panel keypad.<br />
5. When A pressure is established, the message “HOLD:<br />
PRESS RUN” will be displayed.<br />
6. Open the extractor inlet valves.<br />
7. The message “EQUILIBRATE” will be displayed on the<br />
controller screen. If the controller does not display<br />
“EQUILIBRATE,” press the RUN key. While this message<br />
is displayed, no modifier will be delivered.<br />
8. Immediately open the extractant outlet valve(s).<br />
9-9
D <strong>Series</strong> <strong>Syringe</strong> <strong>Pumps</strong><br />
Section 9 Modifier Addition<br />
Note<br />
Flow MUST be established through the system at or before the<br />
time EQUILIBRATE is displayed. To properly equilibrate the<br />
pumps, they must be delivering fluid.<br />
9. Once the message “Running” is displayed, modifier will be<br />
delivered at the selected rate.<br />
9.5.1 Remote Start/Stop The D <strong>Series</strong> syringe pump RUN/STOP function can be externally<br />
controlled by switch contact closure on TTL input. The<br />
input voltage is 5 volts and is internally pulled high (RUN). The<br />
input is level sensitive and must remain High for RUN and Low<br />
for STOP.<br />
The control wire should be connected to terminal 1 and the<br />
common wire should be connected to digital ground. To use the<br />
remote RUN/STOP feature, first press RUN or force the<br />
Run/Stop pin low and then high to start the pumps. Thereafter,<br />
the Run/Stop pin will control operation. Pressing STOP on the<br />
front panel will override the Run/Stop pin.<br />
9.5.2 External Analog<br />
Control<br />
The pumps can be externally controlled by analog voltage. Two<br />
wires are required for analog control. The analog common or<br />
ground wire should be connected to the GND terminal under<br />
ANALOG INPUT and the analog control signal (or input) should<br />
be connected to terminal 1 under ANALOG INPUT. For more<br />
information, see section 3.7 of the instruction manual.<br />
9.5.3 Serial Control The pumps can be externally controlled with any IBM-PC or<br />
compatible which has RS-232-C serial output. The serial<br />
interface accepts English command words from the computer like<br />
constant pressure, refill, etc. For more information, see Section 6,<br />
Serial Interface.<br />
9-10
D <strong>Series</strong> <strong>Syringe</strong> <strong>Pumps</strong><br />
Appendix A Replacement Parts<br />
A.1 Replacement Parts Replacement parts are called out in the following illustrations.<br />
Refer to the call-out in the adjacent table to determine the part<br />
number for the item.<br />
Replacement parts can be purchased by contacting Teledyne<br />
<strong>Isco</strong>’s Customer Service Department.<br />
Teledyne <strong>Isco</strong><br />
Customer Service Department<br />
P.O. Box 82531<br />
Lincoln, NE 68501 USA<br />
Phone: (800) 228-4373<br />
(402) 464-0231<br />
FAX: (402) 465-3022<br />
E-mail: <strong>Isco</strong>Info@teledyne.com<br />
A-1
D <strong>Series</strong> <strong>Syringe</strong> <strong>Pumps</strong><br />
Appendix A Replacement Parts<br />
A.1.1<br />
D <strong>Series</strong> Controller<br />
A-2
D <strong>Series</strong> <strong>Syringe</strong> <strong>Pumps</strong><br />
Appendix A Replacement Parts<br />
<strong>Syringe</strong> Pump Controller<br />
A-3
D <strong>Series</strong> <strong>Syringe</strong> <strong>Pumps</strong><br />
Appendix A Replacement Parts<br />
A.1.2<br />
1000D Pump<br />
A-4
D <strong>Series</strong> <strong>Syringe</strong> <strong>Pumps</strong><br />
Appendix A Replacement Parts<br />
A-5
D <strong>Series</strong> <strong>Syringe</strong> <strong>Pumps</strong><br />
Appendix A Replacement Parts<br />
A-6
D <strong>Series</strong> <strong>Syringe</strong> <strong>Pumps</strong><br />
Appendix A Replacement Parts<br />
This page intentionally blank<br />
A-7
D <strong>Series</strong> <strong>Syringe</strong> <strong>Pumps</strong><br />
Appendix A Replacement Parts<br />
A.1.3<br />
500D/DX Pump<br />
A-8
D <strong>Series</strong> <strong>Syringe</strong> <strong>Pumps</strong><br />
Appendix A Replacement Parts<br />
A-9
D <strong>Series</strong> <strong>Syringe</strong> <strong>Pumps</strong><br />
Appendix A Replacement Parts<br />
A-10
D <strong>Series</strong> <strong>Syringe</strong> <strong>Pumps</strong><br />
Appendix A Replacement Parts<br />
This page intentionally blank<br />
A-11
D <strong>Series</strong> <strong>Syringe</strong> <strong>Pumps</strong><br />
Appendix A Replacement Parts<br />
A.1.4<br />
100DM/DX and 260D<br />
<strong>Pumps</strong><br />
A-12
D <strong>Series</strong> <strong>Syringe</strong> <strong>Pumps</strong><br />
Appendix A Replacement Parts<br />
A-13
D <strong>Series</strong> <strong>Syringe</strong> <strong>Pumps</strong><br />
Appendix A Replacement Parts<br />
A-14
D <strong>Series</strong> <strong>Syringe</strong> <strong>Pumps</strong><br />
Appendix A Replacement Parts<br />
This page intentionally blank<br />
A-15
D <strong>Series</strong> <strong>Syringe</strong> <strong>Pumps</strong><br />
Appendix A Replacement Parts<br />
A.1.5<br />
65D Pump<br />
A-16
D <strong>Series</strong> <strong>Syringe</strong> <strong>Pumps</strong><br />
Appendix A Replacement Parts<br />
A-17
D <strong>Series</strong> <strong>Syringe</strong> <strong>Pumps</strong><br />
Appendix A Replacement Parts<br />
A-18
D <strong>Series</strong> <strong>Syringe</strong> <strong>Pumps</strong><br />
Appendix A Replacement Parts<br />
A-19
D <strong>Series</strong> <strong>Syringe</strong> <strong>Pumps</strong><br />
Appendix A Replacement Parts<br />
A-20
D <strong>Series</strong> <strong>Syringe</strong> <strong>Pumps</strong><br />
Appendix A Replacement Parts<br />
A-21
D <strong>Series</strong> <strong>Syringe</strong> <strong>Pumps</strong><br />
Appendix A Replacement Parts<br />
A-22
D <strong>Series</strong> <strong>Syringe</strong> <strong>Pumps</strong><br />
Appendix A Replacement Parts<br />
A-23
D <strong>Series</strong> <strong>Syringe</strong> <strong>Pumps</strong><br />
Appendix A Replacement Parts<br />
A-24
D <strong>Series</strong> <strong>Syringe</strong> <strong>Pumps</strong><br />
Appendix A Replacement Parts<br />
A-25
D <strong>Series</strong> <strong>Syringe</strong> <strong>Pumps</strong><br />
Appendix A Replacement Parts<br />
A-26
D <strong>Series</strong> <strong>Syringe</strong> <strong>Pumps</strong><br />
Appendix A Replacement Parts<br />
A-27
D <strong>Series</strong> <strong>Syringe</strong> <strong>Pumps</strong><br />
Appendix A Replacement Parts<br />
A.1.6<br />
65DM<br />
A-28
D <strong>Series</strong> <strong>Syringe</strong> <strong>Pumps</strong><br />
Appendix A Replacement Parts<br />
A-29
D <strong>Series</strong> <strong>Syringe</strong> <strong>Pumps</strong><br />
Appendix A Replacement Parts<br />
A-30
D <strong>Series</strong> <strong>Syringe</strong> <strong>Pumps</strong><br />
Appendix A Replacement Parts<br />
A-31
D <strong>Series</strong> <strong>Syringe</strong> <strong>Pumps</strong><br />
Appendix A Replacement Parts<br />
A-32
D <strong>Series</strong> <strong>Syringe</strong> <strong>Pumps</strong><br />
Appendix A Replacement Parts<br />
A-33
D <strong>Series</strong> <strong>Syringe</strong> <strong>Pumps</strong><br />
Appendix A Replacement Parts<br />
A-34
D <strong>Series</strong> <strong>Syringe</strong> <strong>Pumps</strong><br />
Appendix A Replacement Parts<br />
A-35
D <strong>Series</strong> <strong>Syringe</strong> <strong>Pumps</strong><br />
Appendix A Replacement Parts<br />
A-36
D <strong>Series</strong> <strong>Syringe</strong> <strong>Pumps</strong><br />
Appendix A Replacement Parts<br />
A-37
D <strong>Series</strong> <strong>Syringe</strong> <strong>Pumps</strong><br />
Appendix A Replacement Parts<br />
A-38
D <strong>Series</strong> <strong>Syringe</strong> <strong>Pumps</strong><br />
Appendix A Replacement Parts<br />
A-39
D <strong>Series</strong> <strong>Syringe</strong> <strong>Pumps</strong><br />
Appendix A Replacement Parts<br />
A-40
D <strong>Series</strong> <strong>Syringe</strong> <strong>Pumps</strong><br />
Appendix A Replacement Parts<br />
A-41
D <strong>Series</strong> <strong>Syringe</strong> <strong>Pumps</strong><br />
Appendix A Replacement Parts<br />
A.1.7<br />
Power Circuit Board<br />
A-42
D <strong>Series</strong> <strong>Syringe</strong> <strong>Pumps</strong><br />
Appendix A Replacement Parts<br />
A-43
D <strong>Series</strong> <strong>Syringe</strong> <strong>Pumps</strong><br />
Appendix A Replacement Parts<br />
A-44
D <strong>Series</strong> <strong>Syringe</strong> <strong>Pumps</strong><br />
Appendix A Replacement Parts<br />
This page intentionally blank<br />
A-45
D <strong>Series</strong> <strong>Syringe</strong> <strong>Pumps</strong><br />
Appendix A Replacement Parts<br />
A.1.8<br />
Controller Circuit<br />
Board<br />
A-46
D <strong>Series</strong> <strong>Syringe</strong> <strong>Pumps</strong><br />
Appendix A Replacement Parts<br />
A-47
D <strong>Series</strong> <strong>Syringe</strong> <strong>Pumps</strong><br />
Appendix A Replacement Parts<br />
A-48
D <strong>Series</strong> <strong>Syringe</strong> <strong>Pumps</strong><br />
Appendix A Replacement Parts<br />
This page intentionally blank<br />
A-49
D <strong>Series</strong> <strong>Syringe</strong> <strong>Pumps</strong><br />
Appendix A Replacement Parts<br />
A.1.9<br />
Analog Output Circuit<br />
Board<br />
A-50
D <strong>Series</strong> <strong>Syringe</strong> <strong>Pumps</strong><br />
Appendix A Replacement Parts<br />
A-51
D <strong>Series</strong> <strong>Syringe</strong> <strong>Pumps</strong><br />
Appendix A Replacement Parts<br />
A.1.10<br />
Interface Circuit Board<br />
A-52
D <strong>Series</strong> <strong>Syringe</strong> <strong>Pumps</strong><br />
Appendix A Replacement Parts<br />
A-53
D <strong>Series</strong> <strong>Syringe</strong> <strong>Pumps</strong><br />
Appendix A Replacement Parts<br />
A.1.11<br />
Dual Electric Valve<br />
Package<br />
A-54
D <strong>Series</strong> <strong>Syringe</strong> <strong>Pumps</strong><br />
Appendix A Replacement Parts<br />
A-55
D <strong>Series</strong> <strong>Syringe</strong> <strong>Pumps</strong><br />
Appendix A Replacement Parts<br />
A.1.12<br />
Single Electric Valve<br />
Package<br />
A-56
D <strong>Series</strong> <strong>Syringe</strong> <strong>Pumps</strong><br />
Appendix A Replacement Parts<br />
A-57
D <strong>Series</strong> <strong>Syringe</strong> <strong>Pumps</strong><br />
Appendix A Replacement Parts<br />
A.1.13<br />
SST Dual Air Valve<br />
Package for<br />
100/260D/500D<br />
65DM, 100DM/DX, 260D, & 500D AIR VALVE PACKAGE<br />
Note<br />
This valve system is for<br />
use with the 65DM,<br />
100D, 100DX, 260D, and<br />
500D pumps. This air<br />
valve will not work with<br />
65D pumps. Please consult<br />
the factory for<br />
options.<br />
A-58
D <strong>Series</strong> <strong>Syringe</strong> <strong>Pumps</strong><br />
Appendix A Replacement Parts<br />
A-59
D <strong>Series</strong> <strong>Syringe</strong> <strong>Pumps</strong><br />
Appendix A Replacement Parts<br />
A.1.14<br />
SST Dual Air Valve<br />
Package for 1000D<br />
A-60
D <strong>Series</strong> <strong>Syringe</strong> <strong>Pumps</strong><br />
Appendix A Replacement Parts<br />
A-61
D <strong>Series</strong> <strong>Syringe</strong> <strong>Pumps</strong><br />
Appendix A Replacement Parts<br />
A.1.15<br />
Single Air Valve<br />
Package<br />
A-62
D <strong>Series</strong> <strong>Syringe</strong> <strong>Pumps</strong><br />
Appendix A Replacement Parts<br />
A-63
D <strong>Series</strong> <strong>Syringe</strong> <strong>Pumps</strong><br />
Appendix A Replacement Parts<br />
A.1.16<br />
Dual Check Valve<br />
Package for<br />
100/260/500D<br />
A-64
D <strong>Series</strong> <strong>Syringe</strong> <strong>Pumps</strong><br />
Appendix A Replacement Parts<br />
A-65
D <strong>Series</strong> <strong>Syringe</strong> <strong>Pumps</strong><br />
Appendix A Replacement Parts<br />
A.1.17<br />
Dual Check Valve<br />
Package for 1000D<br />
A-66
D <strong>Series</strong> <strong>Syringe</strong> <strong>Pumps</strong><br />
Appendix A Replacement Parts<br />
A-67
D <strong>Series</strong> <strong>Syringe</strong> <strong>Pumps</strong><br />
Appendix A Replacement Parts<br />
A.1.18<br />
Single Check Valve<br />
Package<br />
A-68
D <strong>Series</strong> <strong>Syringe</strong> <strong>Pumps</strong><br />
Appendix A Replacement Parts<br />
A-69
D <strong>Series</strong> <strong>Syringe</strong> <strong>Pumps</strong><br />
Appendix A Replacement Parts<br />
A-70
D <strong>Series</strong> <strong>Syringe</strong> <strong>Pumps</strong><br />
Index<br />
A<br />
Acc ctrl key, 3-16<br />
Accessories<br />
500D accessory package, 2B-3<br />
500D refill kit, 2B-4<br />
500D table, 2B-10<br />
analog output option, 3-19<br />
back pressure regulation, 2A-13<br />
CO 2 cylinder connection package, 2A-7<br />
continuous flow, 8-20<br />
cooling/heating jacket, 2A-11, 2B-8, 2D-4<br />
cylinder insulating cover, 2A-10, 2B-7,<br />
2D-3<br />
in-line filter package, 2A-8<br />
LabView software, 2A-15<br />
manual control, 3-16<br />
nitrogen purge, 2A-14, 2B-8, 2C-4, 2D-6<br />
outlet valve package, 2A-7, 2B-6<br />
refill kit, 2A-5, 2B-4<br />
Valco fittings, 2A-4<br />
Air valve package, 8-8<br />
Alarms<br />
poor fill, 3-12<br />
pressure limits, 3-15<br />
Analog output option, 3-19<br />
Automatic refill, 3-5<br />
B<br />
Back pressure regulation, 2A-13<br />
Baud rate, 3-7<br />
C<br />
Calibrating pressure, 3-12<br />
Check valve package, 8-2<br />
CO 2 cylinder connection package, 2A-7<br />
Commands, serial, 6-12<br />
Connections<br />
see electrical connections or<br />
see liquid connections<br />
Constant flow mode, 3-18<br />
Constant pressure mode, 3-18<br />
Contact Service Department, 5-2<br />
Continuous flow, 8-1<br />
accessories, 8-20<br />
air valves, 8-8<br />
check valves, 8-2<br />
electric valve interface, 4-6<br />
electric valves, 8-13<br />
features, 8-18, 8-19<br />
operation, 8-17<br />
remote start/stop, 8-19<br />
software, 8-16<br />
specifications, 8-2, 8-8, 8-13<br />
tips, 8-18<br />
Controller<br />
front panel label, 1-12<br />
keypad, 3-13<br />
operation, 4-1<br />
rear panel connectors, 1-13<br />
Cooling/heating jacket, 2A-11, 2B-8, 2D-4<br />
Corrosion prevention, 2A-14, 2B-8, 2C-4, 2D-6<br />
Cutting tubing, 2A-3, 2B-2, 2C-2<br />
D<br />
DASNET protocol, 6-3<br />
Diagnostics, 3-12<br />
Displays, 3-2<br />
programming screens, 3-2<br />
reading the run screen, 3-2<br />
setting the contrast, 3-7<br />
Drain tube, 2A-4, 2B-3, 2C-4, 2D-2<br />
E<br />
Electric valve package, 8-13<br />
Electrical connections, 1-16<br />
analog control, 3-9<br />
controller, 1-13<br />
pump, 1-14<br />
serial control, 6-11<br />
Error messages - serial command, 6-23<br />
External control, 3-19<br />
analog, 3-8, 8-19, 9-10<br />
DASNET, 6-3<br />
pinout, 6-2<br />
remote run/stop, 3-19, 8-19, 9-10<br />
serial commands, 6-12<br />
serial control and monitoring, 8-19, 9-10<br />
serial error messages, 6-23<br />
serial interface, 6-1<br />
F<br />
Flow rate limit, 3-15<br />
H<br />
Help key, 3-16<br />
I<br />
ID numbers, 3-7<br />
In-line filter accessory package, 2A-8<br />
Index-1
D <strong>Series</strong> <strong>Syringe</strong> <strong>Pumps</strong><br />
Index<br />
K<br />
Keypad<br />
acc ctrl, 3-16<br />
help, 3-16<br />
hold, 3-13<br />
limits, 3-14<br />
multi-pump mode, 3-10<br />
rapid press, 3-16<br />
recall, 3-13<br />
store, 3-14<br />
zero press, 3-17<br />
L<br />
LabView, 2A-15, 3-7<br />
Liquid connections<br />
1000D, 2C-1<br />
100DM, 100DX, 260D, 2A-2<br />
500D, 2B-2<br />
drain tube, 2A-4, 2B-3, 2C-4, 2D-2<br />
modifier addition, 9-2<br />
M<br />
Main menu, 3-3<br />
units, 3-4<br />
Maintenance, 5-1<br />
calibration, 5-17<br />
flushing the cylinder, 5-8<br />
general cleaning, 5-9<br />
lubrication, 5-3<br />
motor brush replacement, 5-14<br />
power supply voltages, 5-16<br />
removing the case top, 5-3<br />
replacement parts, A-2–A-53<br />
seal cleaning and replacement, 5-5<br />
shear key, 5-10<br />
solvent changeover, 5-8<br />
Teledyne <strong>Isco</strong> Service, 5-2<br />
torque limiter, 5-9<br />
troubleshooting, 5-16<br />
wear ring, 5-7<br />
Master (network), 6-6<br />
Menus<br />
diagnostics, 3-12<br />
diff modes, 3-13<br />
display contrast, 3-7<br />
main menu, 3-3<br />
power failure, 3-5<br />
press calibration, 3-12<br />
press integral, 3-13<br />
pump status, 3-7<br />
refill, 3-5<br />
Second Menu, 3-12<br />
selecting, 3-3<br />
serial options, 3-7<br />
total volume reset, 3-11<br />
Modes of operation, 3-17<br />
Monitoring flow rate, 3-19<br />
Multi-pump, 3-9<br />
continuous flow constant flow mode, 3-9<br />
continuous flow constant pressure mode,<br />
3-10<br />
independent control, 3-10<br />
key functions, 3-10<br />
modifier constant pressure mode, 3-10<br />
N<br />
Network, 6-6<br />
Nitrogen purge, 2A-14, 2B-8, 2C-4, 2D-6<br />
Noise reduction, 2A-10, 2B-7, 2D-3<br />
O<br />
Operating modes, 3-17<br />
Operational test, 1-17<br />
Outlet valve accessory package, 2A-7, 2B-6<br />
P<br />
Parts, A-2–A-53<br />
Piston seal, 5-5<br />
Plumbing<br />
see Liquid connections<br />
Poor fill, 3-12<br />
Power Amplifier, 4-7<br />
Power failure actions, 3-5<br />
Power Supply, 4-7<br />
Preliminary checkout, 1-17<br />
Press. integral, 3-13<br />
Pressure<br />
calibration, 3-12<br />
drift, 3-17<br />
limits - setting, 3-14<br />
rapid pressurization, 3-16<br />
transducer, 4-10<br />
Pump<br />
front panel, 1-15<br />
independent control, 3-10<br />
rear panel connectors, 1-14<br />
status, 3-7<br />
R<br />
Refill kit, 2A-5, 2B-4<br />
Refill rate - setting, 3-5<br />
Remote run/stop, 3-19, 8-19, 9-10<br />
Repairs, 5-2<br />
Replacement parts, A-2–A-53<br />
Returning equipment, 5-2<br />
S<br />
Safety, 1-i–1-ix<br />
Seals<br />
break-in procedure, 5-6<br />
cleaning and replacement, 5-5<br />
piston, 5-5<br />
selection, 2A-16<br />
Serial control<br />
cabling, 6-11<br />
Index-2
D <strong>Series</strong> <strong>Syringe</strong> <strong>Pumps</strong><br />
Index<br />
commands, 6-12<br />
error messages, 6-23<br />
examples, 6-7<br />
set-up, 6-23<br />
Serial options, 3-7<br />
Service Department, 5-2<br />
Slave (network), 6-6<br />
Softkeys, 3-3<br />
Software<br />
continuous flow, 8-16<br />
DASNET, 6-3<br />
designing your software, 6-1<br />
example - BASIC, 6-4<br />
example - C, 6-5<br />
LabView, 2A-15, 3-7<br />
user-written, 6-3<br />
Solvent changeover, 5-8<br />
Specifications, 1-2–??, 1-3–1-8<br />
Supercritical fluid extraction, 9-1<br />
modifier addition, 9-7<br />
modifier plumbing kit, 9-2<br />
preparation for modifier, 9-5<br />
refilling the pumps, 9-8<br />
System preliminary checkout, 1-17<br />
T<br />
Technical specifications, 1-2–??, 1-3–1-8<br />
Terminology, 3-1<br />
Total volume reset, 3-11<br />
Troubleshooting, 5-16<br />
Tubing<br />
cutting by hand, 2A-3, 2B-2, 2C-2<br />
pre-cut, 2A-3, 2B-2, 2C-2<br />
U<br />
Unpacking, 1-16<br />
V<br />
Valco fitting accessory package, 2A-4<br />
Valve<br />
designating as passive, active, or electric,<br />
3-11<br />
user supplied, 8-16<br />
Index-3
D <strong>Series</strong> <strong>Syringe</strong> <strong>Pumps</strong><br />
Index<br />
Index-4
Compliance Statements<br />
NOTICE<br />
Disregard the following “Declaration of Conformity” and Radio Interference<br />
Statement” if your instrument does not have a CE label on its rear panel<br />
Radio Interference Statement<br />
FCC<br />
This equipment has been tested and found to comply with the limits for a<br />
class A digital device, pursuant to Part 15 of the FCC Rules. These limits<br />
are designed to provide reasonable protection against harmful interference<br />
when the equipment is operated in a commercial environment. This equipment<br />
generates, uses, and can radiate radio frequency energy and, if not<br />
installed and used in accordance with the instruction manual, may cause<br />
harmful interference to radio communications. Operation of this equipment<br />
in a residential area is likely to cause harmful interference in which the user<br />
will be required to correct the interference at his own expense.<br />
Canada<br />
This ISM apparatus meets all requirements of the Canadian Interference-<br />
Causing Equipment Regulations.<br />
Ce générateur de fréquence radio ISM respecte toutes les exigences du<br />
Règlement sur le materiel brouilleur du Canada.
Component Name<br />
<br />
Circuit Boards<br />
<br />
LCD Display<br />
<br />
Capacitor<br />
<br />
Wiring<br />
<br />
Internal Cables<br />
<br />
External Cables<br />
<br />
Line Cord<br />
<br />
Transformer<br />
<br />
Front Panel Label<br />
<br />
Keypad<br />
<br />
DC Motor<br />
<br />
Name and amount of Hazardous Substances or Elements in the product<br />
<br />
Hazardous Substances or Elements<br />
<br />
(Pb)<br />
<br />
(Hg)<br />
<br />
(Cd)<br />
<br />
(Cr(VI))<br />
<br />
(PBB)<br />
<br />
(PBDE)<br />
X O O O O O<br />
X O O O O O<br />
O O O O X O<br />
O O O O X O<br />
O O O O X O<br />
O O O O X O<br />
O O O O X O<br />
X O O O X O<br />
O O O O X O<br />
O O O O X O<br />
X O O O X O<br />
Name and amount of Hazardous Substances or Elements in the<br />
product<br />
O: ST/ <br />
O: Represent the concentration of the hazardous substance in this component’s any homogeneous pieces is lower<br />
than the ST/ standard limitation.<br />
XST/ <br />
(“X” )<br />
X: Represent the concentration of the hazardous substance in this component’s at least one homogeneous piece is<br />
higher than the ST/ standard limitation.<br />
(Manufacturer may give technical reasons to the “X”marks)<br />
<br />
The Environmentally Friendly Use Period (EFUP) was determined through experience.<br />
(207 2007) A<br />
B<br />
The date of Manufacture is in code within the serial number. The first three numbers are the year of manufacture<br />
(207 is year 2007) followed by a letter for the month. "A" is January, "B" is February and so on.<br />
D <strong>Series</strong> Hazmat Table<br />
60-1243-928 Rev.
DECLARATION OF CONFORMITY<br />
Application of Council Directive:<br />
Manufacturer's Name:<br />
Manufacturer's Address:<br />
Equipment Type/Environment:<br />
89/336/EEC The EMC Directive<br />
73/23/EEC The Low Voltage Directive<br />
Teledyne <strong>Isco</strong>, Inc.<br />
4700 Superior, Lincoln, Nebraska 68504 USA<br />
Mailing Address: P.O. Box 82531, Lincoln, NE 68501<br />
Laboratory Equipment for Light Industrial/Commercial Environments<br />
Trade Name/Model No: <strong>Series</strong> D <strong>Series</strong> Controller/Pump Controller<br />
Year of Issue: 1999<br />
Standards to which Conformity is Declared: EN 61326-1998 EMC Requirements for Electrical Equipment for<br />
Measurement, Control, and Laboratory Use<br />
EN 61010-1 Safety Requirements for Electrical Equipment for Measurement,<br />
Control, and Laboratory Use<br />
Standard Description Severity Applied Performance Criteria<br />
EN61000-4-2 Electrostatic Discharge Level 2 - 4kV contact discharge<br />
Level 3 - 8kV air discharge<br />
EN61000-4-3 Radiated RF Immunity 80 MHz to 1000MHz 80% AM at 1kHz<br />
Level 1 - 1 V/m<br />
EN61000-4-4 Electrical Fast Transient Level 2 - 1kV on ac lines B<br />
EN61000-4-5 Surge on AC Lines 2kV common mode,<br />
1kV differential mode<br />
EN61000-4-6 Conducted RF on AC lines 150 kHz to 80 MHz, 3V rms,<br />
80% modulated<br />
CISPR11/<br />
EN 55011<br />
RF Emissions<br />
CE Declaration of Conformity<br />
EN61000-3-2, 3-3 Harmonic Flicker Group1, Class A<br />
Group 1, Class A Industrial, Scientific, and<br />
Medical Equipment<br />
B<br />
B<br />
A<br />
B<br />
B<br />
I, the undersigned, hereby declare that the design of the equipment specified above conforms to the above Directive(s) and Standards<br />
as of July 12, 1999.<br />
Williaml Foster<br />
USA Representative<br />
William Foster<br />
Director of Engineering<br />
Teledyne <strong>Isco</strong>, Inc.<br />
4700 Superior Street<br />
Lincoln, Nebraska 68504<br />
Phone: (402) 464-0231<br />
Fax: (402) 465-3799<br />
60-1242-327<br />
Rev E
DECLARATION OF CONFORMITY<br />
Application of Council Directive:<br />
Manufacturer's Name:<br />
Manufacturer's Address:<br />
Equipment Type/Environment:<br />
89/336/EEC – The EMC Directive<br />
73/23/EEC – The Low Voltage Directive<br />
Teledyne <strong>Isco</strong>, Inc.<br />
4700 Superior, Lincoln, Nebraska 68504 USA<br />
Mailing Address: P.O. Box 82531, Lincoln, NE 68501<br />
Laboratory Equipment for Light Industrial/Commercial Environments:<br />
Trade Name/Model No: <strong>Syringe</strong> <strong>Pumps</strong>: 65D, 65DM, 65DX, 65DXX, 65HP, 100DM, 100DX,<br />
100DX2, 100DX4, 260D, 260HP, 260DX, 260DXX, 260SP, 500D, 500DO,<br />
500DX, 500DXX, 500HP, 500HV,500SP, 1000D, 1000DO, 1000DX, 1000<br />
DXX, 1000HV<br />
Year of Issue: 1999<br />
Standards to which Conformity is Declared: EN 61010-1 Safety Requirements for Electrical Equipment for Measurement,<br />
Control, and Laboratory Use<br />
EN 61326-1998 EMC Requirements for Electrical Equipment for<br />
Measurement, Control, and Laboratory Use<br />
Standard Description Severity Applied Performance Criteria<br />
EN61000-4-2 Electrostatic Discharge Level 2 - 4kV contact discharge<br />
Level 3 - 8kV air discharge<br />
EN61000-4-3 Radiated RF Immunity 80 MHz to 1000MHz 80% AM at 1kHz<br />
Level 1 – 1V/m<br />
EN61000-4-4 Electrical Fast Transient Level 1 – 1kV on AC lines A<br />
CE Declaration of Conformity<br />
EN61000-4-5 Surge on AC Lines Level 2 – 1kV common mode,<br />
0.5KV differential mode<br />
EN61000-4-6<br />
Conducted RF on AC and I/O<br />
lines<br />
150 kHz to 80 MHz, 1V rms,<br />
80% modulated<br />
EN61000-4-11 Drop Outs and Short Interruptions 0.5 cycle, each polarity 100% A<br />
EN61000-3-2,3-3<br />
CISPR11/<br />
EN 55011<br />
Harmonic, Flicker<br />
RF Emissions<br />
Group 1, Class A Industrial, Scientific, and<br />
Medical Equipment<br />
I, the undersigned, hereby declare that the design of the equipment specified above conforms to the above Directive(s) and Standards<br />
as of July 12, 1999.<br />
A<br />
A<br />
A<br />
A<br />
A<br />
William Foster<br />
USA Representative<br />
Teledyne <strong>Isco</strong> Inc.<br />
William Foster<br />
Director of Engineering<br />
Teledyne <strong>Isco</strong>, Inc.<br />
4700 Superior Street<br />
Lincoln, Nebraska 68504<br />
Phone: (402) 464-0231<br />
Fax: (402) 464-4543<br />
60-1242-328<br />
Rev G
Warranty
Teledyne <strong>Isco</strong> One Year Limited Factory Service Warranty*<br />
This warranty exclusively covers Teledyne <strong>Isco</strong><br />
instruments, providing a one-year limited warranty<br />
covering parts and labor.<br />
Any instrument that fails during the warranty period due to<br />
faulty parts or workmanship will be repaired at the factory<br />
at no charge to the customer. Teledyne <strong>Isco</strong>’s exclusive<br />
liability is limited to repair or replacement of defective<br />
instruments. Teledyne <strong>Isco</strong> is not liable for consequential<br />
damages.<br />
Teledyne <strong>Isco</strong> will pay surface transportation charges both<br />
ways within the 48 contiguous United States if the<br />
instrument proves to be defective within 30 days of<br />
shipment. Throughout the remainder of the warranty period,<br />
the customer will pay to return the instrument to Teledyne<br />
<strong>Isco</strong>, and Teledyne isco will pay surface transportation to<br />
return the repaired instrument to the customer. Teledyne<br />
<strong>Isco</strong> will not pay air freight or customer’s packing and<br />
crating charges. This warranty does not cover loss, damage,<br />
or defects resulting from transportation between the<br />
customer’s facility and the repair facility.<br />
The warranty for any instrument is the one in effect on date<br />
of shipment. The warranty period begins on the shipping<br />
date, unless Teledyne <strong>Isco</strong> agrees in writing to a different<br />
date.<br />
Excluded from this warranty are normal wear; expendable<br />
items such as charts, ribbon, lamps, tubing, and glassware;<br />
fittings and wetted parts of valves; and damage due to<br />
corrosion, misuse, accident, or lack of proper maintenance.<br />
This warranty does not cover products not sold under the<br />
Teledyne <strong>Isco</strong> trademark or for which any other warranty is<br />
specifically stated.<br />
No item may be returned for warranty service without a<br />
return authorization number issued by Teledyne <strong>Isco</strong>.<br />
This warranty is expressly in lieu of all other warranties<br />
and obligations and Teledyne <strong>Isco</strong> specifically disclaims<br />
any warranty of merchantability or fitness for a<br />
particular purpose.<br />
The warrantor is Teledyne <strong>Isco</strong>, Inc. 4700 Superior,<br />
Lincoln, NE 68504, U.S.A.<br />
* This warranty applies to the USA and countries where Teledyne <strong>Isco</strong> Inc. does not have an authorized<br />
dealer. Customers in countries outside the USA, where Teledyne <strong>Isco</strong> has an authorized dealer, should<br />
contact their Teledyne <strong>Isco</strong> dealer for warranty service.<br />
Before returning any instrument for repair, please call, fax, or e-mail the Teledyne <strong>Isco</strong> Service<br />
Department for instructions. Many problems can often be diagnosed and corrected over the<br />
phone, or by e-mail, without returning the instrument to the factory.<br />
Instruments needing factory repair should be packed carefully, and shipped to the attention of<br />
the service department. Small, non-fragile items can be sent by insured parcel post. PLEASE<br />
BE SURE TO ENCLOSE A NOTE EXPLAINING THE PROBLEM.<br />
Shipping Address: Teledyne <strong>Isco</strong>, Inc. - Attention Repair Service<br />
4700 Superior Street<br />
Lincoln, NE 68504 USA<br />
Mailing Address: Teledyne <strong>Isco</strong>, Inc.<br />
PO Box 82531<br />
Lincoln, NE 68501 USA<br />
Phone: Repair service: (800) 775-2965 (lab instruments)<br />
(866) 298-6174 (samplers & flow meters)<br />
Sales & General Information: (800) 228-4373 (USA & Canada)<br />
Fax: (402) 465-3001<br />
Email:<br />
<strong>Isco</strong>Service@teledyne.com<br />
August 13, 2011 P/N 60-1002-040 Rev F


