compact ballast irplcfl1 - International Rectifier
compact ballast irplcfl1 - International Rectifier
compact ballast irplcfl1 - International Rectifier

Create successful ePaper yourself
Turn your PDF publications into a flip-book with our unique Google optimized e-Paper software.
<strong>International</strong> <strong>Rectifier</strong> • 233 Kansas Street, El Segundo, CA 90245 USA<br />
POWIRLIGHT TM REFERENCE DESIGN : COMPACT BALLAST<br />
Features<br />
• Drive 13W Compact Lamp<br />
• 110 or 220 Vac Input<br />
• High-Frequency Operation (34kHz)<br />
• Soft Start with Cathode Preheating<br />
(45kHz)<br />
• Lamp Removal Protection<br />
• Burst Mode with Auto Restart<br />
• IR51H420 Integrated Half-Bridge<br />
The IRPLCFL1 is intended as a reference<br />
design to be used as a development tool<br />
to speed up customers’ time to market.<br />
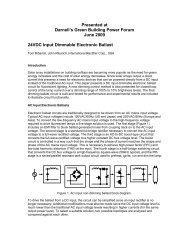
Circuit Schematic<br />
IRPLCFL1<br />
AC1<br />
IR51H420<br />
R2<br />
R1 Vcc Rt Ct COM Vb Vo Vt<br />
BR1<br />
C4<br />
R6<br />
D3<br />
C7<br />
AC2<br />
N<br />
C1<br />
+<br />
R3<br />
C5<br />
F2<br />
F2<br />
C2<br />
+<br />
D1<br />
Q1<br />
C6<br />
C8<br />
AC1-N = 120 VAC input<br />
AC1-AC2=220 VAC input<br />
C3<br />
+<br />
D2<br />
R5<br />
R4<br />
Q2<br />
D4<br />
D5<br />
D6<br />
C9<br />
Fluorescent Lamp<br />
C10<br />
F1<br />
F1<br />
L1<br />
www.irf.com 1
Functional Description<br />
The circuit is centered around the IR51H420 Ballast Driver Hybrid which contains the IR2151 Ballast<br />
Driver IC and two 500 volt size 2 HEXFET’s in a half bridge configuration. With a 120 volt AC line<br />
input (AC1-N), the voltage is rectified and doubled to provide a bus voltage of approximately 300<br />
volts. With a 220 volt AC line input (AC1-AC2), the voltage is rectified but not doubled and again<br />
provides a bus voltage of approximately 300 volts.The start up resistor R2 is sized such that it can<br />
supply enough current to start the oscillator in the IR51H420 but not enough to cause the shunt<br />
clamp to regulate and maintain constant oscillation. With this constraint the power dissipation in<br />
resistor R2 is low enough so that a 1/4 watt unit will suffice. A charge pump circuit, consisting of<br />
capacitor C10 and diodes D5 and D6, is used so that when the IR51H420 begins to oscillate, the<br />
charge pump circuit supplies the current to increase the voltage on Vcc to cause the shunt clamp to<br />
regulate. If the lamp is removed from the circuit there is no longer a path for the charge pump<br />
capacitor C10. This causes the voltage at Vcc of the IR51H420 to begin falling. When the voltage at<br />
Vcc of the IR51H420 falls below the negative undervoltage lockout threshold the oscillator stops<br />
switching. At this point the voltage will begin to rise again and when the voltage reaches the positive<br />
undervoltage lockout threshold the IC again begins to oscillate. If there is no lamp installed in the<br />
circuit there will be no path for the charge pump circuit to supply current and the voltage at Vcc will<br />
again fall below the negative undervoltage lockout threshold. The circuit will continue this sequence<br />
indefinitely until the power is removed or a lamp is reinserted into the circuit. If a lamp is reinserted<br />
into the circuit, the lamp will light.<br />
To provide long life and to insure soft-starting of the lamp, the cathodes must be pre-heated so that<br />
their hot resistance is approximately three to four times that of the cold resistance value. This is<br />
performed by using a three step start-up sequence; the three steps being three oscillator frequency<br />
settings. The oscillator is started at a frequency well above the resonant point of the LC circuit<br />
formed by inductor L1 and capacitor C9. This is done to insure that the initial voltage applied across<br />
the lamp is below the strike potential. The second frequency step, below step 1, was chosen to<br />
provide a current through the cathodes large enough to heat them in the pre-heat time while also<br />
maintaining the voltage across the lamp below the strike potential. The third step is to move the<br />
oscillator to the final running frequency. At this point the voltage across the lamp becomes large<br />
enough to strike the arc and the resonant point of the circuit shifts lower and the current in the lamp<br />
is limited by the inductor L1.<br />
The frequency shifting is accomplished by switching out different capacitors used to program the<br />
oscillator frequency. The capacitors are switched out by shorting them with MOSFET’s which are<br />
timed to turn on at different times. The pre-heat frequency is determined by the following formula:<br />
C5<br />
+ C6<br />
f ph<br />
=<br />
1.4( R6)(<br />
C5)(<br />
C6)<br />
2 www.irf.com
The pre-heat time is determined by an RC combination formed by R3 and C3 and the voltage of<br />
zener diode D1. When the voltage across C3 reaches the magnitude of the zener diode D1 + the<br />
turn-on threshold of Q1, capacitor C6 is shorted out and the frequency shifts to the final running<br />
frequency. The final running frequency is given by the formula:<br />
1<br />
f run<br />
=<br />
1.4( R6)(<br />
C5)<br />
The final component values, shown in Bill of Materials, were chosen to operate a 13 watt <strong>compact</strong><br />
fluorescent lamp with a cathode resistance at cold of 4 ohms. If a lamp is used which has a different<br />
cathode resistance the component values for the pre-heat frequency selection will need to be changed.<br />
The <strong>ballast</strong> circuit was operated at various temperatures from 25 degrees C to 105 degrees C with<br />
little or no change in the operating characteristics.<br />
The IR Family of Integrated Half-Bridge Products (9-pin SIP Package)<br />
Part Number Maximum<br />
Voltage<br />
Rds(on)<br />
at 25C<br />
Target Applications<br />
(Spec only for ZVS)<br />
IRxxH214, HD214 250V 2.0Ω 110VAC, 5W-15W<br />
IRxxH224, HD224 250V 1.1Ω 110VAC, 15W-25W<br />
IRxxH737, HD737 300V 0.75Ω 110VAC, 25W-35W<br />
IRxxH310, HD310 400V 3.6Ω 220VAC, 5W-15W<br />
IRxxH320, HD320 400V 1.8Ω 220VAC, 15W-25W<br />
IRxxH420, HD420 500V 3.0Ω 220VAC, 10W-20W<br />
1) IC options for the half-bridge products include IR2101, IR2102, IR2103, IR2104, IR2151, IR2152,<br />
IR2153, IR2154. Use the last two digits of the IC part number for the “xx” designator.<br />
2) The “H” option contains only the Control IC and MOSFET half-bridge. The “HD” option contains<br />
the Control IC, Bootstrap Diode and MOSFET half-bridge.<br />
www.irf.com 3
Bill of Materials<br />
REF. DESCR. QTY P/N MFG DIST Phone #<br />
DES.<br />
U1 IC 1 IR51H420 IR IR 310-322-<br />
3331<br />
Q1,Q2 MOSFET 2 IRLML2402 IR “ “<br />
BR1 BRIDGE RECTIFIER 1 DF10S IR “ “<br />
C1,C2 10µF/250V 2 ECE-A2EU100W PANASONIC DIGI-KEY 800-344-<br />
4539<br />
C3 1µF/50V 1 ECE-A50Z1 PANASONIC “ “<br />
C4 2.2µF/50V 1 ECE-A50Z2R2 PANASONIC “ “<br />
C5 1000pF SMT1206 1 ECU-U1H102KBM PANASONIC “ “<br />
C6 3300pF SMT1206 1 ECU-U1H332KBM PANASONIC “ “<br />
C7 .1µF/50V SMT1206 1 ECU-V1H104KBW PANASONIC “ “<br />
C8,C10 470pF/1KV SMT1812 1 102S43N471KV4E JOHANSON<br />
DIELECTRIC<br />
NEWARK 310-681-<br />
6674<br />
C9 .01µF/630V 1 MKP10 WIMA TAW 818-846-<br />
3911<br />
R1 1.0Ω,1/2W 1 1.0H-ND YAGEO DIGI-KEY 800-344-<br />
4539<br />
R2 240KΩ, 1/4W 1 240KQBK-ND YAGEO “ “<br />
R3,R4 1MΩ,1/8W SMT1206 1 ERJ-8GEY105 PANASONIC “ “<br />
R5 2.2MΩ,1/8W 1 ERJ-8GEY225 PANASONIC “ “<br />
SMT1206<br />
R6 20KΩ, 1/8W SMT1206 1 ERJ-8GEYJ203 PANASONIC “ “<br />
D1 7.5V Zener, SMT 1 BZT52-C7V5DICT-ND DIODES INC “ “<br />
SOD123<br />
D2 3.9V Zener, SMT 1 BZT52-C3V9DICT-ND DIODES INC “ “<br />
SOD123<br />
D3 Diode, 400V Fast 1 10BF40 IR IR 310-322-<br />
3331<br />
D4,D5,<br />
D6<br />
Diode, SMT DL35 1 1N4148 DIODES INC DIGI-KEY 800-344-<br />
4539<br />
L1* 2.5mH 1 9677142009 FAIR-RITE LODESTON<br />
E PACIFIC<br />
714-970-<br />
0900<br />
* 210 turns #30 wound on FAIR-RITE bobbin core<br />
4 www.irf.com
Figure 1: Cathode Voltage (Start - Preheat - Running)<br />
This figure depicts the increase in cathode resistance<br />
during the preheat phase prior to ignition.<br />
Figure 2: Cathode Current (Start - Preheat - Running)<br />
(500mA/div) This figure depicts the almost constant<br />
current in the cathodes which decreases after ignition.<br />
Figure 3: Lamp Voltage (Start - Preheat - Running)<br />
This figure depicts the magnitude of the lamp voltage<br />
during preheat, at ignition and during running.<br />
Figure 4: Lamp Current (Start - Preheat - Running)<br />
(200mA/div) This figure depicts the lamp<br />
current during preheat and after ignition.<br />
www.irf.com 5
Figure 5: “Vout” with Lamp Removed (burst mode)<br />
This figure depicts the “lamp out” condition with the<br />
output of the half-bridge in intermittent mode of operation.<br />
IR WORLD HEADQUARTERS: 233 Kansas St., El Segundo, California 90245 Tel: (310) 252-7105<br />
Data and specifications subject to change without notice. 10/28/2000<br />
6 www.irf.com