VIDEOJET decoder 3000 - Bosch Security Systems
VIDEOJET decoder 3000 - Bosch Security Systems VIDEOJET decoder 3000 - Bosch Security Systems
VIDEOJET decoder 3000 VJD-3000 en Installation Manual
- Page 3 and 4: VIDEOJET decoder 3000 Table of Cont
- Page 5 and 6: VIDEOJET decoder 3000 Safety | en 5
- Page 7 and 8: VIDEOJET decoder 3000 Short informa
- Page 9 and 10: VIDEOJET decoder 3000 System overvi
- Page 11 and 12: VIDEOJET decoder 3000 System overvi
- Page 13 and 14: VIDEOJET decoder 3000 Installation
- Page 15 and 16: VIDEOJET decoder 3000 Connection |
- Page 17 and 18: VIDEOJET decoder 3000 Connection |
- Page 19 and 20: VIDEOJET decoder 3000 Connection |
- Page 21 and 22: VIDEOJET decoder 3000 Configuration
- Page 23 and 24: VIDEOJET decoder 3000 Troubleshooti
- Page 25 and 26: VIDEOJET decoder 3000 Troubleshooti
- Page 27 and 28: VIDEOJET decoder 3000 Maintenance |
- Page 29 and 30: VIDEOJET decoder 3000 Technical dat
- Page 31: VIDEOJET decoder 3000 Index | en 31
<strong>VIDEOJET</strong> <strong>decoder</strong> <strong>3000</strong><br />
VJD-<strong>3000</strong><br />
en Installation Manual
<strong>VIDEOJET</strong> <strong>decoder</strong> <strong>3000</strong> Table of Contents | en 3<br />
Table of contents<br />
1 Safety 5<br />
1.1 Electric shock hazard 5<br />
1.2 Installation and operation 5<br />
1.3 Maintenance and repair 6<br />
2 Short information 7<br />
2.1 About this manual 7<br />
2.2 Conventions in this manual 7<br />
2.3 Intended use 7<br />
2.4 EU Directives 7<br />
2.5 Rating plate 7<br />
3 System overview 8<br />
3.1 Parts included 8<br />
3.2 System requirements 8<br />
3.3 Overview of functions 8<br />
3.4 Connections, controls and displays 10<br />
3.4.1 Front view 10<br />
3.4.2 Rear view 11<br />
4 Installation 12<br />
4.1 Preparations 12<br />
4.2 Mounting 12<br />
4.3 Installing in a switch cabinet 13<br />
5 Connection 15<br />
5.1 Connecting monitors 15<br />
5.2 Connecting audio 16<br />
5.3 Establishing the network connection 17<br />
5.4 Connecting alarm inputs and relay output 17<br />
5.5 Creating a serial connection 18<br />
5.6 Connecting the power supply 19<br />
6 Configuration 21<br />
6.1 Setup 21<br />
6.2 Setup using <strong>Bosch</strong> Video Client 21<br />
7 Troubleshooting 23<br />
7.1 Contact 23<br />
7.2 General malfunctions 23<br />
7.3 LEDs 24<br />
7.4 Processor load 25<br />
7.5 Network connections 25<br />
7.6 Terminal block 25<br />
7.7 Copyrights 26<br />
8 Maintenance 27<br />
8.1 Updates 27<br />
8.2 Factory reset 27<br />
8.3 Repairs 27<br />
9 Decommissioning 28<br />
9.1 Transfer 28<br />
9.2 Disposal 28<br />
<strong>Bosch</strong> Sicherheitssysteme GmbH Installation Manual 2014.01 | V4 | F.01U.296.741
4 en | Table of Contents <strong>VIDEOJET</strong> <strong>decoder</strong> <strong>3000</strong><br />
10 Technical data 29<br />
10.1 Electrical 29<br />
10.2 Mechanical 29<br />
10.3 Environmental conditions 29<br />
10.4 Standards 30<br />
Index 31<br />
2014.01 | V4 | F.01U.296.741 Installation Manual <strong>Bosch</strong> Sicherheitssysteme GmbH
<strong>VIDEOJET</strong> <strong>decoder</strong> <strong>3000</strong> Safety | en 5<br />
1<br />
1.1<br />
Safety<br />
Electric shock hazard<br />
– Never attempt to connect the unit to any power network other than the type for which it<br />
is intended.<br />
– Use only the power supply provided or power supply units with UL approval and a power<br />
output according to LPS or NEC Class 2.<br />
– Connect the unit to an earthed mains socket-outlet.<br />
– Never open the housing.<br />
– Never open the housing of the power supply unit.<br />
– If a fault occurs, disconnect the power supply unit from the power supply and from all<br />
other units.<br />
– Install the power supply and the unit only in a dry, weather-protected location.<br />
– When installing in a switch cabinet, ensure that the unit and the power supply units have<br />
sufficient grounding.<br />
– If safe operation of the unit cannot be ensured, remove it from service and secure it to<br />
prevent unauthorized operation. In such cases, have the unit checked by <strong>Bosch</strong> <strong>Security</strong><br />
<strong>Systems</strong>.<br />
Safe operation is no longer possible in the following cases:<br />
– if there is visible damage to the unit or power cables,<br />
– if the unit no longer operates correctly,<br />
– if the unit has been exposed to rain or moisture,<br />
– if foreign bodies have penetrated the unit,<br />
– after long storage under adverse conditions, or<br />
– after exposure to extreme stress in transit.<br />
1.2<br />
Installation and operation<br />
– The relevant electrical engineering regulations and guidelines must be complied with at<br />
all times during installation.<br />
– Relevant knowledge of network technology is required to install the unit.<br />
– Before installing or operating the unit, make sure you have read and understood the<br />
documentation for the other equipment connected to it, such as monitors. The<br />
documentation contains important safety instructions and information about permitted<br />
uses.<br />
– Perform only the installation and operation steps described in this manual. Any other<br />
actions may lead to personal injury, damage to property or damage to the equipment.<br />
Please ensure the following installation conditions:<br />
– Do not install the unit or the power supply unit close to heaters or other heat sources.<br />
Avoid locations exposed to direct sunlight.<br />
– Allow sufficient space for running cables.<br />
– Ensure that both the unit and the power supply unit have adequate ventilation. Bear the<br />
total heat output in mind, particularly when installing multiple units in a switch cabinet.<br />
– When making connections, use only the cables supplied or use appropriate cables<br />
immune to electromagnetic interference.<br />
– Position and run all cables so that they are protected from damage, and provide adequate<br />
cable strain relief where needed.<br />
– When installing in a switch cabinet, ensure that the screw joints are free of tension and<br />
subject to as little mechanical stress as possible. Ensure that the unit and the power<br />
supply unit have sufficient grounding.<br />
<strong>Bosch</strong> Sicherheitssysteme GmbH Installation Manual 2014.01 | V4 | F.01U.296.741
6 en | Safety <strong>VIDEOJET</strong> <strong>decoder</strong> <strong>3000</strong><br />
– Avoid impacts, blows, and severe vibrations that exceed the specification limits, as these<br />
can irreparably damage the unit.<br />
1.3<br />
Maintenance and repair<br />
– Never open the housing of the unit. The unit does not contain any user-serviceable parts.<br />
– Never open the housing of the power supply unit. The power supply unit does not contain<br />
any user-serviceable parts.<br />
– Ensure that all maintenance or repair work is carried out only by qualified personnel<br />
(electrical engineers or network technology specialists). In case of doubt, contact your<br />
dealer's technical service center.<br />
2014.01 | V4 | F.01U.296.741 Installation Manual <strong>Bosch</strong> Sicherheitssysteme GmbH
<strong>VIDEOJET</strong> <strong>decoder</strong> <strong>3000</strong> Short information | en 7<br />
2<br />
2.1<br />
Short information<br />
About this manual<br />
This manual is intended for persons responsible for the installation and operation of a<br />
<strong>VIDEOJET</strong> <strong>decoder</strong> <strong>3000</strong> unit. International, national and any regional electrical engineering<br />
regulations must be followed at all times. Relevant knowledge of network technology is<br />
required. The manual describes the installation of the unit.<br />
2.2<br />
Conventions in this manual<br />
In this manual, the following symbols and notations are used to draw attention to special<br />
situations:<br />
!<br />
Caution!<br />
This symbol indicates that failure to follow the safety instructions described may endanger<br />
persons and cause damage to the unit or other equipment.<br />
It is associated with immediate, direct hazards.<br />
Notice!<br />
This symbol refers to features and indicates tips and information for easier, more convenient<br />
use of the unit.<br />
2.3<br />
Intended use<br />
<strong>VIDEOJET</strong> <strong>decoder</strong> <strong>3000</strong> receives and decodes video signals over data networks (Ethernet<br />
LAN, Internet). The unit is intended for use with CCTV systems. Various functions can be<br />
triggered automatically by incorporating external alarm sensors. Other applications are not<br />
permitted.<br />
In the event of questions concerning the use of the unit which are not answered in this<br />
manual, please contact your sales partner or:<br />
<strong>Bosch</strong> Sicherheitssysteme GmbH<br />
Robert-<strong>Bosch</strong>-Ring 5<br />
85630 Grasbrunn<br />
Germany<br />
www.boschsecurity.com<br />
2.4<br />
EU Directives<br />
<strong>VIDEOJET</strong> <strong>decoder</strong> <strong>3000</strong> complies with the requirements of EU Directives 89/336<br />
(Electromagnetic Compatibility) and 73/23, amended by 93/68 (Low Voltage Directive).<br />
2.5<br />
Rating plate<br />
For exact identification, the model name and serial number are inscribed on the bottom of the<br />
housing. Please make a note of this information before installation, if necessary, so as to have<br />
it to hand in case of questions or when ordering spare parts.<br />
<strong>Bosch</strong> Sicherheitssysteme GmbH Installation Manual 2014.01 | V4 | F.01U.296.741
8 en | System overview <strong>VIDEOJET</strong> <strong>decoder</strong> <strong>3000</strong><br />
3<br />
3.1<br />
System overview<br />
Parts included<br />
– 1 <strong>VIDEOJET</strong> <strong>decoder</strong> <strong>3000</strong> video <strong>decoder</strong><br />
– 2 terminal blocks (6-pin, 8-pin)<br />
– 4 self-adhesive elastic bumpers<br />
– 1 wall-mounting panel<br />
– 2 screws<br />
– 2 wall plugs<br />
– 1 power supply unit with 3 primary adapters (EU, US, UK)<br />
– 1 Installation Manual<br />
Notice!<br />
Check that the delivery is complete and in perfect condition. Arrange for the unit to be<br />
checked by <strong>Bosch</strong> <strong>Security</strong> <strong>Systems</strong> if you find any damage.<br />
3.2<br />
System requirements<br />
General requirements<br />
– Computer with Windows XP or Windows 7 operating system<br />
– Network access (Intranet or Internet)<br />
– Screen resolution at least 1,024 × 768 pixels<br />
– 16- or 32-bit color depth<br />
– Installed Oracle JVM<br />
Notice!<br />
The Web browser must be configured to enable cookies to be set from the IP address of the<br />
unit.<br />
In Windows 7, deactivate protected mode on the <strong>Security</strong> tab under Internet Options.<br />
You can find notes on using Microsoft Internet Explorer in the online Help in Internet<br />
Explorer.<br />
Additional configuration and operational requirements<br />
You find the information on additional configuration and operational requirements in the<br />
Releaseletter document for the respective firmware.<br />
For the latest version of the firmware, required programs and controls, and the current version<br />
of the <strong>Bosch</strong> Video Client management software, access your <strong>Bosch</strong> product catalog on the<br />
Internet.<br />
3.3<br />
Overview of functions<br />
High Definition video <strong>decoder</strong><br />
<strong>VIDEOJET</strong> <strong>decoder</strong> <strong>3000</strong> displays H.264 encoded video at up to 60 images per second from<br />
PAL, NTSC, or HD sources over IP networks.<br />
Establish the video connections automatically from the camera, encoder, <strong>decoder</strong>, or the<br />
comprehensive video management system from <strong>Bosch</strong>. The <strong>decoder</strong> is capable of decoding a<br />
single HD video stream, or up to four SD video streams at the same time in quad-mode.<br />
Control the viewing mode remotely via a management system. It can drive an HD monitor via<br />
HDMI directly, thus is ideally suited for applications like flat-screen monitor walls.<br />
Alternatively, it can connect to an analogue monitor using its composite video BNC output.<br />
2014.01 | V4 | F.01U.296.741 Installation Manual <strong>Bosch</strong> Sicherheitssysteme GmbH
<strong>VIDEOJET</strong> <strong>decoder</strong> <strong>3000</strong> System overview | en 9<br />
<strong>VIDEOJET</strong> <strong>decoder</strong> <strong>3000</strong> provides one-channel bidirectional audio communication in parallel<br />
to video.<br />
Ultra-compact in size, <strong>VIDEOJET</strong> <strong>decoder</strong> <strong>3000</strong> is perfect for any application that depends on<br />
space-saving solutions.<br />
Access security<br />
<strong>VIDEOJET</strong> <strong>decoder</strong> <strong>3000</strong> offers various security levels for accessing the network, the unit, and<br />
the data channels. As well as password protection with two levels, it supports 802.1x<br />
authentication using a RADIUS server for identification. You can secure Web browser access<br />
by HTTPS using a SSL certificate that is stored in the unit, providing total data protection with<br />
AES or 3DES encryption, according to the client's encryption capabilities. Alternatively, each<br />
communication channel—video, audio, or serial I/O—can be independently AES encrypted with<br />
128‐bit keys, once the encryption site license has been applied.<br />
High performance<br />
Transmit IP video to the high-performance <strong>decoder</strong> and present it with ultimate clarity on an<br />
analog CCTV monitor or on a large, flat-screen display.<br />
<strong>VIDEOJET</strong> <strong>decoder</strong> <strong>3000</strong> can handle up to four SD H.264 video streams with full resolution<br />
and frame rate and display them in quad-view. When in single-view, it can display an HD video<br />
stream up to 1080p30 or 720p60.<br />
Flexibility<br />
With its connection page in the web browser, the optional IP Matrix license, the support of<br />
IntuiKey keyboard and integration into video clients and video management systems,<br />
<strong>VIDEOJET</strong> <strong>decoder</strong> <strong>3000</strong> enables solutions in varieties from the smallest stand-alone up to<br />
large or distributed but centrally controlled applications.<br />
Easy upgrade<br />
Remotely upgrade the unit whenever new firmware becomes available. This ensures up-to-date<br />
products, thus protecting investment with little effort.<br />
Summary<br />
<strong>VIDEOJET</strong> <strong>decoder</strong> <strong>3000</strong> provides the following main functions:<br />
– Video, audio, and data reception over IP data networks<br />
– Quad view function with simultaneous decoding of four video streams<br />
– 1 BNC composite video output (PAL/NTSC) for connecting an analog monitor<br />
– 1 HDMI interface to display digital video on flat-screen monitors or the like<br />
– Video decoding according to international standard H.264<br />
– Integrated Ethernet port (10/100 Base-T)<br />
– Transparent, bidirectional data channel via RS-232/RS-422/RS-485 serial interface<br />
– Configuration and remote control of all internal functions via TCP/IP, also secured via<br />
HTTPS<br />
– Password protection to prevent unauthorized connection or configuration changes<br />
– 4 alarm inputs for external sensors (such as door contacts)<br />
– 1 relay output for switching external units (such as lamps or sirens)<br />
– Event-controlled automatic connection<br />
– Convenient maintenance via uploads<br />
– Flexible encryption of control and data channels<br />
– Authentication according to international standard 802.1x<br />
– Bidirectional audio (mono) for line connections<br />
– Audio encoding according to international standards G.711 and L16<br />
<strong>Bosch</strong> Sicherheitssysteme GmbH Installation Manual 2014.01 | V4 | F.01U.296.741
10 en | System overview <strong>VIDEOJET</strong> <strong>decoder</strong> <strong>3000</strong><br />
3.4<br />
3.4.1<br />
Connections, controls and displays<br />
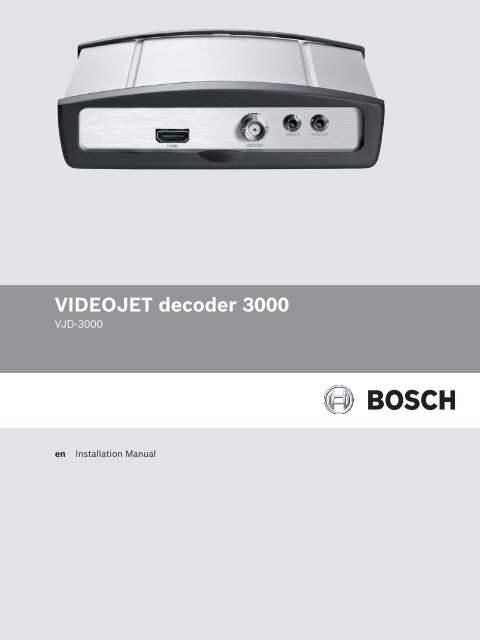
Front view<br />
1 HDMI monitor socket<br />
for connecting a computer monitor via HDMI cable<br />
2 VIDEO OUT video output<br />
BNC socket for connecting a video monitor<br />
3 AUDIO IN audio connection (mono)<br />
3.5 mm (1/8 in) stereo socket audio in for connecting two audio sources<br />
4 AUDIO OUT audio connection (mono)<br />
3.5 mm (1/8 in) stereo socket line-out for connecting one audio connection<br />
2014.01 | V4 | F.01U.296.741 Installation Manual <strong>Bosch</strong> Sicherheitssysteme GmbH
<strong>VIDEOJET</strong> <strong>decoder</strong> <strong>3000</strong> System overview | en 11<br />
3.4.2<br />
Rear view<br />
1 ETH RJ45 socket<br />
for connecting to an Ethernet LAN (local network), 10/100 MBit Base-T<br />
2 LED LINK<br />
lights up when the unit is connected to the network<br />
3 LED CONNECT<br />
lights up when supplied with power and during data transmission<br />
4 Factory reset button<br />
to restore factory default settings<br />
5 LED DISPLAY<br />
indicates use of monitor ports<br />
6 Terminal block<br />
for alarm inputs, relay output and serial interface<br />
7 12V DC power connector<br />
for connecting the power supply unit<br />
See also<br />
– LEDs, page 24<br />
– Terminal block, page 25<br />
<strong>Bosch</strong> Sicherheitssysteme GmbH Installation Manual 2014.01 | V4 | F.01U.296.741
12 en | Installation <strong>VIDEOJET</strong> <strong>decoder</strong> <strong>3000</strong><br />
4<br />
4.1<br />
Installation<br />
Preparations<br />
<strong>VIDEOJET</strong> <strong>decoder</strong> <strong>3000</strong> and the power supply unit are both intended for use indoors or in<br />
housings. Select a suitable location for installation that guarantees to meet the environmental<br />
conditions.<br />
You may use the unit as a desktop device or wall-mounted using the mounting material<br />
supplied. For installation in a switch cabinet, you can obtain a rack mount kit for up to three<br />
units. For more information access your <strong>Bosch</strong> product catalog on the Internet.<br />
!<br />
Caution!<br />
The ambient temperature for the delivered power supply unit must be between 0 and +40 °C<br />
(+32 and +104 °F). The relative humidity must be between 20% and 80%. The ambient<br />
temperature for the unit must be between 0 and +50 °C (+32 and +122 °F). The relative<br />
humidity must not exceed 90%.<br />
The unit and the power supply unit generate heat during operation, so you should ensure that<br />
there is adequate ventilation and enough clearance between both units and heat-sensitive<br />
objects or equipment. Please note the maximum heat value of 31 BTU/h per unit without the<br />
power supply.<br />
Please ensure the following installation conditions:<br />
– Do not install the unit or the power supply unit close to heaters or other heat sources.<br />
Avoid locations exposed to direct sunlight.<br />
– Allow sufficient space for running cables.<br />
– Ensure that both the unit and the power supply unit have adequate ventilation. Bear the<br />
total heat output in mind, particularly when installing multiple units in a switch cabinet.<br />
– When making connections, use only the cables supplied or use appropriate cables<br />
immune to electromagnetic interference.<br />
– Position and run all cables so that they are protected from damage, and provide adequate<br />
cable strain relief where needed.<br />
– When installing in a switch cabinet, ensure that the screw joints are free of tension and<br />
subject to as little mechanical stress as possible. Ensure that the unit and the power<br />
supply unit have sufficient grounding.<br />
– Avoid impacts, blows, and severe vibrations that exceed the specification limits, as these<br />
can irreparably damage the unit.<br />
4.2<br />
Mounting<br />
You can secure the unit to walls, below ceilings or any other load-bearing locations using the<br />
wall-mounting panel, in either a vertical or a horizontal position.<br />
!<br />
Caution!<br />
The mounting location must be able to reliably hold the unit. The load-bearing capacity must<br />
be adequate for four times the weight of the unit.<br />
If mounting the unit in a vertical position, you will need to use the lower plastic frame and<br />
then place the unit onto the frame from above. If mounting the unit in a horizontal position,<br />
you can use either of the two frames.<br />
1. Lift the plastic frame on one side of the housing and carefully remove it from the unit.<br />
2. Screw the plastic frame in the required position together with the wall-mounting panel.<br />
2014.01 | V4 | F.01U.296.741 Installation Manual <strong>Bosch</strong> Sicherheitssysteme GmbH
<strong>VIDEOJET</strong> <strong>decoder</strong> <strong>3000</strong> Installation | en 13<br />
3. Check that the plastic frame is secure.<br />
4. Place the unit on the wall-mounting panel, with the panel positioned between the housing<br />
and the second plastic frame.<br />
5. Slide the unit into the plastic frame until you feel it lock securely into place.<br />
6. Finally, check that the unit is securely attached in the installation location.<br />
4.3<br />
Installing in a switch cabinet<br />
1. Install the required number of fixing plates, two for each unit.<br />
2. Prepare the switch cabinet in such a manner that you are easily able to insert the rack<br />
mount frame directly at the installation point.<br />
3. Place the cage nuts in the corresponding drillings or spaces in the switch cabinet frame.<br />
4. Lift the empty rack mount frame into the switch cabinet frame and insert the fastening<br />
screws together with the washers.<br />
5. Tighten the screws one after the other and then check once more that all the screws are<br />
tight.<br />
6. Remove the plastic frames from both sides of each unit to be installed.<br />
7. Slide each unit onto the corresponding fixing plates until you feel it lock securely into<br />
place.<br />
<strong>Bosch</strong> Sicherheitssysteme GmbH Installation Manual 2014.01 | V4 | F.01U.296.741
14 en | Installation <strong>VIDEOJET</strong> <strong>decoder</strong> <strong>3000</strong><br />
2014.01 | V4 | F.01U.296.741 Installation Manual <strong>Bosch</strong> Sicherheitssysteme GmbH
<strong>VIDEOJET</strong> <strong>decoder</strong> <strong>3000</strong> Connection | en 15<br />
5<br />
5.1<br />
Connection<br />
Connecting monitors<br />
You must connect a suitable monitor to the <strong>decoder</strong>. The unit provides two monitor outputs.<br />
Simultaneous use of both outputs is possible once you have set the video standard to PAL or<br />
NTSC.<br />
Notice!<br />
The default setting for the video standard is PAL. Display may not work properly if you<br />
connect other than PAL monitors without adapting the corresponding setting.<br />
Make sure that the cables used do not exceed the maximum length of 30 m (98 ft).<br />
1. Connect an analog video monitor (PAL/NTSC) to the BNC socket VIDEO OUT using a<br />
video cable (75 ohm, BNC plug).<br />
2. Connect an HDMI-compatible computer monitor to the HDMI socket using an HDMI cable.<br />
Note: No audio is supported via the HDMI connection. Use the audio ports if you need<br />
audio transmission.<br />
Using an HDMI-DVI adapter, you can also connect a DVI monitor via the HDMI socket.<br />
<strong>Bosch</strong> Sicherheitssysteme GmbH Installation Manual 2014.01 | V4 | F.01U.296.741
16 en | Connection <strong>VIDEOJET</strong> <strong>decoder</strong> <strong>3000</strong><br />
5.2<br />
Connecting audio<br />
The unit has two audio ports for audio line signals.<br />
The audio signals are transmitted two-way and in sync with the video signals. The following<br />
specifications should be complied with in all cases.<br />
2 × audio in: Impedance 9 kohm typ., 5.5 V p-p max. input voltage<br />
1 × line out: 3.0 V p-p typ. output voltage at 10 kohm impedance<br />
The stereo plug must be connected as follows:<br />
Contact AUDIO IN AUDIO OUT<br />
Tip Channel 1 Channel 1<br />
Middle ring Channel 2 —<br />
Lower ring Ground Ground<br />
1. Connect an audio source to the AUDIO IN socket with a 3.5 mm (1/8 in) stereo plug.<br />
2. Connect an audio receiver with line-in connection to the AUDIO OUT socket with a<br />
3.5 mm (1/8 in) stereo plug.<br />
Note that the audio function is not activated by default. To use audio connections activate the<br />
corresponding setting when configuring the unit.<br />
2014.01 | V4 | F.01U.296.741 Installation Manual <strong>Bosch</strong> Sicherheitssysteme GmbH
<strong>VIDEOJET</strong> <strong>decoder</strong> <strong>3000</strong> Connection | en 17<br />
5.3<br />
Establishing the network connection<br />
You can connect the unit to a 10/100 Base-T network using a standard UTP category 5 cable<br />
with RJ45 plugs.<br />
4 Connect the unit to the network via the ETH socket.<br />
5.4<br />
Connecting alarm inputs and relay output<br />
Alarm inputs<br />
The unit has 4 alarm inputs on the terminal block. The alarm inputs are used to connect to<br />
external alarm devices such as door contacts or sensors. With the appropriate configuration,<br />
an alarm sensor can automatically connect the unit to a remote location, for example.<br />
A zero potential closing contact or switch can be used as the actuator. If possible, use a<br />
bounce-free contact system as the actuator.<br />
<strong>Bosch</strong> Sicherheitssysteme GmbH Installation Manual 2014.01 | V4 | F.01U.296.741
18 en | Connection <strong>VIDEOJET</strong> <strong>decoder</strong> <strong>3000</strong><br />
!<br />
Caution!<br />
Please observe the labeling on the unit.<br />
1. Connect the lines to the appropriate terminals on the terminal block (IN1 to IN4) and<br />
check that the connections are secure.<br />
2. Connect each alarm input to a ground contact (GND).<br />
Relay output<br />
The unit has one relay output for switching external units such as lamps or alarm sirens. You<br />
can operate the relay output manually while there is an active connection to the unit. The<br />
output can also be configured to automatically activate sirens or other alarm units in response<br />
to an alarm signal. The relay output is also located on the terminal block.<br />
!<br />
Caution!<br />
Please observe the labeling on the unit.<br />
A maximum load of 30 V p-p (SELV) and 200 mA may be applied to the relay contacts.<br />
1. Connect the lines to the appropriate terminals R on the terminal block and check that the<br />
connections are secure.<br />
2. Connect the terminal block to the socket on the unit observing the labeling.<br />
See also<br />
– Terminal block, page 25<br />
5.5<br />
Creating a serial connection<br />
The bidirectional data interface is used to control units connected to the <strong>decoder</strong>, such as a<br />
control panel for a dome cameras with motorized lens. The connection supports the RS-232,<br />
RS-422, and RS-485 transmission standards. A video connection is necessary to transmit<br />
transparent data.<br />
The serial interface is also located on the terminal block.<br />
2014.01 | V4 | F.01U.296.741 Installation Manual <strong>Bosch</strong> Sicherheitssysteme GmbH
<strong>VIDEOJET</strong> <strong>decoder</strong> <strong>3000</strong> Connection | en 19<br />
The range of controllable equipment is expanding constantly. The manufacturers of the<br />
relevant equipment provide specific information on installation and control. Please take note<br />
of the appropriate documentation when installing and operating the peripheral to be<br />
controlled. The documentation contains important safety instructions and information about<br />
permitted uses.<br />
!<br />
Caution!<br />
Please observe the labeling on the unit.<br />
1. If you require a serial connection to the unit, connect the relevant cables to the terminal<br />
block and check that the connections are secure.<br />
2. Connect the terminal block to the socket on the unit observing the labeling.<br />
See also<br />
– Terminal block, page 25<br />
5.6<br />
Connecting the power supply<br />
<strong>VIDEOJET</strong> <strong>decoder</strong> <strong>3000</strong> comes with a plug-in power supply unit with three primary adapters.<br />
It does not have a power switch. The unit is ready for operation as soon as it is connected to<br />
the mains.<br />
<strong>Bosch</strong> Sicherheitssysteme GmbH Installation Manual 2014.01 | V4 | F.01U.296.741
20 en | Connection <strong>VIDEOJET</strong> <strong>decoder</strong> <strong>3000</strong><br />
!<br />
Caution!<br />
Make sure to use the power supply unit provided only with the correct primary adapter for<br />
your power outlet or use another power supply unit with UL approval and a power output<br />
according to LPS or NEC Class 2.<br />
Where necessary, use suitable equipment to ensure that the power supply is free from<br />
interference such as voltage surges, spikes or voltage drops.<br />
Do not connect the <strong>decoder</strong> to the power supply until all other connections have been made.<br />
1. Connect the power supply unit to the 12V DC socket.<br />
2. Ensure that the correct primary adapter is attached to the power supply unit and that a<br />
suitable power outlet is available.<br />
3. Plug the power supply unit into the grounded power outlet. The unit is ready for use as<br />
soon as the CONNECT LED changes from a red light, indicating the start-up procedure, to<br />
a green light.<br />
Provided the network connection has been correctly made, the green LINK LED also lights up.<br />
The flashing green CONNECT LED signals that data packets are being transmitted via the<br />
network.<br />
See also<br />
– LEDs, page 24<br />
2014.01 | V4 | F.01U.296.741 Installation Manual <strong>Bosch</strong> Sicherheitssysteme GmbH
<strong>VIDEOJET</strong> <strong>decoder</strong> <strong>3000</strong> Configuration | en 21<br />
6<br />
6.1<br />
Configuration<br />
Setup<br />
Before you can operate the unit within your network, it must have a valid IP address for your<br />
network and a compatible subnet mask.<br />
Notice!<br />
As a default DHCP is enabled in the unit’s network settings.<br />
With an active DHCP server in the network you must know the IP address assigned by the<br />
DHCP server to operate the unit.<br />
The following default address is preset at the factory: 192.168.0.1<br />
The setup procedure is carried out via our Video Client software or other management<br />
systems. All information regarding the configuration can be found in the relevant<br />
documentation of the video management system in use.<br />
6.2<br />
Setup using <strong>Bosch</strong> Video Client<br />
For the current version of our Video Client management software, access your <strong>Bosch</strong> product<br />
catalog on the Internet. This program allows you to implement and set up the unit in the<br />
network quickly and conveniently.<br />
Installing the program<br />
1. Download Video Client from the <strong>Bosch</strong> product catalog on the Internet.<br />
2. Unzip the file.<br />
3. Double-click the installer file.<br />
4. Follow the instructions on the screen to complete the installation.<br />
Configuring the unit<br />
You can start Video Client immediately after installation.<br />
1. Double-click the icon on the desktop to start the program. Alternatively, start<br />
the application via the Start button and the Programs menu (path: Start/Programs/<br />
<strong>Bosch</strong> Video Client/<strong>Bosch</strong> Video Client).<br />
2. When the program is started for the first time, a wizard opens to help you detect and<br />
configure devices on the network.<br />
3. If the wizard does not start automatically, click to open the Configuration Manager<br />
application. Then, click Configuration Wizard... on the Tools menu.<br />
4. Follow the instructions given in the Configuration Wizard window.<br />
<strong>Bosch</strong> Sicherheitssysteme GmbH Installation Manual 2014.01 | V4 | F.01U.296.741
22 en | Configuration <strong>VIDEOJET</strong> <strong>decoder</strong> <strong>3000</strong><br />
Additional parameters<br />
You can check and set additional parameters with the assistance of the Configuration Manager<br />
application in <strong>Bosch</strong> Video Client. You can find detailed information on this in the<br />
documentation for these applications.<br />
Note that the audio function is not activated by default. To use audio connections activate the<br />
corresponding setting when configuring the unit.<br />
2014.01 | V4 | F.01U.296.741 Installation Manual <strong>Bosch</strong> Sicherheitssysteme GmbH
<strong>VIDEOJET</strong> <strong>decoder</strong> <strong>3000</strong> Troubleshooting | en 23<br />
7<br />
7.1<br />
Troubleshooting<br />
Contact<br />
If you are unable to resolve a malfunction, please contact your supplier or systems integrator,<br />
or go directly to <strong>Bosch</strong> <strong>Security</strong> <strong>Systems</strong> Customer Service.<br />
The following tables are intended to help you identify the causes of malfunctions and correct<br />
them where possible.<br />
7.2<br />
General malfunctions<br />
Malfunction Possible causes Recommended solution<br />
No image on the<br />
monitor.<br />
No connection<br />
established, no image<br />
transmission.<br />
No audio transmission to<br />
remote station.<br />
The unit does not report<br />
an alarm.<br />
Monitor error.<br />
Faulty cable connections.<br />
Monitor fault.<br />
Incorrect configuration.<br />
The unit's configuration.<br />
Faulty installation.<br />
Wrong IP address.<br />
Faulty data transmission within<br />
the LAN.<br />
The maximum number of<br />
connections has been reached.<br />
Hardware fault.<br />
Faulty cable connections.<br />
Incorrect configuration.<br />
The audio connection is already<br />
in use by another receiver.<br />
Alarm source is not selected.<br />
Connect local camera or other<br />
video source to the monitor<br />
and check the monitor<br />
function.<br />
Check all cables, plugs,<br />
contacts and connections.<br />
Connect another monitor to the<br />
unit or use another monitor<br />
connection.<br />
Check video standard settings<br />
to match the monitor.<br />
Check all configuration<br />
parameters.<br />
Check all cables, plugs,<br />
contacts and connections.<br />
Check the IP addresses.<br />
Check the data transmission<br />
with e.g. ping.<br />
Wait until there is a free<br />
connection and then call the<br />
sender again.<br />
Check that all connected audio<br />
units are operating correctly.<br />
Check all cables, plugs,<br />
contacts and connections.<br />
Check audio parameters.<br />
Wait until the connection is<br />
free and then call the unit<br />
again.<br />
Check alarm source settings.<br />
<strong>Bosch</strong> Sicherheitssysteme GmbH Installation Manual 2014.01 | V4 | F.01U.296.741
24 en | Troubleshooting <strong>VIDEOJET</strong> <strong>decoder</strong> <strong>3000</strong><br />
Malfunction Possible causes Recommended solution<br />
Control of cameras or<br />
other units is not<br />
possible.<br />
The unit is not<br />
operational after a<br />
firmware upload.<br />
Placeholder with a red<br />
cross instead of the<br />
ActiveX components.<br />
Web browser contains<br />
empty fields.<br />
If a sender is connected<br />
to the <strong>decoder</strong>, the first<br />
connection remains.<br />
No alarm response specified.<br />
The cable connection between<br />
the serial interface and the<br />
connected unit is not correct.<br />
The interface parameters do<br />
not match those of the other<br />
unit connected.<br />
Power failure during<br />
programming by firmware file.<br />
Incorrect firmware file.<br />
JVM not installed on your<br />
computer or not activated.<br />
Active proxy server in network.<br />
Auto-connect configured.<br />
Specify the desired alarm<br />
response, change the IP<br />
address, if necessary.<br />
Check all cable connections<br />
and ensure all plugs are<br />
properly fitted.<br />
Make sure that the settings of<br />
all units involved are<br />
compatible.<br />
Have the unit checked by<br />
Customer Service and replace<br />
it, if necessary.<br />
Enter the IP address of the unit<br />
followed by /main.htm in your<br />
Web browser and repeat the<br />
upload.<br />
Install Oracle JVM from the<br />
<strong>Bosch</strong> product catalog on the<br />
Internet.<br />
Create a rule in the local<br />
computer's proxy settings to<br />
exclude local IP addresses.<br />
Deactivate auto-connect.<br />
7.3<br />
LEDs<br />
The unit has LEDs on its rear panel that show the operating status and can give indications of<br />
possible malfunctions:<br />
LINK LED<br />
Lights up green:<br />
Network connection established.<br />
CONNECT LED<br />
Does not light up:<br />
Lights up green:<br />
Lights up red:<br />
Flashes green:<br />
Flashes red:<br />
The unit is switched off.<br />
The unit is switched on and startup completed.<br />
Startup in progress.<br />
Data packet transmission via network.<br />
The unit is faulty, for example following failed firmware<br />
upload.<br />
DISPLAY LED<br />
Flashes green:<br />
Lights up green:<br />
Both analog and digital video can be connected.<br />
Only digital video available.<br />
2014.01 | V4 | F.01U.296.741 Installation Manual <strong>Bosch</strong> Sicherheitssysteme GmbH
<strong>VIDEOJET</strong> <strong>decoder</strong> <strong>3000</strong> Troubleshooting | en 25<br />
7.4<br />
Processor load<br />
If the unit is accessed via the Web browser, you will see the processor load indicator bar in<br />
the top right of the window next to the information icon .<br />
You can obtain additional information to help you when troubleshooting or fine tuning the<br />
unit. The values indicate the proportions of the individual functions on the coder load, shown<br />
as percentages.<br />
4 Move the cursor over the graphic indicator. Some additional numerical values are also<br />
displayed.<br />
7.5<br />
Network connections<br />
You can display information about the network connection. To do this, move the cursor over<br />
.<br />
Link<br />
UL<br />
DL<br />
Ethernet link type<br />
Uplink, speed of the outgoing data traffic<br />
Downlink, speed of the incoming data traffic<br />
7.6<br />
Terminal block<br />
The terminal block has several contacts for:<br />
– Serial data transmission<br />
– 4 alarm inputs<br />
– 1 relay output<br />
Pin assignment serial interface<br />
Options for using the serial interface include transferring transparent data, controlling<br />
connected units or operating the unit with a terminal program.<br />
The serial interface supports the RS-232, RS-422 and RS-485 transmission standards. The<br />
mode used depends on the current configuration.<br />
The pin assignment of the serial interface depends on the interface mode used:<br />
Contact RS-232 mode RS-422 mode RS-485 mode<br />
CTS — RxD- (receive data minus) —<br />
TXD TxD (transmit data) TxD- (transmit data minus) Data-<br />
RTS — TxD+ (transmit data plus) Data+<br />
RXD RxD (receive data) RxD+ (receive data plus) —<br />
GND GND (ground) — —<br />
<strong>Bosch</strong> Sicherheitssysteme GmbH Installation Manual 2014.01 | V4 | F.01U.296.741
26 en | Troubleshooting <strong>VIDEOJET</strong> <strong>decoder</strong> <strong>3000</strong><br />
Pin assignment I/O<br />
Contact<br />
Function<br />
IN1 Input alarm 1<br />
IN2 Input alarm 2<br />
IN3 Input alarm 3<br />
IN4 Input alarm 4<br />
GND<br />
R<br />
Ground<br />
Relay output<br />
Connect each alarm input to a ground contact (GND).<br />
7.7<br />
Copyrights<br />
The terms HDMI and HDMI High-Definition Multimedia Interface, and the HDMI logo are<br />
trademarks or registered trademarks of HDMI Licensing LLC in the United States and other<br />
countries.<br />
Fonts<br />
The firmware uses the fonts "Adobe-Helvetica-Bold-R-Normal--24-240-75-75-P-138-ISO10646-1"<br />
and "Adobe-Helvetica-Bold-R-Normal--12-120-75-75-P-70-ISO10646-1" under the following<br />
copyright:<br />
Copyright 1984-1989, 1994 Adobe <strong>Systems</strong> Incorporated.<br />
Copyright 1988, 1994 Digital Equipment Corporation.<br />
Permission to use, copy, modify, distribute and sell this software and its documentation for<br />
any purpose and without fee is hereby granted, provided that the above copyright notices<br />
appear in all copies and that both those copyright notices and this permission notice appear<br />
in supporting documentation, and that the names of Adobe <strong>Systems</strong> and Digital Equipment<br />
Corporation not be used in advertising or publicity pertaining to distribution of the software<br />
without specific, written prior permission.<br />
Software<br />
This software is based in part on the work of the Independent JPEG Group.<br />
2014.01 | V4 | F.01U.296.741 Installation Manual <strong>Bosch</strong> Sicherheitssysteme GmbH
<strong>VIDEOJET</strong> <strong>decoder</strong> <strong>3000</strong> Maintenance | en 27<br />
8<br />
8.1<br />
Maintenance<br />
Updates<br />
Firmware updates are carried out via our Video Client software or other management systems<br />
in use. Please refer to the relevant documentation.<br />
8.2<br />
Factory reset<br />
You can use the factory reset button to restore the unit to its original settings. Any changes to<br />
the settings are overwritten by the factory defaults. A reset may be necessary, for example, if<br />
the unit has invalid settings that prevent it from functioning as desired.<br />
1. Using a pointed object, press the factory reset button located on the rear panel until the<br />
CONNECT LED flashes red. All settings will revert to their defaults.<br />
2. The unit is ready for use as soon as the CONNECT LED lights up green.<br />
P The unit can now only be addressed via the factory default IP 192.168.0.1: reconfigure it<br />
to your needs.<br />
8.3<br />
Repairs<br />
– Never open the housing of the unit. The unit does not contain any user-serviceable parts.<br />
– Never open the housing of the power supply unit. The power supply unit does not contain<br />
any user-serviceable parts.<br />
– Ensure that all maintenance or repair work is carried out only by qualified personnel<br />
(electrical engineers or network technology specialists). In case of doubt, contact your<br />
dealer's technical service center.<br />
<strong>Bosch</strong> Sicherheitssysteme GmbH Installation Manual 2014.01 | V4 | F.01U.296.741
28 en | Decommissioning <strong>VIDEOJET</strong> <strong>decoder</strong> <strong>3000</strong><br />
9<br />
9.1<br />
Decommissioning<br />
Transfer<br />
<strong>VIDEOJET</strong> <strong>decoder</strong> <strong>3000</strong> should only be passed on together with this installation manual.<br />
9.2<br />
Disposal<br />
Your <strong>Bosch</strong> product is designed and manufactured with high-quality materials and<br />
components which can be recycled and reused.<br />
This symbol means that electrical and electronic equipment, at their end-of-life, should be<br />
disposed of separately from your household waste.<br />
In the European Union, there are separate collection systems for used electrical and electronic<br />
products. Please dispose of this equipment at your local community waste collection/recycling<br />
center.<br />
2014.01 | V4 | F.01U.296.741 Installation Manual <strong>Bosch</strong> Sicherheitssysteme GmbH
<strong>VIDEOJET</strong> <strong>decoder</strong> <strong>3000</strong> Technical data | en 29<br />
10<br />
10.1<br />
Technical data<br />
Electrical<br />
Input voltage<br />
Input current<br />
Power consumption<br />
12 V DC<br />
0.75 A<br />
9 W<br />
10.2<br />
Mechanical<br />
Dimensions (H × W × D)<br />
Weight<br />
Video<br />
38 × 146 × 178 mm (1.5 × 5.7 × 7.0 in),<br />
without brackets including BNC sockets<br />
Approx. 0.6 kg (1.3 lb)<br />
1 × BNC socket, 75 ohm, terminated<br />
Analog composite, 1 V p-p , NTSC or PAL<br />
1 × HDMI Type A socket, digital<br />
Audio<br />
Signal line in<br />
Signal line out<br />
Ethernet<br />
COM port<br />
Alarm<br />
Relay<br />
Display<br />
2 × 3.5 mm (1/8 in) stereo socket (2 × mono line in; 1 × mono line<br />
out)<br />
9 kohm typical, 5.5 V p-p max<br />
3.0 V p-p at 10 kohm typical<br />
10/100 Base-T, auto-sensing,<br />
half/full duplex, RJ45<br />
1 × RS-232/RS-422/RS-485, bidirectional, push-in terminal<br />
4 × input, push-in terminal (non-isolated closing contact),<br />
activation resistance 10 ohm max<br />
1 × output, push-in terminal<br />
30 V p-p (SELV), 200 mA<br />
3 × LED (LINK, CONNECT, DISPLAY) on the rear panel<br />
10.3<br />
Environmental conditions<br />
<strong>VIDEOJET</strong> <strong>decoder</strong> <strong>3000</strong><br />
Operating temperature<br />
Storage temperature<br />
Relative humidity<br />
Thermal value<br />
0 °C to +50 °C (+32 °F to +122 °F)<br />
0 °C to +50 °C (+32 °F to +122 °F)<br />
0 to 90% atmospheric humidity, non-condensing<br />
31 BTU/h max<br />
Power supply unit<br />
Operating temperature<br />
Storage temperature<br />
Relative humidity<br />
0 °C to +40 °C (+32 °F to +104 °F)<br />
0 °C to +40 °C (+32 °F to +104 °F)<br />
20 to 80% atmospheric humidity, non-condensing<br />
<strong>Bosch</strong> Sicherheitssysteme GmbH Installation Manual 2014.01 | V4 | F.01U.296.741
30 en | Technical data <strong>VIDEOJET</strong> <strong>decoder</strong> <strong>3000</strong><br />
10.4<br />
Standards<br />
Video standards<br />
PAL, NTSC, HDMI<br />
Video coding protocols H.264 High Profile, H.264 Main Profile, H.264 Baseline Profile<br />
(ISO/IEC 14496-10)<br />
M-JPEG, JPEG<br />
Video data rates<br />
9.6 kbps to 10 Mbps per channel<br />
Image resolutions<br />
PAL/NTSC 4CIF (704 × 576/480)<br />
HDMI Max. 1080p (1920 × 1080)<br />
GOP structure<br />
I, IP<br />
Total delay<br />
300 ms max<br />
Frame rate<br />
PAL/NTSC<br />
1 to 25/30 ips<br />
HDMI<br />
60 ips max<br />
Audio standards<br />
G.711, L16<br />
Audio frequency rate G.711: 300 Hz to 3.4 kHz<br />
L16: 300 Hz to 6.4 kHz<br />
Audio sampling rate G.711: 8 kHz<br />
L16: 16 kHz<br />
Audio data rate<br />
G.711: 80 kbps<br />
L16: 640 kbps<br />
Signal-to-noise ratio > 50 dB<br />
Network protocols IPv4, IPv6, UDP, TCP, HTTP, HTTPS, RTP/RTCP, IGMP V2/V3,<br />
ICMP, ICMPv6, RTSP, Telnet, ARP, DHCP, SNTP, SNMP (V1, MIB-<br />
II), 802.1x, DNS, DNSv6, DDNS (DynDNS.org, selfHOST.de, noip.com),<br />
SMTP, iSCSI, UPnP (SSDP), DiffServ (QoS), LLDP,<br />
SOAP, digest authentication<br />
Encryption<br />
TLS 1.0, SSL, DES, 3DES, AES<br />
2014.01 | V4 | F.01U.296.741 Installation Manual <strong>Bosch</strong> Sicherheitssysteme GmbH
<strong>VIDEOJET</strong> <strong>decoder</strong> <strong>3000</strong> Index | en 31<br />
Index<br />
A<br />
Alarm, 11<br />
Alarm input, 17<br />
Analog video, 10<br />
Audio connections, 10, 16<br />
C<br />
Closing contact, 17<br />
Conventions, 7<br />
D<br />
Danger, 5<br />
Data interface, 18<br />
Default<br />
IP address, 21<br />
Default IP address, 21<br />
DHCP, 21<br />
Digital video, 10<br />
Dome camera, 18<br />
E<br />
Electromagnetic compatibility, 7<br />
H<br />
HDMI, 15<br />
I<br />
Identification, 7<br />
Installation, 5<br />
Installation conditions, 5, 12<br />
Installation location, 12<br />
Interface, 25<br />
IP address<br />
Default, 21<br />
L<br />
Low Voltage Directive, 7<br />
M<br />
Main functions, 9<br />
Maintenance, 6, 27<br />
Monitors, 15<br />
N<br />
Network, 17<br />
Network connection, 11, 25<br />
O<br />
Operation, 5<br />
Overview of functions, 8<br />
P<br />
Parameters, 22<br />
Pin assignment, 25<br />
Power supply, 5, 11<br />
Processor load, 25<br />
Processor load indicator, 25<br />
R<br />
Rear panel connections, 11<br />
Regulations, 7<br />
Relay, 11, 18<br />
Relay outputs, 18<br />
Repair, 6, 27<br />
Reset, 11, 27<br />
S<br />
Safety, 5<br />
Screen resolution, 8<br />
Serial interface, 11<br />
Serial number, 7<br />
Signal source, 17<br />
Symbols, 7<br />
T<br />
Transmission standards, 18, 25<br />
Trigger, 17<br />
U<br />
Unit reset, 27<br />
V<br />
Video<br />
Analog, 10<br />
Digital, 10<br />
<strong>Bosch</strong> Sicherheitssysteme GmbH Installation Manual 2014.01 | V4 | F.01U.296.741
<strong>Bosch</strong> Sicherheitssysteme GmbH<br />
Robert-<strong>Bosch</strong>-Ring 5<br />
85630 Grasbrunn<br />
Germany<br />
www.boschsecurity.com<br />
© <strong>Bosch</strong> Sicherheitssysteme GmbH, 2014


